relay FORD EXPLORER 2002 3.G Owners Manual
[x] Cancel search | Manufacturer: FORD, Model Year: 2002, Model line: EXPLORER, Model: FORD EXPLORER 2002 3.GPages: 312, PDF Size: 3.28 MB
Page 181 of 312
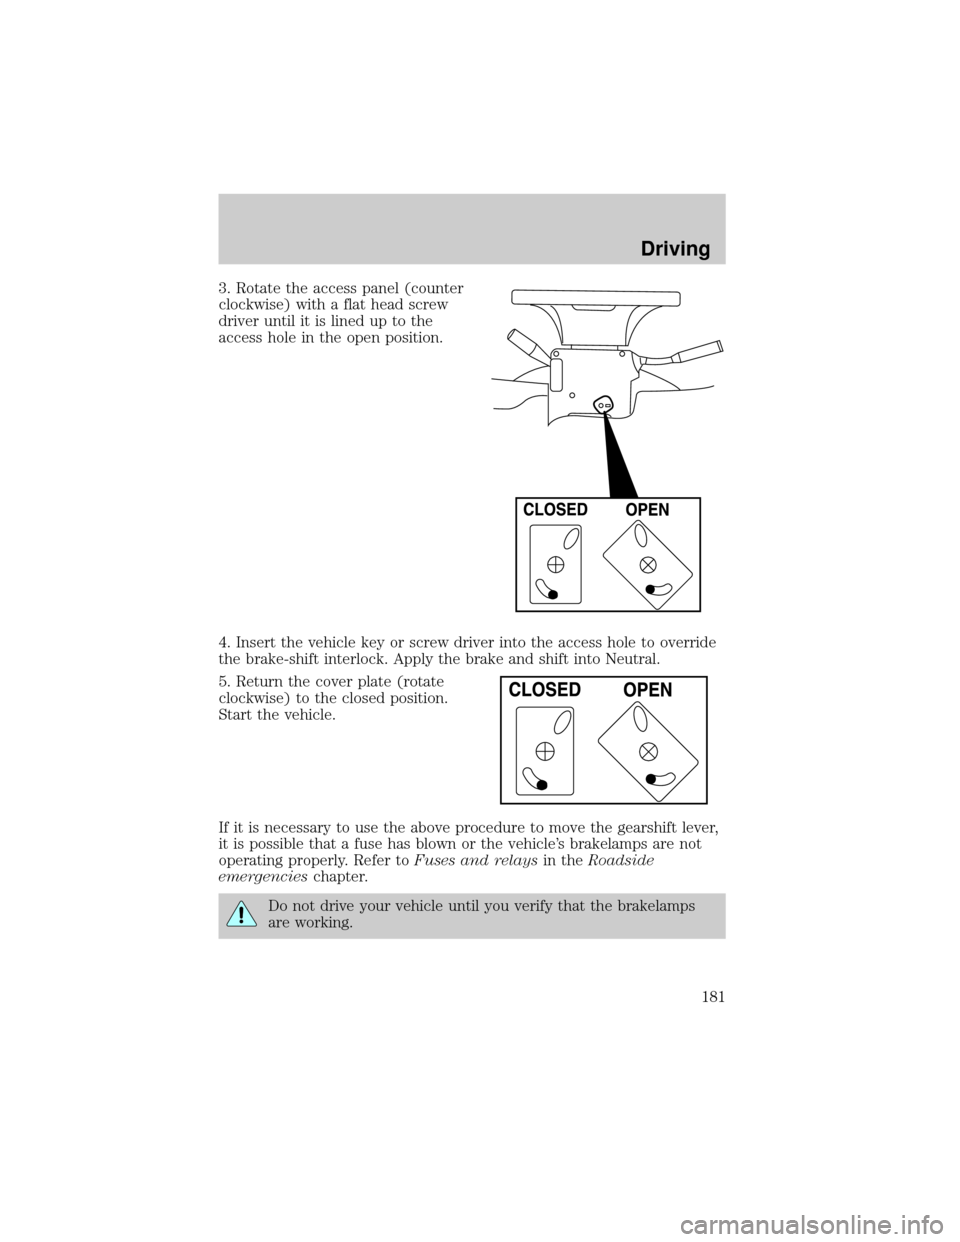
3. Rotate the access panel (counter
clockwise) with a flat head screw
driver until it is lined up to the
access hole in the open position.
4. Insert the vehicle key or screw driver into the access hole to override
the brake-shift interlock. Apply the brake and shift into Neutral.
5. Return the cover plate (rotate
clockwise) to the closed position.
Start the vehicle.
If it is necessary to use the above procedure to move the gearshift lever,
it is possible that a fuse has blown or the vehicle's brakelamps are not
operating properly. Refer toFuses and relaysin theRoadside
emergencieschapter.
Do not drive your vehicle until you verify that the brakelamps
are working.
Driving
181
Page 207 of 312
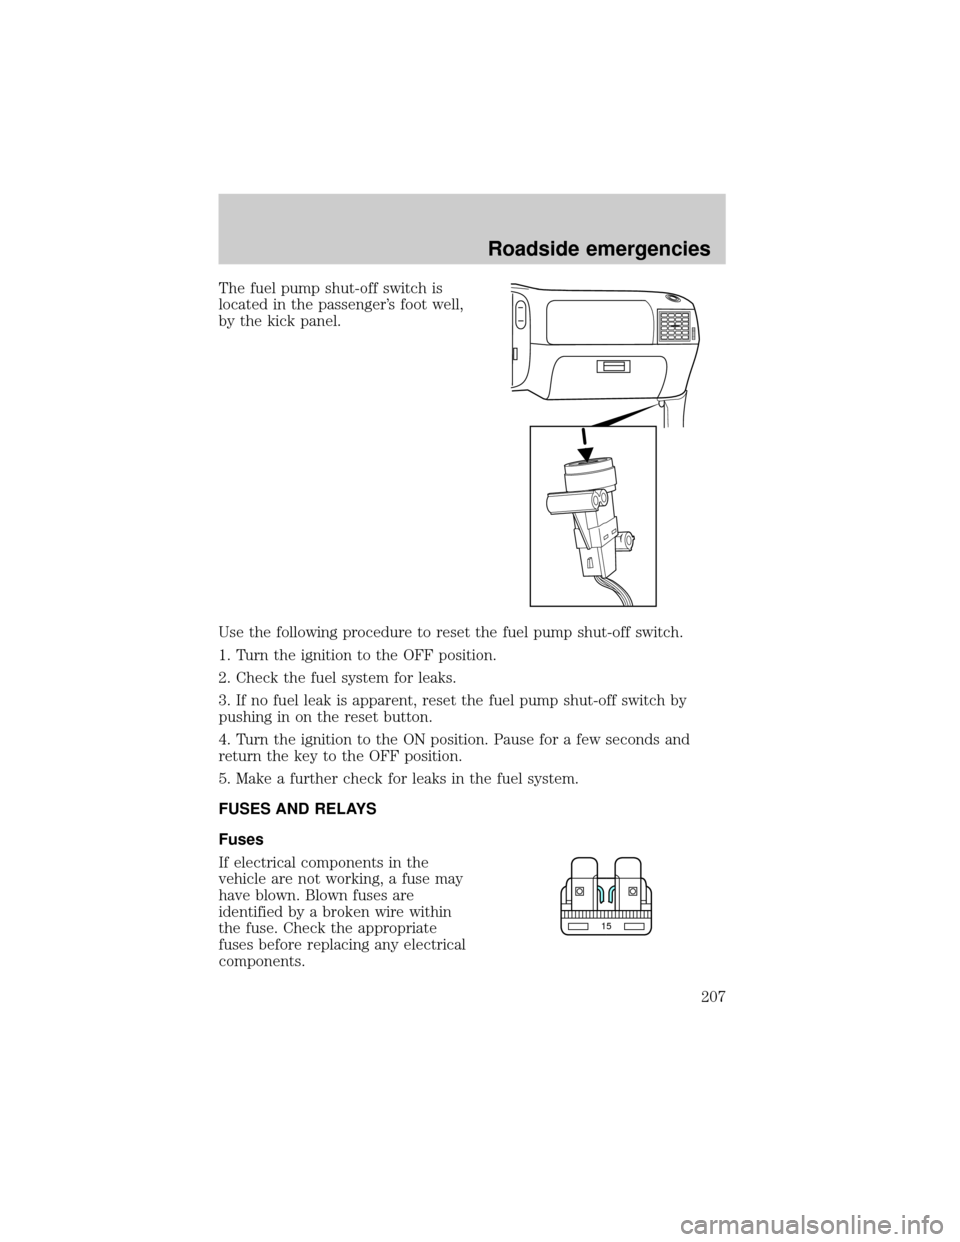
The fuel pump shut-off switch is
located in the passenger's foot well,
by the kick panel.
Use the following procedure to reset the fuel pump shut-off switch.
1. Turn the ignition to the OFF position.
2. Check the fuel system for leaks.
3. If no fuel leak is apparent, reset the fuel pump shut-off switch by
pushing in on the reset button.
4. Turn the ignition to the ON position. Pause for a few seconds and
return the key to the OFF position.
5. Make a further check for leaks in the fuel system.
FUSES AND RELAYS
Fuses
If electrical components in the
vehicle are not working, a fuse may
have blown. Blown fuses are
identified by a broken wire within
the fuse. Check the appropriate
fuses before replacing any electrical
components.
15
Roadside emergencies
207
Page 210 of 312
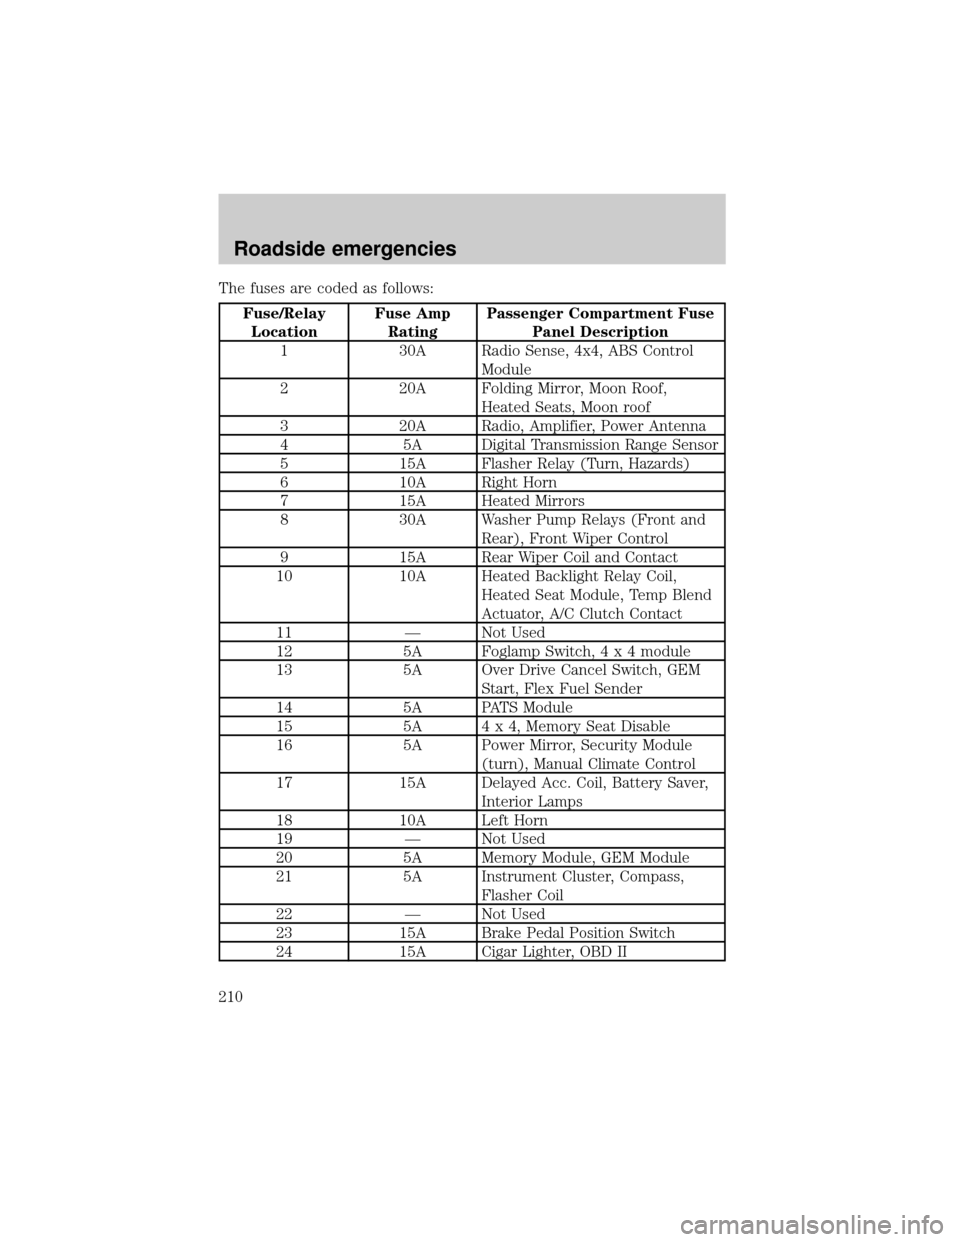
The fuses are coded as follows:
Fuse/Relay
LocationFuse Amp
RatingPassenger Compartment Fuse
Panel Description
1 30A Radio Sense, 4x4, ABS Control
Module
2 20A Folding Mirror, Moon Roof,
Heated Seats, Moon roof
3 20A Radio, Amplifier, Power Antenna
4 5A Digital Transmission Range Sensor
5 15A Flasher Relay (Turn, Hazards)
6 10A Right Horn
7 15A Heated Mirrors
8 30A Washer Pump Relays (Front and
Rear), Front Wiper Control
9 15A Rear Wiper Coil and Contact
10 10A Heated Backlight Relay Coil,
Heated Seat Module, Temp Blend
Actuator, A/C Clutch Contact
11 Ð Not Used
12 5A Foglamp Switch,4x4module
13 5A Over Drive Cancel Switch, GEM
Start, Flex Fuel Sender
14 5A PATS Module
15 5A 4 x 4, Memory Seat Disable
16 5A Power Mirror, Security Module
(turn), Manual Climate Control
17 15A Delayed Acc. Coil, Battery Saver,
Interior Lamps
18 10A Left Horn
19 Ð Not Used
20 5A Memory Module, GEM Module
21 5A Instrument Cluster, Compass,
Flasher Coil
22 Ð Not Used
23 15A Brake Pedal Position Switch
24 15A Cigar Lighter, OBD II
Roadside emergencies
210
Page 211 of 312
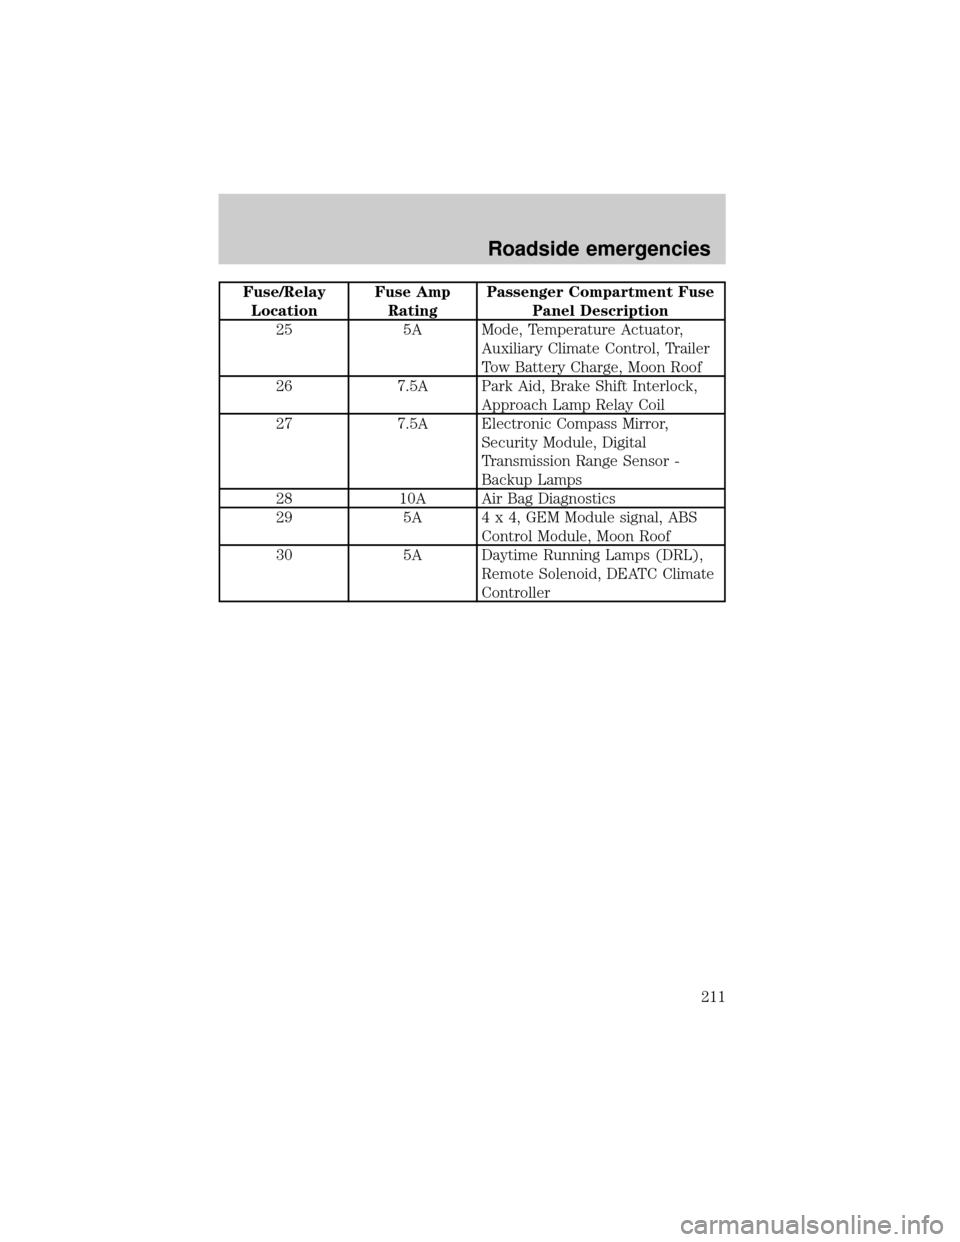
Fuse/Relay
LocationFuse Amp
RatingPassenger Compartment Fuse
Panel Description
25 5A Mode, Temperature Actuator,
Auxiliary Climate Control, Trailer
Tow Battery Charge, Moon Roof
26 7.5A Park Aid, Brake Shift Interlock,
Approach Lamp Relay Coil
27 7.5A Electronic Compass Mirror,
Security Module, Digital
Transmission Range Sensor -
Backup Lamps
28 10A Air Bag Diagnostics
29 5A 4 x 4, GEM Module signal, ABS
Control Module, Moon Roof
30 5A Daytime Running Lamps (DRL),
Remote Solenoid, DEATC Climate
Controller
Roadside emergencies
211
Page 212 of 312
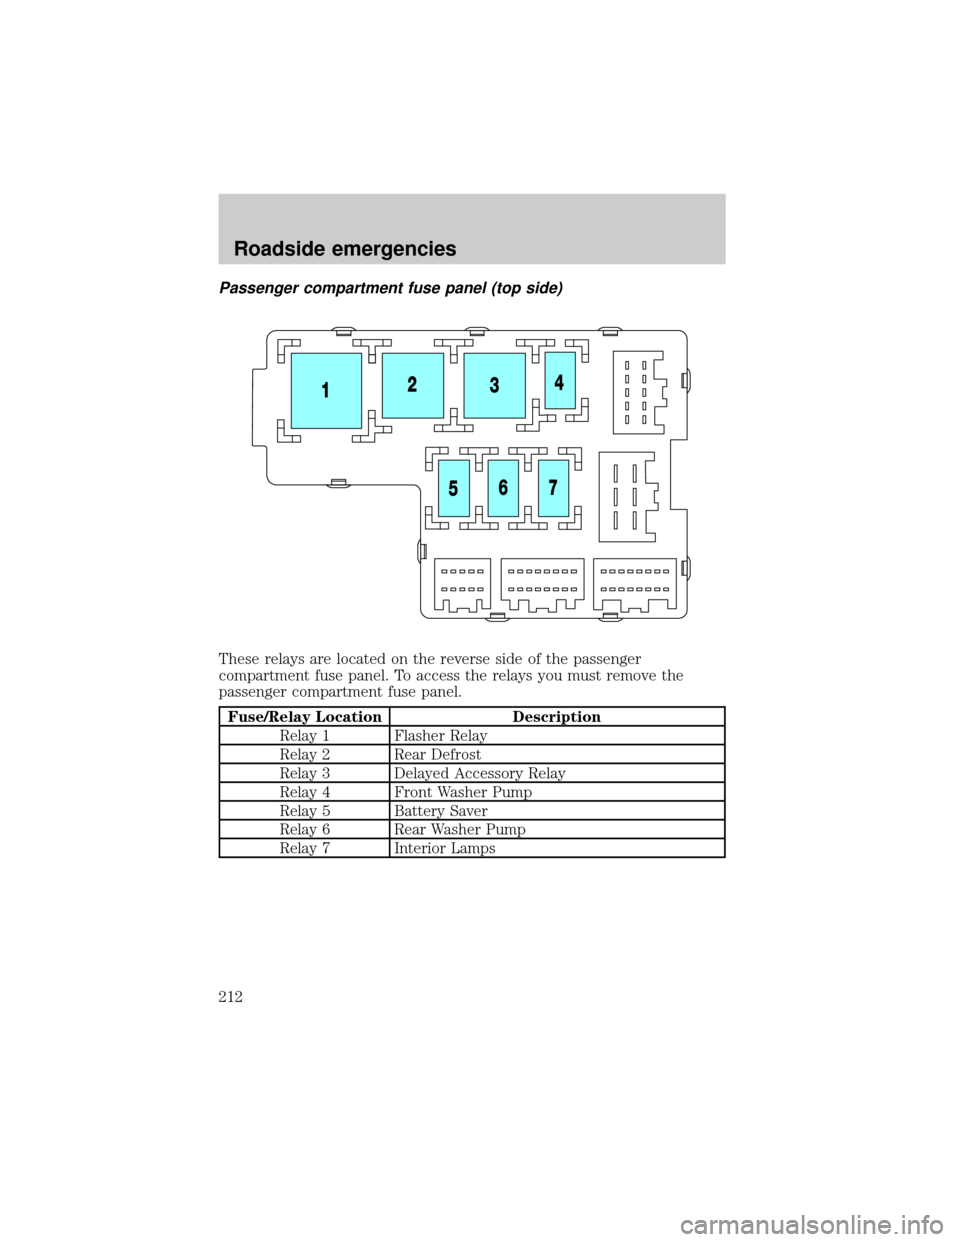
Passenger compartment fuse panel (top side)
These relays are located on the reverse side of the passenger
compartment fuse panel. To access the relays you must remove the
passenger compartment fuse panel.
Fuse/Relay Location Description
Relay 1 Flasher Relay
Relay 2 Rear Defrost
Relay 3 Delayed Accessory Relay
Relay 4 Front Washer Pump
Relay 5 Battery Saver
Relay 6 Rear Washer Pump
Relay 7 Interior Lamps
Roadside emergencies
212
Page 214 of 312
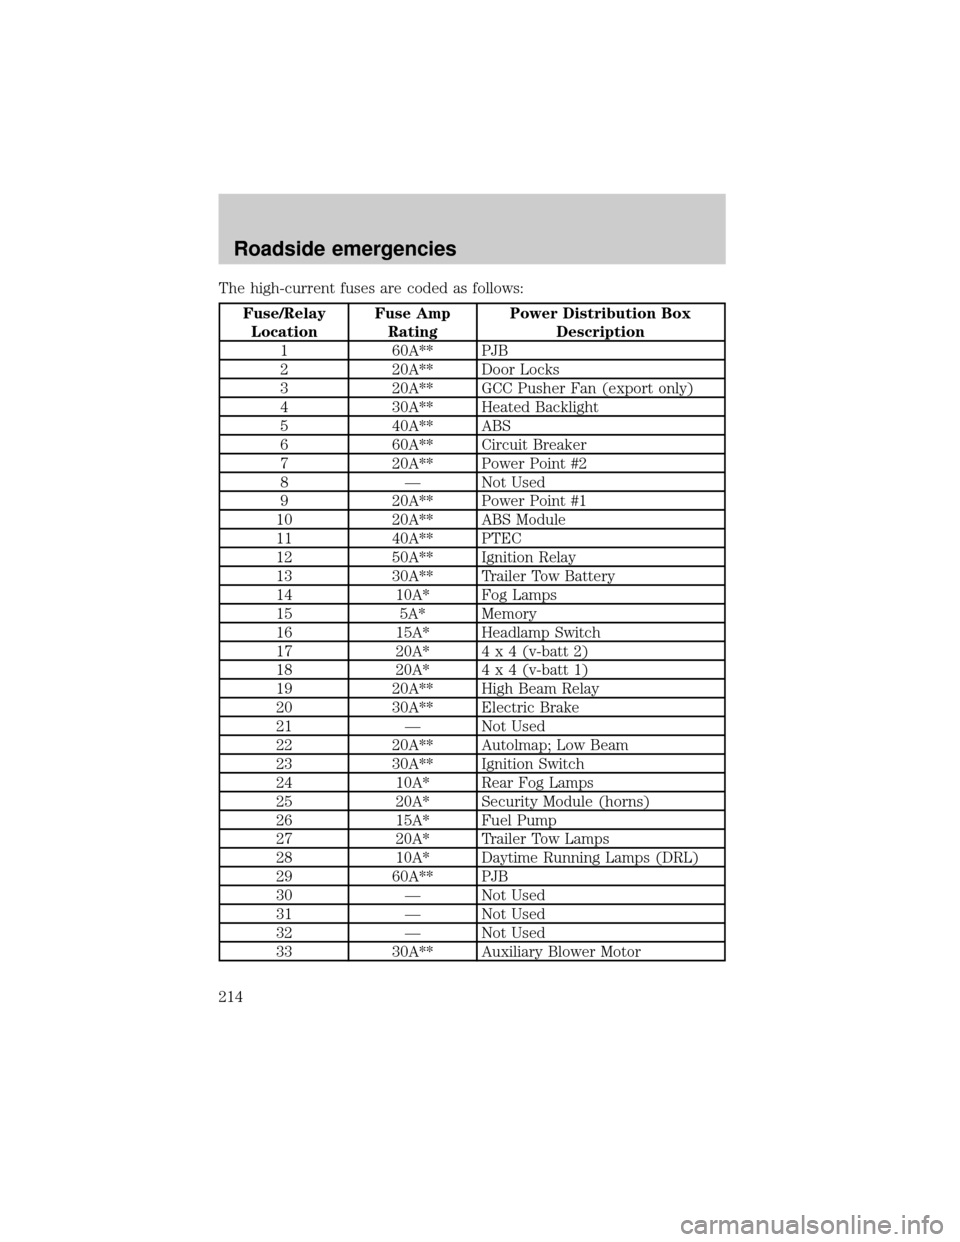
The high-current fuses are coded as follows:
Fuse/Relay
LocationFuse Amp
RatingPower Distribution Box
Description
1 60A** PJB
2 20A** Door Locks
3 20A** GCC Pusher Fan (export only)
4 30A** Heated Backlight
5 40A** ABS
6 60A** Circuit Breaker
7 20A** Power Point #2
8 Ð Not Used
9 20A** Power Point #1
10 20A** ABS Module
11 40A** PTEC
12 50A** Ignition Relay
13 30A** Trailer Tow Battery
14 10A* Fog Lamps
15 5A* Memory
16 15A* Headlamp Switch
17 20A*4 x 4 (v-batt 2)
18 20A*4 x 4 (v-batt 1)
19 20A** High Beam Relay
20 30A** Electric Brake
21 Ð Not Used
22 20A** Autolmap; Low Beam
23 30A** Ignition Switch
24 10A* Rear Fog Lamps
25 20A* Security Module (horns)
26 15A* Fuel Pump
27 20A* Trailer Tow Lamps
28 10A* Daytime Running Lamps (DRL)
29 60A** PJB
30 Ð Not Used
31 Ð Not Used
32 Ð Not Used
33 30A** Auxiliary Blower Motor
Roadside emergencies
214
Page 215 of 312
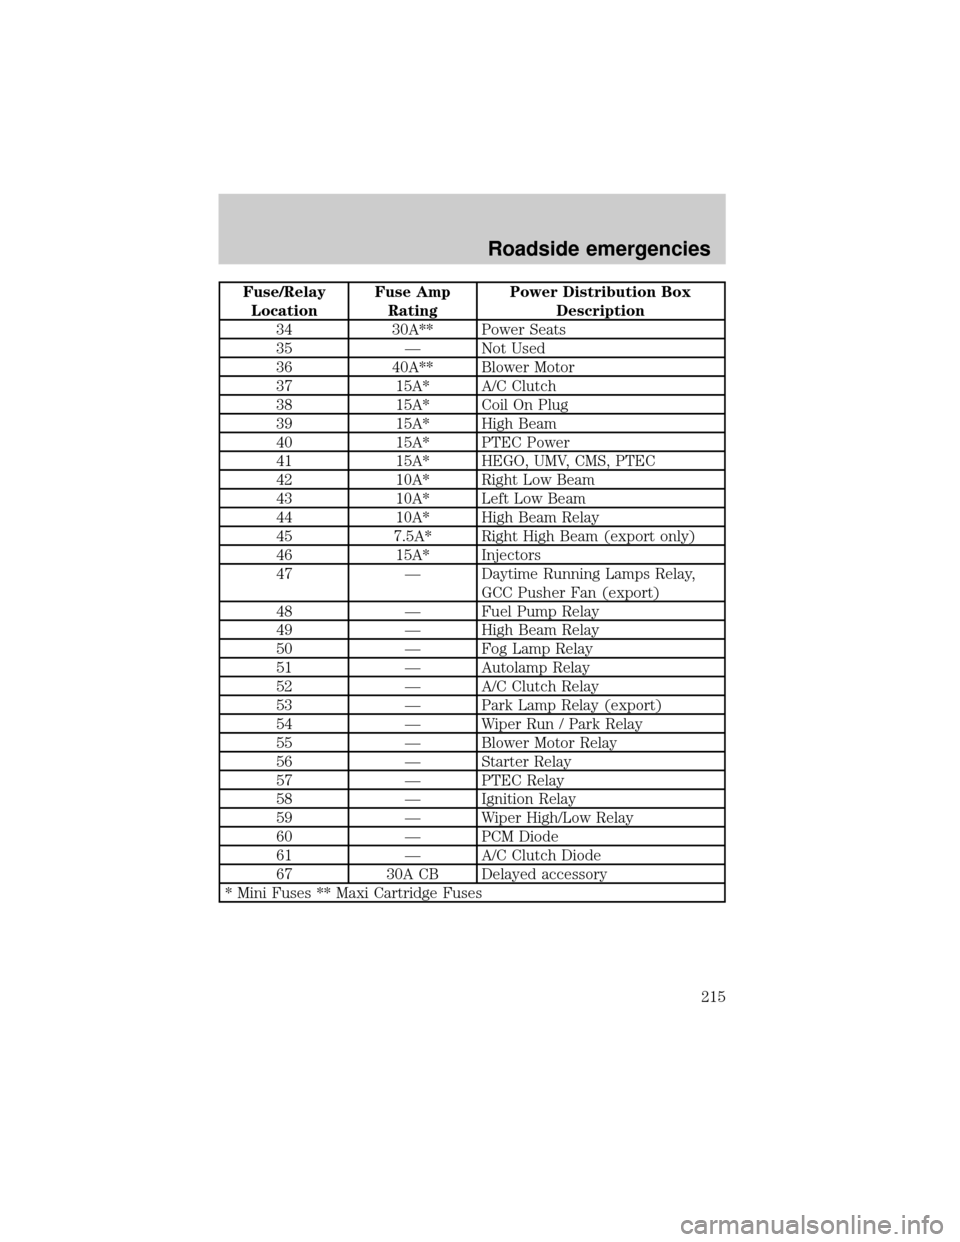
Fuse/Relay
LocationFuse Amp
RatingPower Distribution Box
Description
34 30A** Power Seats
35 Ð Not Used
36 40A** Blower Motor
37 15A* A/C Clutch
38 15A* Coil On Plug
39 15A* High Beam
40 15A* PTEC Power
41 15A* HEGO, UMV, CMS, PTEC
42 10A* Right Low Beam
43 10A* Left Low Beam
44 10A* High Beam Relay
45 7.5A* Right High Beam (export only)
46 15A* Injectors
47 Ð Daytime Running Lamps Relay,
GCC Pusher Fan (export)
48 Ð Fuel Pump Relay
49 Ð High Beam Relay
50 Ð Fog Lamp Relay
51 Ð Autolamp Relay
52 Ð A/C Clutch Relay
53 Ð Park Lamp Relay (export)
54 Ð Wiper Run / Park Relay
55 Ð Blower Motor Relay
56 Ð Starter Relay
57 Ð PTEC Relay
58 Ð Ignition Relay
59 Ð Wiper High/Low Relay
60 Ð PCM Diode
61 Ð A/C Clutch Diode
67 30A CB Delayed accessory
* Mini Fuses ** Maxi Cartridge Fuses
Roadside emergencies
215
Page 216 of 312
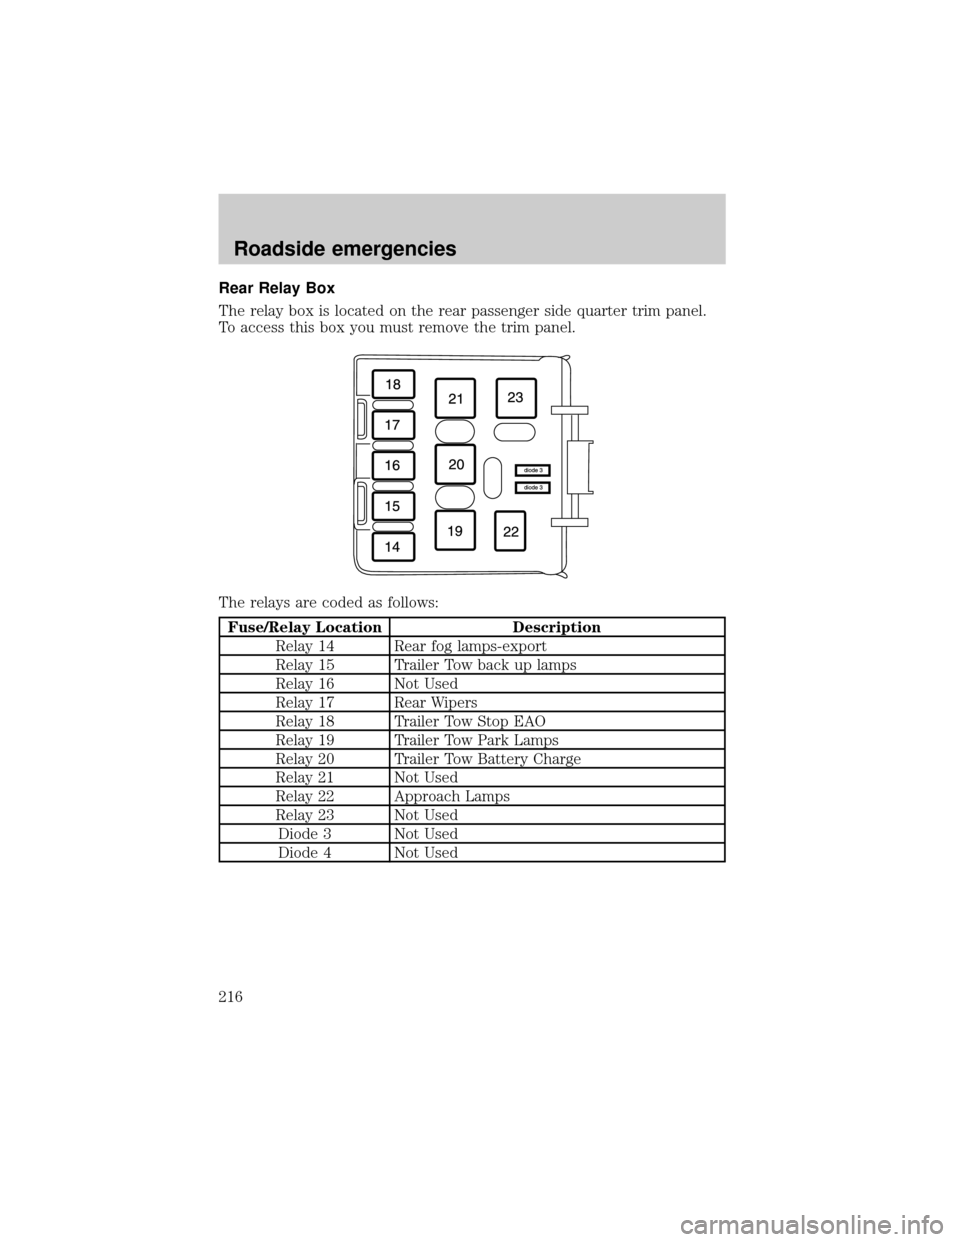
Rear Relay Box
The relay box is located on the rear passenger side quarter trim panel.
To access this box you must remove the trim panel.
The relays are coded as follows:
Fuse/Relay Location Description
Relay 14 Rear fog lamps-export
Relay 15 Trailer Tow back up lamps
Relay 16 Not Used
Relay 17 Rear Wipers
Relay 18 Trailer Tow Stop EAO
Relay 19 Trailer Tow Park Lamps
Relay 20 Trailer Tow Battery Charge
Relay 21 Not Used
Relay 22 Approach Lamps
Relay 23 Not Used
Diode 3 Not Used
Diode 4 Not Used
Roadside emergencies
216
Page 217 of 312
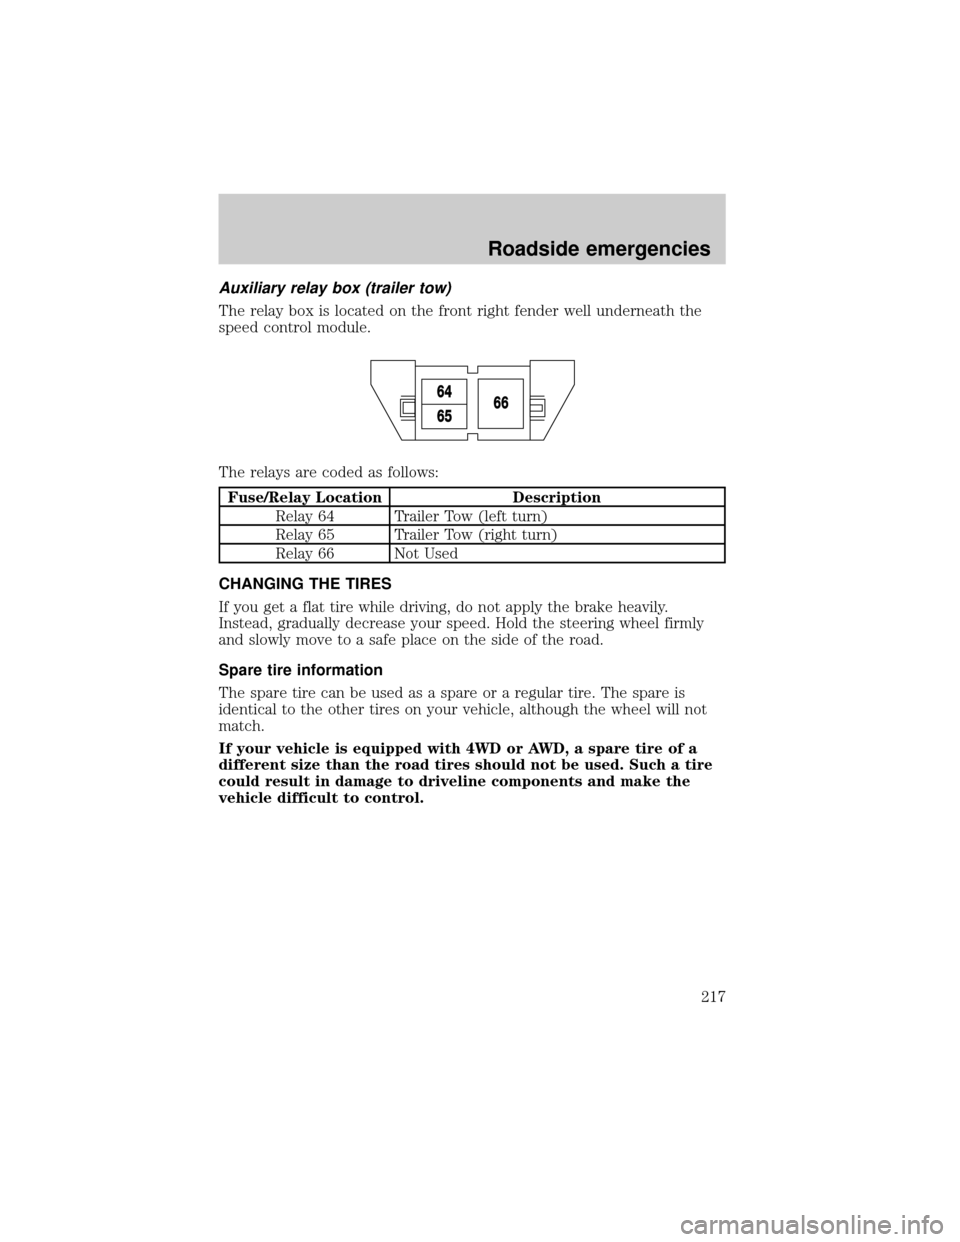
Auxiliary relay box (trailer tow)
The relay box is located on the front right fender well underneath the
speed control module.
The relays are coded as follows:
Fuse/Relay Location Description
Relay 64 Trailer Tow (left turn)
Relay 65 Trailer Tow (right turn)
Relay 66 Not Used
CHANGING THE TIRES
If you get a flat tire while driving, do not apply the brake heavily.
Instead, gradually decrease your speed. Hold the steering wheel firmly
and slowly move to a safe place on the side of the road.
Spare tire information
The spare tire can be used as a spare or a regular tire. The spare is
identical to the other tires on your vehicle, although the wheel will not
match.
If your vehicle is equipped with 4WD or AWD, a spare tire of a
different size than the road tires should not be used. Such a tire
could result in damage to driveline components and make the
vehicle difficult to control.
Roadside emergencies
217
Page 309 of 312

fluid, checking and adding ....247
fluid, refill capacity ................283
fluid, specifications .........285, 287
Preparing to
drive your vehicle .....................179
R
Radio ............................................51
Relays ................................207, 216
Remote entry system .......115, 117
illuminated entry ....................120
locking/unlocking doors .........116
opening the trunk ...................117
panic alarm .............................117
replacement/additional
transmitters .............................119
replacing the batteries ...........118
Reverse sensing system .............30
Roof rack ...................................204
S
Safety belts (see Safety
restraints) ............13, 142±146, 149
Safety defects, reporting ..........303
Safety restraints ........142±146, 149
belt minder .............................151
cleaning the
safety belts ......................154, 282
extension assembly ................150
for adults .........................143±146
for children .............................162
lap belt ....................................147
warning light
and chime ....................10, 13, 150
Safety seats for children ..........163Seat belts
(see Safety restraints) .............142
Seats ..........................................131
child safety seats ....................163
cleaning ...........................281±282
memory seat ...................117, 134
SecuriLock passive
anti-theft system .......127±128, 130
Servicing your vehicle ..............229
Snowplowing .................................3
Spark plugs,
specifications .....................283, 287
Special notice ................................3
ambulance conversions ..............3
utility-type vehicles ....................3
Specification chart,
lubricants ...........................285, 287
Speed control ..............................90
Speedometer ...............................14
Starting your
vehicle ........................171, 173±174
jump starting ..........................222
Steering wheel
controls ......................................99
tilting .........................................96
T
Tachometer .................................16
Tires ...........................217, 254±256
changing ..........................217, 219
checking the pressure ............256
replacing ..................218±219, 257
rotating ....................................256
snow tires and chains ............258
tire grades ...............................255
treadwear ................................255
Index
309