brake sensor FORD EXPLORER 2005 3.G Quick Reference Guide
[x] Cancel search | Manufacturer: FORD, Model Year: 2005, Model line: EXPLORER, Model: FORD EXPLORER 2005 3.GPages: 12, PDF Size: 1.07 MB
Page 5 of 12

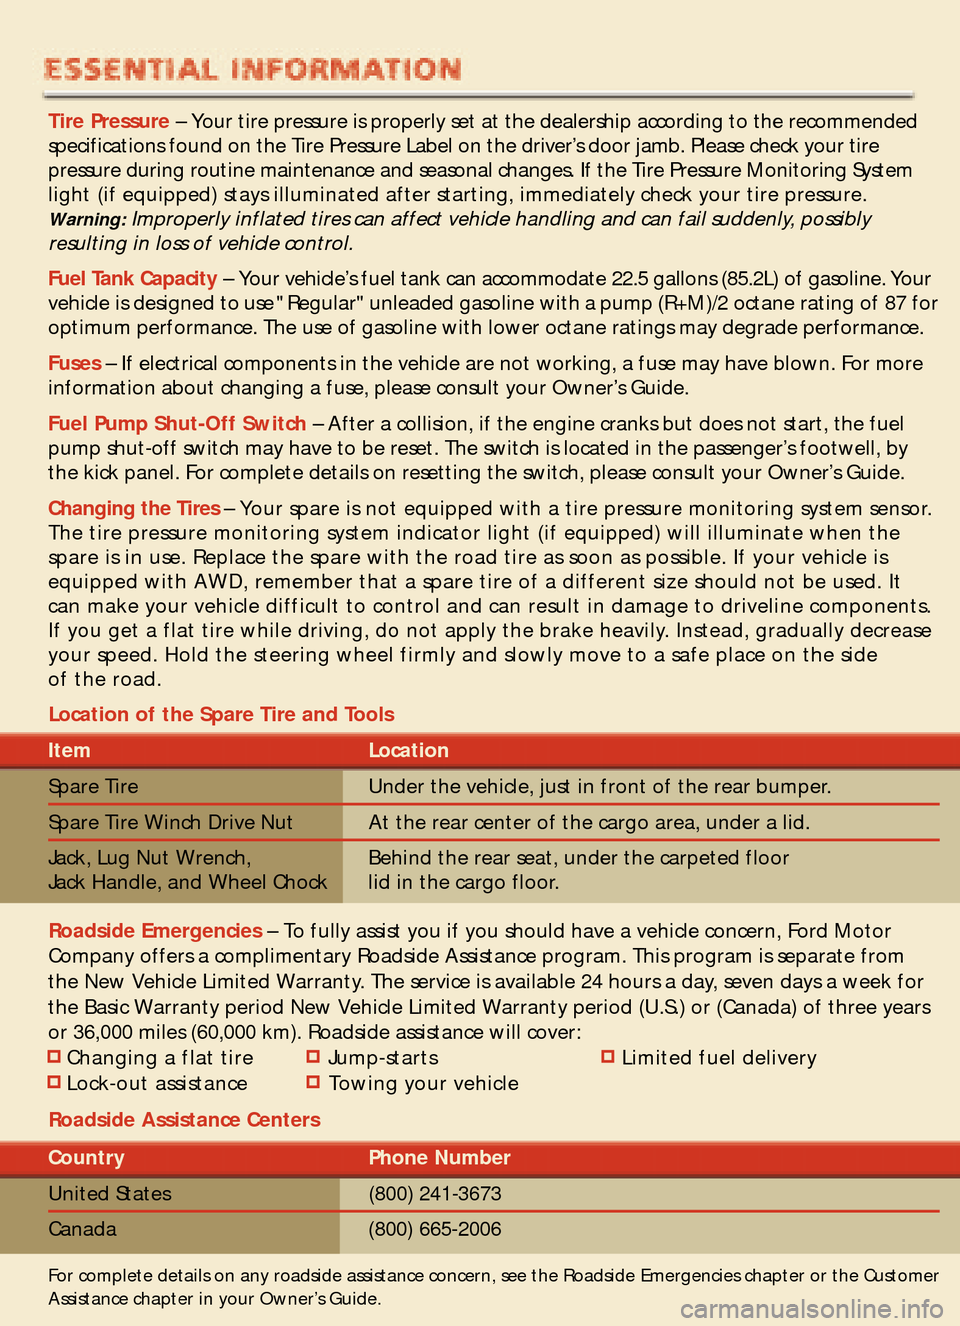
Tire Pressure – Your tire pressure is properly set at the dealership according to the recommended
specifications found on the Tire Pressure Label on the driver’s door jamb. Please check your tire
pressure during routine maintenance and seasonal changes. If the Tire Pressure Monitoring System
light (if equipped) stays illuminated after starting, immediately check your tire pressure.
Warning:Improperly inflated tires can affect vehicle handling and can fail suddenly, possibly
resulting in loss of vehicle control.
Fuel Tank Capacity– Your vehicle’s fuel tank can accommodate 22.5 gallons (85.2L) of gasoline. Your
vehicle is designed to use "Regular" unleaded gasoline with a pump (R+M)/2 octane rating of 87 for
optimum performance. The use of gasoline with lower octane ratings may degrade performance.
Fuses– If electrical components in the vehicle are not working, a fuse may have blown. For more
information about changing a fuse, please consult your Owner’s Guide.
Fuel Pump Shut�Off Switch– After a collision, if the engine cranks but does not start, the fuel
pump shut�off switch may have to be reset. The switch is located in the passenger’s footwell, by
the kick panel. For complete details on resetting the switch, please consult your Owner’s Guide.
Changing the Tires– Your spare is not equipped with a tire pressure monitoring system sensor.The tire pressure monitoring system indicator light (if equipped) will illuminate when the
spare is in use. Replace the spare with the road tire as soon as possible. If your vehicle is
equipped with AWD, remember that a spare tire of a different size should not be used. It
can make your vehicle difficult to control and can result in damage to driveline components.
If you get a flat tire while driving, do not apply the brake heavily. Instead, gradually decreaseyour speed. Hold the steering wheel firmly and slowly move to a safe place on the side
of the road.
Location of the Spare Tire and Tools
Item Location
Spare Tire Under the vehicle, just in front of the rear bumper.
Spare Tire Winch Drive Nut At the rear center of the cargo area, under a lid.
Jack, Lug Nut Wrench, Behind the rear seat, under the carpeted floor
Jack Handle, and Wheel Chock lid in the cargo floor.
Roadside Emergencies– To fully assist you if you should have a vehicle concern, Ford Motor
Company offers a complimentary Roadside Assistance program. This program is separate from
the New Vehicle Limited Warranty. The service is available 24 hours a day, seven days a week for
the Basic Warranty period New Vehicle Limited Warranty period (U.S.) or (Canada) of three yearsor 36,000 miles (60,000 km). Roadside assistance will cover:
Changing a flat tire Jump�starts Limited fuel delivery
Lock�out assistance Towing your vehicle
Roadside Assistance Centers
Country Phone Number
United States (800) 241�3673
Canada (800) 665�2006
For complete details on any roadside assistance concern, see the Roadside Emergencies chapter or the Customer
Assistance chapter in your Owner’s Guide.
Page 9 of 12

may shift firmly. This is considered normal
and will not affect function or durability.
For more information, please consult your
Owner’s Guide.
Message Center (if equipped)
Please see Additional Features for more details.
Premium Cassette/Single CD Radio(if equipped)
Please see reverse side for more details.
In�Dash Six�CD Radio (if equipped)
Please see reverse side for more details.
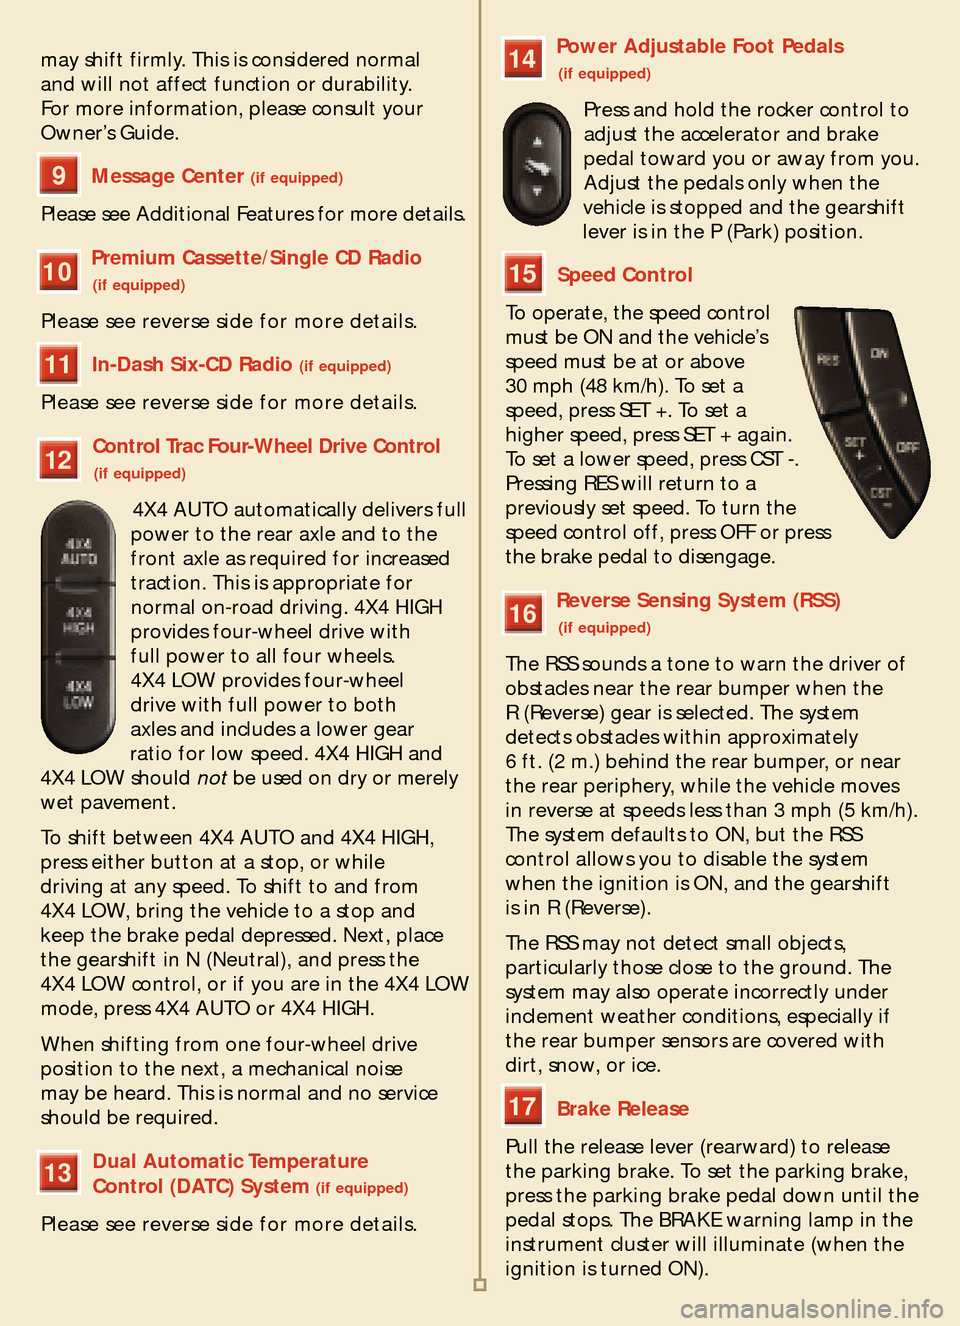
Control Trac Four�Wheel Drive Control (if equipped)
4X4 AUTO automatically delivers full
power to the rear axle and to the
front axle as required for increased
traction. This is appropriate for
normal on�road driving. 4X4 HIGH
provides four�wheel drive with full power to all four wheels.
4X4 LOW provides four�wheel drive with full power to both
axles and includes a lower gear
ratio for low speed. 4X4 HIGH and
4X4 LOW should
notbe used on dry or merely
wet pavement.
To shift between 4X4 AUTO and 4X4 HIGH,
press either button at a stop, or while
driving at any speed. To shift to and from
4X4 LOW, bring the vehicle to a stop and
keep the brake pedal depressed. Next, place
the gearshift in N (Neutral), and press the
4X4 LOW control, or if you are in the 4X4 LOW
mode, press 4X4 AUTO or 4X4 HIGH.
When shifting from one four�wheel drive
position to the next, a mechanical noise
may be heard. This is normal and no service
should be required.
Dual Automatic Temperature
Control (DATC) System (if equipped)
Please see reverse side for more details.
Power Adjustable Foot Pedals (if equipped)
Press and hold the rocker control to
adjust the accelerator and brake
pedal toward you or away from you.Adjust the pedals only when the
vehicle is stopped and the gearshift
lever is in the P (Park) position.
Speed Control
To operate, the speed control
must be ON and the vehicle’sspeed must be at or above
30 mph (48 km/h). To set a
speed, press SET +. To set a
higher speed, press SET + again.
To set a lower speed, press CST �.
Pressing RES will return to a
previously set speed. To turn the
speed control off, press OFF or pressthe brake pedal to disengage.
Reverse Sensing System (RSS) (if equipped)
The RSS sounds a tone to warn the driver of
obstacles near the rear bumper when the R (Reverse) gear is selected. The system
detects obstacles within approximately
6 ft. (2 m.) behind the rear bumper, or near
the rear periphery, while the vehicle moves
in reverse at speeds less than 3 mph (5 km/h).The system defaults to ON, but the RSS
control allows you to disable the systemwhen the ignition is ON, and the gearshift is in R (Reverse).
The RSS may not detect small objects,
particularly those close to the ground. The
system may also operate incorrectly underinclement weather conditions, especially if
the rear bumper sensors are covered with
dirt, snow, or ice.
Brake Release
Pull the release lever (rearward) to release
the parking brake. To set the parking brake,
press the parking brake pedal down until the
pedal stops. The BRAKE warning lamp in the
instrument cluster will illuminate (when the
ignition is turned ON).
9
10
11
12
13
16
14
15
17
Page 12 of 12

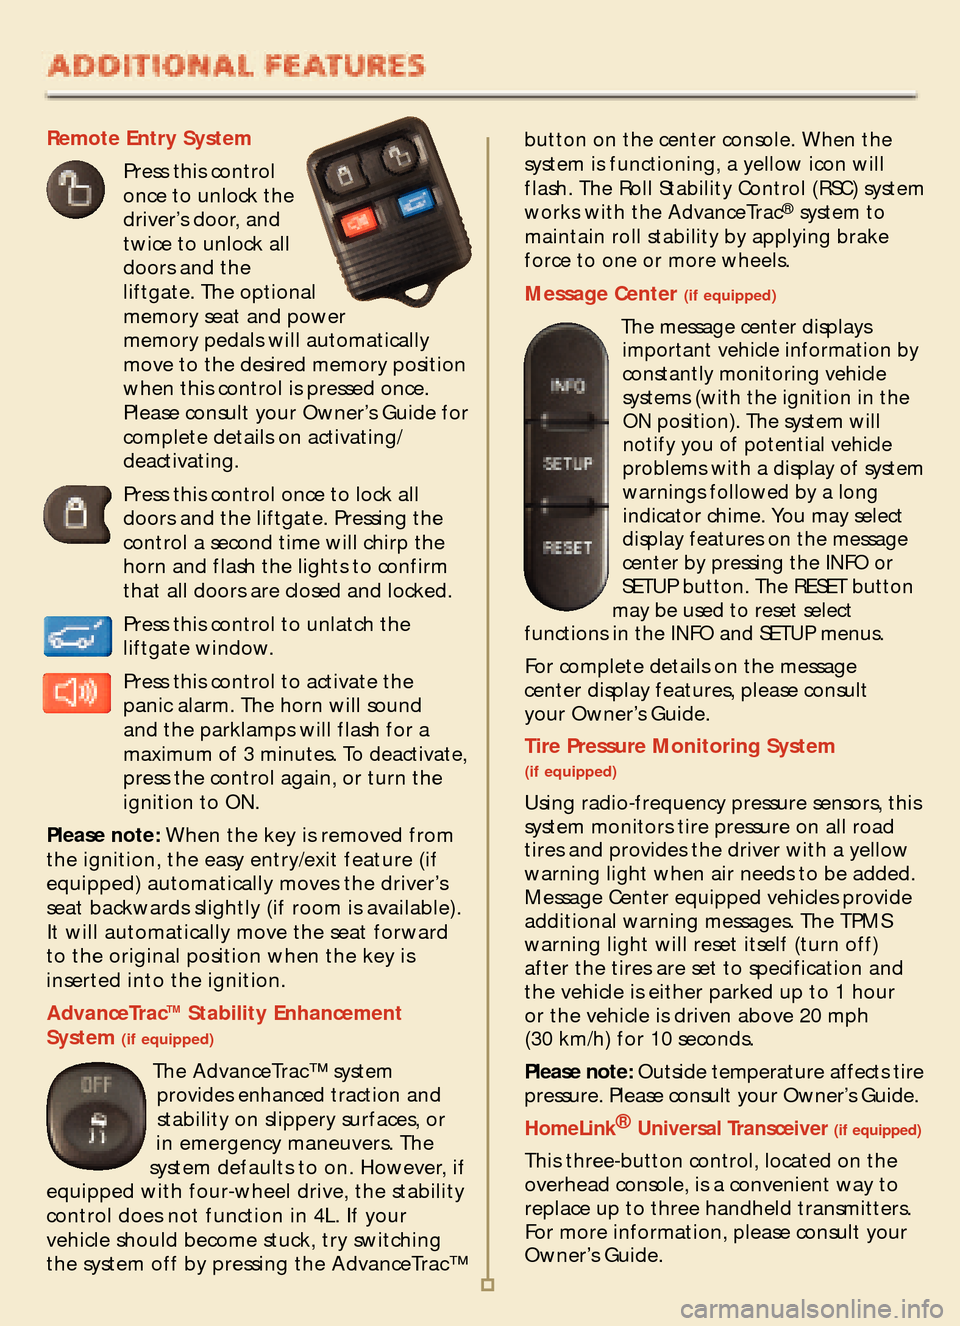
Remote Entry System
Press this control
once to unlock the
driver’s door, andtwice to unlock alldoors and theliftgate. The optional
memory seat and power
memory pedals will automatically
move to the desired memory position
when this control is pressed once.
Please consult your Owner’s Guide for complete details on activating/deactivating.
Press this control once to lock all
doors and the liftgate. Pressing the
control a second time will chirp the
horn and flash the lights to confirm
that all doors are closed and locked.
Press this control to unlatch the
liftgate window.
Press this control to activate the
panic alarm. The horn will sound and the parklamps will flash for a
maximum of 3 minutes. To deactivate,
press the control again, or turn theignition to ON.
Please note: When the key is removed from
the ignition, the easy entry/exit feature (if
equipped) automatically moves the driver’s
seat backwards slightly (if room is available).
It will automatically move the seat forwardto the original position when the key is
inserted into the ignition.
AdvanceTracTMStability Enhancement
System (if equipped)
The AdvanceTrac™ system
provides enhanced tractionand
stability on slippery surfaces,or
in emergency maneuvers. The
system defaults to on. However, if
equipped with four�wheel drive, the stability
control does not function in 4L. If your
vehicle should become stuck, try switching
the system off by pressing the AdvanceTrac™
button on the center console. When the
system is functioning, a yellow icon will
flash. The Roll Stability Control (RSC) system
works with the AdvanceTrac
®system to
maintain roll stability by applying brake
force to one or more wheels.
Message Center (if equipped)
The message center displays
important vehicle information by
constantly monitoring vehicle systems (with the ignition in theON position). The system willnotify you of potential vehicle
problems with a display of system
warnings followed by a long
indicator chime. You may select
display features on the message
center by pressing the INFO or
SETUP button. The RESET button
may be used to reset select
functions in the INFO and SETUP menus.
For complete details on the message
center display features, please consult
your Owner’s Guide.
Tire Pressure Monitoring System (if equipped)
Using radio�frequency pressure sensors, this
system monitors tire pressure on all road
tires and provides the driver with a yellow
warning light when air needs to be added.
Message Center equipped vehicles provide
additional warning messages. The TPMS
warning light will reset itself (turn off)
after the tires are set to specification andthe vehicle is either parked up to 1 hour or the vehicle is driven above 20 mph (30 km/h) for 10 seconds.
Please note:Outside temperature affects tire
pressure. Please consult your Owner’s Guide.
HomeLink®
Universal Transceiver (if equipped)
This three�button control, located on the
overhead console, is a convenient way to
replace up to three handheld transmitters.
For more information, please consult your
Owner’s Guide.