clock FORD EXPLORER 2005 3.G Quick Reference Guide
[x] Cancel search | Manufacturer: FORD, Model Year: 2005, Model line: EXPLORER, Model: FORD EXPLORER 2005 3.GPages: 12, PDF Size: 1.07 MB
Page 2 of 12

(if equipped)
For information on other types of radios,
please refer to your Owner’s Guide.
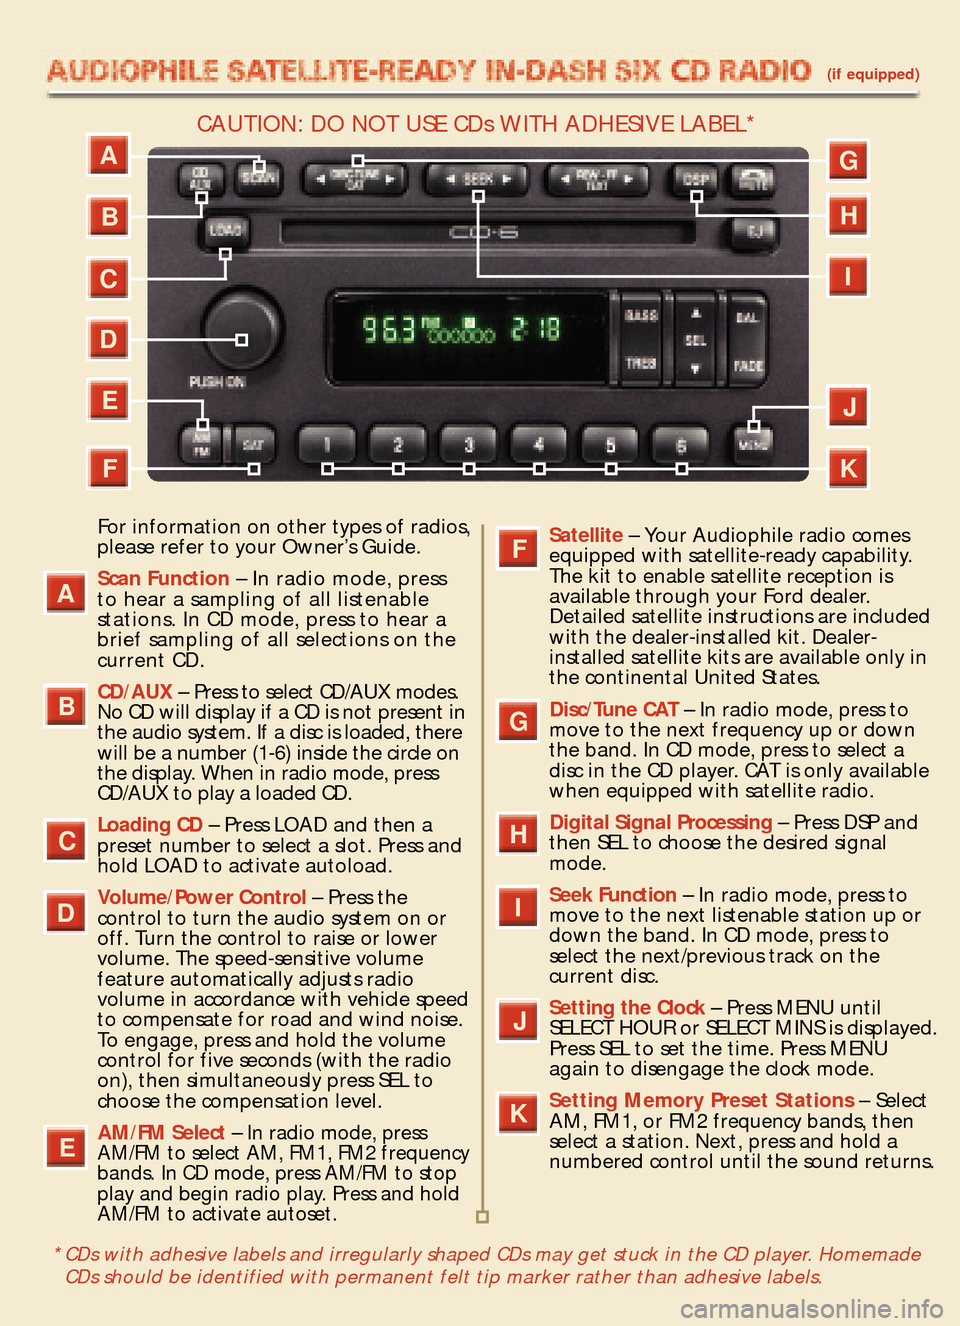
Scan Function– In radio mode, press
to hear a sampling of all listenable
stations. In CD mode, press to hear abrief sampling of all selections on the
current CD.
CD/AUX – Press to select CD/AUX modes.
No CD will display if a CD is not present in
the audio system. If a disc is loaded, there
will be a number (1�6) inside the circle on
the display. When in radio mode, pressCD/AUX to play a loaded CD.
Loading CD– Press LOAD and then a
preset number to select a slot. Press andhold LOAD to activate autoload.
Volume/Power Control – Press the
control to turn the audio system on or
off. Turn the control to raise or lowervolume. The speed�sensitive volume
feature automatically adjusts radio
volume in accordance with vehicle speed
to compensate for road and wind noise.
To engage, press and hold the volume
control for five seconds (with the radio
on), then simultaneously press SEL tochoose the compensation level.
AM/FM Select – In radio mode, press
AM/FM to select AM, FM1, FM2 frequency
bands. In CD mode, press AM/FM to stop
play and begin radio play. Press and holdAM/FM to activate autoset.
Satellite – Your Audiophile radio comes
equipped with satellite�ready capability.
The kit to enable satellite reception is
available through your Ford dealer.
Detailed satellite instructions are included
with the dealer�installed kit. Dealer�
installed satellite kits are available only inthe continental United States.
Disc/Tune CAT– In radio mode, press to
move to the next frequency up or down
the band. In CD mode, press to select a
disc in the CD player. CAT is only availablewhen equipped with satellite radio.
Digital Signal Processing– Press DSP and
then SEL to choose the desired signalmode.
Seek Function– In radio mode, press to
move to the next listenable station up or
down the band. In CD mode, press to
select the next/previous track on the
current disc.
Setting the Clock– Press MENU until
SELECT HOUR or SELECT MINS is displayed.
Press SEL to set the time. Press MENUagain to disengage the clock mode.
Setting Memory Preset Stations– Select
AM, FM1, or FM2 frequency bands, then
select a station. Next, press and hold a
numbered control until the sound returns.
A
B
D
E
C
F
G
J
K
I
H
A
J
K
I
G
C
D
E
F
HB
CAUTION: DO NOT USE CDs WITH ADHESIVE LABEL*
* CDs with adhesive labels and irregularly shaped CDs may get stuck in the CD player. Homemade
CDs should be identified with permanent felt tip marker rather than adhesive labels.
Page 3 of 12

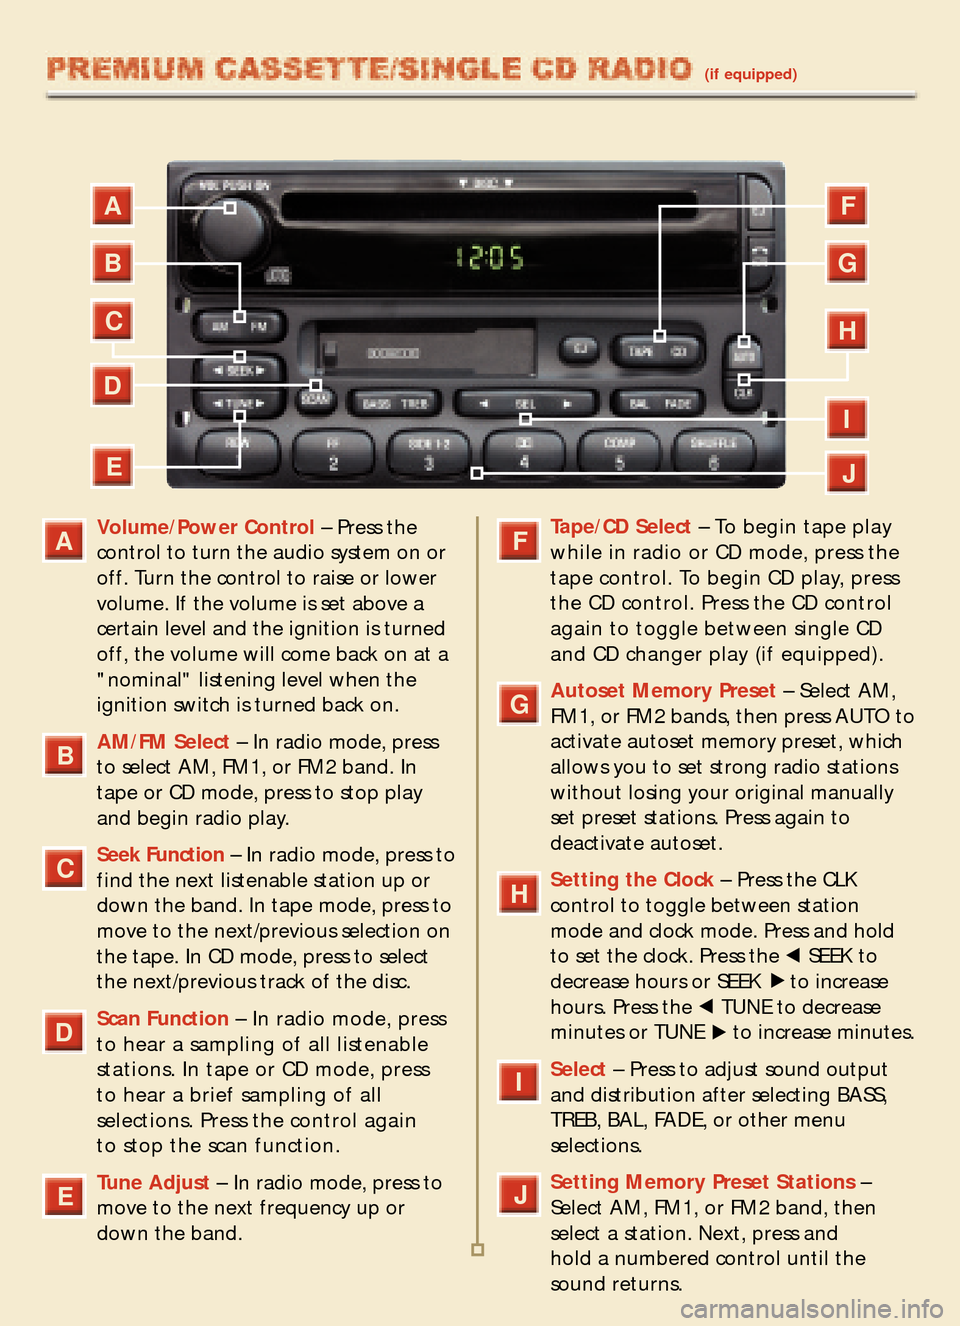
Volume/Power Control– Press the
control to turn the audio system on or
off. Turn the control to raise or lowervolume. If the volume is set above a
certain level and the ignition is turned
off, the volume will come back on at a"nominal" listening level when the
ignition switch is turned back on.
AM/FM Select– In radio mode, press
to select AM, FM1, or FM2 band. In
tape or CD mode, press to stop play
and begin radio play.
Seek Function– In radio mode, press to
find the next listenable station up or
down the band. In tape mode, press to
move to the next/previous selection on
the tape. In CD mode, press to select
the next/previous track of the disc.
Scan Function– In radio mode, press
to hear a sampling of all listenable
stations. In tape or CD mode, press to hear a brief sampling of all
selections. Press the control again to stop the scan function.
Tune Adjust – In radio mode, press to
move to the next frequency up ordown the band.
Tape/CD Select– To begin tape play
while in radio or CD mode, press the
tape control. To begin CD play, press
the CD control. Press the CD controlagain to toggle between single CDand CD changer play (if equipped).
Autoset Memory Preset – Select AM,
FM1, or FM2 bands, then press AUTO to
activate autoset memory preset, which
allows you to set strong radio stationswithout losing your original manually
set preset stations. Press again to deactivate autoset.
Setting the Clock– Press the CLK
control to toggle between station
mode and clock mode. Press and hold
to set the clock. Press the SEEK to
decrease hours or SEEK to increase
hours. Press the TUNE to decrease
minutes or TUNE to increase minutes.
Select– Press to adjust sound output
and distribution after selecting BASS,
TREB, BAL, FADE, or other menu selections.
Setting Memory Preset Stations–
Select AM, FM1, or FM2 band, then
select a station. Next, press and
hold a numbered control until the
sound returns.
A
B
E
D
C
F
G
I
A
B
E
D
C
F
G
J
I
H
J
H
(if equipped)
Page 8 of 12

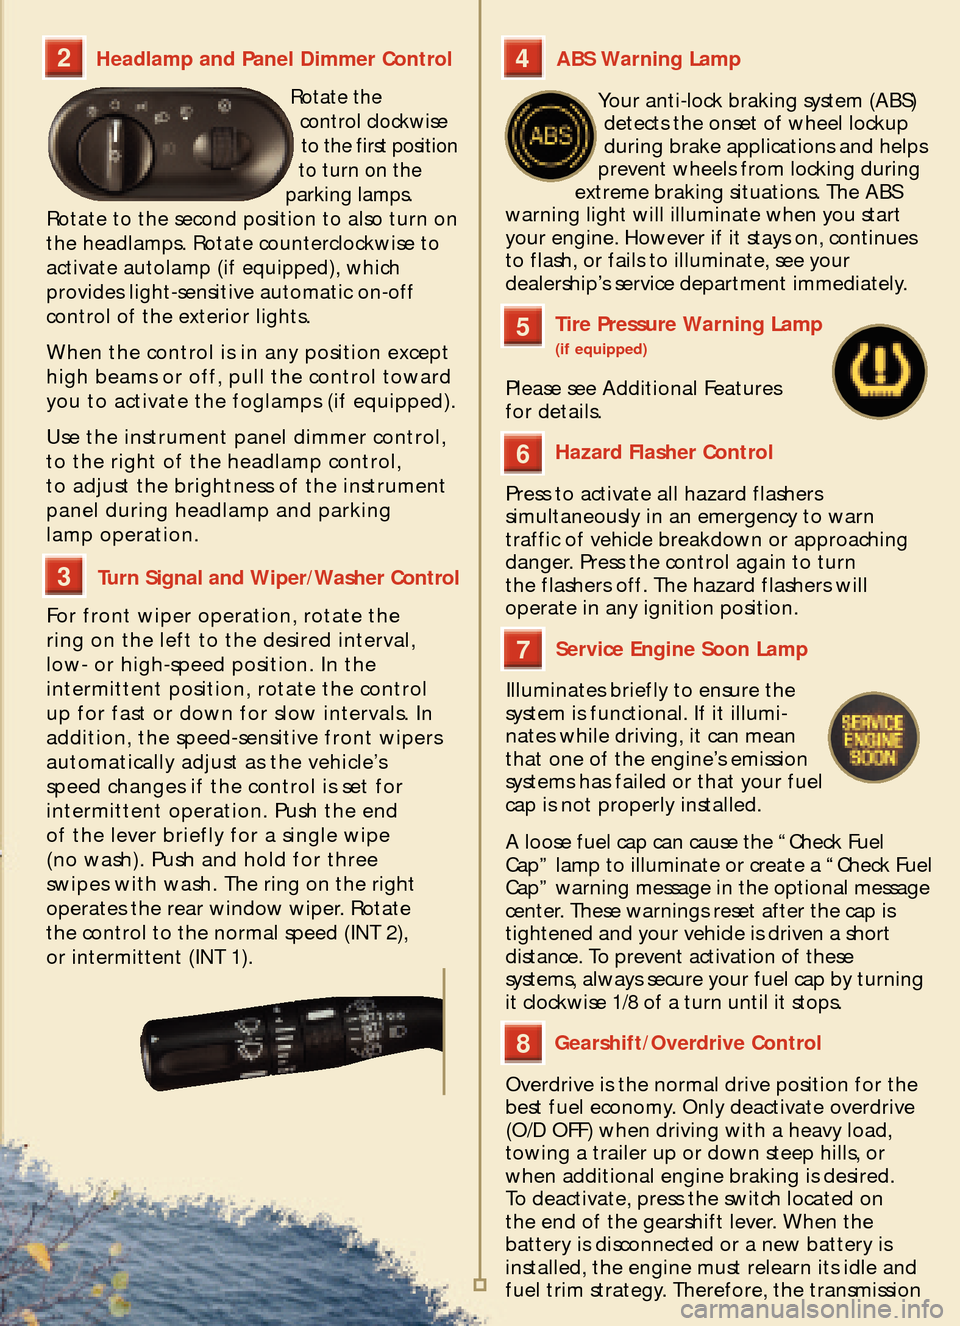
Headlamp and Panel Dimmer Control
Rotate the
control clockwise
to the first position
to turn on the
parking lamps.
Rotate to the second position to also turn on
the headlamps. Rotate counterclockwise toactivate autolamp (if equipped), which
provides light�sensitive automatic on�off
control of the exterior lights.
When the control is in any position except
high beams or off, pull the control towardyou to activate the foglamps (if equipped).
Use the instrument panel dimmer control,
to the right of the headlamp control,
to adjust the brightness of the instrumentpanel during headlamp and parking lamp operation.
Turn Signal and Wiper/Washer Control
For front wiper operation, rotate the
ring on the left to the desired interval, low� or high�speed position. In the
intermittent position, rotate the control
up for fast or down for slow intervals. In
addition, the speed�sensitive front wipers
automatically adjust as the vehicle’s
speed changes if the control is set for
intermittent operation. Push the end of the lever briefly for a single wipe
(no wash). Push and hold for three
swipes with wash. The ring on the right
operates the rear window wiper. Rotate
the control to the normal speed (INT 2),
or intermittent (INT 1).
ABS Warning Lamp
Your anti�lock braking system (ABS)
detects the onset of wheel lockup
during brake applications and helps
prevent wheels from locking during
extreme braking situations. The ABS
warning light will illuminate when you startyour engine. However if it stays on, continuesto flash, or fails to illuminate, see your
dealership’s service department immediately.
Tire Pressure Warning Lamp(if equipped)
Please see Additional Features
for details.
Hazard Flasher Control
Press to activate all hazard flashers
simultaneously in an emergency to warn
traffic of vehicle breakdown or approaching
danger. Press the control again to turn
the flashers off. The hazard flashers will operate in any ignition position.
Service Engine Soon Lamp
Illuminates briefly to ensure the
system is functional. If it illumi�nates while driving, it can mean
that one of the engine’s emissionsystems has failed or that your fuel
cap is not properly installed.
A loose fuel cap can cause the “Check Fuel
Cap” lamp to illuminate or create a “Check Fuel
Cap” warning message in the optional message
center. These warnings reset after the cap is
tightened and your vehicle is driven a short
distance. To prevent activation of these
systems, always secure your fuel cap by turning
it clockwise 1/8 of a turn until it stops.
Gearshift/Overdrive Control
Overdrive is the normal drive position for the
best fuel economy. Only deactivate overdrive(O/D OFF) when driving with a heavy load,towing a trailer up or down steep hills, or
when additional engine braking is desired.
To deactivate, press the switch located on
the end of the gearshift lever. When the
battery is disconnected or a new battery is
installed, the engine must relearn its idle and
fuel trim strategy. Therefore, the transmission
2
3
4
6
5
7
8