tow FORD EXPLORER 2009 4.G Workshop Manual
[x] Cancel search | Manufacturer: FORD, Model Year: 2009, Model line: EXPLORER, Model: FORD EXPLORER 2009 4.GPages: 407, PDF Size: 3.47 MB
Page 316 of 407
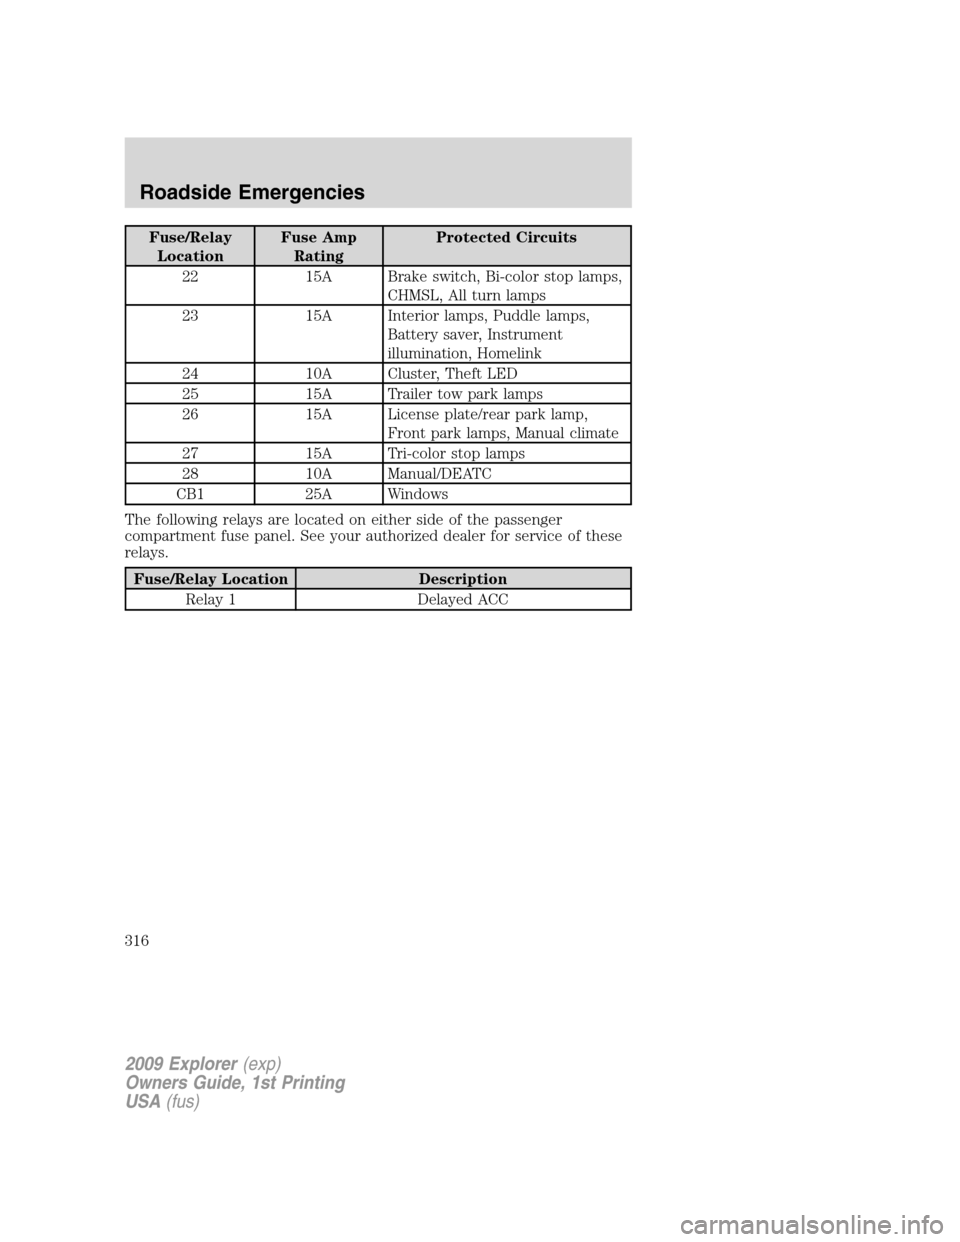
Fuse/Relay
LocationFuse Amp
RatingProtected Circuits
22 15A Brake switch, Bi-color stop lamps,
CHMSL, All turn lamps
23 15A Interior lamps, Puddle lamps,
Battery saver, Instrument
illumination, Homelink
24 10A Cluster, Theft LED
25 15A Trailer tow park lamps
26 15A License plate/rear park lamp,
Front park lamps, Manual climate
27 15A Tri-color stop lamps
28 10A Manual/DEATC
CB1 25A Windows
The following relays are located on either side of the passenger
compartment fuse panel. See your authorized dealer for service of these
relays.
Fuse/Relay Location Description
Relay 1 Delayed ACC
2009 Explorer(exp)
Owners Guide, 1st Printing
USA(fus)
Roadside Emergencies
316
Page 318 of 407
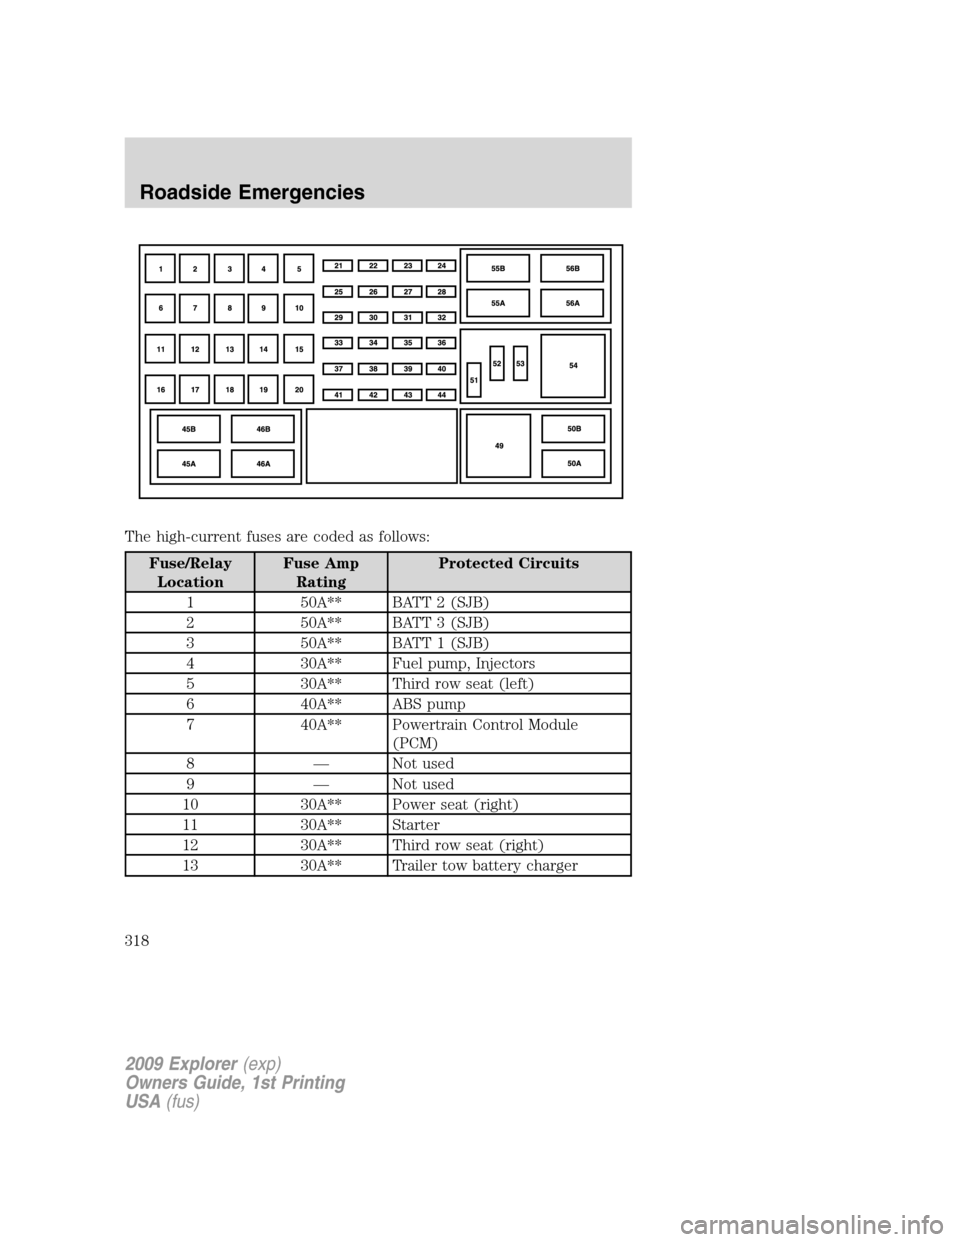
The high-current fuses are coded as follows:
Fuse/Relay
LocationFuse Amp
RatingProtected Circuits
1 50A** BATT 2 (SJB)
2 50A** BATT 3 (SJB)
3 50A** BATT 1 (SJB)
4 30A** Fuel pump, Injectors
5 30A** Third row seat (left)
6 40A** ABS pump
7 40A** Powertrain Control Module
(PCM)
8 — Not used
9 — Not used
10 30A** Power seat (right)
11 30A** Starter
12 30A** Third row seat (right)
13 30A** Trailer tow battery charger
2009 Explorer(exp)
Owners Guide, 1st Printing
USA(fus)
Roadside Emergencies
318
Page 320 of 407
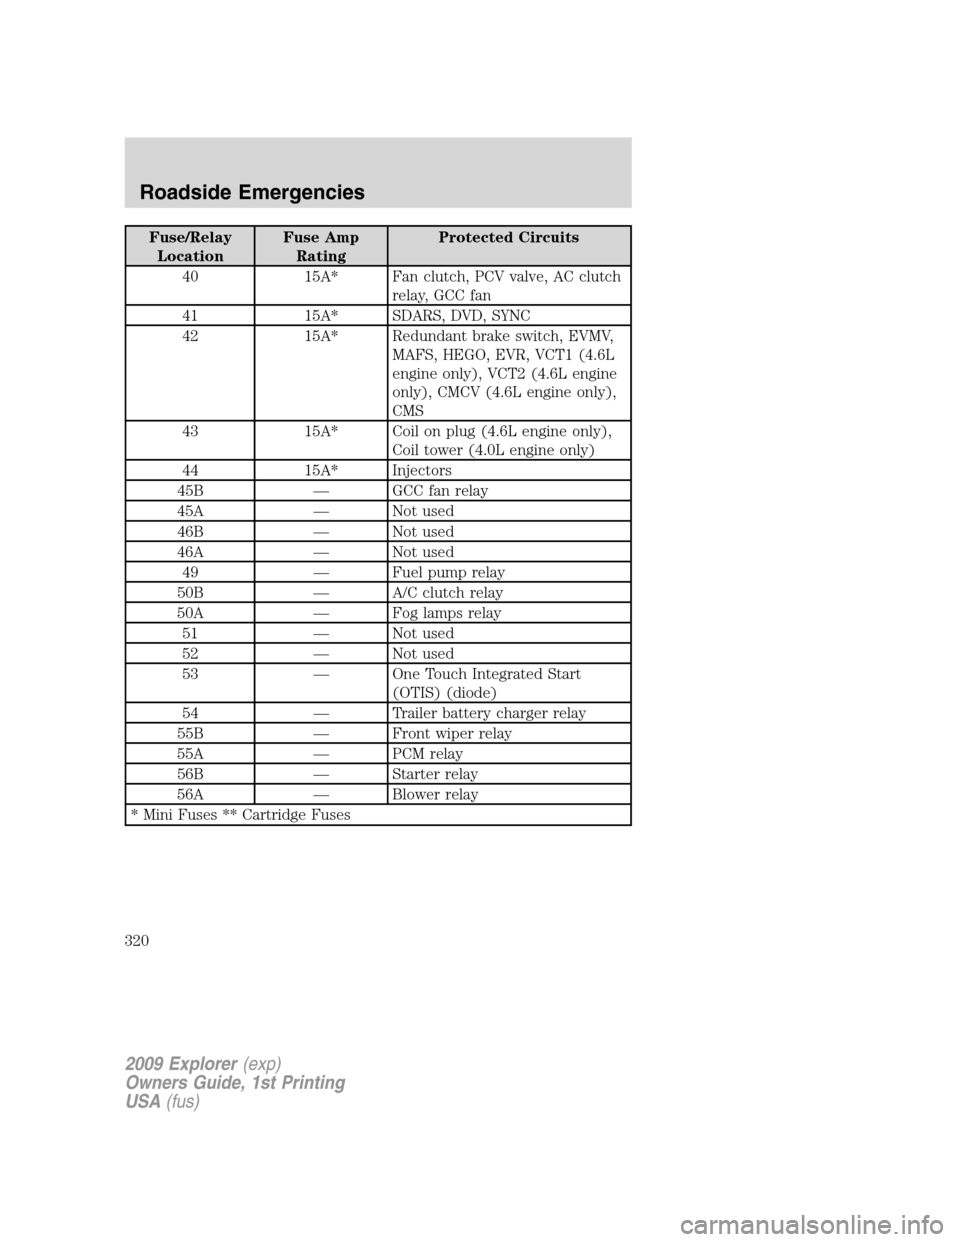
Fuse/Relay
LocationFuse Amp
RatingProtected Circuits
40 15A* Fan clutch, PCV valve, AC clutch
relay, GCC fan
41 15A* SDARS, DVD, SYNC
42 15A* Redundant brake switch, EVMV,
MAFS, HEGO, EVR, VCT1 (4.6L
engine only), VCT2 (4.6L engine
only), CMCV (4.6L engine only),
CMS
43 15A* Coil on plug (4.6L engine only),
Coil tower (4.0L engine only)
44 15A* Injectors
45B — GCC fan relay
45A — Not used
46B — Not used
46A — Not used
49 — Fuel pump relay
50B — A/C clutch relay
50A — Fog lamps relay
51 — Not used
52 — Not used
53 — One Touch Integrated Start
(OTIS) (diode)
54 — Trailer battery charger relay
55B — Front wiper relay
55A — PCM relay
56B — Starter relay
56A — Blower relay
* Mini Fuses ** Cartridge Fuses
2009 Explorer(exp)
Owners Guide, 1st Printing
USA(fus)
Roadside Emergencies
320
Page 322 of 407
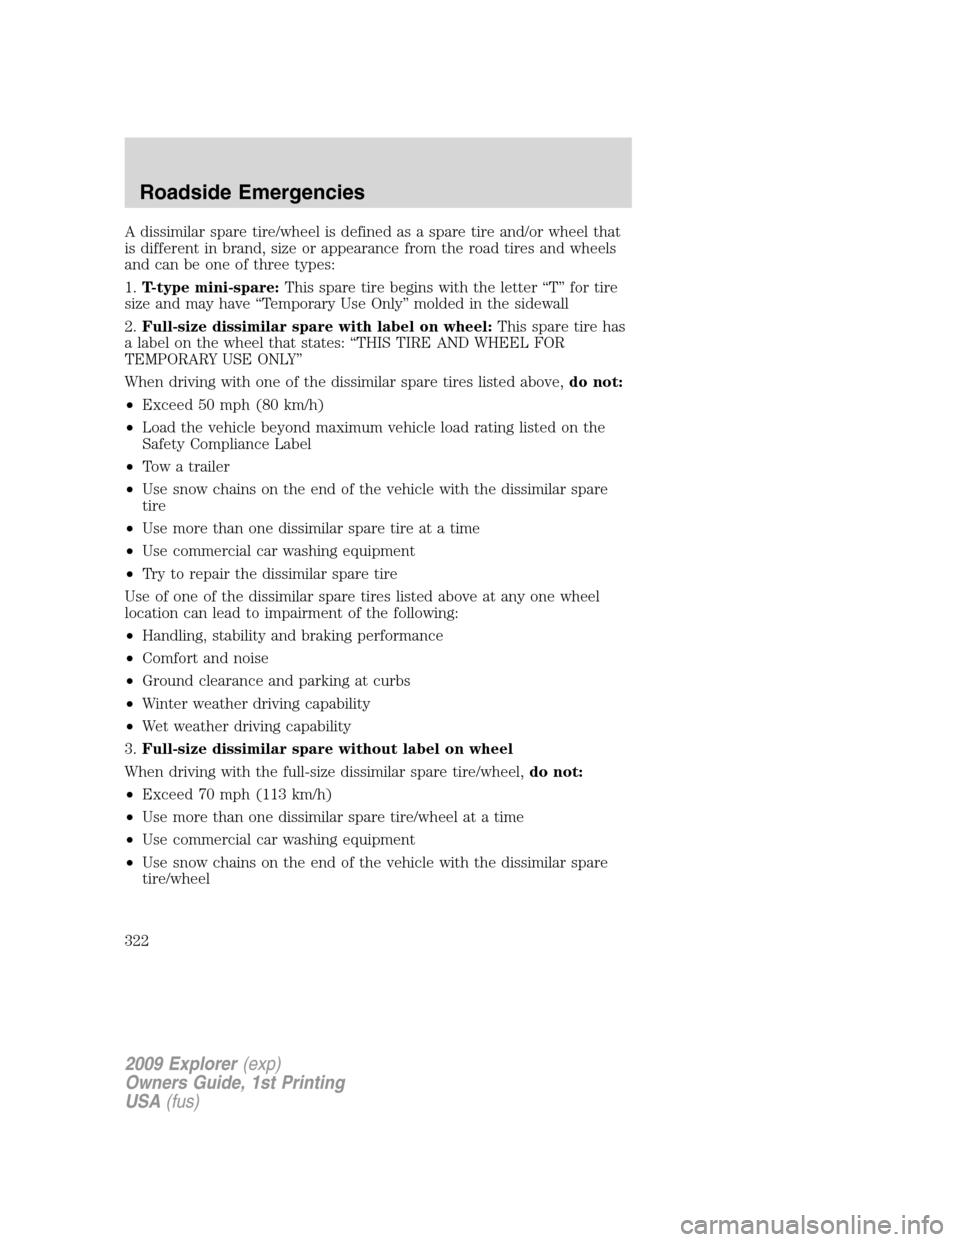
A dissimilar spare tire/wheel is defined as a spare tire and/or wheel that
is different in brand, size or appearance from the road tires and wheels
and can be one of three types:
1.T-type mini-spare:This spare tire begins with the letter “T” for tire
size and may have “Temporary Use Only” molded in the sidewall
2.Full-size dissimilar spare with label on wheel:This spare tire has
a label on the wheel that states: “THIS TIRE AND WHEEL FOR
TEMPORARY USE ONLY”
When driving with one of the dissimilar spare tires listed above,do not:
•Exceed 50 mph (80 km/h)
•Load the vehicle beyond maximum vehicle load rating listed on the
Safety Compliance Label
•Tow a trailer
•Use snow chains on the end of the vehicle with the dissimilar spare
tire
•Use more than one dissimilar spare tire at a time
•Use commercial car washing equipment
•Try to repair the dissimilar spare tire
Use of one of the dissimilar spare tires listed above at any one wheel
location can lead to impairment of the following:
•Handling, stability and braking performance
•Comfort and noise
•Ground clearance and parking at curbs
•Winter weather driving capability
•Wet weather driving capability
3.Full-size dissimilar spare without label on wheel
When driving with the full-size dissimilar spare tire/wheel,do not:
•Exceed 70 mph (113 km/h)
•Use more than one dissimilar spare tire/wheel at a time
•Use commercial car washing equipment
•Use snow chains on the end of the vehicle with the dissimilar spare
tire/wheel
2009 Explorer(exp)
Owners Guide, 1st Printing
USA(fus)
Roadside Emergencies
322
Page 323 of 407
The usage of a full-size dissimilar spare tire/wheel can lead to
impairment of the following:
•Handling, stability and braking performance
•Comfort and noise
•Ground clearance and parking at curbs
•Winter weather driving capability
•Wet weather driving capability
•All-Wheel driving capability (if applicable)
•Load leveling adjustment (if applicable)
When driving with the full-size dissimilar spare tire/wheel additional
caution should be given to:
•Towing a trailer
•Driving vehicles equipped with a camper body
•Driving vehicles with a load on the cargo rack
Drive cautiously when using a full-size dissimilar spare tire/wheel and
seek service as soon as possible.
Stopping and securing the vehicle
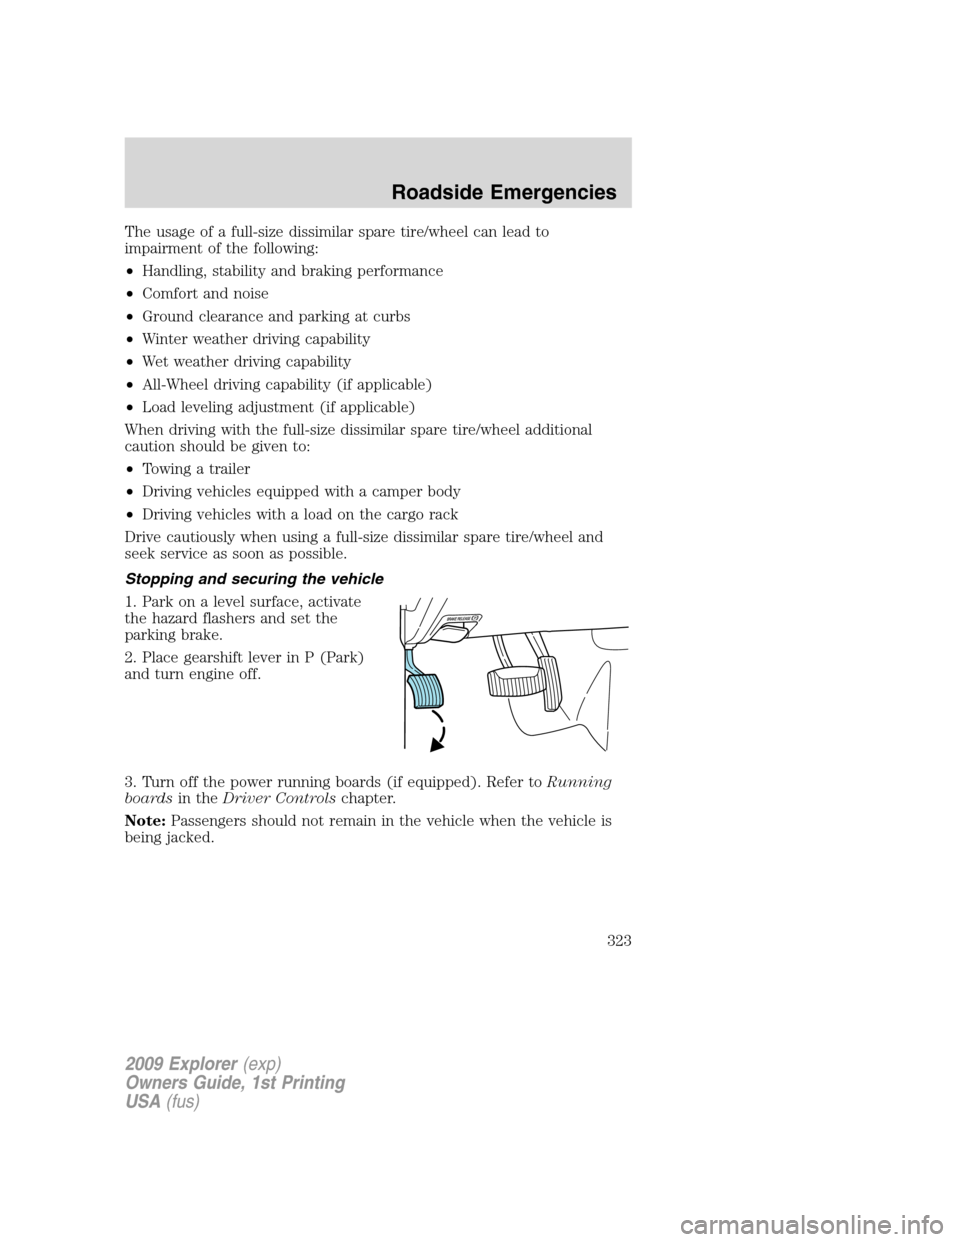
1. Park on a level surface, activate
the hazard flashers and set the
parking brake.
2. Place gearshift lever in P (Park)
and turn engine off.
3. Turn off the power running boards (if equipped). Refer toRunning
boardsin theDriver Controlschapter.
Note:Passengers should not remain in the vehicle when the vehicle is
being jacked.
2009 Explorer(exp)
Owners Guide, 1st Printing
USA(fus)
Roadside Emergencies
323
Page 324 of 407
Location of the spare tire and tools
The spare tire and tools for your vehicle are stowed in the following
locations:
Tool Location
Spare tire Under the vehicle, just in front of
the rear bumper. The spare tire
winch drive nut is located at the
rear center of the cargo area
under a lid.
Jack, lug nut wrench, jack handle,
wheel chockBehind the rear seat under the
carpeted floor lid in the cargo
floor. The tools are located in a
bag attached to the jack.
Removing the jack and tools
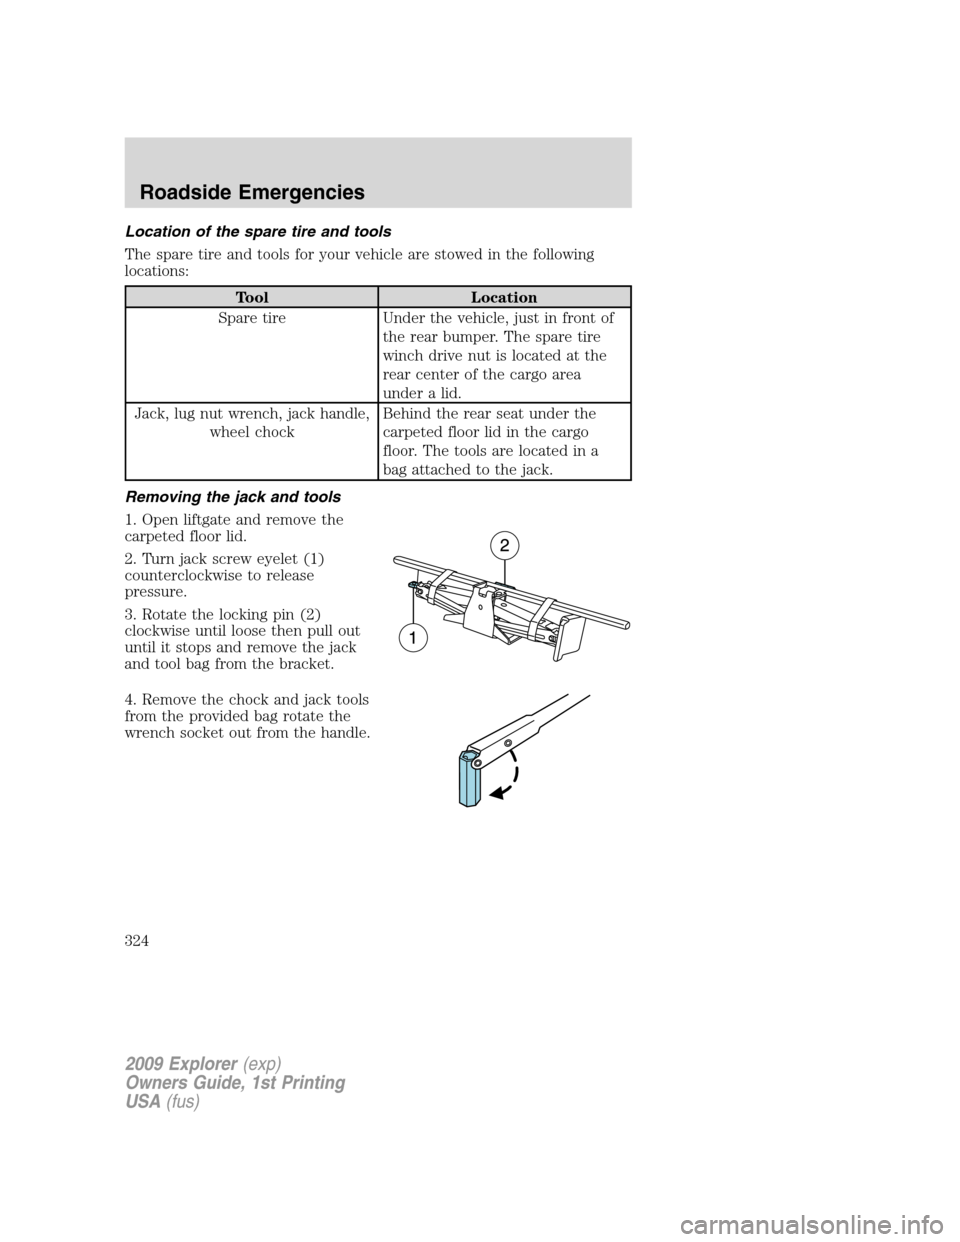
1. Open liftgate and remove the
carpeted floor lid.
2. Turn jack screw eyelet (1)
counterclockwise to release
pressure.
3. Rotate the locking pin (2)
clockwise until loose then pull out
until it stops and remove the jack
and tool bag from the bracket.
4. Remove the chock and jack tools
from the provided bag rotate the
wrench socket out from the handle.
2009 Explorer(exp)
Owners Guide, 1st Printing
USA(fus)
Roadside Emergencies
324
Page 329 of 407
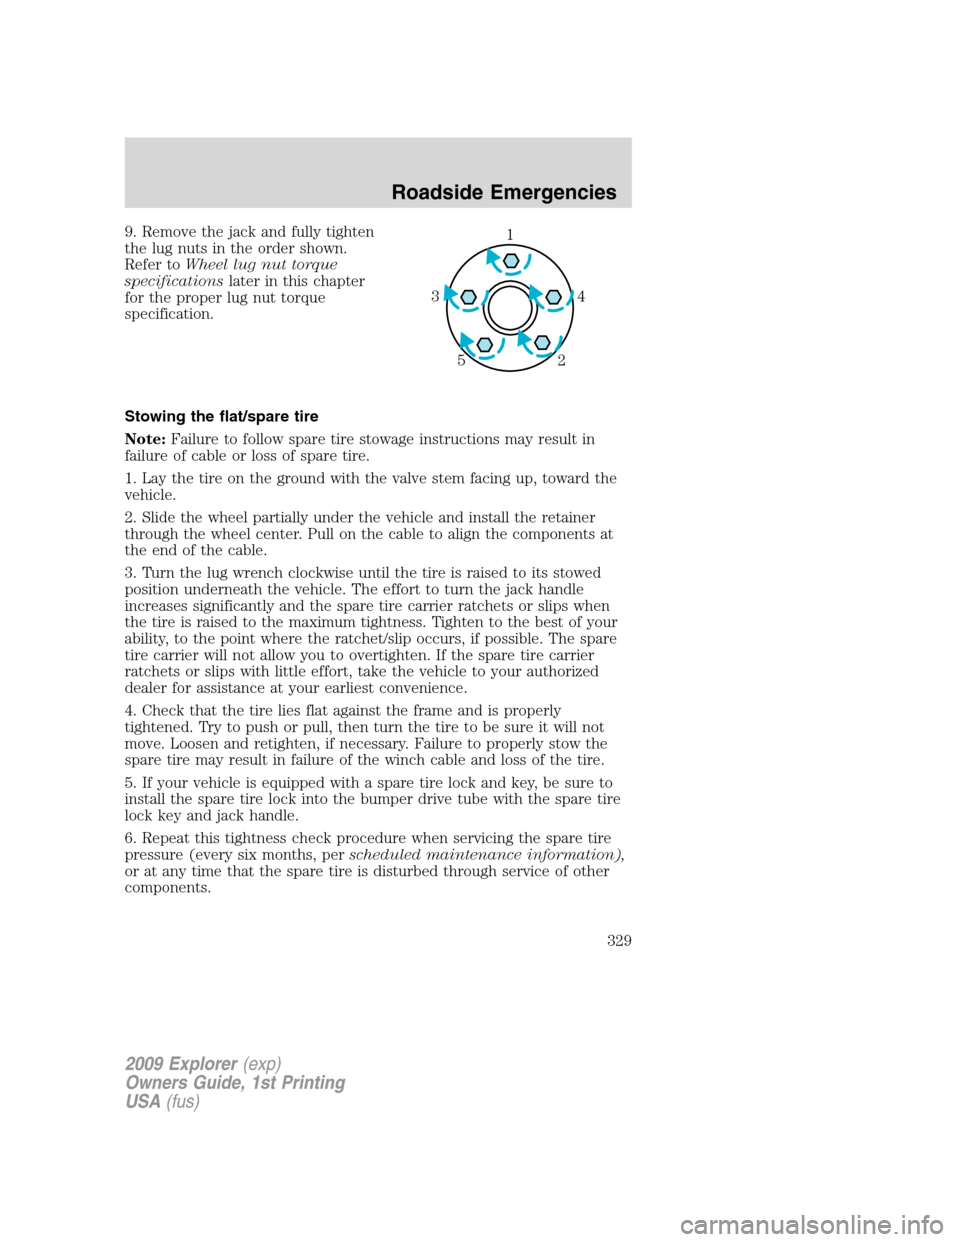
9. Remove the jack and fully tighten
the lug nuts in the order shown.
Refer toWheel lug nut torque
specificationslater in this chapter
for the proper lug nut torque
specification.
Stowing the flat/spare tire
Note:Failure to follow spare tire stowage instructions may result in
failure of cable or loss of spare tire.
1. Lay the tire on the ground with the valve stem facing up, toward the
vehicle.
2. Slide the wheel partially under the vehicle and install the retainer
through the wheel center. Pull on the cable to align the components at
the end of the cable.
3. Turn the lug wrench clockwise until the tire is raised to its stowed
position underneath the vehicle. The effort to turn the jack handle
increases significantly and the spare tire carrier ratchets or slips when
the tire is raised to the maximum tightness. Tighten to the best of your
ability, to the point where the ratchet/slip occurs, if possible. The spare
tire carrier will not allow you to overtighten. If the spare tire carrier
ratchets or slips with little effort, take the vehicle to your authorized
dealer for assistance at your earliest convenience.
4. Check that the tire lies flat against the frame and is properly
tightened. Try to push or pull, then turn the tire to be sure it will not
move. Loosen and retighten, if necessary. Failure to properly stow the
spare tire may result in failure of the winch cable and loss of the tire.
5. If your vehicle is equipped with a spare tire lock and key, be sure to
install the spare tire lock into the bumper drive tube with the spare tire
lock key and jack handle.
6. Repeat this tightness check procedure when servicing the spare tire
pressure (every six months, perscheduled maintenance information),
or at any time that the spare tire is disturbed through service of other
components.1
4 3
2 5
2009 Explorer(exp)
Owners Guide, 1st Printing
USA(fus)
Roadside Emergencies
329
Page 330 of 407
Re-stowing the jack and tools
1. Unblock the wheels.
2. Stow the wheel ornament (if removed) in a safe location in the vehicle
(such as the glove box or jack stowage compartment) so it will not
become damaged. Re-install the wheel ornament onto the wheel once the
tire is repaired or replaced.
3. Stow the jack and tools in their respective locations, making sure they
are fully secured so they do not rattle when you drive.
WHEEL LUG NUT TORQUE SPECIFICATIONS
Retighten the lug nuts to the specified torque within 100 miles (160 km)
after any wheel disturbance (rotation, flat tire, wheel removal, etc.).
Lug nut socket
size/Bolt sizeWheel lug nut torque*
lb.ft. N•m
Lug nut socket size:
3�4
inch (19 mm) hex
Bolt size:1�2x20100 135
* Torque specifications are for nut and bolt threads free of dirt and
rust. Use only Ford recommended replacement fasteners.
WARNING:When a wheel is installed, always remove any
corrosion, dirt or foreign materials present on the mounting
surfaces of the wheel or the surface of the wheel hub, brake drum or
brake disc that contacts the wheel. Ensure that any fasteners that
attach the rotor to the hub are secured so they do not interfere with
the mounting surfaces of the wheel. Installing wheels without correct
metal-to-metal contact at the wheel mounting surfaces can cause the
wheel nuts to loosen and the wheel to come off while the vehicle is in
motion, resulting in loss of control.
2009 Explorer(exp)
Owners Guide, 1st Printing
USA(fus)
Roadside Emergencies
330
Page 334 of 407
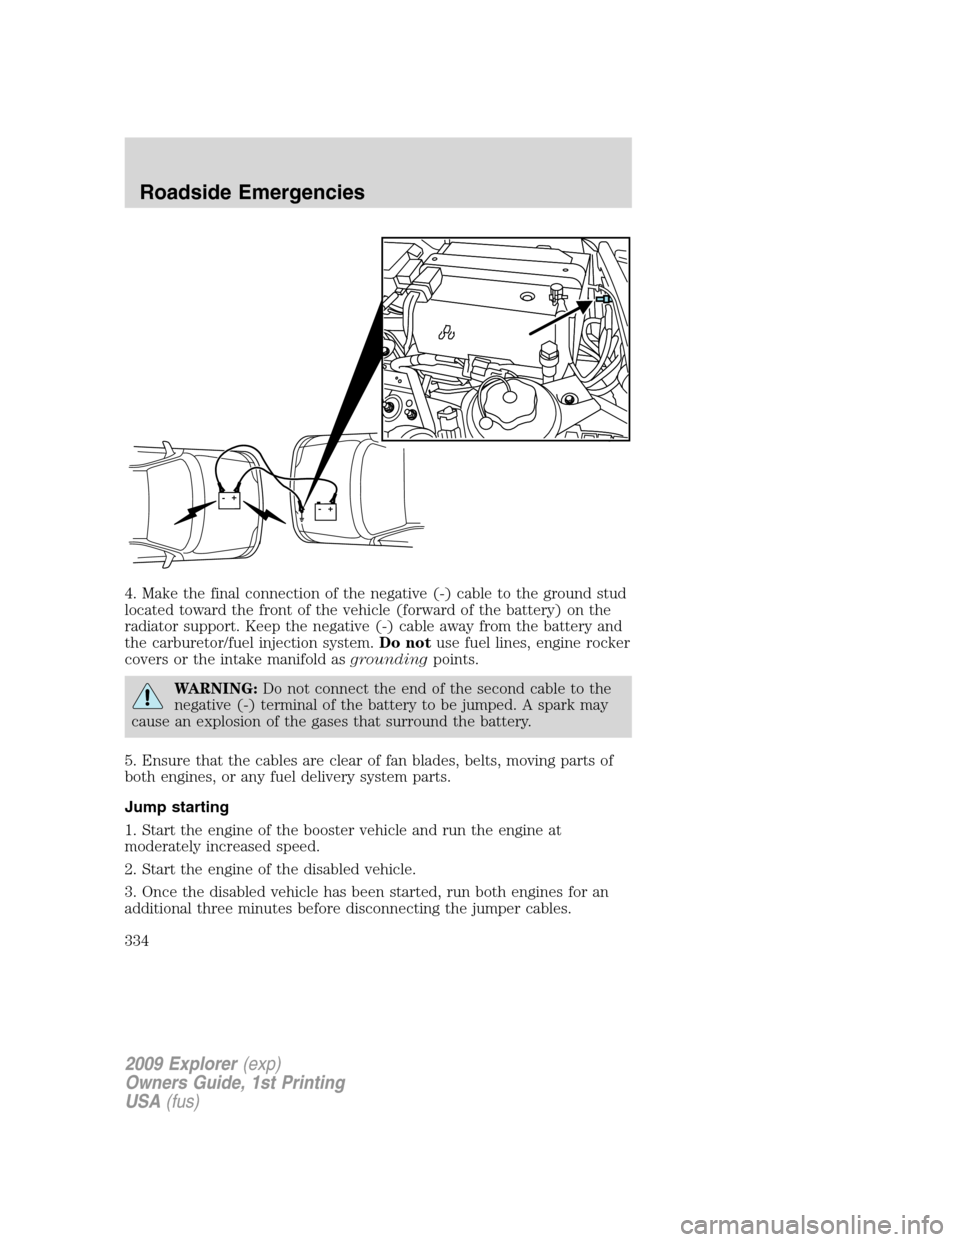
4. Make the final connection of the negative (-) cable to the ground stud
located toward the front of the vehicle (forward of the battery) on the
radiator support. Keep the negative (-) cable away from the battery and
the carburetor/fuel injection system.Do notuse fuel lines, engine rocker
covers or the intake manifold asgroundingpoints.
WARNING:Do not connect the end of the second cable to the
negative (-) terminal of the battery to be jumped. A spark may
cause an explosion of the gases that surround the battery.
5. Ensure that the cables are clear of fan blades, belts, moving parts of
both engines, or any fuel delivery system parts.
Jump starting
1. Start the engine of the booster vehicle and run the engine at
moderately increased speed.
2. Start the engine of the disabled vehicle.
3. Once the disabled vehicle has been started, run both engines for an
additional three minutes before disconnecting the jumper cables.
++-
-
2009 Explorer(exp)
Owners Guide, 1st Printing
USA(fus)
Roadside Emergencies
334
Page 337 of 407
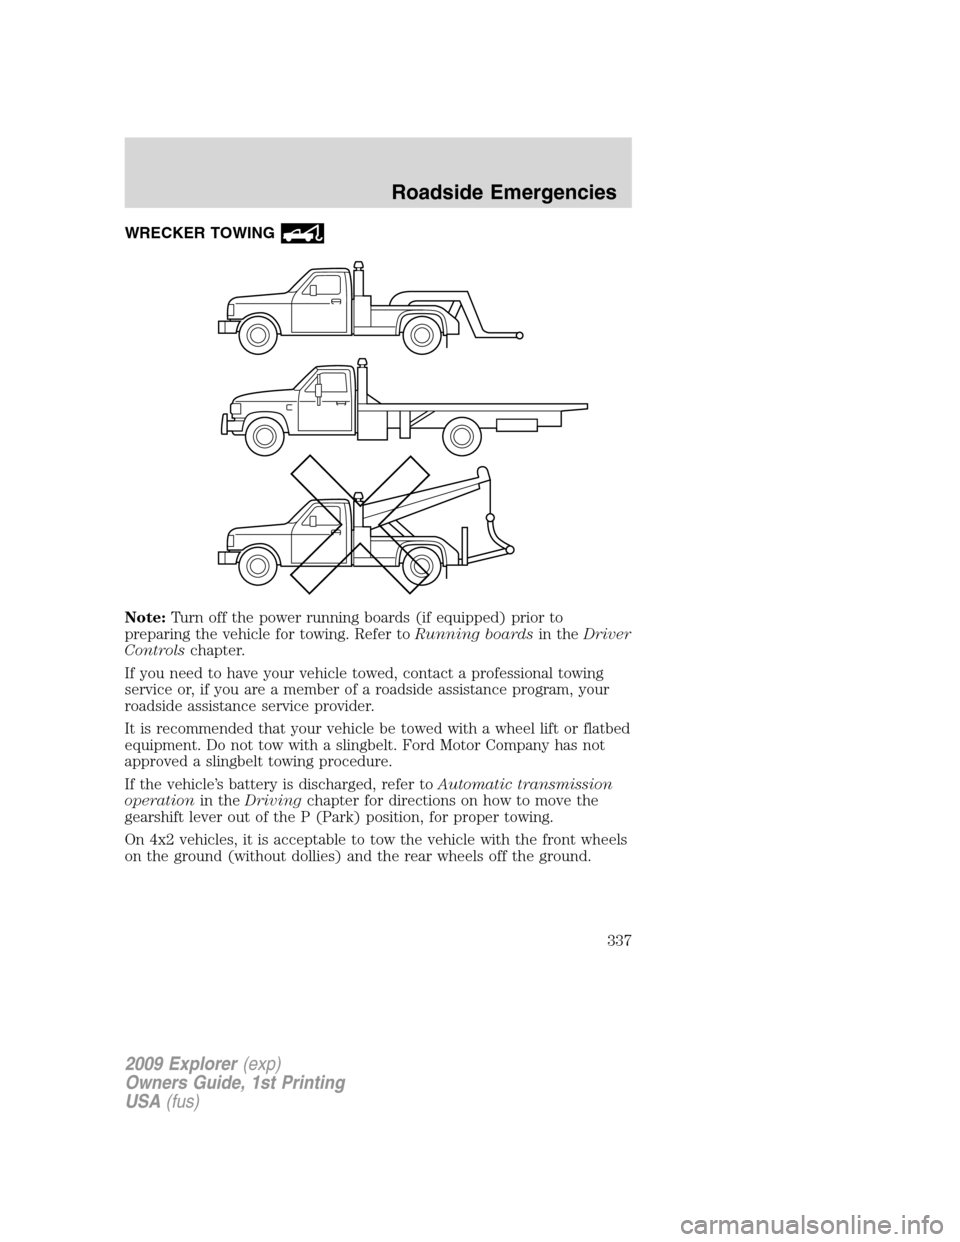
WRECKER TOWING
Note:Turn off the power running boards (if equipped) prior to
preparing the vehicle for towing. Refer toRunning boardsin theDriver
Controlschapter.
If you need to have your vehicle towed, contact a professional towing
service or, if you are a member of a roadside assistance program, your
roadside assistance service provider.
It is recommended that your vehicle be towed with a wheel lift or flatbed
equipment. Do not tow with a slingbelt. Ford Motor Company has not
approved a slingbelt towing procedure.
If the vehicle’s battery is discharged, refer toAutomatic transmission
operationin theDrivingchapter for directions on how to move the
gearshift lever out of the P (Park) position, for proper towing.
On 4x2 vehicles, it is acceptable to tow the vehicle with the front wheels
on the ground (without dollies) and the rear wheels off the ground.
2009 Explorer(exp)
Owners Guide, 1st Printing
USA(fus)
Roadside Emergencies
337