buttons FORD EXPLORER 2013 5.G Quick Reference Guide
[x] Cancel search | Manufacturer: FORD, Model Year: 2013, Model line: EXPLORER, Model: FORD EXPLORER 2013 5.GPages: 16, PDF Size: 3.46 MB
Page 8 of 16

* (if equipped)
Sync® with M
yFord touch®
8
getting started,
understanding s Ync
with mYfOrd tO uch:
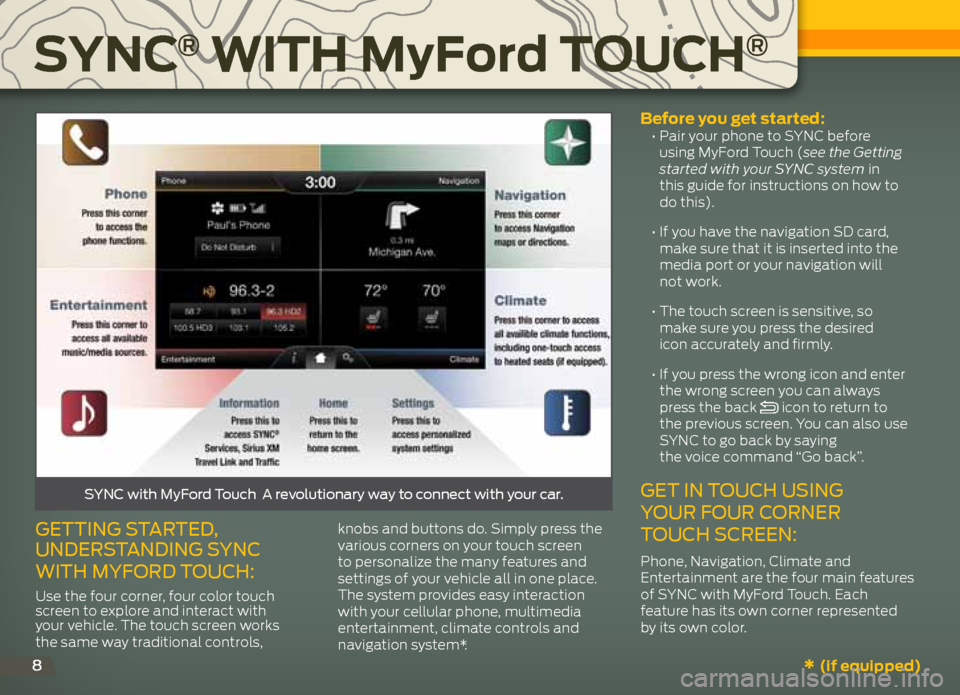
Use the four corner, four color touch
screen to explore and interact with
your vehicle. The touch screen works
the same way traditional controls, knobs and buttons do. Simply press the
various corners on your touch screen
to personalize the many features and
settings of your vehicle all in one place.
The system provides easy interaction
with your cellular phone, multimedia
entertainment, climate controls and
navigation system*.
before you get started: •
Pair your phone to SYNC before
using MyFord Touch (see the Getting
started with your SYNC system in
this guide for instructions on how to
do this).
• If you have the navigation SD card,
make sure that it is inserted into the
media port or your navigation will
not work.
• The touch screen is sensitive, so
make sure you press the desired
icon accurately and firmly.
• If you press the wrong icon and enter
the wrong screen you can always
press the back
icon to return to
the previous screen. You can also use
SYNC to go back by saying
the voice command “Go back”.
get in t Ouch using
YO ur f Our c Orner
t O uch screen:
Phone, Navigation, Climate and
Entertainment are the four main features
of SYNC with MyFord Touch. Each
feature has its own corner represented
by its own color.
sYnc with myford t ouch a revolutionary way to connect with your car.
Page 15 of 16

coMF oRt
heated and cooLed
FR ont Seat S*
To access heated seats and cooled seats
on touch screen equipped vehicles, press
the Climate corner on your touch screen.
Press the heated
or cooled seat
iconrepeatedly to cycle through the
various heat or cool modes and off. For
non-touch screen vehicles, use the hard
button controls (indicated by the same
symbols). Press the controls repeatedly
to cycle through the various heat or cool
modes and off. Indicator lights on the control
will show what settings you have selected.
tiL ting head Re StR aint S*Your vehicle’s front row head restraints
can be adjusted. Pull up to raise the head
restraint. To lower, press the head restraint
down while pressing and holding the
guide sleeve adjust/release button. Tilt the
head restraint for additional comfort by
gently pulling the top of the head restraint
forward. Once it is in the forward-most
position, tilting it forward once more will
release it to the upright position.
note: Do not attempt to force the
headrest backward after it is tilted. Instead,
continue tilting it forward until the headrest
releases to the upright position.
PoweRFoLd® thiRd R ow Seat*
note: The power fold seats work only
when the vehicle is in P (Park) and the
liftgate is open.
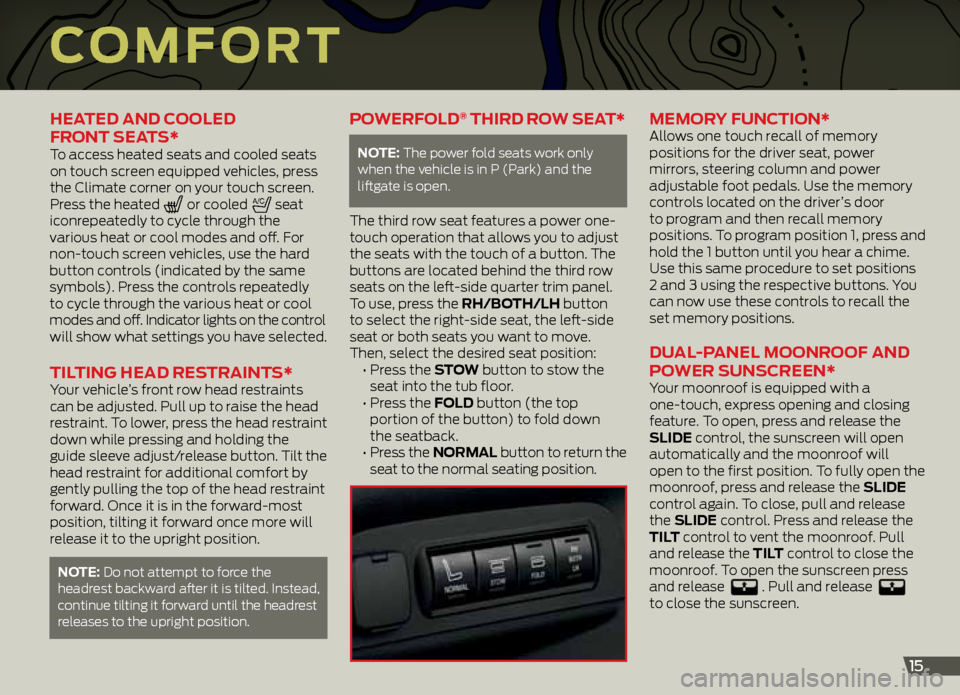
The third row seat features a power one-
touch operation that allows you to adjust
the seats with the touch of a button. The
buttons are located behind the third row
seats on the left-side quarter trim panel.
To use, press the Rh/both/Lh button
to select the right-side seat, the left-side
seat or both seats you want to move.
Then, select the desired seat position:
• Press the Stow button to stow the
seat into the tub floor.
• Press the F oLd button (the top
portion of the button) to fold down
the seatback.
• Press the noRMaL button to return the
seat to the normal seating position.
MeMoR y Function* Allows one touch recall of memory
positions for the driver seat, power
mirrors, steering column and power
adjustable foot pedals. Use the memory
controls located on the driver’s door
to program and then recall memory
positions. To program position 1, press and
hold the 1 button until you hear a chime.
Use this same procedure to set positions
2 and 3 using the respective buttons. You
can now use these controls to recall the
set memory positions.
d uaL -PaneL MoonR ooF and
P oweR S unScReen*
Your moonroof is equipped with a
one-touch, express opening and closing
feature. To open, press and release the
SLide control, the sunscreen will open
automatically and the moonroof will
open to the first position. To fully open the
moonroof, press and release the SLide
control again. To close, pull and release
the SLide control. Press and release the
tiLt control to vent the moonroof. Pull
and release the tiL t control to close the
moonroof. To open the sunscreen press
and release
. Pull and release
to close the sunscreen.
15