stop start FORD EXPLORER 2015 5.G Quick Reference Guide
[x] Cancel search | Manufacturer: FORD, Model Year: 2015, Model line: EXPLORER, Model: FORD EXPLORER 2015 5.GPages: 10, PDF Size: 3.91 MB
Page 3 of 10

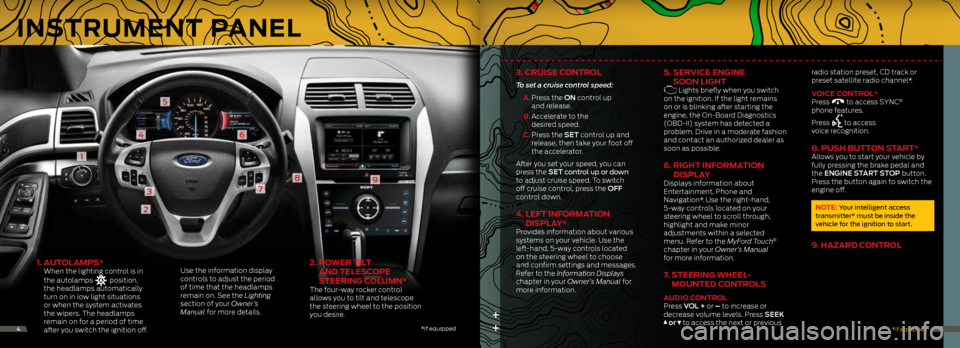
1. AUTOLAMPS*
When the lighting control is in
the autolamps
position,
the headlamps automatically
turn on in low light situations
or when the system activates
the wipers. The headlamps
remain on for a period of time
after you switch the ignition off.
Use the information display
controls to adjust the period
of time that the headlamps
remain on. See the Lighting
section of your Owner’s
Manual for more details.
2.
POWER TILT
AND TELESCOPE
STEERING COLUMN*
The four-way rocker control
allows you to tilt and telescope
the steering wheel to the position
you desire.
2
1
3
4
5
6
7
89
++
3. CRUISE CONTROL
To set a cruise control speed:
A. Press the ON control up
and release.
B. Accelerate to the
desired speed.
C. Press the SET control up and
release, then take your foot off
the accelerator.
After you set your speed, you can
press the SET control up or down
to adjust cruise speed. To switch
off cruise control, press the OFF
control down.
4. LEFT INFORMATION
DISPLAY*
Provides information about various
systems on your vehicle. Use the
left-hand, 5-way controls located
on the steering wheel to choose
and confirm settings and messages.
Refer to the Information Displays
chapter in your Owner’s Manual for
more information.
5. SERVICE ENGINE
SOON LIGHT
Lights briefly when you switch
on the ignition. If the light remains
on or is blinking after starting the
engine, the On-Board Diagnostics
(OBD-II) system has detected a
problem. Drive in a moderate fashion
and contact an authorized dealer as
soon as possible.
6. RIGHT INFORMATION
DISPLAY
Displays information about
Entertainment, Phone and
Navigation*. Use the right-hand,
5-way controls located on your
steering wheel to scroll through,
highlight and make minor
adjustments within a selected
menu. Refer to the MyFord Touch
®
chapter in your Owner’s Manual
for more information.
7. STEERING WHEEL-
MOUNTED CONTROLS
AUDIO CONTROL
Press VOL + or – to increase or
decrease volume levels. Press SEEK
or to access the next or previous radio station preset, CD track or
preset satellite radio channel*.
VOICE CONTROL*
Press
to access SYNC®
phone features.
Press
to access
voice recognition.
8. PUSH BUTTON START*Allows you to start your vehicle by
fully pressing the brake pedal and
the ENGINE START STOP button.
Press the button again to switch the
engine off.
NOTE: Your intelligent access
transmitter* must be inside the
vehicle for the ignition to start.
9. HAZARD CONTROL
* if equipped
*if equipped45
INSTRUMENT PANEL
Page 6 of 10

SYNC
®
WITH MYFORD TOUCH
®*
*if equipped101111*if equipped
EASY FUEL® SYSTEM
With this system, push the fuel door
to open, insert the nozzle and begin
fueling. It is self-sealing and therefore
protected against dust, dirt, water, snow
and ice. Wait 10 seconds from the time
the refueling nozzle shuts off until you
remove the nozzle from the vehicle. This
time allows residual fuel in the nozzle to
drain into the tank.
NOTE: When using a portable fuel
container, slowly insert the fuel funnel
(located in the spare tire compartment),
and pour the fuel into the funnel. Do not
use aftermarket funnels as they will not
work with the Easy Fuel system and
may cause damage. Properly clean the
funnel after each use.
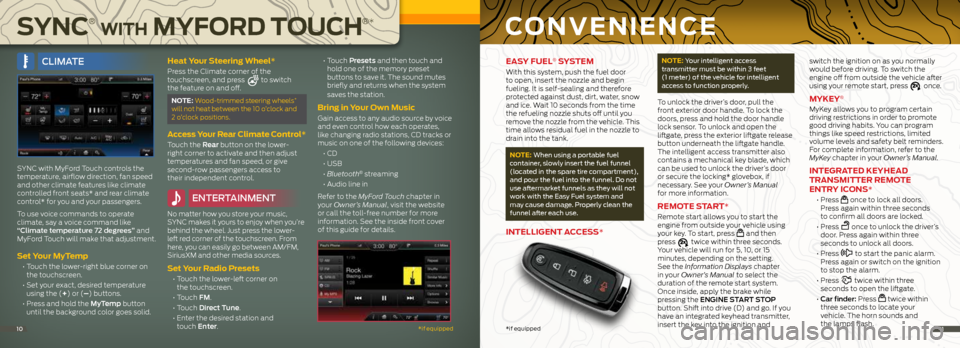
INTELLIGENT ACCESS*
NOTE: Your intelligent access
transmitter must be within 3 feet
(1 meter) of the vehicle for intelligent
access to function properly.
To unlock the driver’s door, pull the
front exterior door handle. To lock the
doors, press and hold the door handle
lock sensor. To unlock and open the
liftgate, press the exterior liftgate release
button underneath the liftgate handle.
The intelligent access transmitter also
contains a mechanical key blade, which
can be used to unlock the driver’s door
or secure the locking* glovebox, if
necessary. See your Owner’s Manual
for more information.
REMOTE START*
Remote start allows you to start the
engine from outside your vehicle using
your key. To start, press
and then
press twice within three seconds.
Your vehicle will run for 5, 10, or 15
minutes, depending on the setting.
See the Information Displays chapter
in your Owner’s Manual to select the
duration of the remote start system.
Once inside, apply the brake while
pressing the ENGINE START STOP
button. Shift into drive (D) and go. If you
have an integrated keyhead transmitter,
insert the key into the ignition and switch the ignition on as you normally
would before driving. To switch the
engine off from outside the vehicle after
using your remote start, press
once.
MYKEY®
MyKey allows you to program certain
driving restrictions in order to promote
good driving habits. You can program
things like speed restrictions, limited
volume levels and safety belt reminders.
For complete information, refer to the
MyKey chapter in your Owner’s Manual.
INTEGRATED KEYHEAD
TRANSMITTER REMOTE
ENTRY ICONS*
• Press once to lock all doors.
Press again within three seconds
to confirm all doors are locked.
• Press
once to unlock the driver’s
door. Press again within three
seconds to unlock all doors.
• Press
to start the panic alarm.
Press again or switch on the ignition
to stop the alarm.
• Press
twice within three
seconds to open the liftgate.
• Car finder: Press
twice within
three seconds to locate your
vehicle. The horn sounds and
the lamps flash.
CONVENIENCE
CLIMATE
SYNC with MyFord Touch controls the
temperature, airflow direction, fan speed
and other climate features like climate
controlled front seats* and rear climate
control* for you and your passengers.
To use voice commands to operate
climate, say a voice command like
“Climate temperature 72 degrees” and
MyFord Touch will make that adjustment.
Set Your MyTemp
• Touch the lower-right blue corner on
the touchscreen.
• Set your exact, desired temperature
using the (+) or (–) buttons.
• Press and hold the MyTemp button
until the background color goes solid.
Heat Your Steering Wheel*
Press the Climate corner of the
touchscreen, and press to switch
the feature on and off.
NOTE: Wood-trimmed steering wheels*
will not heat between the 10 o’clock and
2 o’clock positions.
Access Your Rear Climate Control*
Touch the Rear button on the lower-
right corner to activate and then adjust
temperatures and fan speed, or give
second-row passengers access to
their independent control.
ENTERTAINMENT
No matter how you store your music,
SYNC makes it yours to enjoy when you’re
behind the wheel. Just press the lower-
left red corner of the touchscreen. From
here, you can easily go between AM/FM,
SiriusXM and other media sources.
Set Your Radio Presets
• Touch the lower-left corner on
the touchscreen.
• Touch FM.
• Touch Direct Tune.
• Enter the desired station and
touch Enter.
• Touch Presets and then touch and
hold one of the memory preset
buttons to save it. The sound mutes
briefly and returns when the system
saves the station.
Bring in Your Own Music
Gain access to any audio source by voice
and even control how each operates,
like changing radio stations, CD tracks or
music on one of the following devices:
• CD
• USB
• Bluetooth
® streaming
• Audio line in
Refer to the MyFord Touch chapter in
your Owner’s Manual, visit the website
or call the toll-free number for more
information. See the inside front cover
of this guide for details.
Page 8 of 10

14
COMFORT CONTINUED
FLAT-FOLDING THIRD-ROW SEAT*
NOTE: Make sure that the area under the
seat is free of objects before stowing it.
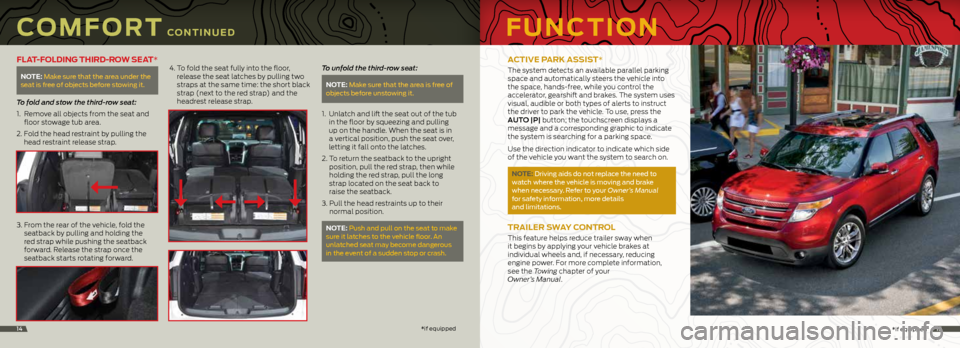
To fold and stow the third-row seat:
1. Remove all objects from the seat and
floor stowage tub area.
2. Fold the head restraint by pulling the
head restraint release strap.
3. From the rear of the vehicle, fold the
seatback by pulling and holding the
red strap while pushing the seatback
forward. Release the strap once the
seatback starts rotating forward. 4.
To fold the seat fully into the floor,
release the seat latches by pulling two
straps at the same time: the short black
strap (next to the red strap) and the
headrest release strap. To unfold the third-row seat:
NOTE: Make sure that the area is free of
objects before unstowing it.
1. Unlatch and lift the seat out of the tub
in the floor by squeezing and pulling
up on the handle. When the seat is in
a vertical position, push the seat over,
letting it fall onto the latches.
2. To return the seatback to the upright
position, pull the red strap, then while
holding the red strap, pull the long
strap located on the seat back to
raise the seatback.
3. Pull the head restraints up to their
normal position.
NOTE: Push and pull on the seat to make
sure it latches to the vehicle floor. An
unlatched seat may become dangerous
in the event of a sudden stop or crash.
*if equipped15*if equipped
ACTIVE PARK ASSIST*
The system detects an available parallel parking
space and automatically steers the vehicle into
the space, hands-free, while you control the
accelerator, gearshift and brakes. The system uses
visual, audible or both types of alerts to instruct
the driver to park the vehicle. To use, press the
AUTO |P| button; the touchscreen displays a
message and a corresponding graphic to indicate
the system is searching for a parking space.
Use the direction indicator to indicate which side
of the vehicle you want the system to search on.
NOTE: Driving aids do not replace the need to
watch where the vehicle is moving and brake
when necessary. Refer to your Owner’s Manual
for safety information, more details
and limitations.
TRAILER SWAY CONTROL
This feature helps reduce trailer sway when
it begins by applying your vehicle brakes at
individual wheels and, if necessary, reducing
engine power. For more complete information,
see the Towing chapter of your
Owner’s Manual.
FUNCTION