washer fluid FORD EXPLORER 2016 5.G Owners Manual
[x] Cancel search | Manufacturer: FORD, Model Year: 2016, Model line: EXPLORER, Model: FORD EXPLORER 2016 5.GPages: 541, PDF Size: 6.51 MB
Page 7 of 541
Trailer Sway Control...................................244
Recommended Towing Weights...........244
Essential Towing Checks..........................246
Transporting the Vehicle
..........................248
Towing the Vehicle on Four Wheels - 2.3L EcoBoost™......................................249
Towing the Vehicle on Four Wheels - 3.5L Duratec/
3.5L Ecoboost™..........250
Driving Hints
Breaking-In.....................................................252
Economical Driving
.....................................252
Driving Through Water...............................253
Floor Mats
.......................................................253
Roadside Emergencies
Roadside Assistance..................................255
Hazard Warning Flashers.........................256
Fuel Shutoff...................................................256
Jump Starting the Vehicle.........................257
Post-Crash Alert System..........................259
Customer Assistance
Getting the Services You Need..............260
In California (U.S. Only).............................261
The Better Business Bureau (BBB) Auto Line Program (U.S. Only)......................262
Utilizing the Mediation/Arbitration Program (Canada Only).......................262
Getting Assistance Outside the U.S. and Canada........................................................263
Ordering Additional Owner's Literature....................................................264
Reporting Safety Defects (U.S. Only)............................................................264
Reporting Safety Defects (Canada Only)............................................................265
Fuses
Fuse Specification Chart..........................266
Changing a Fuse
...........................................274 Maintenance
General Information....................................275
Opening and Closing the Hood..............276
Under Hood Overview -
2.3L
EcoBoost™................................................278
Under Hood Overview -
3.5L
Duratec........................................................279
Under Hood Overview -
3.5L
Ecoboost™...............................................280
Engine Oil Dipstick -
2.3L
EcoBoost™.................................................281
Engine Oil Dipstick -
3.5L Duratec/3.5L
Ecoboost™.................................................281
Engine Oil Check...........................................281
Oil Change Indicator Reset......................282
Engine Coolant Check...............................282
Automatic Transmission Fluid Check - 2.3L EcoBoost™......................................286
Automatic Transmission Fluid Check - 3.5L Duratec/
3.5L Ecoboost™..........286
Brake Fluid Check........................................288
Power Steering Fluid Check....................288
Washer Fluid Check
....................................288
Fuel Filter
........................................................289
Changing the 12V Battery.........................289
Checking the Wiper Blades.....................290
Changing the Wiper Blades......................291
Adjusting the Headlamps..........................291
Removing a Headlamp..............................293
Changing a Bulb
...........................................293
Bulb Specification Chart...........................297
Changing the Engine Air Filter................299
Vehicle Care
General Information
..................................300
Cleaning Products
......................................300
Cleaning the Exterior
.................................300
Waxing
..............................................................301
Cleaning the Engine
....................................301
Cleaning the Windows and Wiper Blades..........................................................302
4
Explorer (TUB), enUSA, First Printing Table of Contents
Page 81 of 541
Use the rotary control to adjust the
sensitivity of the rain sensor. Set the
control to low sensitivity, and the wipers
will turn on when the rain sensor detects
a large amount of moisture on the
windshield. Set the control to high
sensitivity, and the wipers will turn on when
the rain sensor detects a small amount of
moisture on the windshield.
Note:
When you set the wiper system to
intermittent wipe and the autowiper system
is on, the autowiper sensitivity setting
adjusts the wiper speed according to the
moisture on the windshield only. Use the
wiper lever to wipe the windshield
on-demand.
Keep the outside of the windshield clean.
The rain sensor is very sensitive. If the area
around the mirror is dirty, then the wipers
may operate if dirt, mist or insects hit the
windshield.
WINDSHIELD WASHERS
Note: Do not operate the wipers on a dry
windshield. This may scratch the glass,
damage the wiper blades or cause the wiper
motor to burn out. Always use the
windshield washers before wiping a dry
windshield.
Note: Do not operate the washers when
the washer reservoir is empty. This may
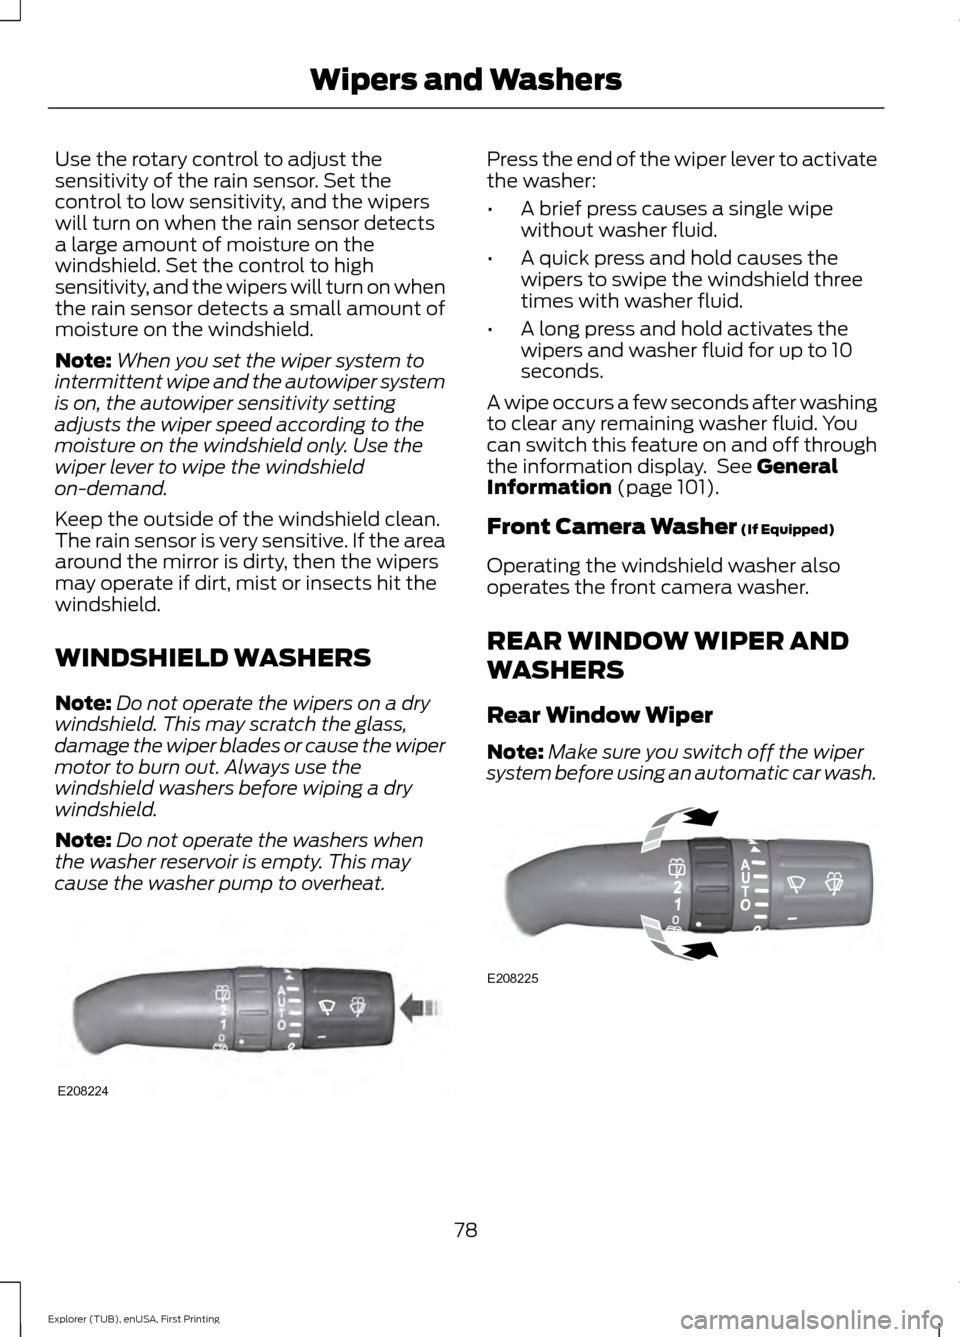
cause the washer pump to overheat. Press the end of the wiper lever to activate
the washer:
•
A brief press causes a single wipe
without washer fluid.
• A quick press and hold causes the
wipers to swipe the windshield three
times with washer fluid.
• A long press and hold activates the
wipers and washer fluid for up to 10
seconds.
A wipe occurs a few seconds after washing
to clear any remaining washer fluid. You
can switch this feature on and off through
the information display. See General
Information (page 101).
Front Camera Washer
(If Equipped)
Operating the windshield washer also
operates the front camera washer.
REAR WINDOW WIPER AND
WASHERS
Rear Window Wiper
Note: Make sure you switch off the wiper
system before using an automatic car wash. 78
Explorer (TUB), enUSA, First Printing Wipers and WashersE208224 E208225
Page 84 of 541
Headlamp Flasher
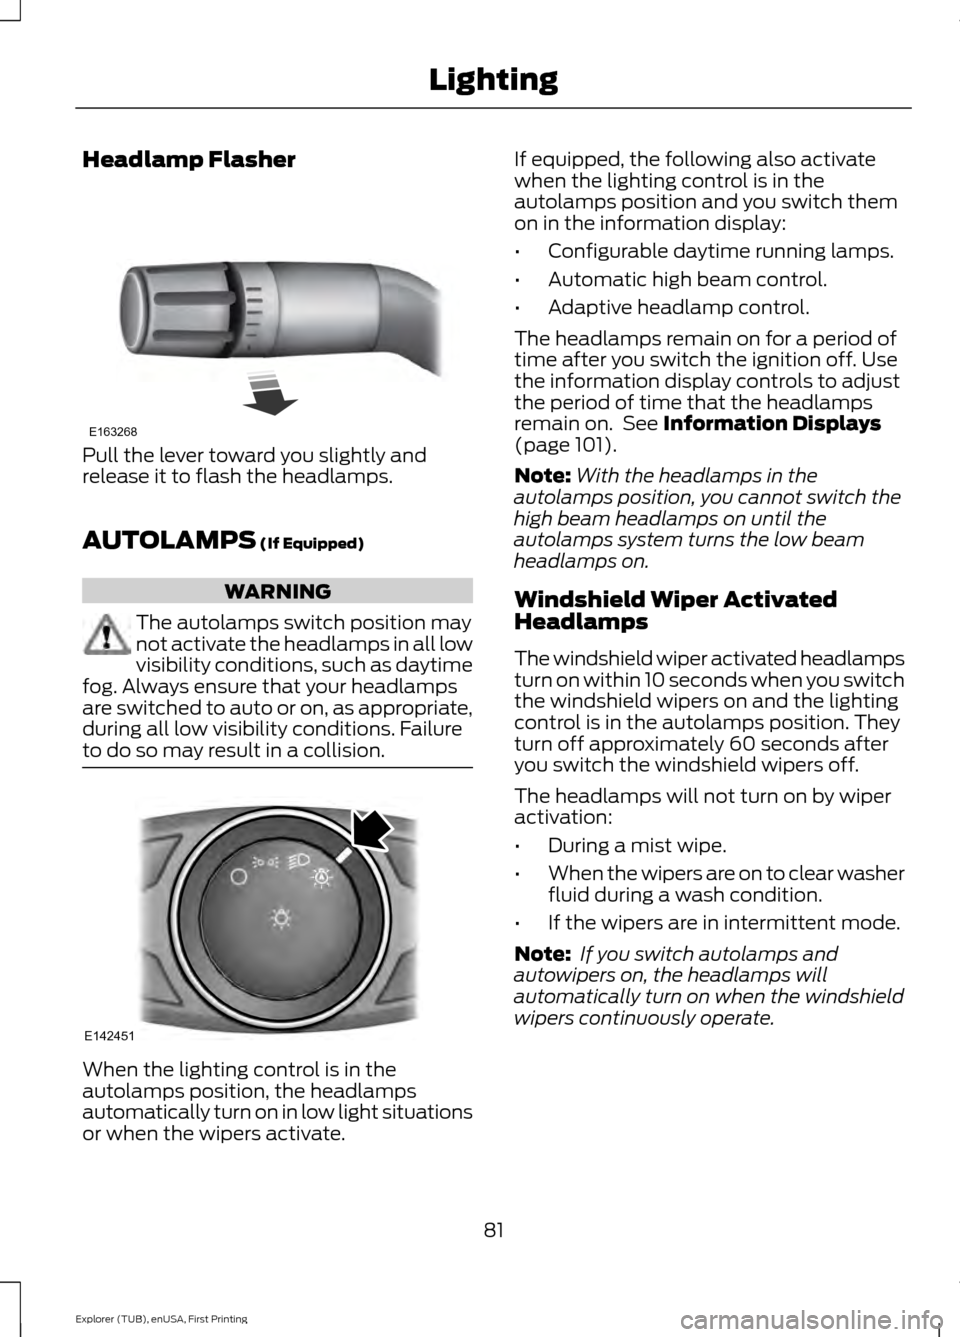
Pull the lever toward you slightly and
release it to flash the headlamps.
AUTOLAMPS (If Equipped)
WARNING
The autolamps switch position may
not activate the headlamps in all low
visibility conditions, such as daytime
fog. Always ensure that your headlamps
are switched to auto or on, as appropriate,
during all low visibility conditions. Failure
to do so may result in a collision. When the lighting control is in the
autolamps position, the headlamps
automatically turn on in low light situations
or when the wipers activate. If equipped, the following also activate
when the lighting control is in the
autolamps position and you switch them
on in the information display:
•
Configurable daytime running lamps.
• Automatic high beam control.
• Adaptive headlamp control.
The headlamps remain on for a period of
time after you switch the ignition off. Use
the information display controls to adjust
the period of time that the headlamps
remain on. See
Information Displays
(page 101).
Note: With the headlamps in the
autolamps position, you cannot switch the
high beam headlamps on until the
autolamps system turns the low beam
headlamps on.
Windshield Wiper Activated
Headlamps
The windshield wiper activated headlamps
turn on within 10 seconds when you switch
the windshield wipers on and the lighting
control is in the autolamps position. They
turn off approximately 60 seconds after
you switch the windshield wipers off.
The headlamps will not turn on by wiper
activation:
• During a mist wipe.
• When the wipers are on to clear washer
fluid during a wash condition.
• If the wipers are in intermittent mode.
Note: If you switch autolamps and
autowipers on, the headlamps will
automatically turn on when the windshield
wipers continuously operate.
81
Explorer (TUB), enUSA, First Printing LightingE163268 E142451
Page 102 of 541
Low Washer Fluid
It illuminates when the
windshield washer fluid is low.
Parking Lamps It illuminates when you switch
the parking lamps on.
Powertrain Fault Illuminates when the system
detects a powertrain or an 4WD
fault. Contact an authorized
dealer as soon as possible.
Service Engine Soon If the service engine soon
indicator light stays illuminated
after you start the engine, it
indicates that the On Board Diagnostics
system (OBD) has detected a malfunction
of the vehicle emissions control system.
Refer to On board diagnostics (OBD) in
the Fuel and Refueling chapter for more
information about having your vehicle
serviced. See Emission Control System
(page 177).
If the light is blinking, engine misfire is
occurring which could damage your
catalytic converter. Drive in a moderate
fashion (avoid heavy acceleration and
deceleration) and have your vehicle
serviced immediately. WARNING
Under engine misfire conditions,
excessive exhaust temperatures
could damage the catalytic
converter, the fuel system, interior floor
coverings or other vehicle components,
possibly causing a fire. Have an authorized
dealer service your vehicle immediately. The service engine soon indicator light
illuminates when you first switch on the
ignition before engine start to check the
bulb and to indicate whether the vehicle
is ready for Inspection/Maintenance (I/M)
testing.
Normally, the service engine soon light
stays on until you crank the engine, then
turns itself off if no malfunctions are
present. However, if after 15 seconds the
service engine soon light blinks eight times,
it means that the vehicle is not ready for
I/M testing. See
Emission Control
System (page 177).
Stability Control It flashes when the system is
active. If it remains illuminated
or does not illuminate when you
switch the ignition on, this indicates a
malfunction. During a malfunction the
system switches off. Have the system
checked by an authorized dealer
immediately. See
Using Stability
Control (page 194).
Stability Control Off It illuminates when you switch
the system off. It goes out when
you switch the system back on
or when you switch the ignition off. See
Using Stability Control
(page 194).
Transmission Tow/Haul
(If Equipped) Illuminates when you activate
the tow/haul feature. If the light
flashes steadily, have the system
serviced immediately. Damage to the
transmission could occur. See
Automatic
Transmission (page 180).
99
Explorer (TUB), enUSA, First Printing Instrument ClusterE132353 E138639 E161509
Page 126 of 541
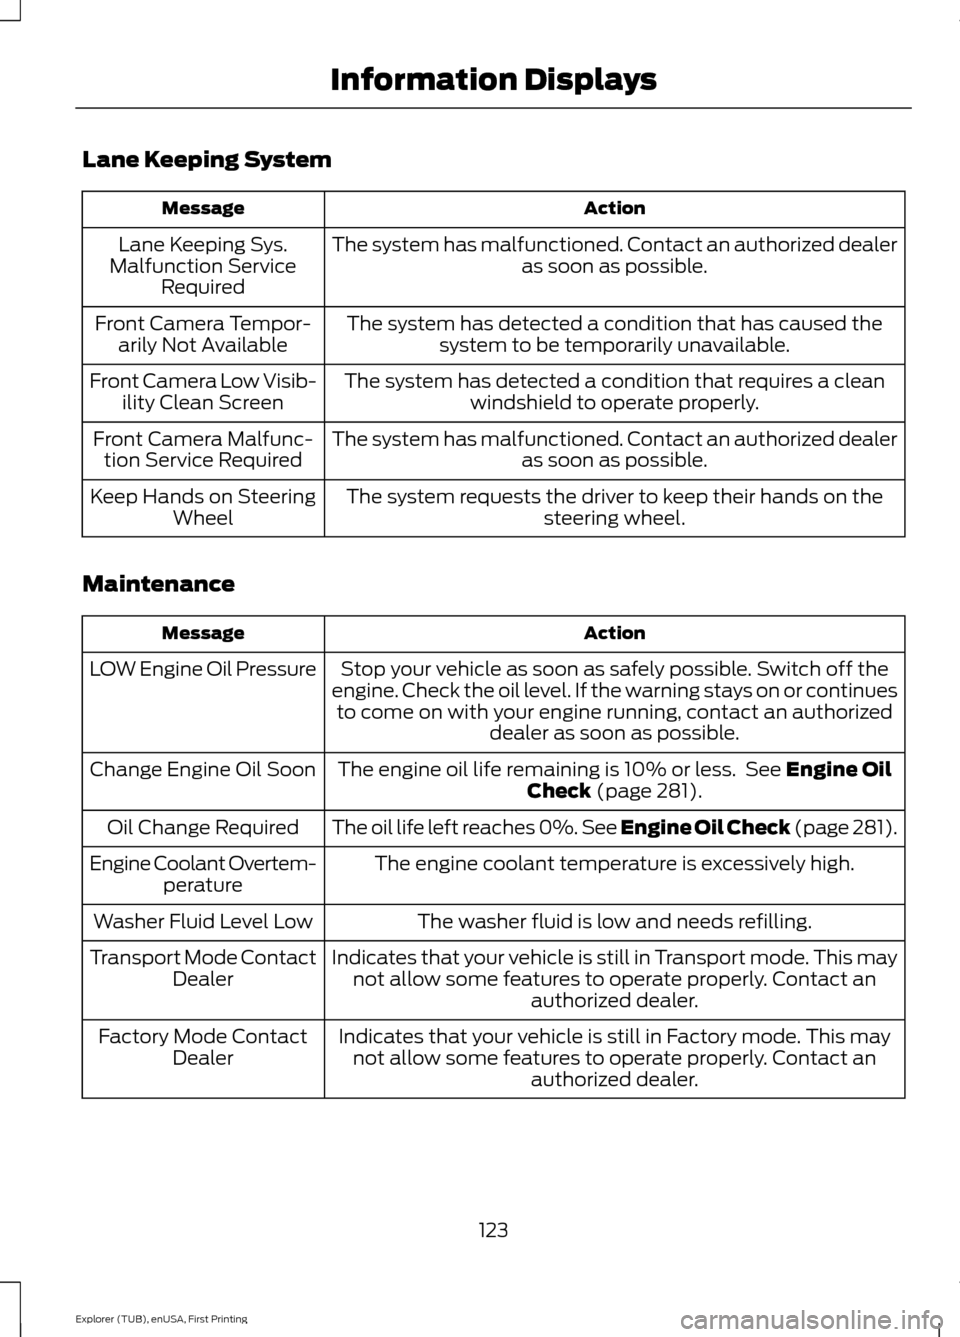
Lane Keeping System
Action
Message
The system has malfunctioned. Contact an authorized dealer as soon as possible.
Lane Keeping Sys.
Malfunction Service Required
The system has detected a condition that has caused thesystem to be temporarily unavailable.
Front Camera Tempor-
arily Not Available
The system has detected a condition that requires a cleanwindshield to operate properly.
Front Camera Low Visib-
ility Clean Screen
The system has malfunctioned. Contact an authorized dealeras soon as possible.
Front Camera Malfunc-
tion Service Required
The system requests the driver to keep their hands on thesteering wheel.
Keep Hands on Steering
Wheel
Maintenance Action
Message
Stop your vehicle as soon as safely possible. Switch off the
engine. Check the oil level. If the warning stays on or continues to come on with your engine running, contact an authorized dealer as soon as possible.
LOW Engine Oil Pressure
The engine oil life remaining is 10% or less. See Engine Oil
Check (page 281).
Change Engine Oil Soon
The oil life left reaches 0%. See
Engine Oil Check (page 281).
Oil Change Required
The engine coolant temperature is excessively high.
Engine Coolant Overtem-
perature
The washer fluid is low and needs refilling.
Washer Fluid Level Low
Indicates that your vehicle is still in Transport mode. This maynot allow some features to operate properly. Contact an authorized dealer.
Transport Mode Contact
Dealer
Indicates that your vehicle is still in Factory mode. This maynot allow some features to operate properly. Contact an authorized dealer.
Factory Mode Contact
Dealer
123
Explorer (TUB), enUSA, First Printing Information Displays
Page 281 of 541
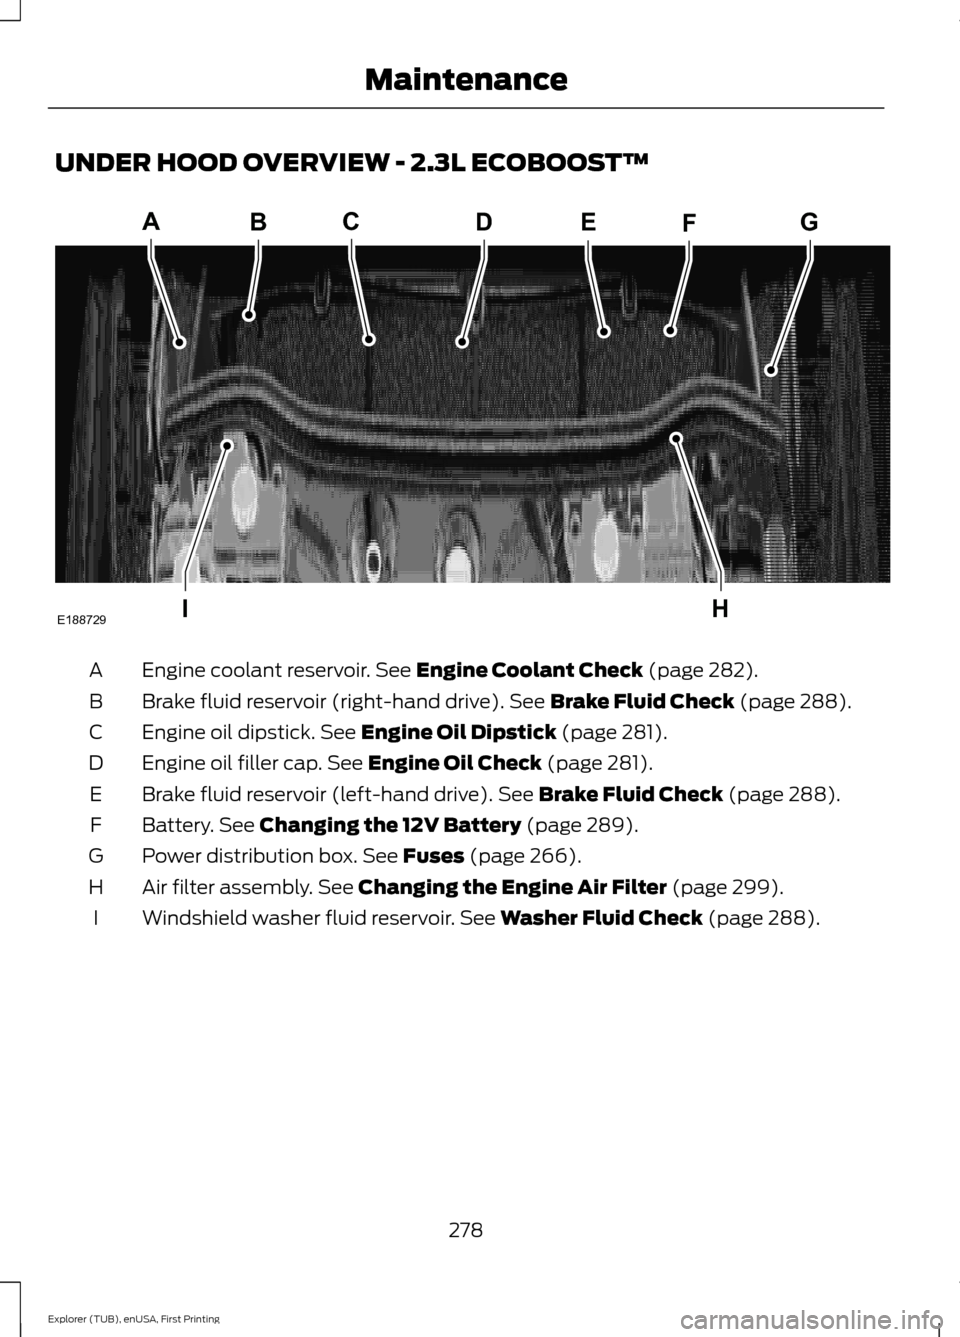
UNDER HOOD OVERVIEW - 2.3L ECOBOOST™
Engine coolant reservoir. See Engine Coolant Check (page 282).
A
Brake fluid reservoir (right-hand drive).
See Brake Fluid Check (page 288).
B
Engine oil dipstick.
See Engine Oil Dipstick (page 281).
C
Engine oil filler cap.
See Engine Oil Check (page 281).
D
Brake fluid reservoir (left-hand drive).
See Brake Fluid Check (page 288).
E
Battery.
See Changing the 12V Battery (page 289).
F
Power distribution box.
See Fuses (page 266).
G
Air filter assembly.
See Changing the Engine Air Filter (page 299).
H
Windshield washer fluid reservoir.
See Washer Fluid Check (page 288).
I
278
Explorer (TUB), enUSA, First Printing MaintenanceA
IH
EBCDFG
E188729
Page 282 of 541
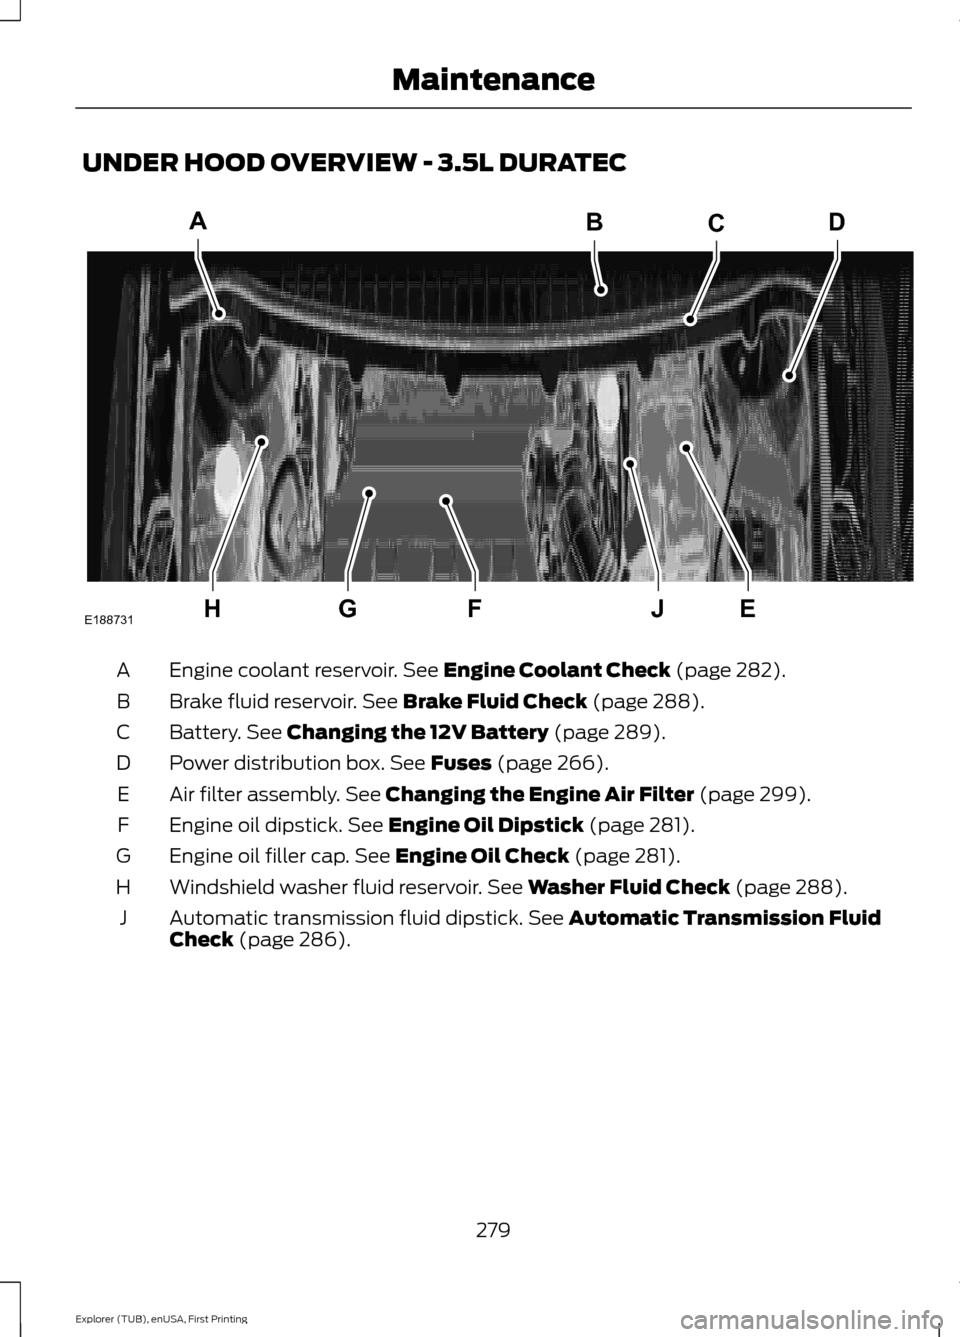
UNDER HOOD OVERVIEW - 3.5L DURATEC
Engine coolant reservoir. See Engine Coolant Check (page 282).
A
Brake fluid reservoir.
See Brake Fluid Check (page 288).
B
Battery.
See Changing the 12V Battery (page 289).
C
Power distribution box.
See Fuses (page 266).
D
Air filter assembly.
See Changing the Engine Air Filter (page 299).
E
Engine oil dipstick.
See Engine Oil Dipstick (page 281).
F
Engine oil filler cap.
See Engine Oil Check (page 281).
G
Windshield washer fluid reservoir.
See Washer Fluid Check (page 288).
H
Automatic transmission fluid dipstick.
See Automatic Transmission Fluid
Check (page 286).
J
279
Explorer (TUB), enUSA, First Printing MaintenanceHEJFG
ABCD
E188731
Page 283 of 541
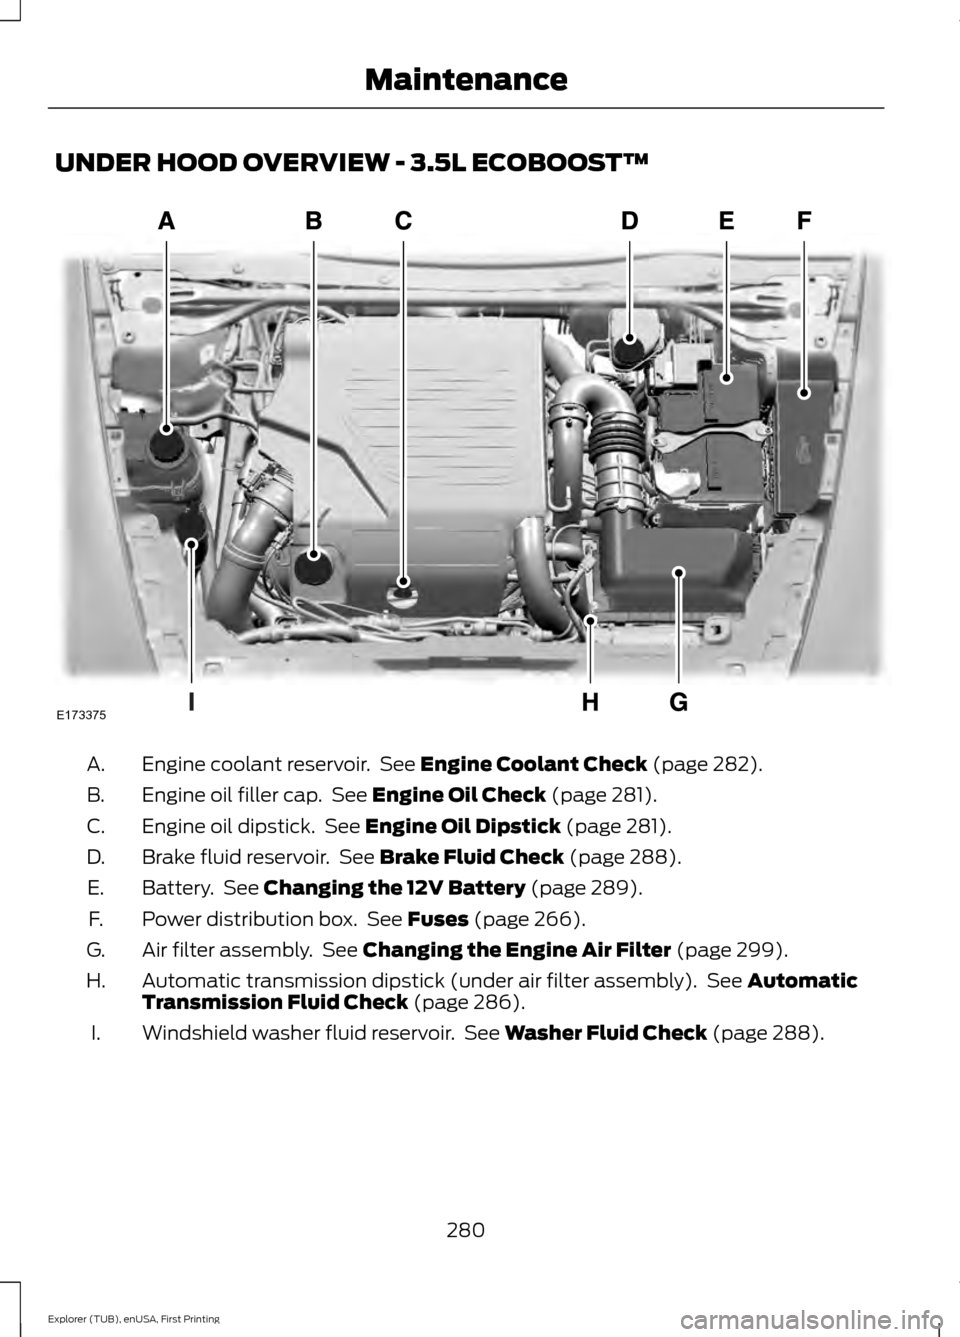
UNDER HOOD OVERVIEW - 3.5L ECOBOOST™
Engine coolant reservoir. See Engine Coolant Check (page 282).
A.
Engine oil filler cap. See
Engine Oil Check (page 281).
B.
Engine oil dipstick. See
Engine Oil Dipstick (page 281).
C.
Brake fluid reservoir. See
Brake Fluid Check (page 288).
D.
Battery. See
Changing the 12V Battery (page 289).
E.
Power distribution box. See
Fuses (page 266).
F.
Air filter assembly. See
Changing the Engine Air Filter (page 299).
G.
Automatic transmission dipstick (under air filter assembly). See
Automatic
Transmission Fluid Check (page 286).
H.
Windshield washer fluid reservoir. See
Washer Fluid Check (page 288).
I.
280
Explorer (TUB), enUSA, First Printing MaintenanceE173375
Page 285 of 541
1. Remove the filler cap.
2. If the engine oil level is not within the
normal range, add engine oil that
meets Ford specifications. See
Capacities and Specifications (page
334).
3. Remove the engine oil filler cap and use a funnel to pour the engine oil into
the opening.
4. Wipe off any spilled oil.
5. Replace the filler cap. Turn it until you feel a strong resistance.
OIL CHANGE INDICATOR
RESET
Use the information display controls on
the steering wheel to reset the oil change
indicator.
From the main menu scroll to: Action and description
Message
Press the right arrow button,
then from this menu scroll
to the following message.
Settings
Press the right arrow button,
then from this menu scroll
to the following message.
Vehicle
Press the right arrow button,
then from this menu scroll
to the following message.
Oil Life
Press and hold the
OK
button until the instrument
cluster displays the
following message.
Hold OK to
Reset
Reset Successful
When the oil change indic-
ator resets the instrument
cluster displays 100%.
Remaining Life Action and description
Message
{00}%
If the instrument cluster
displays one of the following
messages, repeat the
process.
Not Reset
Reset Cancelled
ENGINE COOLANT CHECK WARNINGS
Do not add engine coolant when the
engine is hot. Steam and scalding
liquids released from a hot cooling
system can burn you badly. Also, spilling
coolant on hot engine parts can burn you. Do not put engine coolant in the
windshield washer fluid container. If
sprayed on the windshield, engine
coolant could make it difficult to see
through the windshield. To reduce the risk of personal injury,
make sure the engine is cool before
unscrewing the coolant pressure
relief cap. The cooling system is under
pressure. Steam and hot liquid can come
out forcefully when you loosen the cap
slightly. Do not add coolant further than the
MAX mark.
Checking the Engine Coolant
When the engine is cold, check the
concentration and level of the engine
coolant at the intervals listed in the
scheduled maintenance information.
See
Scheduled Maintenance (page 486).
282
Explorer (TUB), enUSA, First Printing Maintenance
Page 286 of 541
Note:
Make sure that the coolant level is
between the MIN and MAX marks on the
coolant reservoir.
Note: Coolant expands when it is hot. The
level may extend beyond the
MAX mark.
Note: If the level is at the MIN mark, below
the MIN mark, or empty, add coolant
immediately.
Maintain coolant concentration within
48% to 50%, which equates to a freeze
point between -30°F (-34°C) and -34°F
(-37°C).
Note: For best results, coolant
concentration should be tested with a
refractometer such as Robinair® Coolant
and Battery Refractometer 75240. We do
not recommend the use of hydrometers or
coolant test strips for measuring coolant
concentrations.
Note: Automotive fluids are not
interchangeable. Do not use engine coolant,
antifreeze or windshield washer fluid outside
of its specified function and vehicle location.
Adding Engine Coolant
Note: Do not use stop leak pellets, cooling
system sealants or additives as they can
cause damage to the engine cooling or
heating systems. Your warranty may not
cover these damages.
Note: During normal vehicle operation, the
coolant may change color from orange to
pink or light red. As long as the coolant is
clear and uncontaminated, this color change
does not indicate the coolant has degraded
nor does it require the coolant to be drained,
the system to be flushed, or the coolant to
be replaced. Do not mix different colors or types of
coolant in your vehicle. Mixing of engine
coolants may harm your engine
’s cooling
system. The use of an improper coolant
may harm engine and cooling system
components and may void the warranty.
Use prediluted engine coolant meeting the
Ford specification.
In case of emergency, you can add a large
amount of water without engine coolant
in order to reach a vehicle service location.
In this instance, qualified personnel:
1. Must drain the cooling system.
2. Chemically clean the cooling system with Motorcraft Premium Cooling
System Flush.
3. Refill with engine coolant as soon as possible.
Water alone, without engine coolant, can
cause engine damage from corrosion,
overheating or freezing.
Do not use the following as a coolant
substitute:
• Alcohol.
• Methanol.
• Brine.
• Any engine coolant mixed with alcohol
or methanol antifreeze or coolant.
Alcohol and other liquids can cause engine
damage from overheating or freezing.
Do not add extra inhibitors or additives to
the coolant. These can be harmful and
compromise the corrosion protection of
the engine coolant.
When adding coolant:
1. Unscrew the cap slowly. Any pressure will escape as you unscrew the cap.
2. Add prediluted engine coolant meeting
the Ford specification.
3. Check the coolant level in the coolant reservoir the next few times you drive
your vehicle.
283
Explorer (TUB), enUSA, First Printing Maintenance