mirror controls FORD EXPLORER 2018 Owners Manual
[x] Cancel search | Manufacturer: FORD, Model Year: 2018, Model line: EXPLORER, Model: FORD EXPLORER 2018Pages: 571, PDF Size: 7.3 MB
Page 5 of 571
Steering Wheel
Adjusting the Steering Wheel - Vehicles
With: Manual Adjustable Steering
Column ..........................................................76
Adjusting the Steering Wheel - Vehicles With: Power Adjustable Steering
Column ..........................................................
76
Audio Control ..................................................
78
Voice Control ...................................................
78
Cruise Control .................................................
79
Information Display Control ......................
79
Heated Steering Wheel ...............................
79
Pedals
Adjusting the Pedals ...................................
80
Wipers and Washers
Windshield Wipers ........................................
81
Autowipers .......................................................
81
Windshield Washers ....................................
82
Rear Window Wiper and Washers ..........
82
Lighting
General Information .....................................
83
Lighting Control .............................................
83
Autolamps .......................................................
84
Instrument Lighting Dimmer ....................
84
Headlamp Exit Delay ...................................
85
Daytime Running Lamps ...........................
85
Automatic High Beam Control ................
86
Front Fog Lamps ...........................................
87
Direction Indicators .......................................
87
Interior Lamps ................................................
87
Ambient Lighting ..........................................
89
Windows and Mirrors
Power Windows ..............................................
91
Global Opening ..............................................
92
Exterior Mirrors ...............................................
92
Interior Mirror ..................................................
95Sun Visors
........................................................
95
Moonroof .........................................................
95
Instrument Cluster
Gauges ...............................................................
97
Warning Lamps and Indicators .............
100
Audible Warnings and Indicators ..........
103
Information Displays
General Information ...................................
105
Information Messages ................................
119
Climate Control
Manual Climate Control ............................
133
Automatic Climate Control - Vehicles With: Premium AM/FM/CD .................
134
Automatic Climate Control - Vehicles With: Sony AM/FM/CD .........................
136
Hints on Controlling the Interior Climate ........................................................................\
.
138
Rear Passenger Climate Controls .........
140
Heated Windows and Mirrors ..................
141
Cabin Air Filter ...............................................
142
Remote Start .................................................
142
Seats
Sitting in the Correct Position .................
144
Head Restraints ...........................................
144
Manual Seats ................................................
147
Power Seats ..................................................
148
Memory Function ........................................
150
Rear Seats .......................................................
151
Heated Seats ................................................
158
Climate Controlled Seats .........................
159
Universal Garage Door Opener
Universal Garage Door Opener ...............
161
2
Explorer (TUB) Canada/United States of America, enUSA, Edition date: 201711, Fourth-Printing Table of Contents
Page 19 of 571
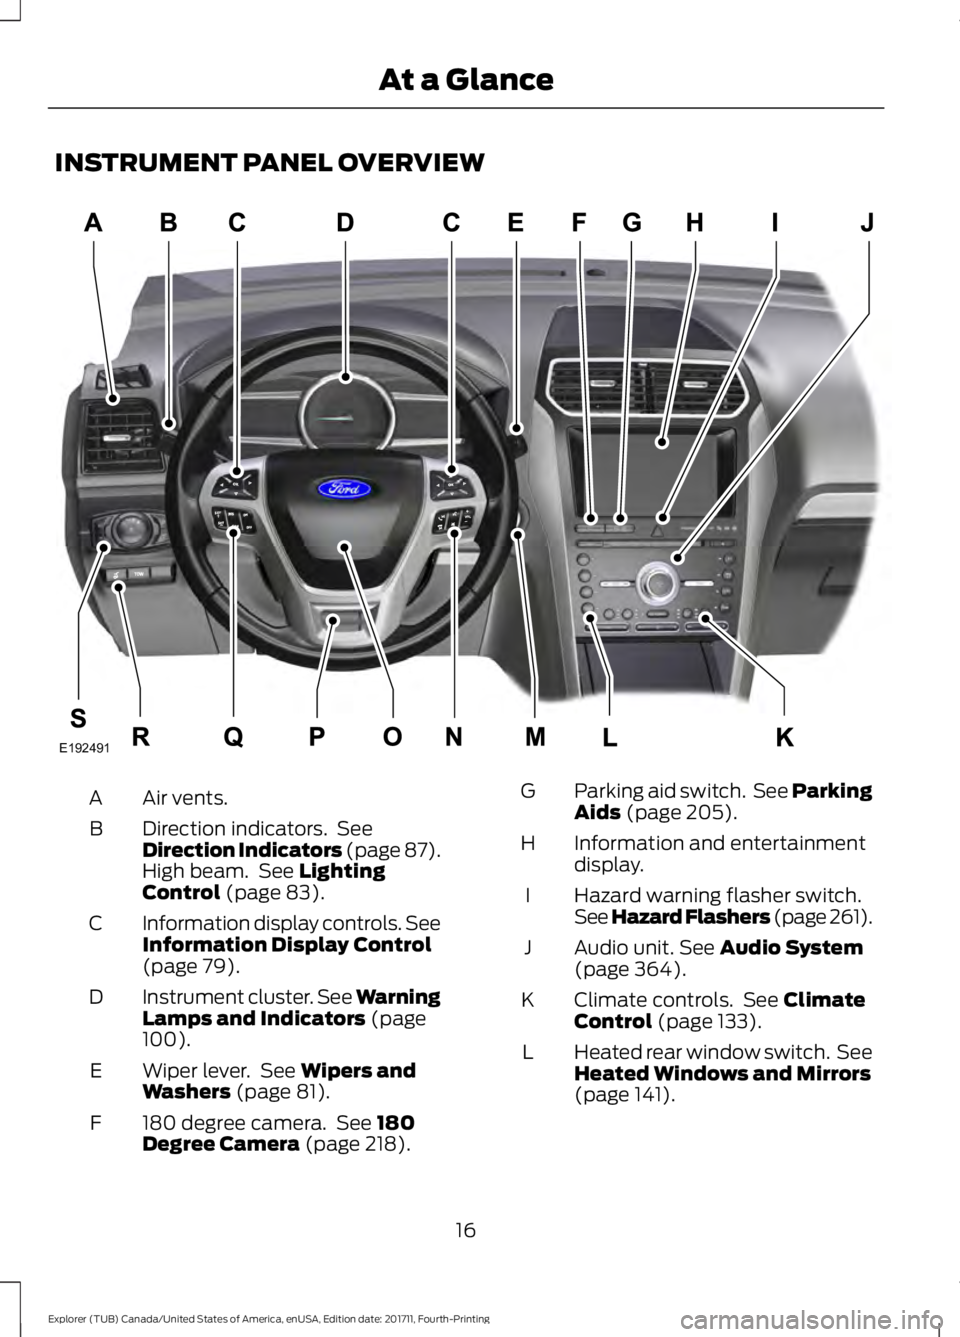
INSTRUMENT PANEL OVERVIEW
Air vents.
A
Direction indicators. See
Direction Indicators (page 87).
High beam. See Lighting
Control (page 83).
B
Information display controls. See
Information Display Control
(page
79).
C
Instrument cluster.
See Warning
Lamps and Indicators (page
100).
D
Wiper lever. See
Wipers and
Washers (page 81).
E
180 degree camera. See
180
Degree Camera (page 218).
F Parking aid switch. See Parking
Aids
(page 205).
G
Information and entertainment
display.
H
Hazard warning flasher switch.
See Hazard Flashers
(page 261).
I
Audio unit.
See Audio System
(page 364).
J
Climate controls. See
Climate
Control (page 133).
K
Heated rear window switch. See
Heated Windows and Mirrors
(page
141).
L
16
Explorer (TUB) Canada/United States of America, enUSA, Edition date: 201711, Fourth-Printing At a GlanceE192491
Page 95 of 571
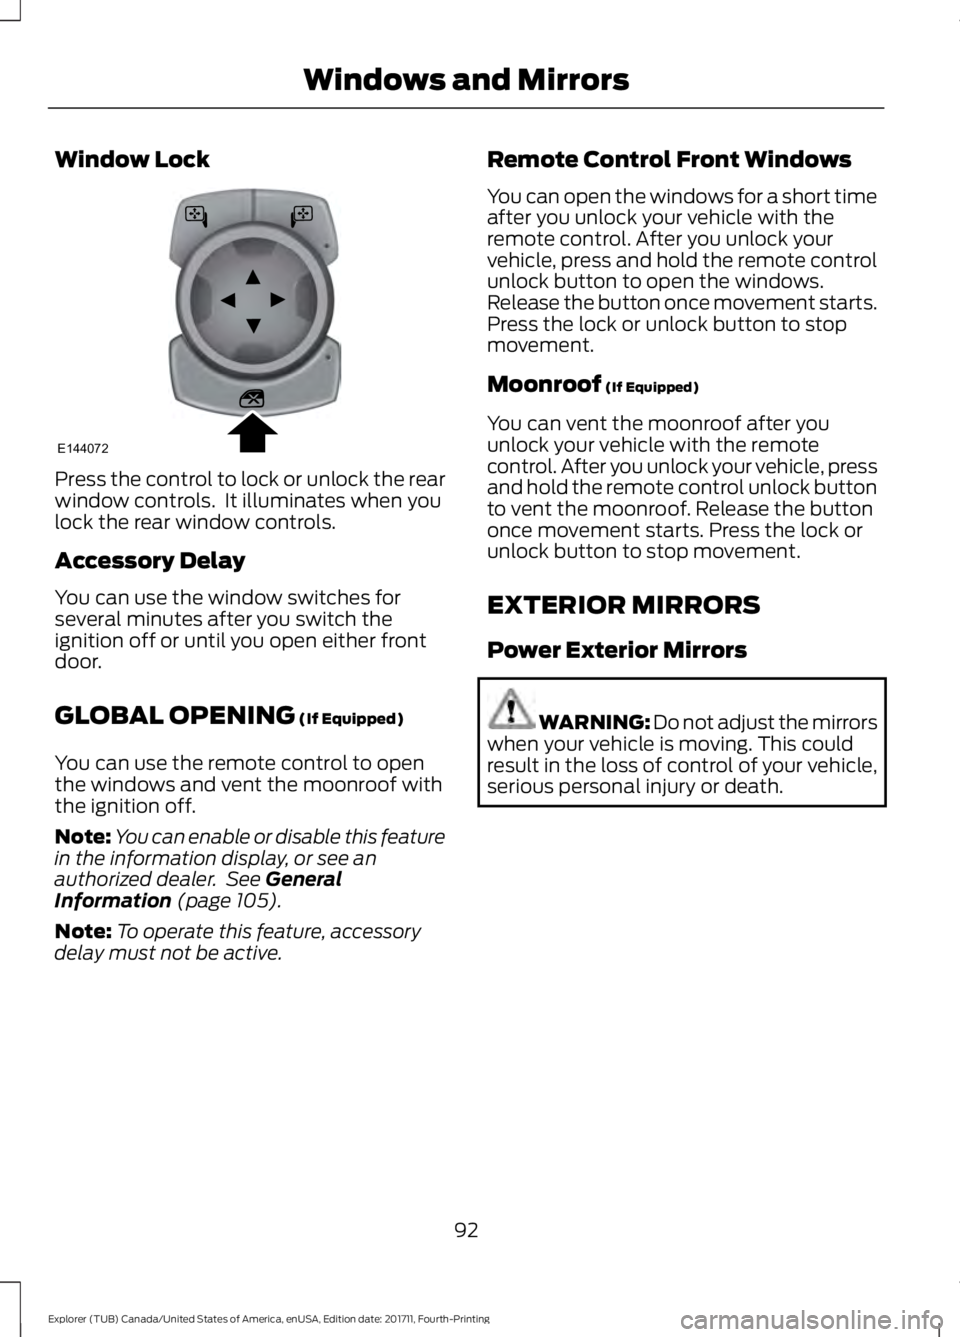
Window Lock
Press the control to lock or unlock the rear
window controls. It illuminates when you
lock the rear window controls.
Accessory Delay
You can use the window switches for
several minutes after you switch the
ignition off or until you open either front
door.
GLOBAL OPENING (If Equipped)
You can use the remote control to open
the windows and vent the moonroof with
the ignition off.
Note: You can enable or disable this feature
in the information display, or see an
authorized dealer. See
General
Information (page 105).
Note: To operate this feature, accessory
delay must not be active. Remote Control Front Windows
You can open the windows for a short time
after you unlock your vehicle with the
remote control. After you unlock your
vehicle, press and hold the remote control
unlock button to open the windows.
Release the button once movement starts.
Press the lock or unlock button to stop
movement.
Moonroof
(If Equipped)
You can vent the moonroof after you
unlock your vehicle with the remote
control. After you unlock your vehicle, press
and hold the remote control unlock button
to vent the moonroof. Release the button
once movement starts. Press the lock or
unlock button to stop movement.
EXTERIOR MIRRORS
Power Exterior Mirrors WARNING: Do not adjust the mirrors
when your vehicle is moving. This could
result in the loss of control of your vehicle,
serious personal injury or death.
92
Explorer (TUB) Canada/United States of America, enUSA, Edition date: 201711, Fourth-Printing Windows and MirrorsE144072
Page 99 of 571
WARNING: When closing the
moonroof, you should verify that it is free
of obstructions and make sure that
children and pets are not in the proximity
of the roof opening.
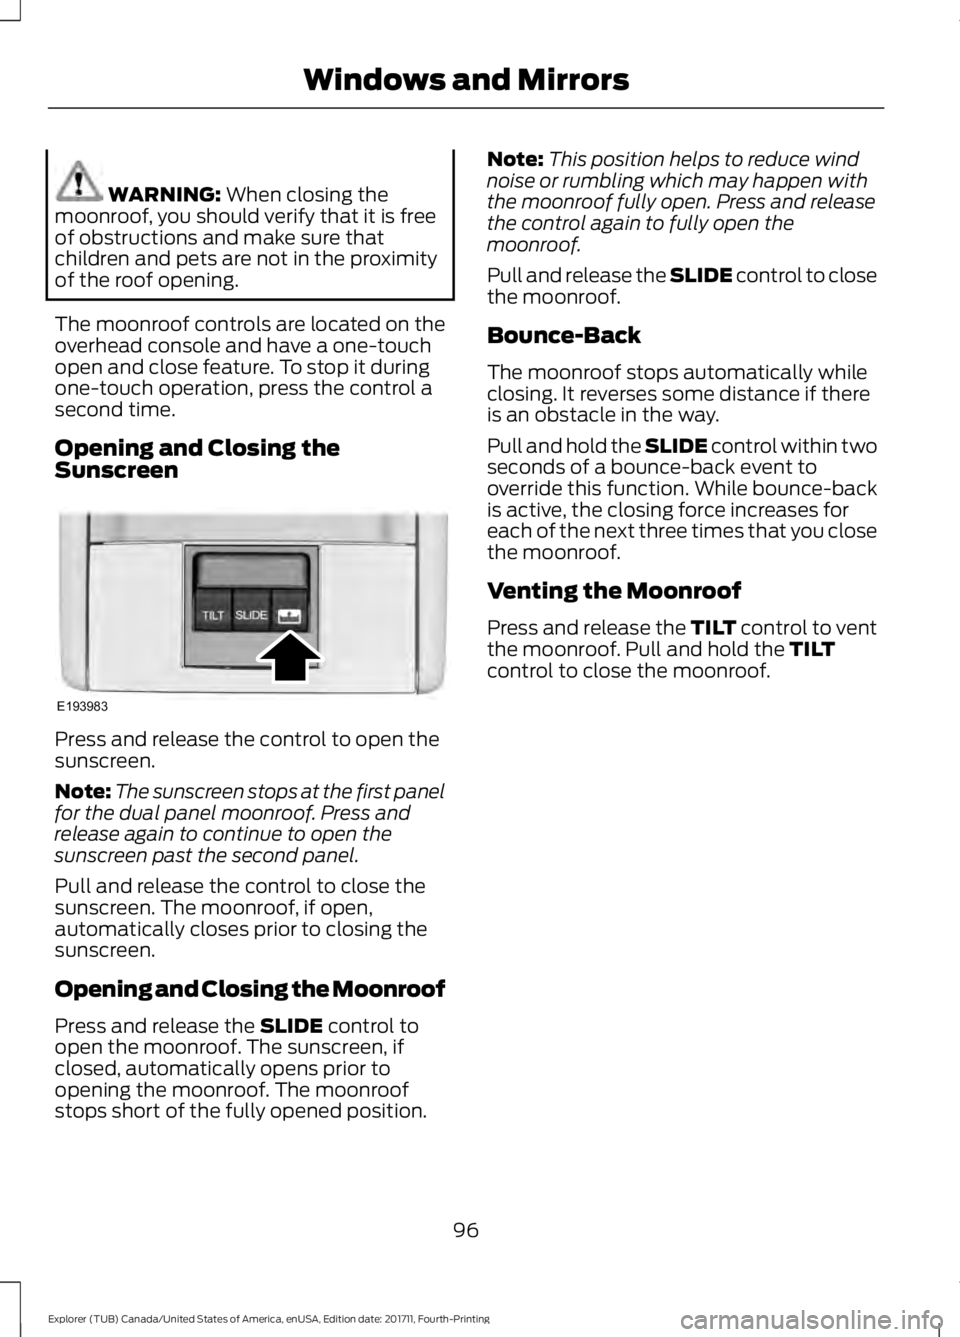
The moonroof controls are located on the
overhead console and have a one-touch
open and close feature. To stop it during
one-touch operation, press the control a
second time.
Opening and Closing the
Sunscreen Press and release the control to open the
sunscreen.
Note:
The sunscreen stops at the first panel
for the dual panel moonroof. Press and
release again to continue to open the
sunscreen past the second panel.
Pull and release the control to close the
sunscreen. The moonroof, if open,
automatically closes prior to closing the
sunscreen.
Opening and Closing the Moonroof
Press and release the
SLIDE control to
open the moonroof. The sunscreen, if
closed, automatically opens prior to
opening the moonroof. The moonroof
stops short of the fully opened position. Note:
This position helps to reduce wind
noise or rumbling which may happen with
the moonroof fully open. Press and release
the control again to fully open the
moonroof.
Pull and release the SLIDE control to close
the moonroof.
Bounce-Back
The moonroof stops automatically while
closing. It reverses some distance if there
is an obstacle in the way.
Pull and hold the SLIDE control within two
seconds of a bounce-back event to
override this function. While bounce-back
is active, the closing force increases for
each of the next three times that you close
the moonroof.
Venting the Moonroof
Press and release the TILT control to vent
the moonroof. Pull and hold the
TILT
control to close the moonroof.
96
Explorer (TUB) Canada/United States of America, enUSA, Edition date: 201711, Fourth-Printing Windows and MirrorsE193983
Page 137 of 571
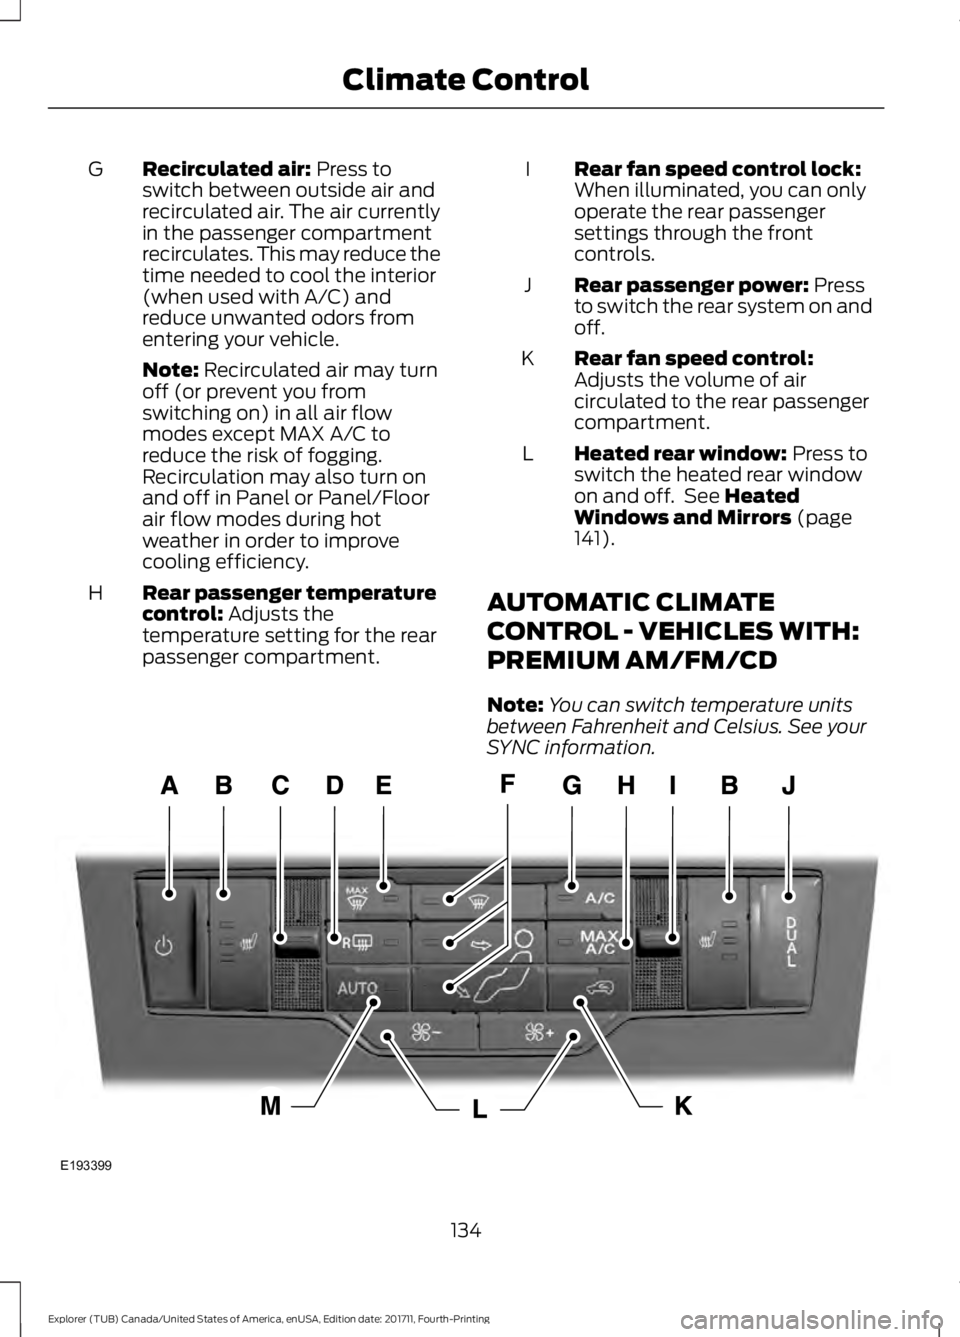
Recirculated air: Press to
switch between outside air and
recirculated air. The air currently
in the passenger compartment
recirculates. This may reduce the
time needed to cool the interior
(when used with A/C) and
reduce unwanted odors from
entering your vehicle.
G
Note:
Recirculated air may turn
off (or prevent you from
switching on) in all air flow
modes except MAX A/C to
reduce the risk of fogging.
Recirculation may also turn on
and off in Panel or Panel/Floor
air flow modes during hot
weather in order to improve
cooling efficiency.
Rear passenger temperature
control:
Adjusts the
temperature setting for the rear
passenger compartment.
H Rear fan speed control lock:
When illuminated, you can only
operate the rear passenger
settings through the front
controls.
I
Rear passenger power:
Press
to switch the rear system on and
off.
J
Rear fan speed control:
Adjusts the volume of air
circulated to the rear passenger
compartment.
K
Heated rear window:
Press to
switch the heated rear window
on and off. See
Heated
Windows and Mirrors (page
141).
L
AUTOMATIC CLIMATE
CONTROL - VEHICLES WITH:
PREMIUM AM/FM/CD
Note: You can switch temperature units
between Fahrenheit and Celsius. See your
SYNC information. 134
Explorer (TUB) Canada/United States of America, enUSA, Edition date: 201711, Fourth-Printing Climate ControlE193399
Page 144 of 571
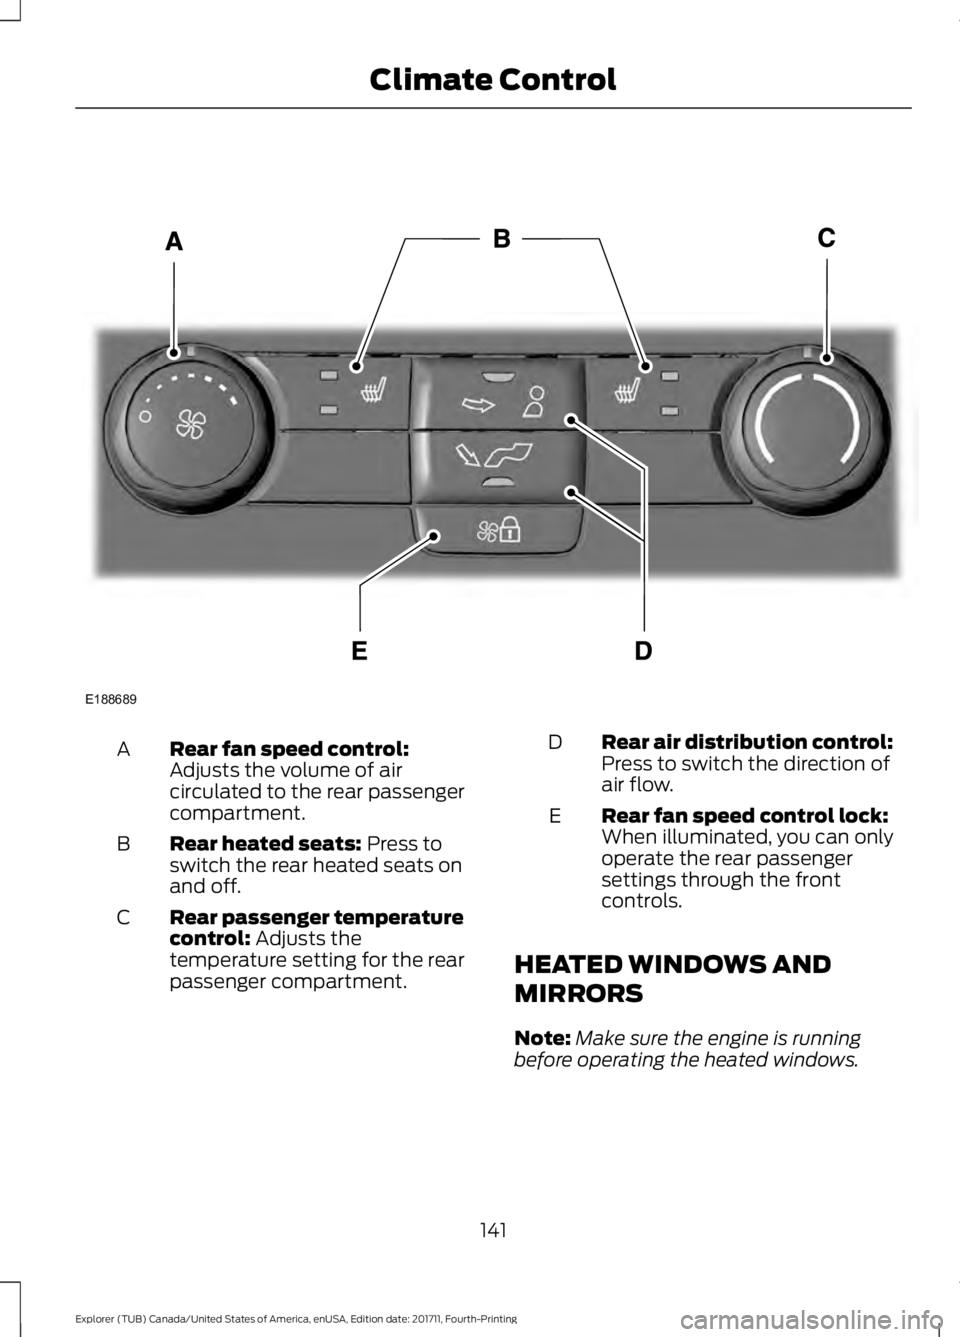
Rear fan speed control:
Adjusts the volume of air
circulated to the rear passenger
compartment.
A
Rear heated seats: Press to
switch the rear heated seats on
and off.
B
Rear passenger temperature
control:
Adjusts the
temperature setting for the rear
passenger compartment.
C Rear air distribution control:
Press to switch the direction of
air flow.
D
Rear fan speed control lock:
When illuminated, you can only
operate the rear passenger
settings through the front
controls.
E
HEATED WINDOWS AND
MIRRORS
Note: Make sure the engine is running
before operating the heated windows.
141
Explorer (TUB) Canada/United States of America, enUSA, Edition date: 201711, Fourth-Printing Climate ControlE188689
Page 153 of 571
2. Choose the desired seat to adjust.
3. Press the + or - to adjust the lumbar
intensity.
To access and make adjustments to the
massage setting:
1. Press the Menu Settings icon > Vehicle
>Multi-Contour Seat.
2. Choose the desired seat to adjust.
3. Press Off, Lo or Hi.
MEMORY FUNCTION (If Equipped) WARNING:
Before activating the
memory seat, make sure that the area
immediately surrounding the seat is clear
of obstructions and that all occupants are
clear of moving parts. WARNING:
Do not use the memory
function when your vehicle is moving.
This feature automatically recalls the
position of the following:
• Driver seat.
• Power mirrors.
• Optional power adjustable foot pedals.
• Optional power steering column.
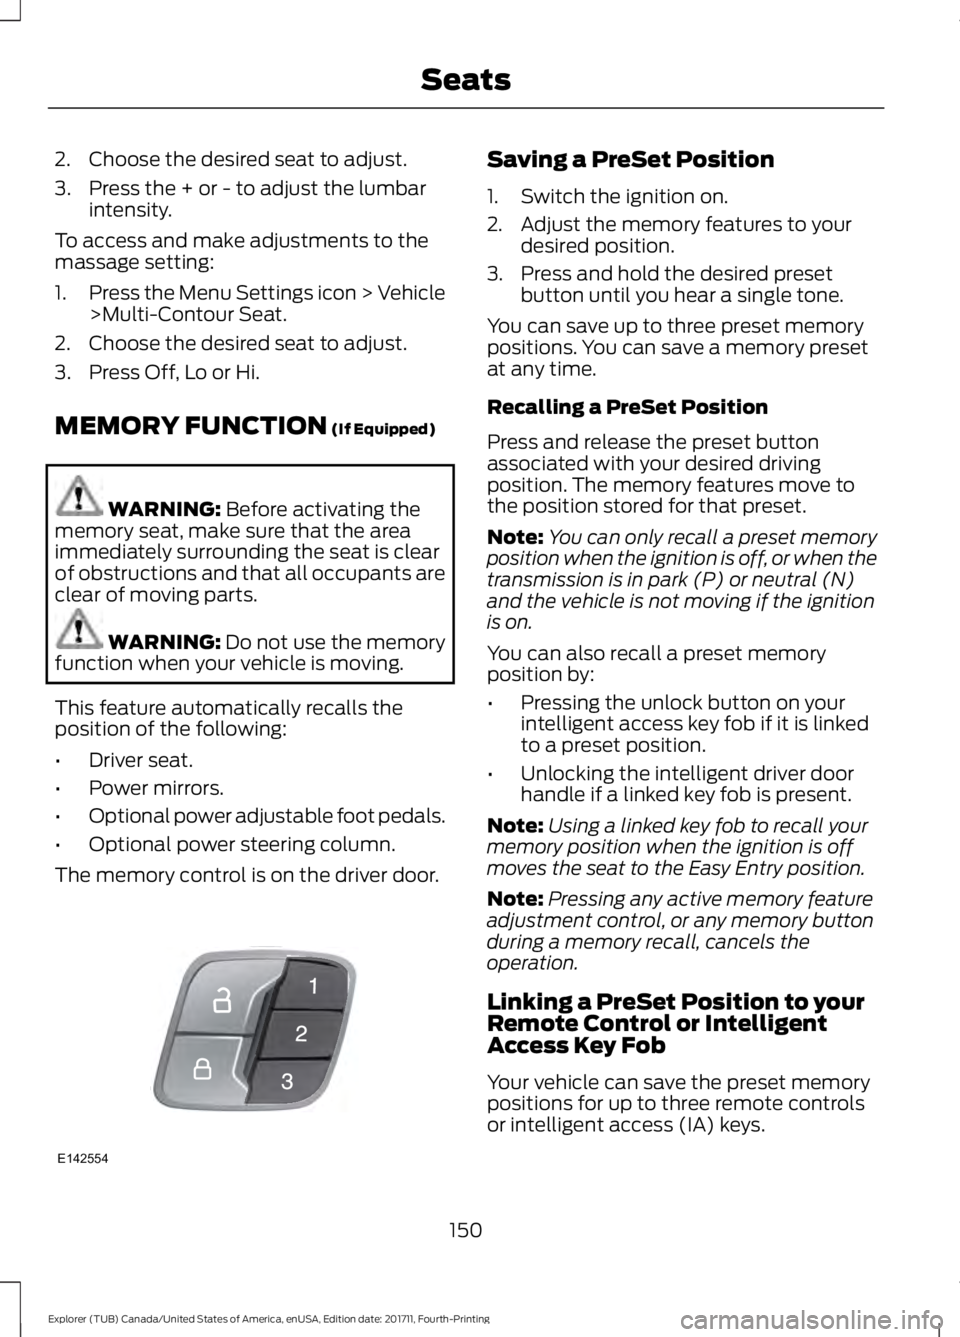
The memory control is on the driver door. Saving a PreSet Position
1. Switch the ignition on.
2. Adjust the memory features to your
desired position.
3. Press and hold the desired preset button until you hear a single tone.
You can save up to three preset memory
positions. You can save a memory preset
at any time.
Recalling a PreSet Position
Press and release the preset button
associated with your desired driving
position. The memory features move to
the position stored for that preset.
Note: You can only recall a preset memory
position when the ignition is off, or when the
transmission is in park (P) or neutral (N)
and the vehicle is not moving if the ignition
is on.
You can also recall a preset memory
position by:
• Pressing the unlock button on your
intelligent access key fob if it is linked
to a preset position.
• Unlocking the intelligent driver door
handle if a linked key fob is present.
Note: Using a linked key fob to recall your
memory position when the ignition is off
moves the seat to the Easy Entry position.
Note: Pressing any active memory feature
adjustment control, or any memory button
during a memory recall, cancels the
operation.
Linking a PreSet Position to your
Remote Control or Intelligent
Access Key Fob
Your vehicle can save the preset memory
positions for up to three remote controls
or intelligent access (IA) keys.
150
Explorer (TUB) Canada/United States of America, enUSA, Edition date: 201711, Fourth-Printing SeatsE142554
Page 452 of 571
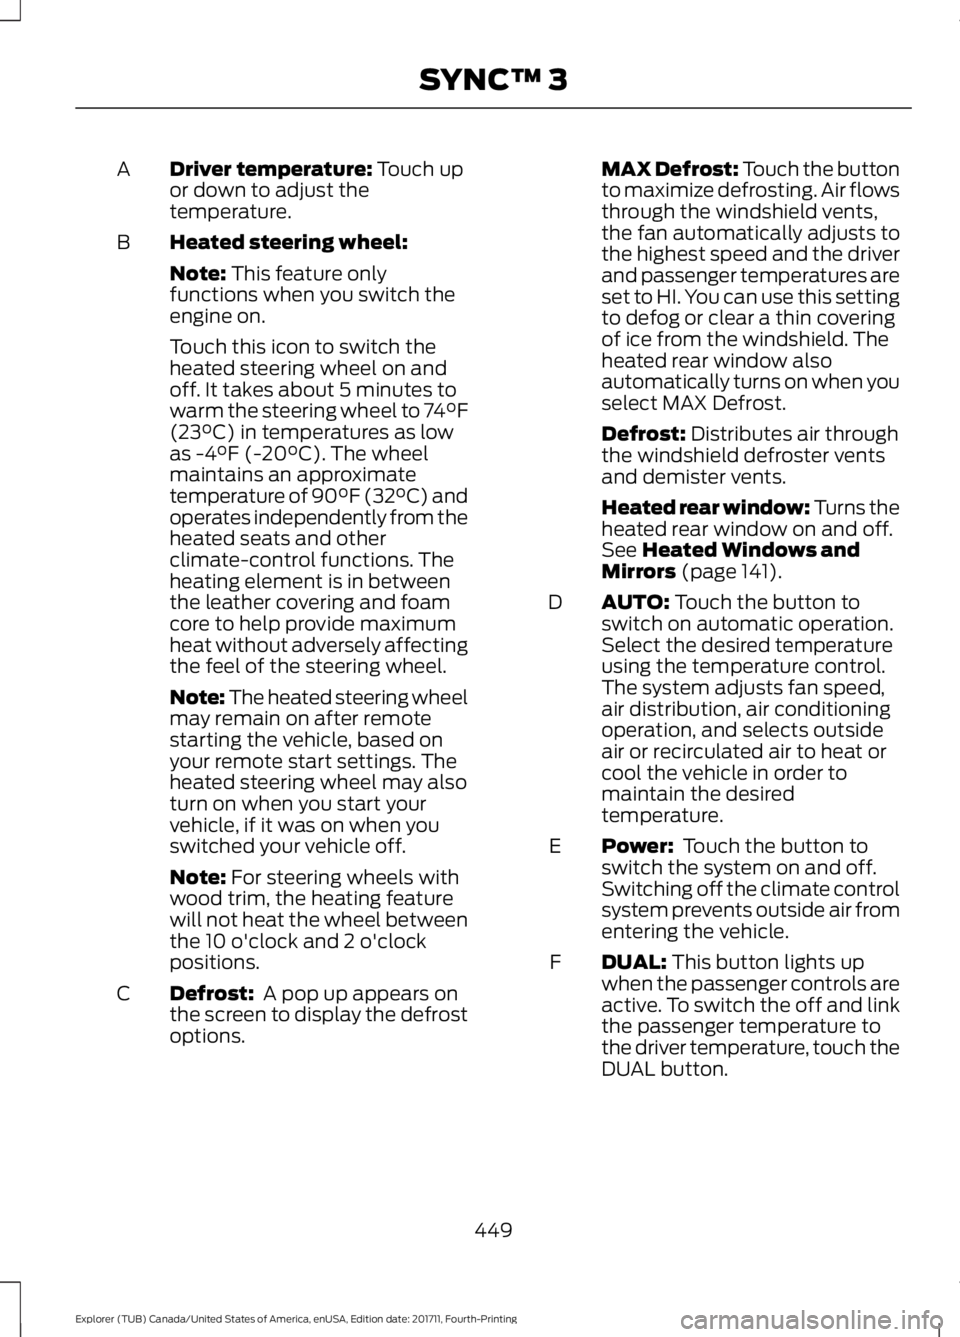
Driver temperature: Touch up
or down to adjust the
temperature.
A
Heated steering wheel:
B
Note:
This feature only
functions when you switch the
engine on.
Touch this icon to switch the
heated steering wheel on and
off. It takes about 5 minutes to
warm the steering wheel to 74°F
(23°C) in temperatures as low
as -4°F (-20°C). The wheel
maintains an approximate
temperature of 90°F (32°C) and
operates independently from the
heated seats and other
climate-control functions. The
heating element is in between
the leather covering and foam
core to help provide maximum
heat without adversely affecting
the feel of the steering wheel.
Note: The heated steering wheel
may remain on after remote
starting the vehicle, based on
your remote start settings. The
heated steering wheel may also
turn on when you start your
vehicle, if it was on when you
switched your vehicle off.
Note:
For steering wheels with
wood trim, the heating feature
will not heat the wheel between
the 10 o'clock and 2 o'clock
positions.
Defrost:
A pop up appears on
the screen to display the defrost
options.
C MAX Defrost: Touch the button
to maximize defrosting. Air flows
through the windshield vents,
the fan automatically adjusts to
the highest speed and the driver
and passenger temperatures are
set to HI. You can use this setting
to defog or clear a thin covering
of ice from the windshield. The
heated rear window also
automatically turns on when you
select MAX Defrost.
Defrost:
Distributes air through
the windshield defroster vents
and demister vents.
Heated rear window: Turns the
heated rear window on and off.
See
Heated Windows and
Mirrors (page 141).
AUTO:
Touch the button to
switch on automatic operation.
Select the desired temperature
using the temperature control.
The system adjusts fan speed,
air distribution, air conditioning
operation, and selects outside
air or recirculated air to heat or
cool the vehicle in order to
maintain the desired
temperature.
D
Power:
Touch the button to
switch the system on and off.
Switching off the climate control
system prevents outside air from
entering the vehicle.
E
DUAL:
This button lights up
when the passenger controls are
active. To switch the off and link
the passenger temperature to
the driver temperature, touch the
DUAL button.
F
449
Explorer (TUB) Canada/United States of America, enUSA, Edition date: 201711, Fourth-Printing SYNC™ 3
Page 565 of 571
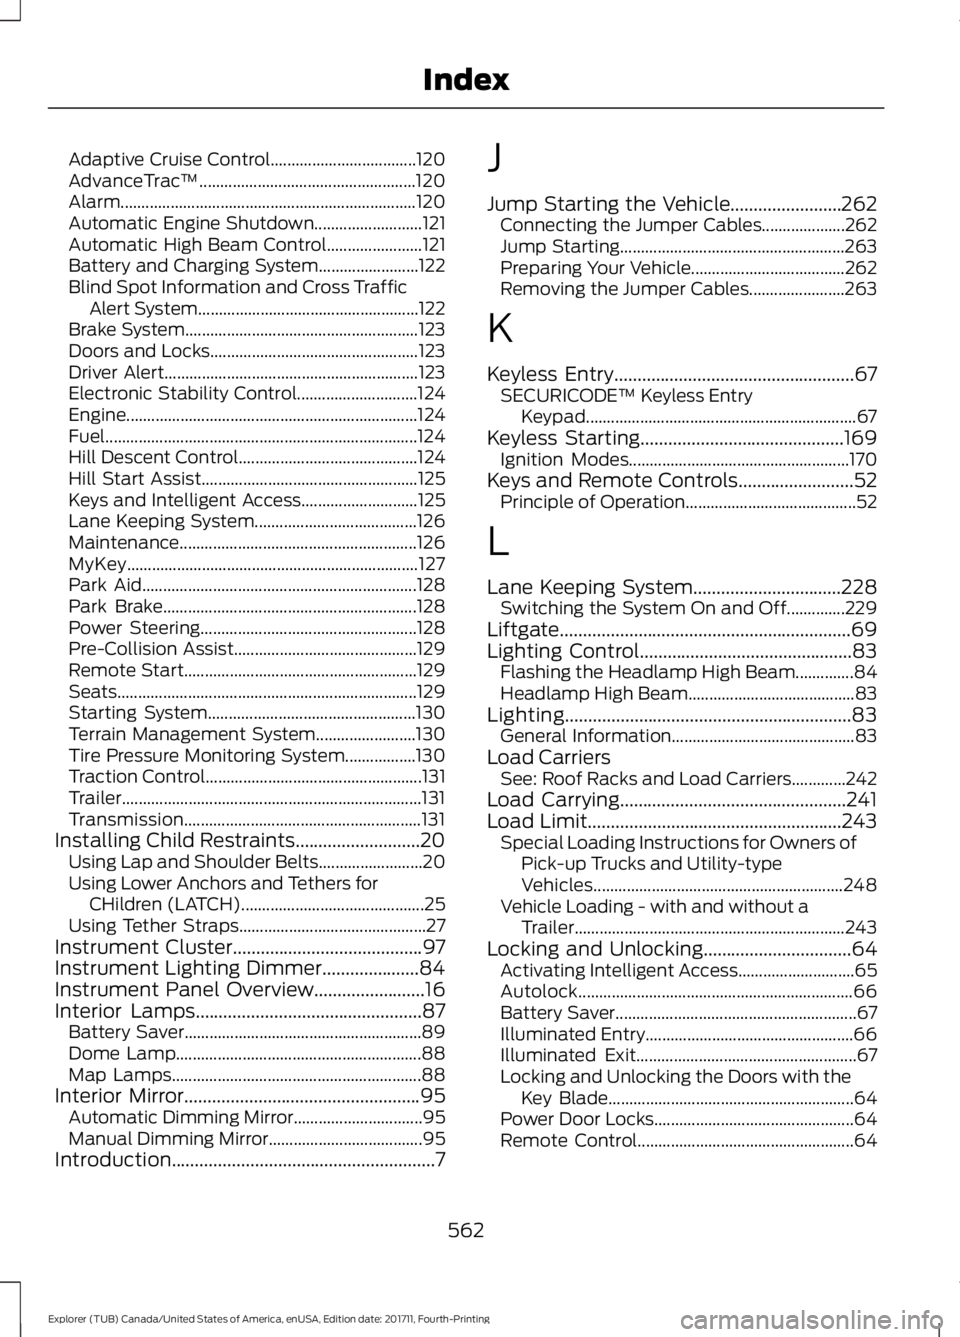
Adaptive Cruise Control...................................
120
AdvanceTrac ™.................................................... 120
Alarm....................................................................... 120
Automatic Engine Shutdown.......................... 121
Automatic High Beam Control....................... 121
Battery and Charging System........................ 122
Blind Spot Information and Cross Traffic Alert System..................................................... 122
Brake System........................................................ 123
Doors and Locks.................................................. 123
Driver Alert............................................................. 123
Electronic Stability Control............................. 124
Engine...................................................................... 124
Fuel........................................................................\
... 124
Hill Descent Control........................................... 124
Hill Start Assist.................................................... 125
Keys and Intelligent Access............................ 125
Lane Keeping System....................................... 126
Maintenance......................................................... 126
MyKey...................................................................... 127
Park Aid.................................................................. 128
Park Brake............................................................. 128
Power Steering.................................................... 128
Pre-Collision Assist............................................ 129
Remote Start........................................................ 129
Seats........................................................................\
129
Starting System.................................................. 130
Terrain Management System........................ 130
Tire Pressure Monitoring System.................130
Traction Control.................................................... 131
Trailer........................................................................\
131
Transmission......................................................... 131
Installing Child Restraints...........................20 Using Lap and Shoulder Belts......................... 20
Using Lower Anchors and Tethers for CHildren (LATCH)............................................ 25
Using Tether Straps............................................. 27
Instrument Cluster.........................................97
Instrument Lighting Dimmer.....................84
Instrument Panel Overview........................16
Interior Lamps
.................................................87
Battery Saver......................................................... 89
Dome Lamp........................................................... 88
Map Lamps............................................................ 88
Interior Mirror
...................................................95
Automatic Dimming Mirror............................... 95
Manual Dimming Mirror..................................... 95
Introduction.........................................................7 J
Jump Starting the Vehicle........................262
Connecting the Jumper Cables.................... 262
Jump Starting...................................................... 263
Preparing Your Vehicle..................................... 262
Removing the Jumper Cables....................... 263
K
Keyless Entry
....................................................67
SECURICODE™ Keyless Entry
Keypad................................................................. 67
Keyless Starting
............................................169
Ignition Modes..................................................... 170
Keys and Remote Controls.........................52 Principle of Operation......................................... 52
L
Lane Keeping System................................228 Switching the System On and Off..............229
Liftgate...............................................................69
Lighting Control
..............................................83
Flashing the Headlamp High Beam..............84
Headlamp High Beam........................................ 83
Lighting..............................................................83 General Information............................................ 83
Load Carriers See: Roof Racks and Load Carriers.............242
Load Carrying.................................................241
Load Limit.......................................................243 Special Loading Instructions for Owners of
Pick-up Trucks and Utility-type
Vehicles............................................................ 248
Vehicle Loading - with and without a Trailer................................................................. 243
Locking and Unlocking
................................64
Activating Intelligent Access............................ 65
Autolock.................................................................. 66
Battery Saver.......................................................... 67
Illuminated Entry.................................................. 66
Illuminated Exit..................................................... 67
Locking and Unlocking the Doors with the Key Blade........................................................... 64
Power Door Locks................................................ 64
Remote Control.................................................... 64
562
Explorer (TUB) Canada/United States of America, enUSA, Edition date: 201711, Fourth-Printing Index