tire pressure FORD EXPLORER 2019 User Guide
[x] Cancel search | Manufacturer: FORD, Model Year: 2019, Model line: EXPLORER, Model: FORD EXPLORER 2019Pages: 571, PDF Size: 6.8 MB
Page 182 of 571
3. Apply the parking brake.
4. Fully open the fuel filler door.
5. Check the fuel tank filler valve for any
debris that may be restricting its
movement.
6. Remove any debris from the fuel tank filler valve.
7. Fully insert a fuel pump nozzle or the fuel filler funnel provided with your
vehicle into the fuel filler pipe. See
Fuel Filler Funnel Location (page
174). This action should dislodge any
debris that may be preventing the fuel
tank filler valve from fully closing.
8. Remove the fuel pump nozzle or fuel filler funnel from the fuel filler pipe.
9. Fully close the fuel filler door.
Note: The message may not immediately
reset. If the message continues to appear
and a warning lamp illuminates, have your
vehicle checked as soon as possible.
FUEL CONSUMPTION
Advertised Capacity
The advertised capacity is the maximum
amount of fuel that you can add to the fuel
tank after running out of fuel. Included in
the advertised capacity is an empty
reserve. The empty reserve is an
unspecified amount of fuel that remains
in the fuel tank when the fuel gauge
indicates empty.
Note: The amount of fuel in the empty
reserve varies and should not be relied upon
to increase driving range.
Fuel Economy
Your vehicle calculates fuel economy
figures through the trip computer average
fuel function. See
General Information
(page 104). The first
1,000 mi (1,500 km) of driving is
the break-in period of the engine. A more
accurate measurement is obtained after
2,000 mi (3,000 km)
.
Impacting Fuel Economy
• Incorrect tire inflation pressures.
• Fully loading your vehicle.
• Carrying unnecessary weight.
• Adding certain accessories to your
vehicle such as bug deflectors, rollbars
or light bars, running boards and ski
racks.
• Using fuel blended with alcohol. See
Fuel Quality
(page 172).
• Fuel economy may decrease with lower
temperatures.
• Fuel economy may decrease when
driving short distances.
• You may get better fuel economy when
driving on flat terrain than when driving
on hilly terrain.
179
Explorer (TUB) Canada/United States of America, enUSA, Edition date: 201807, Second-Printing Fuel and Refueling
Page 193 of 571
WARNING: If the parking brake is
fully released, but the brake warning
lamp remains illuminated, the brakes
may not be working properly. See your
authorized dealer. WARNING: Do not spin the wheels
at over 35 mph (56 km/h). The tires may
fail and injure a passenger or bystander.
Note: Do not rock the vehicle if the engine
is not at normal operating temperature or
damage to the transmission may occur.
Note: Do not rock the vehicle for more than
a few minutes or damage to the
transmission and tires may occur or the
engine may overheat.
If your vehicle gets stuck in mud or snow it
may be rocked out by shifting between
forward and reverse gears, stopping
between shifts, in a steady pattern. Press
lightly on the accelerator in each gear.
If your vehicle is equipped with
AdvanceTrac® with Roll Stability
Control ™, it may be beneficial to
disengage the AdvanceTrac® with Roll
Stability Control ™ system while
attempting to rock the vehicle.
Emergency Maneuvers
• In an unavoidable emergency situation
where a sudden sharp turn must be
made, remember to avoid
"over-driving" your vehicle (i.e., turn the
steering wheel only as rapidly and as
far as required to avoid the
emergency). Excessive steering will
result in less vehicle control, not more.
Additionally, smooth variations of the
accelerator and/or brake pedal
pressure should be utilized if changes
in vehicle speed are called for. Avoid abrupt steering, acceleration or braking
which could result in an increased risk
of loss of vehicle control, vehicle
rollover and/or personal injury. Use all
available road surface to return the
vehicle to a safe direction of travel.
• In the event of an emergency stop,
avoid skidding the tires and do not
attempt any sharp steering wheel
movements.
• If the vehicle goes from one type of
surface to another (i.e., from concrete
to gravel) there will be a change in the
way the vehicle responds to a
maneuver (steering, acceleration or
braking). Again, avoid these abrupt
inputs.
Sand
When driving over sand, try to keep all four
wheels on the most solid area of the trail.
Avoid reducing the tire pressures but shift
to a lower gear and drive steadily through
the terrain. Apply the accelerator slowly
and avoid spinning the wheels.
Avoid excessive speed because vehicle
momentum can work against you and
cause the vehicle to become stuck to the
point that assistance may be required from
another vehicle. Remember, you may be
able to back out the way you came if you
proceed with caution.
Mud and Water
Note: Driving through deep water may
damage your vehicle.
If you must drive through high water, drive
slowly. Traction or brake capability may
be limited.
When driving through water, determine the
depth; avoid water higher than the bottom
of the hubs (if possible) and proceed
slowly. If the ignition system gets wet, the
vehicle may stall.
190
Explorer (TUB) Canada/United States of America, enUSA, Edition date: 201807, Second-Printing Four-Wheel Drive
(If Equipped)
Page 194 of 571
Once through water, always try the brakes.
Wet brakes do not stop the vehicle as
effectively as dry brakes. Drying can be
improved by moving your vehicle slowly
while applying light pressure on the brake
pedal.
Be cautious of sudden changes in vehicle
speed or direction when you are driving in
mud. Even 4WD vehicles can lose traction
in slick mud. As when you are driving over
sand, apply the accelerator slowly and
avoid spinning your wheels. If the vehicle
does slide, steer in the direction of the slide
until you regain control of the vehicle.
After driving through mud, clean off residue
stuck to rotating driveshafts and tires.
Excess mud stuck on tires and rotating
driveshafts causes an imbalance that
could damage drive components.
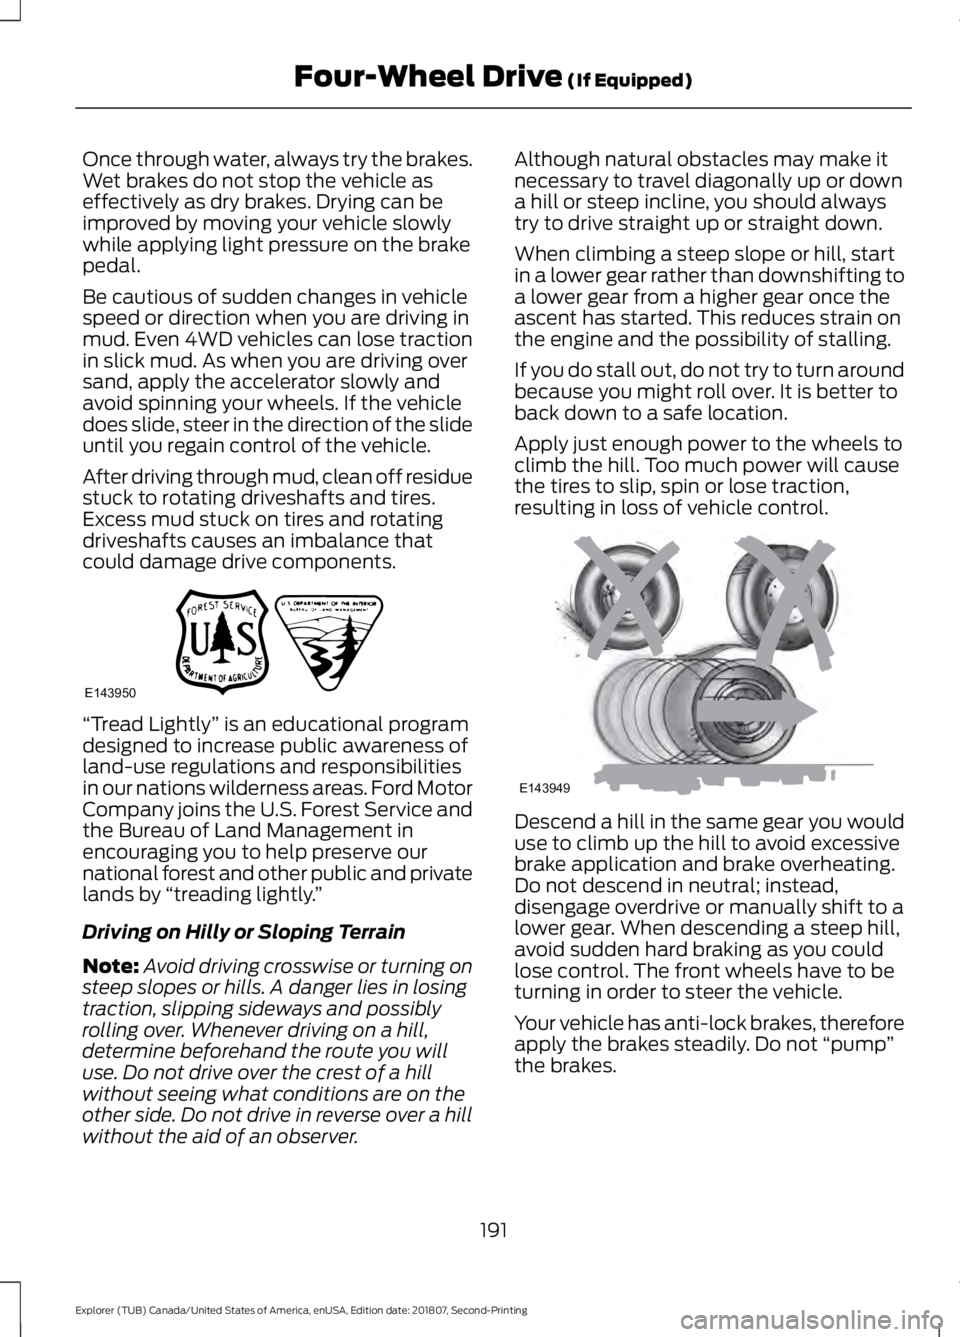
“Tread Lightly
” is an educational program
designed to increase public awareness of
land-use regulations and responsibilities
in our nations wilderness areas. Ford Motor
Company joins the U.S. Forest Service and
the Bureau of Land Management in
encouraging you to help preserve our
national forest and other public and private
lands by “treading lightly. ”
Driving on Hilly or Sloping Terrain
Note: Avoid driving crosswise or turning on
steep slopes or hills. A danger lies in losing
traction, slipping sideways and possibly
rolling over. Whenever driving on a hill,
determine beforehand the route you will
use. Do not drive over the crest of a hill
without seeing what conditions are on the
other side. Do not drive in reverse over a hill
without the aid of an observer. Although natural obstacles may make it
necessary to travel diagonally up or down
a hill or steep incline, you should always
try to drive straight up or straight down.
When climbing a steep slope or hill, start
in a lower gear rather than downshifting to
a lower gear from a higher gear once the
ascent has started. This reduces strain on
the engine and the possibility of stalling.
If you do stall out, do not try to turn around
because you might roll over. It is better to
back down to a safe location.
Apply just enough power to the wheels to
climb the hill. Too much power will cause
the tires to slip, spin or lose traction,
resulting in loss of vehicle control.
Descend a hill in the same gear you would
use to climb up the hill to avoid excessive
brake application and brake overheating.
Do not descend in neutral; instead,
disengage overdrive or manually shift to a
lower gear. When descending a steep hill,
avoid sudden hard braking as you could
lose control. The front wheels have to be
turning in order to steer the vehicle.
Your vehicle has anti-lock brakes, therefore
apply the brakes steadily. Do not
“pump”
the brakes.
191
Explorer (TUB) Canada/United States of America, enUSA, Edition date: 201807, Second-Printing Four-Wheel Drive (If Equipped)E143950 E143949
Page 233 of 571
Why is the feature not available (line markings are gray) when I can see the lane markings
on the road?
Your vehicle stays too close to the lane markings.
Driving at high speeds in curves.
The last alert warning or aid intervention occurred a short time ago.
Ambiguous lane markings, for example in construction zones.
Rapid transition from light to dark, or from dark to light.
Sudden offset in lane markings.
ABS or AdvanceTrac ™ is active.
There is a camera blockage due to dirt, grime, fog, frost or water on the windshield.
You are driving too close to the vehicle in front of you.
Transitioning between no lane markings to lane markings or vice versa.
There is standing water on the road.
Faint lane markings, for example partial yellow lane markings on concrete roads.
Lane width is too narrow or too wide.
The camera has not been calibrated after a windshield replacement.
Driving on tight roads or on uneven roads. Why does the vehicle not come back toward the middle of the lane, as expected, in the
Aid or Aid + Alert mode?
High cross winds are present.
There is a large road crown.
Rough roads, grooves or shoulder drop-offs.
Heavy uneven loading of the vehicle or improper tire inflation pressure.
The tires have been changed, or the suspension has been modified.
230
Explorer (TUB) Canada/United States of America, enUSA, Edition date: 201807, Second-Printing Driving Aids
Page 239 of 571
Extreme continuous steering may increase
the effort required for you to steer your
vehicle. This increased effort prevents
overheating and permanent damage to
the steering system. You do not lose the
ability to steer your vehicle manually.
Typical steering and driving maneuvers
allow the system to cool and return to
normal operation.
Steering Tips
If the steering wanders or pulls, check for:
•
Correct tire pressures.
• Uneven tire wear.
• Loose or worn suspension
components.
• Loose or worn steering components.
• Improper vehicle alignment.
Note: A high crown in the road or high
crosswinds may also make the steering
seem to wander or pull.
Adaptive Learning
The electronic power steering system
adaptive learning helps correct road
irregularities and improves overall handling
and steering feel. It communicates with
the brake system to help operate
advanced stability control and accident
avoidance systems. Additionally, whenever
the battery is disconnected or a new
battery installed, you must drive your
vehicle a short distance before the system
relearns the strategy and reactivates all
systems. PRE-COLLISION ASSIST (IF
EQUIPPED) WARNING:
You are responsible
for controlling your vehicle at all times.
The system is designed to be an aid and
does not relieve you of your responsibility
to drive with due care and attention.
Failure to follow this instruction could
result in the loss of control of your
vehicle, personal injury or death. WARNING:
The system does not
detect vehicles that are driving in a
different direction, pedestrians at night,
cyclists or animals. Failure to take care
may result in the loss of control of your
vehicle, serious personal injury or death. WARNING:
The system does not
operate during hard acceleration or
steering. Failure to take care may lead
to a crash or personal injury. WARNING:
The system may fail
or operate with reduced function during
cold and severe weather conditions.
Snow, ice, rain, spray and fog can
adversely affect the system. Keep the
front camera and radar free of snow and
ice. Failure to take care may result in the
loss of control of your vehicle, serious
personal injury or death. WARNING: In situations where the
vehicle camera has limited detection
capability, this may reduce system
performance. These situations include
but are not limited to direct or low
sunlight, vehicles at night without tail
lights, unconventional vehicle types,
pedestrians with complex backgrounds,
236
Explorer (TUB) Canada/United States of America, enUSA, Edition date: 201807, Second-Printing Driving Aids
Page 310 of 571
•
Dry your vehicle with a chamois or soft
terry cloth towel to eliminate water
spotting.
• Immediately remove fuel spillages, bird
droppings, insect deposits and road tar.
These may cause damage to your
vehicle ’s paintwork or trim over time.
We recommend Motorcraft Bug and
Tar Remover.
• Remove any exterior accessories, for
example antennas, before entering a
car wash.
• When filling with AdBlue®, remove any
residue on painted surfaces
immediately.
Note: Suntan lotions and insect repellents
can damage painted surfaces. If these
substances come in contact with your
vehicle, wash the affected area as soon as
possible.
Cleaning the Headlamps
Note: Do not scrape the headlamp lenses
or use abrasives, alcoholic solvents or
chemical solvents to clean them.
Note: Do not wipe the headlamps when
they are dry.
Exterior Chrome Parts
• Apply a high quality-cleaning product
to bumpers and other chrome parts.
Follow the manufacturer ’s instructions.
We recommend Motorcraft Custom
Bright Metal Cleaner.
• Do not apply the cleaning product to
hot surfaces. Do not leave the cleaning
product on chrome surfaces longer
than the time recommended.
• Using non-recommended cleaners can
result in severe and permanent
cosmetic damage.
Note: Never use abrasive materials, for
example steel wool or plastic pads as they
can scratch the chrome surface. Note:
Do not use chrome cleaner, metal
cleaner or polish on wheels or wheel covers.
Exterior Plastic Parts
For routine cleaning we recommend
Motorcraft Detail Wash. If tar or grease
spots are present, we recommend
Motorcraft Bug and Tar Remover.
Stripes or Graphics (If Equipped)
Hand washing your vehicle is preferred
however, pressure washing may be used
under the following conditions:
• Do not use water pressure higher than
2,000 psi (14,000 kPa)
.
• Do not use water hotter than
179°F
(82°C).
• Use a spray with a
40° wide spray
angle pattern.
• Keep the nozzle at a
12 in (305 mm)
distance and 90° angle to your
vehicle's surface.
Note: Holding the pressure washer nozzle
at an angle to the vehicle's surface may
damage graphics and cause the edges to
peel away from the vehicle's surface.
Underbody
Regularly clean the underside of your
vehicle using water. Keep body and door
drain holes free of debris or foreign
material.
Under Hood
For removing black rubber marks from
under the hood we recommend Motorcraft
Wheel and Tire Cleaner or Motorcraft Bug
and Tar Remover.
307
Explorer (TUB) Canada/United States of America, enUSA, Edition date: 201807, Second-Printing Vehicle Care
Page 315 of 571
•
Cover interior trim to prevent fading.
• Keep all rubber parts free from oil and
solvents.
Engine
• Change the engine oil and filter prior to
storage because used engine oil
contains contaminates which may
cause engine damage.
• Start the engine every 15 days for a
minimum of 15 minutes. Run at fast idle
with the climate controls set to defrost
until the engine reaches normal
operating temperature.
• With your foot on the brake, shift
through all the gears while the engine
is running.
• We recommend that you change the
engine oil before you use your vehicle
again.
Fuel system
• Fill the fuel tank with high-quality fuel
until the first automatic shutoff of the
fuel pump nozzle.
Cooling system
• Protect against freezing temperatures.
• When removing your vehicle from
storage, check coolant fluid level.
Confirm that there are no cooling
system leaks and that fluid is at the
recommended level.
Battery
• Check and recharge as necessary. Keep
connections clean.
• If storing your vehicle for more than 30
days without recharging the battery,
we recommend that you disconnect
the battery cables to maintain battery
charge for quick starting. Note:
It is necessary to reset memory
features if battery cables are disconnected.
Brakes
• Make sure the brakes and parking brake
release fully.
Tires
• Maintain recommended air pressure.
Miscellaneous
• Make sure all linkages, cables, levers
and pins under your vehicle are covered
with grease to prevent rust.
• Move vehicles at least 25 ft (7.5 m)
every 15 days to lubricate working parts
and prevent corrosion.
Removing Vehicle From Storage
When your vehicle is ready to come out of
storage, do the following:
• Wash your vehicle to remove any dirt
or grease film build-up on window
surfaces.
• Check windshield wipers for any
deterioration.
• Check under the hood for any foreign
material that may have collected
during storage such as mice or squirrel
nests.
• Check the exhaust for any foreign
material that may have collected
during storage.
• Check tire pressures and set tire
inflation per the Tire Label.
• Check brake pedal operation. Drive
your vehicle
15 ft (4.5 m) back and
forth to remove rust build-up.
312
Explorer (TUB) Canada/United States of America, enUSA, Edition date: 201807, Second-Printing Vehicle Care
Page 317 of 571
GENERAL INFORMATION
Use only approved wheel and tire sizes,
using other sizes could damage your
vehicle. If you change the diameter of the
tires from that fitted at the factory, the
speedometer may not display the correct
speed. If you intend to change the size of
the wheels from that fitted by the
manufacturer, you can check the suitability
with an authorized dealer.
Additional information related to the
functionality and maintenance of your tires
can be found later in this chapter. See Tire
Care (page 316).
You can find the recommended tire
inflation pressures can on the Tire Label,
which is on the B-pillar or the edge of the
driver door. You can also find this
information on the Safety Compliance
Certification Label, affixed to either the
door hinge pillar, door-latch post, or the
door edge that meets the door latch post;
next to the driver seating position.
We strongly recommend maintaining these
tire pressures at all times. Failure to follow
the tire pressure recommendations can
cause uneven treadwear patterns, reduced
fuel economy, and adversely affect the
way your vehicle handles.
Note: Check and set the tire pressure at the
ambient temperature in which you are
intending to drive your vehicle and when the
tires are cold.
Note: Check your tire pressures at least
once per month.
If your vehicle has a spare tire, set the
pressure to the highest value given for your
vehicle and tire size combination. Notice to utility vehicle and truck
owners WARNING:
Utility vehicles have a
significantly higher rollover rate than
other types of vehicles. WARNING: Vehicles with a higher
center of gravity (utility and four-wheel
drive vehicles) handle differently than
vehicles with a lower center of gravity
(passenger cars). Avoid sharp turns,
excessive speed and abrupt steering in
these vehicles. Failure to drive cautiously
increases the risk of losing control of your
vehicle, vehicle rollover, personal injury
and death. WARNING:
In a rollover crash, an
unbelted person is significantly more
likely to die than a person wearing a
seatbelt. WARNING:
Do not become
overconfident in the ability of four-wheel
drive vehicles. Although a four-wheel
drive vehicle may accelerate better than
a two-wheel drive vehicle in low traction
situations, it won't stop any faster than
two-wheel drive vehicles. Always drive
at a safe speed.
Utility vehicles and trucks handle
differently than passenger cars in the
various driving conditions that are
encountered on streets, highways and
off-road. Utility vehicles and trucks are not
designed for cornering at speeds as high
as passenger cars any more than low-slung
sports cars are designed to perform
satisfactorily under off-road conditions.
314
Explorer (TUB) Canada/United States of America, enUSA, Edition date: 201807, Second-Printing Wheels and Tires
Page 320 of 571
The traction grades, from highest
to lowest are AA, A, B, and C. The
grades represent the tire
’s ability
to stop on wet pavement as
measured under controlled
conditions on specified
government test surfaces of
asphalt and concrete. A tire
marked C may have poor traction
performance.
Temperature A B C WARNING: The
temperature grade for this tire is
established for a tire that is
properly inflated and not
overloaded. Excessive speed,
underinflation, or excessive
loading, either separately or in
combination, can cause heat
buildup and possible tire failure.
The temperature grades are A
(the highest), B and C,
representing the tire ’s resistance
to the generation of heat and its
ability to dissipate heat when
tested under controlled conditions
on a specified indoor laboratory
test wheel. Sustained high
temperature can cause the
material of the tire to degenerate
and reduce tire life, and excessive
temperature can lead to sudden
tire failure. The grade C
corresponds to a level of
performance which all passenger
car tires must meet under the Federal Motor Vehicle Safety
Standard No. 139. Grades B and A
represent higher levels of
performance on the laboratory
test wheel than the minimum
required by law.
Glossary of Tire Terminology
*
Tire label: A label showing the
original equipment tire sizes,
recommended inflation pressure
and the maximum weight the
vehicle can carry.
*
Tire Identification Number
(TIN): A number on the sidewall
of each tire providing information
about the tire brand and
manufacturing plant, tire size and
date of manufacture. Also referred
to as DOT code.
*
Inflation pressure: A measure
of the amount of air in a tire.
*
Standard load: A class of
P-metric or Metric tires designed
to carry a maximum load at set
pressure. For example: For
P-metric tires
35 psi (2.4 bar) and
for Metric tires 36 psi (2.5 bar).
Increasing the inflation pressure
beyond this pressure will not
increase the tire ’s load carrying
capability.
*
Extra load: A class of P-metric
or Metric tires designed to carry a
heavier maximum load at
42 psi
(2.9 bar). Increasing the inflation
pressure beyond this pressure will
not increase the tire ’s load
carrying capability.
317
Explorer (TUB) Canada/United States of America, enUSA, Edition date: 201807, Second-Printing Wheels and Tires
Page 321 of 571
*kPa: Kilopascal, a metric unit of
air pressure.
*
PSI: Pounds per square inch, a
standard unit of air pressure.
*
Cold tire pressure: The tire
pressure when the vehicle has
been stationary and out of direct
sunlight for an hour or more and
prior to the vehicle being driven for
1 mi (1.6 km)
.
*
Recommended inflation
pressure: The cold inflation
pressure found on the Safety
Compliance Certification Label
(affixed to either the door hinge
pillar, door-latch post, or the door
edge that meets the door-latch
post, next to the driver's seating
position), or Tire Label located on
the B-Pillar or the edge of the
driver door.
* B-pillar: The structural member
at the side of the vehicle behind
the front door.
*
Bead area of the tire: Area of
the tire next to the rim.
*
Sidewall of the tire: Area
between the bead area and the
tread.
*
Tread area of the tire: Area of
the perimeter of the tire that
contacts the road when mounted
on the vehicle.
*Rim: The metal support (wheel)
for a tire or a tire and tube
assembly upon which the tire
beads are seated. Information Contained on the
Tire Sidewall
Both United States and Canada
Federal regulations require tire
manufacturers to place
standardized information on the
sidewall of all tires. This
information identifies and
describes the fundamental
characteristics of the tire and also
provides a U.S. DOT Tire
Identification Number for safety
standard certification and in case
of a recall.
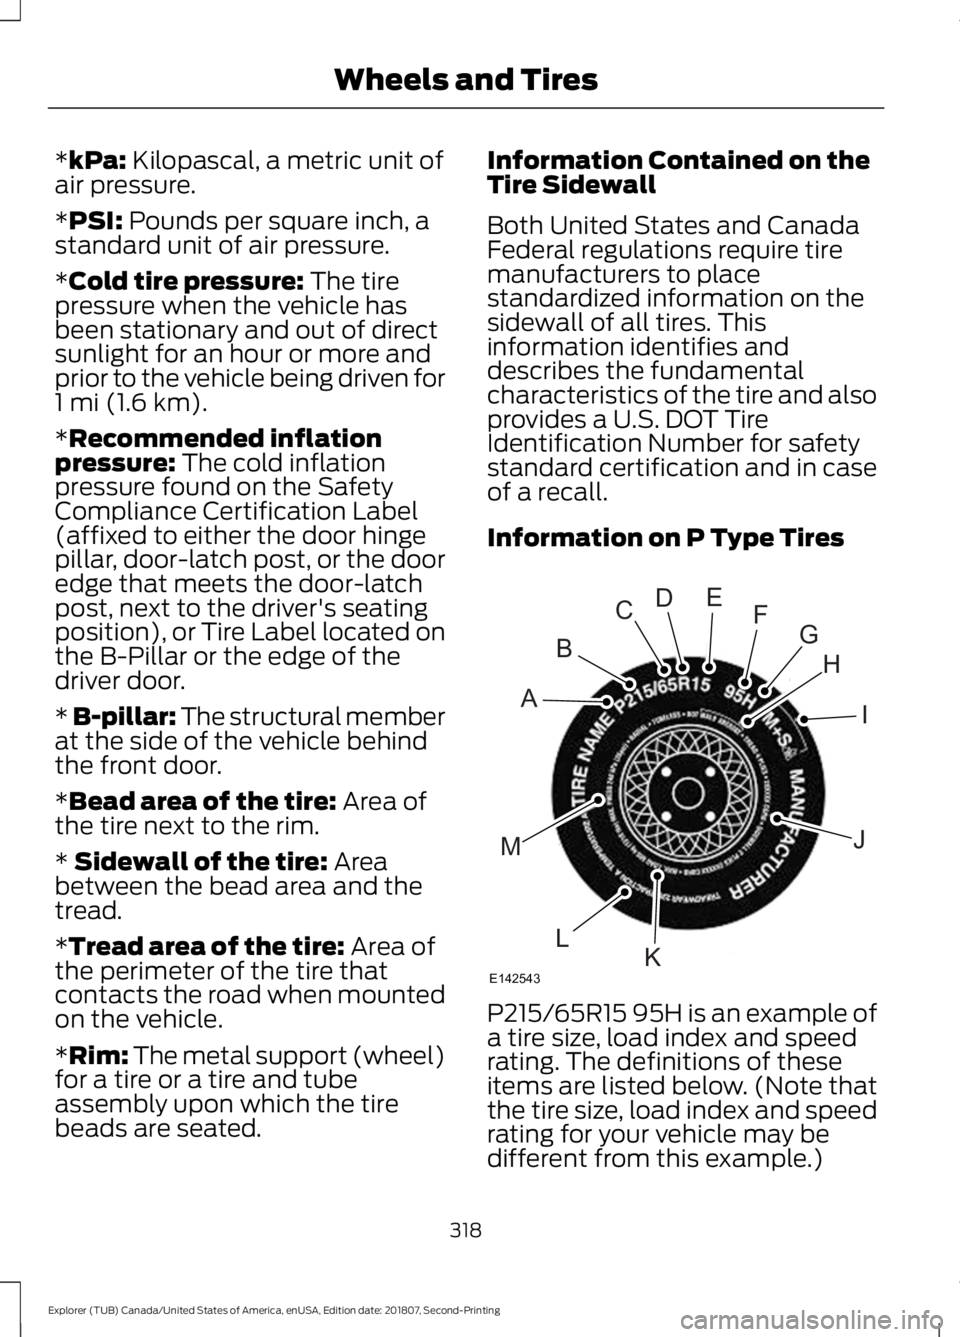
Information on P Type Tires
P215/65R15 95H is an example of
a tire size, load index and speed
rating. The definitions of these
items are listed below. (Note that
the tire size, load index and speed
rating for your vehicle may be
different from this example.)
318
Explorer (TUB) Canada/United States of America, enUSA, Edition date: 201807, Second-Printing Wheels and TiresH
I
J
KL
M
A
B
CDEFG
E142543