warning light FORD EXPLORER 2021 User Guide
[x] Cancel search | Manufacturer: FORD, Model Year: 2021, Model line: EXPLORER, Model: FORD EXPLORER 2021Pages: 577, PDF Size: 9.79 MB
Page 97 of 577
WHAT IS AUTOMATIC HIGH
BEAM CONTROL
The system turns on high beams if it is dark
enough and no other traffic is present. If it
detects an approaching vehicle
’s
headlamps or tail lamps, or street lighting
ahead, the system turns the high beams
off. Low beams remain on.
A camera sensor, centrally mounted
behind the windshield of your vehicle,
continuously monitors conditions to turn
the high beams on and off.
SWITCHING AUTOMATIC HIGH
BEAM CONTROL ON AND OFF WARNING: Do not use the system
in poor visibility, for example fog, heavy
rain, spray or snow.
1. Press
Settings on the touchscreen.
2. Press
Vehicle.
3. Press
Lighting.
Activating the Automatic High
Beam Control Switch the lighting control to the
autolamps position. See
Autolamps
(page 88).
Note: The lighting control defaults to
autolamps each time you switch your
vehicle on.
When active, the high beams turn on if:
• The ambient light level is low enough.
• There is no traffic in front of your
vehicle.
• The vehicle speed is greater than
approximately
32 mph (51 km/h). When active, the high beams turn off if:
•
The ambient light level is high enough
that high beams are not required.
• The system detects an approaching
vehicle's headlamps or tail lamps.
• The system detects severe rain, snow
or fog.
• The camera is blocked.
• The vehicle speed falls below
approximately
27 mph (44 km/h).
Note: The deactivation speed is lower on
curves.
Note: High beam reactivation may be
delayed in certain curvy road situations.
Note: The system may not operate properly
if the sensor is blocked. Keep the windshield
free from obstruction or damage.
Note: The system may not operate properly
in cold or inclement conditions. You can
switch on the high beams by overriding the
system.
Note: If the system detects a blockage, for
example bird droppings, bug splatter, snow
or ice, the system goes into low beam mode
until you clear the blockage. A message may
appear in the information display if the
camera is blocked.
Note: Using much larger tires or equipping
vehicle accessories such as snowplows can
modify your vehicle's ride height and
degrade automatic high beam control
performance.
AUTOMATIC HIGH BEAM
CONTROL INDICATORS The indicator illuminates to
confirm when the system is
ready to assist.
94
Explorer (CTW), enUSA, Edition date: 202007, Second-Printing Automatic High Beam ControlE281240
Page 99 of 577
POWER WINDOWS
WARNING: Do not leave children
unattended in your vehicle and do not
let them play with the power windows.
Failure to follow this instruction could
result in personal injury. WARNING:
When closing the
power windows, verify they are free of
obstruction and make sure that children
and pets are not in the proximity of the
window openings. Press the control to open the
window. Lift the control to close
the window.
Note: If you hear a pulsing noise when just
one of the windows is open. Lower the
opposite window slightly to reduce this
noise.
One-Touch Down
Note: One-touch down applies to the front
windows only.
Fully press the switch and release it. Press
again or lift it to stop the window.
One-Touch Up
Note: One-touch up applies to the front
windows only.
Fully lift the switch and release it. Press or
lift it again to stop the window.
Resetting One-Touch Up
Start the engine.
1. Lift and hold the window switch until you fully close the door window.
Continue to hold the switch for a few
seconds after you close the window.
2. Release the window switch. 3.
Press and hold the window switch until
you fully open the door window.
4. Release the window switch.
5. Lift and hold the window switch until you fully close the window.
6. Test for correct window operation by carrying out the one-touch down and
one-touch up features.
Bounce-Back
The window stops when closing. It reverses
some distance if there is an obstacle in the
way.
Overriding the Bounce-Back Feature WARNING:
If you override
bounce-back, the window does not
reverse if it detects an obstacle. Take
care when closing the windows to avoid
personal injury or damage to your
vehicle.
The window stops if you release the switch
before the window fully closes. Pull up the
window switch and hold within a few
seconds of the window reaching the
bounce-back position. The window travels
up with no bounce-back protection.
Window Lock 96
Explorer (CTW), enUSA, Edition date: 202007, Second-Printing Windows and Mirrors E295318
Page 100 of 577
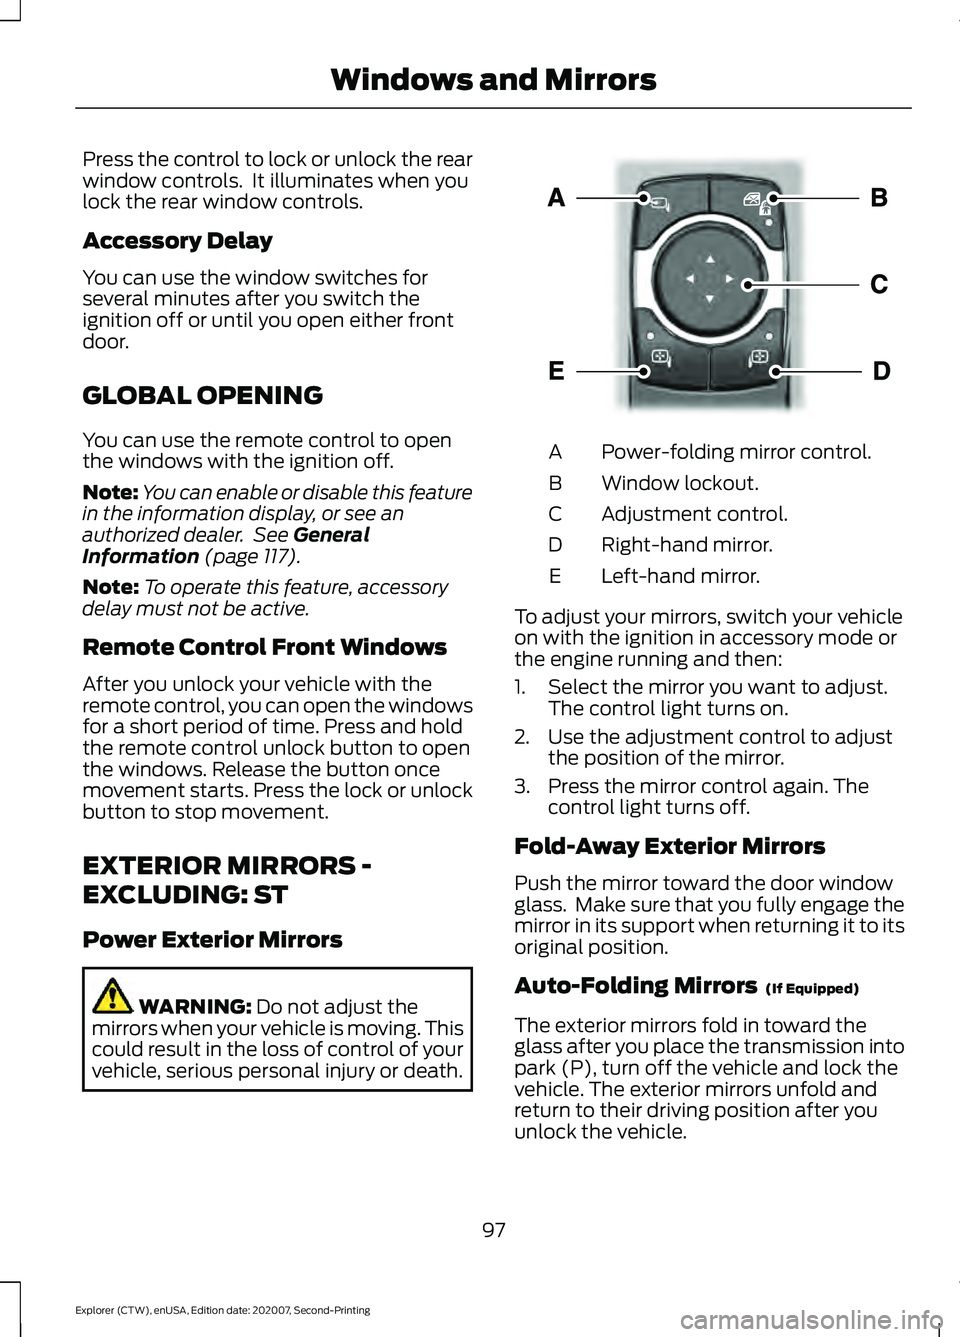
Press the control to lock or unlock the rear
window controls. It illuminates when you
lock the rear window controls.
Accessory Delay
You can use the window switches for
several minutes after you switch the
ignition off or until you open either front
door.
GLOBAL OPENING
You can use the remote control to open
the windows with the ignition off.
Note:
You can enable or disable this feature
in the information display, or see an
authorized dealer. See General
Information (page 117).
Note: To operate this feature, accessory
delay must not be active.
Remote Control Front Windows
After you unlock your vehicle with the
remote control, you can open the windows
for a short period of time. Press and hold
the remote control unlock button to open
the windows. Release the button once
movement starts. Press the lock or unlock
button to stop movement.
EXTERIOR MIRRORS -
EXCLUDING: ST
Power Exterior Mirrors WARNING:
Do not adjust the
mirrors when your vehicle is moving. This
could result in the loss of control of your
vehicle, serious personal injury or death. Power-folding mirror control.
A
Window lockout.
B
Adjustment control.
C
Right-hand mirror.
D
Left-hand mirror.
E
To adjust your mirrors, switch your vehicle
on with the ignition in accessory mode or
the engine running and then:
1. Select the mirror you want to adjust. The control light turns on.
2. Use the adjustment control to adjust the position of the mirror.
3. Press the mirror control again. The control light turns off.
Fold-Away Exterior Mirrors
Push the mirror toward the door window
glass. Make sure that you fully engage the
mirror in its support when returning it to its
original position.
Auto-Folding Mirrors (If Equipped)
The exterior mirrors fold in toward the
glass after you place the transmission into
park (P), turn off the vehicle and lock the
vehicle. The exterior mirrors unfold and
return to their driving position after you
unlock the vehicle.
97
Explorer (CTW), enUSA, Edition date: 202007, Second-Printing Windows and MirrorsE295322
Page 101 of 577
You can switch this feature on and off
through the information display. See
General Information (page 117).
You can fold the mirrors on demand by
pressing the power-folding mirror control
on the door. The control lights and the
mirrors fold in toward the glass. Press the
control again to unfold the mirrors. The
control light turns off.
Note: If you use the power-folding control
to fold the mirrors on demand with the auto
fold feature on, you must use the control
again to unfold them.
Loose Mirror
If you manually fold your power-folding
mirrors, they may not work properly even
after you re-position them. You need to
reset them if:
• The mirrors vibrate when you drive.
• The mirrors feel loose.
• The mirrors do not stay in the folded or
unfolded position.
• One of the mirrors is not in its normal
driving position.
To reset the power-fold feature, use the
power-folding mirror control to fold and
unfold the mirrors. You may hear a loud
noise as you reset the power-folding
mirrors. This sound is normal. Repeat this
process as needed each time you manually
fold the mirrors.
Heated Exterior Mirrors
(If Equipped)
See
Heated Exterior Mirrors (page 144).
Memory Mirrors
(If Equipped)
You can save and recall the mirror
positions through the memory function.
See
Memory Function (page 152). Auto-dimming Feature
(If Equipped)
The driver exterior mirror dims when the
interior auto-dimming mirror turns on.
Direction Indicator Mirrors (If Equipped)
When the vehicle is running, the
forward-facing portion of the appropriate
mirror housing blinks when you switch on
the direction indicator.
Puddle Lamps
(If Equipped)
The lamps on the bottom part of the mirror
housing light when you use your
transmitter to unlock the doors or when
you open a door.
360-Degree Camera
(If Equipped)
See
360 Degree Camera (page 241).
Blind Spot Information System
See
Blind Spot Information System
(page 264).
EXTERIOR MIRRORS - ST
Power Exterior Mirrors WARNING:
Do not adjust the
mirrors when your vehicle is moving. This
could result in the loss of control of your
vehicle, serious personal injury or death.
98
Explorer (CTW), enUSA, Edition date: 202007, Second-Printing Windows and Mirrors
Page 103 of 577
Heated Exterior Mirrors
See Heated Exterior Mirrors (page 144).
Memory Mirrors
You can save and recall the mirror
positions through the memory function.
See
Memory Function (page 152).
Auto-dimming Feature
The driver exterior mirror dims when the
interior auto-dimming mirror turns on.
Direction Indicator Mirrors
When the vehicle is running, the
forward-facing portion of the appropriate
mirror housing blinks when you switch on
the direction indicator.
Puddle Lamps
The lamps on the bottom part of the mirror
housing light when you use your
transmitter to unlock the doors or when
you open a door.
Blind Spot Information System
See
Blind Spot Information System
(page 264).
INTERIOR MIRROR WARNING:
Do not adjust the
mirrors when your vehicle is moving. This
could result in the loss of control of your
vehicle, serious personal injury or death.
Note: Do not clean the mirror housing or
glass with harsh abrasives, fuel or other
petroleum-based cleaning products. You can adjust the interior mirror to your
preference. Some mirrors also have a
second pivot point. This lets you move the
mirror head up or down and from side to
side.
Manual Dimming Mirror
Pull the tab below the mirror toward you
to reduce the effect of bright light from
behind.
Automatic Dimming Mirror (If Equipped)
Note:
Do not block the sensors on the front
and back of the mirror. A rear center
passenger or raised rear center head
restraint may also block light from reaching
the sensor.
The mirror dims to reduce the effect of
bright light from behind. It returns to
normal when the bright light from behind
is no longer present or if you shift into
reverse (R).
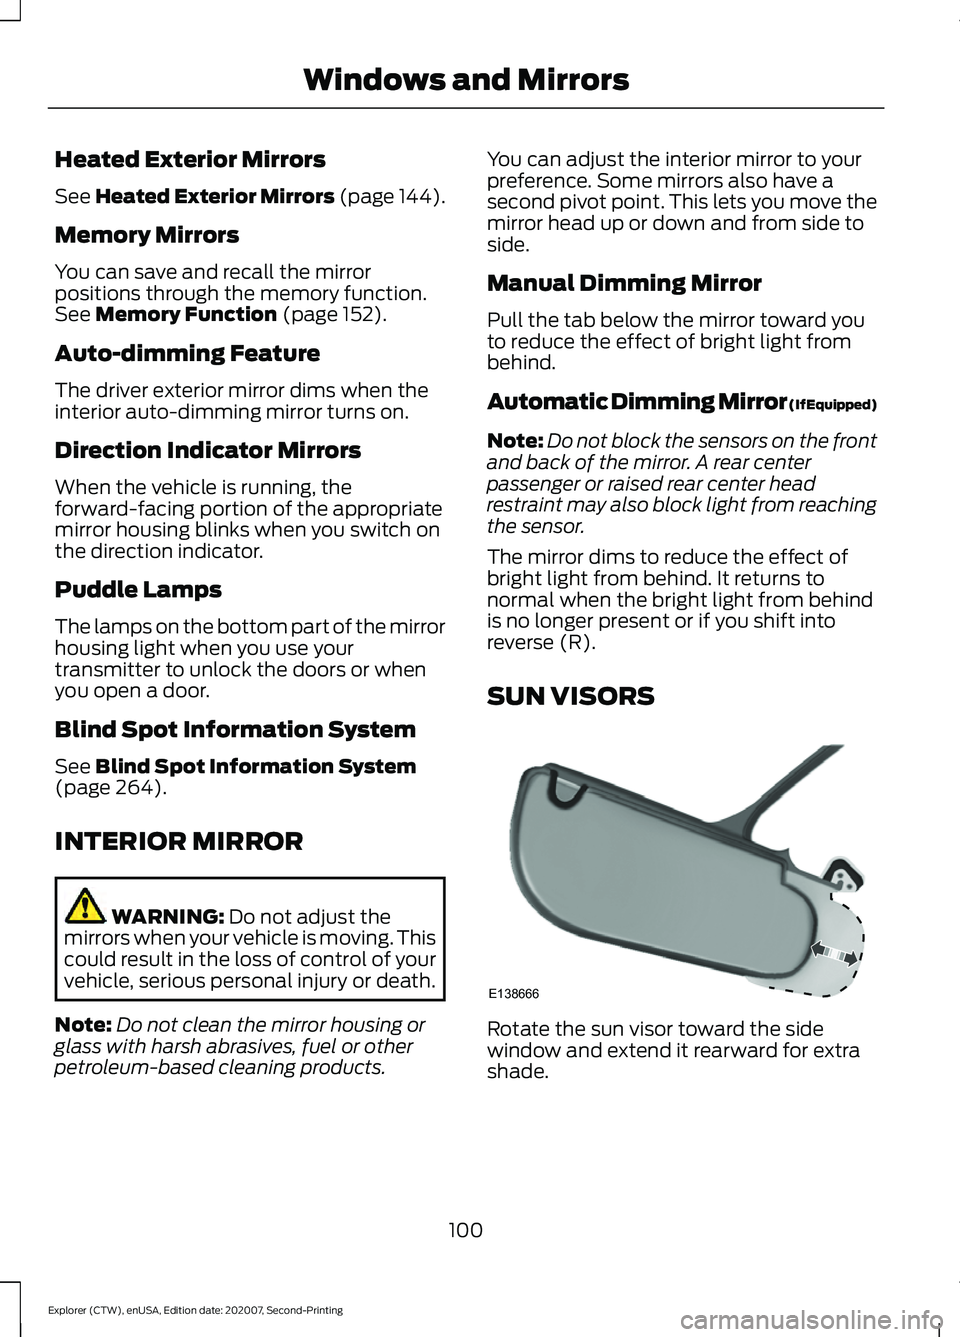
SUN VISORS Rotate the sun visor toward the side
window and extend it rearward for extra
shade.
100
Explorer (CTW), enUSA, Edition date: 202007, Second-Printing Windows and MirrorsE138666
Page 107 of 577
Note:
The fuel gauge may vary slightly
when your vehicle is moving or on a slope.
Low Fuel Reminder
A low fuel level reminder displays and
sounds when the distance to empty
reaches 75 mi (120 km) to empty for
MyKey, and at 50 mi (80 km), 25 mi
(40 km), 10 mi (20 km) and 0 mi (0 km)
for all vehicle keys.
Note: The low fuel reminder can appear at
different fuel gauge positions depending on
fuel economy conditions. This variation is
normal.
Distance to Empty
Indicates the approximate distance your
vehicle can travel on the fuel remaining in
the tank. Changes in driving pattern can
cause the value to not only decrease but
also increase or stay constant for periods
of time. Engine Coolant Temperature
Gauge WARNING:
Do not remove the
coolant reservoir cap when the engine is
on or the cooling system is hot. Wait 10
minutes for the cooling system to cool
down. Cover the coolant reservoir cap
with a thick cloth to prevent the
possibility of scalding and slowly remove
the cap. Failure to follow this instruction
could result in personal injury.
Indicates engine coolant temperature. At
normal operating temperature, the level
indicator will be in the normal range. If the
engine coolant temperature exceeds the
normal range, stop your vehicle as soon as
safely possible, switch off the engine and
let the engine cool.
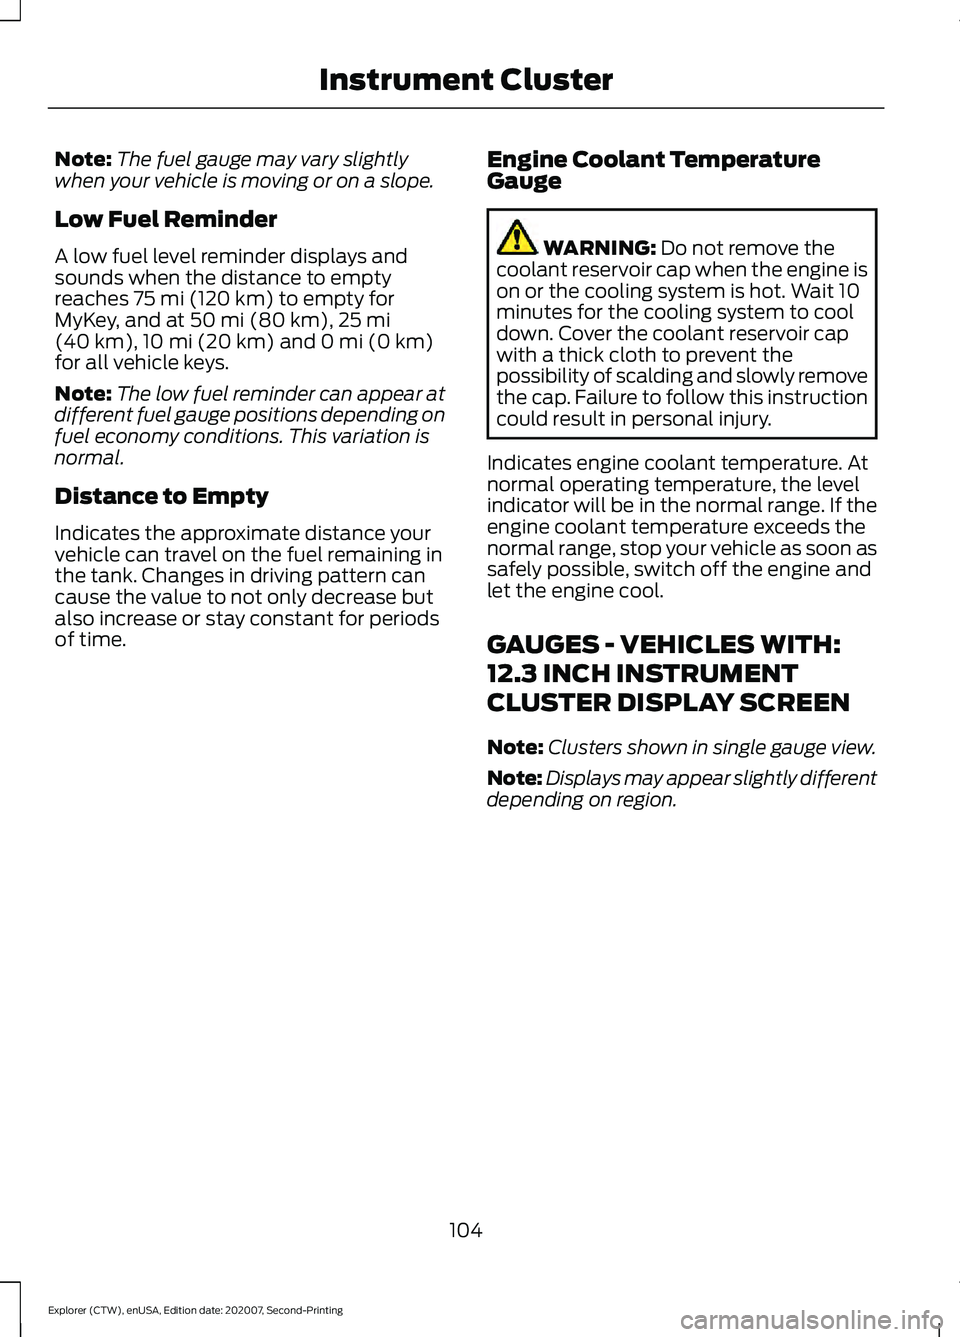
GAUGES - VEHICLES WITH:
12.3 INCH INSTRUMENT
CLUSTER DISPLAY SCREEN
Note: Clusters shown in single gauge view.
Note: Displays may appear slightly different
depending on region.
104
Explorer (CTW), enUSA, Edition date: 202007, Second-Printing Instrument Cluster
Page 110 of 577
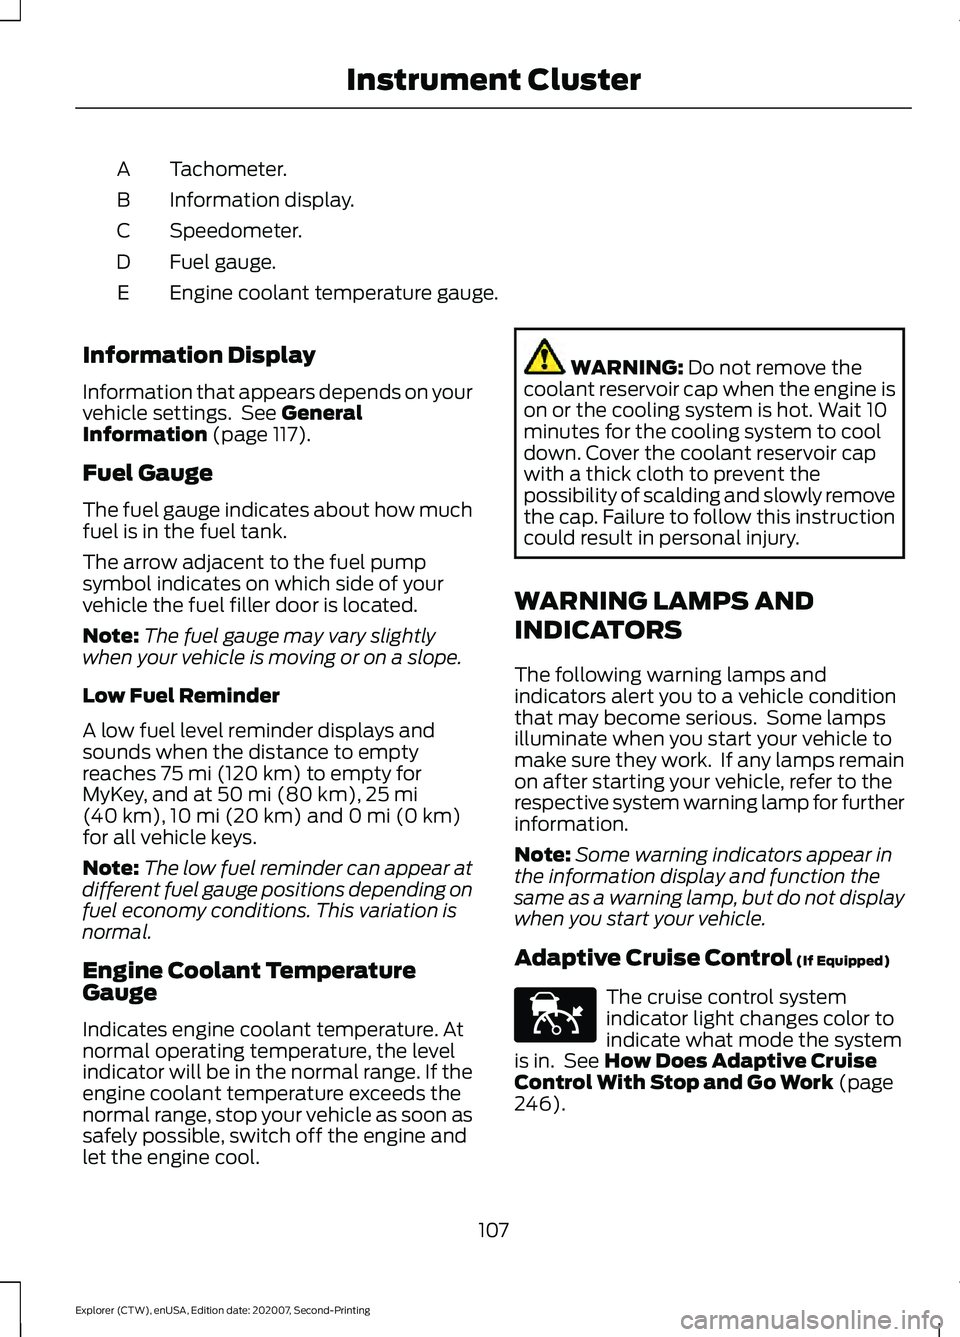
Tachometer.
A
Information display.
B
Speedometer.
C
Fuel gauge.
D
Engine coolant temperature gauge.
E
Information Display
Information that appears depends on your
vehicle settings. See General
Information (page 117).
Fuel Gauge
The fuel gauge indicates about how much
fuel is in the fuel tank.
The arrow adjacent to the fuel pump
symbol indicates on which side of your
vehicle the fuel filler door is located.
Note: The fuel gauge may vary slightly
when your vehicle is moving or on a slope.
Low Fuel Reminder
A low fuel level reminder displays and
sounds when the distance to empty
reaches
75 mi (120 km) to empty for
MyKey, and at 50 mi (80 km), 25 mi
(40 km), 10 mi (20 km) and 0 mi (0 km)
for all vehicle keys.
Note: The low fuel reminder can appear at
different fuel gauge positions depending on
fuel economy conditions. This variation is
normal.
Engine Coolant Temperature
Gauge
Indicates engine coolant temperature. At
normal operating temperature, the level
indicator will be in the normal range. If the
engine coolant temperature exceeds the
normal range, stop your vehicle as soon as
safely possible, switch off the engine and
let the engine cool. WARNING:
Do not remove the
coolant reservoir cap when the engine is
on or the cooling system is hot. Wait 10
minutes for the cooling system to cool
down. Cover the coolant reservoir cap
with a thick cloth to prevent the
possibility of scalding and slowly remove
the cap. Failure to follow this instruction
could result in personal injury.
WARNING LAMPS AND
INDICATORS
The following warning lamps and
indicators alert you to a vehicle condition
that may become serious. Some lamps
illuminate when you start your vehicle to
make sure they work. If any lamps remain
on after starting your vehicle, refer to the
respective system warning lamp for further
information.
Note: Some warning indicators appear in
the information display and function the
same as a warning lamp, but do not display
when you start your vehicle.
Adaptive Cruise Control
(If Equipped) The cruise control system
indicator light changes color to
indicate what mode the system
is in. See
How Does Adaptive Cruise
Control With Stop and Go Work (page
246).
107
Explorer (CTW), enUSA, Edition date: 202007, Second-Printing Instrument ClusterE144524
Page 111 of 577
On (white light): Illuminates when you
switch on the adaptive cruise control
system. Turns off when you switch the
cruise control system off.
Engaged (green light): Illuminates when
you engage the adaptive cruise control
system. Turns off when you disengage the
cruise control system.
Anti-Lock Braking System
If it illuminates when you are
driving, this indicates a system
error. You continue to have the
normal braking (without ABS) unless the
brake system warning lamp also
illuminates. Have the system checked by
an authorized dealer.
Automatic High Beam Control Illuminates when this feature is
on. See What Is Automatic
High Beam Control (page 94).
Auto Hold Active Illuminates when the system
holds your vehicle stationary.
Auto Hold Unavailable Illuminates when the system is
on, but unavailable to hold your
vehicle stationary.
Auto Start-stop
(If Equipped) Illuminates when the engine
shuts down or in conjunction
with a message. Battery If it illuminates while driving, it
indicates a system error. Switch
off all unnecessary electrical
equipment and have the system checked
by an authorized dealer immediately.
Blind Spot Monitor Illuminates when you switch this
feature off or in conjunction with
a message. See
Blind Spot
Information System (page 264).
Brake System Warning Lamp WARNING:
Driving your vehicle
with the warning lamp on is dangerous.
A significant decrease in braking
performance may occur. It may take you
longer to stop your vehicle. Have your
vehicle checked as soon as possible.
Driving extended distances with the
parking brake engaged can cause brake
failure and the risk of personal injury.
Note: Indicators vary depending on region.
This lamp is a dual function lamp and
illuminates when:
• You apply the parking brake with the
ignition on.
• Your vehicle has a brake fault or low
brake fluid level, regardless of parking
brake position. If the lamp illuminates when you
are moving, you may have the
parking brake applied. Make sure
the parking brake is off. Have
your vehicle checked as soon as
possible if the lamp continues to
illuminate.
108
Explorer (CTW), enUSA, Edition date: 202007, Second-Printing Instrument Cluster E197933 E322410 E197934 E322411 E151262 E270480
Page 115 of 577
GENERAL INFORMATION -
VEHICLES WITH: 6.5 INCH
INSTRUMENT CLUSTER
DISPLAY SCREEN
WARNING: Driving while distracted
can result in loss of vehicle control, crash
and injury. We strongly recommend that
you use extreme caution when using any
device that may take your focus off the
road. Your primary responsibility is the
safe operation of your vehicle. We
recommend against the use of any
hand-held device while driving and
encourage the use of voice-operated
systems when possible. Make sure you
are aware of all applicable local laws
that may affect the use of electronic
devices while driving.
You can control various systems on your
vehicle using the information display
controls on the steering wheel.
Corresponding information appears in the
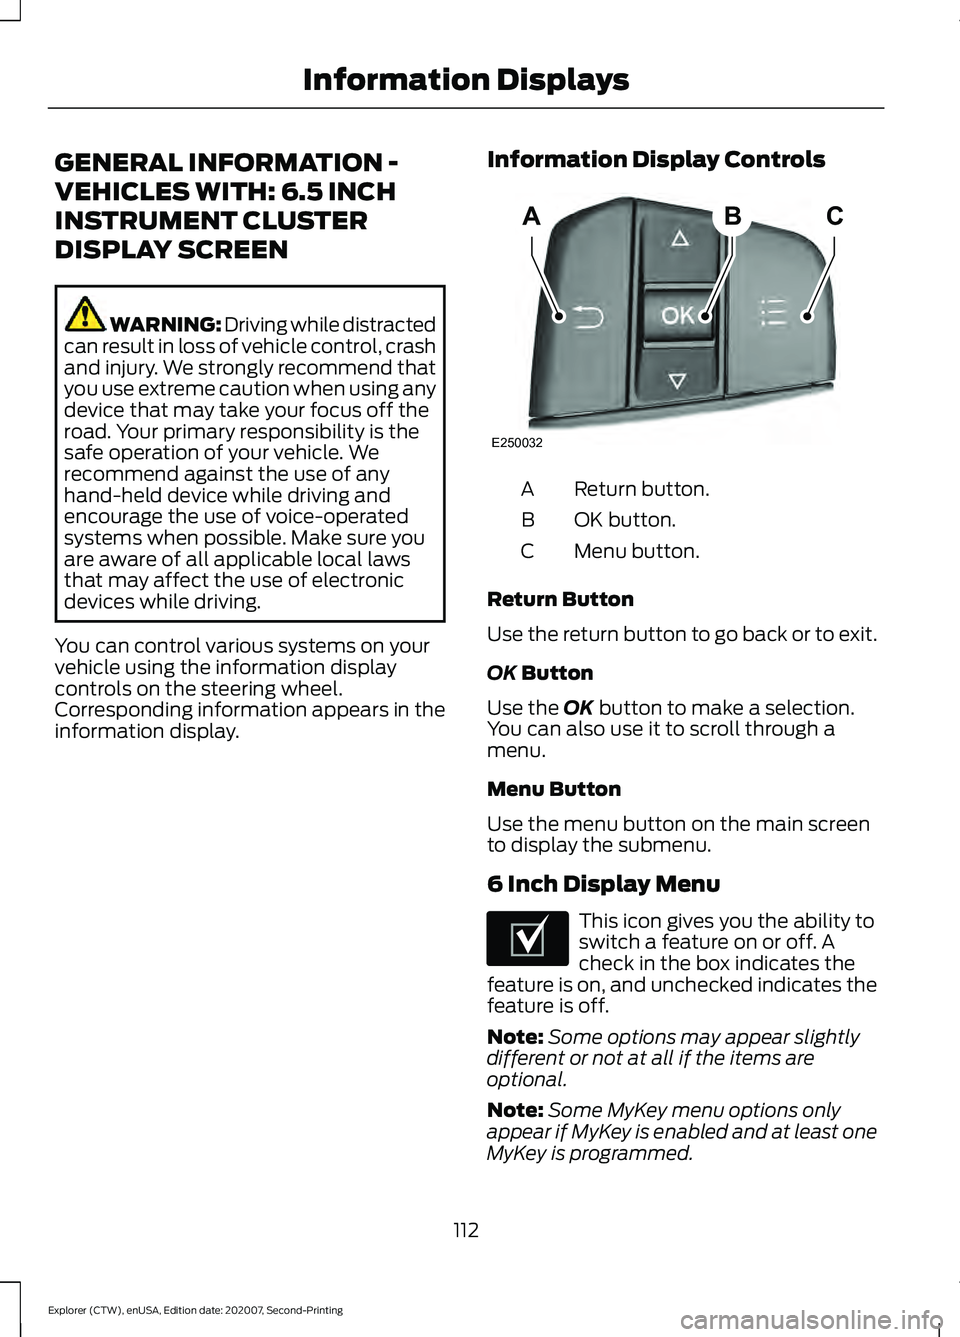
information display. Information Display Controls Return button.
A
OK button.
B
Menu button.
C
Return Button
Use the return button to go back or to exit.
OK Button
Use the
OK button to make a selection.
You can also use it to scroll through a
menu.
Menu Button
Use the menu button on the main screen
to display the submenu.
6 Inch Display Menu This icon gives you the ability to
switch a feature on or off. A
check in the box indicates the
feature is on, and unchecked indicates the
feature is off.
Note: Some options may appear slightly
different or not at all if the items are
optional.
Note: Some MyKey menu options only
appear if MyKey is enabled and at least one
MyKey is programmed.
112
Explorer (CTW), enUSA, Edition date: 202007, Second-Printing Information DisplaysABC
E250032 E204495
Page 138 of 577
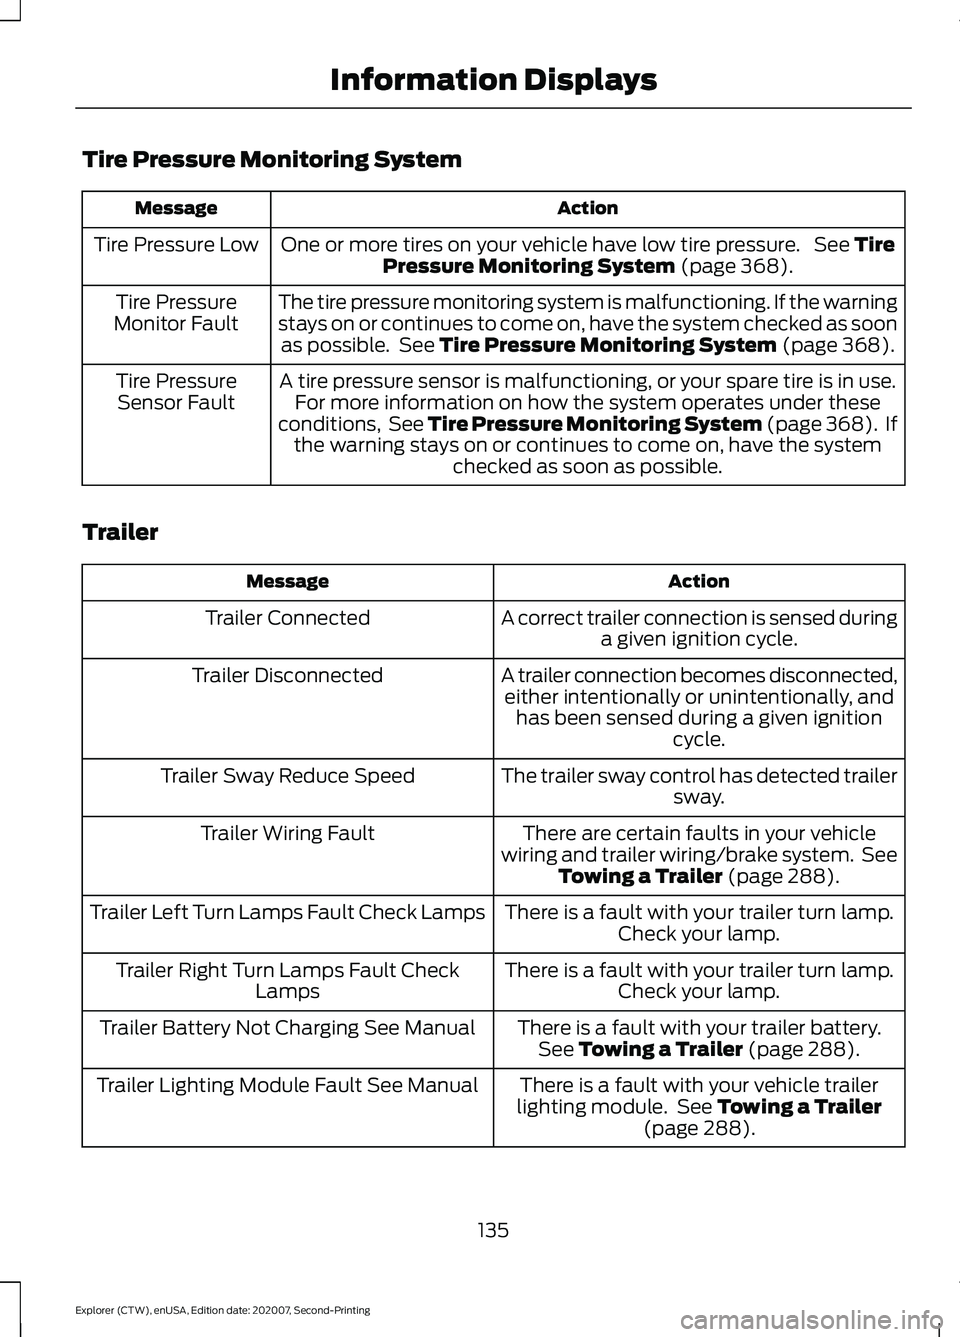
Tire Pressure Monitoring System
Action
Message
One or more tires on your vehicle have low tire pressure. See Tire
Pressure Monitoring System (page 368).
Tire Pressure Low
The tire pressure monitoring system is malfunctioning. If the warning
stays on or continues to come on, have the system checked as soonas possible. See
Tire Pressure Monitoring System (page 368).
Tire Pressure
Monitor Fault
A tire pressure sensor is malfunctioning, or your spare tire is in use.For more information on how the system operates under these
conditions, See
Tire Pressure Monitoring System (page 368). If
the warning stays on or continues to come on, have the system checked as soon as possible.
Tire Pressure
Sensor Fault
Trailer Action
Message
A correct trailer connection is sensed duringa given ignition cycle.
Trailer Connected
A trailer connection becomes disconnected,either intentionally or unintentionally, and has been sensed during a given ignition cycle.
Trailer Disconnected
The trailer sway control has detected trailersway.
Trailer Sway Reduce Speed
There are certain faults in your vehicle
wiring and trailer wiring/brake system. See Towing a Trailer
(page 288).
Trailer Wiring Fault
There is a fault with your trailer turn lamp.Check your lamp.
Trailer Left Turn Lamps Fault Check Lamps
There is a fault with your trailer turn lamp.Check your lamp.
Trailer Right Turn Lamps Fault Check
Lamps
There is a fault with your trailer battery.See
Towing a Trailer (page 288).
Trailer Battery Not Charging See Manual
There is a fault with your vehicle trailer
lighting module. See
Towing a Trailer
(page 288).
Trailer Lighting Module Fault See Manual
135
Explorer (CTW), enUSA, Edition date: 202007, Second-Printing Information Displays