FORD EXPLORER 2021 Owner's Manual
Manufacturer: FORD, Model Year: 2021, Model line: EXPLORER, Model: FORD EXPLORER 2021Pages: 577, PDF Size: 9.79 MB
Page 21 of 577
MOBILE DEVICE DATA
If you connect a mobile device to your
vehicle, you can display data from your
device on the touchscreen for example,
music and album art. You can share your
vehicle data with mobile apps on your
device through the system. See Apps
(page 461).
The mobile apps function operates by your
connected device sending data to us in the
United States. The data is encrypted and
includes, for example, the vehicle
identification number of your vehicle, the
SYNC module serial number, odometer,
enabled apps, usage statistics and
debugging information. We retain it only
as long as necessary to provide the service,
to troubleshoot, for continuous
improvement and to offer you products
and services that may be of interest to you
according to your preferences and where
allowed by law.
If you connect a cell phone to the system,
the system creates a profile that links to
that cell phone. The cell phone profile
enables more mobile features and efficient
operation. The profile contains, for
example data from your phonebook, read
and unread text messages and call history,
including history of calls when your cell
phone was not connected to the system.
If you connect a media device, the system
creates and retains a media device index
of supported media content. The system
also records a short diagnostic log of
approximately 10 minutes of all recent
system activity. The cell phone profile, media device index
and diagnostic log remain in your vehicle
unless you delete them and are generally
accessible only in your vehicle when you
connect your cell phone or media device.
If you no longer plan to use the system or
your vehicle, we recommend you use the
master reset function to erase the stored
information. See Settings (page 464).
System data cannot be accessed without
special equipment and access to your
vehicle's module.
For additional information about our
privacy policy, refer to the local Ford
website.
Note: To find out if your vehicle has
connectivity technology, visit
www .For dC onne c t e d . c om .
EMERGENCY CALL SYSTEM
DATA
When the emergency call system is active,
it may disclose to emergency services that
your vehicle has been in a crash involving
the deployment of an airbag or activation
of the fuel pump shut-off. Certain versions
or updates to the emergency call system
may also be capable of electronically or
verbally disclosing to emergency services
operators your vehicle location or other
details about your vehicle or crash to assist
emergency services operators to provide
the most appropriate emergency services.
If you do not want to disclose this
information, do not activate the emergency
call system.
Note: You cannot deactivate emergency
call systems that are required by law.
18
Explorer (CTW), enUSA, Edition date: 202007, Second-Printing Data Privacy
Page 22 of 577
PROTECTING THE
ENVIRONMENT
You should play your part in protecting the
environment. Correct vehicle usage and
the authorized disposal of waste, cleaning
and lubrication materials are significant
steps toward this aim.
For additional information about our
sustainability progress and initiatives, visit
www
.sus t ainabilit y .f or d . c om .
19
Explorer (CTW), enUSA, Edition date: 202007, Second-Printing Environment
Page 23 of 577
AT A GLANCE - ST
Exterior
•
Front and rear fascias feature unique
ST grille and unique finish.
• ST badging in front grille and on rear
liftgate.
• Trim features unique ST gloss black
finish.
• E-X-P-L-O-R-E-R lettering across
hood.
• Blackout treatment on headlight and
taillight lenses.
Interior
• Unique ST interior trim.
• Ford Performance sill plates.
• ST flat-bottom steering wheel with
integrated transmission shift paddle
controls.
• Selectable Drive Mode controller with
7 settings (Normal, Eco, Sport, Trail,
Slippery, Deep Snow/Sand and
Tow/Haul).
• Unique electronic sound enhancement
in Sport Selectable Drive Mode.
Chassis
• Unique ST-tuned suspension featuring
32 N/mm front coil springs and a 34
mm hollow front stabilizer bar and 106
N/mm rear coil springs and a 21.7 mm
hollow rear stabilizer bar.
• Standard ST brake system consists of
345 mm diameter vented front rotors
with two piston calipers and low-dust
linings; 326 mm solid rear rotors with
single-piston brake calipers and
electric integrated park brake with low
dust linings. •
Optional ST braking system includes
363 mm diameter vented front rotors
with heavy duty two-piston calipers
and low-dust linings; 350 mm diameter
vented rear rotors with heavy-duty
single-piston brake calipers and
electric integrated park brake with
low-dust linings; system requires 21 x
9-inch wheels and P275/45R21
all-season tires.
• Optional low-metallic brake linings are
included with optional P275/45R21
summer tire (late availability).
• ST-tuned electric power assist steering
rack and pinion.
• AdvanceTrac with stability
enhancement system with four modes:
Default, Traction Control Off, Sport and
Disabled.
• Aluminum ST 20 in (50.8 cm) x 8.5 in
(21.6 cm) wheels standard; 21 in
(53.3 cm) x 9 in (22.9 cm) wheels
optional.
• P255/55R20 all-season tires or
optional P275/45R21 all-season tires.
Powertrain
• 3.0L V6 DOHC GTDI engine, 400
horsepower, 415 lb-ft.
• 10R60 10-speed automatic
transmission with SelectShift manual
shift mode.
• 3.58 axle ratios.
• Unique transmission calibration in
Sport Selectable Drive Mode.
• Dual exhaust with quad-tip outlets.
20
Explorer (CTW), enUSA, Edition date: 202007, Second-Printing At a Glance
Page 24 of 577
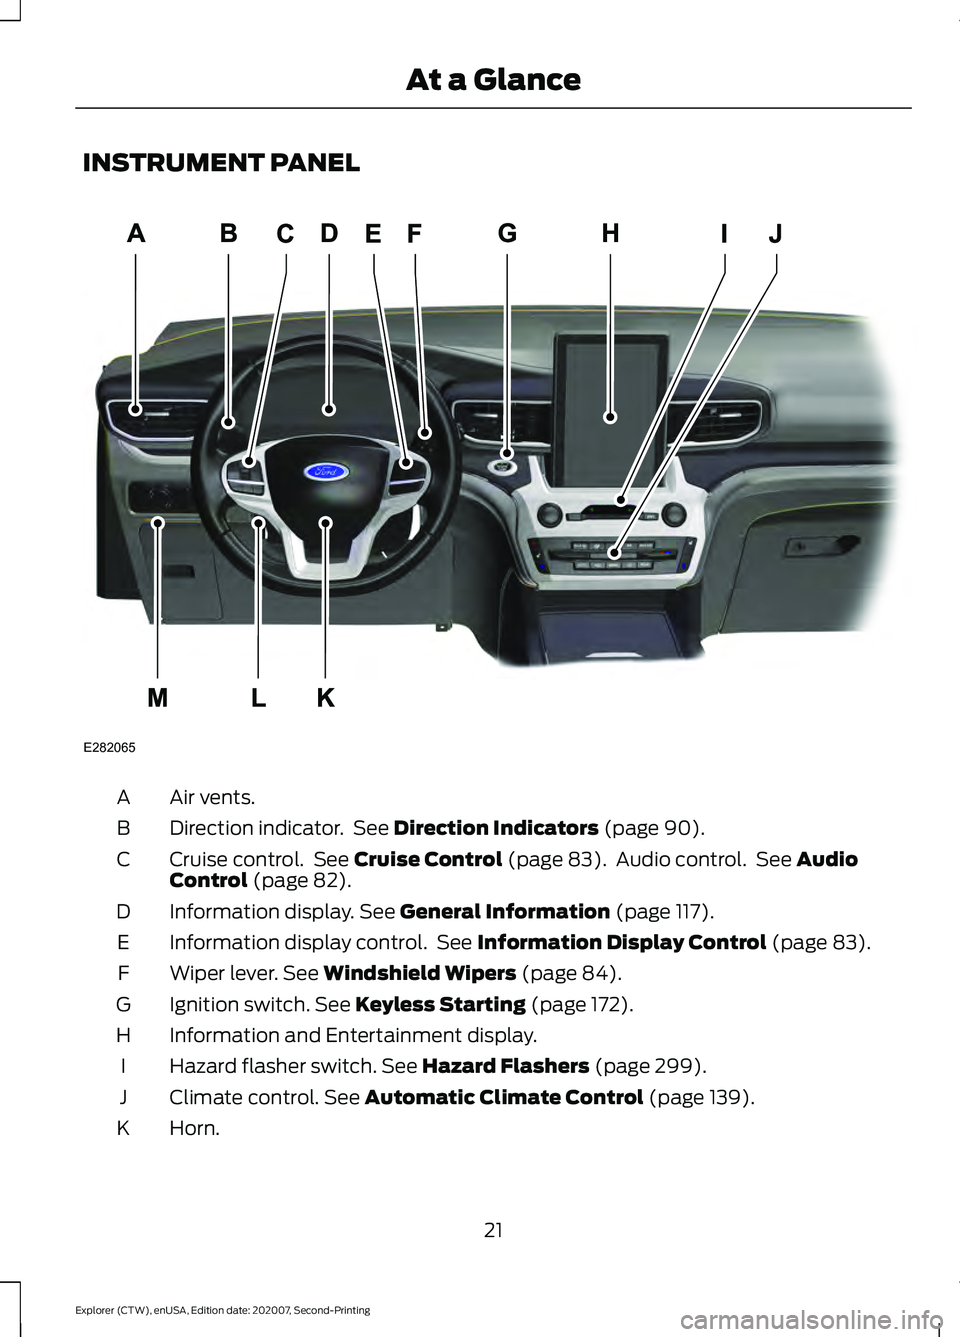
INSTRUMENT PANEL
Air vents.
A
Direction indicator. See Direction Indicators (page 90).
B
Cruise control. See
Cruise Control (page 83). Audio control. See Audio
Control (page 82).
C
Information display.
See General Information (page 117).
D
Information display control. See
Information Display Control (page 83).
E
Wiper lever.
See Windshield Wipers (page 84).
F
Ignition switch.
See Keyless Starting (page 172).
G
Information and Entertainment display.
H
Hazard flasher switch.
See Hazard Flashers (page 299).
I
Climate control.
See Automatic Climate Control (page 139).
J
Horn.
K
21
Explorer (CTW), enUSA, Edition date: 202007, Second-Printing At a GlanceE282065
A
Page 25 of 577
Steering wheel adjustment. See Adjusting the Steering Wheel (page 80).
L
Lighting control. See Lighting Control (page 87). Power liftgate release. See
Power Liftgate
(page 74).
M
22
Explorer (CTW), enUSA, Edition date: 202007, Second-Printing At a Glance
Page 26 of 577
GENERAL INFORMATION
See the following sections for directions
on how to properly use safety restraints
for children.
WARNING: Always make sure your
child is secured properly in a device that
is appropriate for their height, age and
weight. Child safety restraints must be
bought separately from your vehicle.
Failure to follow these instructions and
guidelines may result in an increased risk
of serious injury or death to your child. WARNING: All children are shaped
differently. The National Highway Traffic
Safety Administration and other safety
organizations, base their
recommendations for child restraints on
probable child height, age and weight
thresholds, or on the minimum
requirements of the law. We recommend
that you check with a NHTSA Certified
Child Passenger Safety Technician (CPST) to make sure that you properly
install the child restraint in your vehicle
and that you consult your pediatrician to
make sure you have a child restraint
appropriate for your child. To locate a
child restraint fitting station and CPST,
contact NHTSA toll free at
1-888-327-4236 or go to
www.nhtsa.dot.gov. In Canada, contact
Transport Canada toll free at
1-800-333-0371 or go to www.tc.gc.ca
to find a Child Car Seat Clinic in your
area. Failure to properly restrain children
in child restraints made especially for
their height, age and weight, may result
in an increased risk of serious injury or
death to your child.
WARNING:
On hot days, the
temperature inside the vehicle can rise
very quickly. Exposure of people or
animals to these high temperatures for
even a short time can cause death or
serious heat related injuries, including
brain damage. Small children are
particularly at risk.
23
Explorer (CTW), enUSA, Edition date: 202007, Second-Printing Child Safety
Page 27 of 577
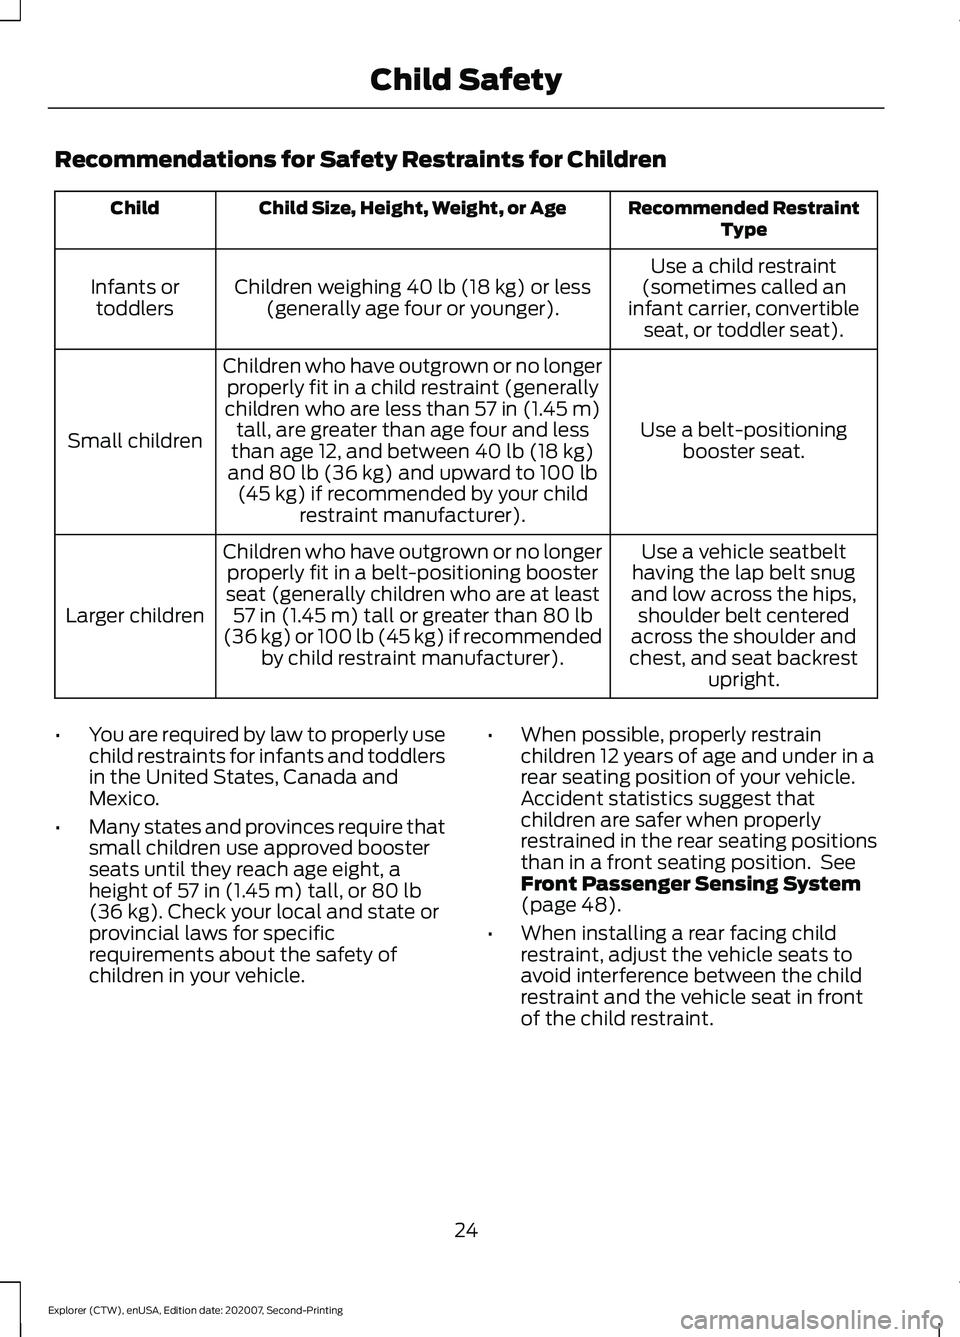
Recommendations for Safety Restraints for Children
Recommended Restraint
Type
Child Size, Height, Weight, or Age
Child
Use a child restraint
(sometimes called an
infant carrier, convertible seat, or toddler seat).
Children weighing 40 lb (18 kg) or less
(generally age four or younger).
Infants or
toddlers
Use a belt-positioningbooster seat.
Children who have outgrown or no longer
properly fit in a child restraint (generally
children who are less than
57 in (1.45 m)
tall, are greater than age four and less
than age 12, and between
40 lb (18 kg)
and 80 lb (36 kg) and upward to 100 lb
(45 kg) if recommended by your child
restraint manufacturer).
Small children
Use a vehicle seatbelt
having the lap belt snug
and low across the hips, shoulder belt centered
across the shoulder and
chest, and seat backrest upright.
Children who have outgrown or no longer
properly fit in a belt-positioning booster
seat (generally children who are at least 57 in (1.45 m)
tall or greater than 80 lb
(36 kg) or 100 lb (45 kg) if recommended by child restraint manufacturer).
Larger children
• You are required by law to properly use
child restraints for infants and toddlers
in the United States, Canada and
Mexico.
• Many states and provinces require that
small children use approved booster
seats until they reach age eight, a
height of
57 in (1.45 m) tall, or 80 lb
(36 kg). Check your local and state or
provincial laws for specific
requirements about the safety of
children in your vehicle. •
When possible, properly restrain
children 12 years of age and under in a
rear seating position of your vehicle.
Accident statistics suggest that
children are safer when properly
restrained in the rear seating positions
than in a front seating position. See
Front Passenger Sensing System
(page 48).
• When installing a rear facing child
restraint, adjust the vehicle seats to
avoid interference between the child
restraint and the vehicle seat in front
of the child restraint.
24
Explorer (CTW), enUSA, Edition date: 202007, Second-Printing Child Safety
Page 28 of 577
INSTALLING CHILD
RESTRAINTS
Child Seats
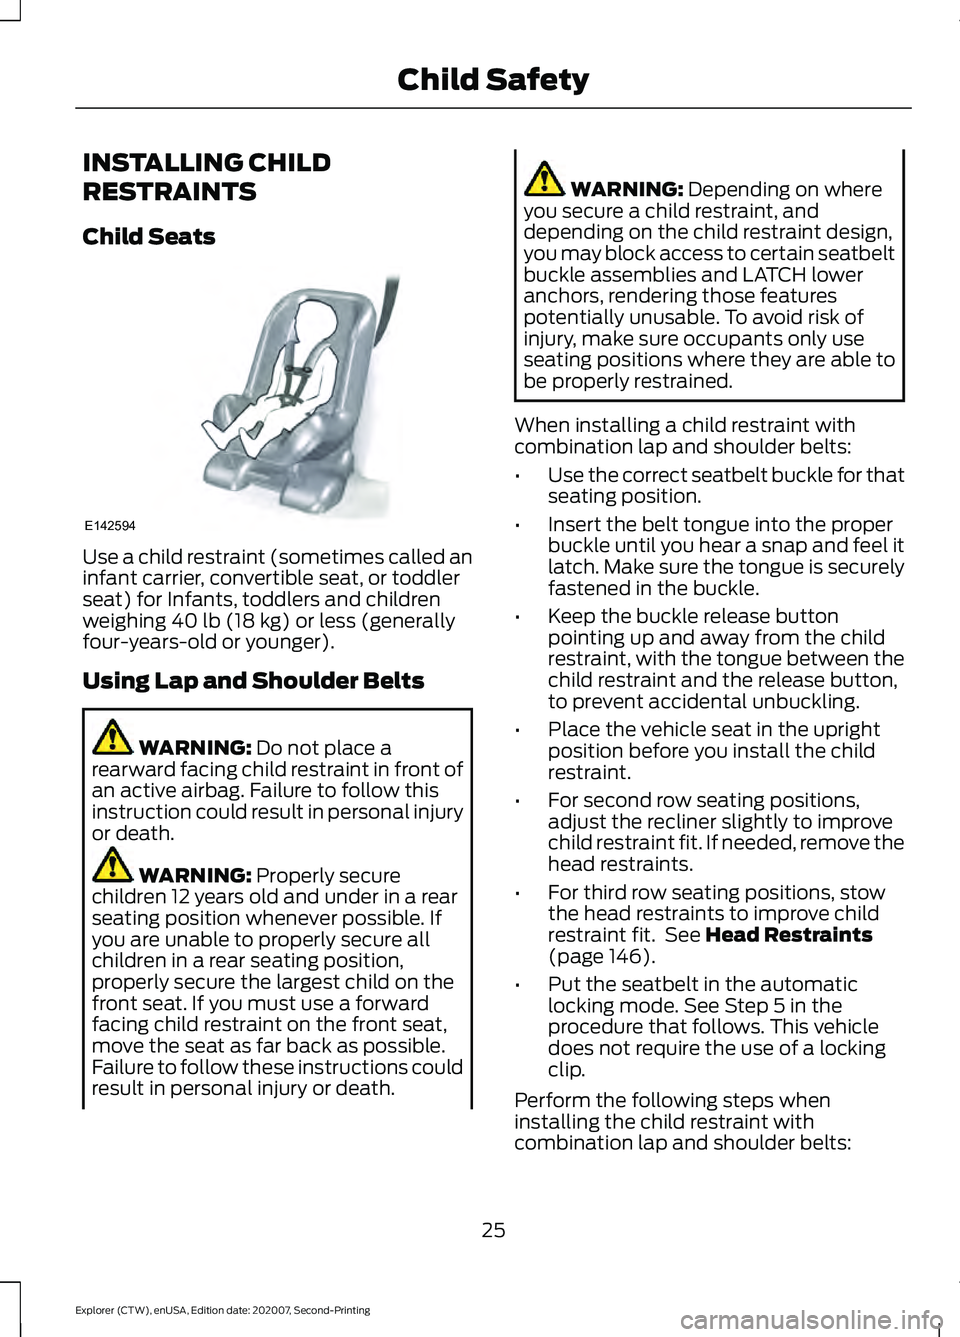
Use a child restraint (sometimes called an
infant carrier, convertible seat, or toddler
seat) for Infants, toddlers and children
weighing 40 lb (18 kg) or less (generally
four-years-old or younger).
Using Lap and Shoulder Belts WARNING:
Do not place a
rearward facing child restraint in front of
an active airbag. Failure to follow this
instruction could result in personal injury
or death. WARNING:
Properly secure
children 12 years old and under in a rear
seating position whenever possible. If
you are unable to properly secure all
children in a rear seating position,
properly secure the largest child on the
front seat. If you must use a forward
facing child restraint on the front seat,
move the seat as far back as possible.
Failure to follow these instructions could
result in personal injury or death. WARNING:
Depending on where
you secure a child restraint, and
depending on the child restraint design,
you may block access to certain seatbelt
buckle assemblies and LATCH lower
anchors, rendering those features
potentially unusable. To avoid risk of
injury, make sure occupants only use
seating positions where they are able to
be properly restrained.
When installing a child restraint with
combination lap and shoulder belts:
• Use the correct seatbelt buckle for that
seating position.
• Insert the belt tongue into the proper
buckle until you hear a snap and feel it
latch. Make sure the tongue is securely
fastened in the buckle.
• Keep the buckle release button
pointing up and away from the child
restraint, with the tongue between the
child restraint and the release button,
to prevent accidental unbuckling.
• Place the vehicle seat in the upright
position before you install the child
restraint.
• For second row seating positions,
adjust the recliner slightly to improve
child restraint fit. If needed, remove the
head restraints.
• For third row seating positions, stow
the head restraints to improve child
restraint fit. See
Head Restraints
(page 146).
• Put the seatbelt in the automatic
locking mode. See Step 5 in the
procedure that follows. This vehicle
does not require the use of a locking
clip.
Perform the following steps when
installing the child restraint with
combination lap and shoulder belts:
25
Explorer (CTW), enUSA, Edition date: 202007, Second-Printing Child SafetyE142594
Page 29 of 577
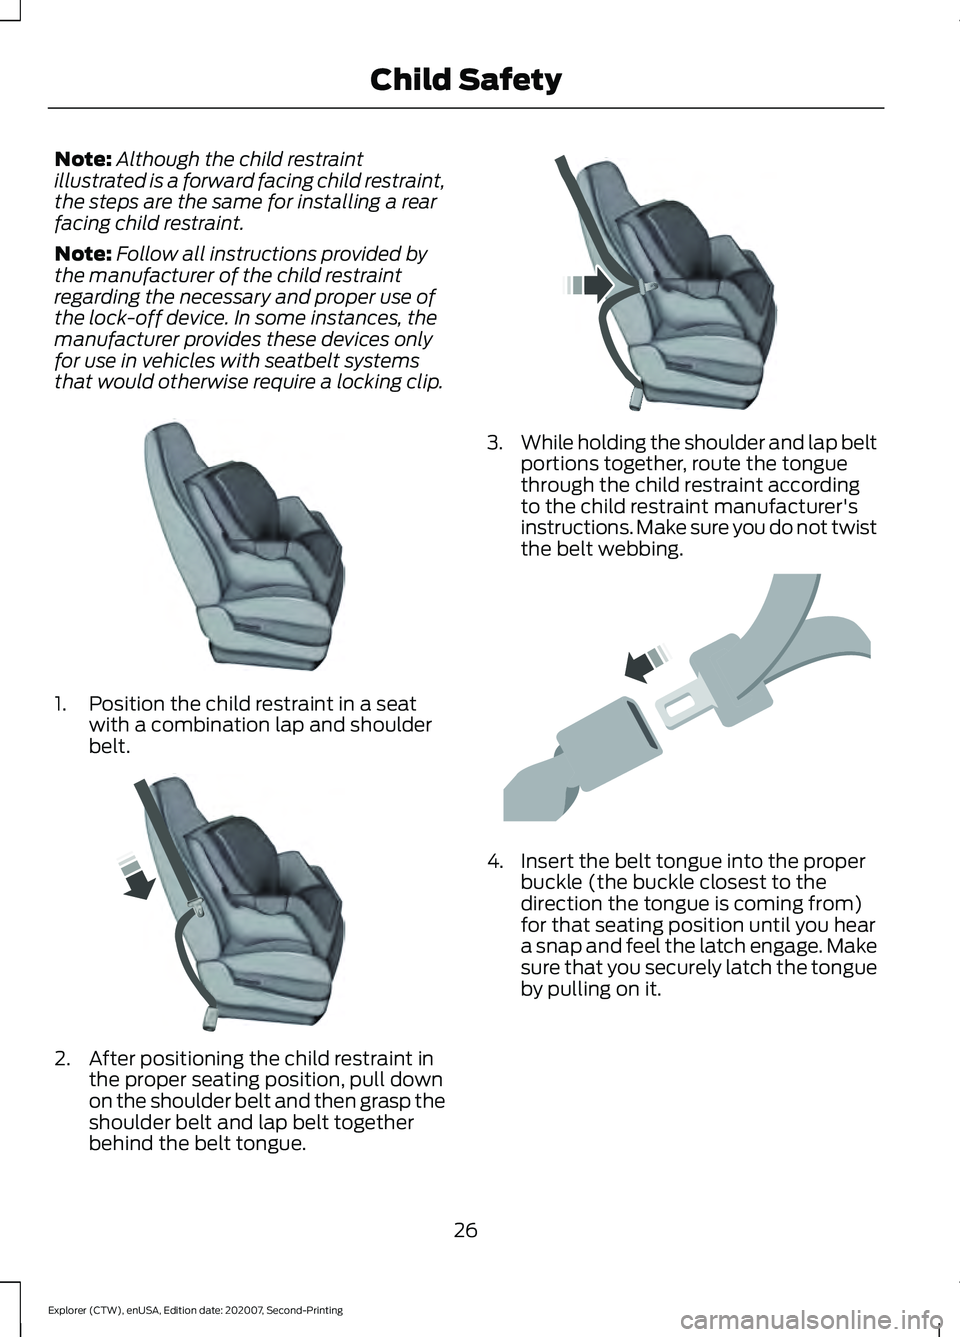
Note:
Although the child restraint
illustrated is a forward facing child restraint,
the steps are the same for installing a rear
facing child restraint.
Note: Follow all instructions provided by
the manufacturer of the child restraint
regarding the necessary and proper use of
the lock-off device. In some instances, the
manufacturer provides these devices only
for use in vehicles with seatbelt systems
that would otherwise require a locking clip. 1. Position the child restraint in a seat
with a combination lap and shoulder
belt. 2. After positioning the child restraint in
the proper seating position, pull down
on the shoulder belt and then grasp the
shoulder belt and lap belt together
behind the belt tongue. 3.
While holding the shoulder and lap belt
portions together, route the tongue
through the child restraint according
to the child restraint manufacturer's
instructions. Make sure you do not twist
the belt webbing. 4. Insert the belt tongue into the proper
buckle (the buckle closest to the
direction the tongue is coming from)
for that seating position until you hear
a snap and feel the latch engage. Make
sure that you securely latch the tongue
by pulling on it.
26
Explorer (CTW), enUSA, Edition date: 202007, Second-Printing Child SafetyE142528 E142529 E142530 E142531
Page 30 of 577
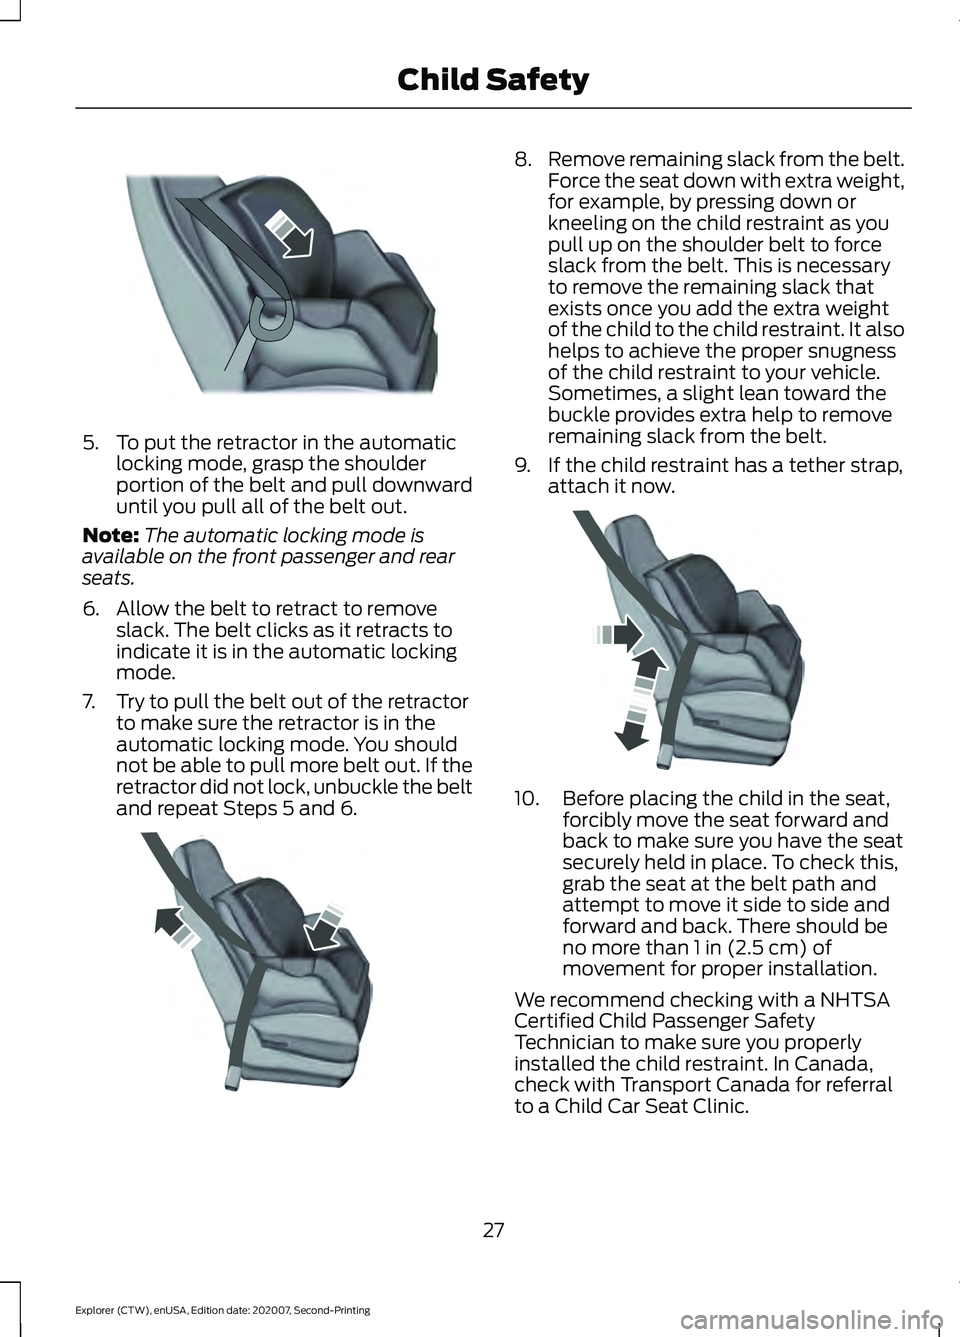
5. To put the retractor in the automatic
locking mode, grasp the shoulder
portion of the belt and pull downward
until you pull all of the belt out.
Note: The automatic locking mode is
available on the front passenger and rear
seats.
6. Allow the belt to retract to remove slack. The belt clicks as it retracts to
indicate it is in the automatic locking
mode.
7. Try to pull the belt out of the retractor to make sure the retractor is in the
automatic locking mode. You should
not be able to pull more belt out. If the
retractor did not lock, unbuckle the belt
and repeat Steps 5 and 6. 8.
Remove remaining slack from the belt.
Force the seat down with extra weight,
for example, by pressing down or
kneeling on the child restraint as you
pull up on the shoulder belt to force
slack from the belt. This is necessary
to remove the remaining slack that
exists once you add the extra weight
of the child to the child restraint. It also
helps to achieve the proper snugness
of the child restraint to your vehicle.
Sometimes, a slight lean toward the
buckle provides extra help to remove
remaining slack from the belt.
9. If the child restraint has a tether strap, attach it now. 10. Before placing the child in the seat,
forcibly move the seat forward and
back to make sure you have the seat
securely held in place. To check this,
grab the seat at the belt path and
attempt to move it side to side and
forward and back. There should be
no more than 1 in (2.5 cm) of
movement for proper installation.
We recommend checking with a NHTSA
Certified Child Passenger Safety
Technician to make sure you properly
installed the child restraint. In Canada,
check with Transport Canada for referral
to a Child Car Seat Clinic.
27
Explorer (CTW), enUSA, Edition date: 202007, Second-Printing Child SafetyE142875 E142533 E142534