transmission fluid FORD EXPLORER SPORT 2001 1.G Owners Manual
[x] Cancel search | Manufacturer: FORD, Model Year: 2001, Model line: EXPLORER SPORT, Model: FORD EXPLORER SPORT 2001 1.GPages: 256, PDF Size: 2.12 MB
Page 127 of 256
The BRAKE warning lamp in the
instrument cluster illuminates and
remains illuminated (when the
ignition is turned ON) until the
parking brake is released.
Always set the parking brake fully and make sure that the
gearshift is securely latched in P (Park) (automatic
transmission) or in 1 (First) (manual transmission).
The parking brake is not recommended to stop a moving vehicle.
However, if the normal brakes fail, the parking brake can be used to stop
your vehicle in an emergency. Since the parking brake applies only the
rear brakes, the vehicle's stopping distance will increase greatly and the
handling of your vehicle will be adversely affected.
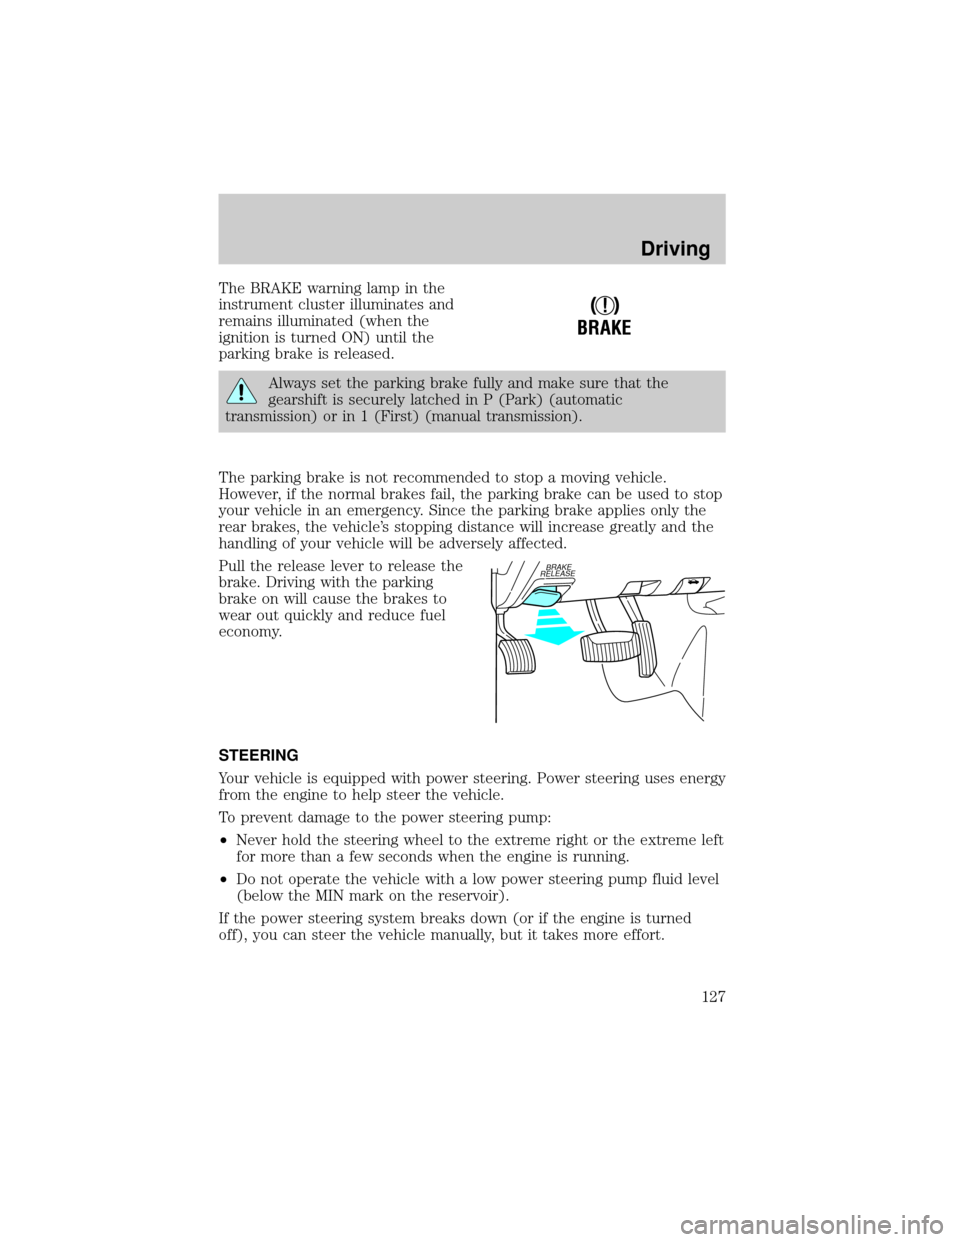
Pull the release lever to release the
brake. Driving with the parking
brake on will cause the brakes to
wear out quickly and reduce fuel
economy.
STEERING
Your vehicle is equipped with power steering. Power steering uses energy
from the engine to help steer the vehicle.
To prevent damage to the power steering pump:
²Never hold the steering wheel to the extreme right or the extreme left
for more than a few seconds when the engine is running.
²Do not operate the vehicle with a low power steering pump fluid level
(below the MIN mark on the reservoir).
If the power steering system breaks down (or if the engine is turned
off), you can steer the vehicle manually, but it takes more effort.
!
BRAKE
BRAKE
RELEASE
Driving
127
Page 139 of 256
You should either know the terrain or examine maps of the area before
driving. Map out your route before driving in the area. For more
information on driving off-road, read the ªFour Wheelingº supplement in
your owner's portfolio.
If your vehicle gets stuck
If the vehicle is stuck it may be rocked out by shifting from forward and
reverse gears, stopping between shifts, in a steady pattern. Press lightly
on the accelerator in each gear.
Do not rock the vehicle if the engine is not at normal operating
temperature or damage to the transmission may occur.
Do not rock the vehicle for more than a few minutes or damage
to the transmission and tires may occur or the engine may
overheat.
Do not spin the wheels at over 56 km/h (35 mph). The tires may
fail and injure a passenger or bystander.
Sand
When driving over sand, try to keep all four wheels on the most solid
area of the trail. Do not reduce the tire pressures but shift to a lower
gear and drive steadily through the terrain. Apply the accelerator slowly
and avoid spinning the wheels.
Mud and water
If you must drive through high water, drive slowly. Traction or brake
capability may be limited.
When driving through water, determine the depth; avoid water higher
than the bottom of the hubs (if possible) and proceed slowly. If the
ignition system gets wet, the vehicle may stall.
Once through water, always try the brakes. Wet brakes do not stop the
vehicle as effectively as dry brakes. Drying can be improved by moving
your vehicle slowly while applying light pressure on the brake pedal.
After driving through mud, clean off residue stuck to the driveshafts and
tires. Excess mud stuck on tires and rotating driveshafts causes an
imbalance that could damage drive components.
If the transmission, transfer case or front axle are submerged in water,
their fluids should be checked and changed, if necessary.
Driving
139
Page 141 of 256

VEHICLE LOADING
Before loading a vehicle, familiarize yourself with the following terms:
²Base Curb Weight:Weight of the vehicle including any standard
equipment, fluids, lubricants, etc. It does not include occupants or
aftermarket equipment.
²Payload:Combined maximum allowable weight of cargo, occupants
and optional equipment. The payload equals the gross vehicle weight
rating minus base curb weight.
²GVW (Gross Vehicle Weight):Base curb weight plus payload
weight. The GVW is not a limit or a specification.
²GVWR (Gross Vehicle Weight Rating):Maximum permissable total
weight of the base vehicle, occupants, optional equipment and cargo.
The GVWR is specific to each vehicle and is listed on the Safety
Certification Label on the driver's door pillar.
²GAWR (Gross Axle Weight Rating):Carrying capacity for each axle
system. The GAWR is specific to each vehicle and is listed on the
Safety Certification Label on the driver's door pillar.
²GCW (Gross Combined Weight):The combined weight of the
towing vehicle (including occupants and cargo) and the loaded trailer.
²GCWR (Gross Combined Weight Rating):Maximum permissable
combined weight of towing vehicle (including occupants and cargo)
and the loaded trailer
²Maximum Trailer Weight Rating:Maximum weight of a trailer the
vehicle is permitted to tow. The maximum trailer weight rating is
determined by subtracting the vehicle curb weight for each
engine/transmission combination, any required option weight for trailer
towing and the weight of the driver from the GCWR for the towing
vehicle.
²Maximum Trailer Weight:Maximum weight of a trailer the loaded
vehicle (including occupants and cargo) is permitted to tow. It is
determined by subtracting the weight of the loaded trailer towing
vehicle from the GCWR for the towing vehicle.
²Trailer Weight Range:Specified weight range that the trailer must
fall within that ranges from zero to the maximum trailer weight rating.
Remember to figure in the tongue load of your loaded trailer when
figuring the total weight.
Driving
141
Page 149 of 256

²do not allow waves to break higher than 15 cm (6 inches) above the
bottom edge of the rear bumper.
Exceeding these limits may allow water to enter critical vehicle
components, adversely affecting driveability, emissions, reliability and
causing internal transmission damage.
Replace the rear axle lubricant any time the axle has been submerged in
water. Rear axle lubricant quantities are not to be checked or changed
unless a leak is suspected or repair required.
Disconnect the wiring to the trailer before backing the trailer into the
water. Reconnect the wiring to the trailer after the trailer is removed
from the water.
Recreational towing
All Rear Wheel Drive (RWD) vehicles with automatic transmissions
This applies to all cars and 4x2 trucks/sport utilities with rear wheel
drive capability.
An example of recreational towing is towing your vehicle behind a
motorhome. The following recreational towing guidelines are designed to
ensure that your transmission is not damaged.
²Place the transmission in N (Neutral).
²Maximum speed is 56 km/h (35 mph).
²Maximum distance is 80 km (50 miles).
If a distance of 80 km (50 miles) or a speed of 56 km/h (35 mph)
must be exceeded, you must disconnect the driveshaft. Ford
recommends the driveshaft be removed/installed only by a
qualified technician. See your local dealer for driveshaft
removal/installation.
Improper removal/installation of the driveshaft can cause
transmission fluid loss, damage to the driveshaft and internal
transmission components.
In case of a roadside emergency with a disabled vehicle (without access
to wheel dollies, a car hauling trailer or a flatbed transport vehicle), your
vehicle can be flat towed (all wheels on the ground) under the following
conditions:
²Release the parking brake.
²Turn the ignition to the OFF position.
Driving
149
Page 176 of 256
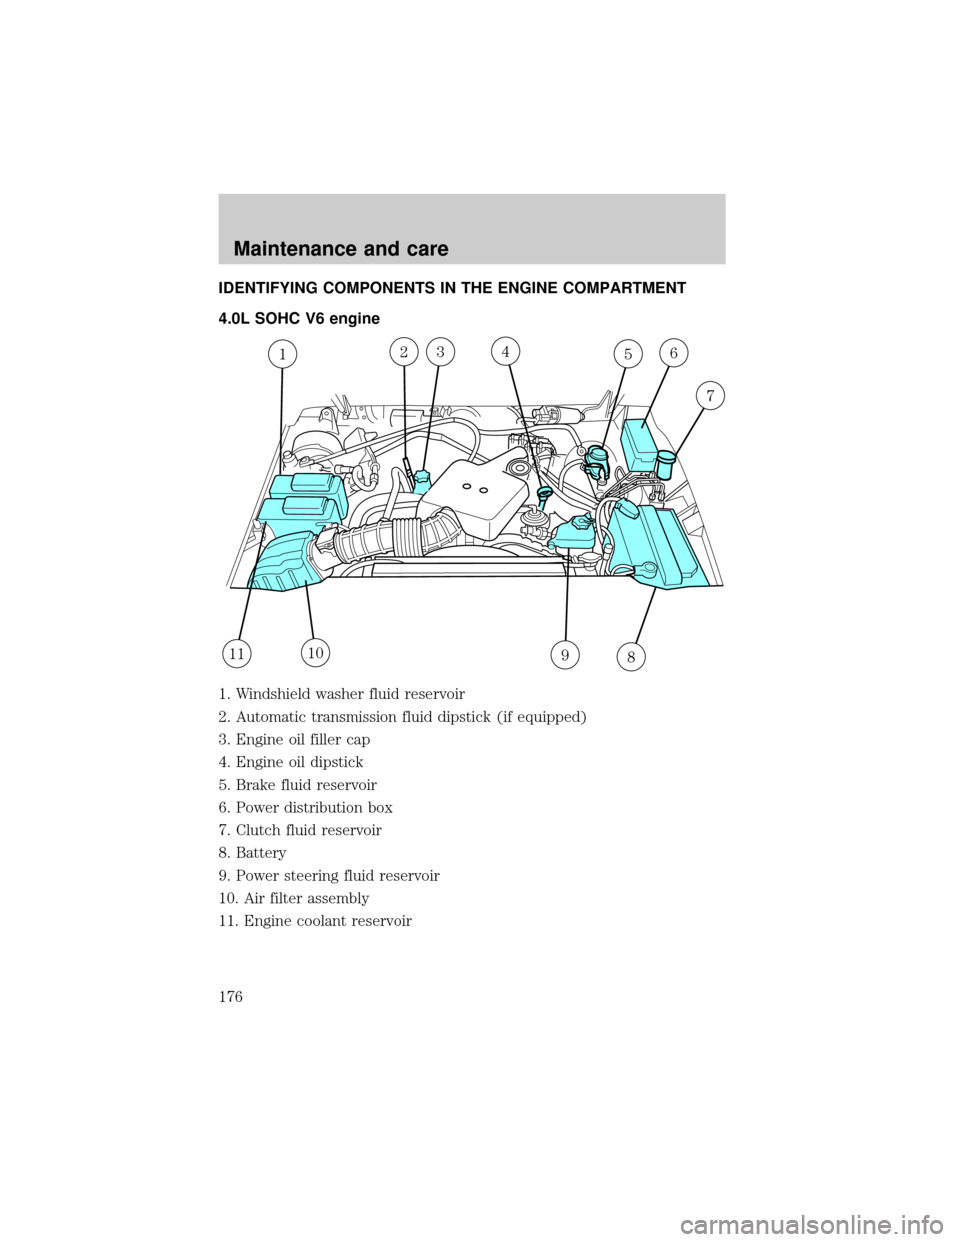
IDENTIFYING COMPONENTS IN THE ENGINE COMPARTMENT
4.0L SOHC V6 engine
1. Windshield washer fluid reservoir
2. Automatic transmission fluid dipstick (if equipped)
3. Engine oil filler cap
4. Engine oil dipstick
5. Brake fluid reservoir
6. Power distribution box
7. Clutch fluid reservoir
8. Battery
9. Power steering fluid reservoir
10. Air filter assembly
11. Engine coolant reservoir
12345
981110
6
7
Maintenance and care
176
Page 188 of 256
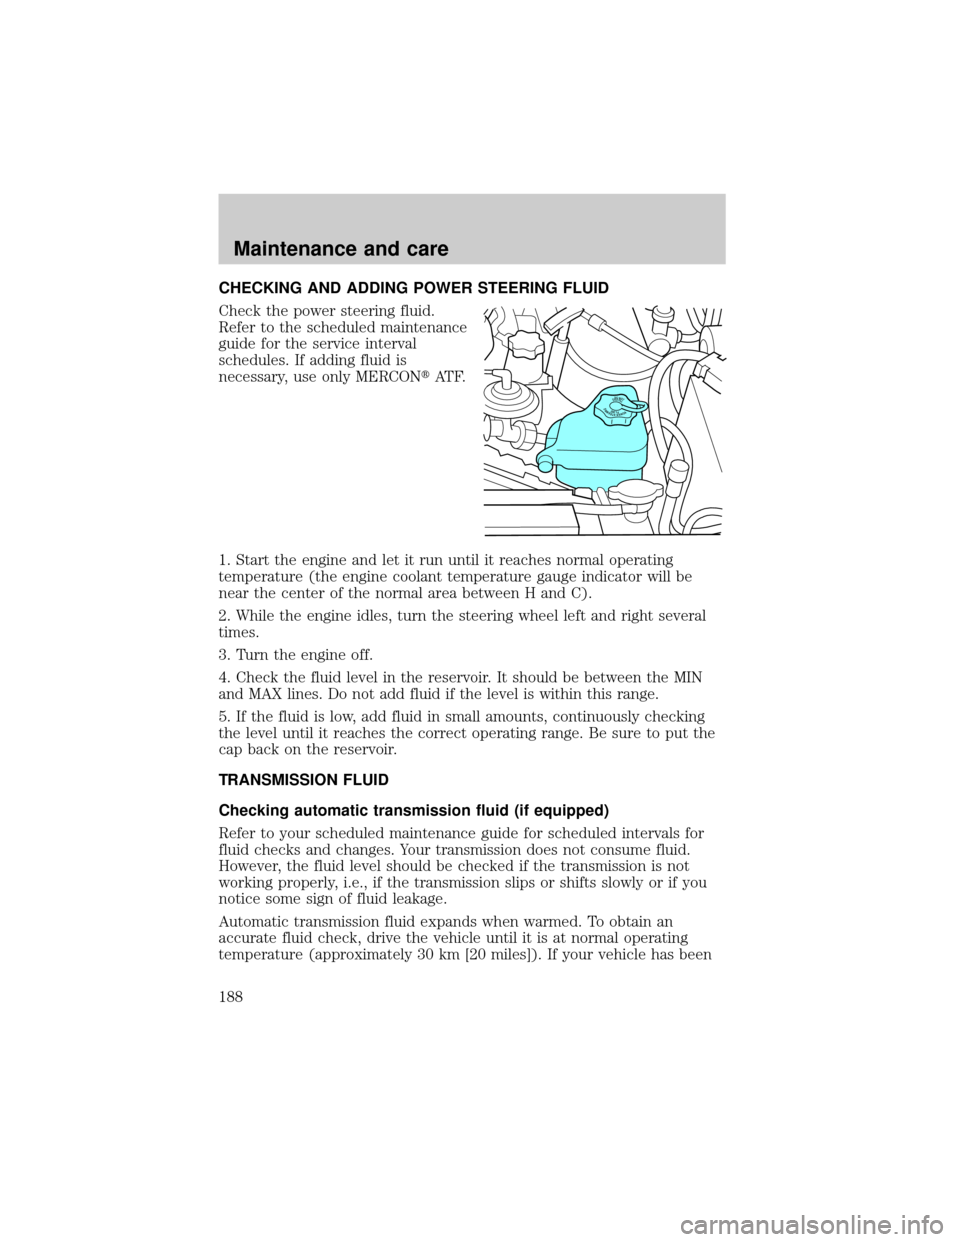
CHECKING AND ADDING POWER STEERING FLUID
Check the power steering fluid.
Refer to the scheduled maintenance
guide for the service interval
schedules. If adding fluid is
necessary, use only MERCONtAT F.
1. Start the engine and let it run until it reaches normal operating
temperature (the engine coolant temperature gauge indicator will be
near the center of the normal area between H and C).
2. While the engine idles, turn the steering wheel left and right several
times.
3. Turn the engine off.
4. Check the fluid level in the reservoir. It should be between the MIN
and MAX lines. Do not add fluid if the level is within this range.
5. If the fluid is low, add fluid in small amounts, continuously checking
the level until it reaches the correct operating range. Be sure to put the
cap back on the reservoir.
TRANSMISSION FLUID
Checking automatic transmission fluid (if equipped)
Refer to your scheduled maintenance guide for scheduled intervals for
fluid checks and changes. Your transmission does not consume fluid.
However, the fluid level should be checked if the transmission is not
working properly, i.e., if the transmission slips or shifts slowly or if you
notice some sign of fluid leakage.
Automatic transmission fluid expands when warmed. To obtain an
accurate fluid check, drive the vehicle until it is at normal operating
temperature (approximately 30 km [20 miles]). If your vehicle has been
DONOTOVERFILLPOWERSTEERINGFLUID
Maintenance and care
188
Page 189 of 256
operated for an extended period at high speeds, in city traffic during hot
weather or pulling a trailer, the vehicle should be turned off for about 30
minutes to allow fluid to cool before checking.
1. Drive the vehicle 30 km (20 miles) or until it reaches normal operating
temperature.
2. Park the vehicle on a level surface and engage the parking brake.
3. With the parking brake engaged and your foot on the brake pedal,
start the engine and move the gearshift lever through all of the gear
ranges. Allow sufficient time for each gear to engage.
4. Latch the gearshift lever in P (Park) and leave the engine running.
5. Remove the dipstick, wiping it clean with a clean, dry lint free rag. If
necessary, refer toIdentifying components in the engine compartment
in this chapter for the location of the dipstick.
6. Install the dipstick making sure it is fully seated in the filler tube.
7. Remove the dipstick and inspect the fluid level. The fluid should be in
the designated area for normal operating temperature or ambient
temperature.
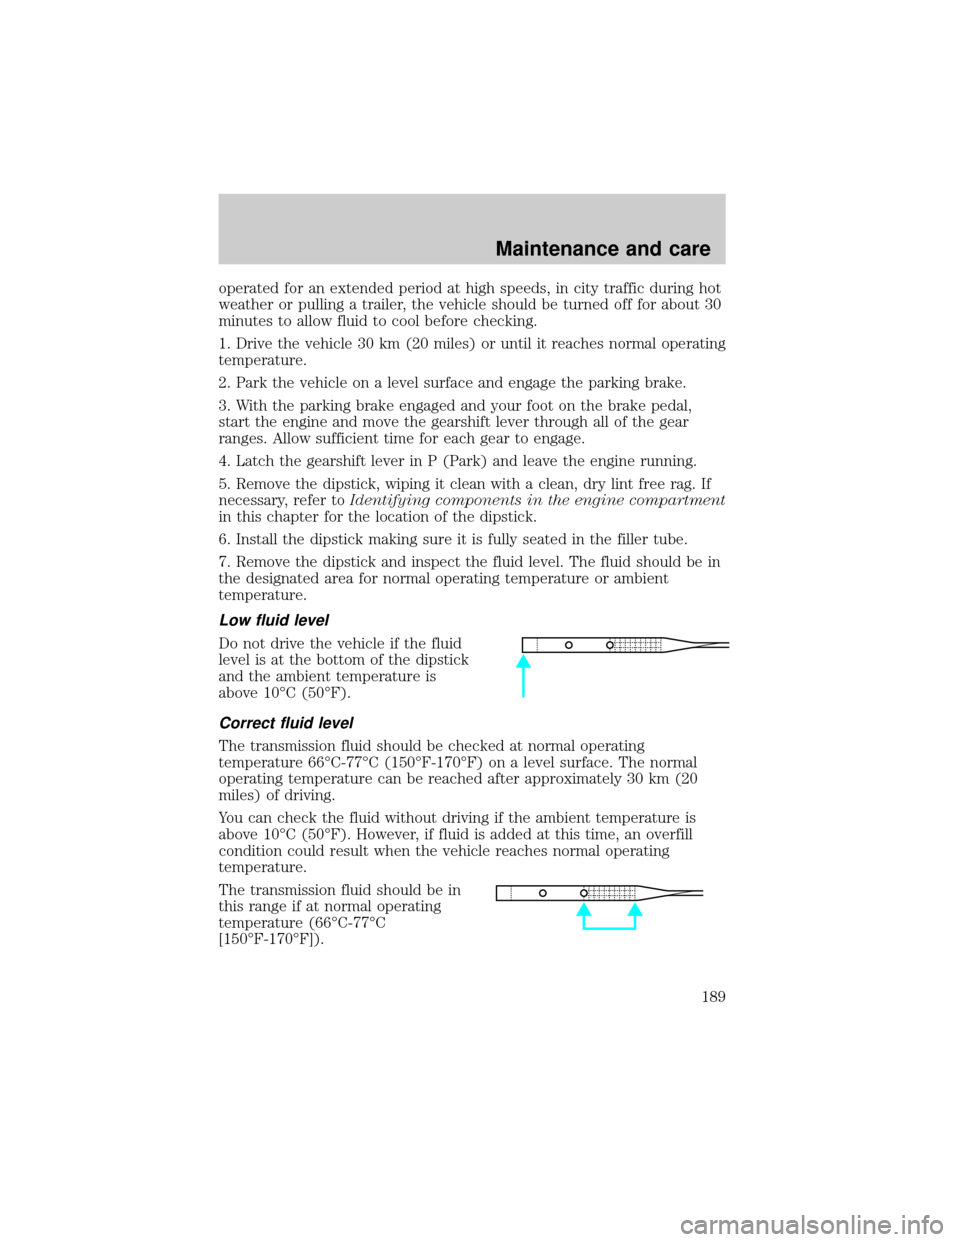
Low fluid level
Do not drive the vehicle if the fluid
level is at the bottom of the dipstick
and the ambient temperature is
above 10ÉC (50ÉF).
Correct fluid level
The transmission fluid should be checked at normal operating
temperature 66ÉC-77ÉC (150ÉF-170ÉF) on a level surface. The normal
operating temperature can be reached after approximately 30 km (20
miles) of driving.
You can check the fluid without driving if the ambient temperature is
above 10ÉC (50ÉF). However, if fluid is added at this time, an overfill
condition could result when the vehicle reaches normal operating
temperature.
The transmission fluid should be in
this range if at normal operating
temperature (66ÉC-77ÉC
[150ÉF-170ÉF]).
Maintenance and care
189
Page 190 of 256
![FORD EXPLORER SPORT 2001 1.G Owners Manual The transmission fluid should be in
this range if at ambient temperature
(10ÉC-35ÉC [50ÉF-95ÉF]).
High fluid level
Fluid levels above the safe range
may result in transmission failure.
An overfill FORD EXPLORER SPORT 2001 1.G Owners Manual The transmission fluid should be in
this range if at ambient temperature
(10ÉC-35ÉC [50ÉF-95ÉF]).
High fluid level
Fluid levels above the safe range
may result in transmission failure.
An overfill](/img/11/4989/w960_4989-189.png)
The transmission fluid should be in
this range if at ambient temperature
(10ÉC-35ÉC [50ÉF-95ÉF]).
High fluid level
Fluid levels above the safe range
may result in transmission failure.
An overfill condition of transmission
fluid may cause shift and/or
engagement concerns and/or
possible damage.
High fluid levels can be caused by an overheating condition.
Adjusting automatic transmission fluid levels
Before adding any fluid, make sure the correct type is used. The type of
fluid used is normally indicated on the dipstick and also in the
Lubricant specificationssection in theCapacities and specifications
chapter.
Use of a non-approved automatic transmission fluid may cause
internal transmission component damage.
If necessary, add fluid in 250 ml (1/2 pint) increments through the filler
tube until the level is correct.
If an overfill occurs, excess fluid
should be removed by a qualified
technician.
An overfill condition of
transmission fluid may cause
shift and/or engagement concerns and/or possible damage.
Maintenance and care
190
Page 224 of 256
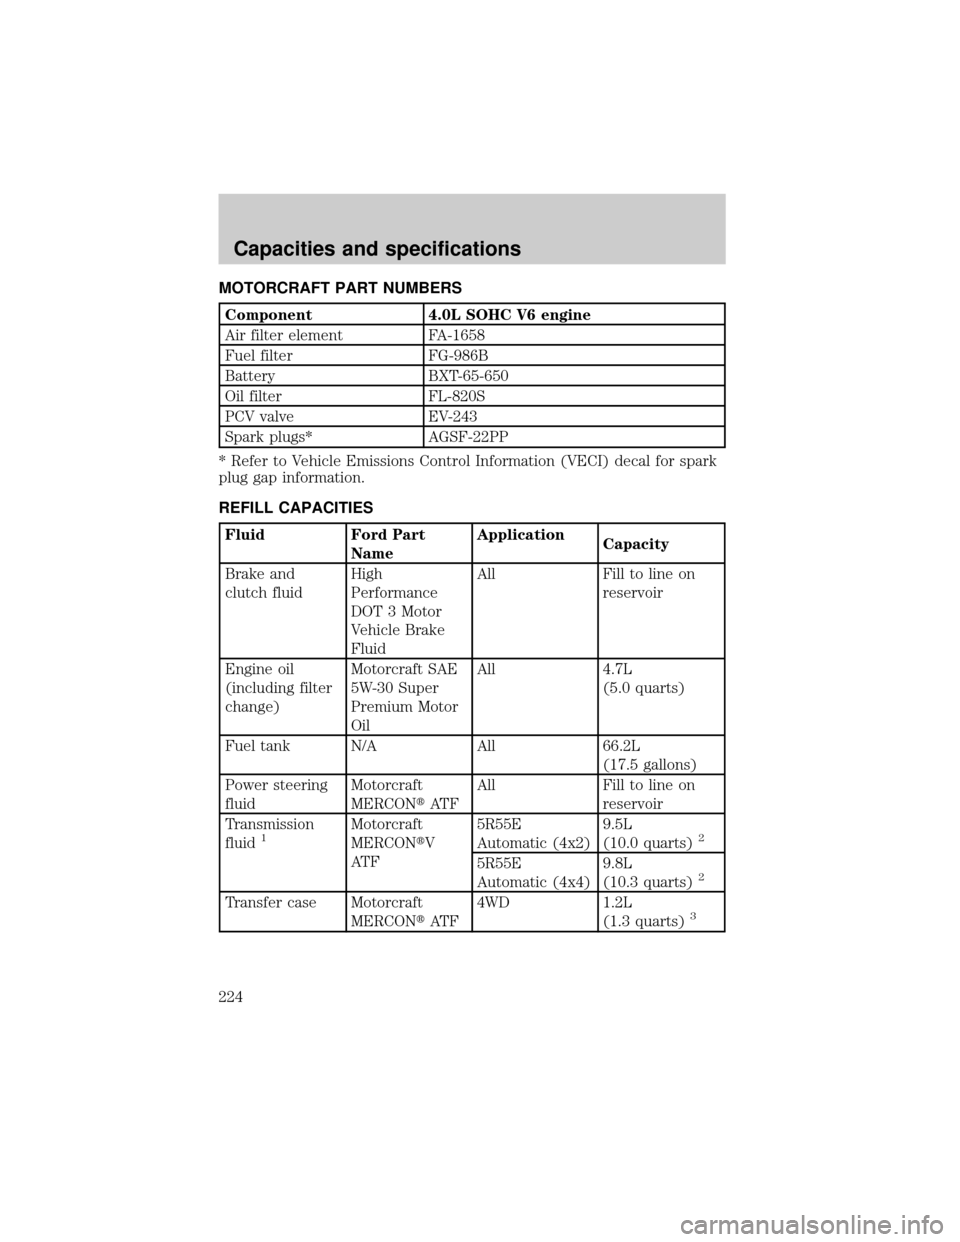
MOTORCRAFT PART NUMBERS
Component 4.0L SOHC V6 engine
Air filter element FA-1658
Fuel filter FG-986B
Battery BXT-65-650
Oil filter FL-820S
PCV valve EV-243
Spark plugs* AGSF-22PP
* Refer to Vehicle Emissions Control Information (VECI) decal for spark
plug gap information.
REFILL CAPACITIES
Fluid Ford Part
NameApplication
Capacity
Brake and
clutch fluidHigh
Performance
DOT 3 Motor
Vehicle Brake
FluidAll Fill to line on
reservoir
Engine oil
(including filter
change)Motorcraft SAE
5W-30 Super
Premium Motor
OilAll 4.7L
(5.0 quarts)
Fuel tank N/A All 66.2L
(17.5 gallons)
Power steering
fluidMotorcraft
MERCONtAT FAll Fill to line on
reservoir
Transmission
fluid
1Motorcraft
MERCONtV
AT F5R55E
Automatic (4x2)9.5L
(10.0 quarts)2
5R55E
Automatic (4x4)9.8L
(10.3 quarts)2
Transfer case Motorcraft
MERCONtAT F4WD 1.2L
(1.3 quarts)3
Capacities and specifications
224
Page 225 of 256
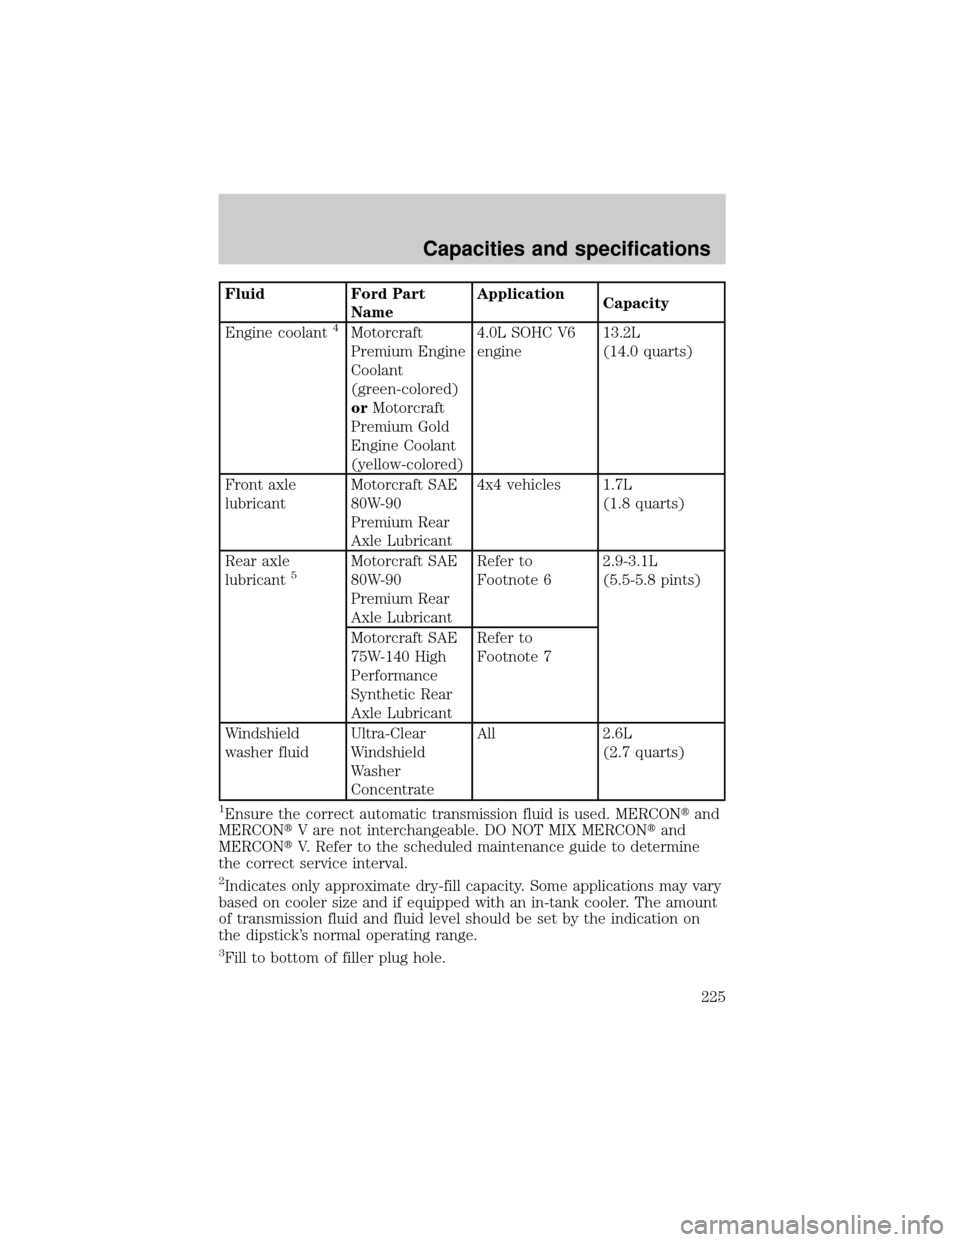
Fluid Ford Part
NameApplication
Capacity
Engine coolant
4Motorcraft
Premium Engine
Coolant
(green-colored)
orMotorcraft
Premium Gold
Engine Coolant
(yellow-colored)4.0L SOHC V6
engine13.2L
(14.0 quarts)
Front axle
lubricantMotorcraft SAE
80W-90
Premium Rear
Axle Lubricant4x4 vehicles 1.7L
(1.8 quarts)
Rear axle
lubricant
5Motorcraft SAE
80W-90
Premium Rear
Axle LubricantRefer to
Footnote 62.9-3.1L
(5.5-5.8 pints)
Motorcraft SAE
75W-140 High
Performance
Synthetic Rear
Axle LubricantRefer to
Footnote 7
Windshield
washer fluidUltra-Clear
Windshield
Washer
ConcentrateAll 2.6L
(2.7 quarts)
1Ensure the correct automatic transmission fluid is used. MERCONtand
MERCONtV are not interchangeable. DO NOT MIX MERCONtand
MERCONtV. Refer to the scheduled maintenance guide to determine
the correct service interval.
2Indicates only approximate dry-fill capacity. Some applications may vary
based on cooler size and if equipped with an in-tank cooler. The amount
of transmission fluid and fluid level should be set by the indication on
the dipstick's normal operating range.
3Fill to bottom of filler plug hole.
Capacities and specifications
225