transmission oil FORD F-150 2019 Owners Manual
[x] Cancel search | Manufacturer: FORD, Model Year: 2019, Model line: F-150, Model: FORD F-150 2019Pages: 644, PDF Size: 14.81 MB
Page 8 of 644
Engine Oil Check - Gasoline
...................356
Engine Oil Check - Diesel .........................
357
Oil Change Indicator Reset .....................
358
Engine Coolant Check ..............................
359
Automatic Transmission Fluid Check ........................................................................\
363
Transfer Case Fluid Check ......................
364
Brake Fluid Check .......................................
364
Power Steering Fluid Check ...................
365
Washer Fluid Check ...................................
365
Draining the Fuel Filter Water Trap ......
365
Fuel Filter - Diesel .......................................
365
Fuel Filter - Gasoline .................................
366
Changing the 12V Battery ........................
366
Checking the Wiper Blades ....................
368
Changing the Wiper Blades ...................
368
Adjusting the Headlamps .......................
369
Changing a Bulb ..........................................
370
Changing the Engine Air Filter - Gasoline ........................................................................\
374
Changing the Engine Air Filter - Diesel ........................................................................\
374
Vehicle Care
General Information ...................................
377
Cleaning Products .......................................
377
Cleaning the Exterior ..................................
377
Waxing ............................................................
379
Cleaning the Engine ...................................
379
Cleaning the Exhaust - Diesel ................
379
Cleaning the Windows and Wiper Blades .......................................................................
380
Cleaning the Interior ..................................
380
Cleaning the Instrument Panel and Instrument Cluster Lens .......................
381
Cleaning Leather Seats ............................
382
Repairing Minor Paint Damage .............
383
Cleaning the Wheels .................................
383
Vehicle Storage ...........................................
383
Body Styling Kits .........................................
385Wheels and Tires
General Information
..................................
386
Tire Care .........................................................
387
Using Snow Chains ....................................
402
Tire Pressure Monitoring System .........
403
Changing a Road Wheel .........................
409
Technical Specifications ...........................
417
Capacities and Specifications
Engine Specifications - 2.7L EcoBoost™ ........................................................................\
.
419
Engine Specifications - 3.0L Diesel ......
419
Engine Specifications - 3.3L ...................
420
Engine Specifications - 3.5L Ecoboost™ ........................................................................\
.
421
Engine Specifications - 5.0L ....................
421
Motorcraft Parts - 2.7L EcoBoost™ ......
422
Motorcraft Parts - 3.0L Diesel ...............
423
Motorcraft Parts - 3.3L .............................
423
Motorcraft Parts - 3.5L Ecoboost™ .....
424
Motorcraft Parts - 5.0L .............................
425
Vehicle Identification Number ...............
425
Vehicle Certification Label ......................
426
Transmission Code Designation ............
427
Capacities and Specifications - 2.7L EcoBoost™ ..............................................
428
Capacities and Specifications - 3.0L Diesel ...........................................................
432
Capacities and Specifications - 3.3L ........................................................................\
436
Capacities and Specifications - 3.5L Ecoboost™ ................................................
441
Capacities and Specifications - 5.0L .......................................................................
446
Bulb Specification Chart .........................
450
Wi-Fi Hotspot
Creating a Wi-Fi Hotspot .........................
452
Changing the Wi-Fi Hotspot Name or Password ...................................................
452
5
F-150 (TFC) Canada/United States of America, enUSA, Edition date: 201808, Third-Printing- Table of Contents
Page 110 of 644
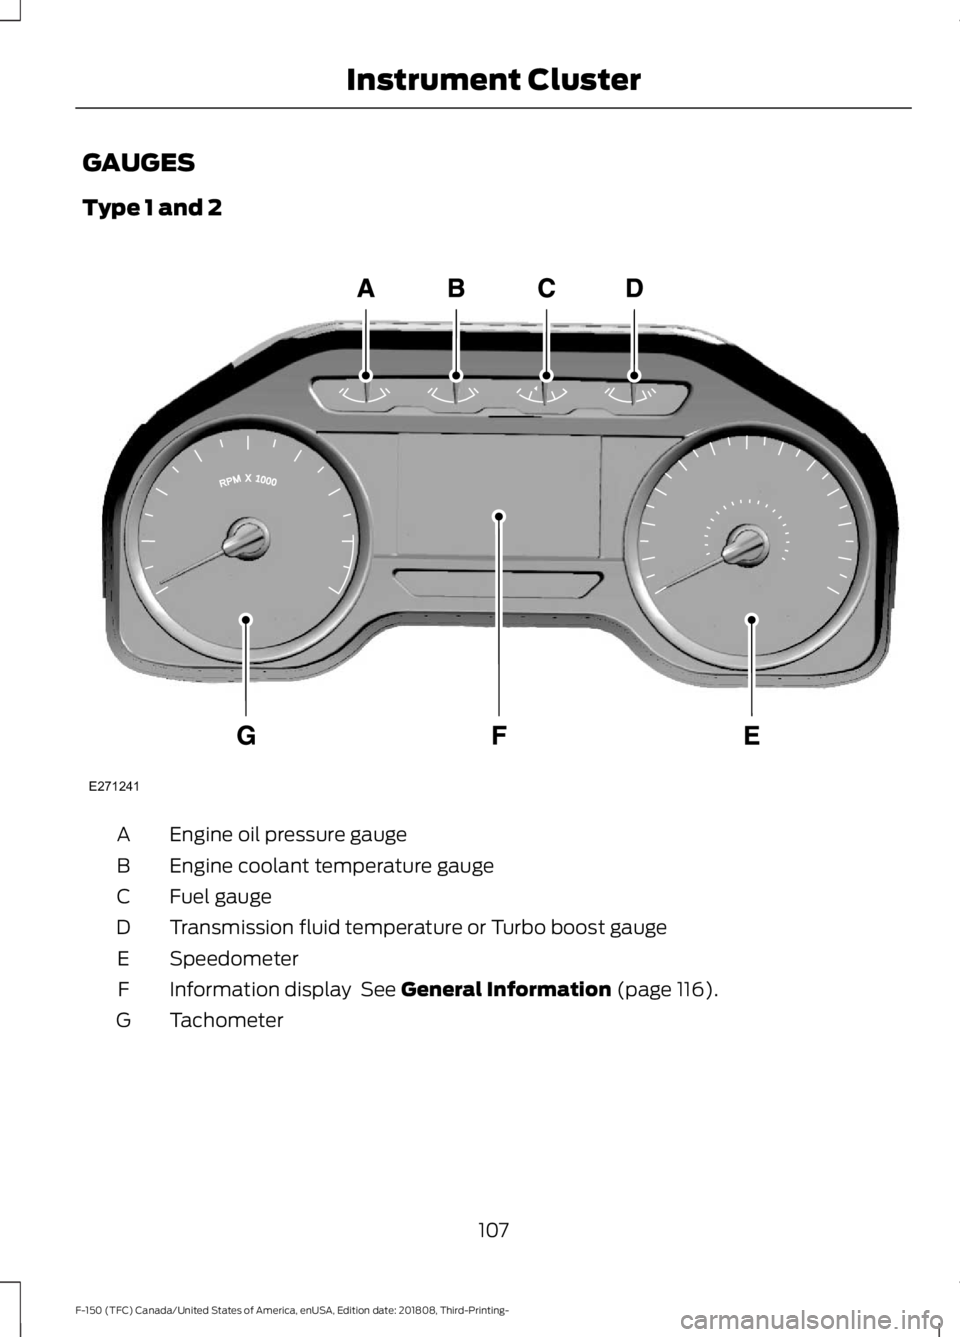
GAUGES
Type 1 and 2
Engine oil pressure gauge
A
Engine coolant temperature gauge
B
Fuel gauge
C
Transmission fluid temperature or Turbo boost gauge
D
Speedometer
E
Information display See General Information (page 116).
F
Tachometer
G
107
F-150 (TFC) Canada/United States of America, enUSA, Edition date: 201808, Third-Printing- Instrument ClusterE271241
Page 111 of 644
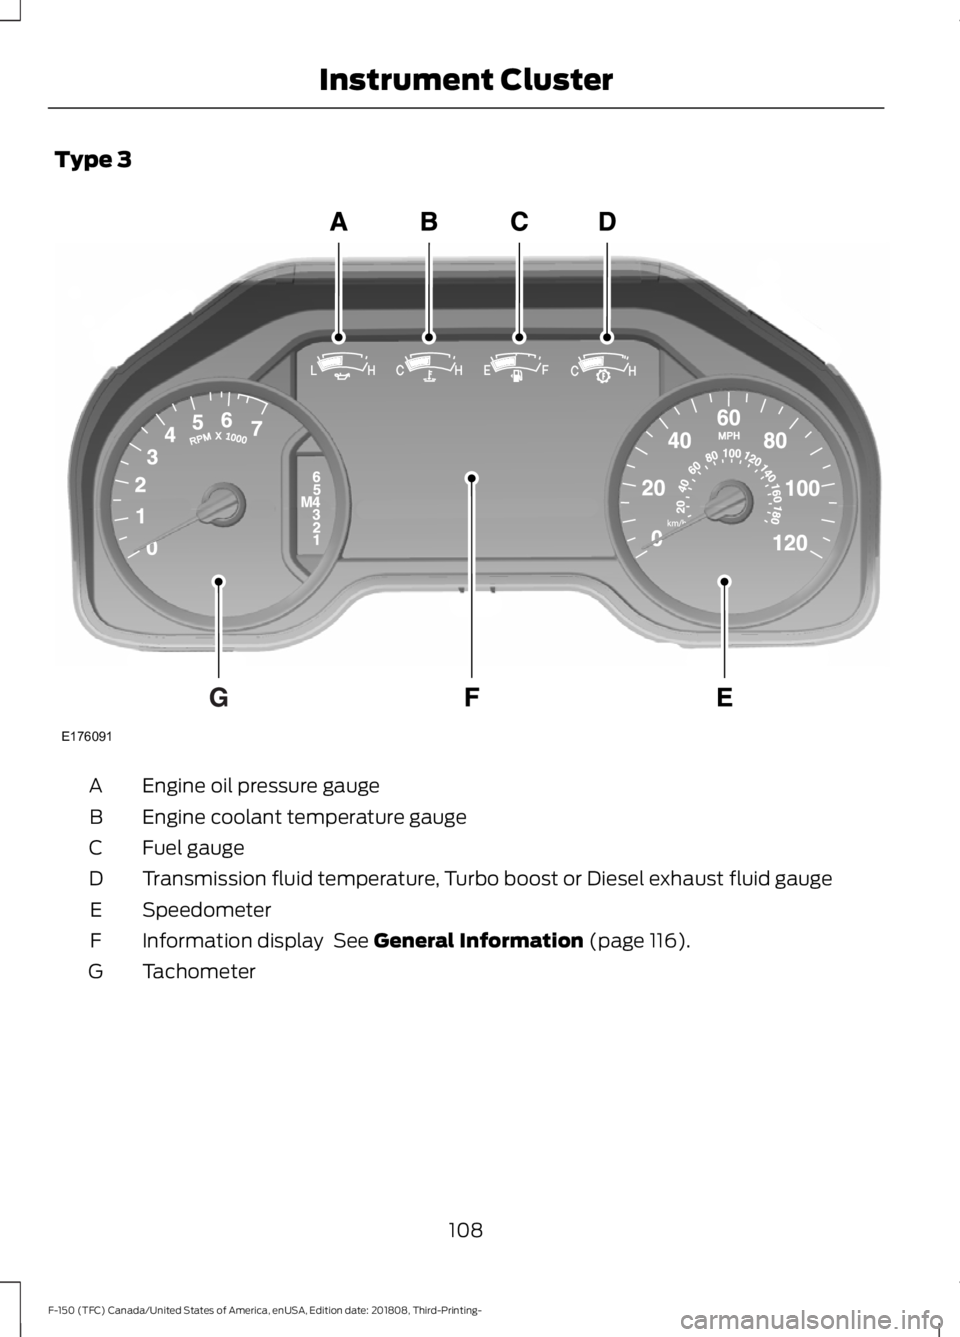
Type 3
Engine oil pressure gauge
A
Engine coolant temperature gauge
B
Fuel gauge
C
Transmission fluid temperature, Turbo boost or Diesel exhaust fluid gauge
D
Speedometer
E
Information display See General Information (page 116).
F
Tachometer
G
108
F-150 (TFC) Canada/United States of America, enUSA, Edition date: 201808, Third-Printing- Instrument ClusterE176091
Page 112 of 644
Engine Oil Pressure Gauge
Indicates engine oil pressure. The needle
should stay in the normal operating range
(between L and H). If the needle falls
below the normal range, stop your vehicle,
turn off the engine and check the engine
oil level. Add oil if needed. If the oil level is
correct, have your vehicle checked by an
authorized dealer.
Engine Coolant Temperature
Gauge
WARNING: Do not remove the
coolant reservoir cap when the cooling
system is hot. Wait 10 minutes for the
cooling system to cool down. Cover the
coolant reservoir cap with a thick cloth
to prevent the possibility of scalding and
slowly remove the cap. Failure to follow
this instruction could result in personal
injury.
Indicates engine coolant temperature. At
normal operating temperature, the level
indicator will be in the normal range. If the
engine coolant temperature exceeds the
normal range, stop your vehicle as soon as
safely possible, switch off the engine and
let the engine cool.
Fuel Gauge
The fuel gauge indicates about how much
fuel is in the fuel tank.
The arrow adjacent to the fuel pump
symbol indicates on which side of your
vehicle the fuel filler door is located.
Note: The fuel gauge may vary slightly
when your vehicle is moving or on a slope. Low Fuel Reminder
A low fuel level reminder displays and
sounds when the distance to empty
reaches
75 mi (120 km) to empty for
MyKey, and at 50 mi (80 km), 25 mi
(40 km), 10 mi (20 km) and 0 mi (0 km)
for all vehicle keys.
Note: The low fuel reminder can appear at
different fuel gauge positions depending on
fuel economy conditions. This variation is
normal.
Transmission Fluid Temperature
Gauge
(If Equipped)
Indicates transmission fluid temperature.
At normal operating temperature, the level
indicator will be in the normal range. If the
transmission fluid temperature exceeds
the normal range, stop your vehicle as soon
as safely possible and verify the airflow is
not restricted (snow or debris blocking
airflow through the grille).
Also, higher than normal operating
temperature can be caused by special
operation conditions (snowplowing, towing
or off-road use). Refer to Special operating
conditions in the scheduled maintenance
information for instructions.
Operating the transmission for extended
periods with the gauge in the higher than
normal area may cause internal
transmission damage. You need to alter
the severity of your driving conditions to
lower the transmission temperature into
the normal range. If the gauge continues
to show high temperatures, see an
authorized dealer.
Turbo Boost Gauge
(If Equipped)
Indicates the amount of manifold air
pressure in the engine.
109
F-150 (TFC) Canada/United States of America, enUSA, Edition date: 201808, Third-Printing- Instrument Cluster
Page 182 of 644
2. When your vehicle has stopped, move
the transmission selector lever to
position P and turn the key to off.
3. Apply the parking brake.
Vehicles with Keyless Start
1. Move the transmission selector lever to position
N and use the brakes to
bring your vehicle to a safe stop.
2. When your vehicle has stopped, move the transmission selector lever to
position
P.
3. Press and hold the button for one second, or press it three times within
two seconds.
4. Apply the parking brake.
Guarding Against Exhaust Fumes WARNING:
Exhaust leaks may
result in entry of harmful and potentially
lethal fumes into the passenger
compartment. If you smell exhaust
fumes inside your vehicle, have your
vehicle inspected immediately. Do not
drive if you smell exhaust fumes.
Important Ventilating Information
If you stop your vehicle and leave the
engine idling for long periods, we
recommend that you do one of the
following:
• Open the windows at least
1 in
(2.5 cm).
• Set your climate control to outside air.
STARTING A DIESEL ENGINE
Read all starting instructions carefully
before you start your vehicle. For temperatures below
32°F (0°C), the
use of the correct grade engine oil is
essential for proper operation. Refer to
Engine oil specifications for more
information. See
Capacities and
Specifications (page 428).
Your vehicle may be equipped with a cold
weather starting strategy that prevents
severe engine damage by assisting in
engine lubrication warm-up. In extremely
cold ambient temperatures, this strategy
activates and prevents the accelerator
pedal from being used for 30 seconds after
starting your vehicle. A message will
appear in the information display as your
vehicle warms up. By not allowing the
accelerator pedal to be used, the engine
oil is allowed to properly lubricate the
bearings preventing engine damage due
to lack of proper lubrication. After the 30
second warm-up period, the accelerator
pedal will be operational again and a
message will appear informing you the
vehicle is ok to drive.
When starting the engine in extremely cold
temperatures
-15°F (-26°C), it is
recommended to allow the engine to idle
for several minutes before driving the
vehicle.
Before starting the engine check the
following:
• Make sure all occupants have fastened
their seatbelts.
• Make sure the headlamps and
electrical accessories are off.
• Make sure the parking brake is on.
• Make sure the transmission is in park
(P).
Note: Do not press the accelerator during
starting.
Vehicles with Keyless Start
Note: Do not touch the accelerator pedal.
179
F-150 (TFC) Canada/United States of America, enUSA, Edition date: 201808, Third-Printing- Starting and Stopping the Engine
Page 327 of 644
Note:
The electrical system is designed to
support the addition of a residential
snowplow (up to 60 Amps continuous) and
snowplow lights (up to 20 Amps
continuous) using snowplow mode. The
system is not designed to support snowplow
usage with additional electrical aftermarket
accessories.
Operating the Vehicle with the
Snowplow Attached
Note: Drive the vehicle at least 500 mi
(800 km) before using your vehicle for snow
removal.
We recommend vehicle speed does not
exceed
45 mph (72 km/h) when
snowplowing.
The attached snowplow blade restricts
airflow to the radiator, and may cause the
engine to run at a higher temperature.
Attention to engine temperature is
especially important when outside
temperatures are above freezing. Angle
the blade to maximize airflow to the
radiator and monitor engine temperature
to determine whether a left or right angle
provides the best performance.
Follow the severe duty schedule in your
Scheduled Maintenance information for
engine oil and transmission fluid change
intervals.
Snowplowing with your Airbag
Equipped Vehicle WARNING:
Do not attempt to
service, repair, or modify the airbag
supplemental restraint systems or its
fuses on a vehicle containing air bags as
you could be seriously injured or killed.
Contact your authorized dealer as soon
as possible. WARNING:
All occupants of your
vehicle, including the driver, should
always properly wear their seatbelts,
even when an airbag supplemental
restraint system is provided. Failure to
properly wear your seatbelt could
seriously increase the risk of injury or
death. WARNING:
Modifying or adding
equipment to the front end of your
vehicle (including hood, bumper system,
frame, front end body structure, tow
hooks and hood pins) may affect the
performance of the airbag system,
increasing the risk of injury. Do not
modify or add equipment to the front
end of your vehicle.
Note: Please refer to the Body Builders
Layout Book for instructions about the
appropriate installation of additional
equipment.
Your vehicle is equipped with a driver and
passenger airbag supplemental restraint
system. The supplemental restraint system
activates in certain frontal and offset
frontal collisions when the vehicle sustains
sufficient longitudinal deceleration.
Careless or high speed driving while
snowplowing, which results in significant
vehicle decelerations, can deploy the
airbag. Such driving also increases the risk
of accidents.
Never remove or defeat the tripping
mechanisms designed into the snow
removal equipment by its manufacturer.
Doing so may cause damage to the vehicle
and the snow removal equipment as well
as possible airbag deployment.
324
F-150 (TFC) Canada/United States of America, enUSA, Edition date: 201808, Third-Printing- Driving Hints
Page 359 of 644
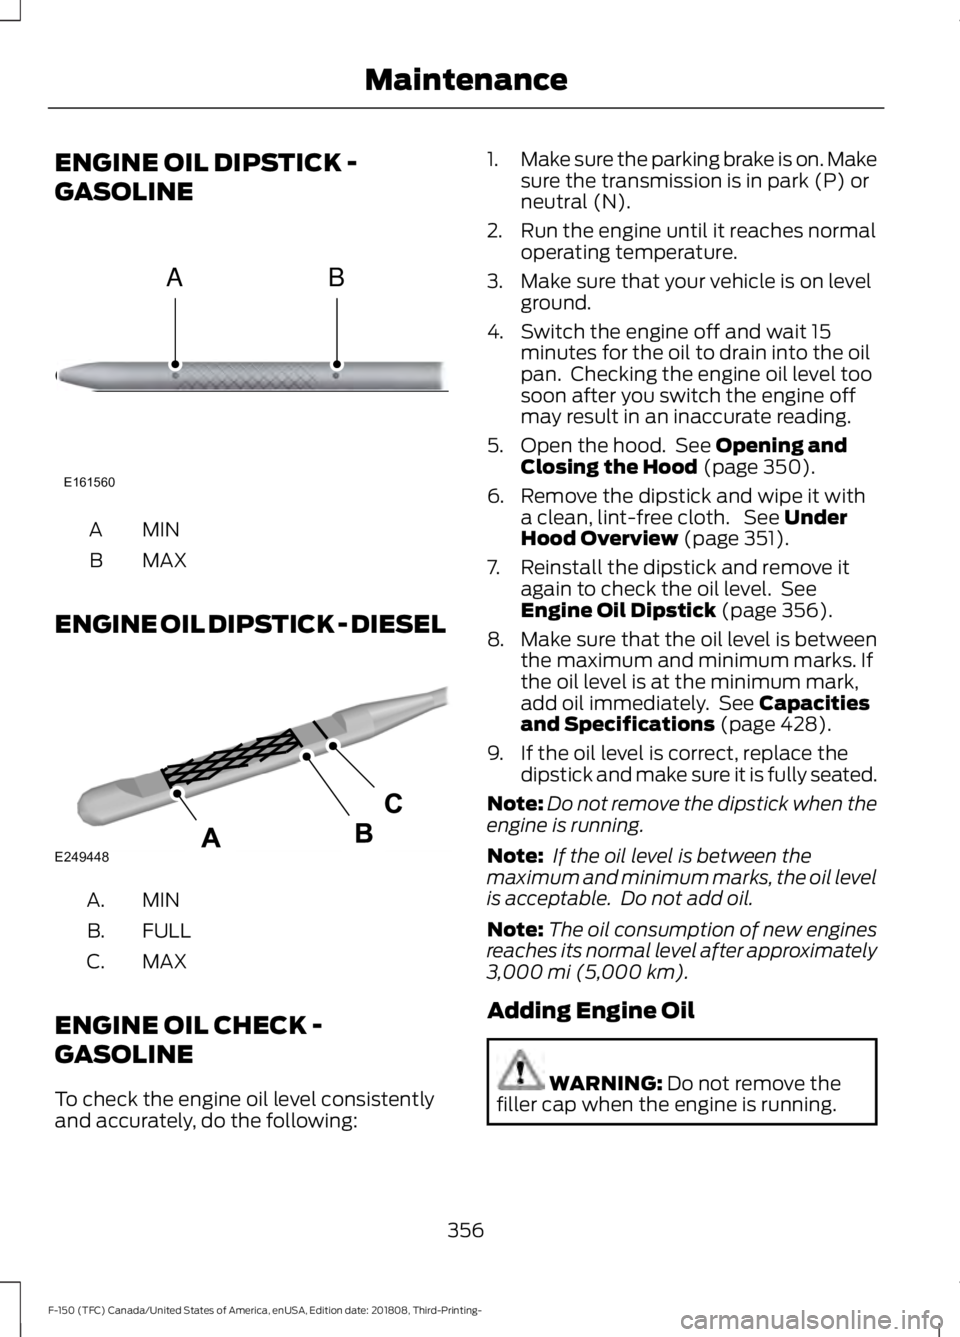
ENGINE OIL DIPSTICK -
GASOLINE
MINA
MAX
B
ENGINE OIL DIPSTICK - DIESEL MINA.
FULL
B.
MAX
C.
ENGINE OIL CHECK -
GASOLINE
To check the engine oil level consistently
and accurately, do the following: 1.
Make sure the parking brake is on. Make
sure the transmission is in park (P) or
neutral (N).
2. Run the engine until it reaches normal operating temperature.
3. Make sure that your vehicle is on level ground.
4. Switch the engine off and wait 15 minutes for the oil to drain into the oil
pan. Checking the engine oil level too
soon after you switch the engine off
may result in an inaccurate reading.
5. Open the hood. See Opening and
Closing the Hood (page 350).
6. Remove the dipstick and wipe it with a clean, lint-free cloth. See
Under
Hood Overview (page 351).
7. Reinstall the dipstick and remove it again to check the oil level. See
Engine Oil Dipstick
(page 356).
8. Make sure that the oil level is between
the maximum and minimum marks. If
the oil level is at the minimum mark,
add oil immediately. See
Capacities
and Specifications (page 428).
9. If the oil level is correct, replace the dipstick and make sure it is fully seated.
Note: Do not remove the dipstick when the
engine is running.
Note: If the oil level is between the
maximum and minimum marks, the oil level
is acceptable. Do not add oil.
Note: The oil consumption of new engines
reaches its normal level after approximately
3,000 mi (5,000 km)
.
Adding Engine Oil WARNING:
Do not remove the
filler cap when the engine is running.
356
F-150 (TFC) Canada/United States of America, enUSA, Edition date: 201808, Third-Printing- MaintenanceE161560
AB E249448
Page 360 of 644
Do not use supplemental engine oil
additives because they are unnecessary
and could lead to engine damage that may
not be covered by the vehicle Warranty.
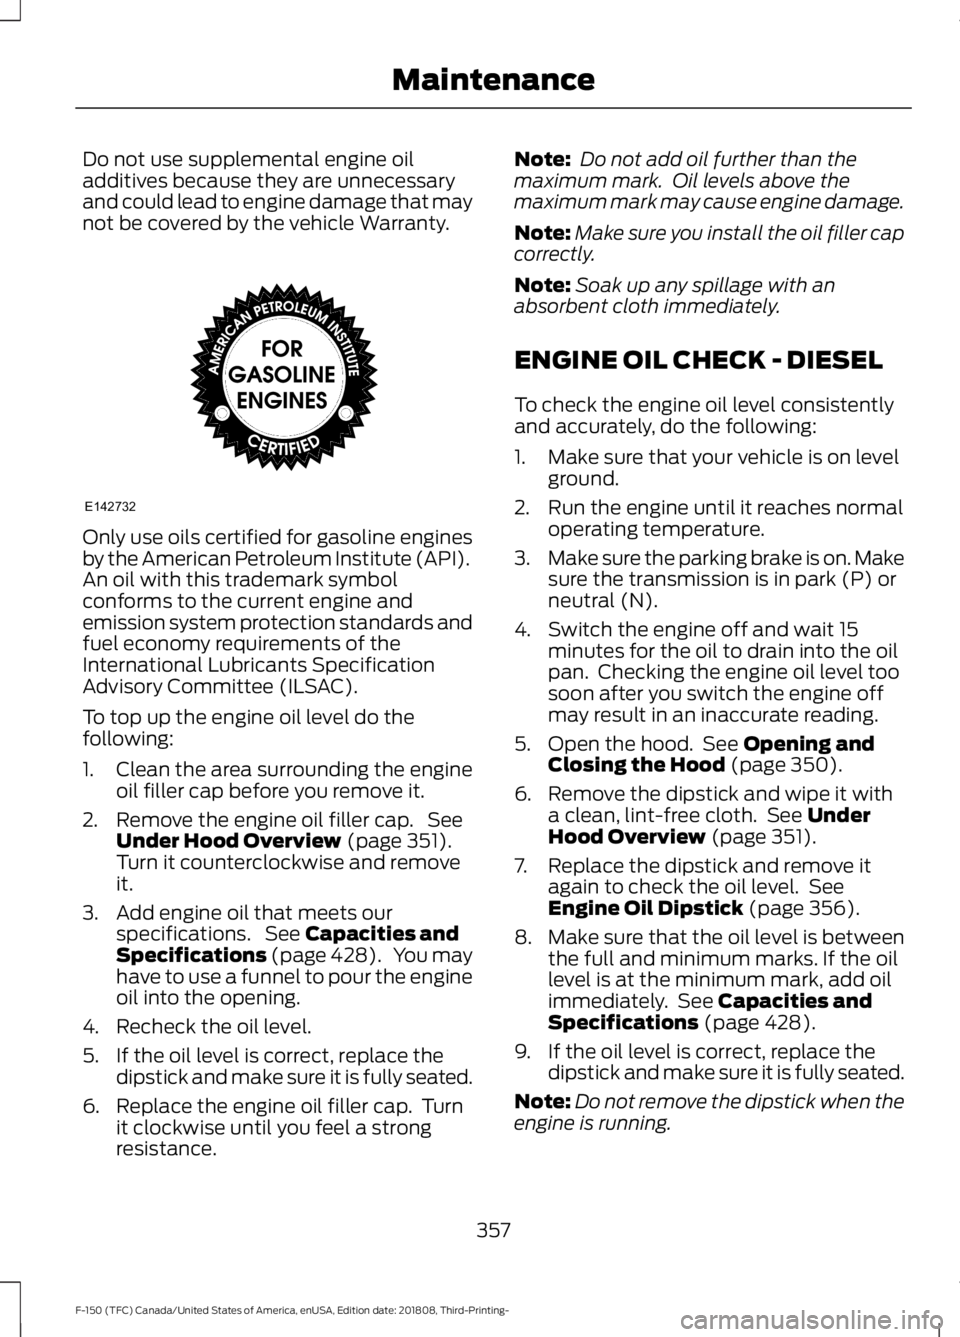
Only use oils certified for gasoline engines
by the American Petroleum Institute (API).
An oil with this trademark symbol
conforms to the current engine and
emission system protection standards and
fuel economy requirements of the
International Lubricants Specification
Advisory Committee (ILSAC).
To top up the engine oil level do the
following:
1. Clean the area surrounding the engine
oil filler cap before you remove it.
2. Remove the engine oil filler cap. See Under Hood Overview (page 351).
Turn it counterclockwise and remove
it.
3. Add engine oil that meets our specifications. See
Capacities and
Specifications (page 428). You may
have to use a funnel to pour the engine
oil into the opening.
4. Recheck the oil level.
5. If the oil level is correct, replace the dipstick and make sure it is fully seated.
6. Replace the engine oil filler cap. Turn it clockwise until you feel a strong
resistance. Note:
Do not add oil further than the
maximum mark. Oil levels above the
maximum mark may cause engine damage.
Note: Make sure you install the oil filler cap
correctly.
Note: Soak up any spillage with an
absorbent cloth immediately.
ENGINE OIL CHECK - DIESEL
To check the engine oil level consistently
and accurately, do the following:
1. Make sure that your vehicle is on level ground.
2. Run the engine until it reaches normal operating temperature.
3. Make sure the parking brake is on. Make
sure the transmission is in park (P) or
neutral (N).
4. Switch the engine off and wait 15 minutes for the oil to drain into the oil
pan. Checking the engine oil level too
soon after you switch the engine off
may result in an inaccurate reading.
5. Open the hood. See
Opening and
Closing the Hood (page 350).
6. Remove the dipstick and wipe it with a clean, lint-free cloth. See
Under
Hood Overview (page 351).
7. Replace the dipstick and remove it again to check the oil level. See
Engine Oil Dipstick
(page 356).
8. Make sure that the oil level is between
the full and minimum marks. If the oil
level is at the minimum mark, add oil
immediately. See
Capacities and
Specifications (page 428).
9. If the oil level is correct, replace the dipstick and make sure it is fully seated.
Note: Do not remove the dipstick when the
engine is running.
357
F-150 (TFC) Canada/United States of America, enUSA, Edition date: 201808, Third-Printing- MaintenanceE142732
Page 425 of 644

Drivebelt Routing
MOTORCRAFT PARTS - 2.7L ECOBOOST™
Part Number
Component
FA-1883
Air filter element.
FL-2062
Oil filter.
FT-188
Transmission oil filter.
BAGM-48H6-760
Battery.
BAGM-94RH7-800SP-542
Spark plugs.
WW-2247
Windshield wiper blade.
FP-79
Cabin air filter.
For scheduled maintenance, we
recommend Motorcraft® replacement
parts available at your authorized dealer
or at fordparts.com. The parts engineered
for your vehicle meet or exceed our
specifications. Use of other parts may
impact vehicle performance, emissions
and durability. Your warranty may be void
for any damage related to use of other
parts. If a Motorcraft® oil filter is not available,
use an oil filter that meets industry
performance specification
SAE/USCAR-36.
For spark plug replacement, contact an
authorized dealer. Replace the spark plugs
at the appropriate intervals. See
Scheduled Maintenance (page 562).
422
F-150 (TFC) Canada/United States of America, enUSA, Edition date: 201808, Third-Printing- Capacities and SpecificationsE249450
Page 427 of 644
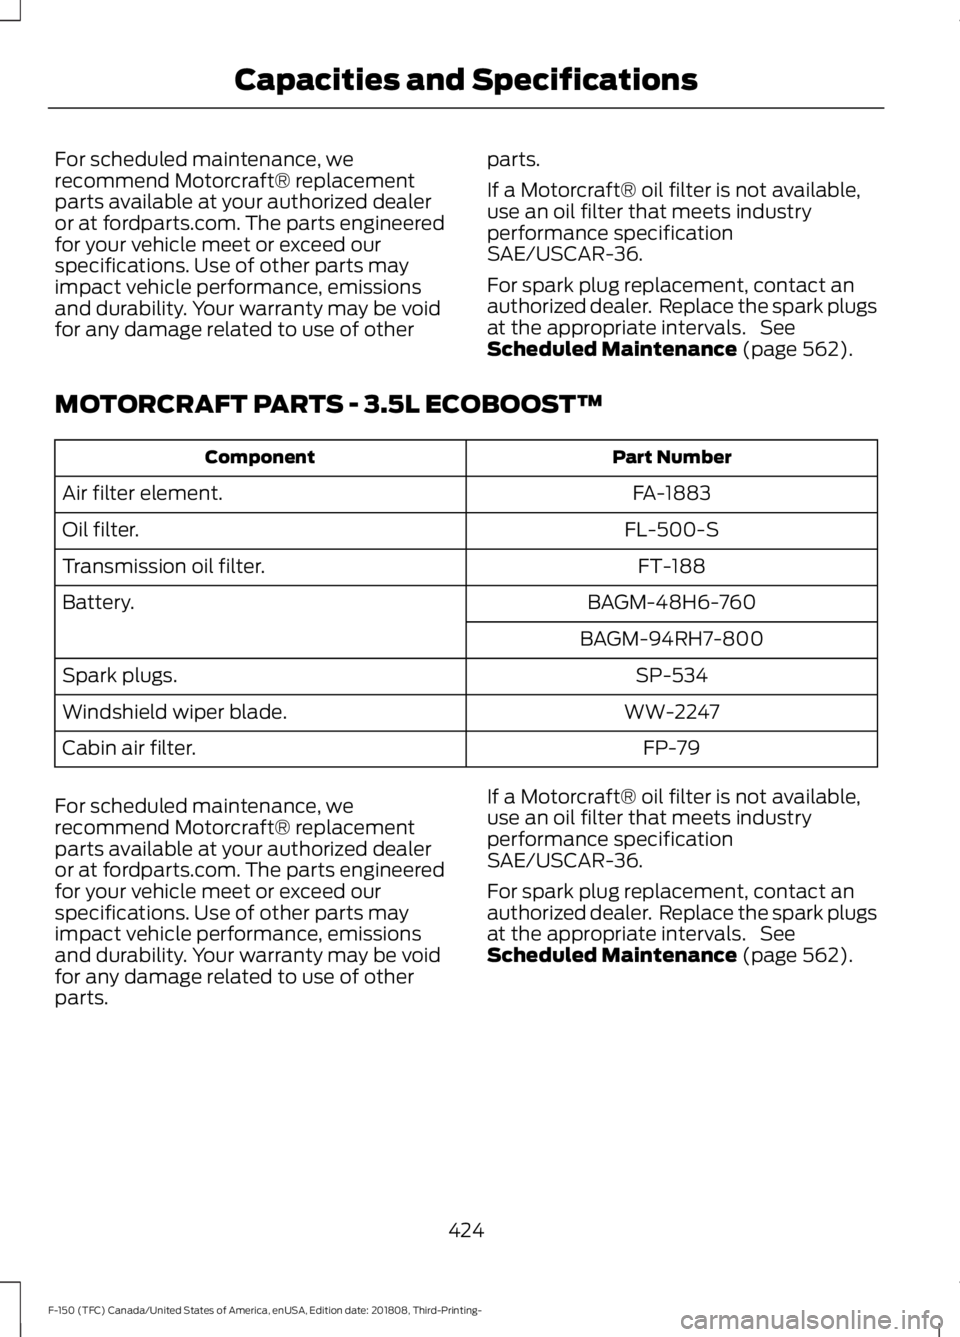
For scheduled maintenance, we
recommend Motorcraft® replacement
parts available at your authorized dealer
or at fordparts.com. The parts engineered
for your vehicle meet or exceed our
specifications. Use of other parts may
impact vehicle performance, emissions
and durability. Your warranty may be void
for any damage related to use of other
parts.
If a Motorcraft® oil filter is not available,
use an oil filter that meets industry
performance specification
SAE/USCAR-36.
For spark plug replacement, contact an
authorized dealer. Replace the spark plugs
at the appropriate intervals. See
Scheduled Maintenance (page 562).
MOTORCRAFT PARTS - 3.5L ECOBOOST™ Part Number
Component
FA-1883
Air filter element.
FL-500-S
Oil filter.
FT-188
Transmission oil filter.
BAGM-48H6-760
Battery.
BAGM-94RH7-800SP-534
Spark plugs.
WW-2247
Windshield wiper blade.
FP-79
Cabin air filter.
For scheduled maintenance, we
recommend Motorcraft® replacement
parts available at your authorized dealer
or at fordparts.com. The parts engineered
for your vehicle meet or exceed our
specifications. Use of other parts may
impact vehicle performance, emissions
and durability. Your warranty may be void
for any damage related to use of other
parts. If a Motorcraft® oil filter is not available,
use an oil filter that meets industry
performance specification
SAE/USCAR-36.
For spark plug replacement, contact an
authorized dealer. Replace the spark plugs
at the appropriate intervals. See
Scheduled Maintenance
(page 562).
424
F-150 (TFC) Canada/United States of America, enUSA, Edition date: 201808, Third-Printing- Capacities and Specifications