check engine FORD F-150 2020 Service Manual
[x] Cancel search | Manufacturer: FORD, Model Year: 2020, Model line: F-150, Model: FORD F-150 2020Pages: 625, PDF Size: 7.98 MB
Page 361 of 625
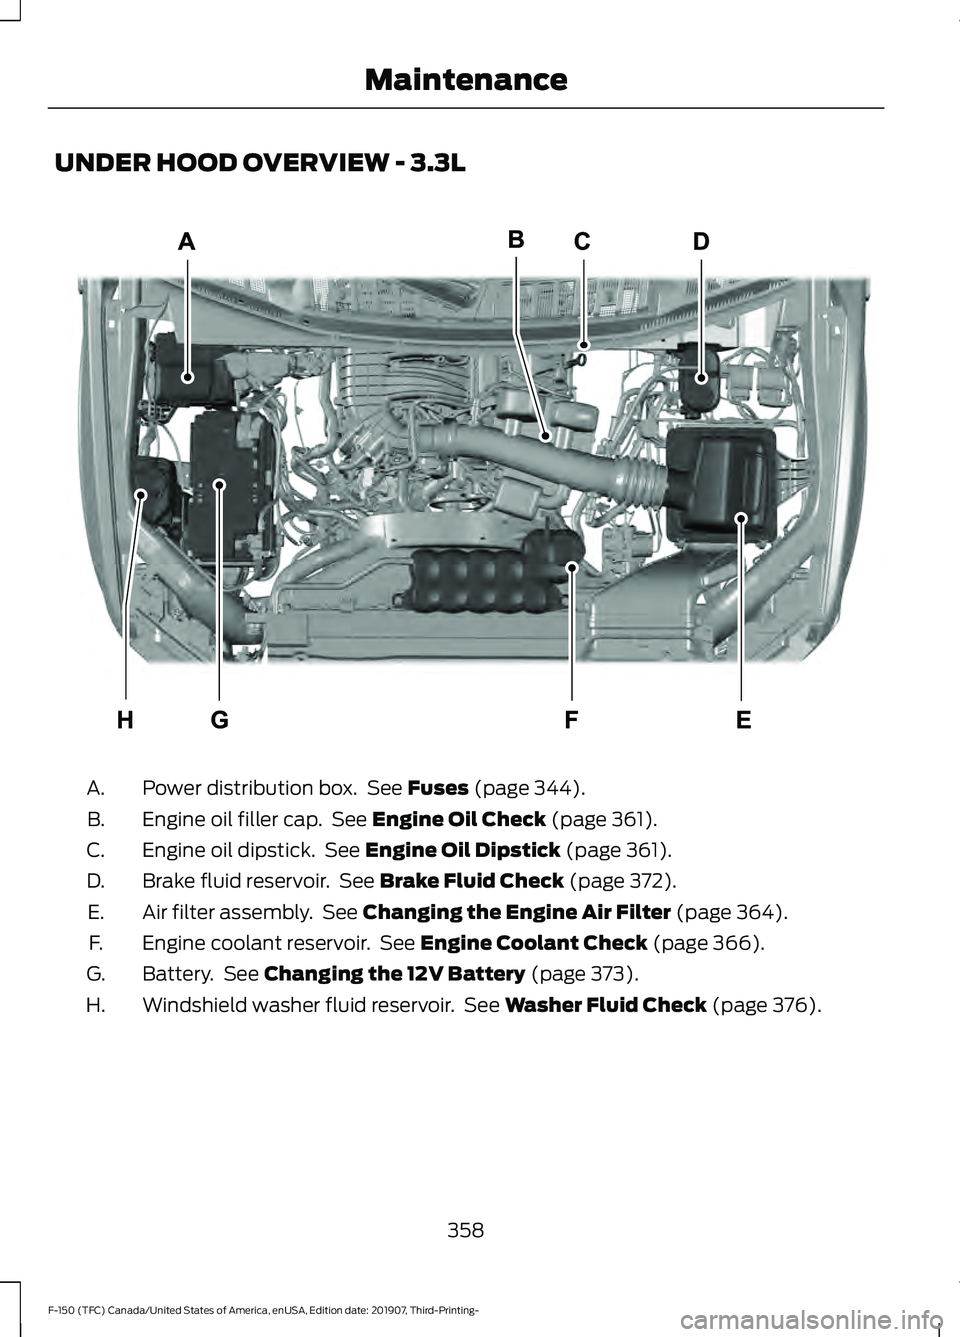
UNDER HOOD OVERVIEW - 3.3L
Power distribution box. See Fuses (page 344).
A.
Engine oil filler cap. See
Engine Oil Check (page 361).
B.
Engine oil dipstick. See
Engine Oil Dipstick (page 361).
C.
Brake fluid reservoir. See
Brake Fluid Check (page 372).
D.
Air filter assembly. See
Changing the Engine Air Filter (page 364).
E.
Engine coolant reservoir. See
Engine Coolant Check (page 366).
F.
Battery. See
Changing the 12V Battery (page 373).
G.
Windshield washer fluid reservoir. See
Washer Fluid Check (page 376).
H.
358
F-150 (TFC) Canada/United States of America, enUSA, Edition date: 201907, Third-Printing- MaintenanceE247636
Page 362 of 625
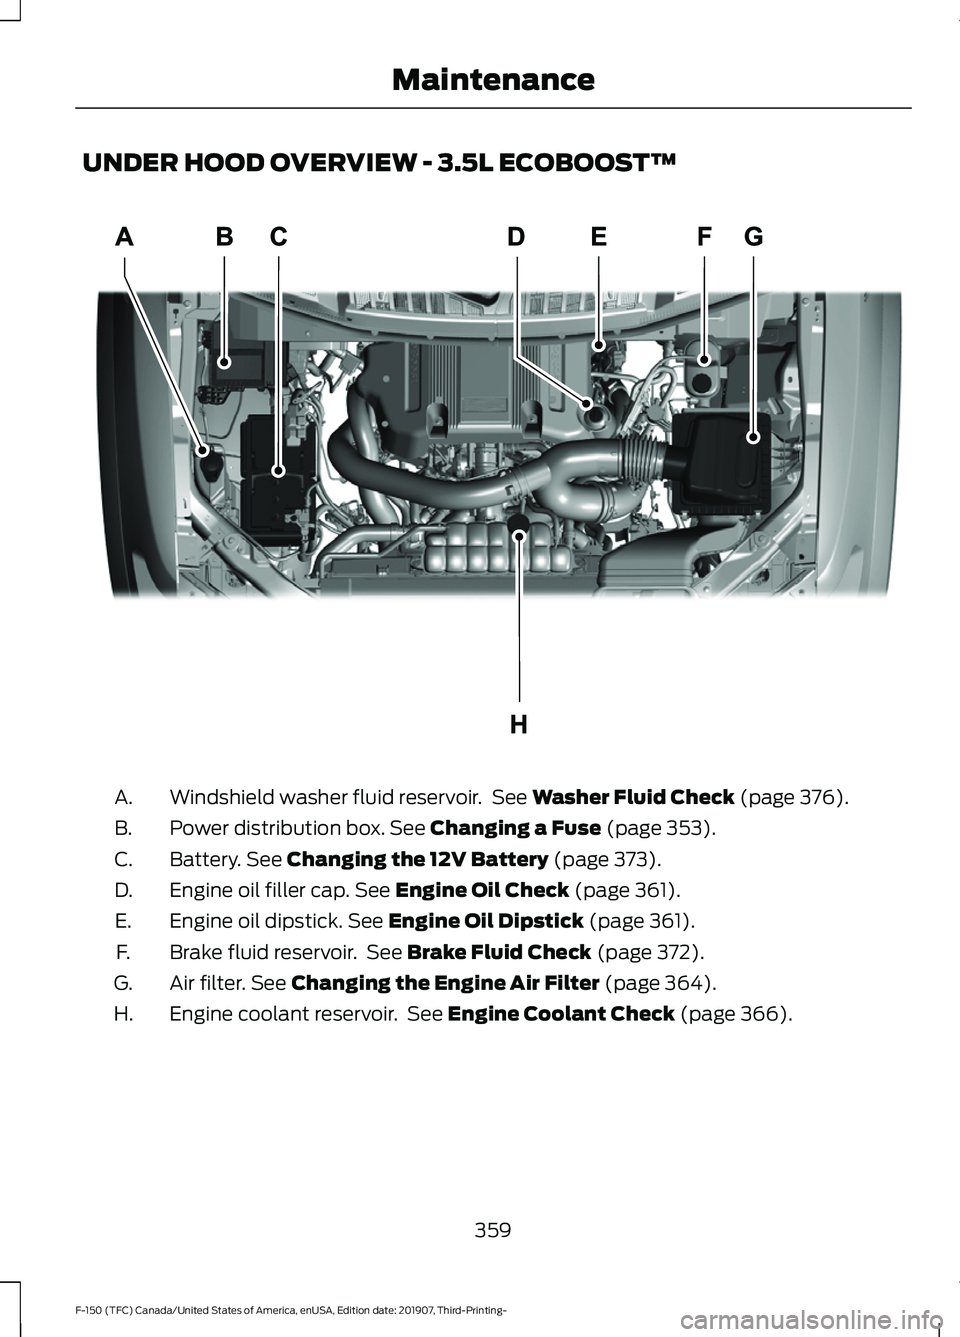
UNDER HOOD OVERVIEW - 3.5L ECOBOOST™
Windshield washer fluid reservoir. See Washer Fluid Check (page 376).
A.
Power distribution box.
See Changing a Fuse (page 353).
B.
Battery.
See Changing the 12V Battery (page 373).
C.
Engine oil filler cap.
See Engine Oil Check (page 361).
D.
Engine oil dipstick.
See Engine Oil Dipstick (page 361).
E.
Brake fluid reservoir. See
Brake Fluid Check (page 372).
F.
Air filter.
See Changing the Engine Air Filter (page 364).
G.
Engine coolant reservoir. See
Engine Coolant Check (page 366).
H.
359
F-150 (TFC) Canada/United States of America, enUSA, Edition date: 201907, Third-Printing- MaintenanceE258054
Page 363 of 625
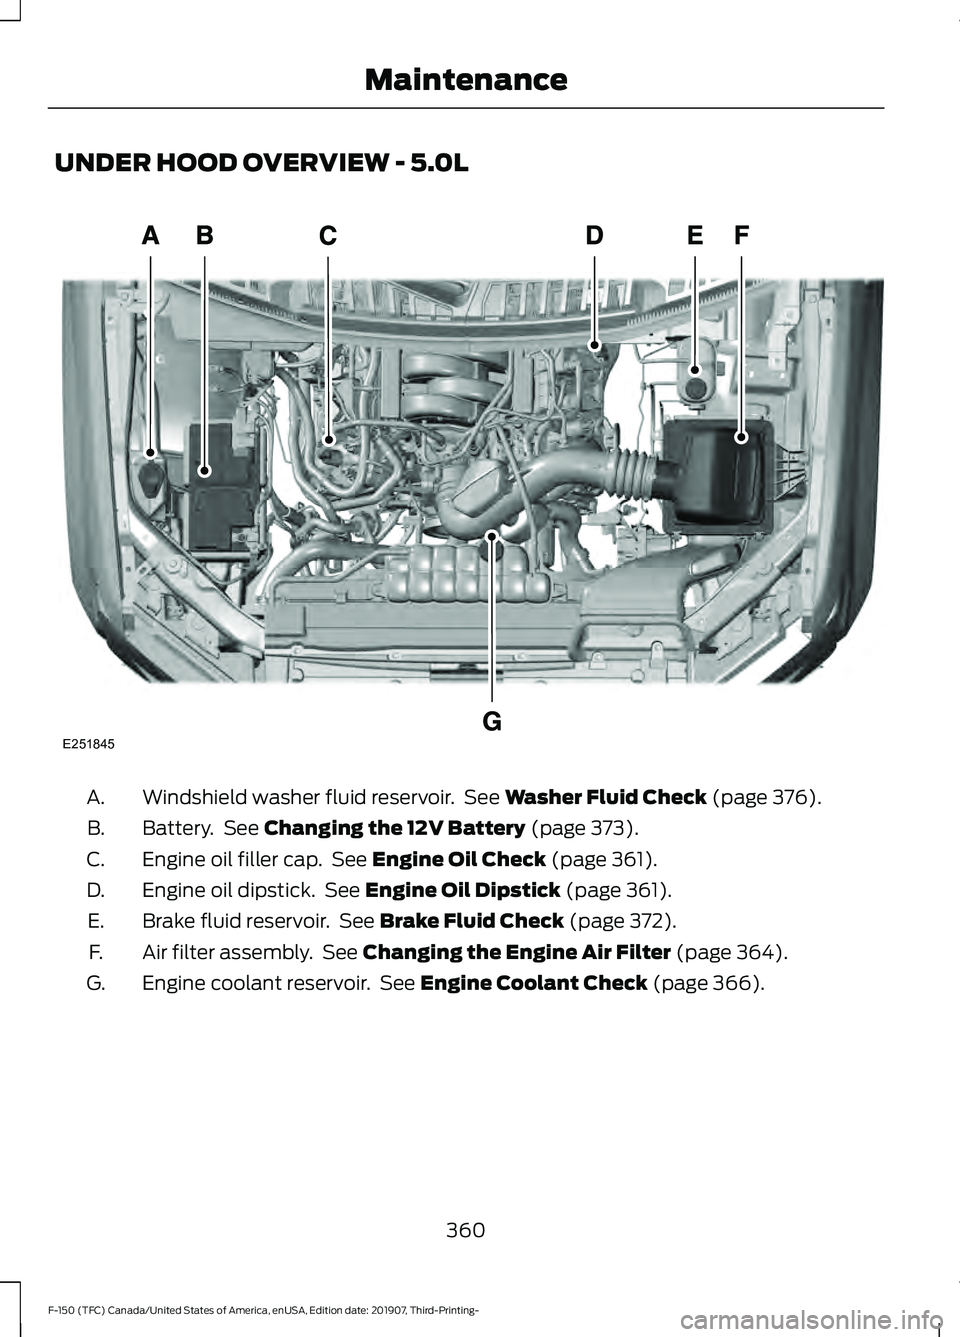
UNDER HOOD OVERVIEW - 5.0L
Windshield washer fluid reservoir. See Washer Fluid Check (page 376).
A.
Battery. See
Changing the 12V Battery (page 373).
B.
Engine oil filler cap. See
Engine Oil Check (page 361).
C.
Engine oil dipstick. See
Engine Oil Dipstick (page 361).
D.
Brake fluid reservoir. See
Brake Fluid Check (page 372).
E.
Air filter assembly. See
Changing the Engine Air Filter (page 364).
F.
Engine coolant reservoir. See
Engine Coolant Check (page 366).
G.
360
F-150 (TFC) Canada/United States of America, enUSA, Edition date: 201907, Third-Printing- MaintenanceE251845
Page 364 of 625
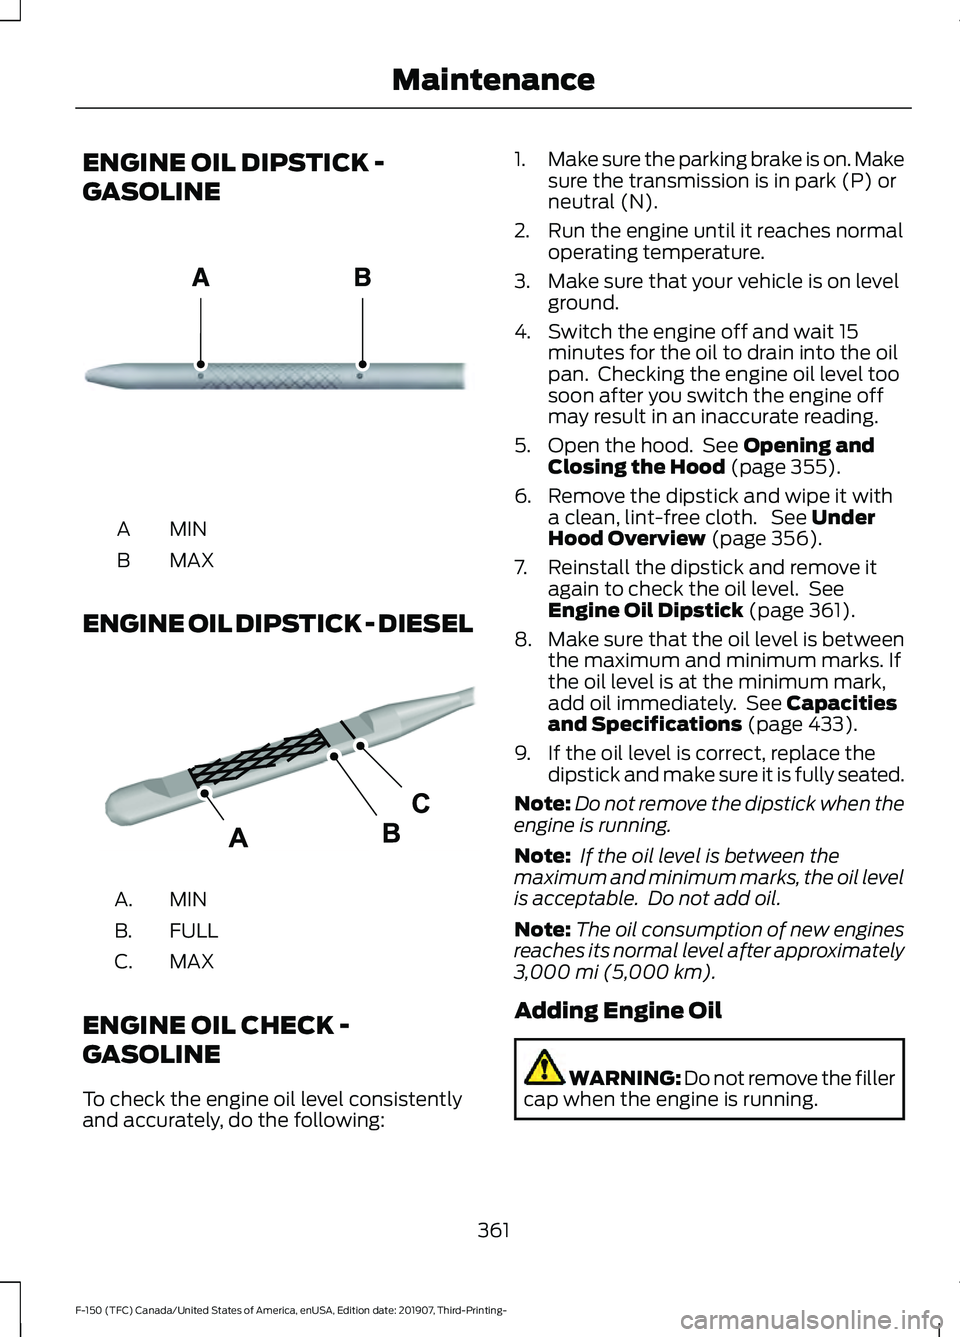
ENGINE OIL DIPSTICK -
GASOLINE
MINA
MAX
B
ENGINE OIL DIPSTICK - DIESEL MINA.
FULL
B.
MAX
C.
ENGINE OIL CHECK -
GASOLINE
To check the engine oil level consistently
and accurately, do the following: 1.
Make sure the parking brake is on. Make
sure the transmission is in park (P) or
neutral (N).
2. Run the engine until it reaches normal operating temperature.
3. Make sure that your vehicle is on level ground.
4. Switch the engine off and wait 15 minutes for the oil to drain into the oil
pan. Checking the engine oil level too
soon after you switch the engine off
may result in an inaccurate reading.
5. Open the hood. See Opening and
Closing the Hood (page 355).
6. Remove the dipstick and wipe it with a clean, lint-free cloth. See
Under
Hood Overview (page 356).
7. Reinstall the dipstick and remove it again to check the oil level. See
Engine Oil Dipstick
(page 361).
8. Make sure that the oil level is between
the maximum and minimum marks. If
the oil level is at the minimum mark,
add oil immediately. See
Capacities
and Specifications (page 433).
9. If the oil level is correct, replace the dipstick and make sure it is fully seated.
Note: Do not remove the dipstick when the
engine is running.
Note: If the oil level is between the
maximum and minimum marks, the oil level
is acceptable. Do not add oil.
Note: The oil consumption of new engines
reaches its normal level after approximately
3,000 mi (5,000 km)
.
Adding Engine Oil WARNING: Do not remove the filler
cap when the engine is running.
361
F-150 (TFC) Canada/United States of America, enUSA, Edition date: 201907, Third-Printing- MaintenanceE161560 E249448
Page 365 of 625
Do not use supplemental engine oil
additives because they are unnecessary
and could lead to engine damage that may
not be covered by the vehicle Warranty.
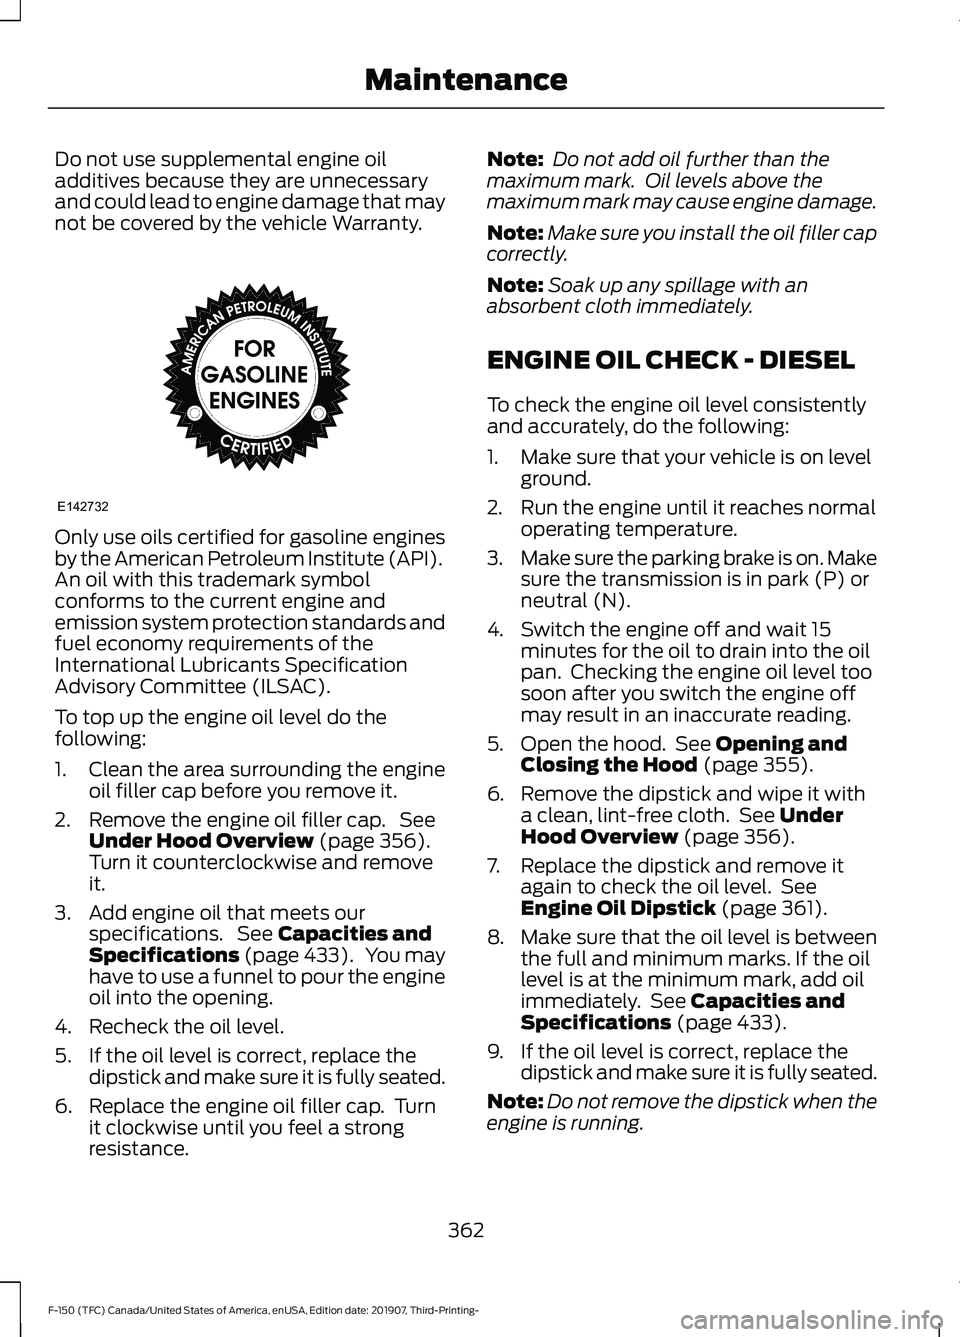
Only use oils certified for gasoline engines
by the American Petroleum Institute (API).
An oil with this trademark symbol
conforms to the current engine and
emission system protection standards and
fuel economy requirements of the
International Lubricants Specification
Advisory Committee (ILSAC).
To top up the engine oil level do the
following:
1. Clean the area surrounding the engine
oil filler cap before you remove it.
2. Remove the engine oil filler cap. See Under Hood Overview (page 356).
Turn it counterclockwise and remove
it.
3. Add engine oil that meets our specifications. See
Capacities and
Specifications (page 433). You may
have to use a funnel to pour the engine
oil into the opening.
4. Recheck the oil level.
5. If the oil level is correct, replace the dipstick and make sure it is fully seated.
6. Replace the engine oil filler cap. Turn it clockwise until you feel a strong
resistance. Note:
Do not add oil further than the
maximum mark. Oil levels above the
maximum mark may cause engine damage.
Note: Make sure you install the oil filler cap
correctly.
Note: Soak up any spillage with an
absorbent cloth immediately.
ENGINE OIL CHECK - DIESEL
To check the engine oil level consistently
and accurately, do the following:
1. Make sure that your vehicle is on level ground.
2. Run the engine until it reaches normal operating temperature.
3. Make sure the parking brake is on. Make
sure the transmission is in park (P) or
neutral (N).
4. Switch the engine off and wait 15 minutes for the oil to drain into the oil
pan. Checking the engine oil level too
soon after you switch the engine off
may result in an inaccurate reading.
5. Open the hood. See
Opening and
Closing the Hood (page 355).
6. Remove the dipstick and wipe it with a clean, lint-free cloth. See
Under
Hood Overview (page 356).
7. Replace the dipstick and remove it again to check the oil level. See
Engine Oil Dipstick
(page 361).
8. Make sure that the oil level is between
the full and minimum marks. If the oil
level is at the minimum mark, add oil
immediately. See
Capacities and
Specifications (page 433).
9. If the oil level is correct, replace the dipstick and make sure it is fully seated.
Note: Do not remove the dipstick when the
engine is running.
362
F-150 (TFC) Canada/United States of America, enUSA, Edition date: 201907, Third-Printing- MaintenanceE142732
Page 366 of 625
Note:
If the oil level is between the full and
minimum marks, the oil level is acceptable.
Do not add oil.
Note: The oil consumption of new engines
reaches its normal level after approximately
3,000 mi (5,000 km).
Adding Engine Oil WARNING: Do not remove the filler
cap when the engine is running.
Do not use supplemental engine oil
additives because they are unnecessary
and could lead to engine damage that may
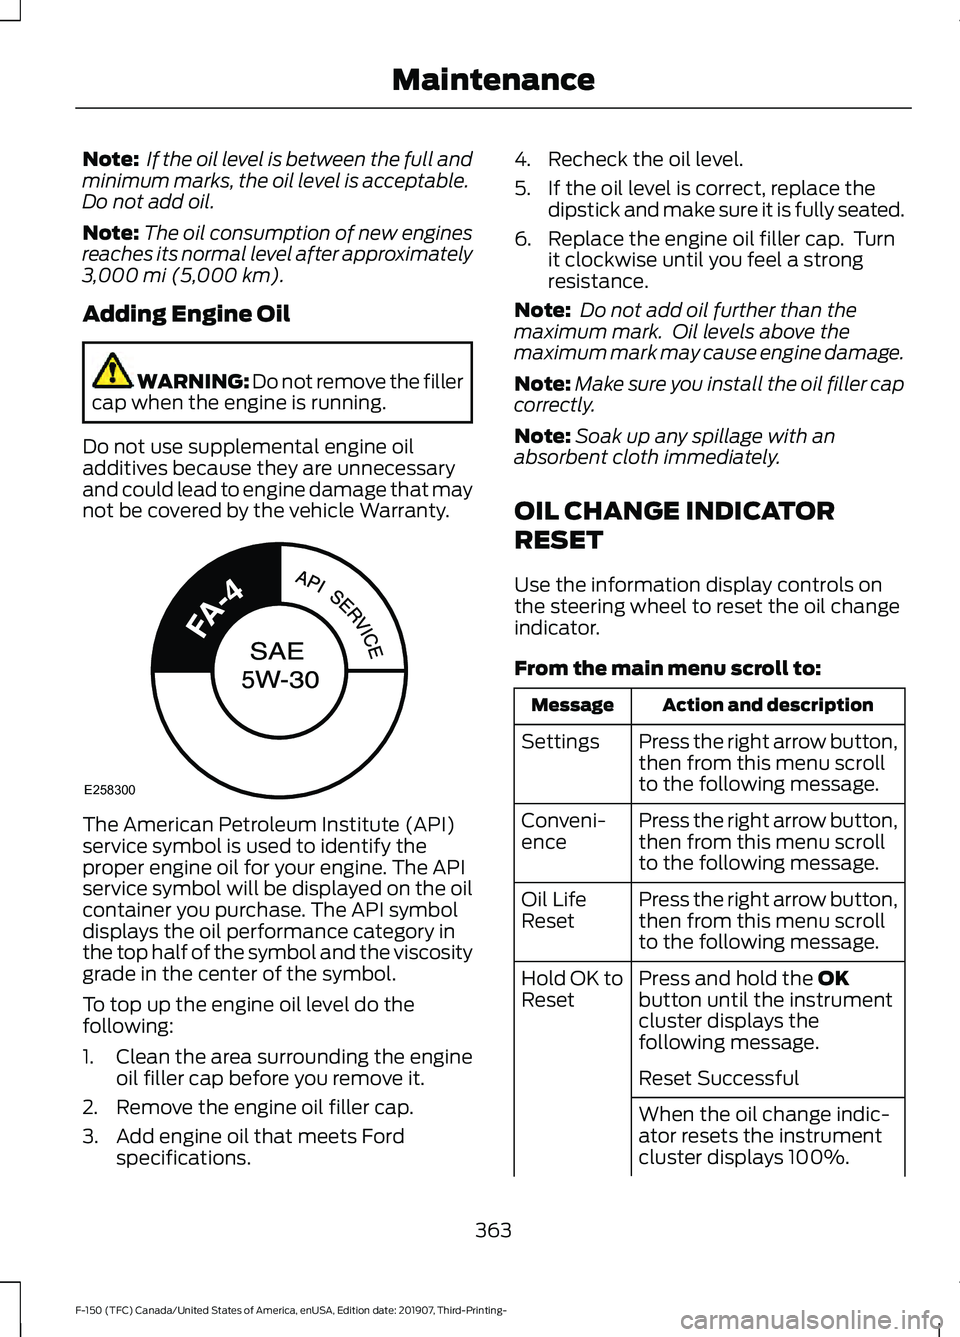
not be covered by the vehicle Warranty. The American Petroleum Institute (API)
service symbol is used to identify the
proper engine oil for your engine. The API
service symbol will be displayed on the oil
container you purchase. The API symbol
displays the oil performance category in
the top half of the symbol and the viscosity
grade in the center of the symbol.
To top up the engine oil level do the
following:
1. Clean the area surrounding the engine
oil filler cap before you remove it.
2. Remove the engine oil filler cap.
3. Add engine oil that meets Ford specifications. 4. Recheck the oil level.
5. If the oil level is correct, replace the
dipstick and make sure it is fully seated.
6. Replace the engine oil filler cap. Turn it clockwise until you feel a strong
resistance.
Note: Do not add oil further than the
maximum mark. Oil levels above the
maximum mark may cause engine damage.
Note: Make sure you install the oil filler cap
correctly.
Note: Soak up any spillage with an
absorbent cloth immediately.
OIL CHANGE INDICATOR
RESET
Use the information display controls on
the steering wheel to reset the oil change
indicator.
From the main menu scroll to: Action and description
Message
Press the right arrow button,
then from this menu scroll
to the following message.
Settings
Press the right arrow button,
then from this menu scroll
to the following message.
Conveni-
ence
Press the right arrow button,
then from this menu scroll
to the following message.
Oil Life
Reset
Press and hold the
OK
button until the instrument
cluster displays the
following message.
Hold OK to
Reset
Reset Successful
When the oil change indic-
ator resets the instrument
cluster displays 100%.
363
F-150 (TFC) Canada/United States of America, enUSA, Edition date: 201907, Third-Printing- MaintenanceE258300
Page 368 of 625
Note:
Failure to use the correct air filter
element may result in severe engine
damage. Resulting component damage
may not be covered by the vehicle Warranty.
Change the air filter element at the correct
service interval. See Scheduled
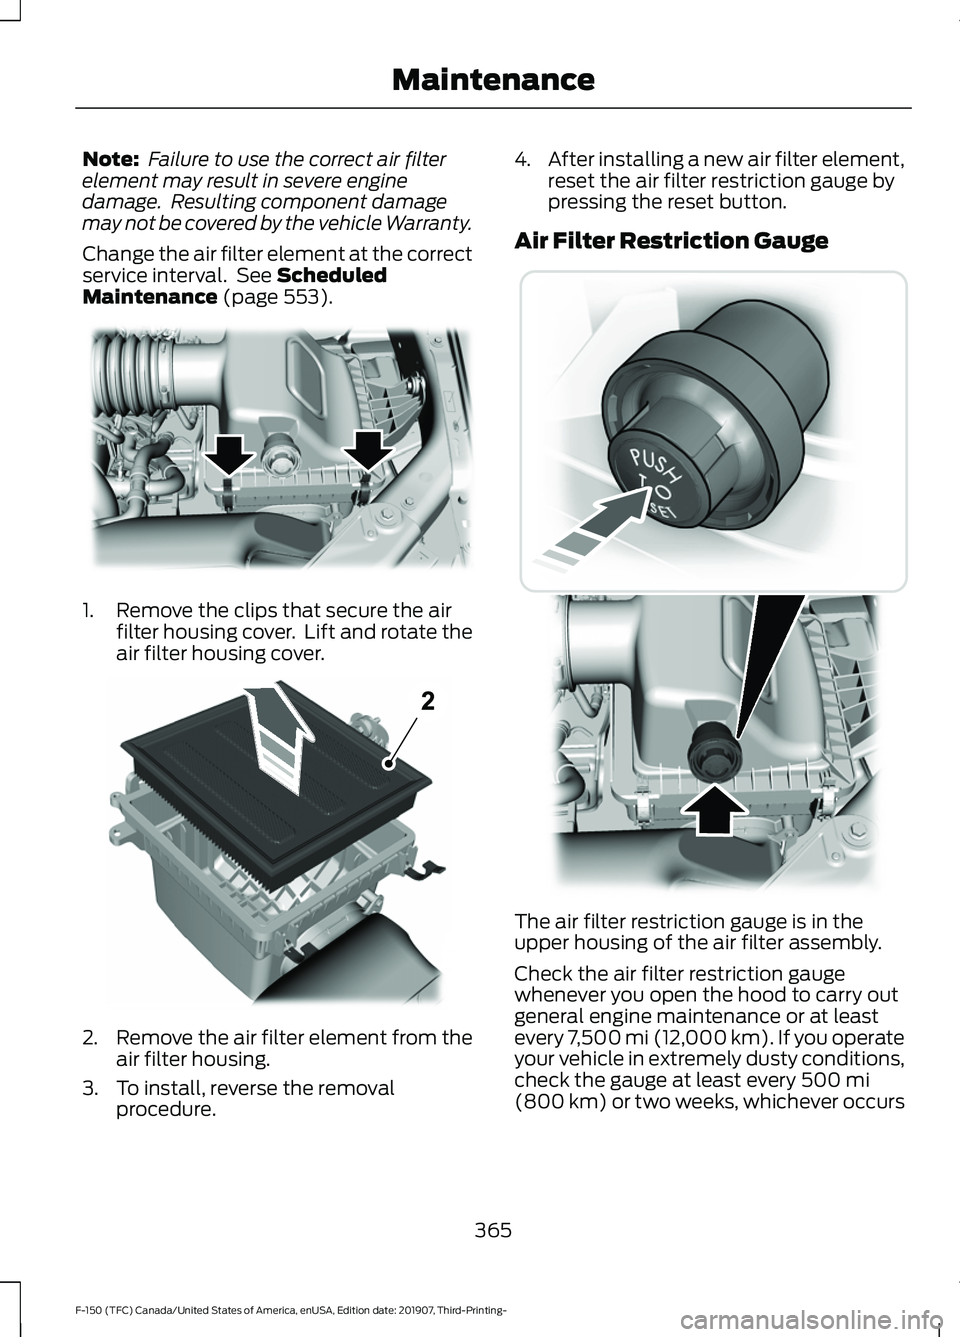
Maintenance (page 553). 1. Remove the clips that secure the air
filter housing cover. Lift and rotate the
air filter housing cover. 2.
Remove the air filter element from the
air filter housing.
3. To install, reverse the removal procedure. 4.
After installing a new air filter element,
reset the air filter restriction gauge by
pressing the reset button.
Air Filter Restriction Gauge The air filter restriction gauge is in the
upper housing of the air filter assembly.
Check the air filter restriction gauge
whenever you open the hood to carry out
general engine maintenance or at least
every 7,500 mi (12,000 km). If you operate
your vehicle in extremely dusty conditions,
check the gauge at least every
500 mi
(800 km) or two weeks, whichever occurs
365
F-150 (TFC) Canada/United States of America, enUSA, Edition date: 201907, Third-Printing- MaintenanceE254171 E254172 E254173
Page 369 of 625
first. Change the air filter element when
the restriction gauge reads near the
change filter line and the gauge is yellow.
Allowing the restriction gauge to reach
maximum affects engine performance and
fuel economy.
Operating your vehicle in heavy snowfall
or extreme rain conditions may allow
excessive amounts of snow or water into
the air intake system. This could restrict air
flow and cause the engine to lose power
or shut down.
After installing a new air filter element,
reset the gauge by pressing the reset
button.
After operating your vehicle during heavy
snowfall or extreme rain, do the following:
•
Snow: At the earliest opportunity, open
the hood and clear any snow and ice
from the air filter housing inlet and
reset the air filter restriction gauge.
• Extreme rain: The air filter element
dries out after approximately 15– 30
minutes of driving at highway speeds.
At the earliest opportunity, open the
hood and reset the air filter restriction
gauge.
DRAINING THE FUEL FILTER
WATER TRAP - DIESEL WARNING: Do not dispose of fuel
in the household refuse or the public
sewage system. Use an authorized waste
disposal facility.
Note: Only add fuel that meets the Ford
specification. See
Fuel Quality (page 196).
Note: The in-tank pump will turn off
automatically after approximately 30
seconds.
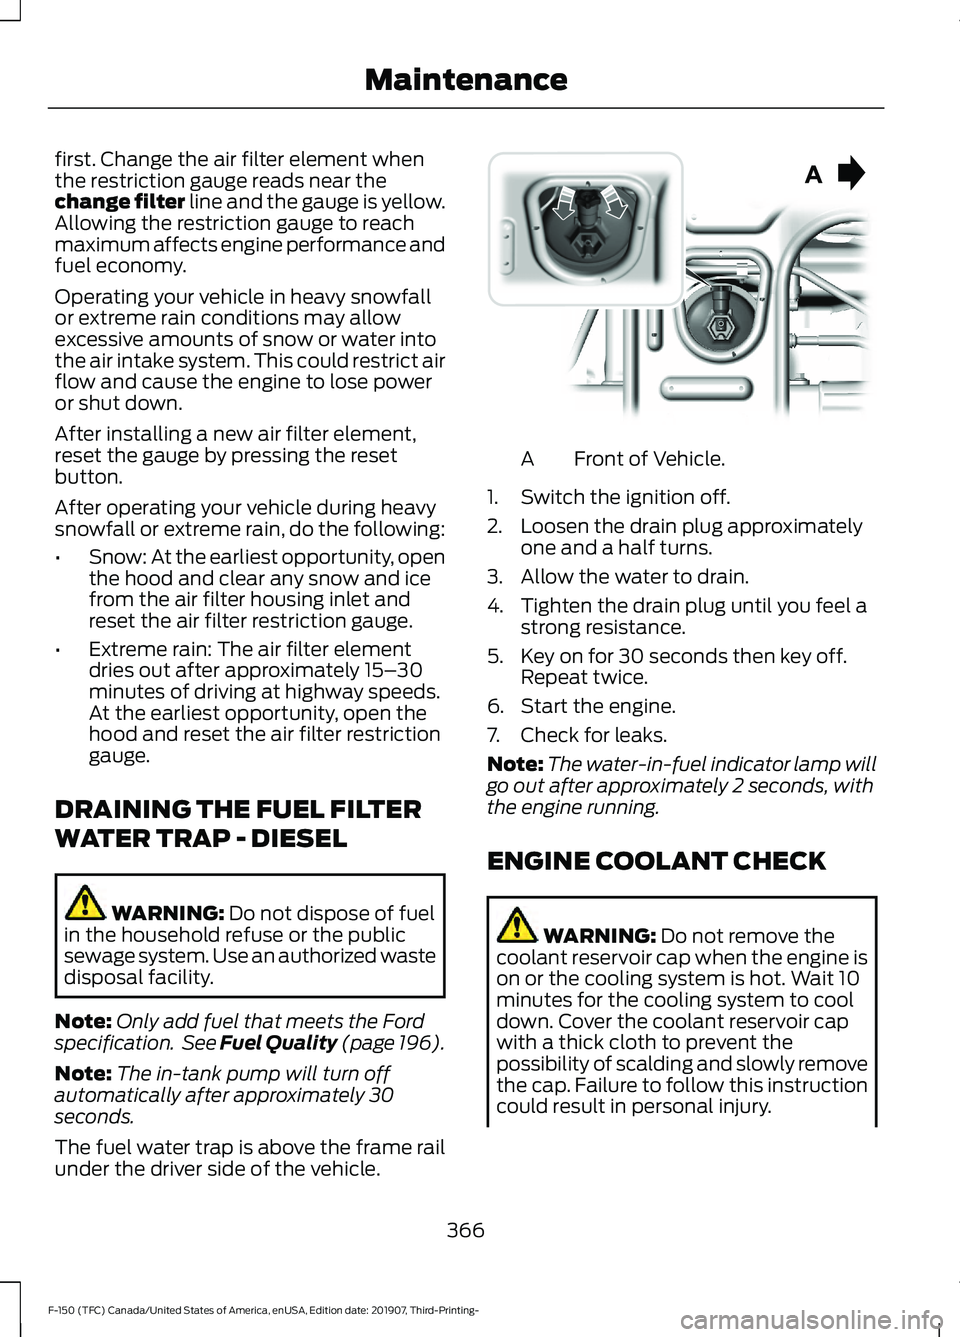
The fuel water trap is above the frame rail
under the driver side of the vehicle. Front of Vehicle.
A
1. Switch the ignition off.
2. Loosen the drain plug approximately one and a half turns.
3. Allow the water to drain.
4. Tighten the drain plug until you feel a strong resistance.
5. Key on for 30 seconds then key off. Repeat twice.
6. Start the engine.
7. Check for leaks.
Note: The water-in-fuel indicator lamp will
go out after approximately 2 seconds, with
the engine running.
ENGINE COOLANT CHECK WARNING:
Do not remove the
coolant reservoir cap when the engine is
on or the cooling system is hot. Wait 10
minutes for the cooling system to cool
down. Cover the coolant reservoir cap
with a thick cloth to prevent the
possibility of scalding and slowly remove
the cap. Failure to follow this instruction
could result in personal injury.
366
F-150 (TFC) Canada/United States of America, enUSA, Edition date: 201907, Third-Printing- Maintenance E254226
Page 370 of 625
WARNING: Do not put coolant in
the windshield washer reservoir. If
sprayed on the windshield, coolant could
make it difficult to see through the
windshield. WARNING:
To reduce the risk of
personal injury, make sure the engine is
cool before unscrewing the coolant
pressure relief cap. The cooling system
is under pressure. Steam and hot liquid
can come out forcefully when you loosen
the cap slightly. WARNING:
Do not add coolant
further than the MAX mark.
When the engine is cold, check the
concentration and level of the coolant at
the intervals listed in the scheduled
maintenance information. See Scheduled
Maintenance
(page 553).
Note: Make sure that the coolant level is
between the
MIN and MAX marks on the
coolant reservoir.
Note: Coolant expands when it is hot. The
level may extend beyond the
MAX mark.
Maintain coolant concentration within
48% to 50%, which equates to a freeze
point between
-29°F (-34°C) and -35°F
(-37°C). Coolant concentration should be
checked using a refractometer. We do not
recommend the use of hydrometers or
coolant test strips for measuring coolant
concentration.
Adding Coolant WARNING:
Do not add engine
coolant when the engine is on or the
cooling system is hot. Failure to follow
this instruction could result in personal
injury. WARNING:
Do not remove the
coolant reservoir cap when the engine is
on or the cooling system is hot. Wait 10
minutes for the cooling system to cool
down. Cover the coolant reservoir cap
with a thick cloth to prevent the
possibility of scalding and slowly remove
the cap. Failure to follow this instruction
could result in personal injury. WARNING:
Do not put coolant in
the windshield washer reservoir. If
sprayed on the windshield, coolant could
make it difficult to see through the
windshield.
Note: Do not use stop leak pellets, cooling
system sealants, or non-specified additives
as they can cause damage to the engine
cooling or heating systems. Resulting
component damage may not be covered by
the vehicle Warranty.
Note: Automotive fluids are not
interchangeable.
It is very important to use prediluted
coolant approved to the correct
specification in order to avoid plugging the
small passageways in the engine cooling
system. See
Capacities and
Specifications (page 424). Do not mix
different colors or types of coolant in your
vehicle. Mixing of engine coolants or using
an incorrect coolant may harm the engine
or cooling system components and may
not be covered by the vehicle Warranty.
Note: If prediluted coolant is not available,
use the approved concentrated coolant
diluting it to 50/50 with distilled water. See
Capacities and Specifications (page
424).
Using water that has not been deionised
may contribute to deposit formation,
corrosion and plugging of the small cooling
system passageways.
367
F-150 (TFC) Canada/United States of America, enUSA, Edition date: 201907, Third-Printing- Maintenance
Page 371 of 625
Note:
Coolants marketed for all makes and
models may not be approved to our
specifications and may cause damage to
the cooling system. Resulting component
damage may not be covered by the vehicle
Warranty.
If the coolant level is at or below the
minimum mark, add prediluted coolant
immediately.
To top up the coolant level do the
following:
1. Unscrew the cap slowly. Any pressure escapes as you unscrew the cap.
2. Add prediluted coolant approved to the correct specification. See
Capacities and Specifications (page
424).
3. Add enough prediluted coolant to reach the correct level.
4. Replace the coolant reservoir cap. Turn
the cap clockwise until it contacts the
hard stop.
5. Check the coolant level in the coolant reservoir the next few times you drive
your vehicle. If necessary, add enough
prediluted engine coolant to bring the
coolant level to the correct level.
If you have to add more than
1.1 qt (1 L) of
engine coolant per month, have your
vehicle checked as soon as possible.
Operating an engine with a low level of
coolant can result in engine overheating
and possible engine damage.
In case of emergency, you can add a large
amount of water without engine coolant
in order to reach a vehicle service location.
In this instance, qualified personnel:
1. Must drain the cooling system.
2. Chemically clean the coolant system.
3. Refill with engine coolant as soon as possible. Water alone, without engine coolant, can
cause engine damage from corrosion,
overheating or freezing.
Do not use the following as a coolant
substitute:
•
Alcohol.
• Methanol.
• Brine.
• Any coolant mixed with alcohol or
methanol antifreeze.
Alcohol and other liquids can cause engine
damage from overheating or freezing.
Do not add extra inhibitors or additives to
the coolant. These can be harmful and
compromise the corrosion protection of
the coolant.
Recycled Coolant
We do not recommend the use of recycled
coolant as an approved recycling process
is not yet available.
Note: Dispose of used coolant in the
appropriate manner.
Follow your community's regulations and
standards for recycling and disposing of
automotive fluids.
Severe Climates
If you drive in extremely cold climates:
• It may be necessary to increase the
coolant concentration above 50%.
• A coolant concentration of 60%
provides improved freeze point
protection. Coolant concentrations
above 60% decrease the overheat
protection characteristics of the
coolant and may cause engine
damage.
368
F-150 (TFC) Canada/United States of America, enUSA, Edition date: 201907, Third-Printing- Maintenance