Screen FORD F-150 2022 Owners Manual
[x] Cancel search | Manufacturer: FORD, Model Year: 2022, Model line: F-150, Model: FORD F-150 2022Pages: 750, PDF Size: 12.96 MB
Page 493 of 750
3. Select Oil Life.
4. Select
Reset Oil Life.
5. Press and hold the OK button until the
system reset confirmation appears.
RESETTING THE ENGINE OIL
CHANGE REMINDER - VEHICLES
WITH: 8 INCH SCREEN/12.3 INCH
SCREEN
Depending on your cluster, there are two
paths to reset the engine oil change
reminder.
Path 1
1. Press the Menu button on the steering
wheel to enter the information display
main menu.
2. Select
Settings.
3. Select
Vehicle Maintenance.
4. Select
Oil Life.
5. Press and hold the OK button until the
system reset confirmation appears.
Path 2
1. Press the Menu button on the steering
wheel to enter the information display
main menu.
2. Select
Truck Info.
3. Select
Engine Information.
4. Press and hold the OK button until the
system reset confirmation appears.
ENGINE OIL CAPACITY AND
SPECIFICATION
For filling information, please refer to the
Capacities and Specifications section of
your owner's manual. See
Engine Oil
Capacity and Specification (page 489). CHECKING THE COOLANT
When the engine is cold, check the
concentration and level of the coolant at
the intervals listed in the scheduled
maintenance information. See Scheduled
Maintenance
(page 642).
Note: Make sure that the coolant level is
between the minimum and maximum marks
on the coolant reservoir.
Note: Coolant expands when it is hot. The
level may extend beyond the
MAX mark.
If the coolant level is at or below the
minimum mark, add prediluted coolant
immediately.
Maintain coolant concentration within
48% to 50%, which equates to a freeze
point between
-29°F (-34°C) and -35°F
(-37°C). Coolant concentration should be
checked using a refractometer. We do not
recommend the use of hydrometers or
coolant test strips for measuring coolant
concentration.
Adding Coolant WARNING:
Keep your hands and
clothing clear of the cooling fan. WARNING:
Do not remove the
coolant reservoir cap when the engine is
on or the cooling system is hot. Wait 10
minutes for the cooling system to cool
down. Cover the coolant reservoir cap
with a thick cloth to prevent the
possibility of scalding and slowly remove
the cap. Failure to follow this instruction
could result in personal injury. WARNING:
Do not add engine
coolant when the engine is on or the
cooling system is hot. Failure to follow
this instruction could result in personal
injury.
489
2022 F-150 (TFD) Canada/United States of America, enUSA, Edition date: 202109, First-Printing Maintenance
Page 501 of 750
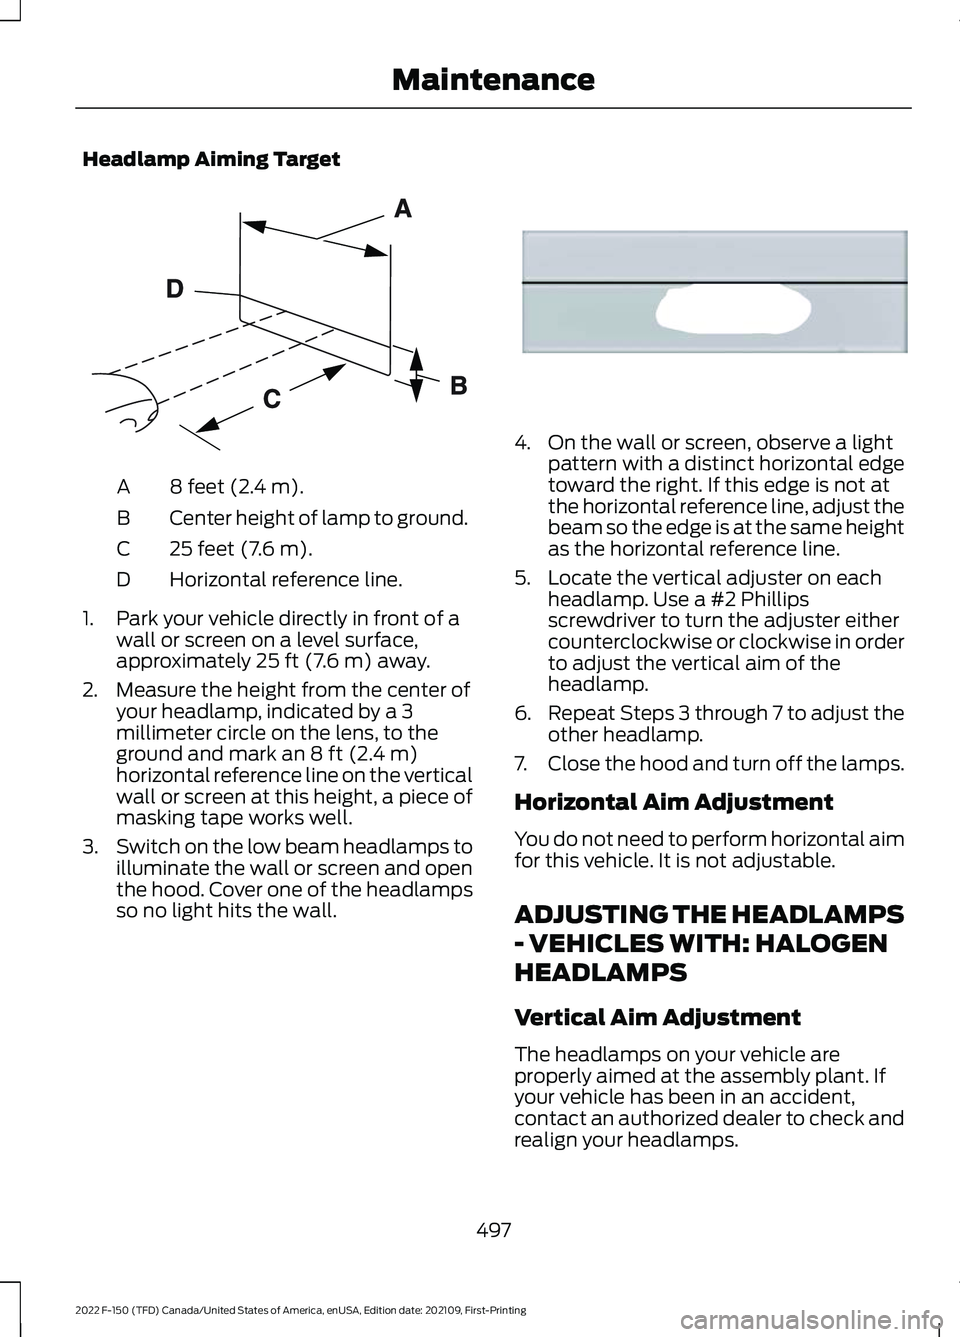
Headlamp Aiming Target
8 feet (2.4 m).
A
Center height of lamp to ground.
B
25 feet (7.6 m).
C
Horizontal reference line.
D
1. Park your vehicle directly in front of a wall or screen on a level surface,
approximately 25 ft (7.6 m) away.
2. Measure the height from the center of your headlamp, indicated by a 3
millimeter circle on the lens, to the
ground and mark an
8 ft (2.4 m)
horizontal reference line on the vertical
wall or screen at this height, a piece of
masking tape works well.
3. Switch on the low beam headlamps to
illuminate the wall or screen and open
the hood. Cover one of the headlamps
so no light hits the wall. 4. On the wall or screen, observe a light
pattern with a distinct horizontal edge
toward the right. If this edge is not at
the horizontal reference line, adjust the
beam so the edge is at the same height
as the horizontal reference line.
5. Locate the vertical adjuster on each headlamp. Use a #2 Phillips
screwdriver to turn the adjuster either
counterclockwise or clockwise in order
to adjust the vertical aim of the
headlamp.
6. Repeat Steps 3 through 7 to adjust the
other headlamp.
7. Close the hood and turn off the lamps.
Horizontal Aim Adjustment
You do not need to perform horizontal aim
for this vehicle. It is not adjustable.
ADJUSTING THE HEADLAMPS
- VEHICLES WITH: HALOGEN
HEADLAMPS
Vertical Aim Adjustment
The headlamps on your vehicle are
properly aimed at the assembly plant. If
your vehicle has been in an accident,
contact an authorized dealer to check and
realign your headlamps.
497
2022 F-150 (TFD) Canada/United States of America, enUSA, Edition date: 202109, First-Printing MaintenanceE142592 E167358
Page 502 of 750
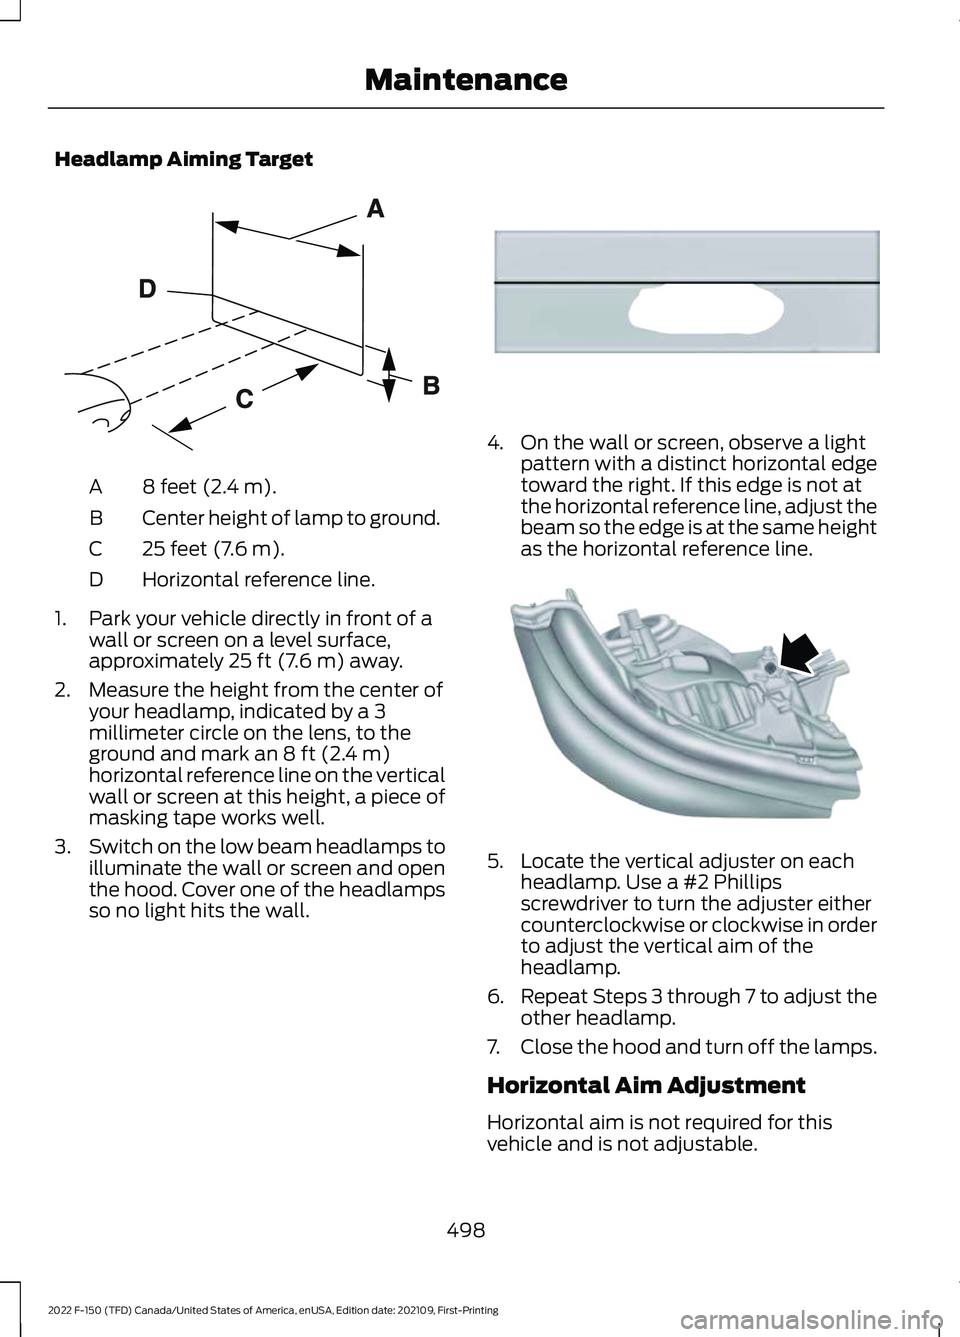
Headlamp Aiming Target
8 feet (2.4 m).
A
Center height of lamp to ground.
B
25 feet (7.6 m).
C
Horizontal reference line.
D
1. Park your vehicle directly in front of a wall or screen on a level surface,
approximately 25 ft (7.6 m) away.
2. Measure the height from the center of your headlamp, indicated by a 3
millimeter circle on the lens, to the
ground and mark an
8 ft (2.4 m)
horizontal reference line on the vertical
wall or screen at this height, a piece of
masking tape works well.
3. Switch on the low beam headlamps to
illuminate the wall or screen and open
the hood. Cover one of the headlamps
so no light hits the wall. 4. On the wall or screen, observe a light
pattern with a distinct horizontal edge
toward the right. If this edge is not at
the horizontal reference line, adjust the
beam so the edge is at the same height
as the horizontal reference line. 5. Locate the vertical adjuster on each
headlamp. Use a #2 Phillips
screwdriver to turn the adjuster either
counterclockwise or clockwise in order
to adjust the vertical aim of the
headlamp.
6. Repeat Steps 3 through 7 to adjust the
other headlamp.
7. Close the hood and turn off the lamps.
Horizontal Aim Adjustment
Horizontal aim is not required for this
vehicle and is not adjustable.
498
2022 F-150 (TFD) Canada/United States of America, enUSA, Edition date: 202109, First-Printing MaintenanceE142592 E167358 E163806
Page 517 of 750
CLEANING THE ENGINE
COMPARTMENT
Use a vacuum cleaner to remove debris
from the screen area below windshield.
Note:
If you are not familiar with the parts
around the engine do not wash the engine
compartment. Avoid frequent engine
washes.
When washing the engine compartment:
• Never wash or rinse the engine while it
is hot or running.
• Never wash or rinse any ignition coil,
spark plug wire or spark plug well.
• Cover the battery, power distribution
box, and air filter assembly to prevent
water damage.
Note: If your vehicle has an engine cover
remove the cover before application of
shampoo and degreaser.
• Spray an approved engine shampoo
and degreaser on all parts that require
cleaning and rinse with water.
CLEANING STRIPES OR
GRAPHICS
It is recommended to wash your vehicle by
hand however, pressure washing may be
used under the following conditions:
• Use a spray with a 40° wide spray
angle pattern.
• Keep the nozzle at a
12 in (305 mm)
distance and 90° angle to your
vehicle's surface.
• Do not use water pressure higher than
2,000 psi (14,000 kPa)
.
• Do not use water hotter than
179°F
(82°C).
Note: Holding the pressure washer nozzle
at an angle to the vehicle's surface may
damage graphics and cause the edges to
peel away from the vehicle's surface. CLEANING CAMERA LENSES AND
SENSORS
We recommend that you only use
lukewarm or cold water and a soft cloth
to clean the camera lens and sensors.
Note:
Do not pressure wash camera lens
and sensors.
CLEANING THE UNDERBODY
Flush the complete underside of your
vehicle frequently. Keep body and door
drain holes free from packed dirt.
Rear suspension components may require
regular cleaning with a power washer or a
thorough rinse with a strong stream of
water if the vehicle is operated in dusty or
muddy environments. Rear leaf springs or
other suspension components may emit
squeaking or popping noises while
operating the vehicle if particles, such as
dirt, rocks, or other debris, are present in
the components.
CLEANING THE INTERIOR
CLEANING THE INSTRUMENT
PANEL WARNING:
Do not use chemical
solvents or strong detergents when
cleaning the steering wheel or
instrument panel to avoid contamination
of the airbag system.
We recommend that you only clean the
instrument panel and cluster lens with a
damp soft cloth. Dry the area with a clean,
soft cloth.
For additional information and assistance,
we recommend that you contact an
authorized dealer.
513
2022 F-150 (TFD) Canada/United States of America, enUSA, Edition date: 202109, First-Printing Vehicle Care
Page 518 of 750
Note:
Avoid cleaners or polishes that
increase the gloss of the upper portion of
the instrument panel. The dull finish in this
area helps protect you from undesirable
windshield reflection.
CLEANING PLASTIC
We recommend that you only use a mild
soap and water solution on a soft cloth.
Dry the area with a clean, soft cloth.
CLEANING DISPLAYS AND
SCREENS
We recommend that you only use a
microfiber cloth in a circular motion to
clean off the fingerprint or dust.
If dirt or fingerprints are still on the screen,
apply a small amount of alcohol to the
cloth and try to clean it again.
Note: Do not pour or spray alcohol onto the
touchscreen.
Note: Do not use detergent or any type of
solvent to clean the touchscreen.
CLEANING SEATS AND THE
HEADLINER WARNING: On vehicles equipped
with seat-mounted airbags, do not use
chemical solvents or strong detergents.
Such products could contaminate the
side airbag system and affect
performance of the side airbag in a crash.
Cleaning Fabric Seats and the
Headliner
We recommend that you only clean the
fabric seats and headliners in the following
way:
1. Remove dust and loose dirt with a vacuum cleaner. 2. Wipe the surface with a soft, damp
cloth and a mild soap and water
solution. Dry the area with a clean, soft
cloth.
3. For additional information and assistance, we recommend that you
contact an authorized dealer.
For heavy stains, spot clean the area. If a
ring forms on the fabric, immediately clean
the entire area, but do not oversaturate or
the ring could set.
Cleaning Vinyl and Leather
We recommend that you only clean the
leather and vinyl surfaces in the following
way:
1. Remove dust and loose dirt with a vacuum cleaner.
2. Wipe the surface with a soft, damp cloth and a mild soap and water
solution. Dry the area with a clean, soft
cloth.
3. For additional information and assistance, we recommend that you
contact an authorized dealer.
With King Ranch Edition
Your vehicle has seating covered in
premium, top-grain leather that is
extremely durable, but still requires special
care and maintenance in order to preserve
longevity and comfort.
Regular cleaning and conditioning
maintains the appearance of the leather.
Scratches
Because the leather in the seat comes
from genuine steer hides, there may be
evidence of naturally occurring markings,
such as small scars. These markings give
character to the seating covers and are
considered to be proof of a genuine leather
product.
514
2022 F-150 (TFD) Canada/United States of America, enUSA, Edition date: 202109, First-Printing Vehicle Care
Page 544 of 750
pressure sensors are mounted into
each tire on your trailer. The
sensors send a message to your
vehicle indicating the current
trailer tire pressure and
temperature.
If the trailer tire pressure
monitoring system detects that a
tire is low, a warning message
appears in the information display.
The trailer tire information screen
in the information display
highlights the tire with a low
pressure.
If the trailer tire pressure
monitoring system detects that a
tire temperature is over temp, a
warning message appears in the
Information display. The trailer tire
information screen in the
information display highlights the
tire with a high temperature.
The main function of the trailer tire
pressure monitoring system is to
warn you when your trailer tires
need air or if the tires are
experiencing high temperatures.
It can also warn you in the event
the system is no longer capable
of functioning as intended. See
Tire Pressure Monitoring
System – Information
Messages
(page 542). When a Temporary Spare or
New Tire is Installed
If you have replaced a trailer tire
with a new or spare tire, a warning
message appears and pressure
readings are no longer displayed
for that tire.
To restore the full function of the
trailer tire pressure monitoring
system:
•
Have the damaged wheel and
tire assembly repaired and
remounted to your trailer.
• Install the trailer tire pressure
monitoring sensor into the new
wheel and tire assembly.
• Perform the trailer tire pressure
monitoring system reset
procedure.
Trailer Tire Pressure
Monitoring System Reset
Procedure
Note: You need to perform the tire
pressure monitoring system reset
procedure after each tire rotation,
or when a new trailer tire pressure
sensor is installed into a trailer tire.
The trailer tire pressure monitoring
system can be reset through the
menu in the information display.
See Tire Pressure Monitoring
System – Information
Messages (page
542). Performing
the trailer setup process also
resets the trailer tire pressure
monitoring system.
540
2022 F-150 (TFD) Canada/United States of America, enUSA, Edition date: 202109, First-Printing Tire Pressure Monitoring System
Page 601 of 750
WHAT IS A CONNECTED
VEHICLE
A connected vehicle has technology that
allows your vehicle to connect to a mobile
network and for you to access a range of
features. When used in conjunction with
the FordPass app, it could allow you to
monitor and control your vehicle further,
for example checking the tire pressures,
the fuel level and the vehicle location. For
additional information, refer to the local
Ford website.
CONNECTED VEHICLE
REQUIREMENTS
Connected service and related feature
functionality requires a compatible vehicle
network.
Some remote features require additional
service activation. Log in to your Ford
account for details. Some restrictions, third
party terms and message or data rates
may apply.
CONNECTED VEHICLE
LIMITATIONS
Evolving technology, cellular networks, or
regulations could affect functionality and
availability, or continued provision of some
features. These changes could even stop
some features from functioning.
CONNECTING THE VEHICLE TO
A MOBILE NETWORK
WHAT IS THE MODEM
The modem allows access to a
range of features built into your
vehicle. ENABLING AND DISABLING THE
MODEM
1. Press Settings.
2. Press
Connectivity.
3. Press
Connected Vehicle Features.
4. Switch vehicle connectivity on or off.
CONNECTING FORDPASS TO THE
MODEM
1. Make sure that the modem is enabled using the vehicle settings menu.
2. Open the FordPass app on your device
and log in.
3. Add your vehicle or select your vehicle if already added.
4. Select the option to activate your vehicle.
5. Make sure that the name on the screen
matches the name shown in your
FordPass account.
6. Confirm that FordPass account is connected to the modem.
CONNECTING THE VEHICLE TO
A WI-FI NETWORK Select the settings option on the
feature bar.
1. Press
Connectivity.
2. Press
Manage Wi-Fi Networks.
3. Switch
Wi-Fi on.
4. Press
View Available Networks.
5. Select an available Wi-Fi network.
Note: Enter the network password to
connect to a secure network.
597
2022 F-150 (TFD) Canada/United States of America, enUSA, Edition date: 202109, First-Printing Connected Vehicle E280315
Page 607 of 750
AUDIO SYSTEM
PRECAUTIONS
WARNING: Driving while distracted
can result in loss of vehicle control, crash
and injury. We strongly recommend that
you use extreme caution when using any
device that may take your focus off the
road. Your primary responsibility is the
safe operation of your vehicle. We
recommend against the use of any
hand-held device while driving and
encourage the use of voice-operated
systems when possible. Make sure you
are aware of all applicable local laws
that may affect the use of electronic
devices while driving.
Listening to loud audio for long periods of
time could damage your hearing.
IDENTIFYING THE AUDIO UNIT Depending on your vehicle options, the
controls may look different from what you
see here.
SWITCHING THE AUDIO UNIT
ON AND OFF
Press the button on the volume
control. SELECTING THE AUDIO
SOURCE
Audio Unit Press to open the media source
menu.
You can press this multiple times to
change the audio source or scroll through
the media sources.
Touchscreen
Press Sources on the touchscreen to open
the media source menu.
PLAYING OR PAUSING THE
AUDIO SOURCE
Audio Unit Press the button to pause
playback. Press again to resume
playback.
Touchscreen Press the button to pause
playback. Press again to resume
playback.
Note: Not all sources can be paused.
603
2022 F-150 (TFD) Canada/United States of America, enUSA, Edition date: 202109, First-Printing Audio SystemE308144 E308143
Page 608 of 750
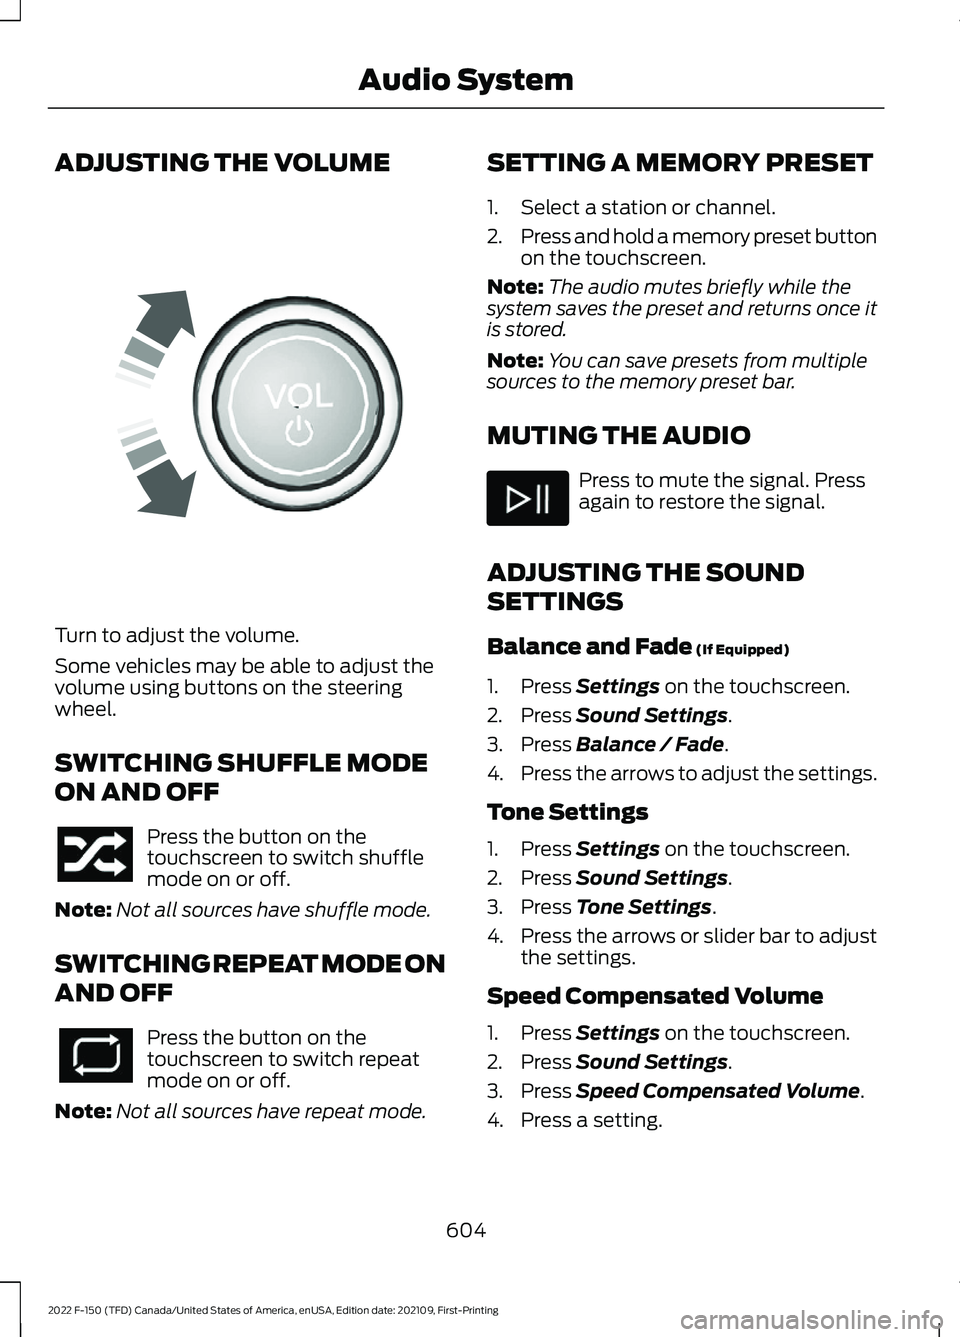
ADJUSTING THE VOLUME
Turn to adjust the volume.
Some vehicles may be able to adjust the
volume using buttons on the steering
wheel.
SWITCHING SHUFFLE MODE
ON AND OFF
Press the button on the
touchscreen to switch shuffle
mode on or off.
Note: Not all sources have shuffle mode.
SWITCHING REPEAT MODE ON
AND OFF Press the button on the
touchscreen to switch repeat
mode on or off.
Note: Not all sources have repeat mode. SETTING A MEMORY PRESET
1. Select a station or channel.
2.
Press and hold a memory preset button
on the touchscreen.
Note: The audio mutes briefly while the
system saves the preset and returns once it
is stored.
Note: You can save presets from multiple
sources to the memory preset bar.
MUTING THE AUDIO Press to mute the signal. Press
again to restore the signal.
ADJUSTING THE SOUND
SETTINGS
Balance and Fade (If Equipped)
1. Press
Settings on the touchscreen.
2. Press
Sound Settings.
3. Press
Balance / Fade.
4. Press the arrows to adjust the settings.
Tone Settings
1. Press
Settings on the touchscreen.
2. Press
Sound Settings.
3. Press
Tone Settings.
4. Press the arrows or slider bar to adjust
the settings.
Speed Compensated Volume
1. Press
Settings on the touchscreen.
2. Press
Sound Settings.
3. Press
Speed Compensated Volume.
4. Press a setting.
604
2022 F-150 (TFD) Canada/United States of America, enUSA, Edition date: 202109, First-Printing Audio SystemE248939
Page 609 of 750
Occupancy Mode (If Equipped)
1. Press
Settings on the touchscreen.
2. Press
Sound Settings.
3. Press
Occupancy Mode.
4. Press a setting.
Sound Mode
(If Equipped)
1. Press
Settings on the touchscreen.
2. Press
Sound Settings.
3. Press
Sound Mode.
4. Press a setting.
SETTING THE CLOCK AND
DATE
1. Press
Settings on the touchscreen.
2. Press
Clock Settings.
3. Set the time.
Note: The
AM and PM options are not
available if 24-hour mode is on.
Switching Automatic Time
Updates On and Off
1. Press
Settings on the touchscreen.
2. Press
Clock Settings.
3. Switch
Automatic time zone update
on or off.
AM/FM RADIO
AM/FM RADIO LIMITATIONS
The further you travel from an AM or FM
station, the weaker the signal and the
weaker the reception. Hills, mountains, tall buildings, bridges,
tunnels, freeway overpasses, parking
garages, dense tree foliage and
thunderstorms can interfere with the
reception.
When you pass a ground-based broadcast
repeating tower, a stronger signal may
overtake a weaker one and result in the
audio system muting.
SELECTING A RADIO STATION
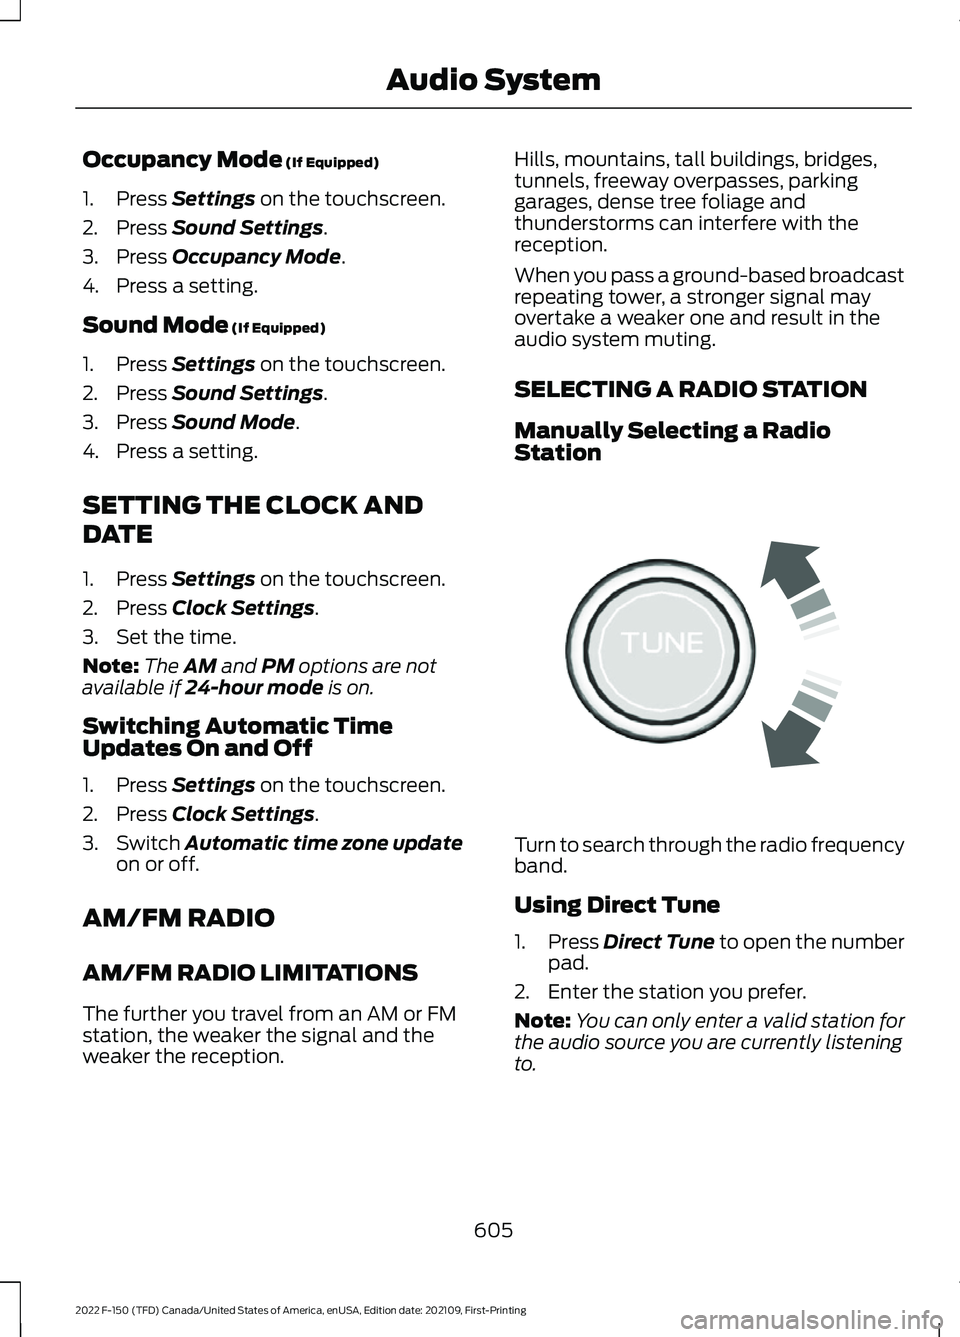
Manually Selecting a Radio
Station
Turn to search through the radio frequency
band.
Using Direct Tune
1.
Press
Direct Tune to open the number
pad.
2. Enter the station you prefer.
Note: You can only enter a valid station for
the audio source you are currently listening
to.
605
2022 F-150 (TFD) Canada/United States of America, enUSA, Edition date: 202109, First-Printing Audio SystemE270235