air filter FORD F-350 2022 User Guide
[x] Cancel search | Manufacturer: FORD, Model Year: 2022, Model line: F-350, Model: FORD F-350 2022Pages: 740, PDF Size: 12.6 MB
Page 402 of 740
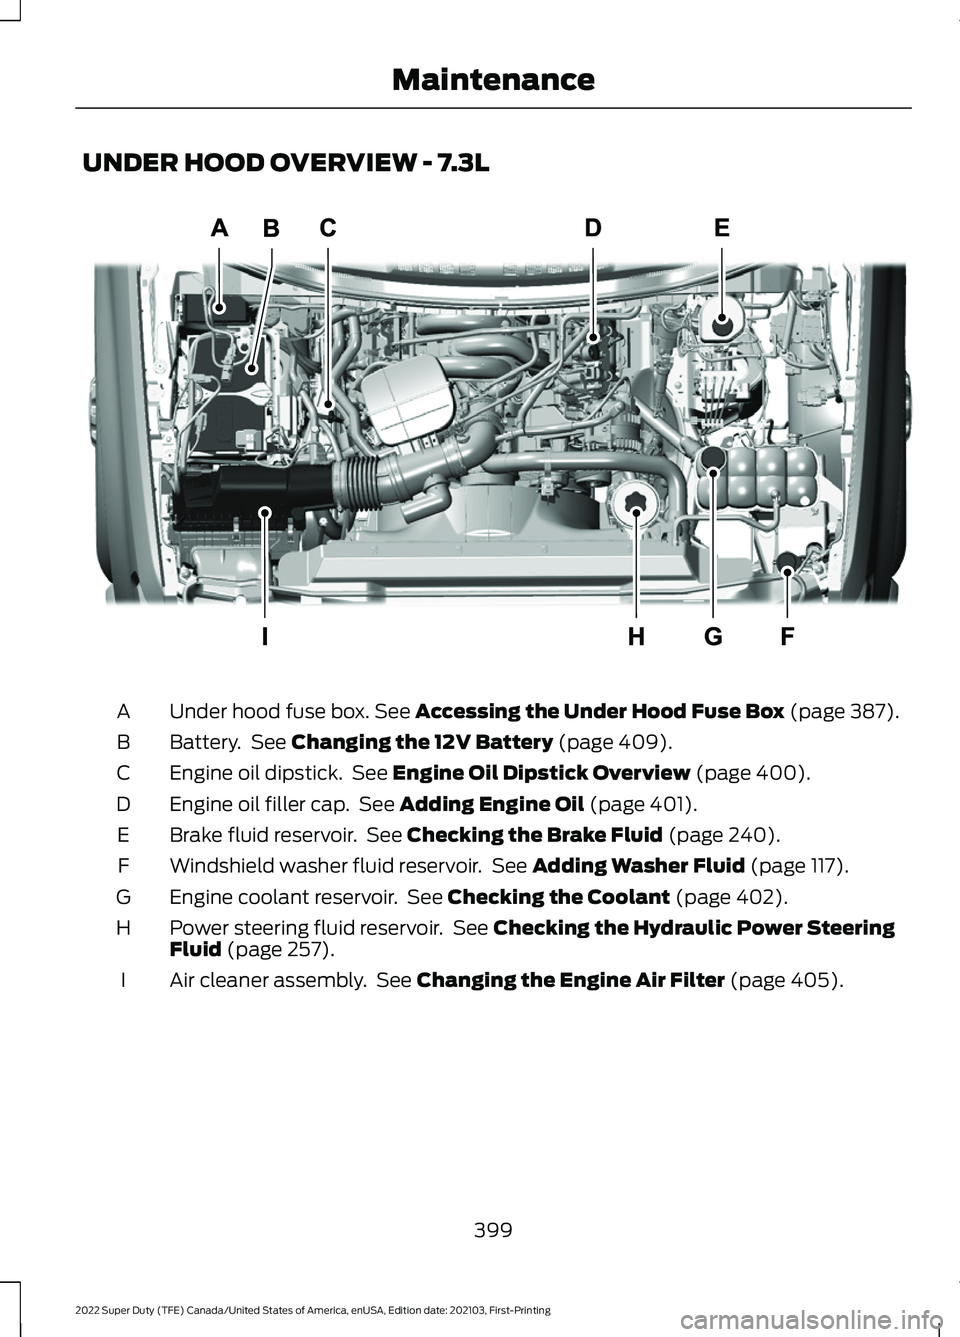
UNDER HOOD OVERVIEW - 7.3L
Under hood fuse box. See Accessing the Under Hood Fuse Box (page 387).
A
Battery. See
Changing the 12V Battery (page 409).
B
Engine oil dipstick. See
Engine Oil Dipstick Overview (page 400).
C
Engine oil filler cap. See
Adding Engine Oil (page 401).
D
Brake fluid reservoir. See
Checking the Brake Fluid (page 240).
E
Windshield washer fluid reservoir. See
Adding Washer Fluid (page 117).
F
Engine coolant reservoir. See
Checking the Coolant (page 402).
G
Power steering fluid reservoir. See
Checking the Hydraulic Power Steering
Fluid (page 257).
H
Air cleaner assembly. See
Changing the Engine Air Filter (page 405).
I
399
2022 Super Duty (TFE) Canada/United States of America, enUSA, Edition date: 202103, First-Printing MaintenanceE351057
Page 408 of 740
You may notice a reduction in vehicle
speed caused by reduced engine power in
order to manage the engine coolant
temperature. Your vehicle may enter this
mode if certain high-temperature and
high-load conditions take place. The
amount of speed reduction depends on
vehicle loading, grade and ambient
temperature. If this occurs, there is no
need to stop your vehicle. You can
continue to drive.
The air conditioning may automatically
turn on and off during severe operating
conditions to protect the engine from
overheating. When the coolant
temperature decreases to the normal
operating temperature, the air conditioning
turns on.
If the coolant temperature gauge moves
fully into the red zone, or if the coolant
temperature warning or service engine
soon messages appear in your information
display, do the following:
1. Stop your vehicle as soon as it is safe
to do so. Fully apply the parking brake,
shift into park (P) or neutral (N).
2. Leave the engine running until the coolant temperature gauge needle
returns to the normal position. If the
temperature does not drop after
several minutes, follow the remaining
steps.
3. Switch the engine off and wait for it to
cool. Check the coolant level.
4. If the coolant level is at or below the minimum mark, add prediluted coolant
immediately.
5. If the coolant level is normal, restart the engine and continue. ENGINE AIR FILTER
CHANGING THE ENGINE AIR
FILTER WARNING: To reduce the risk of
vehicle damage and personal burn
injuries, do not start your engine with the
air cleaner removed and do not remove
it while the engine is running.
Use the correct specification air filter
element. See
Motorcraft Parts (page
469).
Note: Failure to use the correct air filter
element may result in severe engine
damage. Resulting component damage
may not be covered by the vehicle Warranty.
Change the air filter element at the correct
service interval. See
Scheduled
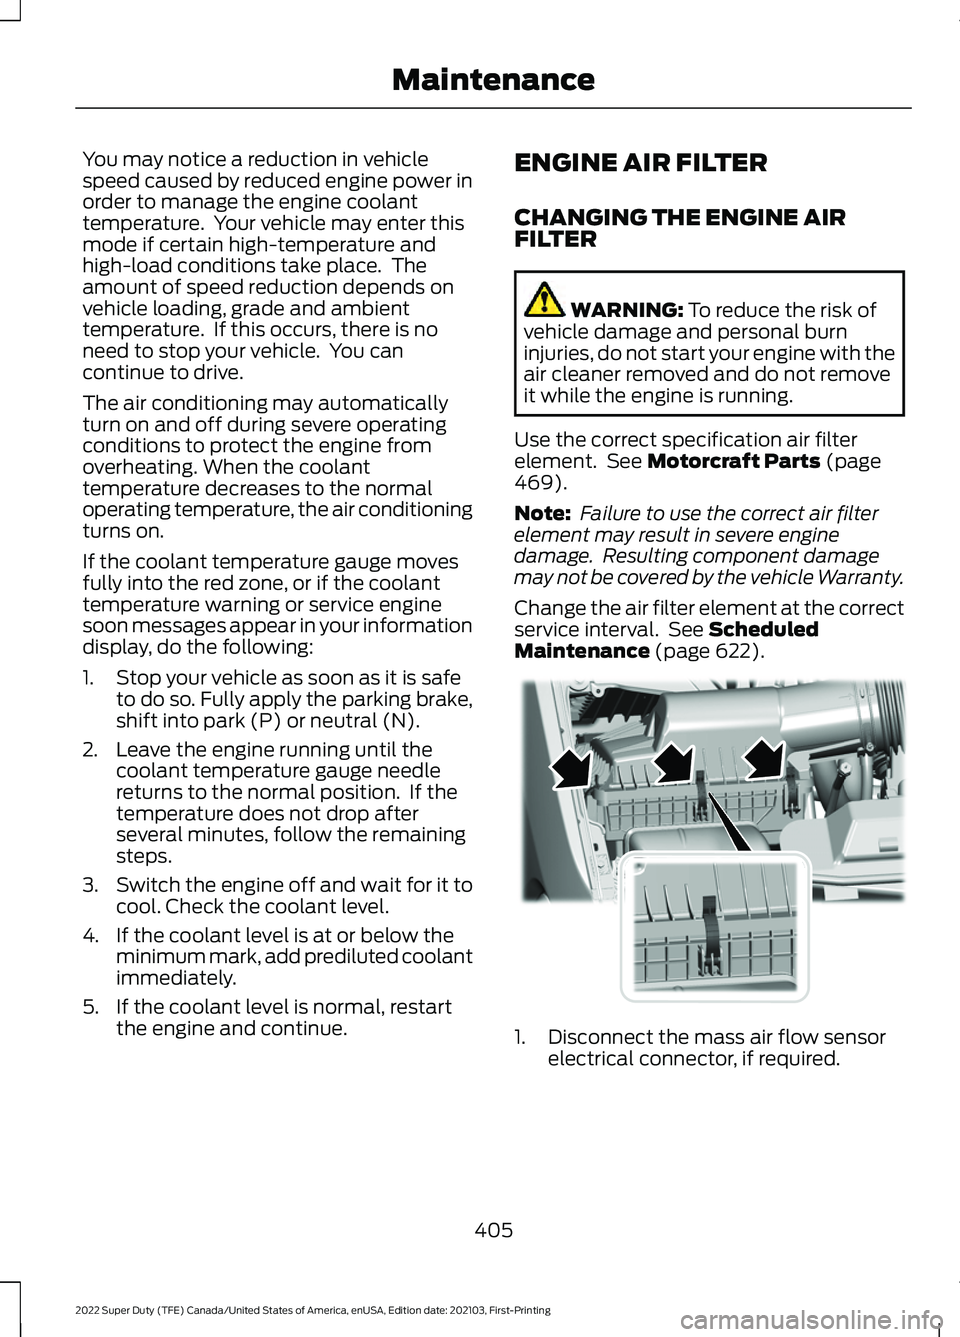
Maintenance (page 622). 1. Disconnect the mass air flow sensor
electrical connector, if required.
405
2022 Super Duty (TFE) Canada/United States of America, enUSA, Edition date: 202103, First-Printing MaintenanceE350657
Page 409 of 740
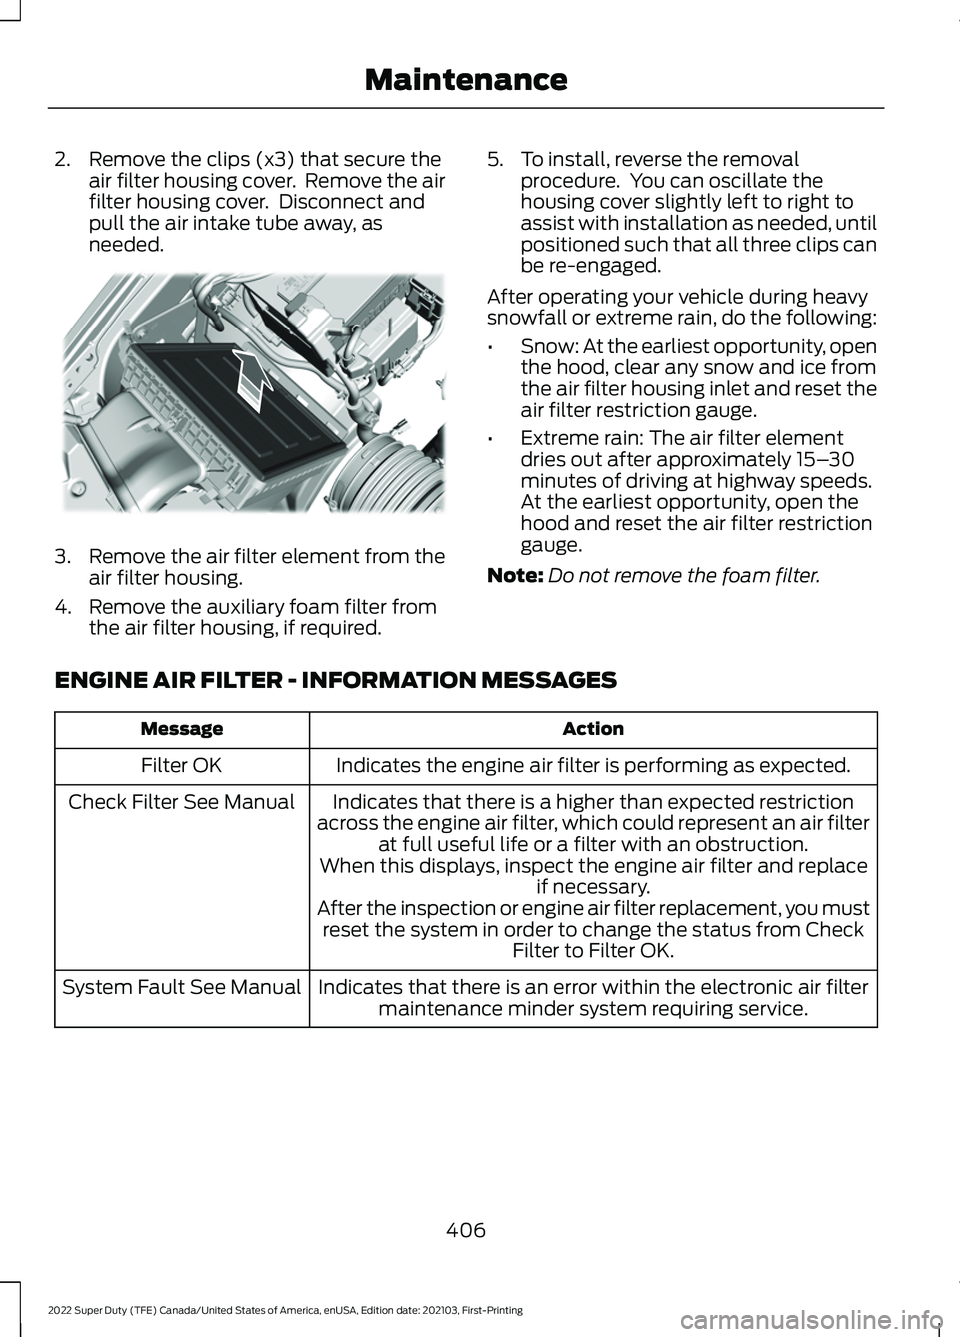
2. Remove the clips (x3) that secure the
air filter housing cover. Remove the air
filter housing cover. Disconnect and
pull the air intake tube away, as
needed. 3.
Remove the air filter element from the
air filter housing.
4. Remove the auxiliary foam filter from the air filter housing, if required. 5. To install, reverse the removal
procedure. You can oscillate the
housing cover slightly left to right to
assist with installation as needed, until
positioned such that all three clips can
be re-engaged.
After operating your vehicle during heavy
snowfall or extreme rain, do the following:
• Snow: At the earliest opportunity, open
the hood, clear any snow and ice from
the air filter housing inlet and reset the
air filter restriction gauge.
• Extreme rain: The air filter element
dries out after approximately 15– 30
minutes of driving at highway speeds.
At the earliest opportunity, open the
hood and reset the air filter restriction
gauge.
Note: Do not remove the foam filter.
ENGINE AIR FILTER - INFORMATION MESSAGES Action
Message
Indicates the engine air filter is performing as expected.
Filter OK
Indicates that there is a higher than expected restriction
across the engine air filter, which could represent an air filter at full useful life or a filter with an obstruction.
When this displays, inspect the engine air filter and replace if necessary.
After the inspection or engine air filter replacement, you must reset the system in order to change the status from Check Filter to Filter OK.
Check Filter See Manual
Indicates that there is an error within the electronic air filtermaintenance minder system requiring service.
System Fault See Manual
406
2022 Super Duty (TFE) Canada/United States of America, enUSA, Edition date: 202103, First-Printing MaintenanceE310319
Page 417 of 740
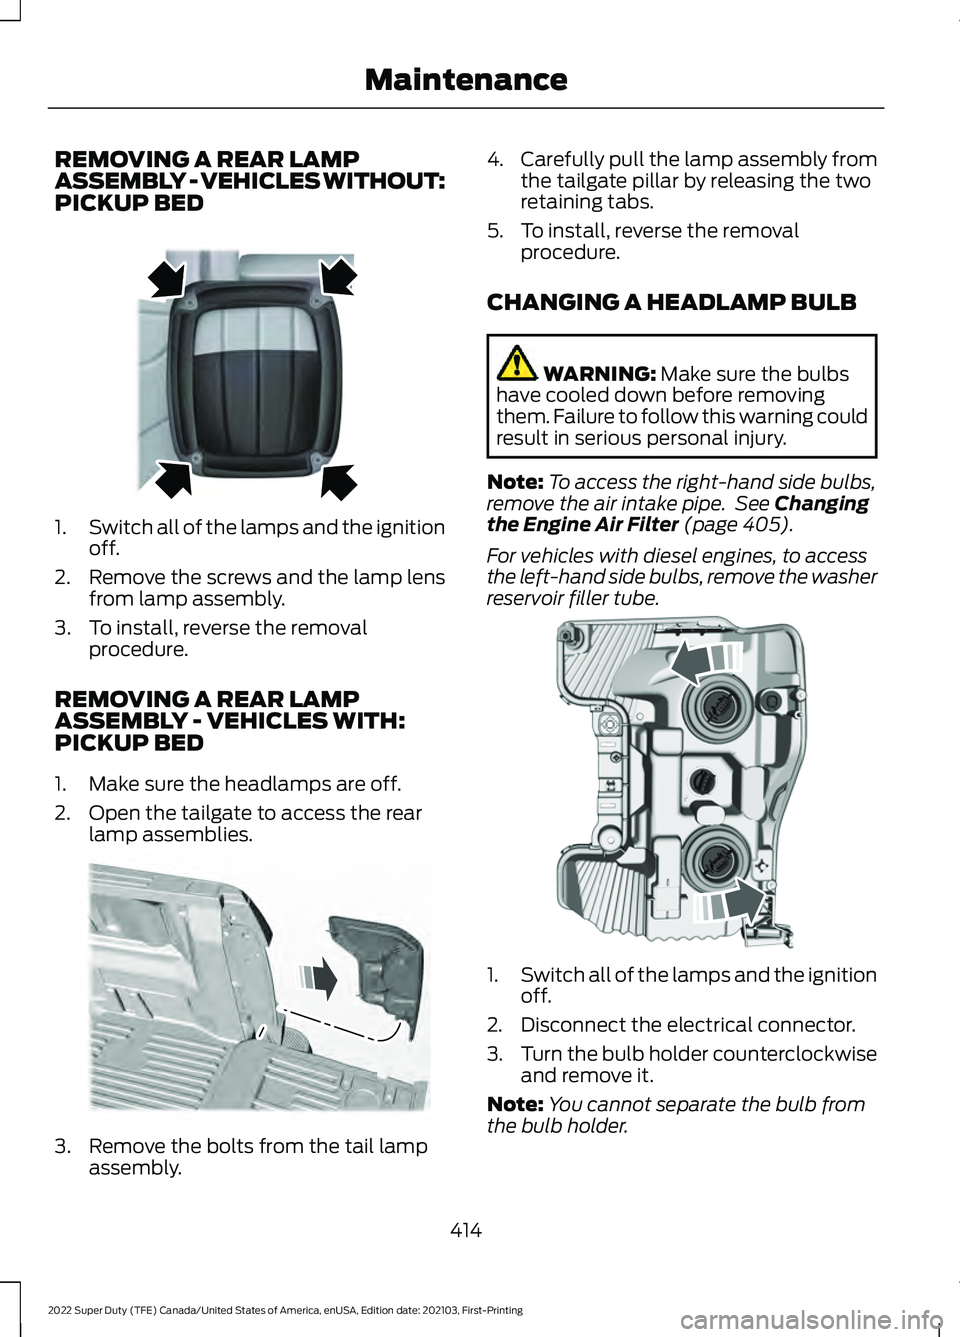
REMOVING A REAR LAMP
ASSEMBLY - VEHICLES WITHOUT:
PICKUP BED
1.
Switch all of the lamps and the ignition
off.
2. Remove the screws and the lamp lens from lamp assembly.
3. To install, reverse the removal procedure.
REMOVING A REAR LAMP
ASSEMBLY - VEHICLES WITH:
PICKUP BED
1. Make sure the headlamps are off.
2. Open the tailgate to access the rear lamp assemblies. 3. Remove the bolts from the tail lamp
assembly. 4.
Carefully pull the lamp assembly from
the tailgate pillar by releasing the two
retaining tabs.
5. To install, reverse the removal procedure.
CHANGING A HEADLAMP BULB WARNING: Make sure the bulbs
have cooled down before removing
them. Failure to follow this warning could
result in serious personal injury.
Note: To access the right-hand side bulbs,
remove the air intake pipe. See
Changing
the Engine Air Filter (page 405).
For vehicles with diesel engines, to access
the left-hand side bulbs, remove the washer
reservoir filler tube. 1.
Switch all of the lamps and the ignition
off.
2. Disconnect the electrical connector.
3. Turn the bulb holder counterclockwise
and remove it.
Note: You cannot separate the bulb from
the bulb holder.
414
2022 Super Duty (TFE) Canada/United States of America, enUSA, Edition date: 202103, First-Printing MaintenanceE163828 E187288 E224991
Page 418 of 740
4. To install, reverse the removal
procedure.
Note: Handle a halogen headlamp bulb
carefully and keep out of children ’s reach.
Grasp the bulb only by its plastic base and
do not touch the glass. The oil from your
hand could cause the bulb to break the next
time you operate the headlamps.
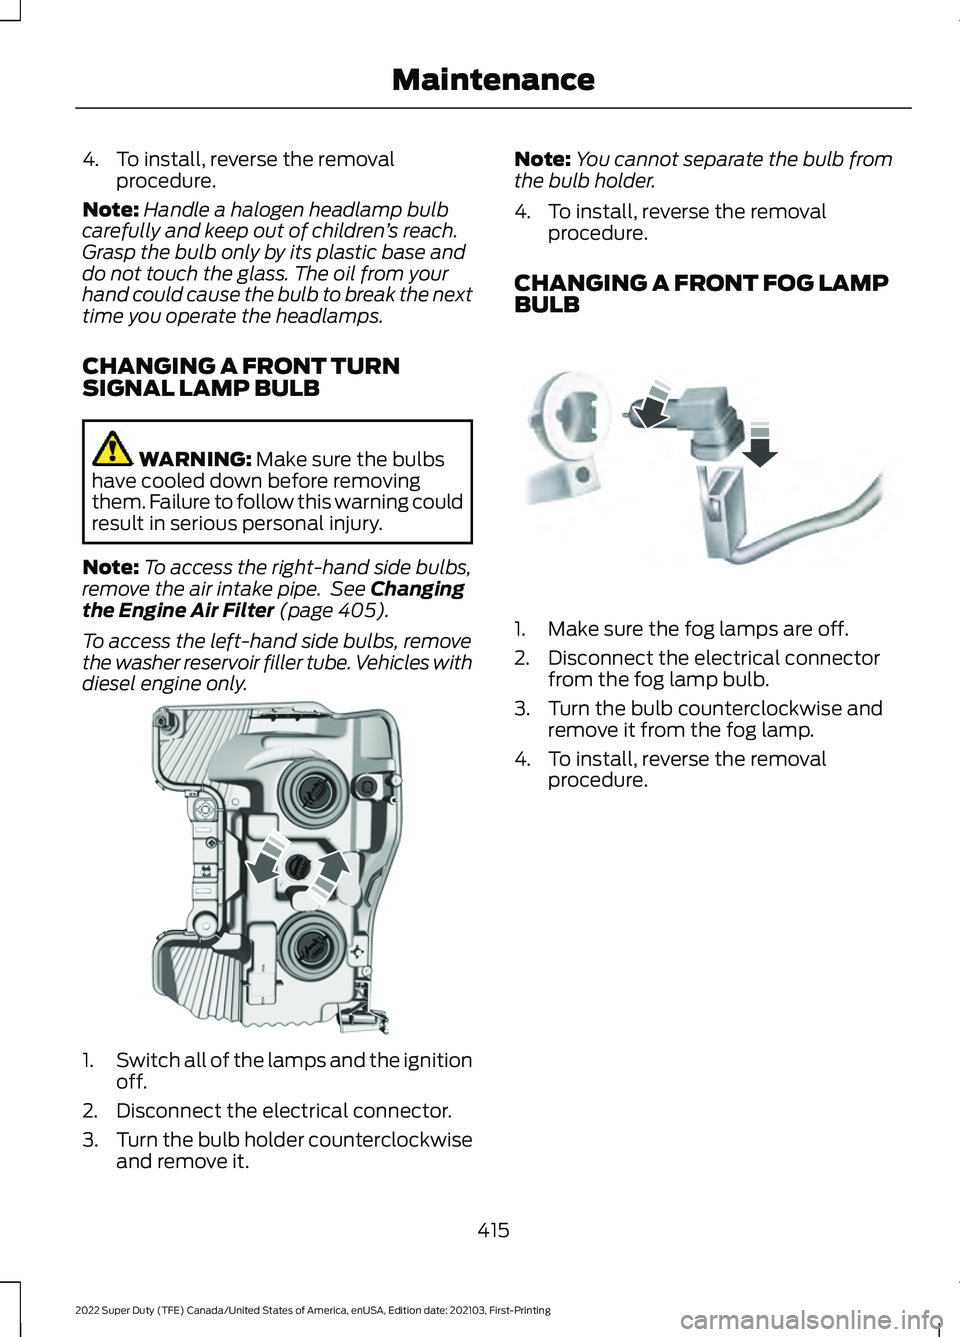
CHANGING A FRONT TURN
SIGNAL LAMP BULB WARNING: Make sure the bulbs
have cooled down before removing
them. Failure to follow this warning could
result in serious personal injury.
Note: To access the right-hand side bulbs,
remove the air intake pipe. See
Changing
the Engine Air Filter (page 405).
To access the left-hand side bulbs, remove
the washer reservoir filler tube. Vehicles with
diesel engine only. 1.
Switch all of the lamps and the ignition
off.
2. Disconnect the electrical connector.
3. Turn the bulb holder counterclockwise
and remove it. Note:
You cannot separate the bulb from
the bulb holder.
4. To install, reverse the removal procedure.
CHANGING A FRONT FOG LAMP
BULB 1. Make sure the fog lamps are off.
2. Disconnect the electrical connector
from the fog lamp bulb.
3. Turn the bulb counterclockwise and remove it from the fog lamp.
4. To install, reverse the removal procedure.
415
2022 Super Duty (TFE) Canada/United States of America, enUSA, Edition date: 202103, First-Printing MaintenanceE224990 E163826
Page 425 of 740
Do not scrape the lamps.
Do not wipe lamps when they are dry.
CLEANING WINDOWS AND WIPER
BLADES
To clean the windshield and wiper blades:
•
Clean the windshield with a
non-abrasive glass cleaner.
Note: When cleaning the interior of the
windshield, avoid getting any glass cleaner
on the instrument panel or door panels.
Wipe any glass cleaner off these surfaces
immediately.
• Clean the wiper blades with washer
fluid or water applied with a soft
sponge or cloth.
Note: Do not use razor blades or other
sharp objects to clean or remove decals
from the inside of the heated rear window.
This can cause damage not covered by the
vehicle Warranty.
CLEANING CHROME, ALUMINIUM
OR STAINLESS STEEL
We recommend that you only use a car
shampoo, a soft cloth and water on
bumpers and other chrome, aluminium or
stainless steel parts.
Note: For additional information and
assistance, we recommend that you contact
an authorized dealer.
Note: Rinse the area well after cleaning.
Note: Do not use abrasive materials, for
example steel wool or plastic pads, as they
can scratch these surfaces.
Note: Do not use chrome cleaner, metal
cleaner or polish on wheels or wheel covers. CLEANING WHEELS
Only use a recommended wheel and tire
cleaner to clean the wheels weekly. For
additional information and assistance, we
recommend that you contact an
authorized dealer.
1. Use a sponge to remove heavy
deposits of dirt and brake dust.
2. Rinse well after cleaning.
Note: Do not apply a cleaning chemical to
warm or hot wheel rims and covers.
If you intend on parking your vehicle for an
extended period after cleaning the wheels
with a wheel cleaner, drive your vehicle for
a few minutes before parking your vehicle.
This reduces the risk of corrosion of the
brake discs, brake pads and linings.
Do not clean the wheels when they are hot.
Note: Some car washes could damage
wheel rims and covers.
Note: Using non-recommended cleaners,
harsh cleaning products, chrome wheel
cleaners or abrasive materials could
damage wheel rims and covers.
CLEANING THE ENGINE
COMPARTMENT
Use a vacuum cleaner to remove debris
from the screen area below windshield.
Note: If you are not familiar with the parts
around the engine do not wash the engine
compartment. Avoid frequent engine
washes.
When washing the engine compartment:
• Never wash or rinse the engine while it
is hot or running.
• Never wash or rinse any ignition coil,
spark plug wire or spark plug well.
• Cover the battery, power distribution
box, and air filter assembly to prevent
water damage.
422
2022 Super Duty (TFE) Canada/United States of America, enUSA, Edition date: 202103, First-Printing Vehicle Care
Page 426 of 740
Note:
If your vehicle has an engine cover
remove the cover before application of
shampoo and degreaser.
• Spray an approved engine shampoo
and degreaser on all parts that require
cleaning and rinse with water.
CLEANING STRIPES OR
GRAPHICS
It is recommended to wash your vehicle by
hand however, pressure washing may be
used under the following conditions:
• Use a spray with a 40° wide spray
angle pattern.
• Keep the nozzle at a
12 in (305 mm)
distance and 90° angle to your
vehicle's surface.
• Do not use water pressure higher than
2,000 psi (14,000 kPa)
.
• Do not use water hotter than
179°F
(82°C).
Note: Holding the pressure washer nozzle
at an angle to the vehicle's surface may
damage graphics and cause the edges to
peel away from the vehicle's surface.
CLEANING CAMERA LENSES AND
SENSORS
We recommend that you only use
lukewarm or cold water and a soft cloth
to clean the camera lens and sensors.
Note: Do not pressure wash camera lens
and sensors.
CLEANING THE UNDERBODY
Flush the complete underside of your
vehicle frequently. Keep body and door
drain holes free from packed dirt. Rear suspension components may require
regular cleaning with a power washer or a
thorough rinse with a strong stream of
water if the vehicle is operated in dusty or
muddy environments. Rear leaf springs or
other suspension components may emit
squeaking or popping noises while
operating the vehicle if particles, such as
dirt, rocks, or other debris, are present in
the components.
CLEANING THE EXHAUST
WARNING:
Do not modify or
remove the exhaust tailpipe. Blocked
holes may result in increased exhaust
gas temperatures, vehicle damage,
property damage or personal injury. WARNING:
Failure to keep the
holes in the exhaust tailpipe clean and
free of debris or foreign material may
result in blocked holes. Blocked holes
may result in increased exhaust gas
temperatures, vehicle damage, property
damage or personal injury. WARNING:
The normal operating
temperature of the exhaust system is
very high. Never work around or attempt
to repair any part of the exhaust system
until it has cooled. Use special care when
working around the diesel oxidation
catalytic converter or the diesel
particulate filter. The diesel oxidation
catalytic converter and the diesel
particulate filter heat up to very high
temperatures after only a short period
of engine operation and remain hot after
you switch the engine off.
423
2022 Super Duty (TFE) Canada/United States of America, enUSA, Edition date: 202103, First-Printing Vehicle Care
Page 472 of 740
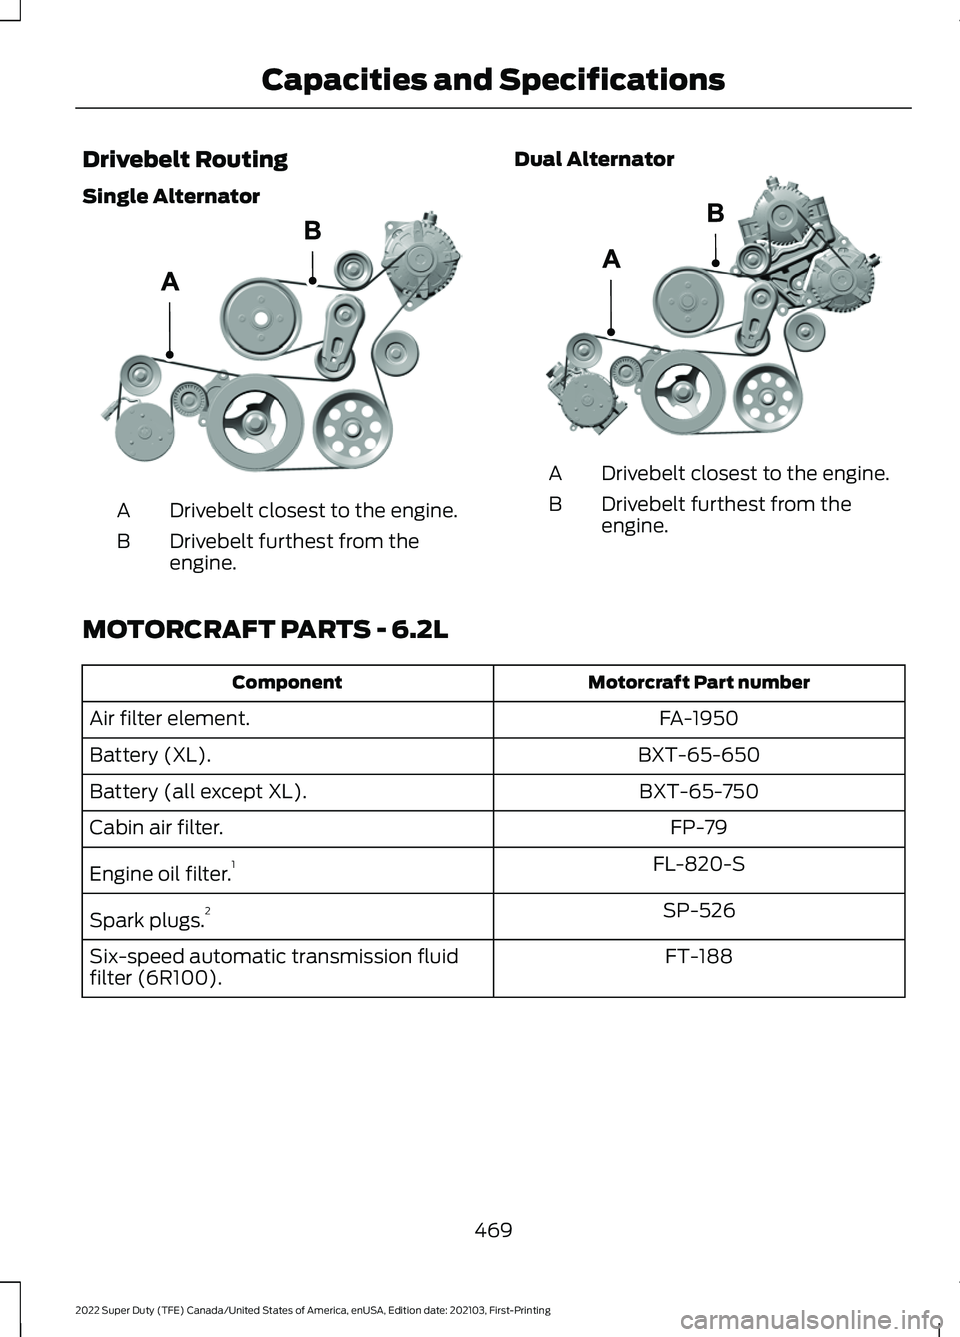
Drivebelt Routing
Single Alternator
Drivebelt closest to the engine.
A
Drivebelt furthest from the
engine.
B Dual Alternator Drivebelt closest to the engine.
A
Drivebelt furthest from the
engine.
B
MOTORCRAFT PARTS - 6.2L Motorcraft Part number
Component
FA-1950
Air filter element.
BXT-65-650
Battery (XL).
BXT-65-750
Battery (all except XL).
FP-79
Cabin air filter.
FL-820-S
Engine oil filter. 1
SP-526
Spark plugs. 2
FT-188
Six-speed automatic transmission fluid
filter (6R100).
469
2022 Super Duty (TFE) Canada/United States of America, enUSA, Edition date: 202103, First-Printing Capacities and SpecificationsE305075 E298579
Page 474 of 740
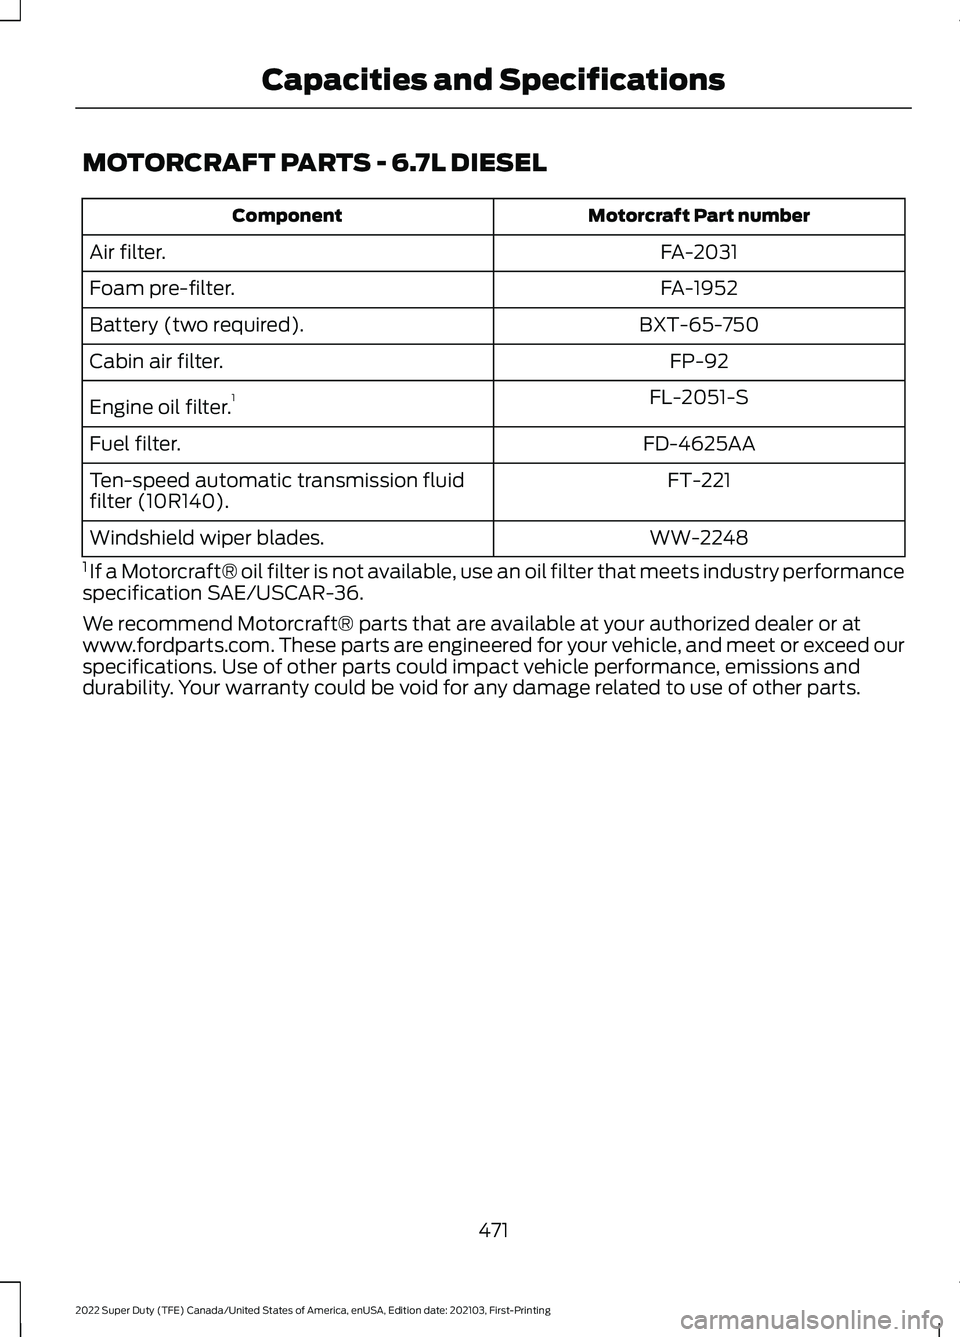
MOTORCRAFT PARTS - 6.7L DIESEL
Motorcraft Part number
Component
FA-2031
Air filter.
FA-1952
Foam pre-filter.
BXT-65-750
Battery (two required).
FP-92
Cabin air filter.
FL-2051-S
Engine oil filter. 1
FD-4625AA
Fuel filter.
FT-221
Ten-speed automatic transmission fluid
filter (10R140).
WW-2248
Windshield wiper blades.
1 If a Motorcraft® oil filter is not available, use an oil filter that meets industry performance
specification SAE/USCAR-36.
We recommend Motorcraft® parts that are available at your authorized dealer or at
www.fordparts.com. These parts are engineered for your vehicle, and meet or exceed our
specifications. Use of other parts could impact vehicle performance, emissions and
durability. Your warranty could be void for any damage related to use of other parts.
471
2022 Super Duty (TFE) Canada/United States of America, enUSA, Edition date: 202103, First-Printing Capacities and Specifications
Page 475 of 740
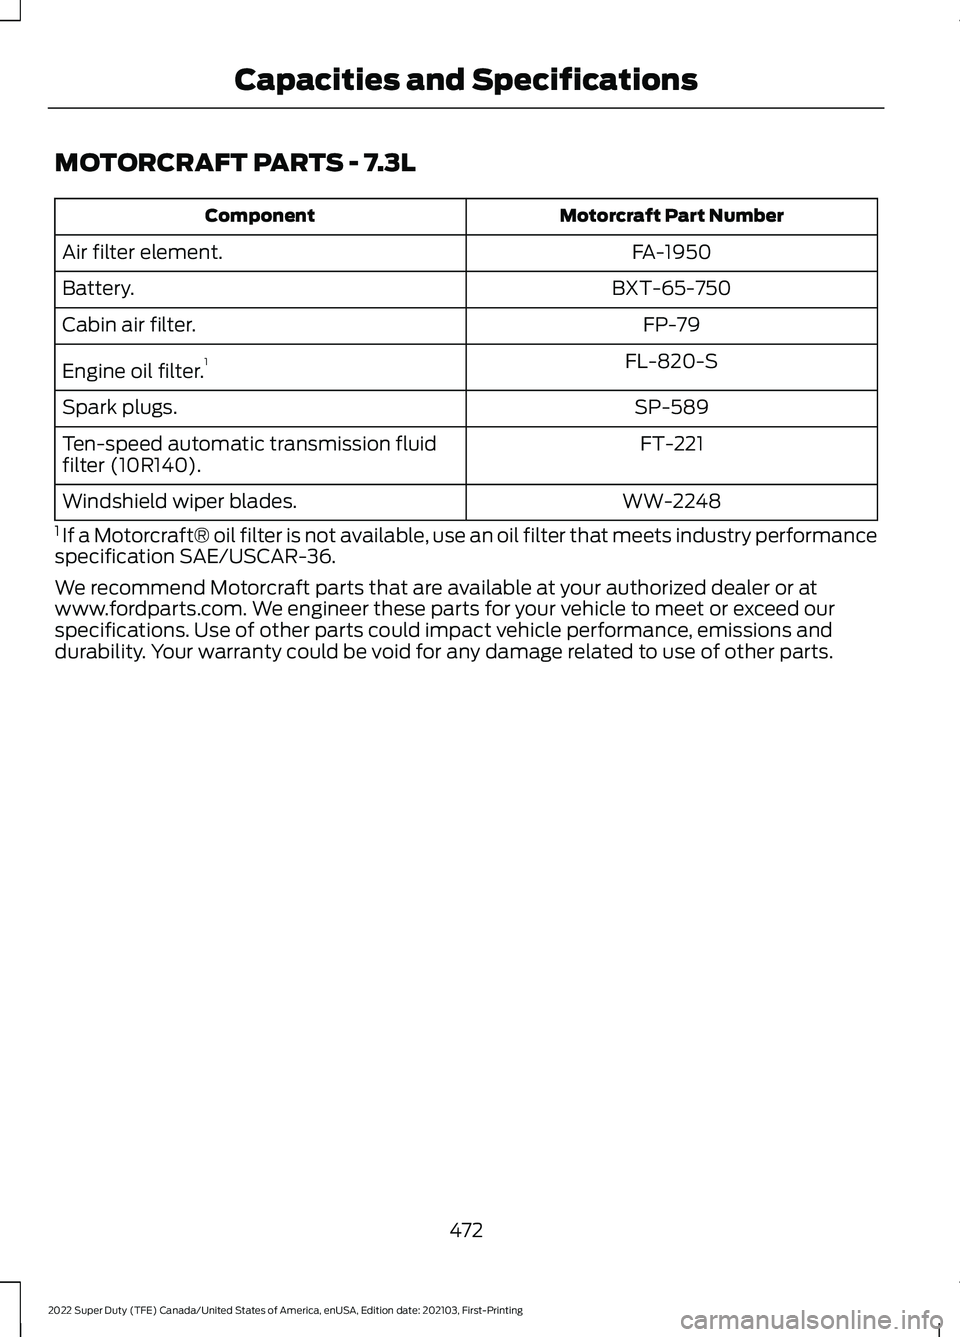
MOTORCRAFT PARTS - 7.3L
Motorcraft Part Number
Component
FA-1950
Air filter element.
BXT-65-750
Battery.
FP-79
Cabin air filter.
FL-820-S
Engine oil filter. 1
SP-589
Spark plugs.
FT-221
Ten-speed automatic transmission fluid
filter (10R140).
WW-2248
Windshield wiper blades.
1 If a Motorcraft® oil filter is not available, use an oil filter that meets industry performance
specification SAE/USCAR-36.
We recommend Motorcraft parts that are available at your authorized dealer or at
www.fordparts.com. We engineer these parts for your vehicle to meet or exceed our
specifications. Use of other parts could impact vehicle performance, emissions and
durability. Your warranty could be void for any damage related to use of other parts.
472
2022 Super Duty (TFE) Canada/United States of America, enUSA, Edition date: 202103, First-Printing Capacities and Specifications