ECO mode FORD F-450 2018 Repair Manual
[x] Cancel search | Manufacturer: FORD, Model Year: 2018, Model line: F-450, Model: FORD F-450 2018Pages: 660, PDF Size: 11.64 MB
Page 229 of 660
Benefits of engine braking are:
•
Lower brake temperature.
• Reduced brake fade.
• Longer brake life.
• Improved driving and trailering control. Press the button on the switch
bank next to the audio unit to
switch the system on or off.
There are two engine brake modes, manual
and automatic.
Manual Engine Braking
1. Press the button to switch on manual engine braking.
2. Release the accelerator pedal to maximize engine braking.
3. Apply the brakes. The transmission downshifts to lower gears.
Note: The engine braking feature only
functions when you release the accelerator.
Note: You can shift the transmission to
lower gears with progressive range selection
(PRS) or manual shifting independent of
pressing the brakes.
Note: You can also use manual engine
braking with cruise control to improve grade
descent control.
Note: If your vehicle has Adaptive Cruise
Control, the speed control system uses the
selected engine brake mode, transmission
gears, and brakes to maintain the set speed
and distance to the vehicle being followed.
Automatic Engine Braking
1. Press the button twice to switch on automatic engine braking.
2. Release the accelerator or brake pedal.
The system remembers your vehicle
speed. Note:
This feature offers smoother, less
aggressive engine braking during downhill
descents. It may not apply braking if the
vehicle speed is not increasing, although it
will apply full engine braking force when
needed to prevent acceleration. The system
automatically activates the engine brake
and, if necessary, downshifts the
transmission to lower gears to not exceed
your vehicle's set speed when the brake or
accelerator were last released.
Warning Lamp Conditions
• Illuminates when this feature is
switched on and the system is
operating properly. See Warning
Lamps and Indicators (page 108).
• Flashes when the engine brake is
disabled due to a fault or the engine
does not meet the required braking
conditions.
• Does not illuminate when the switch
or indicator is faulty.
You can switch the system on at anytime.
The system becomes active once the
braking conditions are met.
Braking Conditions
• Your vehicle is in a forward gear.
• The engine speed is above about 1500
RPM.
• Your foot is off the accelerator.
You can use this feature with tow/haul or
progressive range selection to provide
further increased engine braking. The
transmission automatically upshifts to
prevent the engine from entering the red
zone on the tachometer.
See Automatic
Transmission (page 208).
226
Super Duty (TFE) Canada/United States of America, enUSA, Edition date: 201709, Second Printing BrakesE171217
Page 232 of 660
PRINCIPLE OF OPERATION
The traction control system helps avoid
drive wheel spin and loss of traction.
If your vehicle begins to slide, the system
applies the brakes to individual wheels
and, when needed, reduces engine power
at the same time. If the wheels spin when
accelerating on slippery or loose surfaces,
the system reduces engine power in order
to increase traction.
USING TRACTION CONTROL
WARNING
The stability and traction control
light illuminates steadily if the
system detects a failure. Make sure
you did not manually disable the traction
control system using the information
display controls or the switch. If the
stability control and traction control light
is still illuminating steadily, have the
system serviced by an authorized dealer
immediately. Operating your vehicle with
the traction control disabled could lead to
an increased risk of loss of vehicle control,
vehicle rollover, personal injury and death. The system automatically turns on each
time you switch the ignition on.
If your vehicle is stuck in mud or snow,
switching traction control off may be
beneficial as this allows the wheels to spin.
Note:
When you switch traction control off,
stability control remains fully active.
Note: For additional information on the
traction and stability control systems. See
Using Stability Control (page 231).
Switching the System Off
When you switch the system off or on, a
message appears in the information
display showing system status. Use the traction and stability control
switch on the instrument panel to switch
the system off or on.
The switch illuminates when traction
control is off.
When you place your vehicle into
four-wheel drive low mode the traction
control disables. Traction control resumes
full operation when you put your vehicle
back into two-wheel drive mode.
System Indicator Lights and
Messages
The stability and traction control
light:
• Temporarily illuminates on engine
start-up.
• Flashes when a driving condition
activates either of the systems.
• Illuminates if a problem occurs in either
of the systems. The stability and traction control
off light temporarily illuminates
on engine start-up and stays on
when you switch the traction control
system off.
229
Super Duty (TFE) Canada/United States of America, enUSA, Edition date: 201709, Second Printing Traction ControlE166706 E225465 E225466
Page 236 of 660
PRINCIPLE OF OPERATION
WARNINGS
Hill descent control cannot control
descent in all surface conditions and
circumstances, such as ice or
extremely steep grades. Hill descent
control is a driver assist system and cannot
substitute for good judgment by the driver.
Failure to do so may result in loss of vehicle
control, crash or serious injury. Hill descent control does not provide
hill hold at zero miles per hour (0
kilometers per hour). When stopped,
the parking brake must be applied or the
vehicle must be placed in P (Park) or it
may roll away. Hill descent control allows the driver to set
and maintain vehicle speed while
descending steep grades in various surface
conditions.
Hill descent control can maintain vehicle
speeds on downhill grades between 2 mph
(3 km/h) and 12 mph (20 km/h). Above 20
mph (32 km/h), the system remains
armed, but descent speed cannot be set
or maintained.
Hill descent control requires a cooling
down interval after a period of sustained
use. The amount of time that the feature
can remain active before cooling varies
with conditions. The system will provide a
warning in the message center and a chime
will sound when the system is about to
disengage for cooling. At this time,
manually apply the brakes as needed to
maintain descent speed. USING HILL DESCENT
CONTROL Press and release the hill
descent button located on the
instrument panel. A light in the
cluster will illuminate and a chime will
sound when this feature is activated.
To increase descent speed, press the
accelerator pedal until the desired speed
is reached. To decrease descent speed,
press the brake pedal until the desired
speed is reached.
Whether accelerating or decelerating, once
the desired descent speed is reached,
remove your feet from the pedals and the
chosen vehicle speed will be maintained.
Note: Noise from the ABS pump motor may
be observed during hill descent control
operation. This is a normal characteristic of
the ABS and should be no reason for
concern.
Hill descent modes
• At speeds below 20 mph (32 km/h):
When the Hill Descent Control switch
is pressed and Hill Descent Control is
active, the Hill Descent Control telltale
will flash.
• At speeds below 20 mph (32 km/h):
When the Hill Descent Control switch
is pressed and conditions are not
correct for hill descent activation, the
Hill Descent Control system will be
enabled, the Hill Descent Control
telltale will be solid and a message will
display in the information display.
• At speeds above 20 mph (32 km/h):
When the Hill Descent Control switch
is pressed, the Hill Descent Control
system will be enabled, the telltale in
the cluster will not be illuminated and
a message will be displayed in the
information display.
233
Super Duty (TFE) Canada/United States of America, enUSA, Edition date: 201709, Second Printing Terrain Control
(If Equipped)E163957
Page 246 of 660
PRINCIPLE OF OPERATION
Cruise control lets you maintain a set
speed without keeping your foot on the
accelerator pedal. You can use cruise
control when your vehicle speed is greater
than 20 mph (30 km/h).
USING CRUISE CONTROL WARNINGS
Do not use cruise control on winding
roads, in heavy traffic or when the
road surface is slippery. This could
result in loss of vehicle control, serious
injury or death. When you are going downhill, your
vehicle speed could increase above
the set speed. The system does not
apply the brakes. Note:
Cruise control disengages if the
vehicle speed decreases more than 10 mph
(16 km/h) below the set speed when driving
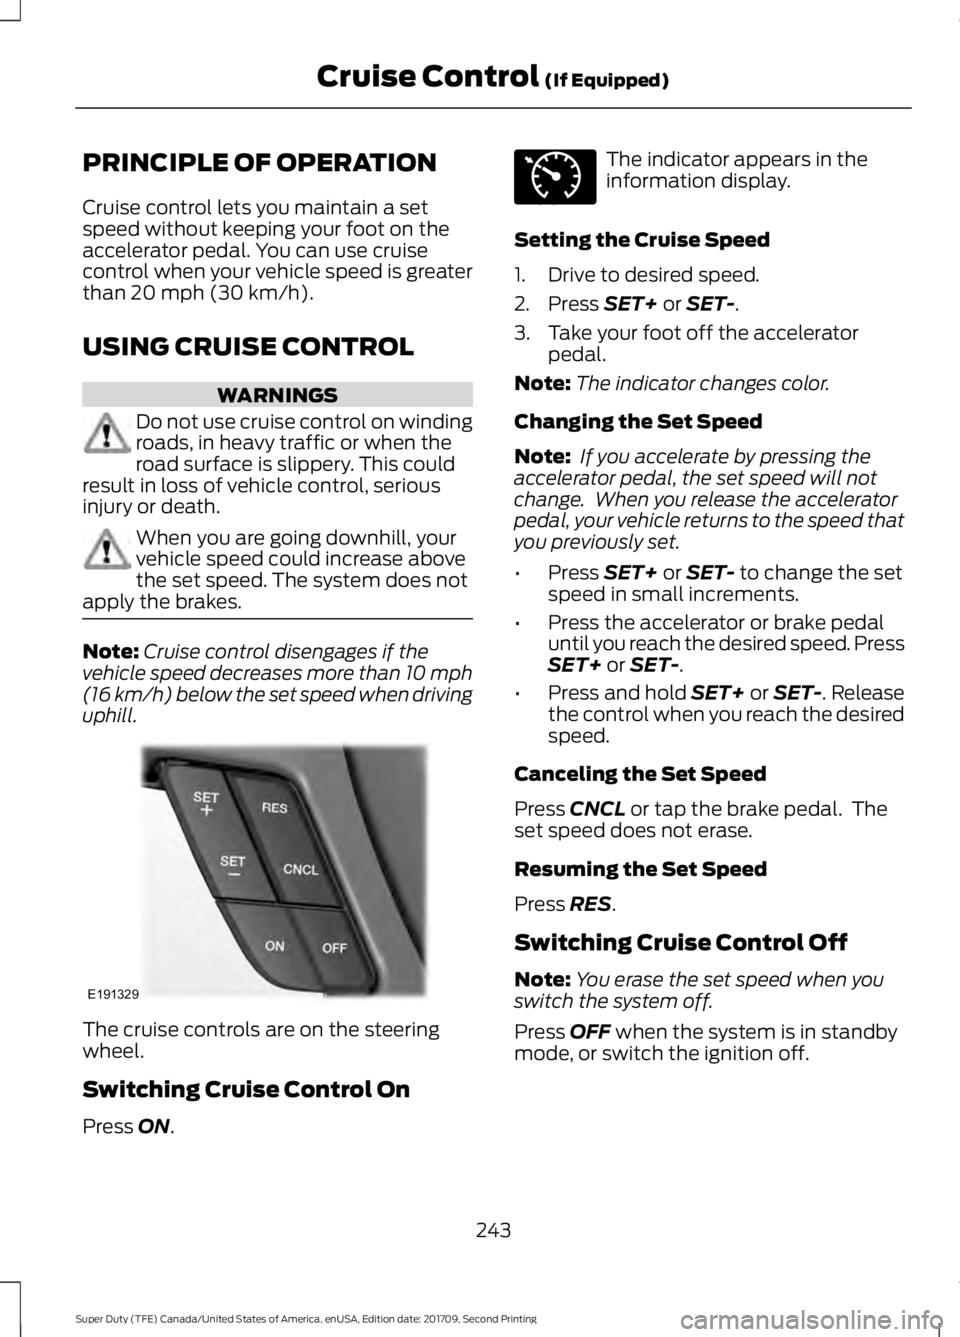
uphill. The cruise controls are on the steering
wheel.
Switching Cruise Control On
Press
ON. The indicator appears in the
information display.
Setting the Cruise Speed
1. Drive to desired speed.
2. Press
SET+ or SET-.
3. Take your foot off the accelerator pedal.
Note: The indicator changes color.
Changing the Set Speed
Note: If you accelerate by pressing the
accelerator pedal, the set speed will not
change. When you release the accelerator
pedal, your vehicle returns to the speed that
you previously set.
• Press
SET+ or SET- to change the set
speed in small increments.
• Press the accelerator or brake pedal
until you reach the desired speed. Press
SET+
or SET-.
• Press and hold SET+ or SET-. Release
the control when you reach the desired
speed.
Canceling the Set Speed
Press
CNCL or tap the brake pedal. The
set speed does not erase.
Resuming the Set Speed
Press
RES.
Switching Cruise Control Off
Note: You erase the set speed when you
switch the system off.
Press
OFF when the system is in standby
mode, or switch the ignition off.
243
Super Duty (TFE) Canada/United States of America, enUSA, Edition date: 201709, Second Printing Cruise Control
(If Equipped)E191329 E71340
Page 250 of 660
Changing the Set Speed
•
Press SET+ or SET- to change the set
speed in small increments.
• Press the accelerator or brake pedal
until you reach the desired speed. Press
SET+
or SET-.
• Press and hold
SET+ or SET- to
change the set speed in large
increments. Release the control when
you reach the desired speed.
The system may apply the brakes to slow
the vehicle to the new set speed. The set
speed displays continuously in the
information display when the system is
active.
Canceling the Set Speed
Press
CNCL or tap the brake pedal. The
set speed does not erase.
Resuming the Set Speed
Note: Only use resume if you are aware of
the set speed and intend to return to it.
Press
RES. Your vehicle speed returns to
the previously set speed and gap setting.
The set speed displays continuously in the
information display when the system is
active.
Automatic Cancellation
Note: If the engine speed drops too low, an
audible warning sounds and a message
appears in the information display.
Automatic braking releases.
Hilly Condition and Trailer Tow
Usage
Note: An audible alarm sounds and the
system shuts down if it applies brakes for
an extended period of time. This allows the
brakes to cool. The system functions
normally again after the brakes cool. Note:
When towing with adaptive cruise
control, switch on Tow/Haul Mode and
Diesel Engine Brake.
Note: Tow/Haul mode increases the time
gaps and allows more distance for braking.
Select a lower gear when the system is
active in situations such as prolonged
downhill driving on steep grades, for
example in mountainous areas. The
system needs additional engine braking in
these situations to reduce the load on the
vehicle ’s regular brake system to prevent
it from overheating.
Switching Adaptive Cruise Control
Off
Note: You erase the set speed and gap
setting when you switch the system off.
Press
OFF when the system is in standby
mode, or switch the ignition off.
Detection Issues WARNINGS
On rare occasions, detection issues
can occur due to the road
infrastructures, for example bridges,
tunnels and safety barriers. In these cases,
the system may brake late or
unexpectedly. At all times, you are
responsible for controlling your vehicle,
supervising the system and intervening, if
required. If the system malfunctions, have your
vehicle checked as soon as possible.
The radar sensor has a limited field of view.
It may not detect vehicles at all or detect
a vehicle later than expected in some
situations. The lead vehicle graphic does
not illuminate if the system does not
detect a vehicle in front of you.
247
Super Duty (TFE) Canada/United States of America, enUSA, Edition date: 201709, Second Printing Cruise Control
(If Equipped)
Page 252 of 660
Possible Causes and Actions for This Message Displaying:
Action
Cause
Clean the grille surface in front of the radar
or remove the object causing the obstruc-
tion.
The surface of the radar is dirty or
obstructed.
Wait a short time. It may take several
minutes for the radar to detect that it is free
from obstruction.
The surface of the radar is clean but the
message remains in the display.
Do not use the system in these conditions
because it may not detect any vehicles
ahead.
Heavy rain or snow is interfering with the
radar signals.
Do not use the system in these conditions
because it may not detect any vehicles
ahead.
Water, snow or ice on the surface of the
road may interfere with the radar signals.
Wait a short time or switch to normal cruise
control.
You are in a desert or remote area with no
other vehicles and no roadside objects.
Due to the nature of radar technology, it is possible to get a blockage warning with no
actual block. This happens, for example, when driving in sparse rural or desert
environments. A false blocked condition either self clears, or clears after you restart your
vehicle.
Switching to Normal Cruise
Control WARNING
Normal cruise control will not brake
when your vehicle is approaching
slower vehicles. Always be aware of
which mode you have selected and apply
the brakes when necessary. You can change from adaptive cruise
control to normal cruise control through
the information display. The cruise control indicator light
replaces the adaptive cruise
control indicator light if you
select normal cruise control. The gap
setting does not display, and the system
does not respond to lead vehicles.
Automatic braking remains active to
maintain set speed.
249
Super Duty (TFE) Canada/United States of America, enUSA, Edition date: 201709, Second Printing Cruise Control (If Equipped)E71340
Page 253 of 660
LANE KEEPING SYSTEM (If
Equipped) WARNING
The system is designed to aid the
driver. It is not intended to replace
your attention and judgment. You are
still responsible to drive with due care and
attention. Note:
The system works as long as the
camera can detect one lane marking at a
speed above
40 mph (64 km/h).
Note: The system may not function if the
camera is blocked or there is damage to the
windshield.
The Lane Keeping System automatically
detects and tracks the road lane markings
using a camera mounted behind the
interior review view mirror. The system
notifies you to stay in your lane when the
front camera detects an unintentional lane
change is likely to occur.
Switching the System On and Off
Note: The system on or off setting is stored
until it is manually changed, unless a MyKey
is detected. If the system detects a MyKey,
it defaults to on and the mode is set to alert.
Note: If a MyKey is detected, pressing the
button will not affect the on or off status of
the system. You can only change the mode
and intensity settings. Press the button located on the
center console to switch the
system on or off. System Settings
The system sensitivity and intensity can
be adjusted through the display screen.
See General Information (page 113). The
system remembers the last selection. You
do not need to readjust the setting each
time you turn on your vehicle.
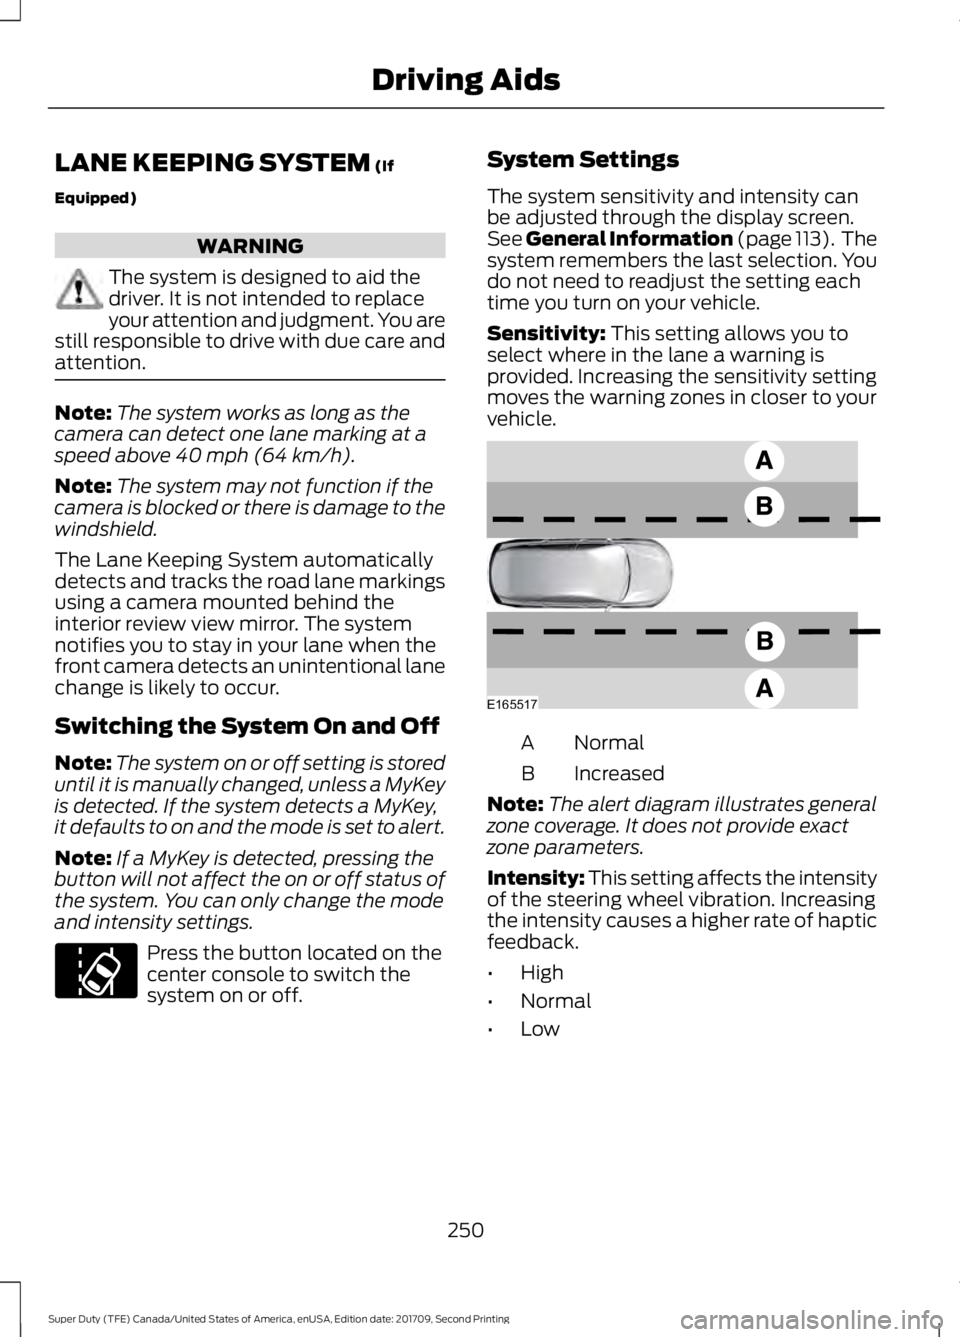
Sensitivity:
This setting allows you to
select where in the lane a warning is
provided. Increasing the sensitivity setting
moves the warning zones in closer to your
vehicle. Normal
A
Increased
B
Note: The alert diagram illustrates general
zone coverage. It does not provide exact
zone parameters.
Intensity: This setting affects the intensity
of the steering wheel vibration. Increasing
the intensity causes a higher rate of haptic
feedback.
• High
• Normal
• Low
250
Super Duty (TFE) Canada/United States of America, enUSA, Edition date: 201709, Second Printing Driving AidsE173233 E165517
Page 280 of 660
Step 5: Enter Measurements Using the
Information Display
Using the measurements you recorded,
enter the required data into the system.
Follow the on screen prompts to enter
each of the measurements taken in step
4. Use the up and down arrows to increase
or decrease the numbers as necessary.
Press OK to confirm each measurement.
Once you add the last measurement, the
information display shows all of the
entered measurements. You can choose
to confirm or change the measurements.
Step 6: Confirming the Sticker Location
Check the rear view camera display to see
if the system identifies the sticker. The
system marks the sticker with a red circle.
Confirm that the red circle shows over the
sticker image in the rear view camera
display.
Note:
If the system cannot locate the
sticker, try cleaning the camera lens. Make
sure the sticker is within the zone as
indicated in step 3.
The information display shows a
confirmation message when you
successfully confirm the target.
Calibrating the System
To complete setup, drive your vehicle
straight forward between 4– 24 mph
(6– 39 km/h), as directed by the
information display.
Note: Keep the steering wheel straight
during the calibration process. If the steering
wheel is in a turned position, the calibration
pauses. The information display prompts
you to drive straight forward to complete
the calibration.
The information display shows a message
during calibration and after calibration is
complete Note:
For best results, do not calibrate the
system at night.
Using Trailer Reverse Guidance
1. Shift into reverse (R). Press the rear camera button to expand the menu.
2. Press the trailer icon.
3. Select the applicable trailer in the information display.
4. When in trailer reverse guidance mode,
you can see the camera view on the
side your trailer is moving, or both sides
when the trailer is straight behind you.
When the views change with the trailer
direction, it is called auto mode. For
example, if you turn the trailer to the
right, you see the right side of your
vehicle and trailer. You can switch this
view manually at any time by using the
arrow keys. To return to auto mode,
press the auto button.
Note: Auto mode is the default setting.
Use the view that helps you the most when
reversing your vehicle and trailer. Normal rear view camera view.
Use this feature when you want
to see your trailer hitch or what
is directly behind your vehicle. Straight back-up mode. Use this
feature when you want to keep
your trailer completely in line
with your truck. In this mode, a steering
wheel graphic shows you which way to turn
your steering wheel to keep your trailer
straight.
Note: It may be helpful to shift your vehicle
into drive (D), pull forward and straighten
out the vehicle and trailer before engaging
straight back-up mode.
Left and right arrows let you see other
views regardless of your trailer angle. Use
them to switch views manually.
277
Super Duty (TFE) Canada/United States of America, enUSA, Edition date: 201709, Second Printing TowingE263194 E224484
Page 288 of 660
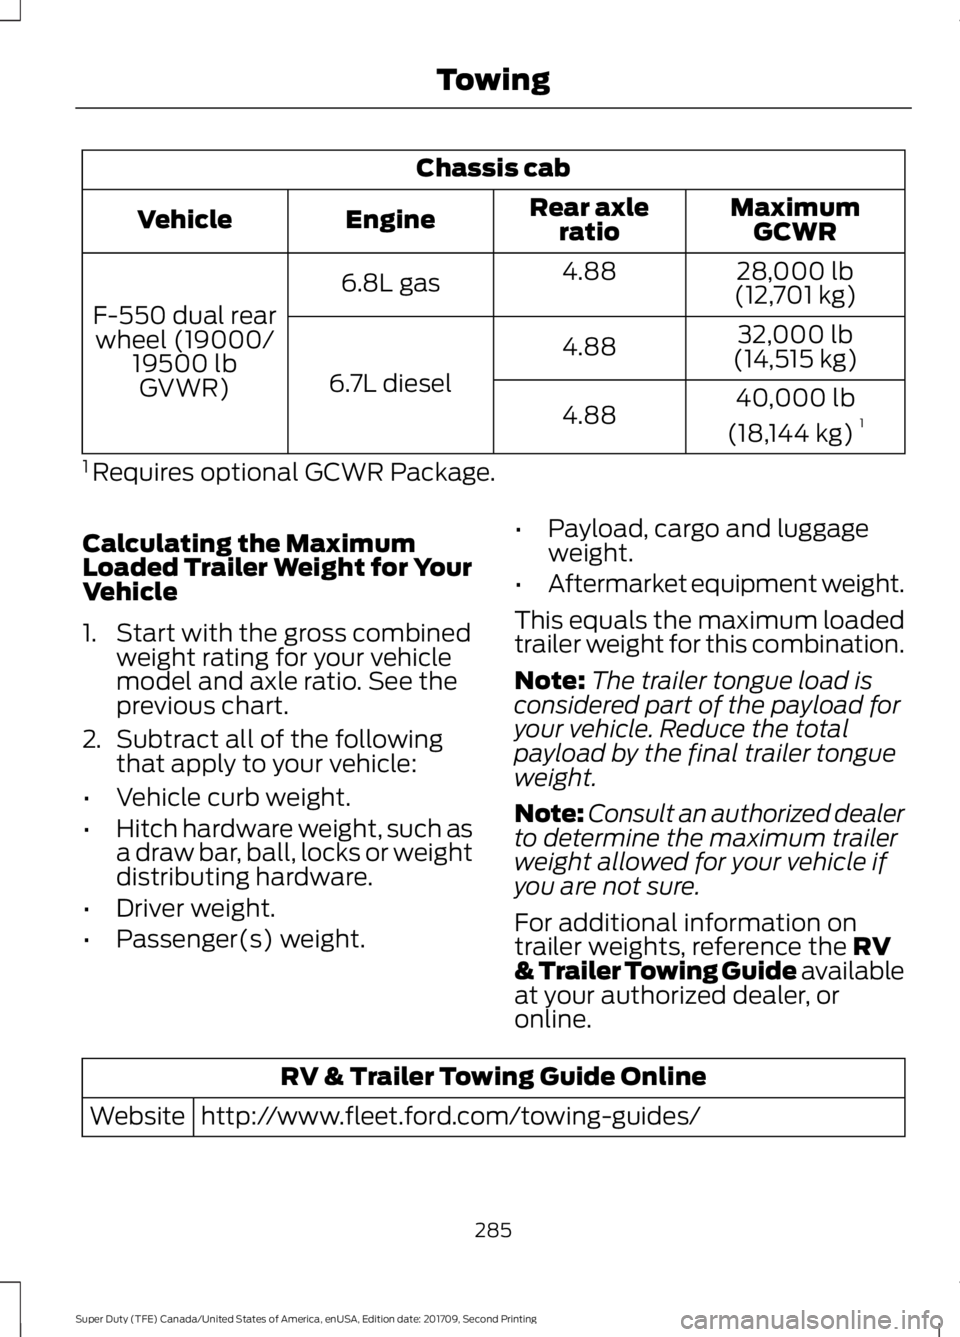
Chassis cab
MaximumGCWR
Rear axle
ratio
Engine
Vehicle
28,000 lb
(12,701 kg)
4.88
6.8L gas
F-550 dual rear wheel (19000/ 19500 lbGVWR) 32,000 lb
(14,515 kg)
4.88
6.7L diesel 40,000 lb
(18,144 kg) 1
4.88
1 Requires optional GCWR Package.
Calculating the Maximum
Loaded Trailer Weight for Your
Vehicle
1. Start with the gross combined weight rating for your vehicle
model and axle ratio. See the
previous chart.
2. Subtract all of the following
that apply to your vehicle:
• Vehicle curb weight.
• Hitch hardware weight, such as
a draw bar, ball, locks or weight
distributing hardware.
• Driver weight.
• Passenger(s) weight. •
Payload, cargo and luggage
weight.
• Aftermarket equipment weight.
This equals the maximum loaded
trailer weight for this combination.
Note: The trailer tongue load is
considered part of the payload for
your vehicle. Reduce the total
payload by the final trailer tongue
weight.
Note: Consult an authorized dealer
to determine the maximum trailer
weight allowed for your vehicle if
you are not sure.
For additional information on
trailer weights, reference the RV
& Trailer Towing Guide available
at your authorized dealer, or
online. RV & Trailer Towing Guide Online
http://www.fleet.ford.com/towing-guides/
Website
285
Super Duty (TFE) Canada/United States of America, enUSA, Edition date: 201709, Second Printing Towing
Page 295 of 660
Trailer Brake Effort Setting
The trailer brake controller allows the user
to customize how aggressively the trailer
brakes engage. The default value is the low
setting and is the recommended setting
for most trailers. If your trailer's brakes
require more initial voltage, or if you prefer
more aggressive trailer braking, then select
either the medium or the high setting.
Procedure for Setting Trailer Brake
Controller Mode
Choose the low, medium or high setting
for the required initial trailer brake output.
Procedure for Adjusting Gain
Note:
Only perform this procedure in a
traffic-free environment at speeds of
approximately 20– 25 mph (30–40 km/h).
The gain setting adjusts the trailer brake
controller for the specific towing condition.
You should change the setting as towing
conditions change. Changes to towing
conditions include trailer load, vehicle load,
road conditions and weather.
The gain should be set to provide the
maximum trailer braking assistance while
making sure the trailer wheels do not lock
when using the brakes. Locked trailer
wheels may lead to trailer instability.
1. Make sure the trailer brakes are in good
working condition, functioning normally
and properly adjusted. See your trailer
dealer if necessary.
2. Hook up the trailer and make the electrical connections according to the
trailer manufacturer's instructions.
3. When you plug in a trailer with electric or electric-over-hydraulic brakes, a
confirmation message appears in the
information display. 4. Use the gain adjustment (+ and -)
buttons to increase or decrease the
gain setting to the desired starting
point. A gain setting of 6.0 is a good
starting point for heavier loads.
5. In a traffic-free environment, tow the trailer on a dry, level surface at a speed
of
20– 25 mph (30–40 km/h) and
squeeze the manual control lever
completely.
6. If the trailer wheels lock up, indicated by squealing tires, reduce the gain
setting. If the trailer wheels turn freely,
increase the gain setting. Repeat Steps
5 and 6 until the gain setting is at a
point just below trailer wheel lock-up.
If towing a heavier trailer, trailer wheel
lock-up may not be attainable even
with the maximum gain setting of 10.
Information Display Warning Messages
Note: An authorized dealer can diagnose
the trailer brake controller to determine
exactly which trailer fault has occurred.
However, your Ford warranty does not cover
this diagnosis if the fault is with the trailer.
TRAILER BRAKE MODULE FAULT
Displays in response to faults sensed by
the trailer brake controller, accompanied
by a single tone. If this message appears,
contact an authorized dealer as soon as
possible for diagnosis and repair. The
controller may still function, but with
degraded performance.
WIRING FAULT ON TRAILER
Displays when there is a short circuit on
the electric brake output wire.
If this message displays, with no trailer
connected, the problem is with your vehicle
wiring or trailer brake controller. Contact
an authorized dealer.
292
Super Duty (TFE) Canada/United States of America, enUSA, Edition date: 201709, Second Printing Towing