ECU FORD F-450 2020 User Guide
[x] Cancel search | Manufacturer: FORD, Model Year: 2020, Model line: F-450, Model: FORD F-450 2020Pages: 631, PDF Size: 9.62 MB
Page 37 of 631
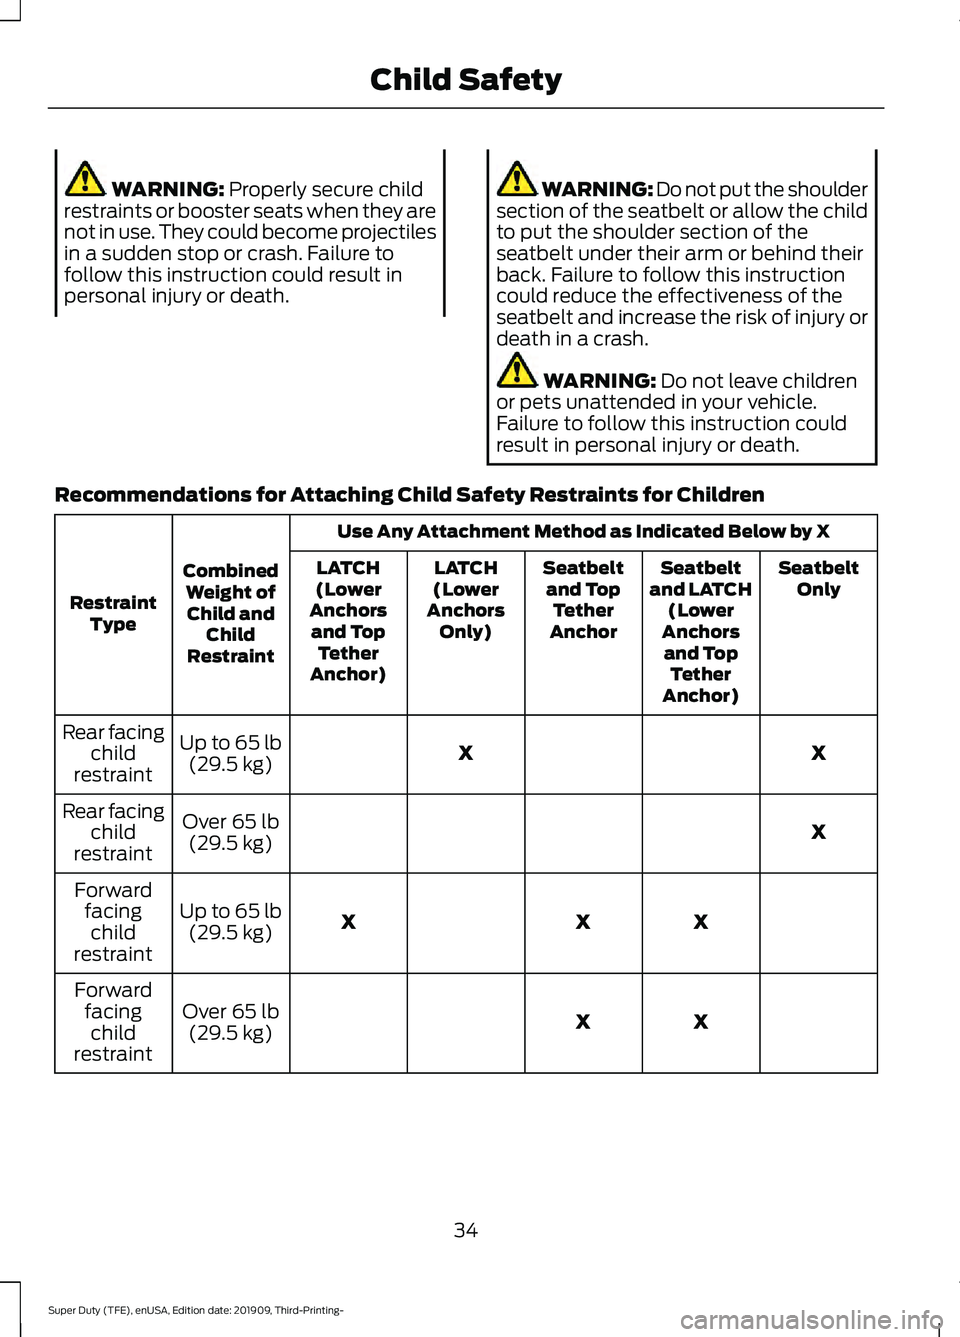
WARNING: Properly secure child
restraints or booster seats when they are
not in use. They could become projectiles
in a sudden stop or crash. Failure to
follow this instruction could result in
personal injury or death. WARNING: Do not put the shoulder
section of the seatbelt or allow the child
to put the shoulder section of the
seatbelt under their arm or behind their
back. Failure to follow this instruction
could reduce the effectiveness of the
seatbelt and increase the risk of injury or
death in a crash. WARNING:
Do not leave children
or pets unattended in your vehicle.
Failure to follow this instruction could
result in personal injury or death.
Recommendations for Attaching Child Safety Restraints for Children Use Any Attachment Method as Indicated Below by X
Combined Weight ofChild and Child
Restraint
Restraint
Type Seatbelt
Only
Seatbelt
and LATCH (Lower
Anchors and Top Tether
Anchor)
Seatbelt
and Top Tether
Anchor
LATCH
(Lower
Anchors Only)
LATCH
(Lower
Anchors and Top Tether
Anchor)
X
X
Up to
65 lb
(29.5 kg)
Rear facing
child
restraint
X
Over
65 lb
(29.5 kg)
Rear facing
child
restraint
X
X
X
Up to
65 lb
(29.5 kg)
Forward
facingchild
restraint
X
X
Over
65 lb
(29.5 kg)
Forward
facingchild
restraint
34
Super Duty (TFE), enUSA, Edition date: 201909, Third-Printing- Child Safety
Page 40 of 631

•
Crash sensors and monitoring system
with readiness indicator.
The seatbelt pretensioners are designed
to tighten the seatbelts when activated. In
frontal and near-frontal crashes, the
seatbelt pretensioners may be activated
alone or, if the crash is of sufficient severity,
together with the front airbags. In side
crashes and rollovers, the seatbelt
pretensioners activate when the Safety
Canopy is activated.
FASTENING THE SEATBELTS
The front outermost and rear safety
restraints in the vehicle are combination
lap and shoulder belts. 1. Insert the belt tongue into the proper
buckle (the buckle closest to the
direction the tongue is coming from)
until you hear a snap and feel it latch.
Make sure you securely fasten the
tongue in the buckle. 2. To unfasten, press the release button
and remove the tongue from the
buckle.
Using the Seatbelt with Cinch
Tongue (Front Center Seat on
Super Cab and Crew Cab)
The cinch tongue slides up and down the
belt webbing when you stow the belt or
while putting seatbelts on. When you
buckle the lap and shoulder seatbelt, the
cinch tongue allows you to shorten the lap
portion, but pinches the webbing to keep
the lap portion from getting longer. The
cinch tongue is designed to slip during a
crash, so always wear the shoulder belt
properly and do not allow any slack in
either the lap or shoulder portions.
Before you can reach and latch a lap and
shoulder belt having a cinch tongue into
the buckle, you may have to lengthen the
lap belt portion of it.
37
Super Duty (TFE), enUSA, Edition date: 201909, Third-Printing- SeatbeltsE67017 E142587 E142588
Page 41 of 631
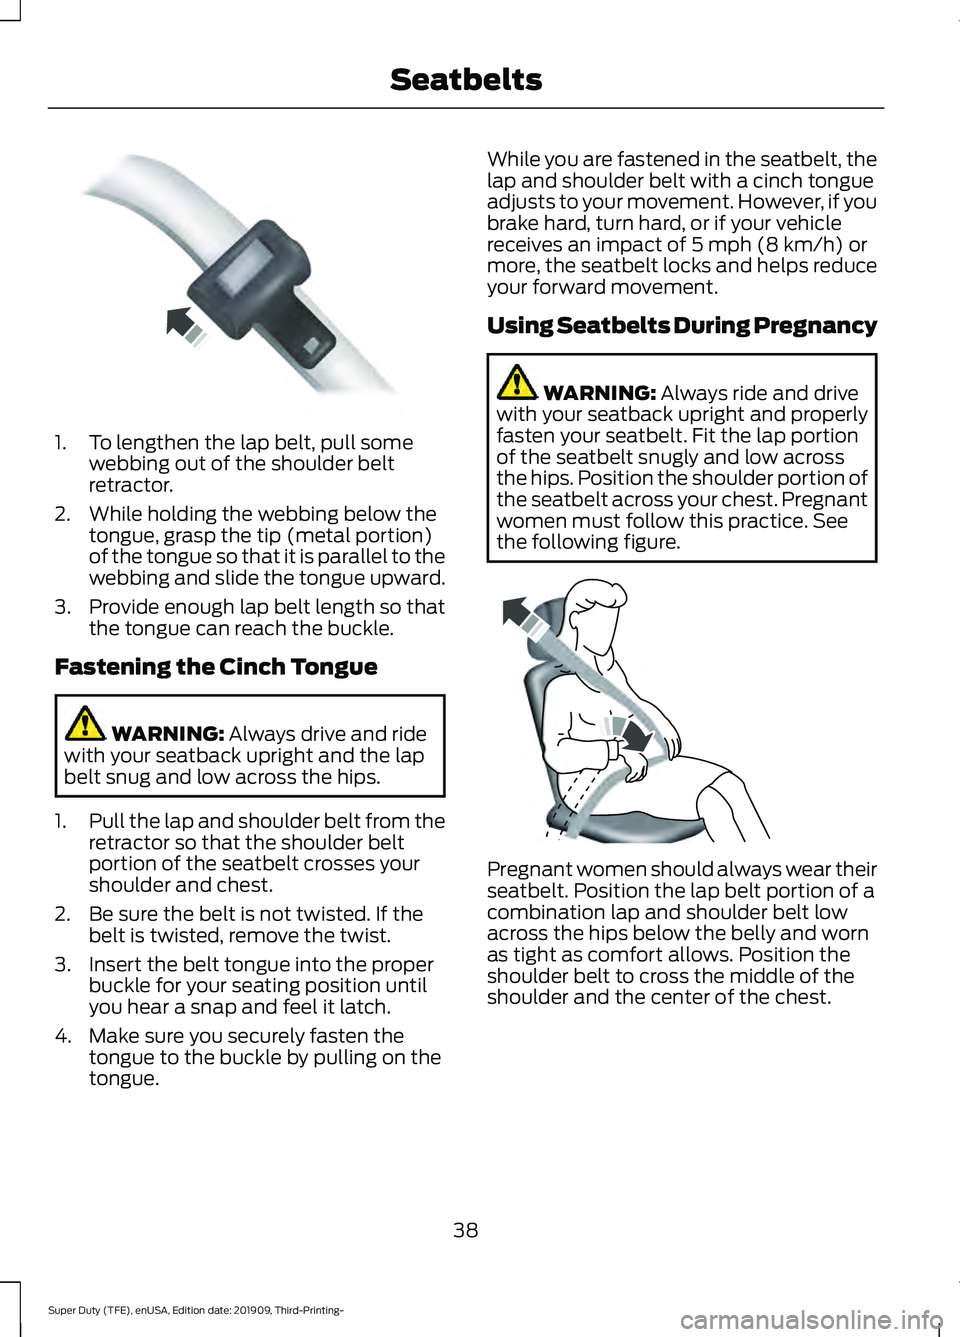
1. To lengthen the lap belt, pull some
webbing out of the shoulder belt
retractor.
2. While holding the webbing below the tongue, grasp the tip (metal portion)
of the tongue so that it is parallel to the
webbing and slide the tongue upward.
3. Provide enough lap belt length so that
the tongue can reach the buckle.
Fastening the Cinch Tongue WARNING: Always drive and ride
with your seatback upright and the lap
belt snug and low across the hips.
1. Pull the lap and shoulder belt from the
retractor so that the shoulder belt
portion of the seatbelt crosses your
shoulder and chest.
2. Be sure the belt is not twisted. If the belt is twisted, remove the twist.
3. Insert the belt tongue into the proper buckle for your seating position until
you hear a snap and feel it latch.
4. Make sure you securely fasten the tongue to the buckle by pulling on the
tongue. While you are fastened in the seatbelt, the
lap and shoulder belt with a cinch tongue
adjusts to your movement. However, if you
brake hard, turn hard, or if your vehicle
receives an impact of
5 mph (8 km/h) or
more, the seatbelt locks and helps reduce
your forward movement.
Using Seatbelts During Pregnancy WARNING:
Always ride and drive
with your seatback upright and properly
fasten your seatbelt. Fit the lap portion
of the seatbelt snugly and low across
the hips. Position the shoulder portion of
the seatbelt across your chest. Pregnant
women must follow this practice. See
the following figure. Pregnant women should always wear their
seatbelt. Position the lap belt portion of a
combination lap and shoulder belt low
across the hips below the belly and worn
as tight as comfort allows. Position the
shoulder belt to cross the middle of the
shoulder and the center of the chest.
38
Super Duty (TFE), enUSA, Edition date: 201909, Third-Printing- SeatbeltsE162708 E142590
Page 46 of 631
PRINCIPLE OF OPERATION
WARNING: Airbags do not inflate
slowly or gently, and the risk of injury
from a deploying airbag is the greatest
close to the trim covering the airbag
module. WARNING:
All occupants of your
vehicle, including the driver, should
always properly wear their seatbelts,
even when an airbag supplemental
restraint system is provided. Failure to
properly wear your seatbelt could
seriously increase the risk of injury or
death. WARNING:
Properly secure
children 12 years old and under in a rear
seating position whenever possible. If
you are unable to properly secure all
children in a rear seating position,
properly secure the largest child on the
front seat. If you must use a forward
facing child restraint on the front seat,
move the seat as far back as possible.
Failure to follow these instructions could
result in personal injury or death. WARNING:
Do not place your arms
on the airbag cover or through the
steering wheel. Failure to follow this
instruction could result in personal injury. WARNING:
Do not place a
rearward facing child restraint in front of
an active airbag. Failure to follow this
instruction could result in personal injury
or death. WARNING:
Do not attempt to
service, repair, or modify the
supplementary restraint system or
associated components. Failure to
follow this instruction could result in
personal injury or death. WARNING:
Several airbag system
components get hot after inflation. To
reduce the risk of injury, do not touch
them after inflation. WARNING:
If a supplementary
restraint system component has
deployed, it will not function again. Have
the system and associated components
inspected as soon as possible. Failure to
follow this instruction could result in
personal injury or death.
The airbags are a supplemental restraint
system and are designed to work with the
seatbelts to help protect the driver and
right front passenger from certain upper
body injuries. Airbags do not inflate slowly;
there is a risk of injury from a deploying
airbag.
Note: You will hear a loud bang and see a
cloud of harmless powdery residue if an
airbag deploys. This is normal.
The airbags inflate and deflate rapidly
upon activation. After airbag deployment,
it is normal to notice a smoke-like, powdery
residue or smell the burnt propellant. This
may consist of cornstarch, talcum powder
(to lubricate the bag) or sodium
compounds (for example, baking soda)
that result from the combustion process
that inflates the airbag. Small amounts of
sodium hydroxide may be present which
may irritate the skin and eyes, but none of
the residue is toxic.
While the system is designed to help
reduce serious injuries, contact with a
deploying airbag may also cause abrasions
or swelling. Temporary hearing loss is also
a possibility as a result of the noise
associated with a deploying airbag.
Because airbags must inflate rapidly and
with considerable force, there is the risk of
death or serious injuries such as fractures,
facial and eye injuries or internal injuries,
43
Super Duty (TFE), enUSA, Edition date: 201909, Third-Printing- Supplementary Restraints System
Page 57 of 631
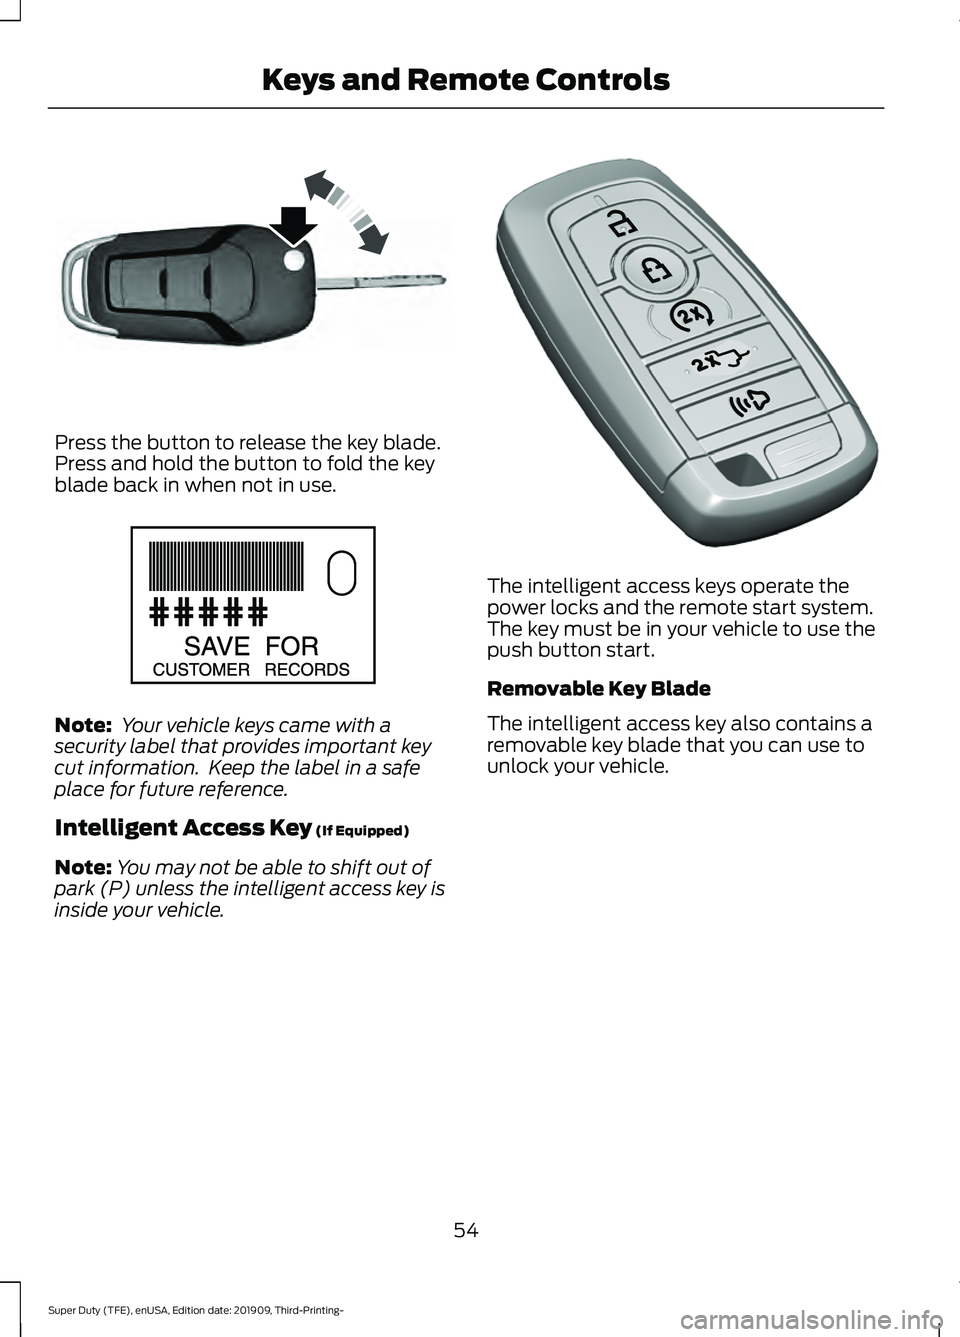
Press the button to release the key blade.
Press and hold the button to fold the key
blade back in when not in use.
Note:
Your vehicle keys came with a
security label that provides important key
cut information. Keep the label in a safe
place for future reference.
Intelligent Access Key (If Equipped)
Note: You may not be able to shift out of
park (P) unless the intelligent access key is
inside your vehicle. The intelligent access keys operate the
power locks and the remote start system.
The key must be in your vehicle to use the
push button start.
Removable Key Blade
The intelligent access key also contains a
removable key blade that you can use to
unlock your vehicle.
54
Super Duty (TFE), enUSA, Edition date: 201909, Third-Printing- Keys and Remote ControlsE191532 E151795 E307113
Page 58 of 631
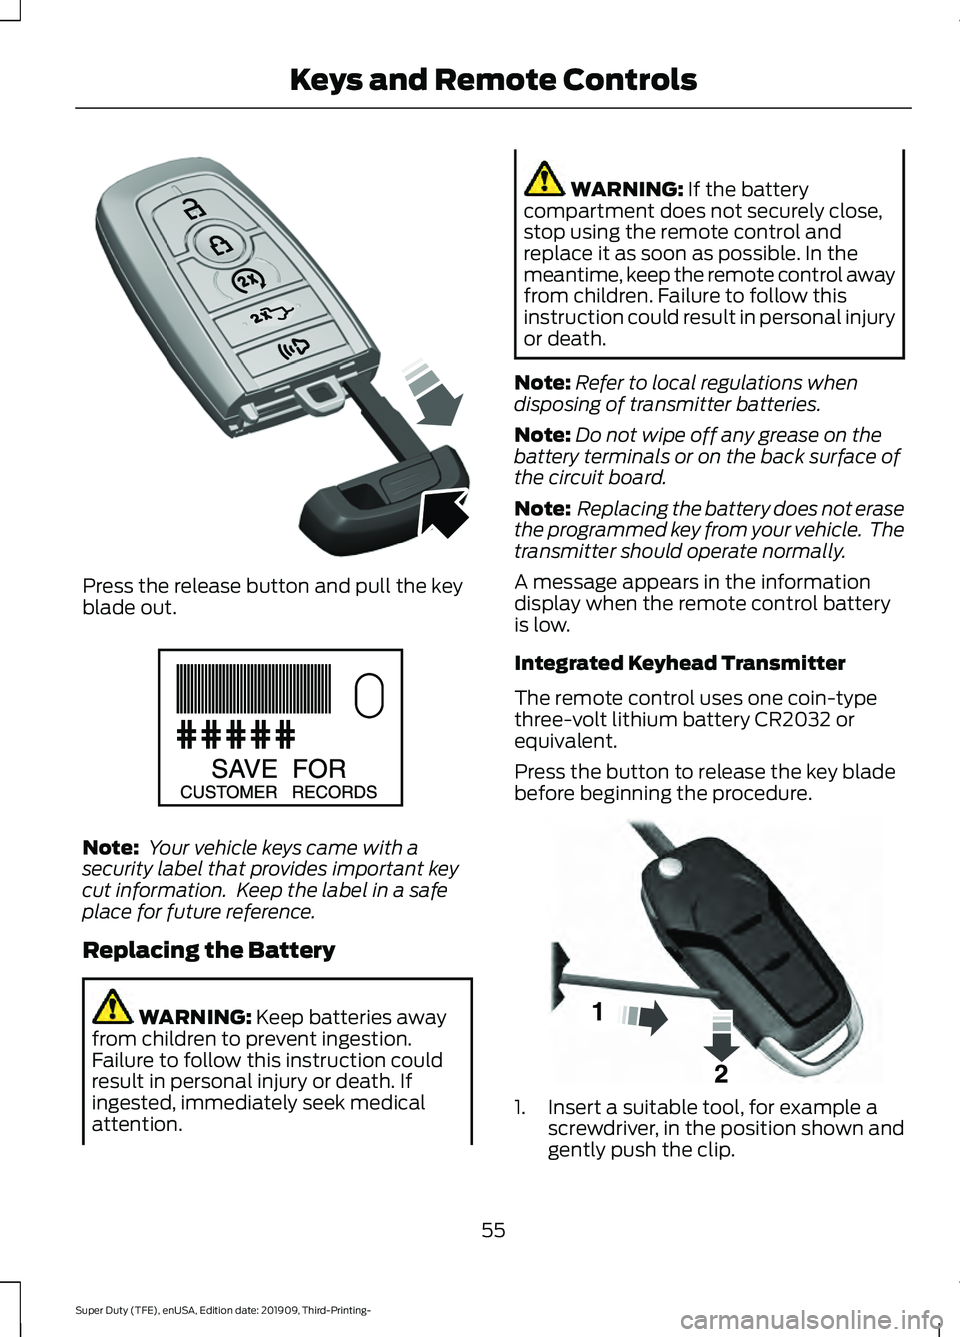
Press the release button and pull the key
blade out.
Note:
Your vehicle keys came with a
security label that provides important key
cut information. Keep the label in a safe
place for future reference.
Replacing the Battery WARNING: Keep batteries away
from children to prevent ingestion.
Failure to follow this instruction could
result in personal injury or death. If
ingested, immediately seek medical
attention. WARNING:
If the battery
compartment does not securely close,
stop using the remote control and
replace it as soon as possible. In the
meantime, keep the remote control away
from children. Failure to follow this
instruction could result in personal injury
or death.
Note: Refer to local regulations when
disposing of transmitter batteries.
Note: Do not wipe off any grease on the
battery terminals or on the back surface of
the circuit board.
Note: Replacing the battery does not erase
the programmed key from your vehicle. The
transmitter should operate normally.
A message appears in the information
display when the remote control battery
is low.
Integrated Keyhead Transmitter
The remote control uses one coin-type
three-volt lithium battery CR2032 or
equivalent.
Press the button to release the key blade
before beginning the procedure. 1. Insert a suitable tool, for example a
screwdriver, in the position shown and
gently push the clip.
55
Super Duty (TFE), enUSA, Edition date: 201909, Third-Printing- Keys and Remote ControlsE307112 E151795 E191533
Page 67 of 631
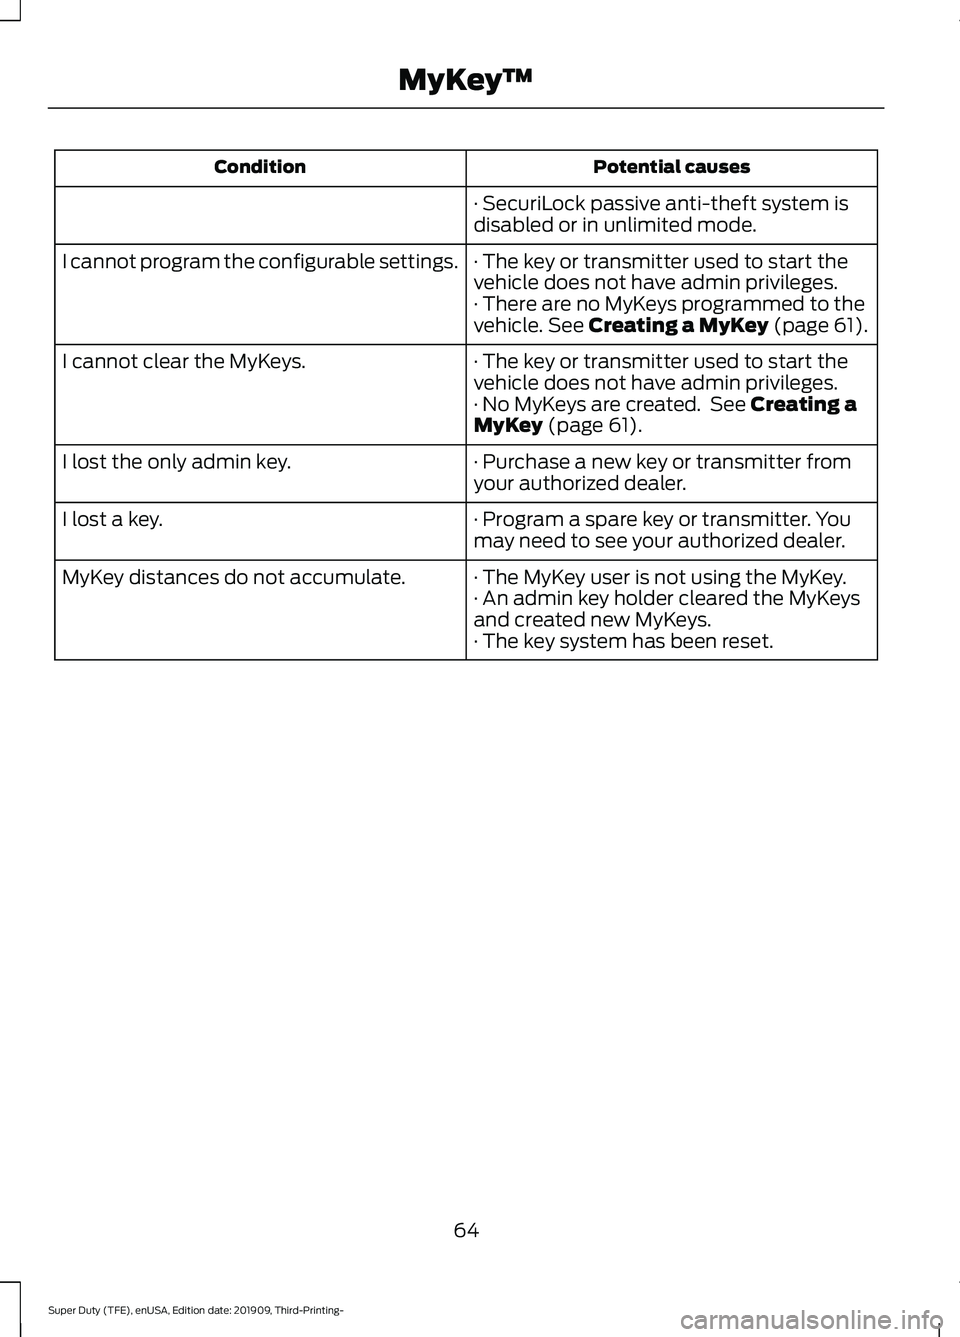
Potential causes
Condition
· SecuriLock passive anti-theft system is
disabled or in unlimited mode.
· The key or transmitter used to start the
vehicle does not have admin privileges.
I cannot program the configurable settings.
· There are no MyKeys programmed to the
vehicle. See Creating a MyKey (page 61).
· The key or transmitter used to start the
vehicle does not have admin privileges.
I cannot clear the MyKeys.
· No MyKeys are created. See
Creating a
MyKey (page 61).
· Purchase a new key or transmitter from
your authorized dealer.
I lost the only admin key.
· Program a spare key or transmitter. You
may need to see your authorized dealer.
I lost a key.
· The MyKey user is not using the MyKey.
MyKey distances do not accumulate.
· An admin key holder cleared the MyKeys
and created new MyKeys.
· The key system has been reset.
64
Super Duty (TFE), enUSA, Edition date: 201909, Third-Printing- MyKey
™
Page 71 of 631
Accessory Mode Battery Saver for
Intelligent Access Keys (If Equipped)
If you leave the ignition on after leaving
your vehicle, it turns off 30 minutes after
you close all the doors.
KEYLESS ENTRY (IF EQUIPPED)
SECURICODE™ KEYLESS ENTRY
KEYPAD
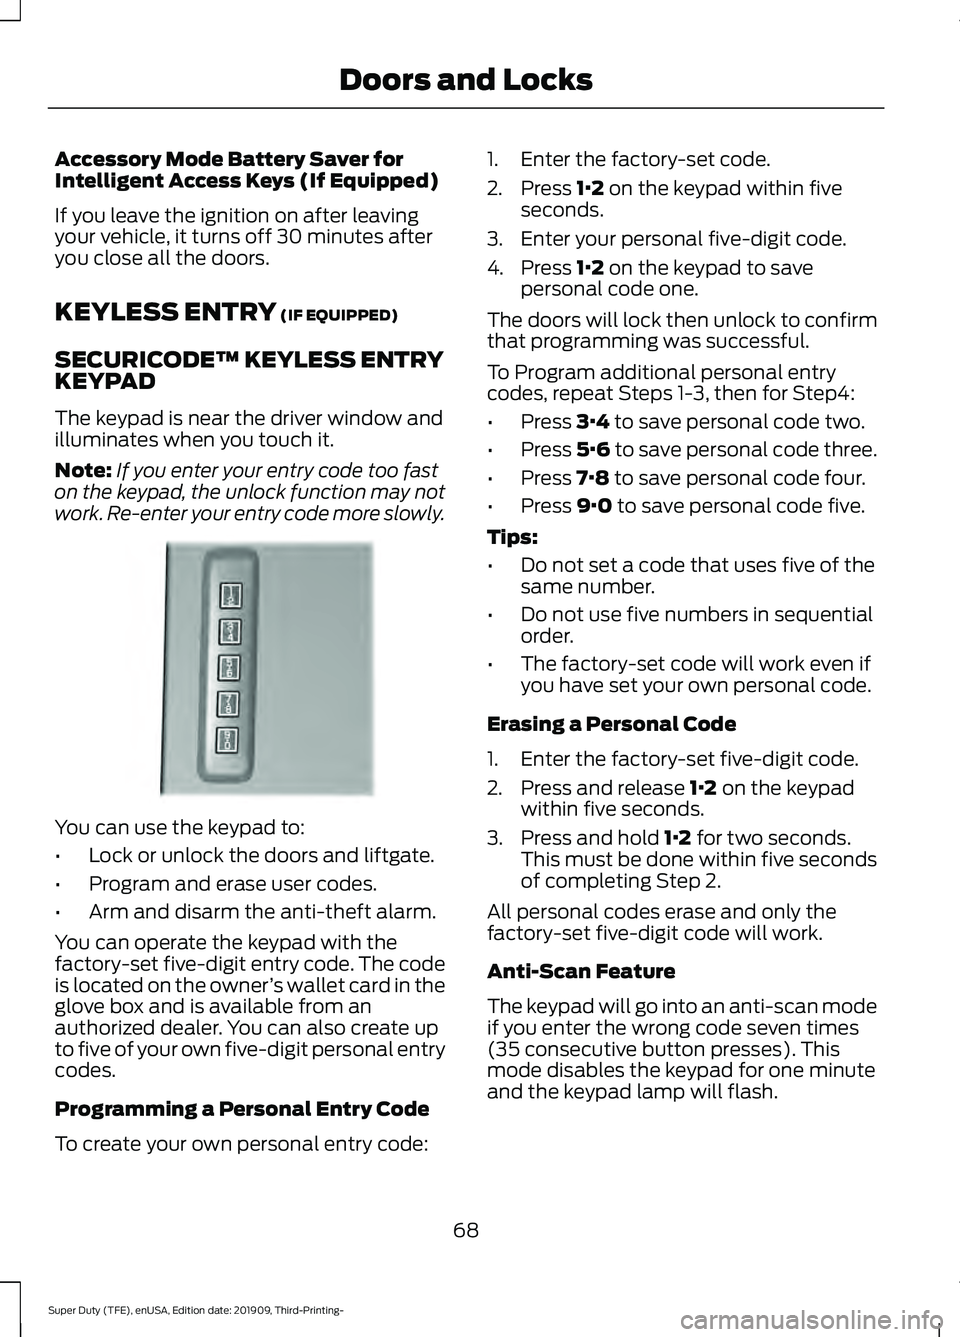
The keypad is near the driver window and
illuminates when you touch it.
Note: If you enter your entry code too fast
on the keypad, the unlock function may not
work. Re-enter your entry code more slowly. You can use the keypad to:
•
Lock or unlock the doors and liftgate.
• Program and erase user codes.
• Arm and disarm the anti-theft alarm.
You can operate the keypad with the
factory-set five-digit entry code. The code
is located on the owner ’s wallet card in the
glove box and is available from an
authorized dealer. You can also create up
to five of your own five-digit personal entry
codes.
Programming a Personal Entry Code
To create your own personal entry code: 1. Enter the factory-set code.
2. Press
1·2 on the keypad within five
seconds.
3. Enter your personal five-digit code.
4. Press
1·2 on the keypad to save
personal code one.
The doors will lock then unlock to confirm
that programming was successful.
To Program additional personal entry
codes, repeat Steps 1-3, then for Step4:
• Press
3·4 to save personal code two.
• Press
5·6 to save personal code three.
• Press
7·8 to save personal code four.
• Press
9·0 to save personal code five.
Tips:
• Do not set a code that uses five of the
same number.
• Do not use five numbers in sequential
order.
• The factory-set code will work even if
you have set your own personal code.
Erasing a Personal Code
1. Enter the factory-set five-digit code.
2. Press and release
1·2 on the keypad
within five seconds.
3. Press and hold
1·2 for two seconds.
This must be done within five seconds
of completing Step 2.
All personal codes erase and only the
factory-set five-digit code will work.
Anti-Scan Feature
The keypad will go into an anti-scan mode
if you enter the wrong code seven times
(35 consecutive button presses). This
mode disables the keypad for one minute
and the keypad lamp will flash.
68
Super Duty (TFE), enUSA, Edition date: 201909, Third-Printing- Doors and LocksE190936
Page 74 of 631
REMOVING THE TAILGATE
WARNING: Always properly secure
cargo to prevent shifting cargo or cargo
falling from the vehicle. Failure to do so
could result in compromised vehicle
stability and serious personal injury to
vehicle occupants or others.
You can remove the tailgate for more
loading room.
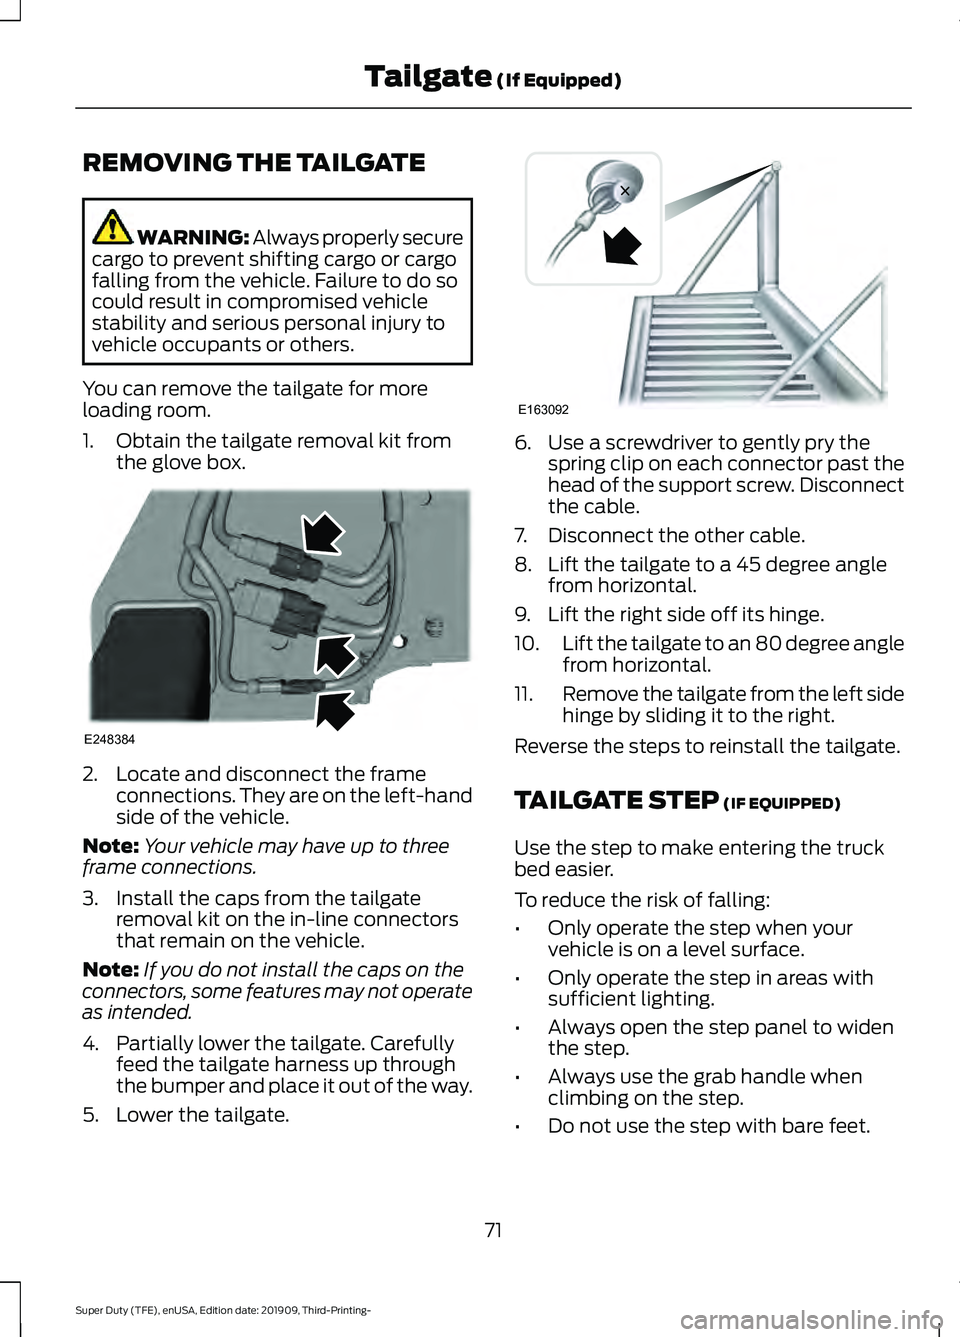
1. Obtain the tailgate removal kit from the glove box. 2. Locate and disconnect the frame
connections. They are on the left-hand
side of the vehicle.
Note: Your vehicle may have up to three
frame connections.
3. Install the caps from the tailgate removal kit on the in-line connectors
that remain on the vehicle.
Note: If you do not install the caps on the
connectors, some features may not operate
as intended.
4. Partially lower the tailgate. Carefully feed the tailgate harness up through
the bumper and place it out of the way.
5. Lower the tailgate. 6. Use a screwdriver to gently pry the
spring clip on each connector past the
head of the support screw. Disconnect
the cable.
7. Disconnect the other cable.
8. Lift the tailgate to a 45 degree angle from horizontal.
9. Lift the right side off its hinge.
10. Lift the tailgate to an 80 degree angle
from horizontal.
11. Remove the tailgate from the left side
hinge by sliding it to the right.
Reverse the steps to reinstall the tailgate.
TAILGATE STEP (IF EQUIPPED)
Use the step to make entering the truck
bed easier.
To reduce the risk of falling:
• Only operate the step when your
vehicle is on a level surface.
• Only operate the step in areas with
sufficient lighting.
• Always open the step panel to widen
the step.
• Always use the grab handle when
climbing on the step.
• Do not use the step with bare feet.
71
Super Duty (TFE), enUSA, Edition date: 201909, Third-Printing- Tailgate
(If Equipped)E248384 E163092
Page 75 of 631
•
Make sure the step is clean before use.
• Keep the step load, you plus the load,
below 350 lb (159 kg).
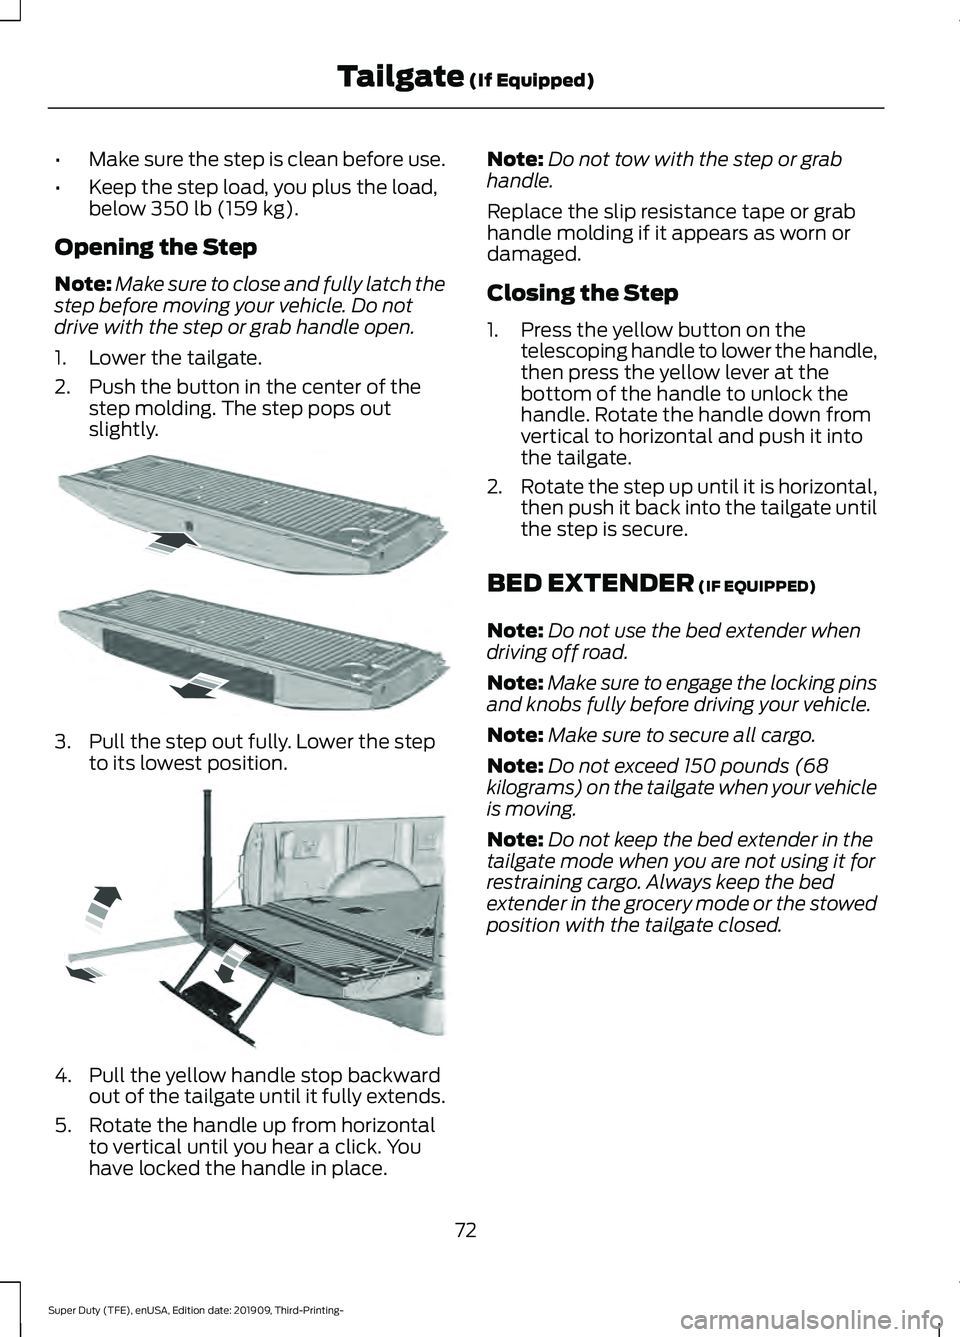
Opening the Step
Note: Make sure to close and fully latch the
step before moving your vehicle. Do not
drive with the step or grab handle open.
1. Lower the tailgate.
2. Push the button in the center of the step molding. The step pops out
slightly. 3. Pull the step out fully. Lower the step
to its lowest position. 4. Pull the yellow handle stop backward
out of the tailgate until it fully extends.
5. Rotate the handle up from horizontal to vertical until you hear a click. You
have locked the handle in place. Note:
Do not tow with the step or grab
handle.
Replace the slip resistance tape or grab
handle molding if it appears as worn or
damaged.
Closing the Step
1. Press the yellow button on the telescoping handle to lower the handle,
then press the yellow lever at the
bottom of the handle to unlock the
handle. Rotate the handle down from
vertical to horizontal and push it into
the tailgate.
2. Rotate the step up until it is horizontal,
then push it back into the tailgate until
the step is secure.
BED EXTENDER
(IF EQUIPPED)
Note: Do not use the bed extender when
driving off road.
Note: Make sure to engage the locking pins
and knobs fully before driving your vehicle.
Note: Make sure to secure all cargo.
Note: Do not exceed 150 pounds (68
kilograms) on the tailgate when your vehicle
is moving.
Note: Do not keep the bed extender in the
tailgate mode when you are not using it for
restraining cargo. Always keep the bed
extender in the grocery mode or the stowed
position with the tailgate closed.
72
Super Duty (TFE), enUSA, Edition date: 201909, Third-Printing- Tailgate
(If Equipped)E187718 E189557