manual transmission FORD F-450 2020 User Guide
[x] Cancel search | Manufacturer: FORD, Model Year: 2020, Model line: F-450, Model: FORD F-450 2020Pages: 631, PDF Size: 9.62 MB
Page 204 of 631
AUTOMATIC TRANSMISSION
WARNING: Apply the parking
brake, shift into park (P), switch the
ignition off and remove the key before
you leave your vehicle. Failure to follow
this instruction could result in personal
injury or death. WARNING:
When your vehicle is
stationary, keep the brake pedal fully
pressed when shifting gears. Failure to
follow this instruction could result in
personal injury, death or property
damage.
Note: You may not be able to shift out of
park (P) unless the intelligent access key is
inside your vehicle.
Understanding the Shift Positions
of Your Automatic Transmission
(If Equipped)
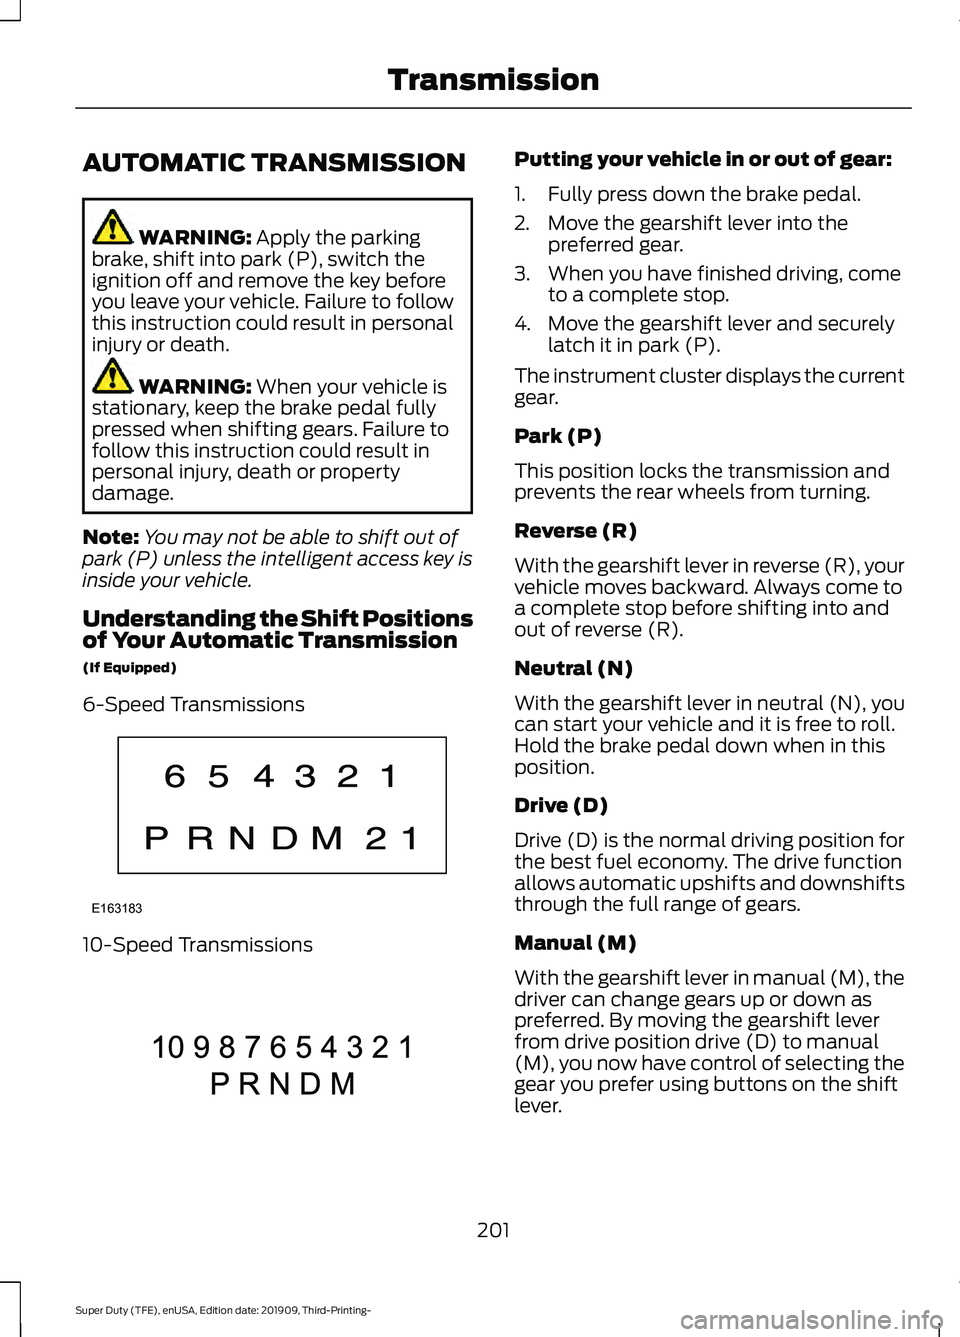
6-Speed Transmissions 10-Speed Transmissions Putting your vehicle in or out of gear:
1. Fully press down the brake pedal.
2. Move the gearshift lever into the
preferred gear.
3. When you have finished driving, come to a complete stop.
4. Move the gearshift lever and securely latch it in park (P).
The instrument cluster displays the current
gear.
Park (P)
This position locks the transmission and
prevents the rear wheels from turning.
Reverse (R)
With the gearshift lever in reverse (R), your
vehicle moves backward. Always come to
a complete stop before shifting into and
out of reverse (R).
Neutral (N)
With the gearshift lever in neutral (N), you
can start your vehicle and it is free to roll.
Hold the brake pedal down when in this
position.
Drive (D)
Drive (D) is the normal driving position for
the best fuel economy. The drive function
allows automatic upshifts and downshifts
through the full range of gears.
Manual (M)
With the gearshift lever in manual (M), the
driver can change gears up or down as
preferred. By moving the gearshift lever
from drive position drive (D) to manual
(M), you now have control of selecting the
gear you prefer using buttons on the shift
lever.
201
Super Duty (TFE), enUSA, Edition date: 201909, Third-Printing- TransmissionE163183 E308145
Page 205 of 631
To return to the normal drive (D) position,
move the shift lever from manual (M) to
drive (D).
The transmission operates through the full
range of gears.
Forced downshifts
•
Allowed in drive (D) with the tow/haul
feature on or off.
• Press the accelerator to the floor.
• Allows transmission to select an
appropriate gear.
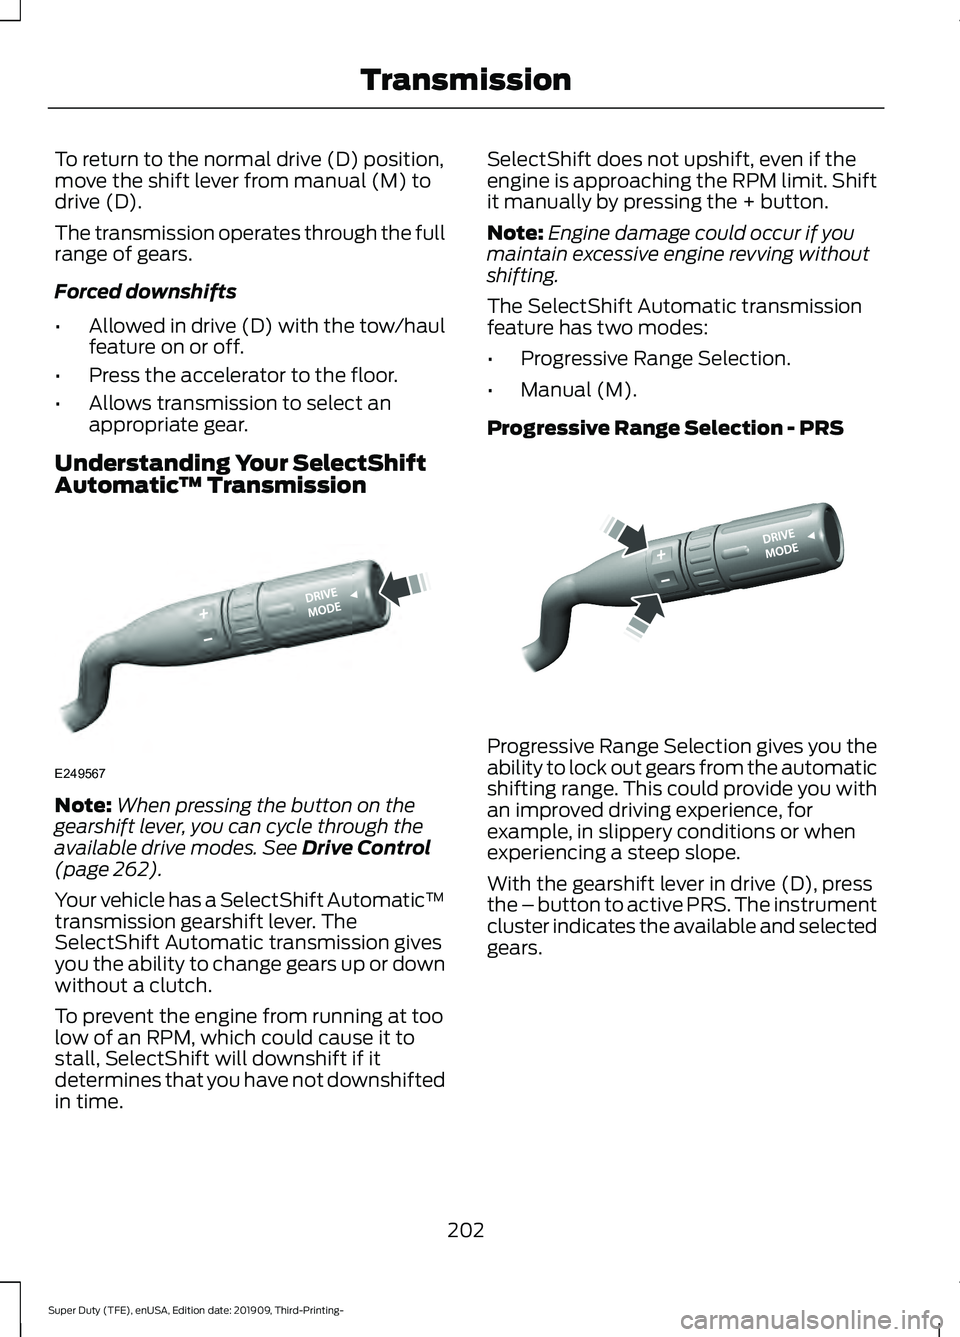
Understanding Your SelectShift
Automatic ™ TransmissionNote:
When pressing the button on the
gearshift lever, you can cycle through the
available drive modes. See Drive Control
(page 262).
Your vehicle has a SelectShift Automatic ™
transmission gearshift lever. The
SelectShift Automatic transmission gives
you the ability to change gears up or down
without a clutch.
To prevent the engine from running at too
low of an RPM, which could cause it to
stall, SelectShift will downshift if it
determines that you have not downshifted
in time. SelectShift does not upshift, even if the
engine is approaching the RPM limit. Shift
it manually by pressing the + button.
Note:
Engine damage could occur if you
maintain excessive engine revving without
shifting.
The SelectShift Automatic transmission
feature has two modes:
• Progressive Range Selection.
• Manual (M).
Progressive Range Selection - PRS Progressive Range Selection gives you the
ability to lock out gears from the automatic
shifting range. This could provide you with
an improved driving experience, for
example, in slippery conditions or when
experiencing a steep slope.
With the gearshift lever in drive (D), press
the – button to active PRS. The instrument
cluster indicates the available and selected
gears.
202
Super Duty (TFE), enUSA, Edition date: 201909, Third-Printing- TransmissionE249567 E312894
Page 206 of 631
All available gears display with the current
gear indicated. Press the – button again to
lock out gears beginning with the highest
gear, for example, press the – button twice
to lock out 6th and 5th gears. Only the
available gears display, and the
transmission shifts between the available
gears. Press the + button to unlock gears
to allow the transmission to shift to higher
gears. The transmission shifts within the
gear range you select.
Manual (M)
Moving the gearshift lever to the manual
(M) position allows you to manually select
the gear you prefer. Only the current gear
displays. Use the buttons on the gearshift
lever to manually select gears. Press the
+ button to upshift or the – button to
downshift. Return the transmission to a
different gearshift position to deactivate
manual control.
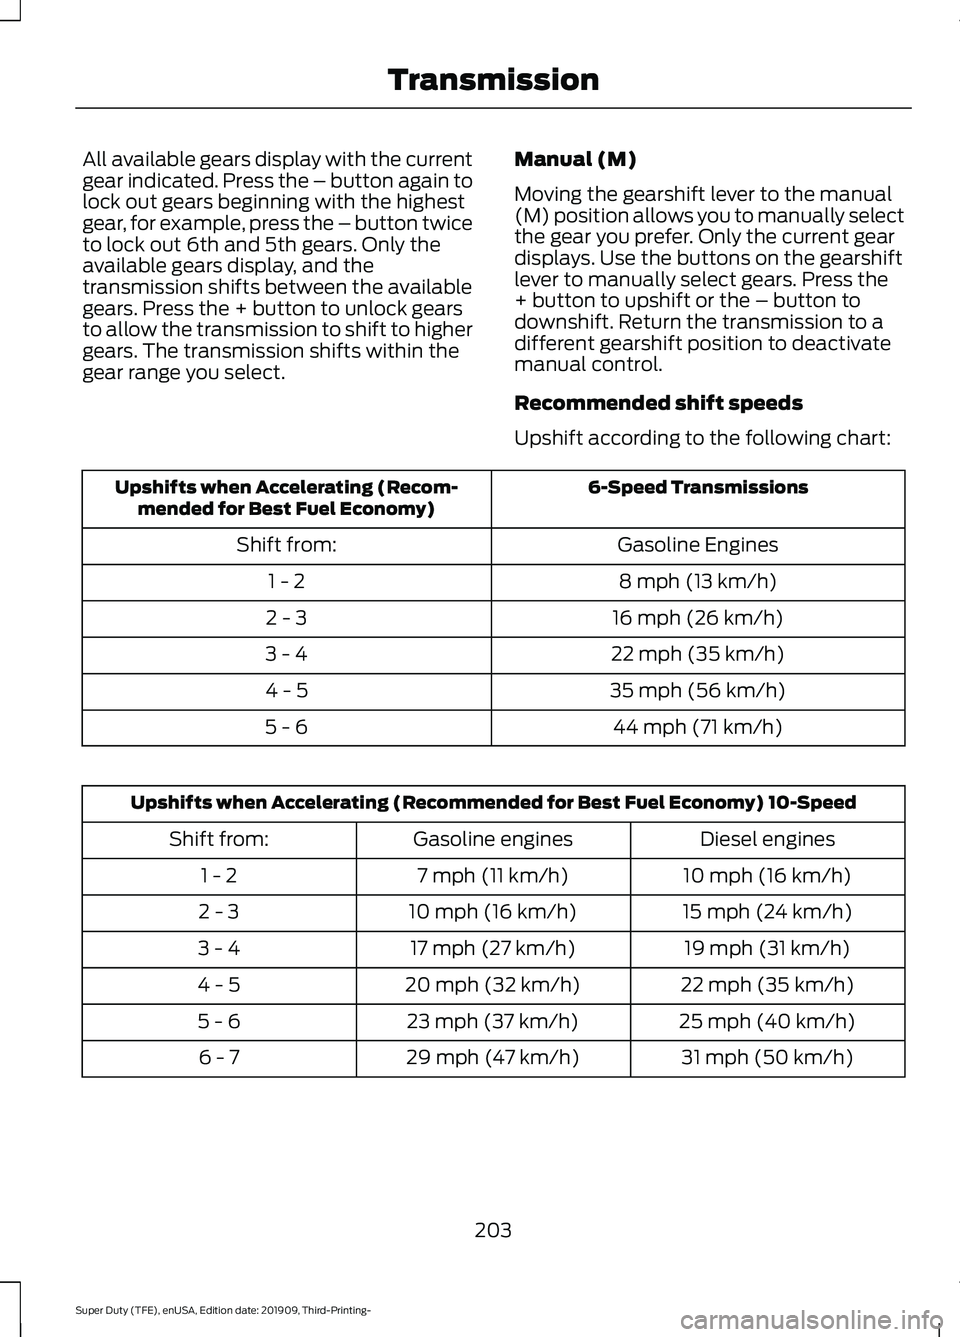
Recommended shift speeds
Upshift according to the following chart: 6-Speed Transmissions
Upshifts when Accelerating (Recom-
mended for Best Fuel Economy)
Gasoline Engines
Shift from:
8 mph (13 km/h)
1 - 2
16 mph (26 km/h)
2 - 3
22 mph (35 km/h)
3 - 4
35 mph (56 km/h)
4 - 5
44 mph (71 km/h)
5 - 6 Upshifts when Accelerating (Recommended for Best Fuel Economy) 10-Speed
Diesel engines
Gasoline engines
Shift from:
10 mph (16 km/h)
7 mph (11 km/h)
1 - 2
15 mph (24 km/h)
10 mph (16 km/h)
2 - 3
19 mph (31 km/h)
17 mph (27 km/h)
3 - 4
22 mph (35 km/h)
20 mph (32 km/h)
4 - 5
25 mph (40 km/h)
23 mph (37 km/h)
5 - 6
31 mph (50 km/h)
29 mph (47 km/h)
6 - 7
203
Super Duty (TFE), enUSA, Edition date: 201909, Third-Printing- Transmission
Page 216 of 631
chances of a loss of vehicle control
which can lead to serious injury or death.
If the rear end of your vehicle slides while
cornering, steer in the direction of the
slide until you regain control of your
vehicle.
Note: Excessive tire slippage can cause
transmission damage.
Four-wheel drive vehicles have advantages
over two-wheel drive vehicles in snow and
ice but can skid like any other vehicle.
Should you start to slide while driving on
snowy or icy roads, turn the steering wheel
in the direction of the slide until you regain
control.
Avoid sudden applications of power and
quick changes of direction on snow and
ice. Apply the accelerator slowly and
steadily when starting from a full stop.
Avoid sudden braking. Although a
four-wheel drive vehicle may accelerate
better than a two-wheel drive vehicle in
snow and ice, it will not stop any faster as
braking occurs at all four wheels. Do not
become overconfident as to road
conditions.
Make sure you allow sufficient distance
between you and other vehicles for
stopping. Drive slower than usual and
consider using one of the lower gears. In
emergency stopping situations, apply the
brake steadily. Do not pump the brake
pedal. See Hints on Driving With
Anti-Lock Brakes (page 219).
If Your Vehicle Gets Stuck in Mud or
Snow WARNING:
Do not spin the wheels
at over 34 mph (55 km/h). The tires may
fail and injure a passenger or bystander. If your vehicle gets stuck in mud or snow,
it may be rocked out by shifting between
forward and reverse gears, stopping
between shifts in a steady pattern. Press
lightly on the accelerator in each gear.
Note:
Do not rock your vehicle if the engine
is not at normal operating temperature,
damage to the transmission may occur.
Note: Do not rock your vehicle for more
than a minute, damage to the transmission
and tires may occur or the engine may
overheat.
Parking WARNING:
If the parking brake is
fully released, but the brake warning
lamp remains illuminated, the brakes
may not be working properly. Have your
vehicle checked as soon as possible. WARNING:
Apply the parking
brake, shift into park (P), switch the
ignition off and remove the key before
you leave your vehicle. Failure to follow
this instruction could result in personal
injury or death.
On some four-wheel drive vehicles, when
the transfer case is in the neutral (N)
position, the engine and transmission are
disconnected from the rest of the driveline.
Therefore, the vehicle is free to roll even if
the automatic transmission is in park (P)
or the manual transmission is in gear. Do
not leave the vehicle unattended with the
transfer case in the neutral (N) position.
Always set the parking brake fully and turn
off the ignition when leaving the vehicle.
213
Super Duty (TFE), enUSA, Edition date: 201909, Third-Printing- Four-Wheel Drive
(If Equipped)
Page 221 of 631
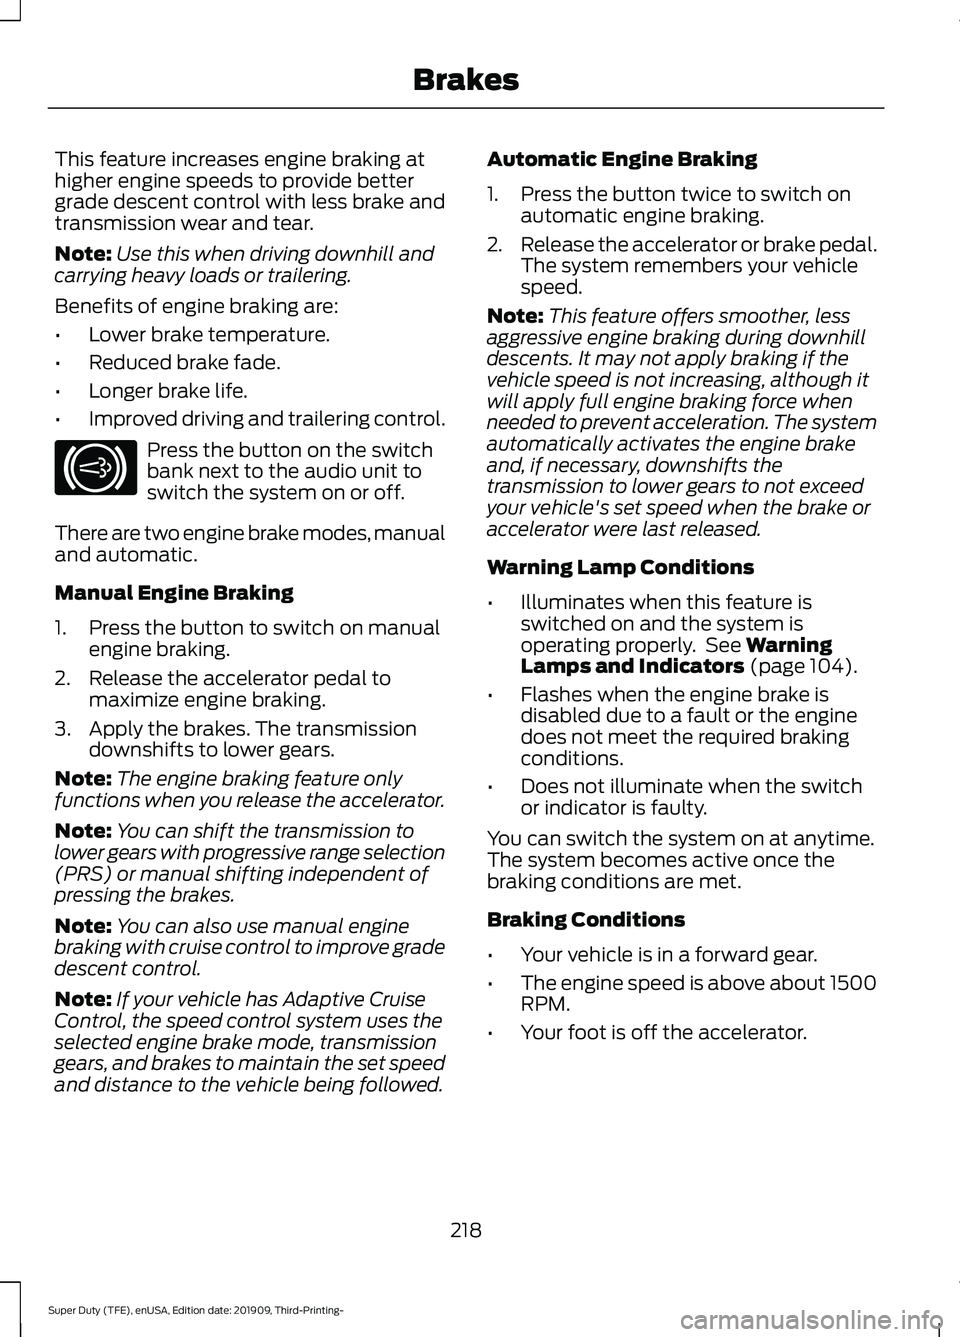
This feature increases engine braking at
higher engine speeds to provide better
grade descent control with less brake and
transmission wear and tear.
Note:
Use this when driving downhill and
carrying heavy loads or trailering.
Benefits of engine braking are:
• Lower brake temperature.
• Reduced brake fade.
• Longer brake life.
• Improved driving and trailering control. Press the button on the switch
bank next to the audio unit to
switch the system on or off.
There are two engine brake modes, manual
and automatic.
Manual Engine Braking
1. Press the button to switch on manual engine braking.
2. Release the accelerator pedal to maximize engine braking.
3. Apply the brakes. The transmission downshifts to lower gears.
Note: The engine braking feature only
functions when you release the accelerator.
Note: You can shift the transmission to
lower gears with progressive range selection
(PRS) or manual shifting independent of
pressing the brakes.
Note: You can also use manual engine
braking with cruise control to improve grade
descent control.
Note: If your vehicle has Adaptive Cruise
Control, the speed control system uses the
selected engine brake mode, transmission
gears, and brakes to maintain the set speed
and distance to the vehicle being followed. Automatic Engine Braking
1. Press the button twice to switch on
automatic engine braking.
2. Release the accelerator or brake pedal.
The system remembers your vehicle
speed.
Note: This feature offers smoother, less
aggressive engine braking during downhill
descents. It may not apply braking if the
vehicle speed is not increasing, although it
will apply full engine braking force when
needed to prevent acceleration. The system
automatically activates the engine brake
and, if necessary, downshifts the
transmission to lower gears to not exceed
your vehicle's set speed when the brake or
accelerator were last released.
Warning Lamp Conditions
• Illuminates when this feature is
switched on and the system is
operating properly. See Warning
Lamps and Indicators (page 104).
• Flashes when the engine brake is
disabled due to a fault or the engine
does not meet the required braking
conditions.
• Does not illuminate when the switch
or indicator is faulty.
You can switch the system on at anytime.
The system becomes active once the
braking conditions are met.
Braking Conditions
• Your vehicle is in a forward gear.
• The engine speed is above about 1500
RPM.
• Your foot is off the accelerator.
218
Super Duty (TFE), enUSA, Edition date: 201909, Third-Printing- BrakesE171217
Page 223 of 631
When the system is active, your vehicle
remains stationary on the slope for two to
three seconds after you release the brake
pedal. This allows time to move your foot
from the brake to the accelerator pedal.
The system releases the brakes
automatically once the engine has
developed sufficient torque to prevent your
vehicle from rolling down the slope. This
is an advantage when pulling away on a
slope, for example from a car park ramp,
traffic lights or when reversing uphill into
a parking space.
The system activates on any slope that
causes your vehicle to roll.
Note:
There is no warning light to indicate
the system is either on or off.
Using Hill Start Assist
1. Press the brake pedal to bring your vehicle to a complete standstill. Keep
the brake pedal pressed and shift into
first gear when facing uphill or reverse
(R) when facing downhill.
2. If the sensors detect that your vehicle is on a slope, the system activates
automatically.
3. When you remove your foot from the brake pedal, your vehicle remains on
the slope without rolling away for
about two to three seconds. This hold
time automatically extends if you are
in the process of driving off.
4. Drive off in the normal manner. The system releases the brakes
automatically.
Note: When you remove your foot from the
brake pedal and press the pedal again when
the system is active, you will experience
significantly reduced brake pedal travel. This
is normal. Switching the System On and Off
Vehicles with Manual Transmission
You can switch this feature on or off in the
information display. The system
remembers the last setting when you start
your vehicle.
Vehicles with Automatic Transmission
You cannot turn the system on or off.
When you switch the ignition on, the
system automatically turns on.
220
Super Duty (TFE), enUSA, Edition date: 201909, Third-Printing- Brakes
Page 228 of 631
WHAT IS TRAIL CONTROL
WARNING: The system does not
control speed in low traction conditions
or extremely steep slopes. The system
is designed to be an aid and does not
relieve you of your responsibility to drive
with due care and attention. Failure to
follow this instruction could result in
personal injury. WARNING:
The system does not
replace the parking brake. When you
leave your vehicle, always apply the
parking brake and shift the transmission
into park (P) for automatic transmission
or first gear for manual transmission.
Trail control lets you focus on steering
during low-speed and off-road use by
controlling your vehicle's acceleration and
braking.
You can use trail control under the
following speeds:
• 20 mph (31 km/h)
in two-wheel or
four-wheel drive high range.
• 10 mph (15 km/h)
in four-wheel drive
low range.
• 5 mph (8 km/h)
in reverse (R).
You may hear a noise from the anti-lock
brake system pump motor when you use
the system. This is normal.
SWITCHING TRAIL CONTROL
ON AND OFF Press the button.
The system switches off if you press the
button again or exceed 42 mph (68 km/h). SETTING THE TRAIL CONTROL
SPEED
Note:
The buttons are located on the
steering wheel.
Drive to your preferred speed. Press button to increase the set
current speed.
Press button to decrease the set
current speed.
Note: The indicator changes color.
You can adjust the set speed in small or
large increments. Press the toggle button
upward or downward once to adjust the
set speed in small increments. Press and
hold the toggle button upward or
downward to adjust the set speed in large
increments.
You can also adjust the set speed by
braking.
Note: Pressing the brake pedal does not
switch off the system.
CANCELING THE SET SPEED Press the button.
TRAIL CONTROL INDICATORS 225
Super Duty (TFE), enUSA, Edition date: 201909, Third-Printing- Trail Control
(If Equipped)E272858 E265298 E272858
Page 229 of 631
PRINCIPLE OF OPERATION
WARNING: Hill descent control
cannot control descent in all surface
conditions and circumstances, such as
ice or extremely steep grades. Hill
descent control is a driver assist system
and cannot substitute for good judgment
by the driver. Failure to do so may result
in loss of vehicle control, crash or serious
injury. WARNING:
The system does not
replace the parking brake. When you
leave your vehicle, always apply the
parking brake and shift the transmission
into park (P) for automatic transmission
or first gear for manual transmission.
Hill descent control allows the driver to set
and maintain vehicle speed while
descending steep grades in various surface
conditions.
Hill descent control can maintain vehicle
speeds on downhill grades between 2 mph
(3 km/h)
and 12 mph (20 km/h). Above
20 mph (32 km/h), the system remains
armed, but descent speed cannot be set
or maintained.
Hill descent control requires a cooling
down interval after a period of sustained
use. The amount of time that the feature
can remain active before cooling varies
with conditions. The system will provide
a warning in the message center and a
chime will sound when the system is about
to disengage for cooling. At this time,
manually apply the brakes as needed to
maintain descent speed. USING HILL DESCENT
CONTROL Press and release the hill
descent button on the
instrument panel. A light in the
cluster illuminates and a tone sounds
when this feature is activated.
To increase descent speed, press the
accelerator pedal until the desired speed
is reached. To decrease descent speed,
press the brake pedal until the desired
speed is reached.
Whether accelerating or decelerating, once
the desired descent speed is reached,
remove your feet from the pedals and the
chosen vehicle speed is maintained.
Note: Noise from the ABS pump motor may
be observed during hill descent control
operation. This is a normal characteristic of
the ABS and should be no reason for
concern.
Hill Descent Modes
• At speeds below
20 mph (32 km/h):
When the hill descent control switch is
pressed and hill descent control is
active, the hill descent control telltale
flashes.
• At speeds below
20 mph (32 km/h):
When the hill descent control switch is
pressed and conditions are not correct
for hill descent activation, the hill
descent control system is enabled and
the hill descent control telltale is solid.
A message displays in the information
display.
• At speeds above
20 mph (32 km/h):
When the hill descent control switch is
pressed, the hill descent control
system is enabled, the telltale in the
cluster is not illuminated and a
message is displayed in the information
display.
226
Super Duty (TFE), enUSA, Edition date: 201909, Third-Printing- Terrain Control
(If Equipped)E163957
Page 235 of 631
When shifting the transmission out of
reverse (R) and into any gear other than
park (P), the camera image remains in the
display until:
•
Your vehicle speed sufficiently
increases.
• You shift your vehicle into park (P).
• You apply the parking brake on vehicles
with a manual transmission.
360 DEGREE CAMERA WARNING: The 360 degree
camera system still requires the driver
to use it in conjunction with looking out
of the windows, and checking the interior
and exterior mirrors for maximum
coverage. WARNING:
Objects that are close
to either corner of the bumper or under
the bumper, might not be seen on the
screen due to the limited coverage of the
camera system. WARNING:
Use caution when
turning camera features on or off when
the transmission is not in park (P). Make
sure your vehicle is not moving.
Note: The 360 degree camera system turns
off when your vehicle is in motion at low
speed, except when in reverse (R).
The 360 degree camera system consists
of front, side and rear cameras. The
system:
• Allows you to see what is directly in
front or behind your vehicle.
• Provides cross traffic view in front and
behind your vehicle. •
Allows you to see a top-down view of
the area outside your vehicle, including
the blind spots.
• Provides visibility around your vehicle
to you in parking maneuvers such as:
•Centering in a parking space.
• Obstacles near vehicle.
• Parallel parking.
Camera Views The camera button is on the
instrument panel. Pressing the
camera button activates the
system.
When in park (P), neutral (N) or drive (D),
only images from the front cameras are
displayed. Press the camera button to
display the front camera image on the
display screen.
When in reverse (R), only images from the
rear cameras are displayed. When you shift
into reverse (R), the rear view camera
image automatically shows on the display
screen.
Advanced Camera Views (If Equipped) Additional camera views may be
available for vehicles with
specific features. Press the small
camera icon shown on the top left corner
of the display screen to open the camera
view menu.
The following camera views can be
accessed in park (P), neutral (N) or drive
(D) when you press the camera button:
• Front 360 + Normal:
Contains the
normal front camera view next to a
360 degree camera view.
• Front Normal View:
Provides an
image of what is directly in front of your
vehicle.
232
Super Duty (TFE), enUSA, Edition date: 201909, Third-Printing- Parking Aids
(If Equipped)E205884 E233726
Page 243 of 631
Adaptive Cruise Control Gap Settings
Dynamic
Behavior
Distance Gap
Graphic
Display,
Bars Indic- ated
Between Vehicles
Sport.
Closest.
1
Normal.
Close.
2
Normal.
Medium.
3
Comfort.
Far.
4
Each time you switch the system on, it
selects the last chosen gap setting.
Overriding the Set Speed WARNING: If you override the
system by pressing the accelerator
pedal, it does not automatically apply
the brakes to maintain a gap from any
vehicle ahead.
When you press the accelerator pedal, you
override the set speed and gap distance. Use the accelerator pedal
normally to intentionally exceed
the set speed limit.
When you override the system, the green
indicator light illuminates and the vehicle
image does not appear in the information
display.
The system resumes operation when you
release the accelerator pedal. The vehicle
speed decreases to the set speed, or a
lower speed if following a slower vehicle. Changing the Set Speed Press and release to increase the
set speed in small increments.
Press and release to decrease
the set speed in small
increments.
Press and hold either button to change the
set speed in large increments. Release the
button when you reach your preferred
speed.
The system may apply the brakes to slow
the vehicle to the new set speed. The set
speed displays continuously in the
information display when the system is
active.
Canceling the Set Speed Press and release the button or
tap the brake pedal.
The set speed does not erase.
Note: If you press the clutch pedal (manual
transmission only) for an extended period,
this action also cancels the set speed.
Resuming the Set Speed Press and release the button.
Your vehicle speed returns to the
previously set speed and gap setting. The
set speed displays continuously in the
information display when the system is
active.
Note: Only use resume if you are aware of
the set speed and intend to return to it.
240
Super Duty (TFE), enUSA, Edition date: 201909, Third-Printing- Cruise Control
(If Equipped)E144529 E265298