key FORD F-450 2020 Manual PDF
[x] Cancel search | Manufacturer: FORD, Model Year: 2020, Model line: F-450, Model: FORD F-450 2020Pages: 631, PDF Size: 9.62 MB
Page 338 of 631
Protected Component
Fuse
Rating
Fuse
Number
Driver front door module.
30 A
23
Moonroof.
30 A
24
Not used.
—
25
Passenger front door module.
30 A
26
Not used.
—
27
Amplifier.
30 A
28
Adjustable pedals switch.
15 A
29
Brake on-off output to trailer brake controller and customer access
circuits.
5 A
30
Remote keyless entry.
10 A
31
Radio.
20 A
32
Not used.
—
33
Run/start relay.
30 A
34
Not used.
—
35
Camera module.
15 A
36
Lane keeping system.
Auto-dimming interior mirror.
Rear heated seats.
Heated steering wheel.
20 A
37
Power windows.
30 A
38
Note: Spare fuse amperage may vary.
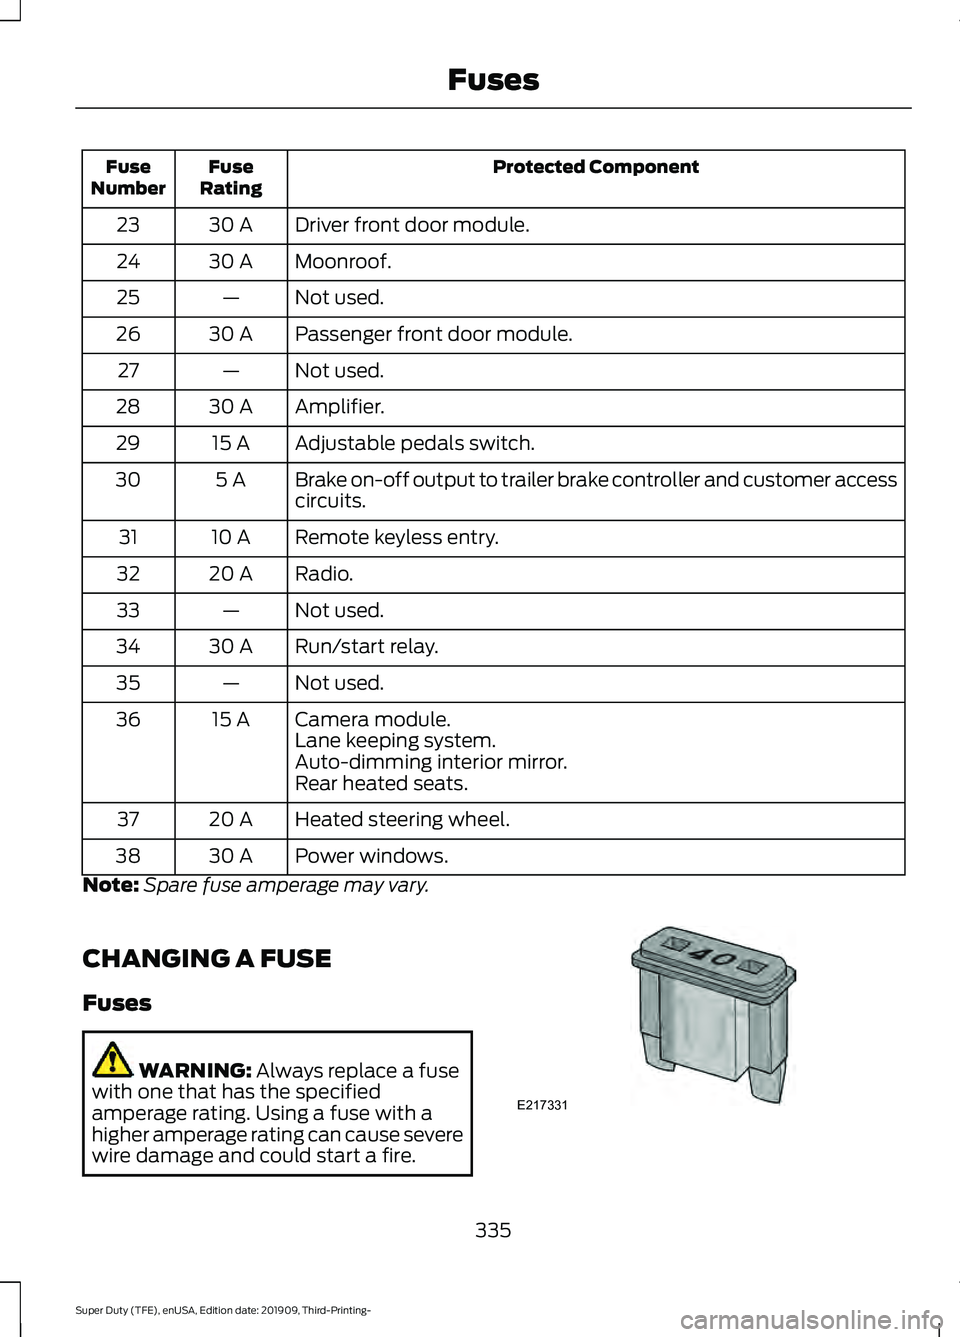
CHANGING A FUSE
Fuses WARNING: Always replace a fuse
with one that has the specified
amperage rating. Using a fuse with a
higher amperage rating can cause severe
wire damage and could start a fire. 335
Super Duty (TFE), enUSA, Edition date: 201909, Third-Printing- FusesE217331
Page 355 of 631
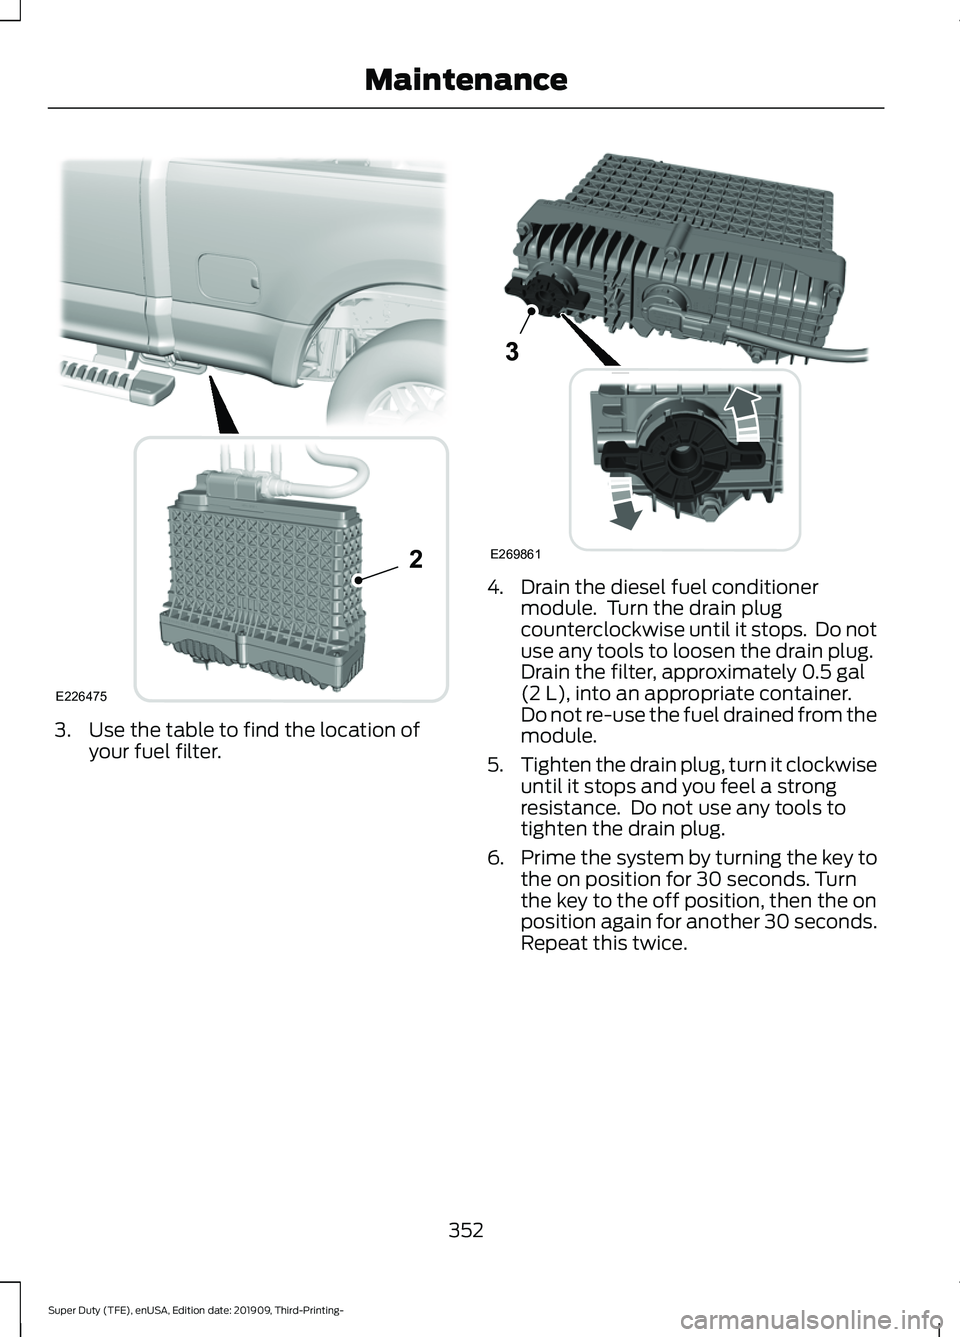
3. Use the table to find the location of
your fuel filter. 4. Drain the diesel fuel conditioner
module. Turn the drain plug
counterclockwise until it stops. Do not
use any tools to loosen the drain plug.
Drain the filter, approximately 0.5 gal
(2 L), into an appropriate container.
Do not re-use the fuel drained from the
module.
5. Tighten the drain plug, turn it clockwise
until it stops and you feel a strong
resistance. Do not use any tools to
tighten the drain plug.
6. Prime the system by turning the key to
the on position for 30 seconds. Turn
the key to the off position, then the on
position again for another 30 seconds.
Repeat this twice.
352
Super Duty (TFE), enUSA, Edition date: 201909, Third-Printing- MaintenanceE226475
2 E269861
Page 417 of 631
•
To reduce the chances of interference
from another vehicle, perform the
system reset procedure at least 3 ft
(1 m) away from another Ford Motor
Company vehicle undergoing the
system reset procedure at the same
time.
• Do not wait more than two minutes
between resetting each tire sensor or
the system can time-out and you have
to repeat the entire procedure on all
four wheels.
• A double horn sounds indicating the
need to repeat the procedure.
Performing the System Reset Procedure
- Single Rear Wheel
Read the entire procedure before
attempting.
1. Drive the vehicle above
20 mph
(32 km/h) for at least two minutes,
then park in a safe location where you
can easily get to all four tires and have
access to an air pump.
2. Place the ignition in the off position and
keep the key in the ignition.
3. Cycle the ignition to the on position with the engine off.
4. Turn the hazard flashers on then off three times. You must accomplish this
within 10 seconds. If you successfully
enter the reset mode, the horn sounds
once, the system indicator flashes and
a message shows in the information
display. If this does not occur, please
try again starting at step 2. If after
repeated attempts to enter the reset
mode, the horn does not sound, the
system indicator does not flash and no
message shows in the information
display, seek service from your
authorized dealer. 5. Train the tire pressure monitoring
system sensors in the tires using the
following system reset sequence
starting with the left front tire in the
following clockwise order: Left front -
driver side front tire, Right front -
passenger side front tire, Right rear -
passenger side rear tire, Left rear -
driver side rear tire.
6. Remove the valve cap from the valve stem on the left front tire. Decrease the
air pressure until the horn sounds.
Note: The single horn tone confirms that
the sensor identification code has been
learned by the module for this position. If a
double horn is heard, the reset procedure
was unsuccessful, and you must repeat it.
7. Remove the valve cap from the valve stem on the right front tire. Decrease
the air pressure until the horn sounds.
8. Remove the valve cap from the valve stem on the right rear tire. Decrease the
air pressure until the horn sounds.
9. Remove the valve cap from the valve stem on the left rear tire. Decrease the
air pressure until the horn sounds.
Training is complete after the horn
sounds for the last tire trained, driver
side rear tire, the system indicator
stops flashing, and a message shows
in the information display.
10. Turn the ignition off. If two short horn
beeps are heard, the reset procedure
was unsuccessful and you must
repeat it. If after repeating the
procedure and two short beeps are
heard when the ignition is turned to
off, seek assistance from your
authorized dealer.
414
Super Duty (TFE), enUSA, Edition date: 201909, Third-Printing- Wheels and Tires
Page 418 of 631
11.
Set all four tires to the recommended
air pressure as indicated on the
Safety Compliance Certification
Label, affixed to either the door hinge
pillar, door-latch post, or the door
edge that meets the door-latch post,
next to the driver seating position or
Tire Label located on the B-Pillar or
the edge of the driver door.
Performing the System Reset Procedure
- Dual Rear Wheel
For further information see
Understanding Your Tire Pressure
Monitoring System and refer to Dual
Rear Wheel, earlier in this section.
Read the entire procedure before
attempting.
1. Drive the vehicle above
20 mph
(32 km/h) for at least two minutes,
then park in a safe location where you
can easily get to all six tires and have
access to an air pump.
2. Place the ignition in the off position and
keep the key in the ignition.
3. Cycle the ignition to the on position with the engine off.
4. Turn the hazard flashers on then off three times. You must accomplish this
within 10 seconds. If you successfully
enter the reset mode, the horn sounds
once, the system indicator flashes and
a message shows in the information
display. If this does not occur, please
try again starting at step 2. If after
repeated attempts to enter the reset
mode, the horn does not sound, the
system indicator does not flash and no
message shows in the information
display, seek service from your
authorized dealer. 5. Train the tire pressure monitoring
system sensors in the tires using the
following system reset sequence
starting with the left front tire in the
following order: Left front - driver side
front tire, Right front - passenger side
front tire, Right outer rear -passenger
side rear outer tire, Right inner rear -
passenger side rear inner tire, Left outer
rear - driver side rear outer tire, Left
inner rear - driver side rear inner tire.
6. Remove the valve cap from the valve stem on the left front tire. Decrease the
air pressure until the horn sounds.
Note: The single horn chirp confirms that
the sensor identification code has been
learned by the module for this position. If a
double horn is heard, the reset procedure
was unsuccessful, and you must repeat it.
7. Remove the valve cap from the valve stem on the right front tire. Decrease
the air pressure until the horn sounds.
8. Remove the valve cap from the valve stem on the right outer rear tire.
Decrease the air pressure until the horn
sounds.
9. Remove the valve cap from the valve stem on the right inner rear tire.
Decrease the air pressure until the horn
sounds.
10. Remove the valve cap from the valve
stem on the left outer rear tire.
Decrease the air pressure until the
horn sounds.
11. Remove the valve cap from the valve
stem on the left inner rear tire.
Decrease the air pressure until the
horn sounds. Training is complete
after the horn sounds for the last tire
trained, the system indicator stops
flashing, and a message is shown in
the information display.
415
Super Duty (TFE), enUSA, Edition date: 201909, Third-Printing- Wheels and Tires
Page 423 of 631
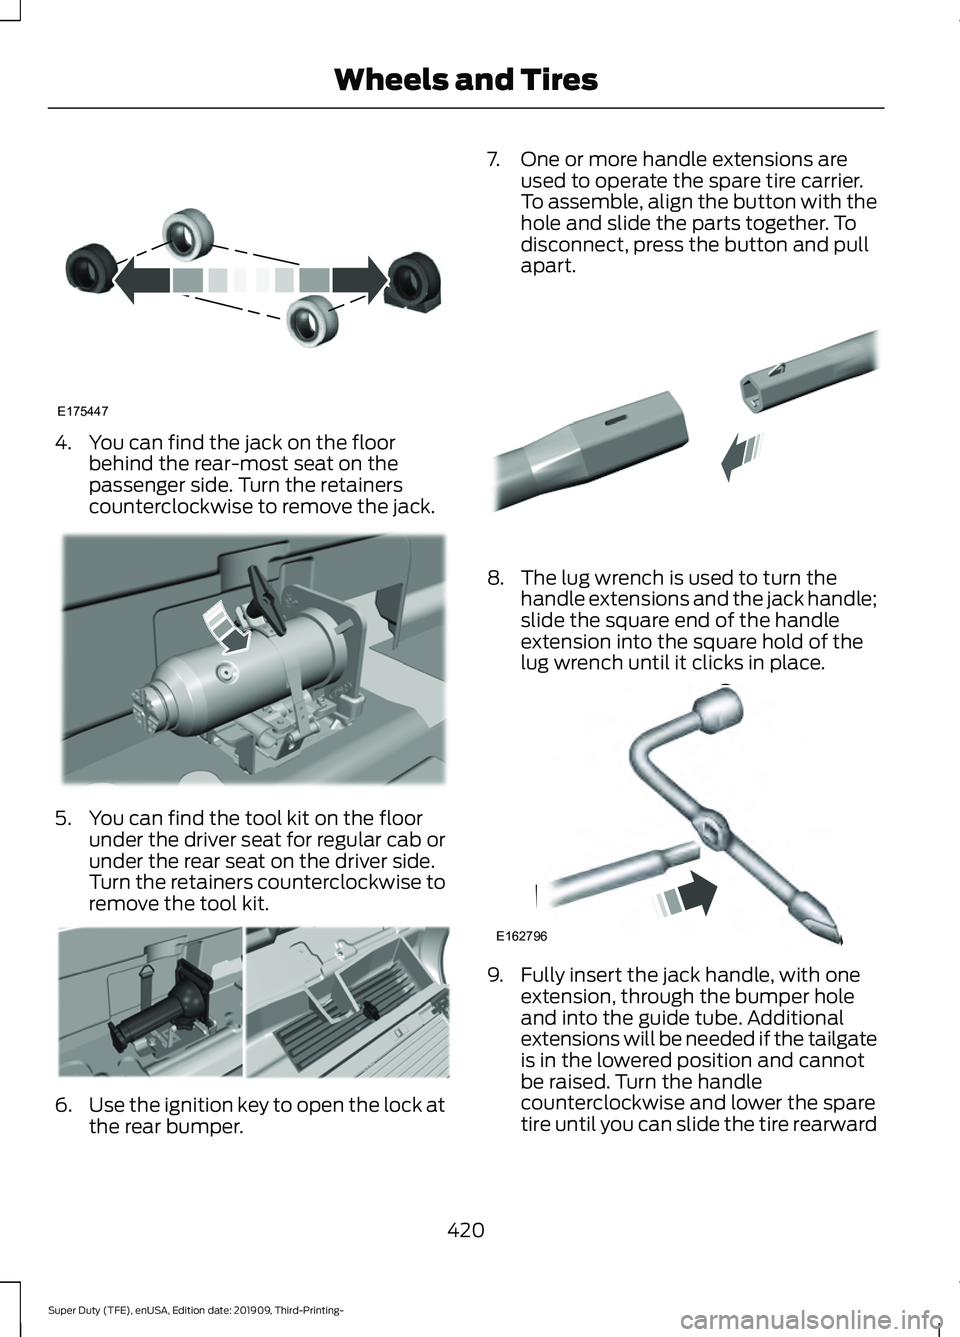
4. You can find the jack on the floor
behind the rear-most seat on the
passenger side. Turn the retainers
counterclockwise to remove the jack. 5. You can find the tool kit on the floor
under the driver seat for regular cab or
under the rear seat on the driver side.
Turn the retainers counterclockwise to
remove the tool kit. 6.
Use the ignition key to open the lock at
the rear bumper. 7. One or more handle extensions are
used to operate the spare tire carrier.
To assemble, align the button with the
hole and slide the parts together. To
disconnect, press the button and pull
apart. 8. The lug wrench is used to turn the
handle extensions and the jack handle;
slide the square end of the handle
extension into the square hold of the
lug wrench until it clicks in place. 9. Fully insert the jack handle, with one
extension, through the bumper hole
and into the guide tube. Additional
extensions will be needed if the tailgate
is in the lowered position and cannot
be raised. Turn the handle
counterclockwise and lower the spare
tire until you can slide the tire rearward
420
Super Duty (TFE), enUSA, Edition date: 201909, Third-Printing- Wheels and TiresE175447 E309424 E309795 E308882 E162796
Page 485 of 631
Locating Your ESN
With satellite radio as the source, use the
touchscreen to select the following:
1. Select Settings. See Settings (page
531).
2. Select
SiriusXM.
3. Select
SiriusXM information.
Troubleshooting Action
Condition
Message
No action required. This
message should disappear
shortly.
Radio requires more than
two seconds to produce
audio for the selected
channel.
Acquiring\b
If this message does not
clear shortly, or with an igni-
tion key cycle, your receiver
may have a fault. See an
authorized dealer for service.
There is an internal module
or system failure present.
Satellite antenna fault
SIRIUS system failure
Tune to another channel or
choose another preset.
The channel is no longer
available.
Invalid Channel
Contact SiriusXM at 1-888-
539-7474 to subscribe to
the channel, or tune to
another channel.
Your subscription does not
include this channel.
Unsubscribed Channel
The signal is blocked. When
you move into an open area,
the signal should return.
The signal is lost from the
SiriusXM satellite or Siri-
usXM tower to your vehicle
antenna.
No Signal
No action required. The
process may take up to
three minutes.
Update of channel
programming in progress.
Updating\b
Contact SiriusXM at 1-888-
539-7474 to resolve
subscription issues.
Your satellite service is no
longer available.
Questions? Call
1-888-539-7474
Use the channel guide to
turn off the Lock or Skip
function on that station.
All the channels in the
selected category are either
skipped or locked.
None found
Check Channel Guide
No action required.
SiriusXM has updated the
channels available for your
vehicle.
Subscription Updated
482
Super Duty (TFE), enUSA, Edition date: 201909, Third-Printing- Audio System
Page 494 of 631
App Permissions
App permissions are organized by groups.
You can grant these group permissions
individually. You can change a permission
group status any time when not driving, by
using the settings menu.
When you launch an app using SYNC, the
system may ask you to grant certain
permissions, for example:
•
To allow your vehicle to provide vehicle
information to the app such as, but not
limited to: Fuel level, fuel economy, fuel
consumption, engine speed, rain
sensor, odometer, VIN, external
temperature, gear position, tire
pressure, and head lamp status.
• To allow your vehicle to provide driving
characteristic information such as, but
not limited to: MyKey, seat belt status,
engine revolutions per minute, gear
position, braking events, steering wheel
angle, and accelerator pedal position.
• To allow your vehicle to provide
location information, including: GPS
and speed.
• To allow the app to send push
notifications using the vehicle display
and voice capabilities while running in
a background state. Push notifications
may be particularly useful for news or
location based apps.
Note: You only need to grant permissions
the first time you use an app with SYNC.
Note: Ford is not responsible or liable for
any damages or loss of privacy relating to
usage of an app, or dissemination of any
vehicle data that you approve Ford to
provide to an app. Enabling SYNC Mobile Apps
In order to enable mobile apps, SYNC
requires user consent to send and receive
app authorization information and updates
using the data plan associated with the
connected device.
Data is sent to Ford in the United States
through the connected device. The
information is encrypted and includes your
VIN, SYNC module number, anonymous
usage statistics and debugging
information. Updates may take place.
Note:
You must enable mobile apps for
each connected device the first time you
select a mobile app using the system.
Note: Standard data rates apply. Ford is
not responsible for any additional charges
you may receive from your service provider,
when your vehicle sends or receives data
through the connected device. This includes
any additional charges incurred due to
driving in areas when roaming out of a home
network.
USING SYNC™ WITH YOUR
MEDIA PLAYER
SYNC supports digital media sources
including: iPod, Bluetooth devices, and
most USB drives. SYNC also supports
audio formats, such as MP3, WMA, WAV
and ACC.
Media Sources
The AUX or MEDIA button allows you to
view and select available media sources.
Press the
AUX or MEDIA button to view
your sources. Use the directional arrows
and OK button to select your source. You
can also use the steering wheel audio
controls.
491
Super Duty (TFE), enUSA, Edition date: 201909, Third-Printing- SYNC™
(If Equipped)
Page 516 of 631
Troubleshooting Tips
Action
Cause
Message
No action required. This
message should disappear
shortly.
Radio requires more than two
seconds to produce audio for
the selected channel.
Acquiring Signal
If this message does not clear
shortly, or with an ignition key
cycle, your receiver may have
a fault. See an authorized
dealer for service.
There is an internal module or
system failure present.
Satellite antenna fault
SIRIUS system failure
Tune to another channel or
choose another preset.
The channel is no longer avail-
able.
Invalid Channel
Contact SiriusXM at 1-888-
539-7474 to subscribe to the
channel, or tune to another
channel.
Your subscription does not
include this channel.
Unsubscribed Channel
The signal is blocked. When
you move into an open area,
the signal should return.
The signal is lost from the Siri-
usXM satellite or SiriusXM
tower to your vehicle antenna.
Satellite acquiring
signal\b
No action required. The
process may take up to three
minutes.
Update of channel program-
ming in progress.
Updating\b
Contact SiriusXM at 1-888-
539-7474 to resolve subscrip-
tion issues.
Your satellite service is no
longer available.
Questions? Call 1-
888-539-7474
Use the channel guide or the
Sirius XM Settings tile to turn
off the Lock or Skip function on
that station.
All the channels in the selected
category are either skipped or
locked.
None found. Check
channel guide.
No action required.
SiriusXM has updated the
channels available for your
vehicle.
SIRIUS Subscription
updated
HD Radio ™ Information (If
Available)
To activate HD radio, please see the Radio
Settings in the Settings Chapter. See
Settings (page 531). Note:
HD Radio broadcasts are not
available in all markets.
513
Super Duty (TFE), enUSA, Edition date: 201909, Third-Printing- SYNC™ 3
(If Equipped)
Page 525 of 631
Check the compatibility of your device on
the regional website.
Pairing Your Cell Phone for the
First Time
Go to the settings menu on your cell phone
and switch Bluetooth on.
Select the phone option on the
feature bar.
1. Select Add Phone.
Note: A prompt alerts you to search for your
vehicle on your cell phone.
2. Select your vehicle on your cell phone.
Note: A number appears on your cell phone
and on the touchscreen.
3. Confirm that the number on your cell phone matches the number on the
touchscreen.
Note: The touchscreen indicates that you
have successfully paired your cell phone.
4. Download the phonebook from your cell phone when you are prompted.
Note: If you pair more than one cell phone,
use the phone settings to specify the
primary phone. You can change this setting
at any time.
Using Your Cell Phone
Recent Call List
Display and select an entry from a list of
previous calls.
Contacts
Display a smart search form to look up your
contacts. Use the List button to
alphabetically sort your contacts. Change Phone
Display the list of paired or connected
devices that you can select.
Phone Settings
Change ring tones, alerts or pair another
phone.
Do Not Disturb
Reject incoming calls and switch ring tones
and alerts off.
Phone Keypad
Directly dial a number.
Mute
Mute the microphone when in a call or
voice recognition session.
Text Messaging
Setting Text Message Notification
iOS
1. Go to the settings menu on your cell
phone.
2. Select Bluetooth.
3. Select the information icon to the right
of your vehicle.
4. Switch text message notification on.
Android
1. Go to the settings menu on your cell phone.
2. Select Bluetooth.
3. Select the profiles option.
4. Select the phone profile.
5. Switch text message notification on.
522
Super Duty (TFE), enUSA, Edition date: 201909, Third-Printing- SYNC™ 3
(If Equipped)
Page 527 of 631
Setting a Destination
Destination Entry Menu
Description
Item
Enter a destination address.
Search
Display and select from a list of previous destinations.
Previous Destinations
Set your saved home address as your destination
Home
Set your saved place of work as your destination.
Work
Display and select from a list of favorite destinations.
Favorites
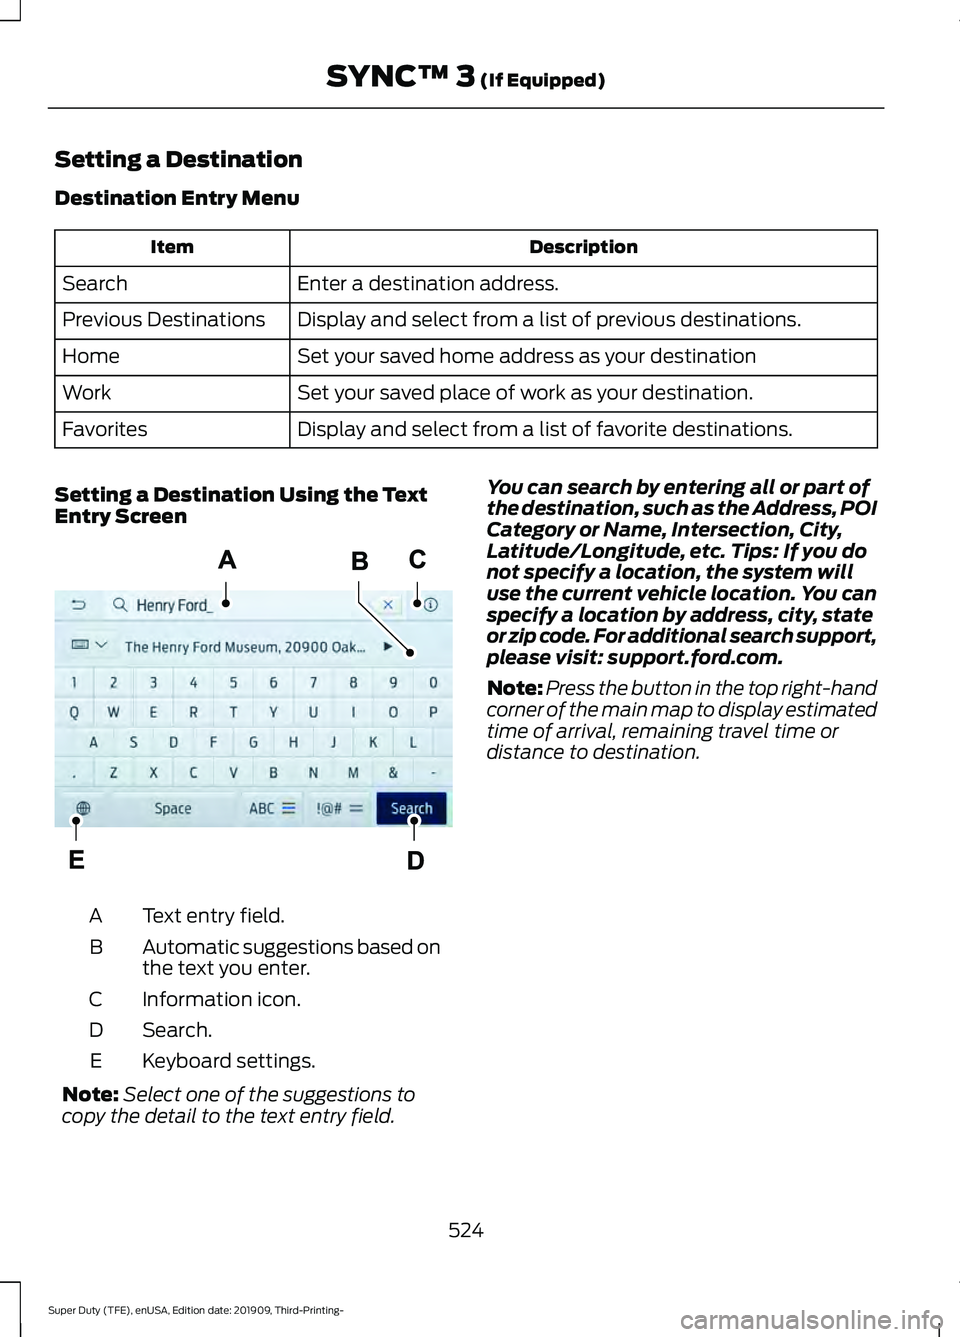
Setting a Destination Using the Text
Entry Screen Text entry field.
A
Automatic suggestions based on
the text you enter.
B
Information icon.
C
Search.
D
Keyboard settings.
E
Note: Select one of the suggestions to
copy the detail to the text entry field. You can search by entering all or part of
the destination, such as the Address, POI
Category or Name, Intersection, City,
Latitude/Longitude, etc. Tips: If you do
not specify a location, the system will
use the current vehicle location. You can
specify a location by address, city, state
or zip code. For additional search support,
please visit: support.ford.com.
Note:
Press the button in the top right-hand
corner of the main map to display estimated
time of arrival, remaining travel time or
distance to destination.
524
Super Duty (TFE), enUSA, Edition date: 201909, Third-Printing- SYNC™ 3 (If Equipped)E297558