climate control FORD F-450 2021 User Guide
[x] Cancel search | Manufacturer: FORD, Model Year: 2021, Model line: F-450, Model: FORD F-450 2021Pages: 666, PDF Size: 11.3 MB
Page 151 of 666
SWITCHING THE HEATED
REAR WINDOW ON AND OFF (IF
EQUIPPED)
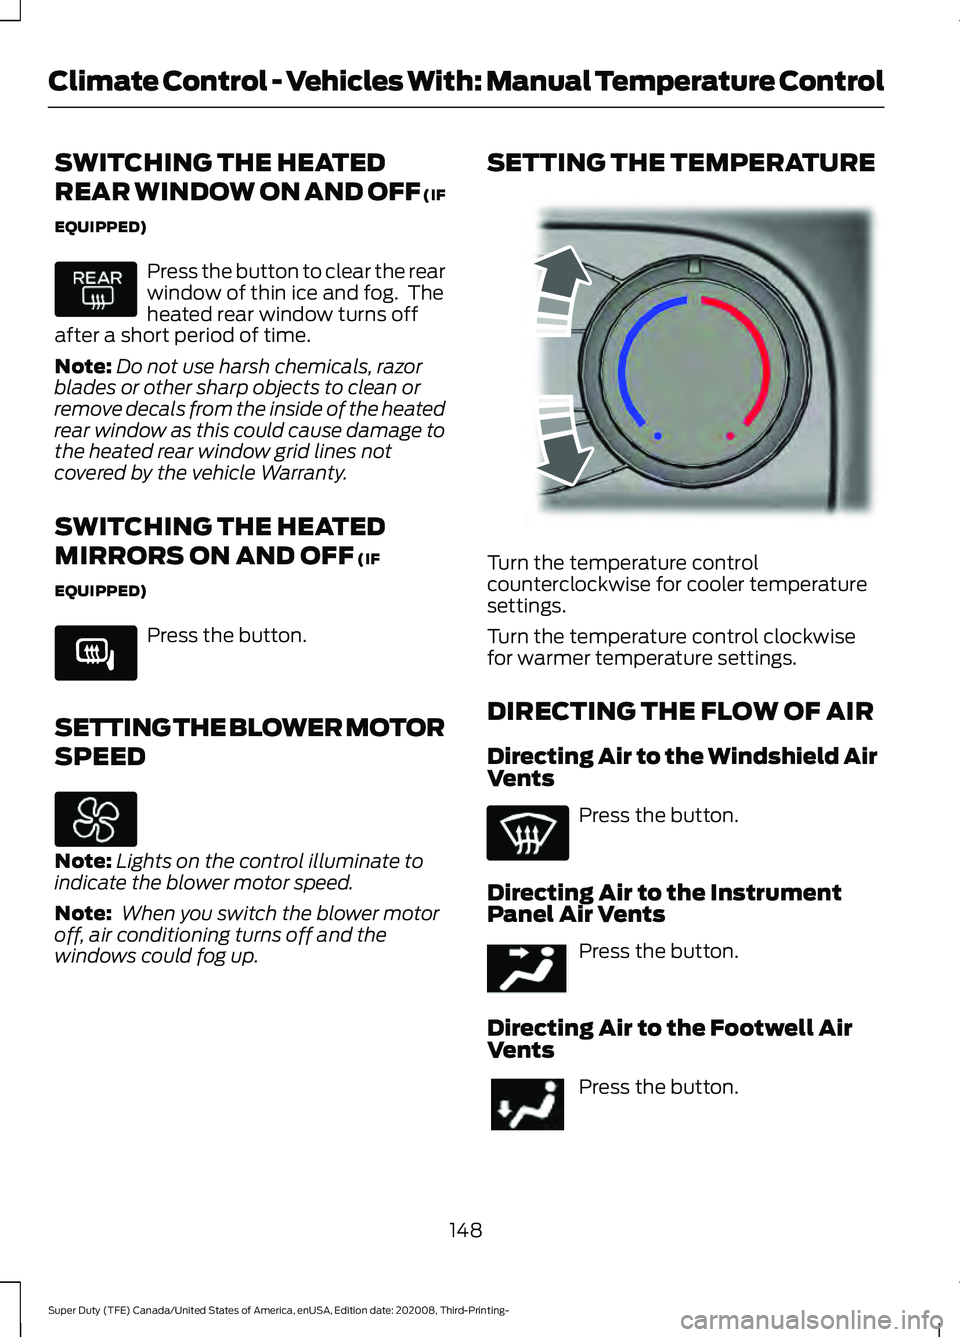
Press the button to clear the rear
window of thin ice and fog. The
heated rear window turns off
after a short period of time.
Note: Do not use harsh chemicals, razor
blades or other sharp objects to clean or
remove decals from the inside of the heated
rear window as this could cause damage to
the heated rear window grid lines not
covered by the vehicle Warranty.
SWITCHING THE HEATED
MIRRORS ON AND OFF (IF
EQUIPPED) Press the button.
SETTING THE BLOWER MOTOR
SPEED Note:
Lights on the control illuminate to
indicate the blower motor speed.
Note: When you switch the blower motor
off, air conditioning turns off and the
windows could fog up. SETTING THE TEMPERATURE
Turn the temperature control
counterclockwise for cooler temperature
settings.
Turn the temperature control clockwise
for warmer temperature settings.
DIRECTING THE FLOW OF AIR
Directing Air to the Windshield Air
Vents
Press the button.
Directing Air to the Instrument
Panel Air Vents Press the button.
Directing Air to the Footwell Air
Vents Press the button.
148
Super Duty (TFE) Canada/United States of America, enUSA, Edition date: 202008, Third-Printing- Climate Control - Vehicles With: Manual Temperature Control E266189 E244106 E244097
Page 152 of 666
CLIMATE CONTROL –
TROUBLESHOOTING
Climate Control – Frequently
Asked Questions
Why is the volume of air to the rear
passenger compartment limited?
Objects may obstruct the air direction
to the rear passenger compartment.
Make sure objects have not been
placed under the front seats.
Why is the volume of air from the air
vents reduced? The air intake area at the base of the
windshield could be obstructed. Make
sure the air intake area is free from any
snow, ice or leaves.
What are the recommended settings
for heating the interior? A medium blower motor speed
selected and the air directed to the
footwell and windshield air vents.
How can I quickly heat the interior? Select the highest blower motor
speed, highest temperature and direct
the air to the footwell air vents.
What are the recommended settings
for cooling the interior? Air conditioning on, a medium blower
motor speed selected and air directed
to the footwell and windshield air
vents.
How can I quickly cool the interior? Switch maximum cooling on, switch
recirculated air on and drive with the
windows open until you feel cold air
through the air vents. How can I reduce the humidity build-up
inside my vehicle?
Do not drive with the system off or
with recirculated air on.
How can I defog the side windows? Switch maximum defrost on.
How can I defog or clear the windshield
of thin ice? Switch maximum defrost on.
Why do I feel air from the footwell air
vents regardless of the air
distribution? This is normal operation. You may feel
a small amount of air from the
footwell air vents regardless of the air
distribution.
149
Super Duty (TFE) Canada/United States of America, enUSA, Edition date: 202008, Third-Printing- Climate Control - Vehicles With: Manual Temperature Control
Page 153 of 666
WHAT IS THE CABIN AIR
FILTER
The cabin air filter improves the quality of
air in your vehicle by trapping dust, pollen
and other particles.
LOCATING THE CABIN AIR
FILTER
You can locate the cabin air filter behind
the glove box.
REPLACING THE CABIN AIR
FILTER
Replace the filter at regular intervals. See
Scheduled Maintenance (page 565).
Note: Make sure you have a cabin air filter
installed at all times. This prevents foreign
objects from entering the system. Running
the system without a filter in place could
result in degradation or damage to the
system.
Note: Using an aftermarket cabin air filter
could reduce cabin air filtration and climate
control performance.
150
Super Duty (TFE) Canada/United States of America, enUSA, Edition date: 202008, Third-Printing- Interior Air Quality
Page 180 of 666
Cold Weather Starting (Flexible
Fuel Vehicles Only)
The starting characteristics of all grades
of E85 ethanol make it unsuitable for use
when ambient temperatures fall below
0°F (-18°C). Consult your fuel distributor
for the availability of winter grade ethanol.
As the outside temperature approaches
freezing, ethanol fuel distributors should
supply winter grade ethanol, the same as
with unleaded gasoline.
If summer grade ethanol is used in cold
weather conditions, 0°F (-18°C), you may
experience increased cranking times, rough
idle or hesitation until the engine has
warmed up.
You may experience a decrease in
performance when the engine is cold when
operating on E85 ethanol.
Do not use starting fluid such as ether in
the air intake system. Such fluid could
cause immediate explosive damage to the
engine and possible personal injury.
If you should experience cold weather
starting problems on E85 ethanol, and
neither an alternative brand of E85 ethanol
nor an engine block heater is available, the
addition of unleaded gasoline to your tank
improves cold starting performance. Your
vehicle is designed to operate on E85
ethanol alone, unleaded gasoline alone, or
any mixture of the two.
If the Engine Fails to Start Using the
Preceding Instructions (Flexible Fuel
Vehicles Only)
1. Press the accelerator pedal down one-third to one-half of its travel, and
then crank the engine.
2. When the engine starts, release the key, then gradually release the
accelerator pedal as the engine speed
increases. If the engine still does not
start, repeat Step 1. Guarding Against Exhaust Fumes WARNING:
Exhaust leaks may
result in entry of harmful and potentially
lethal fumes into the passenger
compartment. If you smell exhaust
fumes inside your vehicle, have your
vehicle inspected immediately. Do not
drive if you smell exhaust fumes.
Important Ventilating Information
If you stop your vehicle and then leave the
engine idling for long periods of time, we
recommend that you do one of the
following:
• Open the windows at least
1 in
(2.5 cm).
• Set your climate control to outside air.
STARTING A DIESEL ENGINE -
6.7L DIESEL
Read all starting instructions carefully
before you start your vehicle.
For temperatures below
32°F (0°C), the
use of the correct grade engine oil is
essential for proper operation. Refer to
engine oil specifications for more
information. See
Engine Oil Capacity
and Specification (page 449).
Your vehicle may have a cold weather
starting strategy that prevents severe
engine damage by assisting in engine
lubrication warm-up. In extremely cold
ambient temperatures, this strategy
activates and prevents the accelerator
pedal from being used for 30 seconds after
you start your vehicle. A message appears
in the information display as your vehicle
warms up. By not allowing the accelerator
pedal to be used, the engine oil is allowed
to properly lubricate the bearings
177
Super Duty (TFE) Canada/United States of America, enUSA, Edition date: 202008, Third-Printing- Starting and Stopping the Engine
Page 186 of 666
Note:
The heater is most effective when
outdoor temperatures are below 0°F
(-18°C).
For cold climates that are below
0°F
(-18°C) needing a temporary battery
installation. Order the cold climate pack.
The heater acts as a starting aid by
warming the engine coolant. This allows
the climate control system to respond
quickly. The equipment includes a heater
element (installed in the engine block) and
a wire harness. You can connect the
system to a grounded 120-volt AC
electrical source. We recommend that you do the following
for a safe and correct operation:
•
Make sure your vehicle is parked in a
clean area, clear of combustibles.
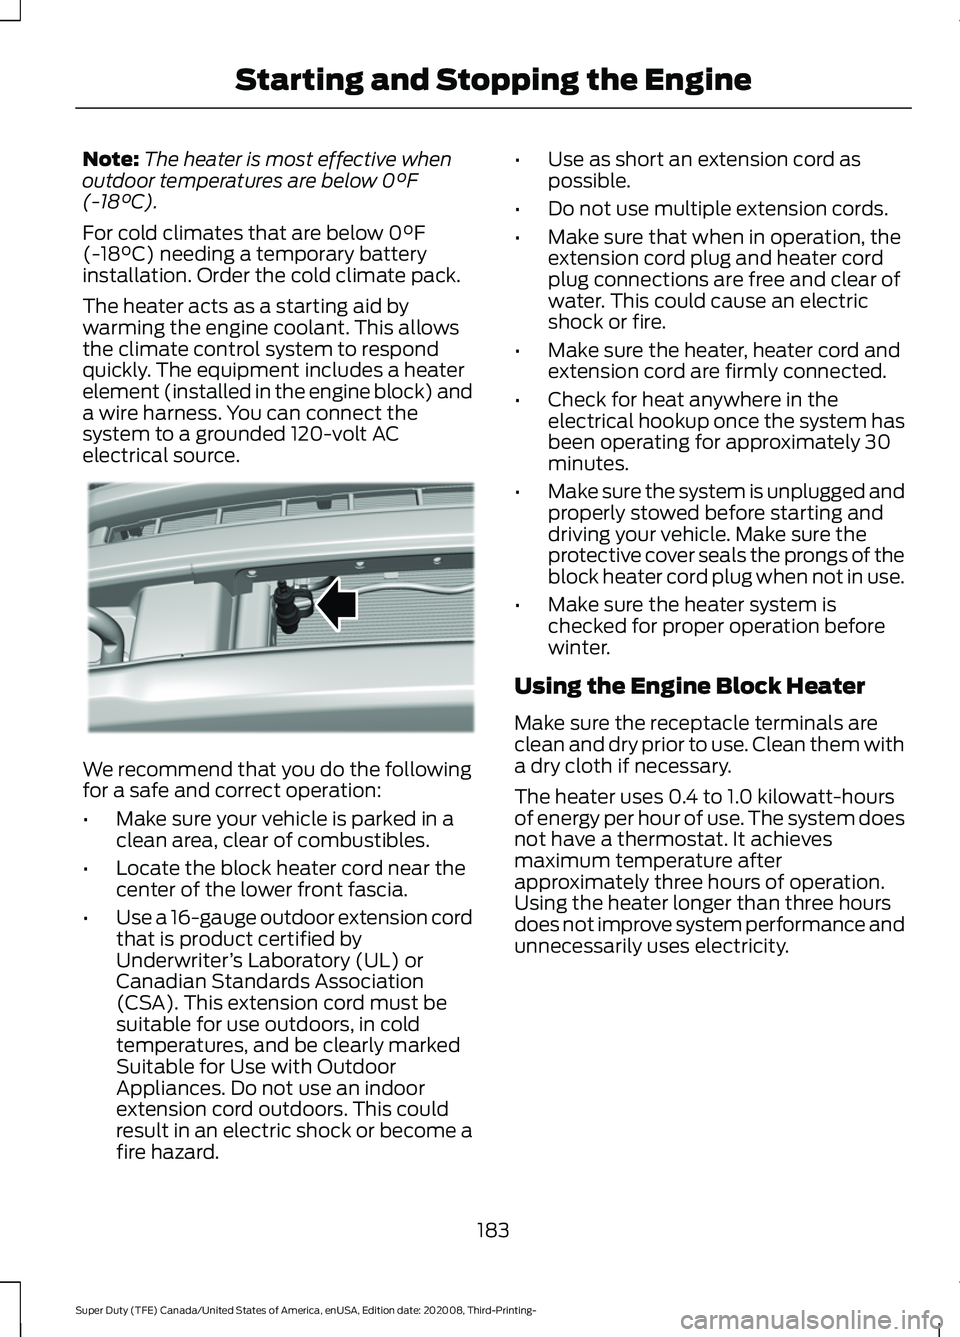
• Locate the block heater cord near the
center of the lower front fascia.
• Use a 16-gauge outdoor extension cord
that is product certified by
Underwriter ’s Laboratory (UL) or
Canadian Standards Association
(CSA). This extension cord must be
suitable for use outdoors, in cold
temperatures, and be clearly marked
Suitable for Use with Outdoor
Appliances. Do not use an indoor
extension cord outdoors. This could
result in an electric shock or become a
fire hazard. •
Use as short an extension cord as
possible.
• Do not use multiple extension cords.
• Make sure that when in operation, the
extension cord plug and heater cord
plug connections are free and clear of
water. This could cause an electric
shock or fire.
• Make sure the heater, heater cord and
extension cord are firmly connected.
• Check for heat anywhere in the
electrical hookup once the system has
been operating for approximately 30
minutes.
• Make sure the system is unplugged and
properly stowed before starting and
driving your vehicle. Make sure the
protective cover seals the prongs of the
block heater cord plug when not in use.
• Make sure the heater system is
checked for proper operation before
winter.
Using the Engine Block Heater
Make sure the receptacle terminals are
clean and dry prior to use. Clean them with
a dry cloth if necessary.
The heater uses 0.4 to 1.0 kilowatt-hours
of energy per hour of use. The system does
not have a thermostat. It achieves
maximum temperature after
approximately three hours of operation.
Using the heater longer than three hours
does not improve system performance and
unnecessarily uses electricity.
183
Super Duty (TFE) Canada/United States of America, enUSA, Edition date: 202008, Third-Printing- Starting and Stopping the EngineE308417
Page 202 of 666
Only use diesel exhaust fluid that is
certified by the American Petroleum
Institute (API). Non-certified diesel exhaust
fluid use can cause damage not covered
by the vehicle Warranty.
Note:
Do not put diesel exhaust fluid in the
fuel tank. This can cause damage not
covered by the vehicle Warranty.
You can purchase diesel exhaust fluid at
an authorized dealer, most highway truck
stops or you can contact roadside
assistance for help in finding a retailer that
sells diesel exhaust fluid. In addition, there
is a government website to help you find
the nearest location to purchase diesel
exhaust fluid:
http://www.discoverdef.com.
Filling the Diesel Exhaust Fluid Tank
Using a Fuel Station Pump
Filling the diesel exhaust fluid tank using
a nozzle is similar to fuel fill. The nozzle
shuts off automatically when the tank is
full. Do not continue to fill the tank as this
could cause spilling or overflow, potentially
damaging the tank.
Filling the Diesel Exhaust Fluid Tank
Using a Container
The following procedure applies to
Motorcraft diesel exhaust fluid or similar
fluid containers. Always follow the
manufacturer's instructions.
1. Remove the diesel exhaust fluid container cap. Place the spout on to
the container and tighten it until you
feel a strong resistance.
2. Remove the diesel exhaust fluid tank filler cap.
3. Insert the spout in to the filler neck until
the seal on the spout seats on to the
filler neck. Pour the fluid in to the tank.
When the tank is full the fluid stops
flowing automatically. 4. Return the container to the vertical
position slightly below the diesel
exhaust fluid filler neck. Allow any fluid
remaining in the spout to drain back in
to the container.
5. Remove the spout from the diesel exhaust fluid filler neck. Replace the
diesel exhaust fluid tank cap.
6. Remove the spout from the diesel exhaust fluid container and replace the
cap.
Note: If there is diesel exhaust fluid left in
the container retain it for later use. The
spout is re-useable. Wash the spout with
clean water prior to storage. Do not use the
diesel exhaust fluid spout with any other
fluid.
Filling the Diesel Exhaust Fluid Tank in
Cold Climates
Diesel exhaust fluid may freeze if the
ambient temperature is below 12°F (-11°C).
Your vehicle has a preheating system
which allows diesel exhaust fluid to
operate below 12°F (-11°C). If you do not
use your vehicle for an extended period
when the ambient temperature is below
12°F (-11°C)
, the fluid in the tank may
freeze. If the tank is overfilled and the fluid
freezes it may damage the tank. This is not
covered by the vehicle warranty.
Diesel Exhaust Fluid Warning
Messages and Vehicle Operations WARNING:
Diesel exhaust fluid
must be refilled when low or replaced
when contaminated or your vehicle
speed becomes limited to
50 mph
(80 km/h). In these conditions, drive with
caution and refill diesel exhaust fluid
immediately. If the diesel exhaust fluid
becomes empty or contaminated and
fluid is not replaced, your vehicle
199
Super Duty (TFE) Canada/United States of America, enUSA, Edition date: 202008, Third-Printing- Engine Emission Control
Page 317 of 666
•
Allow more distance for stopping with
a trailer attached. Anticipate stops and
brake gradually.
• Avoid parking on a grade. However, if
you must park on a grade:
1. Turn the steering wheel to point your vehicle tires away from traffic flow.
2. Set your vehicle parking brake.
3. Place the transmission in park (P).
4. Place wheel chocks in front and back of the trailer wheels. (Chocks not
included with vehicle.)
Your vehicle may be equipped with a
temporary or conventional spare tire. A
"temporary" spare tire is different in size
(diameter or width), tread-type
(All-Season or All Terrain) or is from a
different manufacturer than the road tires
on your vehicle. Consult information on the
tire label or Safety Compliance label for
limitations when using.
Launching or Retrieving a Boat or
Personal Watercraft (PWC)
Note: Disconnect the wiring to the trailer
before backing the trailer into the water.
Note: Reconnect the wiring to the trailer
after
you remove the trailer from the water.
When backing down a ramp during boat
launching or retrieval:
• Do not allow the static water level to
rise above the bottom edge of the rear
bumper.
• Do not allow waves to break higher
than
6 in (15 cm) above the bottom
edge of the rear bumper.
Exceeding these limits may allow water to
enter vehicle components:
• Causing internal damage to the
components.
• Affecting driveability, emissions, and
reliability. Replace the rear axle lubricant anytime
the rear axle has been submerged in water.
Water may have contaminated the rear
axle lubricant, which is not normally
checked or changed unless a leak is
suspected or other axle repair is required.
TOWING THE VEHICLE ON
FOUR WHEELS
WARNING:
If your vehicle has a
steering wheel lock make sure the
ignition is in the accessory or on position
when being towed.
Emergency Towing
If your vehicle becomes inoperable
(without access to wheel dollies,
car-hauling trailer, or flatbed transport
vehicle), it can be flat-towed (all wheels
on the ground, regardless of the powertrain
and transmission configuration) under the
following conditions:
• Your vehicle is facing forward for
towing in a forward direction.
• Place the transmission in neutral (N).
If you cannot move the transmission
into neutral (N), you may need to
override it. See
Transmission (page
207).
• Maximum speed is 35 mph (56 km/h).
• Maximum distance is
50 mi (80 km).
Recreational Towing
Note: Put your climate control system in
recirculated air mode to prevent exhaust
fumes from entering your vehicle.
See
Climate Control (page 143).
314
Super Duty (TFE) Canada/United States of America, enUSA, Edition date: 202008, Third-Printing- Towing
Page 347 of 666
Protected Component
Fuse
Rating
Fuse
Number
Power lumbar motor.
Wireless charging module.
Not used (spare).
20 A
4
Not used.
—
5
Power telescoping mirrors switch.
10 A
6
Front power windows switch.
Brake on-off switch.
10 A
7
Embedded modem.
5 A
8
Combined sensor module.
5 A
9
Not used.
—
10
Not used.
—
11
On-board diagnostic module.
7.5 A
12
Smart data link connector.
Climate control module.
Steering column control module.
7.5 A
13
Instrument cluster.
Not used.
15 A
14
SYNC.
15 A
15
Display.
Not used.
—
16
Active front steering module.
7.5 A
17
Park aid module.
Selectable drive modes switch.
7.5 A
18
Select shift switch.
Head up display.
5 A
19
Ignition switch.
5 A
20
Key inhibit solenoid.
Head up display.
5 A
21
In-vehicle temperature and humidity sensor.
Upfitter switches.
5 A
22
344
Super Duty (TFE) Canada/United States of America, enUSA, Edition date: 202008, Third-Printing- Fuses
Page 383 of 666
4. Press the brake pedal and start your
vehicle.
5. Run the engine until it reaches normal operating temperature. While the
engine is warming up, complete the
following: Reset the clock. Reset the
power windows bounce-back feature.
See Windows and Mirrors (page 95).
Reset the radio station presets. See
Audio System
(page 488).
6. Allow the engine to idle for at least one
minute.
7. Drive the vehicle at least 10 mi (16 km)
to completely relearn the idle trim and
fuel trim strategy.
Note: If you do not allow the engine to
relearn the idle and fuel trim strategy, the
idle quality of your vehicle may be adversely
affected until the engine computer
eventually relearns the idle trim and fuel
trim strategy.
Note: For flexible fuel vehicles, if you are
operating on E85, you may experience poor
starts or an inability to start the engine and
driveability problems until the fuel trim and
ethanol content have been relearned.
Make sure that you dispose of old batteries
in an environmentally friendly way. Seek
advice from your local authority about
recycling old batteries.
If storing your vehicle for more than 30
days without recharging the battery, we
recommend that you disconnect the
negative battery cable to maintain battery
charge for quick starting.
Battery Management System
(If
Equipped)
The battery management system monitors
battery conditions and takes actions to
extend battery life. If excessive battery
drain is detected, the system temporarily
disables some electrical systems to
protect the battery. Systems included are:
•
Heated rear window.
• Heated seats.
• Climate control.
• Heated steering wheel.
• Audio unit.
• Navigation system.
A message may appear in the information
displays to alert you that battery
protection actions are active. These
messages are only for notification that an
action is taking place, and not intended to
indicate an electrical problem or that the
battery requires replacement.
After battery replacement, or in some
cases after charging the battery with an
external charger, the battery management
system requires eight hours of vehicle sleep
time to relearn the battery state of charge.
During this time your vehicle must remain
fully locked with the ignition switched off.
Note: Prior to relearning the battery state
of charge, the battery management system
may temporarily disable some electrical
systems.
Electrical Accessory Installation
To make sure the battery management
system works correctly, do not connect an
electrical device ground connection
directly to the battery negative post. This
can cause inaccurate measurements of
the battery condition and potential
incorrect system operation.
Note: If you add electrical accessories or
components to the vehicle, it may adversely
affect battery performance and durability.
This may also affect the performance of
other electrical systems in the vehicle.
380
Super Duty (TFE) Canada/United States of America, enUSA, Edition date: 202008, Third-Printing- Maintenance
Page 403 of 666
Engine
•
Change the engine oil and filter prior to
storage because used engine oil
contains contaminates which may
cause engine damage.
• Start the engine every 15 days for a
minimum of 15 minutes. Run at fast
idle with the climate controls set to
defrost until the engine reaches normal
operating temperature.
• With your foot on the brake, shift
through all the gears while the engine
is running.
• We recommend that you change the
engine oil before you use your vehicle
again.
Fuel system
• Fill the fuel tank with high-quality fuel
until the first automatic shutoff of the
fuel pump nozzle.
Cooling system
• Protect against freezing temperatures.
• When removing your vehicle from
storage, check coolant fluid level.
Confirm that there are no cooling
system leaks and that fluid is at the
recommended level.
Disconnecting Your 12 Volt Battery
• Check and recharge as necessary. Keep
connections clean.
• If storing your vehicle for more than 30
days without recharging the battery,
we recommend that you disconnect
the battery cables to maintain battery
charge for quick starting.
Note: It is necessary to reset memory
features if you disconnect the battery
cables. Brakes
•
Make sure the brakes and parking brake
release fully.
Tires
• Maintain recommended air pressure.
Miscellaneous
• Make sure all linkages, cables, levers
and pins under your vehicle are covered
with grease to prevent rust.
• Move vehicles at least 25 ft (7.5 m)
every 15 days to lubricate working parts
and prevent corrosion.
Removing Vehicle From Storage
When your vehicle is ready to come out of
storage, do the following:
• Wash your vehicle to remove any dirt
or grease film build-up on window
surfaces.
• Check windshield wipers for any
deterioration.
• Check under the hood for any foreign
material that may have collected
during storage such as mice or squirrel
nests.
• Check the exhaust for any foreign
material that may have collected
during storage.
• Check tire pressures and set tire
inflation per the Tire Label.
• Check brake pedal operation. Drive
your vehicle
15 ft (4.5 m) back and
forth to remove rust build-up.
• Check fluid levels (including coolant,
oil and gas) to make sure there are no
leaks, and fluids are at recommended
levels.
• If you remove the battery, clean the
battery cable ends and check for
damage.
400
Super Duty (TFE) Canada/United States of America, enUSA, Edition date: 202008, Third-Printing- Vehicle Care