wiring FORD F-450 2021 Owners Manual
[x] Cancel search | Manufacturer: FORD, Model Year: 2021, Model line: F-450, Model: FORD F-450 2021Pages: 666, PDF Size: 11.3 MB
Page 140 of 666
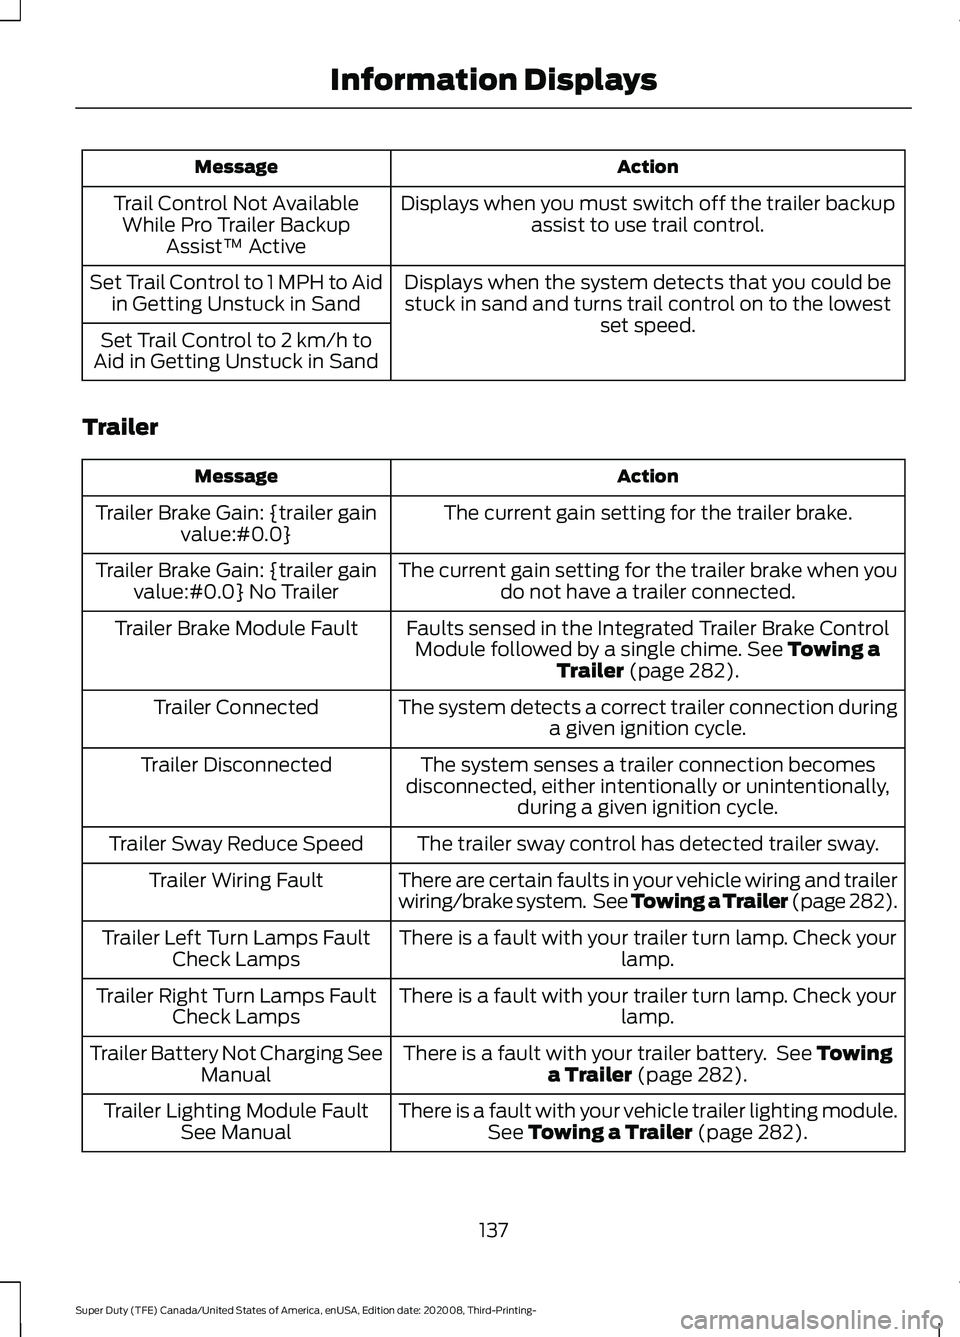
Action
Message
Displays when you must switch off the trailer backupassist to use trail control.
Trail Control Not Available
While Pro Trailer Backup Assist™ Active
Displays when the system detects that you could bestuck in sand and turns trail control on to the lowest set speed.
Set Trail Control to 1 MPH to Aid
in Getting Unstuck in Sand
Set Trail Control to 2 km/h to
Aid in Getting Unstuck in Sand
Trailer Action
Message
The current gain setting for the trailer brake.
Trailer Brake Gain: {trailer gain
value:#0.0}
The current gain setting for the trailer brake when youdo not have a trailer connected.
Trailer Brake Gain: {trailer gain
value:#0.0} No Trailer
Faults sensed in the Integrated Trailer Brake ControlModule followed by a single chime. See Towing a
Trailer (page 282).
Trailer Brake Module Fault
The system detects a correct trailer connection duringa given ignition cycle.
Trailer Connected
The system senses a trailer connection becomes
disconnected, either intentionally or unintentionally, during a given ignition cycle.
Trailer Disconnected
The trailer sway control has detected trailer sway.
Trailer Sway Reduce Speed
There are certain faults in your vehicle wiring and trailer
wiring/brake system. See Towing a Trailer (page 282).
Trailer Wiring Fault
There is a fault with your trailer turn lamp. Check yourlamp.
Trailer Left Turn Lamps Fault
Check Lamps
There is a fault with your trailer turn lamp. Check yourlamp.
Trailer Right Turn Lamps Fault
Check Lamps
There is a fault with your trailer battery. See
Towing
a Trailer (page 282).
Trailer Battery Not Charging See
Manual
There is a fault with your vehicle trailer lighting module.See
Towing a Trailer (page 282).
Trailer Lighting Module Fault
See Manual
137
Super Duty (TFE) Canada/United States of America, enUSA, Edition date: 202008, Third-Printing- Information Displays
Page 287 of 666
This feature helps you to steer your vehicle
when reversing with a trailer by:
•
Using the control knob with Pro Trailer
Backup Assist.
• Using the steering wheel with Trailer
Reverse Guidance.
Each trailer you use with your vehicle has
to be setup once.
You must take care to follow the setup
process accurately to correctly place the
sticker or sensor.
Contact your dealership if you need
assistance setting up your trailer.
Note: Your vehicle saves the trailer
information when you enter it into the
system. You can add a maximum of 10
trailers to the system.
Note: The system is not a substitute for
safe driving practices.
Note: You must always be aware of your
vehicle and trailer combination, and the
surrounding environment.
Note: The system does not detect or
prevent your vehicle or trailer from making
contact with obstacles in the surrounding
environment.
Note: Keep in mind that the front end of
your vehicle swings out when changing the
direction of the trailer. Note:
The system relies on user
measurements to determine sticker
placement or user installation of a sensor
to determine system limits. It is critical to
correctly take the key measurements or
properly install the sensor. Incorrect
measurements or sensor placement can
result in the improper function of the system
up to and including contact between your
vehicle and trailer. Even with correct
measurements and sensor placement, the
system cannot determine if the trailer body
may contact your vehicle. Check the
clearance between your vehicle and trailer,
especially for sharp turns.
Note: The system limits vehicle speed when
backing up. The system is not a replacement
for proper use of the throttle and brake
pedals.
Note: The system does not support backing
up when towing multiple trailers. If you are
towing more than one trailer, you must
disconnect the additional trailers before
using the system.
Positioning Your Vehicle and
Trailer
Hitch your trailer to your vehicle and
connect the electrical wiring harness.
Check to make sure that the wiring is
working. See Essential Towing Checks
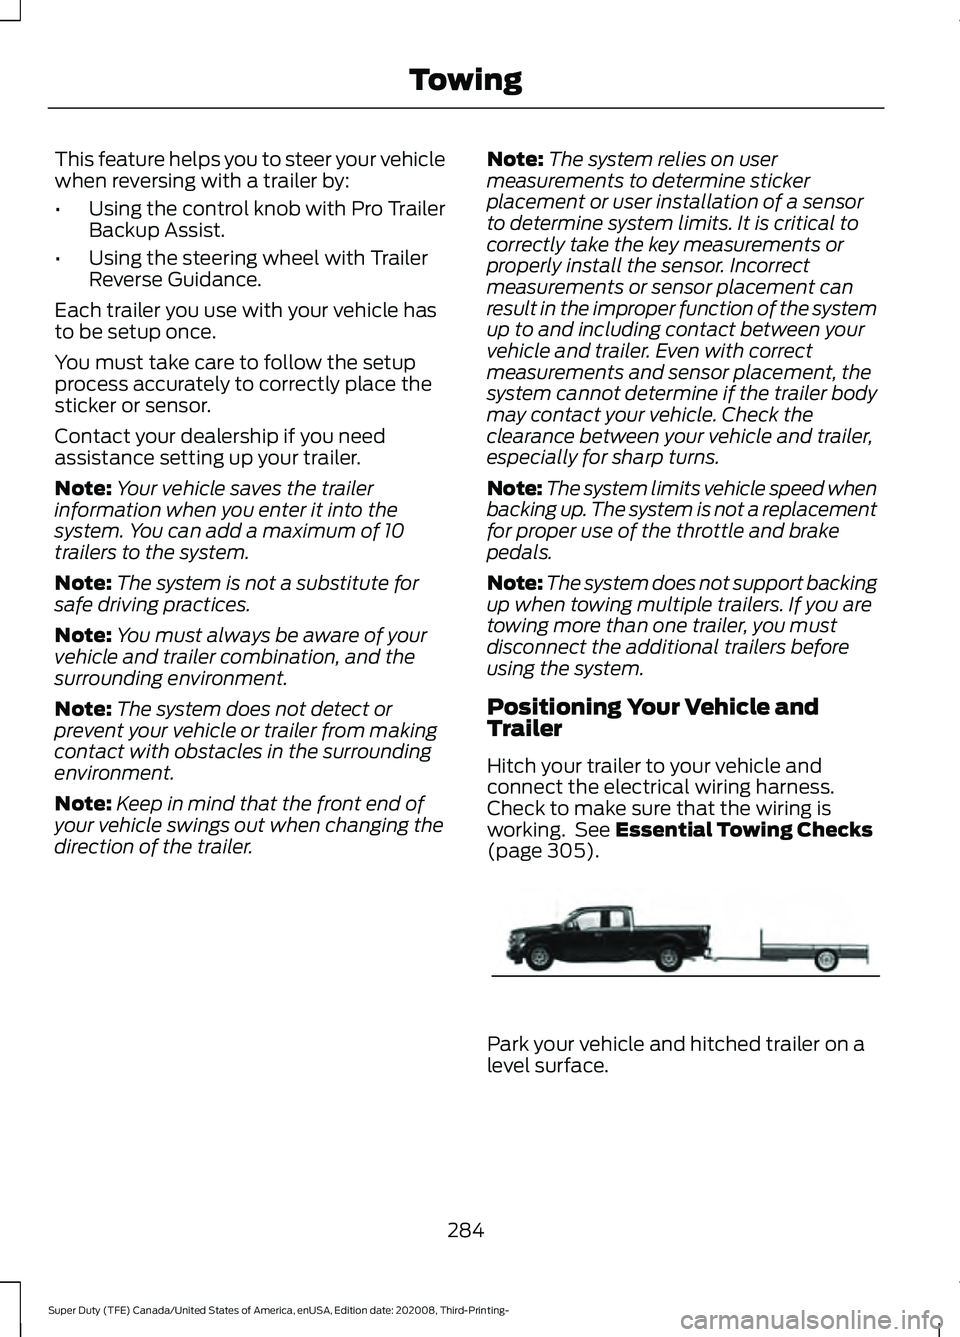
(page 305). Park your vehicle and hitched trailer on a
level surface.
284
Super Duty (TFE) Canada/United States of America, enUSA, Edition date: 202008, Third-Printing- TowingE209759
Page 289 of 666
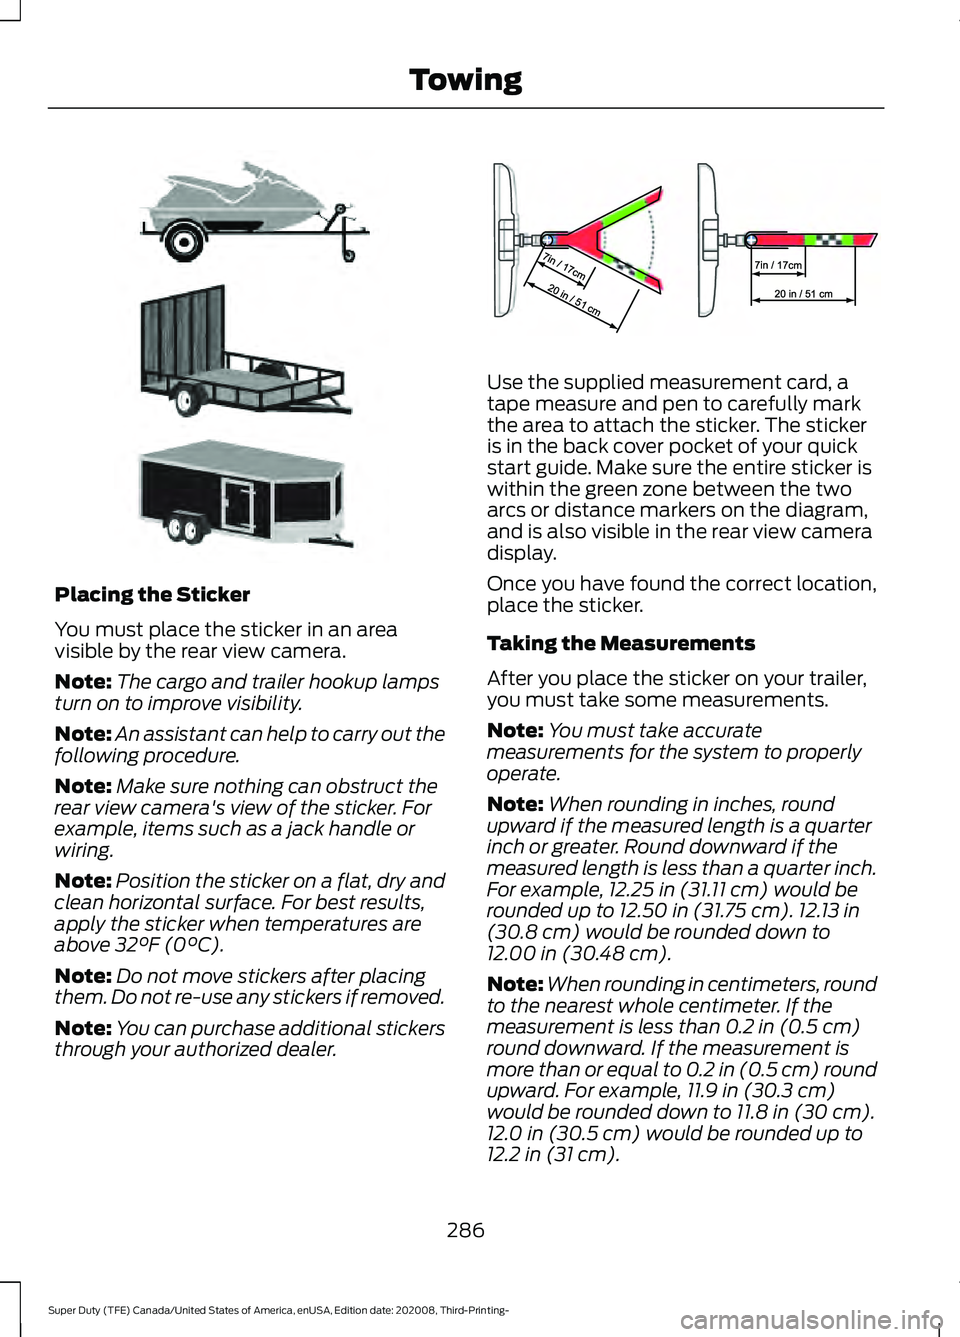
Placing the Sticker
You must place the sticker in an area
visible by the rear view camera.
Note:
The cargo and trailer hookup lamps
turn on to improve visibility.
Note: An assistant can help to carry out the
following procedure.
Note: Make sure nothing can obstruct the
rear view camera's view of the sticker. For
example, items such as a jack handle or
wiring.
Note: Position the sticker on a flat, dry and
clean horizontal surface. For best results,
apply the sticker when temperatures are
above 32°F (0°C).
Note: Do not move stickers after placing
them. Do not re-use any stickers if removed.
Note: You can purchase additional stickers
through your authorized dealer. Use the supplied measurement card, a
tape measure and pen to carefully mark
the area to attach the sticker. The sticker
is in the back cover pocket of your quick
start guide. Make sure the entire sticker is
within the green zone between the two
arcs or distance markers on the diagram,
and is also visible in the rear view camera
display.
Once you have found the correct location,
place the sticker.
Taking the Measurements
After you place the sticker on your trailer,
you must take some measurements.
Note:
You must take accurate
measurements for the system to properly
operate.
Note: When rounding in inches, round
upward if the measured length is a quarter
inch or greater. Round downward if the
measured length is less than a quarter inch.
For example, 12.25 in (31.11 cm)
would be
rounded up to 12.50 in (31.75 cm). 12.13 in
(30.8 cm) would be rounded down to
12.00 in (30.48 cm).
Note: When rounding in centimeters, round
to the nearest whole centimeter. If the
measurement is less than
0.2 in (0.5 cm)
round downward. If the measurement is
more than or equal to 0.2 in (0.5 cm) round
upward. For example, 11.9 in (30.3 cm)
would be rounded down to
11.8 in (30 cm).
12.0 in (30.5 cm) would be rounded up to
12.2 in (31 cm).
286
Super Duty (TFE) Canada/United States of America, enUSA, Edition date: 202008, Third-Printing- TowingE311876 E310619
Page 300 of 666
Troubleshooting - Fifth Wheel and
Gooseneck Trailer
Setup
The system is designed to be used with a
wide variety of trailers. There are some
trailers that do not have a proper surface
and location to mount the sensor. These
trailers are not supported. Attempts to
install the sensor in a manner that does
not meet the requirements can result in
improper system function.
To correctly install the trailer sensor:
•
Attach to vertical surface with the
arrows pointed straight up.
• If you are not sure, use a level to check
that the attachment surface is vertical.
• Securely fasten the sensor so that it is
rigidly mounted and does not shake or
wobble.
• Install within the range of the 12 way
connector so that when the trailer
swings the wire harness does not
stretch, pinch or pull.
If the system displays Pro Trailer Backup
Assist™ Sensor Not Detected Refer to
Owner's Manual Press Knob to Exit or
Trailer Reverse Guidance Sensor Not
Detected Refer to Owner's Manual Press
OK to Exit:
• Check that the 12 way connector is fully
inserted into the 12 way socket. The red
rubber seal is not visible when the
connector is fully inserted.
• Check that the wiring harness sensor
connection is fully inserted at the trailer
sensor.
• Check for damaged wiring between the
12 way connector and the trailer sensor.
• If you have a 12 way connector inside
the bed and in the bumper, ensure that
only a single sensor is connected. Note:
If you did not purchase the fifth wheel
prep pack, you need to replace the 7/4 way
trailer connector in your bumper with a 7/12
pin connector. See your authorized dealer.
Calibration
The calibration process is required for the
system to determine the trailer length. The
system supports trailer lengths of 10– 39 ft
(3– 11.94 m) distance from the hitch point
to the center of the axle or axles. The
calibration process consists of a straight
forward drive followed by a turn. During
the straight drive, the system monitors
various vehicle parameters to make sure
your vehicle is being driven straight and the
trailer is straight behind your vehicle. Any
steering input or trailer movement during
this straight drive pauses the calibration.
During the turn, the system monitors
various vehicle parameters to make sure
your vehicle and trailer are correctly
turning.
For best results:
• Use a smooth and level road when
attempting to calibrate.
• Steer and smoothly turn and avoid
abrupt steering inputs.
• Drive between 2 –16 mph (4– 25 km/h)
.
• Make a typical 90 degree corner turn.
Turning too shallow does not allow the
system to calibrate.
The typical calibration process results in
the system displaying messages in the
information display. The system also
displays additional warnings if the vehicle
or trailer motion is not within the
calibration limits.
297
Super Duty (TFE) Canada/United States of America, enUSA, Edition date: 202008, Third-Printing- Towing
Page 301 of 666
If the system remains on one message for
an extended time, is not progressing
through the typical calibration steps or if
Pro Trailer Backup Assist™ Trailer Not
Detected. Shift to Park Press Knob to Exit,
Pro Trailer Backup Assist™ Trailer Not
Detected. Refer to Owner's Manual. Press
Knob to Exit or Trailer Reverse Guidance
Trailer Not Detected. Refer to Owner's
Manual. Press OK to Exit displays, check
the following:
•
Verify the sensor is correctly installed.
See Fifth Wheel and Gooseneck Trailer
Sensor Installation.
• Verify the trailer length is within the
allowed range of 10– 39 ft (3–11.94 m).
• Verify you are calibrating on a smooth
road surface.
Repeat calibration on a different route if
you have verified the previous checks.
System Operation
The following warnings or difficulties may
occur during system operation. Tips to
resolve them are listed in the following
section.
Pro Trailer Backup Assist™ System is Not
Available or Trailer Reverse Guidance
System is Not Available:
• The system relies on many
sub-systems in your vehicle to correctly
operate. If those sub-systems are not
correctly operating, the system may
not be available.
• Low battery voltage is a condition that
prevents the system from operating.
Please make sure the battery is
correctly charged if the system is not
available.
• If the message continues to display,
see your authorized dealer for service. Pro Trailer Backup Assist™ Driving
Required to Initialize Steering Press Knob
to Exit or Trailer Reverse Guidance Driving
Required to Initialize Steering Press OK to
Exit:
•
The steering system needs to learn
internal parameters to fully enable the
feature. Drive your vehicle straight
forward above 25 mph (40 km/h) for
approximately 5 minutes.
• This may occur when your vehicle is
new, the battery voltage is too low, the
battery has been disconnected or your
steering system has been serviced.
Pro Trailer Backup Assist™ Sensor Not
Detected Refer to Owner's Manual Press
Knob to Exit or Trailer Reverse Guidance
Sensor Not Detected Refer to Owner's
Manual Press OK to Exit:
• Check that the 12 way connector is fully
inserted into the 12 way socket. The red
rubber seal is not visible when the
connector is fully inserted.
• Check that the wiring harness sensor
connection is fully inserted at the trailer
sensor.
• Check for damaged wiring between the
12 way connector and the trailer sensor.
• Only one sensor can be connected to
your vehicle at a time. If you have a 7/12
pin connector in the truck bed and in
the bumper, check to make sure that
only one sensor is connected.
Note: If you did not purchase the fifth wheel
prep pack, you need to replace the 7/4 way
trailer connector in your bumper with a 7/12
pin connector. See your authorized dealer.
Pro Trailer Backup Assist™ Trailer Not
Detected. Refer to Owner's Manual. Press
Knob to Exit or Trailer Reverse Guidance
Trailer Not Detected. Refer to Owner's
Manual. Press OK to Exit:
• If the message continues to display,
see your authorized dealer for service.
298
Super Duty (TFE) Canada/United States of America, enUSA, Edition date: 202008, Third-Printing- Towing
Page 304 of 666
Note:
Exceeding this limitation
may significantly reduce the
performance of your towing
vehicle. Selecting a trailer with a
low aerodynamic drag and rounded
front design helps optimize
performance and fuel economy.
Note: Your vehicle could have
reduced performance when
operating at high altitudes and
when heavily loaded or towing a
trailer. When driving at elevation,
in order to match driving
performance as perceived at sea
level, reduce gross vehicle weight
and gross combination weight by
2% per 1,000 ft (300 m) elevation. Note:
Certain states require
electric trailer brakes for trailers
over a specified weight. Be sure to
check state regulations for this
specified weight. The maximum
trailer weights listed may be limited
to this specified weight, as your
vehicle's electrical system may not
include the wiring connector
needed to use electric trailer
brakes.
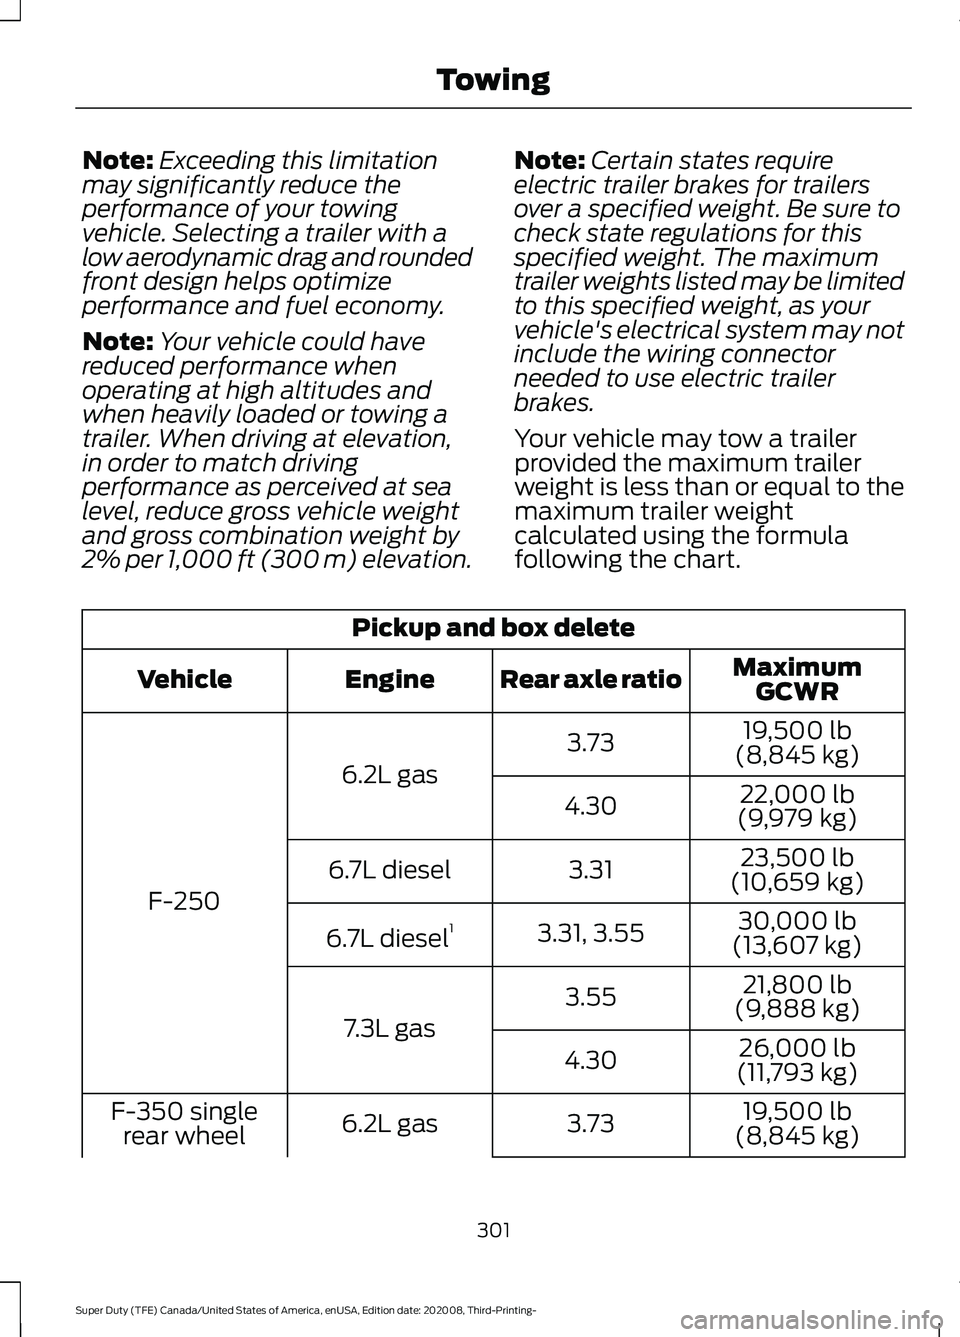
Your vehicle may tow a trailer
provided the maximum trailer
weight is less than or equal to the
maximum trailer weight
calculated using the formula
following the chart. Pickup and box delete
MaximumGCWR
Rear axle ratio
Engine
Vehicle
19,500 lb
(8,845 kg)
3.73
6.2L gas
F-250 22,000 lb
(9,979 kg)
4.30
23,500 lb
(10,659 kg)
3.31
6.7L diesel
30,000 lb
(13,607 kg)
3.31, 3.55
6.7L diesel 1
21,800 lb
(9,888 kg)
3.55
7.3L gas 26,000 lb
(11,793 kg)
4.30
19,500 lb
(8,845 kg)
3.73
6.2L gas
F-350 single
rear wheel
301
Super Duty (TFE) Canada/United States of America, enUSA, Edition date: 202008, Third-Printing- Towing
Page 308 of 666
ESSENTIAL TOWING CHECKS
WARNING: Make sure that the
vertical load on the tow ball is between
the minimum and maximum
recommended weight at all times.
Failure to follow this instruction could
result in the loss of control of your
vehicle, personal injury or death.
Follow these guidelines for safe towing:
• Do not tow a trailer until you drive your
vehicle at least
1,000 mi (1,600 km).
• Consult your local motor vehicle laws
for towing a trailer.
• See the instructions included with
towing accessories for the proper
installation and adjustment
specifications.
• Service your vehicle more frequently if
you tow a trailer. See your scheduled
maintenance information.
See
Scheduled Maintenance (page 565).
• If you use a rental trailer, follow the
instructions the rental agency gives
you.
See
Load Limits in the Load Carrying
chapter for load specification terms found
on the tire label and Safety Compliance
label and instructions on calculating your
vehicle's load.
Vehicles with a diesel engine have an
engine braking feature.
See General
Information (page 223).
Remember to account for the trailer
tongue weight as part of your vehicle load
when calculating the total vehicle weight.
Some vehicles will have the ability to
modify trailer towing features. See
General Information
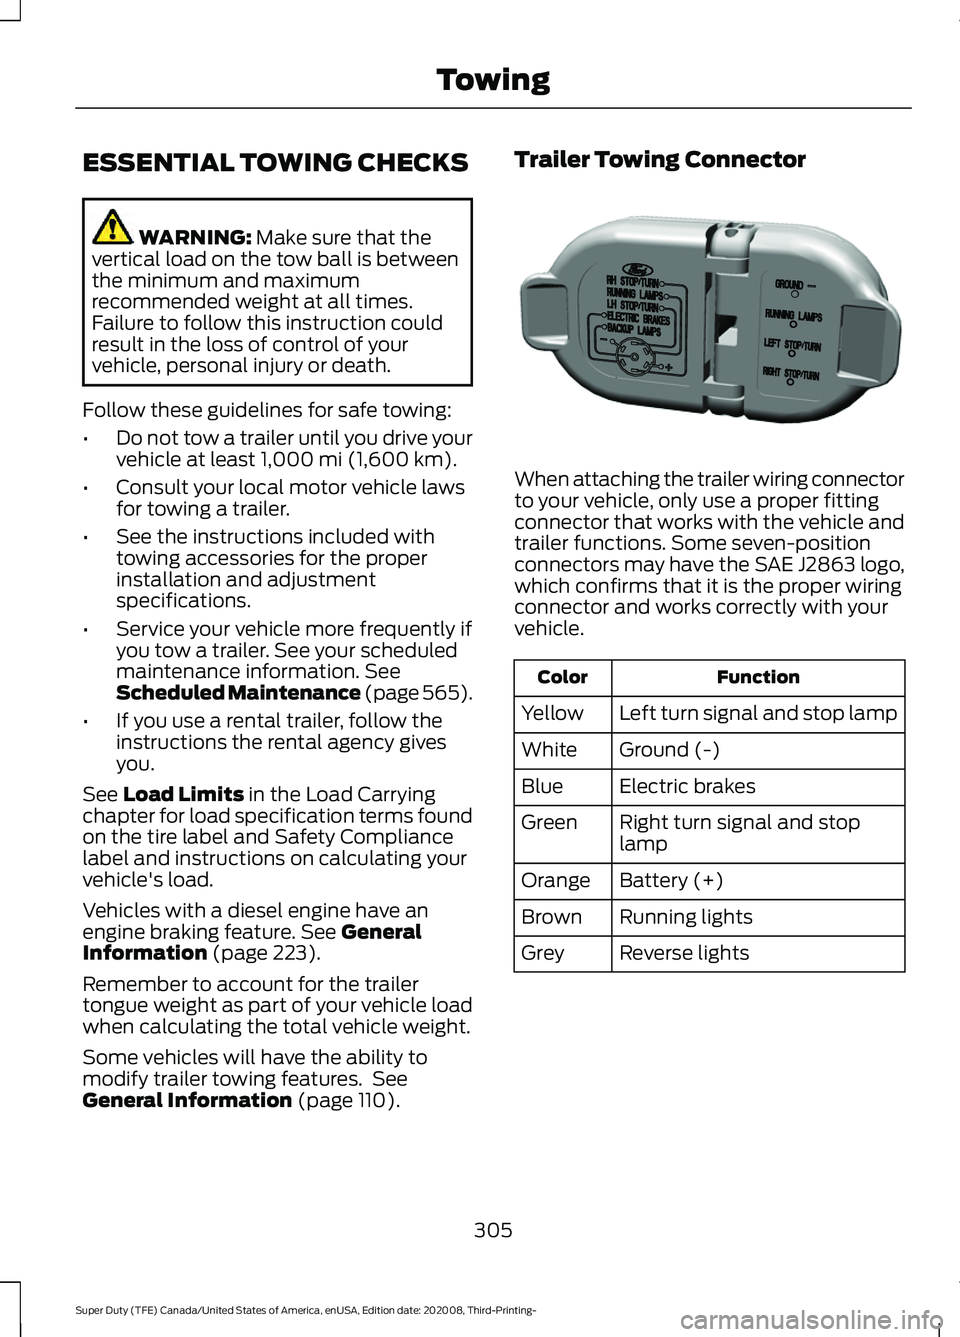
(page 110). Trailer Towing Connector
When attaching the trailer wiring connector
to your vehicle, only use a proper fitting
connector that works with the vehicle and
trailer functions. Some seven-position
connectors may have the SAE J2863 logo,
which confirms that it is the proper wiring
connector and works correctly with your
vehicle.
Function
Color
Left turn signal and stop lamp
Yellow
Ground (-)
White
Electric brakes
Blue
Right turn signal and stop
lamp
Green
Battery (+)
Orange
Running lights
Brown
Reverse lights
Grey
305
Super Duty (TFE) Canada/United States of America, enUSA, Edition date: 202008, Third-Printing- TowingE163167
Page 312 of 666
Fifth-wheel Trailer Hitch (If Equipped)
Note:
For a detailed description of
installation and other information, see the
Owner's Manual-5th Wheel Trailer Hitch.
Note: The mounting pads in the bed are
specifically designed for certain fifth-wheel
trailer hitches and gooseneck ball hitches.
Do not use these mounting pads for other
purposes.
Note: Contact an authorized dealer to
purchase gooseneck and fifth-wheel hitches
that are compatible with your vehicle.
Your vehicle may be equipped with a
fifth-wheel prep package. This package
enables your vehicle to accept certain
fifth-wheel trailer hitches and gooseneck
ball hitches. The fifth-wheel trailer hitch
attaches to the four mounting pads in the
pick-up bed. An optional 7-pin trailer wiring
connector may be in the bed as well. The
gooseneck ball hitch is a separate
mounting pad from the fifth-wheel hitch,
located in the center of the bed.
Shorter pick-up boxes, such as the 6½-foot
box on the F-250 and F-350, provide less
clearance between the cab and the
fifth-wheel and gooseneck trailer
compared to longer box pick-ups, such as
an 8-foot box on the F-250 or F-350. When
selecting a trailer and tow vehicle, it is
critical to check that this combination
provides clearance between the front of
the trailer and tow vehicle for turns up to
90 degrees. Failure to follow this
recommendation could result in the trailer
contacting the cab of the tow vehicle
during tight turns that are typical during
low-speed parking and turning maneuvers.
This contact could result in damage to the
trailer and tow vehicle. Safety Chains
Note:
Do not attach safety chains to the
bumper. Always connect the safety chains
to the frame or hook retainers of your trailer
hitch.
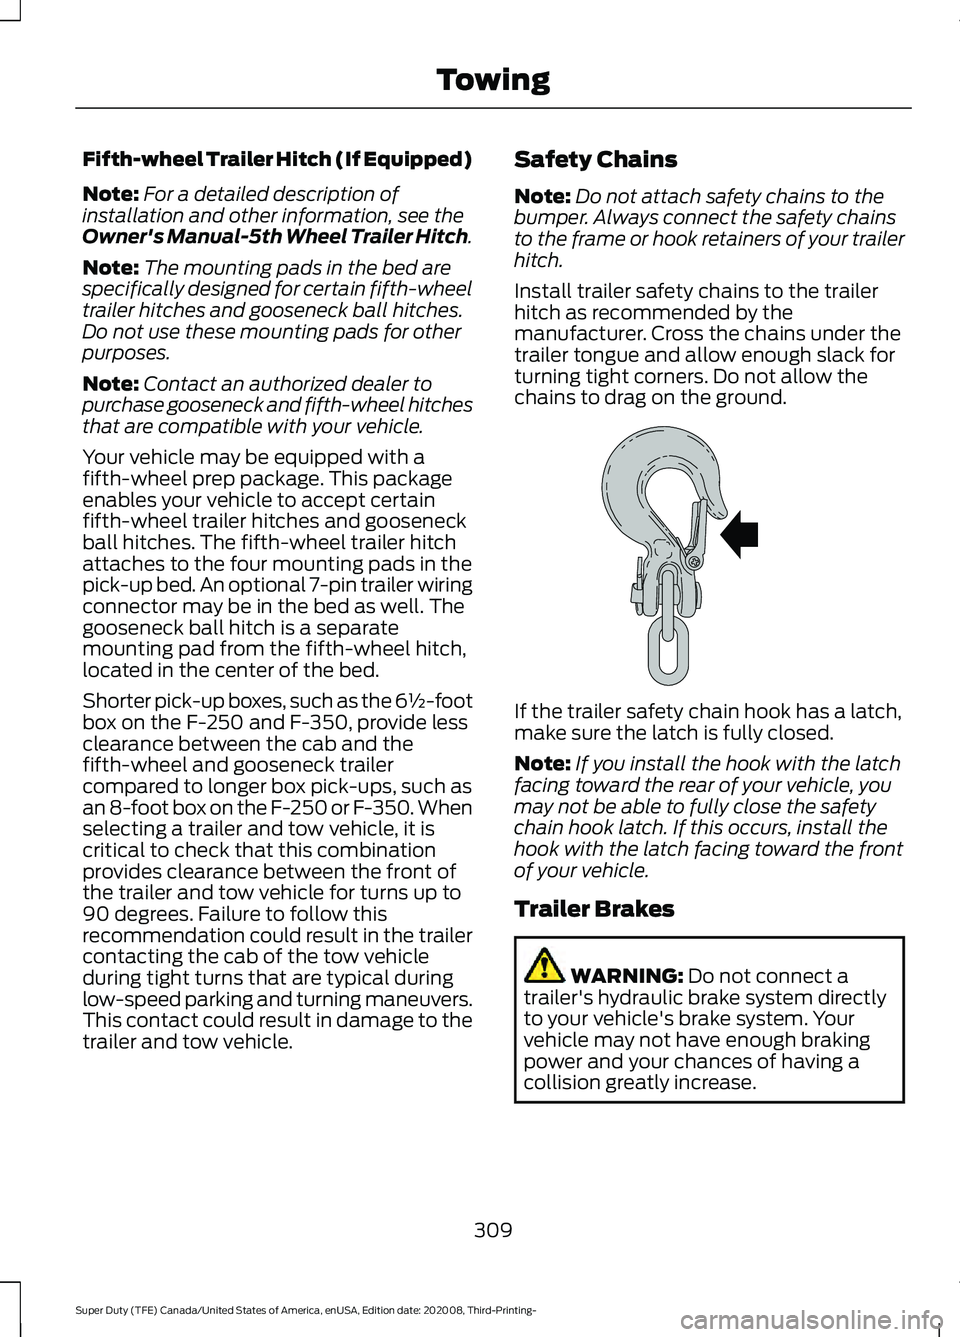
Install trailer safety chains to the trailer
hitch as recommended by the
manufacturer. Cross the chains under the
trailer tongue and allow enough slack for
turning tight corners. Do not allow the
chains to drag on the ground. If the trailer safety chain hook has a latch,
make sure the latch is fully closed.
Note:
If you install the hook with the latch
facing toward the rear of your vehicle, you
may not be able to fully close the safety
chain hook latch. If this occurs, install the
hook with the latch facing toward the front
of your vehicle.
Trailer Brakes WARNING: Do not connect a
trailer's hydraulic brake system directly
to your vehicle's brake system. Your
vehicle may not have enough braking
power and your chances of having a
collision greatly increase.
309
Super Duty (TFE) Canada/United States of America, enUSA, Edition date: 202008, Third-Printing- TowingE265060
Page 314 of 666
B: Manual control lever: Slide the control
lever to the left to switch on the trailer's
electric brakes independent of the tow
vehicle's. See the following Procedure for
adjusting gain section for instructions on
proper use of this feature. If you use the
manual control while the brake is also
applied, the greater of the two inputs
determines the power sent to the trailer
brakes.
• Stop lamps: Using the manual control
lever lights both the trailer brake lamps
and your vehicle brake lamps.
Trailer brake control messages appear in
the information display as follows:
• TBC GAIN = XX.X NO TRAILER:
Shows the current gain setting.
• TBC GAIN = XX.X OUTPUT=/ / / /
/ /
: Displays when braking. The bars
indicate the amount of power going to
the trailer brakes.
• TRAILER CONNECTED:
Displays
when the system senses a correct
trailer wiring connection.
• TRAILER DISCONNECTED: Displays
when the system senses a trailer
disconnection.
Procedure for Setting Trailer Brake
Controller Effort
Choose either the electric option for trailers
with electromagnetic drum brakes, or the
electric over hydraulic option for trailers
with these brake systems.
Trailer Brake Effort Setting
The trailer brake controller allows the user
to customize how aggressively the trailer
brakes engage. The default value is the low
setting and is the recommended setting
for most trailers. If your trailer's brakes
require more initial voltage, or if you prefer
more aggressive trailer braking, then select
either the medium or the high setting. Procedure for Setting Trailer Brake
Controller Mode
Choose the low, medium or high setting
for the required initial trailer brake output.
Procedure for Adjusting Gain
Note:
Only perform this procedure in a
traffic-free environment at speeds of
approximately
20– 25 mph (30–40 km/h).
The gain setting adjusts the trailer brake
controller for the specific towing condition.
You should change the setting as towing
conditions change. Changes to towing
conditions include trailer load, vehicle load,
road conditions and weather.
The gain should be set to provide the
maximum trailer braking assistance while
making sure the trailer wheels do not lock
when using the brakes. Locked trailer
wheels may lead to trailer instability.
1. Make sure the trailer brakes are in good
working condition, functioning normally
and properly adjusted. See your trailer
dealer if necessary.
2. Hook up the trailer and make the electrical connections according to the
trailer manufacturer's instructions.
3. When you plug in a trailer with electric or electric-over-hydraulic brakes, a
confirmation message appears in the
information display.
4. Use the gain adjustment (+ and -) buttons to increase or decrease the
gain setting to the desired starting
point. A gain setting of 6.0 is a good
starting point for heavier loads.
5. In a traffic-free environment, tow the trailer on a dry, level surface at a speed
of
20– 25 mph (30–40 km/h) and
squeeze the manual control lever
completely.
311
Super Duty (TFE) Canada/United States of America, enUSA, Edition date: 202008, Third-Printing- Towing
Page 315 of 666
6. If the trailer wheels lock up, indicated
by squealing tires, reduce the gain
setting. If the trailer wheels turn freely,
increase the gain setting. Repeat Steps
5 and 6 until the gain setting is at a
point just below trailer wheel lock-up.
If towing a heavier trailer, trailer wheel
lock-up may not be attainable even
with the maximum gain setting of 10.
Information Display Warning Messages
Note: An authorized dealer can diagnose
the trailer brake controller to determine
exactly which trailer fault has occurred.
However, your Ford warranty does not cover
this diagnosis if the fault is with the trailer.
TRAILER BRAKE MODULE FAULT
Displays in response to faults sensed by
the trailer brake controller, accompanied
by a single tone. If this message appears,
contact an authorized dealer as soon as
possible for diagnosis and repair. The
controller may still function, but with
degraded performance.
WIRING FAULT ON TRAILER
Displays when there is a short circuit on
the electric brake output wire.
If this message displays, with no trailer
connected, the problem is with your vehicle
wiring or trailer brake controller. Contact
an authorized dealer.
If the message only displays with a trailer
connected, the problem is with the trailer
wiring. Consult your trailer dealer for
assistance. This can be a short to ground
(such as a chaffed wire), short to voltage
(such as a pulled pin on trailer emergency
breakaway battery) or the trailer brakes
may be drawing too much current. Points to Remember
Note:
Do not attempt removal of the trailer
brake controller without consulting the
Workshop Manual. Damage to the unit may
result.
• Adjust gain setting before using the
trailer brake controller.
• Adjust gain setting, using the procedure
above, whenever road, weather, trailer
or vehicle loading conditions change
from when the gain was initially set.
• Only use the manual control lever for
proper adjustment of the gain during
trailer setup. Misuse, such as
application during trailer sway, could
cause instability of trailer or tow
vehicle.
• Avoid towing in adverse weather
conditions. The trailer brake controller
does not provide anti-lock control of
the trailer wheels. Trailer wheels can
lock up on slippery surfaces, resulting
in reduced stability of trailer and tow
vehicle.
• The trailer brake controller is equipped
with a feature that reduces output at
vehicle speeds below 11 mph (18 km/h)
so trailer and vehicle braking is not jerky
or harsh. This feature is only active
when applying the brakes using your
vehicle's brake pedal, not the
controller.
• The controller interacts with the brake
control system and powertrain control
system of your vehicle to provide the
best performance on different road
conditions.
312
Super Duty (TFE) Canada/United States of America, enUSA, Edition date: 202008, Third-Printing- Towing