display FORD F-53 2020 Owner's Guide
[x] Cancel search | Manufacturer: FORD, Model Year: 2020, Model line: F-53, Model: FORD F-53 2020Pages: 197, PDF Size: 3.04 MB
Page 77 of 197
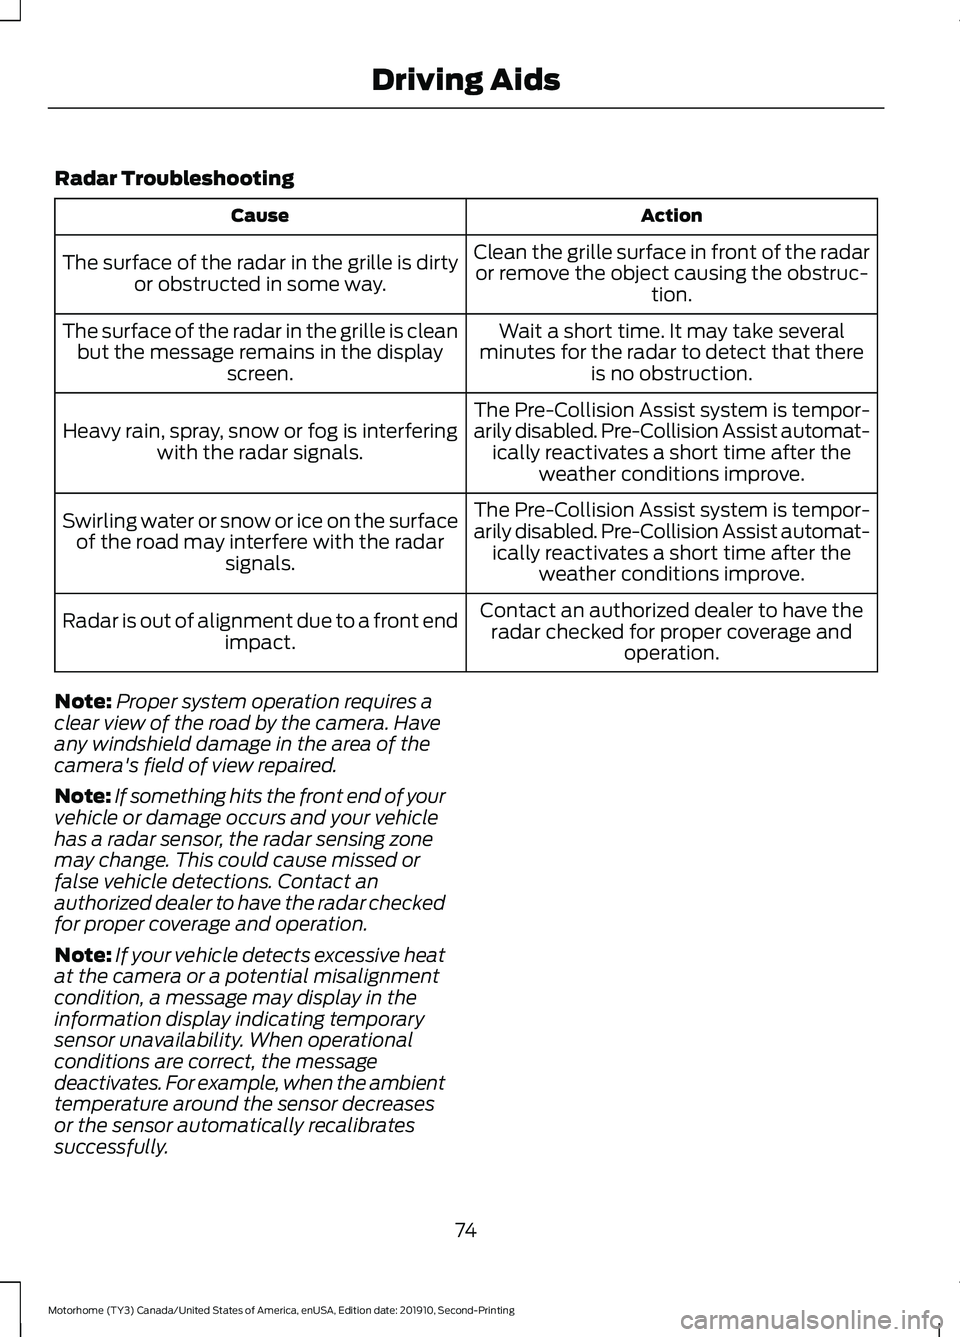
Radar Troubleshooting
Action
Cause
Clean the grille surface in front of the radaror remove the object causing the obstruc- tion.
The surface of the radar in the grille is dirty
or obstructed in some way.
Wait a short time. It may take several
minutes for the radar to detect that there is no obstruction.
The surface of the radar in the grille is clean
but the message remains in the display screen.
The Pre-Collision Assist system is tempor-
arily disabled. Pre-Collision Assist automat-ically reactivates a short time after the weather conditions improve.
Heavy rain, spray, snow or fog is interfering
with the radar signals.
The Pre-Collision Assist system is tempor-
arily disabled. Pre-Collision Assist automat-ically reactivates a short time after the weather conditions improve.
Swirling water or snow or ice on the surface
of the road may interfere with the radar signals.
Contact an authorized dealer to have theradar checked for proper coverage and operation.
Radar is out of alignment due to a front end
impact.
Note: Proper system operation requires a
clear view of the road by the camera. Have
any windshield damage in the area of the
camera's field of view repaired.
Note: If something hits the front end of your
vehicle or damage occurs and your vehicle
has a radar sensor, the radar sensing zone
may change. This could cause missed or
false vehicle detections. Contact an
authorized dealer to have the radar checked
for proper coverage and operation.
Note: If your vehicle detects excessive heat
at the camera or a potential misalignment
condition, a message may display in the
information display indicating temporary
sensor unavailability. When operational
conditions are correct, the message
deactivates. For example, when the ambient
temperature around the sensor decreases
or the sensor automatically recalibrates
successfully.
74
Motorhome (TY3) Canada/United States of America, enUSA, Edition date: 201910, Second-Printing Driving Aids
Page 117 of 197
Only use oils certified for gasoline engines
by the American Petroleum Institute (API).
An oil with this trademark symbol
conforms to the current engine and
emission system protection standards and
fuel economy requirements of the
International Lubricants Specification
Advisory Committee (ILSAC).
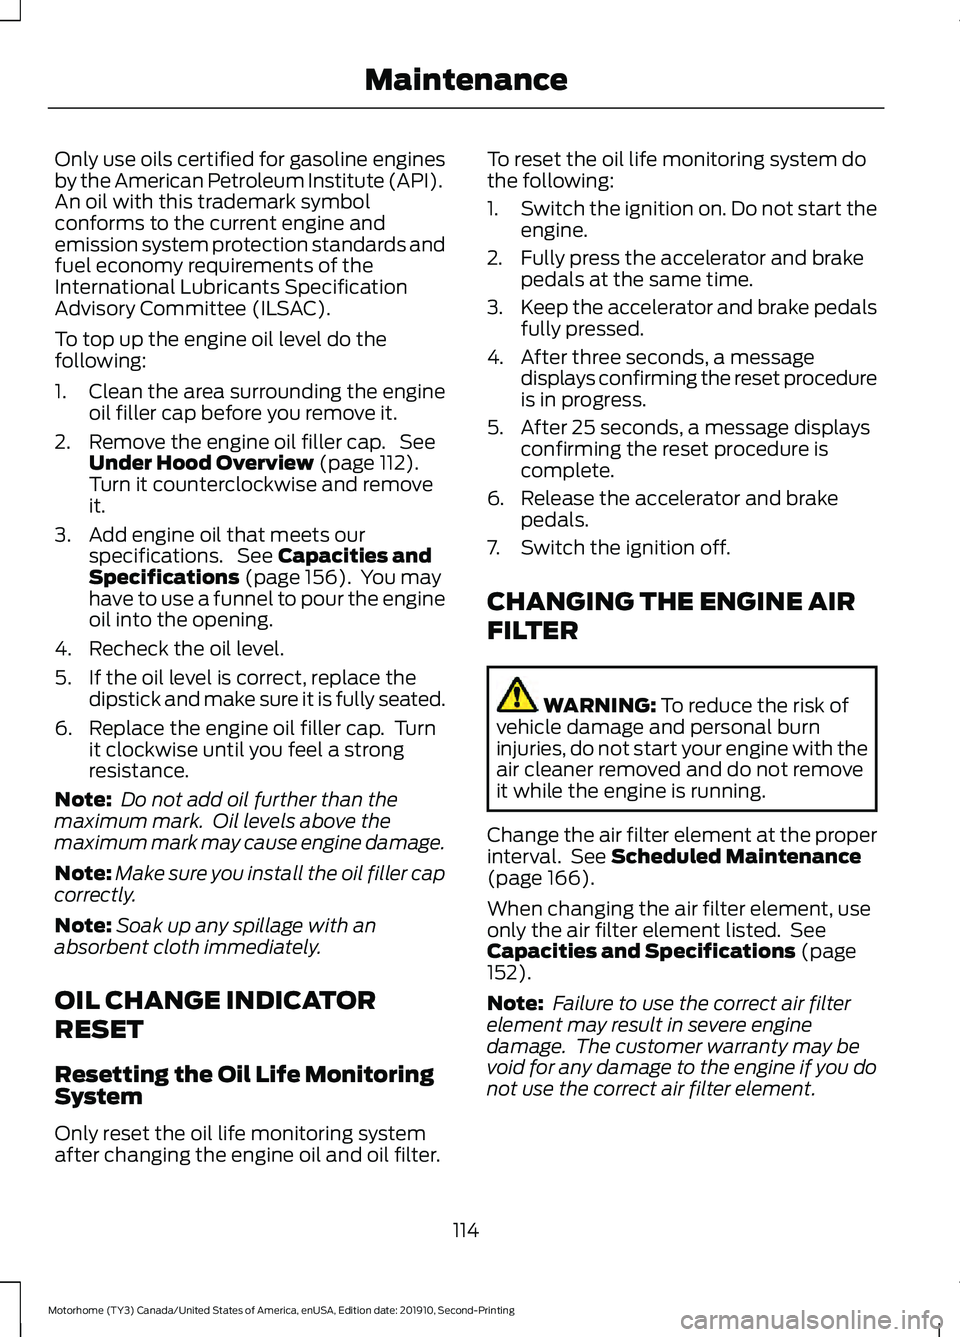
To top up the engine oil level do the
following:
1. Clean the area surrounding the engine
oil filler cap before you remove it.
2. Remove the engine oil filler cap. See Under Hood Overview (page 112).
Turn it counterclockwise and remove
it.
3. Add engine oil that meets our specifications. See
Capacities and
Specifications (page 156). You may
have to use a funnel to pour the engine
oil into the opening.
4. Recheck the oil level.
5. If the oil level is correct, replace the dipstick and make sure it is fully seated.
6. Replace the engine oil filler cap. Turn it clockwise until you feel a strong
resistance.
Note: Do not add oil further than the
maximum mark. Oil levels above the
maximum mark may cause engine damage.
Note: Make sure you install the oil filler cap
correctly.
Note: Soak up any spillage with an
absorbent cloth immediately.
OIL CHANGE INDICATOR
RESET
Resetting the Oil Life Monitoring
System
Only reset the oil life monitoring system
after changing the engine oil and oil filter. To reset the oil life monitoring system do
the following:
1.
Switch the ignition on. Do not start the
engine.
2. Fully press the accelerator and brake pedals at the same time.
3. Keep the accelerator and brake pedals
fully pressed.
4. After three seconds, a message displays confirming the reset procedure
is in progress.
5. After 25 seconds, a message displays confirming the reset procedure is
complete.
6. Release the accelerator and brake pedals.
7. Switch the ignition off.
CHANGING THE ENGINE AIR
FILTER WARNING:
To reduce the risk of
vehicle damage and personal burn
injuries, do not start your engine with the
air cleaner removed and do not remove
it while the engine is running.
Change the air filter element at the proper
interval. See
Scheduled Maintenance
(page 166).
When changing the air filter element, use
only the air filter element listed. See
Capacities and Specifications
(page
152).
Note: Failure to use the correct air filter
element may result in severe engine
damage. The customer warranty may be
void for any damage to the engine if you do
not use the correct air filter element.
114
Motorhome (TY3) Canada/United States of America, enUSA, Edition date: 201910, Second-Printing Maintenance
Page 121 of 197
A warning lamp illuminates and
a message may appear in the
information display.
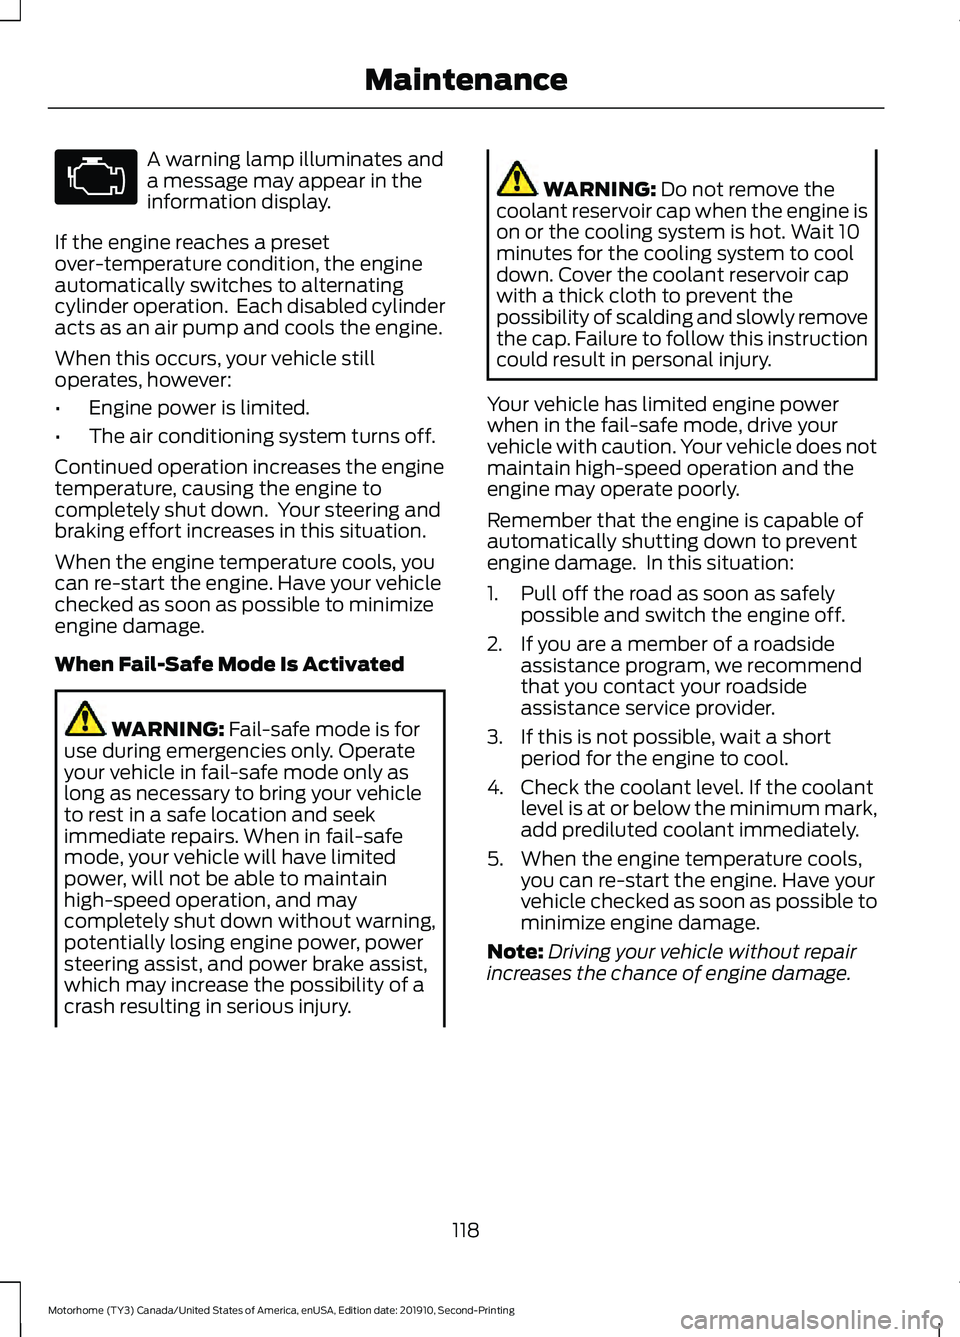
If the engine reaches a preset
over-temperature condition, the engine
automatically switches to alternating
cylinder operation. Each disabled cylinder
acts as an air pump and cools the engine.
When this occurs, your vehicle still
operates, however:
• Engine power is limited.
• The air conditioning system turns off.
Continued operation increases the engine
temperature, causing the engine to
completely shut down. Your steering and
braking effort increases in this situation.
When the engine temperature cools, you
can re-start the engine. Have your vehicle
checked as soon as possible to minimize
engine damage.
When Fail-Safe Mode Is Activated WARNING: Fail-safe mode is for
use during emergencies only. Operate
your vehicle in fail-safe mode only as
long as necessary to bring your vehicle
to rest in a safe location and seek
immediate repairs. When in fail-safe
mode, your vehicle will have limited
power, will not be able to maintain
high-speed operation, and may
completely shut down without warning,
potentially losing engine power, power
steering assist, and power brake assist,
which may increase the possibility of a
crash resulting in serious injury. WARNING:
Do not remove the
coolant reservoir cap when the engine is
on or the cooling system is hot. Wait 10
minutes for the cooling system to cool
down. Cover the coolant reservoir cap
with a thick cloth to prevent the
possibility of scalding and slowly remove
the cap. Failure to follow this instruction
could result in personal injury.
Your vehicle has limited engine power
when in the fail-safe mode, drive your
vehicle with caution. Your vehicle does not
maintain high-speed operation and the
engine may operate poorly.
Remember that the engine is capable of
automatically shutting down to prevent
engine damage. In this situation:
1. Pull off the road as soon as safely possible and switch the engine off.
2. If you are a member of a roadside assistance program, we recommend
that you contact your roadside
assistance service provider.
3. If this is not possible, wait a short period for the engine to cool.
4. Check the coolant level. If the coolant level is at or below the minimum mark,
add prediluted coolant immediately.
5. When the engine temperature cools, you can re-start the engine. Have your
vehicle checked as soon as possible to
minimize engine damage.
Note: Driving your vehicle without repair
increases the chance of engine damage.
118
Motorhome (TY3) Canada/United States of America, enUSA, Edition date: 201910, Second-Printing Maintenance
Page 122 of 197
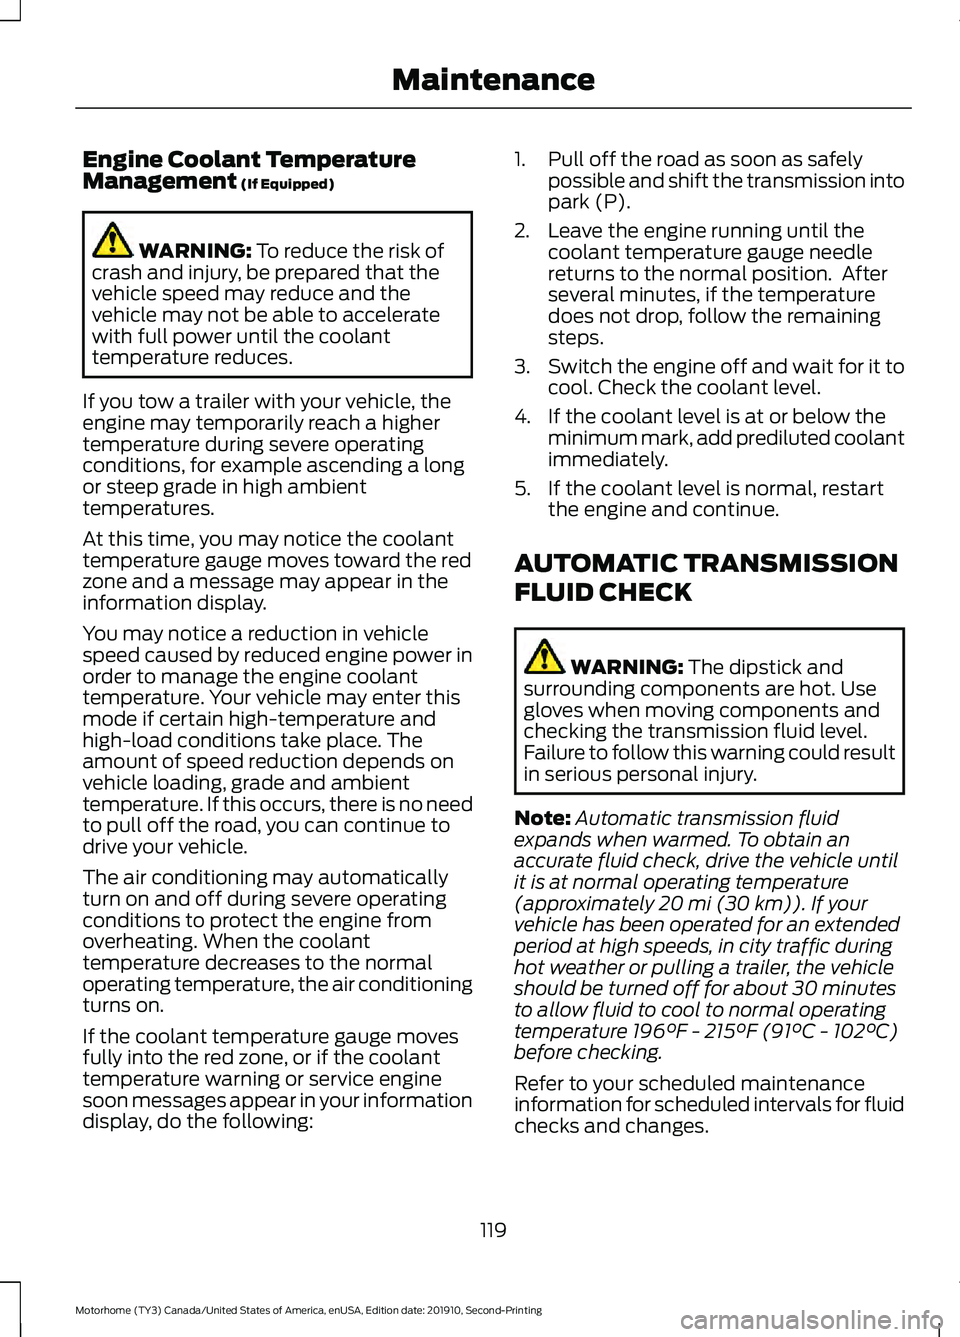
Engine Coolant Temperature
Management (If Equipped)
WARNING:
To reduce the risk of
crash and injury, be prepared that the
vehicle speed may reduce and the
vehicle may not be able to accelerate
with full power until the coolant
temperature reduces.
If you tow a trailer with your vehicle, the
engine may temporarily reach a higher
temperature during severe operating
conditions, for example ascending a long
or steep grade in high ambient
temperatures.
At this time, you may notice the coolant
temperature gauge moves toward the red
zone and a message may appear in the
information display.
You may notice a reduction in vehicle
speed caused by reduced engine power in
order to manage the engine coolant
temperature. Your vehicle may enter this
mode if certain high-temperature and
high-load conditions take place. The
amount of speed reduction depends on
vehicle loading, grade and ambient
temperature. If this occurs, there is no need
to pull off the road, you can continue to
drive your vehicle.
The air conditioning may automatically
turn on and off during severe operating
conditions to protect the engine from
overheating. When the coolant
temperature decreases to the normal
operating temperature, the air conditioning
turns on.
If the coolant temperature gauge moves
fully into the red zone, or if the coolant
temperature warning or service engine
soon messages appear in your information
display, do the following: 1. Pull off the road as soon as safely
possible and shift the transmission into
park (P).
2. Leave the engine running until the coolant temperature gauge needle
returns to the normal position. After
several minutes, if the temperature
does not drop, follow the remaining
steps.
3. Switch the engine off and wait for it to
cool. Check the coolant level.
4. If the coolant level is at or below the minimum mark, add prediluted coolant
immediately.
5. If the coolant level is normal, restart the engine and continue.
AUTOMATIC TRANSMISSION
FLUID CHECK WARNING:
The dipstick and
surrounding components are hot. Use
gloves when moving components and
checking the transmission fluid level.
Failure to follow this warning could result
in serious personal injury.
Note: Automatic transmission fluid
expands when warmed. To obtain an
accurate fluid check, drive the vehicle until
it is at normal operating temperature
(approximately
20 mi (30 km)). If your
vehicle has been operated for an extended
period at high speeds, in city traffic during
hot weather or pulling a trailer, the vehicle
should be turned off for about 30 minutes
to allow fluid to cool to normal operating
temperature 196°F - 215°F (91°C - 102°C)
before checking.
Refer to your scheduled maintenance
information for scheduled intervals for fluid
checks and changes.
119
Motorhome (TY3) Canada/United States of America, enUSA, Edition date: 201910, Second-Printing Maintenance
Page 161 of 197
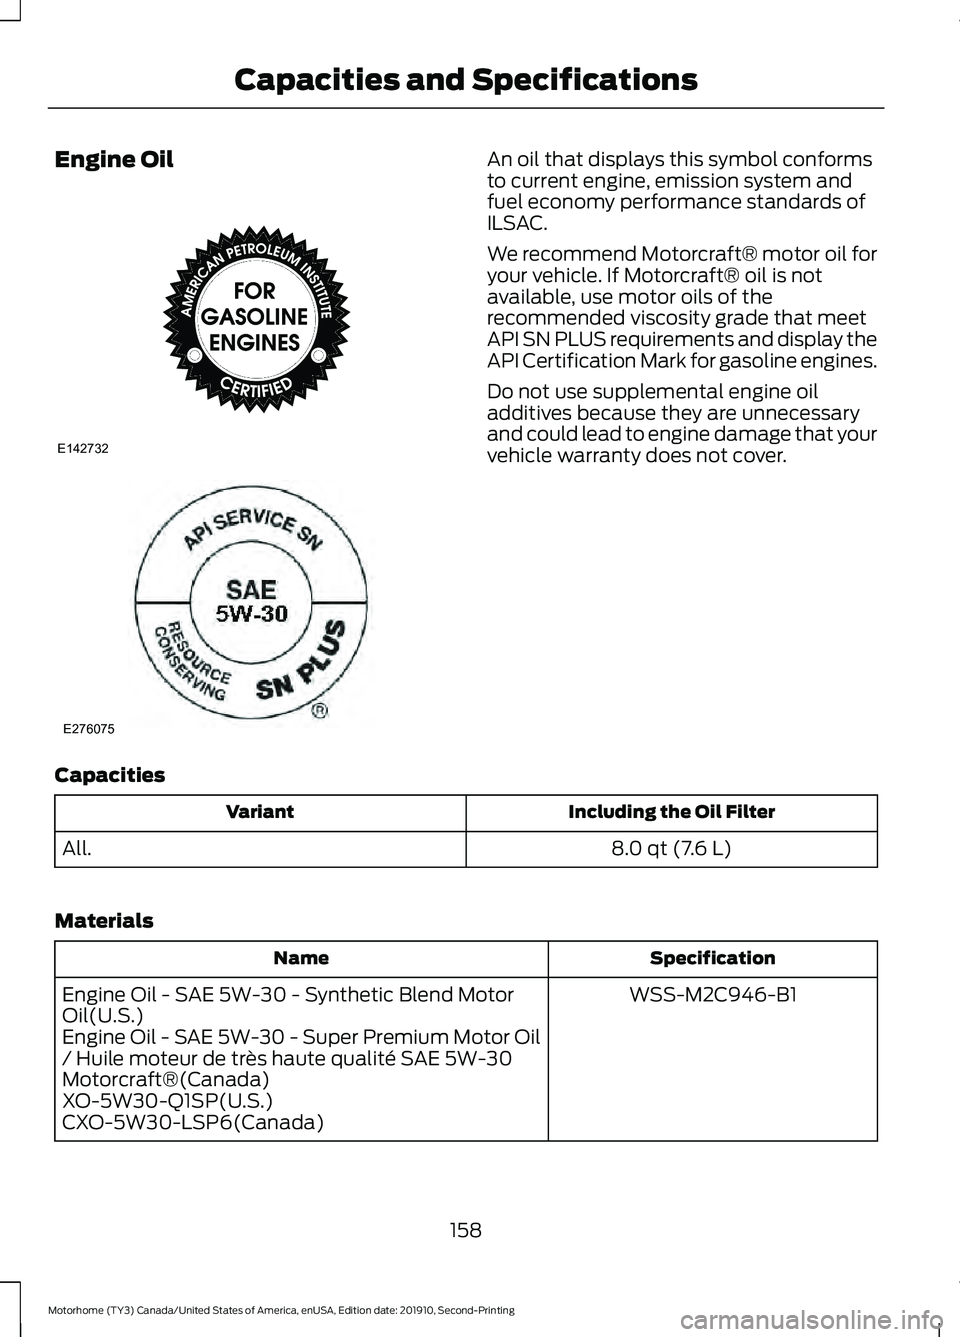
Engine Oil An oil that displays this symbol conforms
to current engine, emission system and
fuel economy performance standards of
ILSAC.
We recommend Motorcraft® motor oil for
your vehicle. If Motorcraft® oil is not
available, use motor oils of the
recommended viscosity grade that meet
API SN PLUS requirements and display the
API Certification Mark for gasoline engines.
Do not use supplemental engine oil
additives because they are unnecessary
and could lead to engine damage that your
vehicle warranty does not cover.
Capacities Including the Oil Filter
Variant
8.0 qt (7.6 L)
All.
Materials Specification
Name
WSS-M2C946-B1
Engine Oil - SAE 5W-30 - Synthetic Blend Motor
Oil(U.S.)
Engine Oil - SAE 5W-30 - Super Premium Motor Oil
/ Huile moteur de très haute qualité SAE 5W-30
Motorcraft®(Canada)
XO-5W30-Q1SP(U.S.)
CXO-5W30-LSP6(Canada)
158
Motorhome (TY3) Canada/United States of America, enUSA, Edition date: 201910, Second-Printing Capacities and SpecificationsE142732 E276075
Page 194 of 197
Fuel Consumption..........................................41
Advertised Capacity............................................. 41
Fuel Economy........................................................ 42
Fuel Filter.........................................................126
Fuel Quality......................................................38 Choosing the Right Fuel.................................... 38
Fuses..................................................................101
Fuse Specification Chart............................101 Engine Compartment Fuse Box..................... 101
Passenger Compartment Fuse Box............106
G
Gauges.................................................................21 2.3 Inch Display....................................................... 21
8 Inch Display......................................................... 22
Configurable Gauge............................................. 23
Engine Coolant Temperature Gauge.............23
Engine Oil Pressure Gauge................................ 23
Fuel Gauge.............................................................. 23
Voltmeter................................................................. 23
Gearbox See: Transmission................................................ 47
General Maintenance Information........166 Multi-point Inspection...................................... 168
Owner Checks and Services........................... 167
Protecting Your Investment........................... 166
Why Maintain Your Vehicle?.......................... 166
Why Maintain Your Vehicle at Your Dealership? ...................................................... 166
Getting Assistance Outside the U.S. and Canada...........................................................98
Getting the Services You Need.................95 Away From Home................................................ 95
H
Handbrake See: Parking Brake............................................... 52
Hazard Flashers...............................................91
Hill Start Assist
................................................52
Switching the System On and Off.................53
Using Hill Start Assist......................................... 53
Hints on Driving With Anti-Lock Brakes
...............................................................51
Horn......................................................................17 I
Ignition Switch.................................................34
In California (U.S. Only)...............................96
Information Display Control........................17
Information Displays
.....................................27
General Information............................................ 27
Information Messages
.................................30
Battery and Charging System......................... 30
Engine........................................................................\
31
Fuel........................................................................\
..... 31
Maintenance........................................................... 31
Power Steering...................................................... 32
Transmission.......................................................... 32
Instrument Cluster..........................................21
Instrument Lighting Dimmer.....................20
Introduction........................................................5
J
Jump Starting the Vehicle............................91 Connecting the Jumper Cables....................... 92
Jump Starting........................................................ 93
Preparing Your Vehicle........................................ 91
Removing the Jumper Cables......................... 93
L
Lane Keeping System..................................66 Switching the System On and Off.................67
System Display...................................................... 67
System Settings.................................................... 67
Troubleshooting................................................... 68
Lighting Control...............................................19 Flashing the Headlamp High Beam...............19
Headlamp High Beam......................................... 19
Lighting...............................................................19
Load Carrying
...................................................75
Load Limit..........................................................75
Special Loading Instructions for Owners of
Pick-up Trucks and Utility-type
Vehicles............................................................... 79
Vehicle Loading - with and without a Trailer.................................................................... 75
Lug Nuts See: Changing a Road Wheel......................... 147
191
Motorhome (TY3) Canada/United States of America, enUSA, Edition date: 201910, Second-Printing Index
Page 195 of 197
M
Maintenance...................................................110
General Information........................................... 110
Message Center See: Information Displays.................................. 27
Mobile Communications Equipment.......13
Motorcraft Parts............................................152
N
Normal Scheduled Maintenance
...........169
O
Oil Change Indicator Reset........................114 Resetting the Oil Life Monitoring
System................................................................ 114
Oil Check See: Engine Oil Check........................................ 113
Ordering Additional Owner's Literature........................................................99
Obtaining a French Owner ’s Manual...........99
P
Parking Brake
...................................................52
Perchlorate.........................................................11
Power Steering Fluid Check
......................123
Steering linkage lubrication points...............123
Pre-Collision Assist.......................................70 Adjusting the Pre-Collision Assist
Settings................................................................ 72
Blocked Sensors.................................................... 73
Distance Indication and Alert........................... 72
Using the Pre-Collision Assist System..........71
Protecting the Environment........................15
Puncture See: Changing a Road Wheel......................... 147
R
Recommended Towing Weights
...............81
Reduced Engine Performance...................87
Refueling...........................................................40
Replacement Parts Recommendation........................................12
Collision Repairs.................................................... 12Scheduled Maintenance and Mechanical
Repairs.................................................................. 12
Warranty on Replacement Parts..................... 12
Reporting Safety Defects (Canada Only)..............................................................100
Reporting Safety Defects (U.S. Only)................................................................99
Resuming the Set Speed............................58
Roadside Assistance....................................90 Vehicles Sold in Canada: Getting Roadside
Assistance........................................................... 91
Vehicles Sold in the United States: Getting Roadside Assistance..................................... 90
Vehicles Sold in the United States: Using Roadside Assistance..................................... 90
Roadside Emergencies
................................90
Running-In See: Breaking-In................................................... 88
Running Out of Fuel......................................39
S
Safety Precautions........................................38
Scheduled Maintenance Record
.............173
Scheduled Maintenance...........................166
Setting the Cruise Control Speed.............57 Changing the Set Speed.................................... 57
Snow Chains See: Using Snow Chains................................... 147
Spare Wheel See: Changing a Road Wheel......................... 147
Special Notices................................................12 New Vehicle Limited Warranty......................... 12
Notice to Owners of Pickup Trucks and Utility Type Vehicles........................................ 13
On Board Diagnostics Data Link Connector............................................................ 13
Special Instructions.............................................. 12
Using Your Vehicle as an Ambulance............13
Using Your Vehicle With a Snowplow............13
Special Operating Conditions Scheduled Maintenance.................................................171
Exceptions.............................................................. 172
Speed Control See: Cruise Control............................................... 57
Stability Control
..............................................55
Principle of Operation........................................ 55
192
Motorhome (TY3) Canada/United States of America, enUSA, Edition date: 201910, Second-Printing Index