parking brake FORD F-59 2019 User Guide
[x] Cancel search | Manufacturer: FORD, Model Year: 2019, Model line: F-59, Model: FORD F-59 2019Pages: 176, PDF Size: 9.98 MB
Page 58 of 176
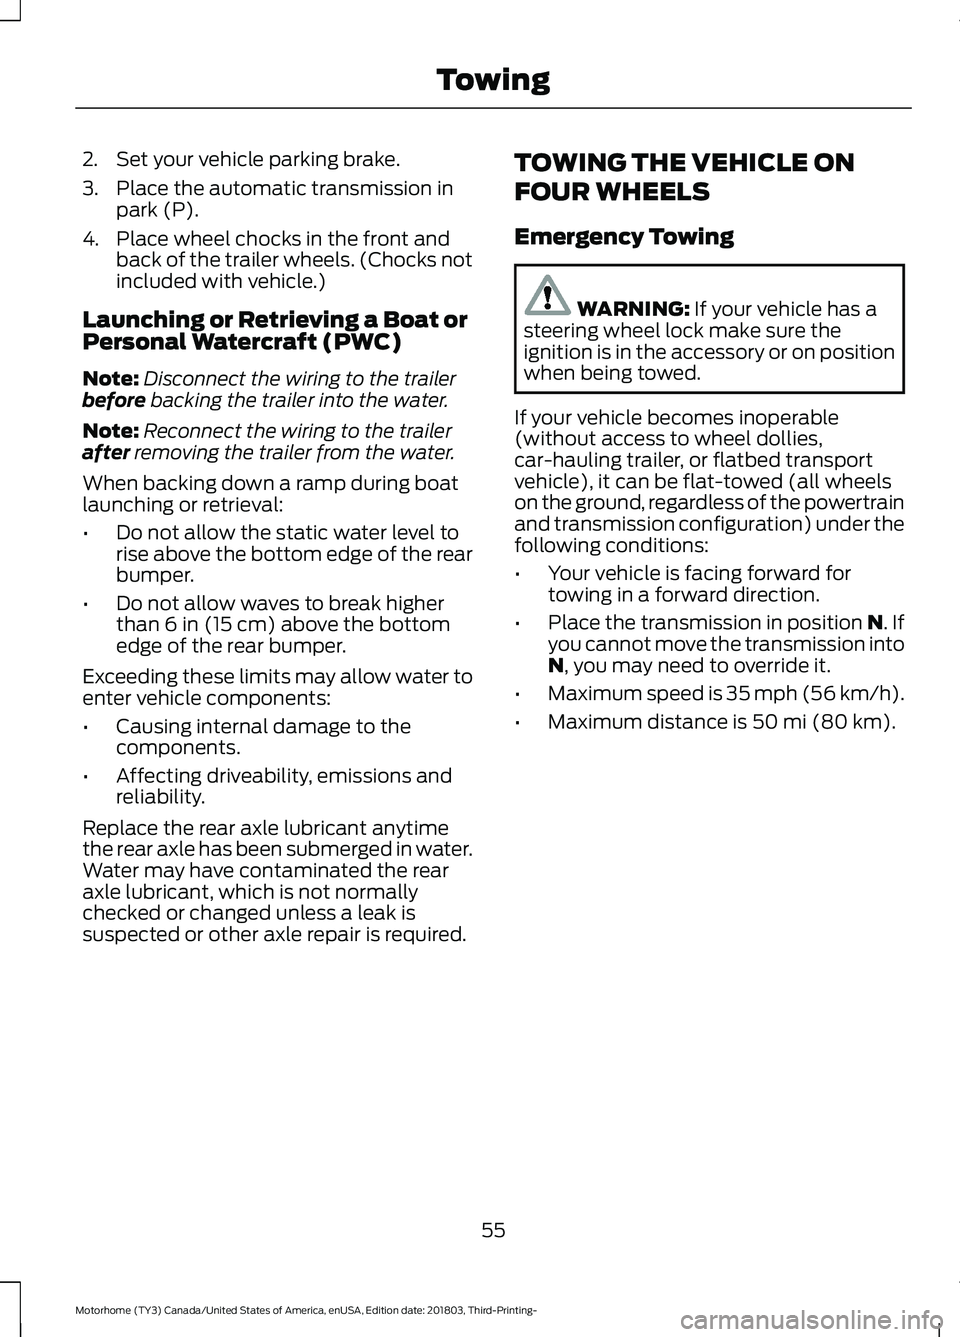
2.Set your vehicle parking brake.
3.Place the automatic transmission inpark (P).
4.Place wheel chocks in the front andback of the trailer wheels. (Chocks notincluded with vehicle.)
Launching or Retrieving a Boat orPersonal Watercraft (PWC)
Note:Disconnect the wiring to the trailerbefore backing the trailer into the water.
Note:Reconnect the wiring to the trailerafter removing the trailer from the water.
When backing down a ramp during boatlaunching or retrieval:
•Do not allow the static water level torise above the bottom edge of the rearbumper.
•Do not allow waves to break higherthan 6 in (15 cm) above the bottomedge of the rear bumper.
Exceeding these limits may allow water toenter vehicle components:
•Causing internal damage to thecomponents.
•Affecting driveability, emissions andreliability.
Replace the rear axle lubricant anytimethe rear axle has been submerged in water.Water may have contaminated the rearaxle lubricant, which is not normallychecked or changed unless a leak issuspected or other axle repair is required.
TOWING THE VEHICLE ON
FOUR WHEELS
Emergency Towing
WARNING: If your vehicle has asteering wheel lock make sure theignition is in the accessory or on positionwhen being towed.
If your vehicle becomes inoperable(without access to wheel dollies,car-hauling trailer, or flatbed transportvehicle), it can be flat-towed (all wheelson the ground, regardless of the powertrainand transmission configuration) under thefollowing conditions:
•Your vehicle is facing forward fortowing in a forward direction.
•Place the transmission in position N. Ifyou cannot move the transmission intoN, you may need to override it.
•Maximum speed is 35 mph (56 km/h).
•Maximum distance is 50 mi (80 km).
55
Motorhome (TY3) Canada/United States of America, enUSA, Edition date: 201803, Third-Printing-Towing
Page 81 of 176
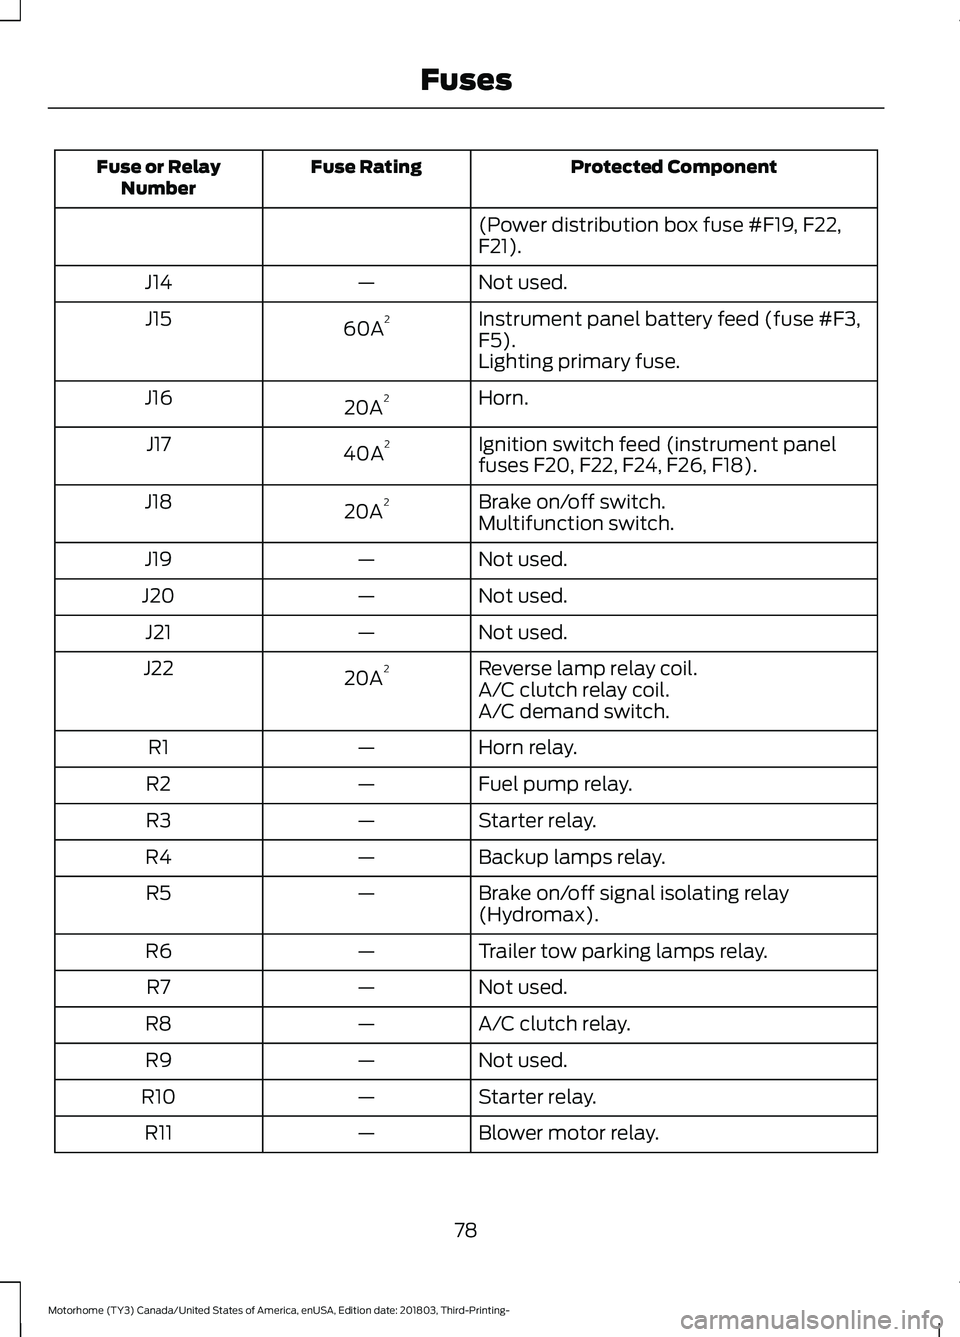
Protected ComponentFuse RatingFuse or RelayNumber
(Power distribution box fuse #F19, F22,F21).
Not used.—J14
Instrument panel battery feed (fuse #F3,F5).60A2J15
Lighting primary fuse.
Horn.20A2J16
Ignition switch feed (instrument panelfuses F20, F22, F24, F26, F18).40A2J17
Brake on/off switch.20A2J18Multifunction switch.
Not used.—J19
Not used.—J20
Not used.—J21
Reverse lamp relay coil.20A2J22A/C clutch relay coil.A/C demand switch.
Horn relay.—R1
Fuel pump relay.—R2
Starter relay.—R3
Backup lamps relay.—R4
Brake on/off signal isolating relay(Hydromax).—R5
Trailer tow parking lamps relay.—R6
Not used.—R7
A/C clutch relay.—R8
Not used.—R9
Starter relay.—R10
Blower motor relay.—R11
78
Motorhome (TY3) Canada/United States of America, enUSA, Edition date: 201803, Third-Printing-Fuses
Page 83 of 176
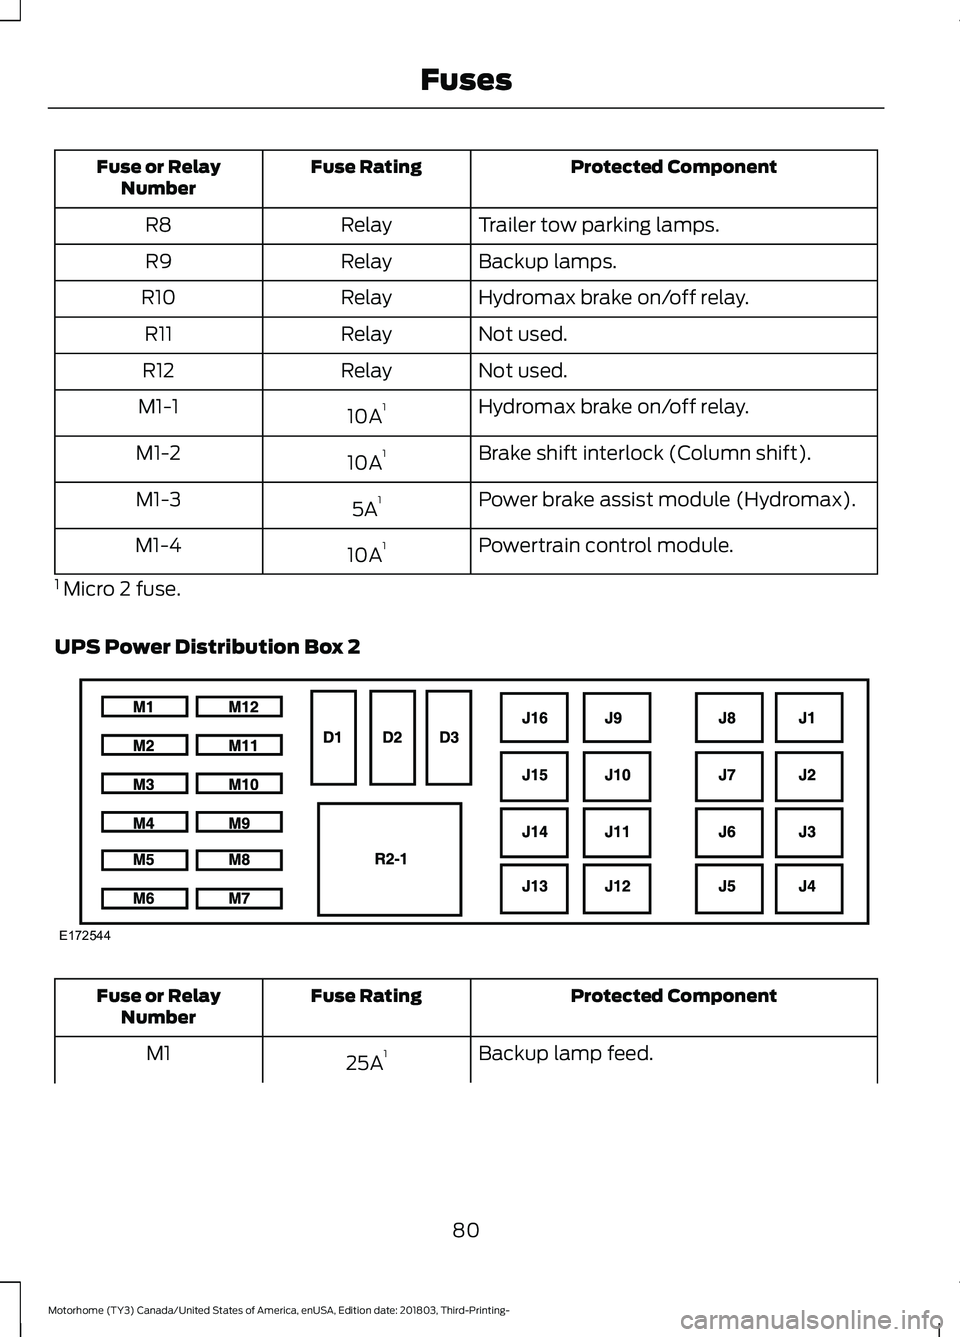
Protected ComponentFuse RatingFuse or RelayNumber
Trailer tow parking lamps.RelayR8
Backup lamps.RelayR9
Hydromax brake on/off relay.RelayR10
Not used.RelayR11
Not used.RelayR12
Hydromax brake on/off relay.10A1M1-1
Brake shift interlock (Column shift).10A1M1-2
Power brake assist module (Hydromax).5A1M1-3
Powertrain control module.10A1M1-4
1 Micro 2 fuse.
UPS Power Distribution Box 2
Protected ComponentFuse RatingFuse or RelayNumber
Backup lamp feed.25A1M1
80
Motorhome (TY3) Canada/United States of America, enUSA, Edition date: 201803, Third-Printing-FusesE172544
Page 84 of 176
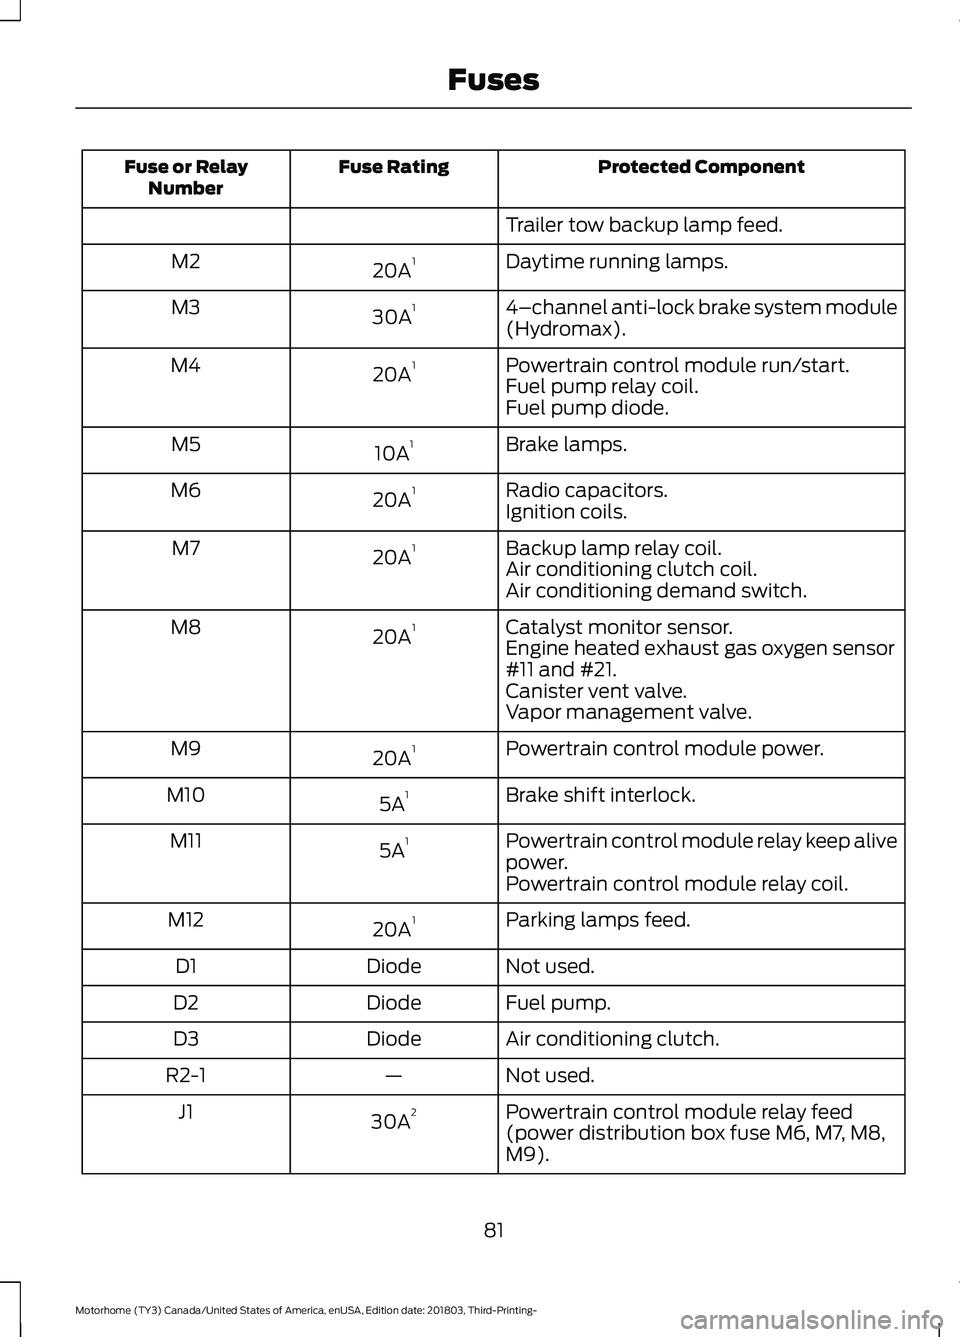
Protected ComponentFuse RatingFuse or RelayNumber
Trailer tow backup lamp feed.
Daytime running lamps.20A1M2
4–channel anti-lock brake system module(Hydromax).30A1M3
Powertrain control module run/start.20A1M4Fuel pump relay coil.Fuel pump diode.
Brake lamps.10A1M5
Radio capacitors.20A1M6Ignition coils.
Backup lamp relay coil.20A1M7Air conditioning clutch coil.Air conditioning demand switch.
Catalyst monitor sensor.20A1M8Engine heated exhaust gas oxygen sensor#11 and #21.Canister vent valve.Vapor management valve.
Powertrain control module power.20A1M9
Brake shift interlock.5A1M10
Powertrain control module relay keep alivepower.5A1M11
Powertrain control module relay coil.
Parking lamps feed.20A1M12
Not used.DiodeD1
Fuel pump.DiodeD2
Air conditioning clutch.DiodeD3
Not used.—R2-1
Powertrain control module relay feed(power distribution box fuse M6, M7, M8,M9).
30A2J1
81
Motorhome (TY3) Canada/United States of America, enUSA, Edition date: 201803, Third-Printing-Fuses
Page 85 of 176
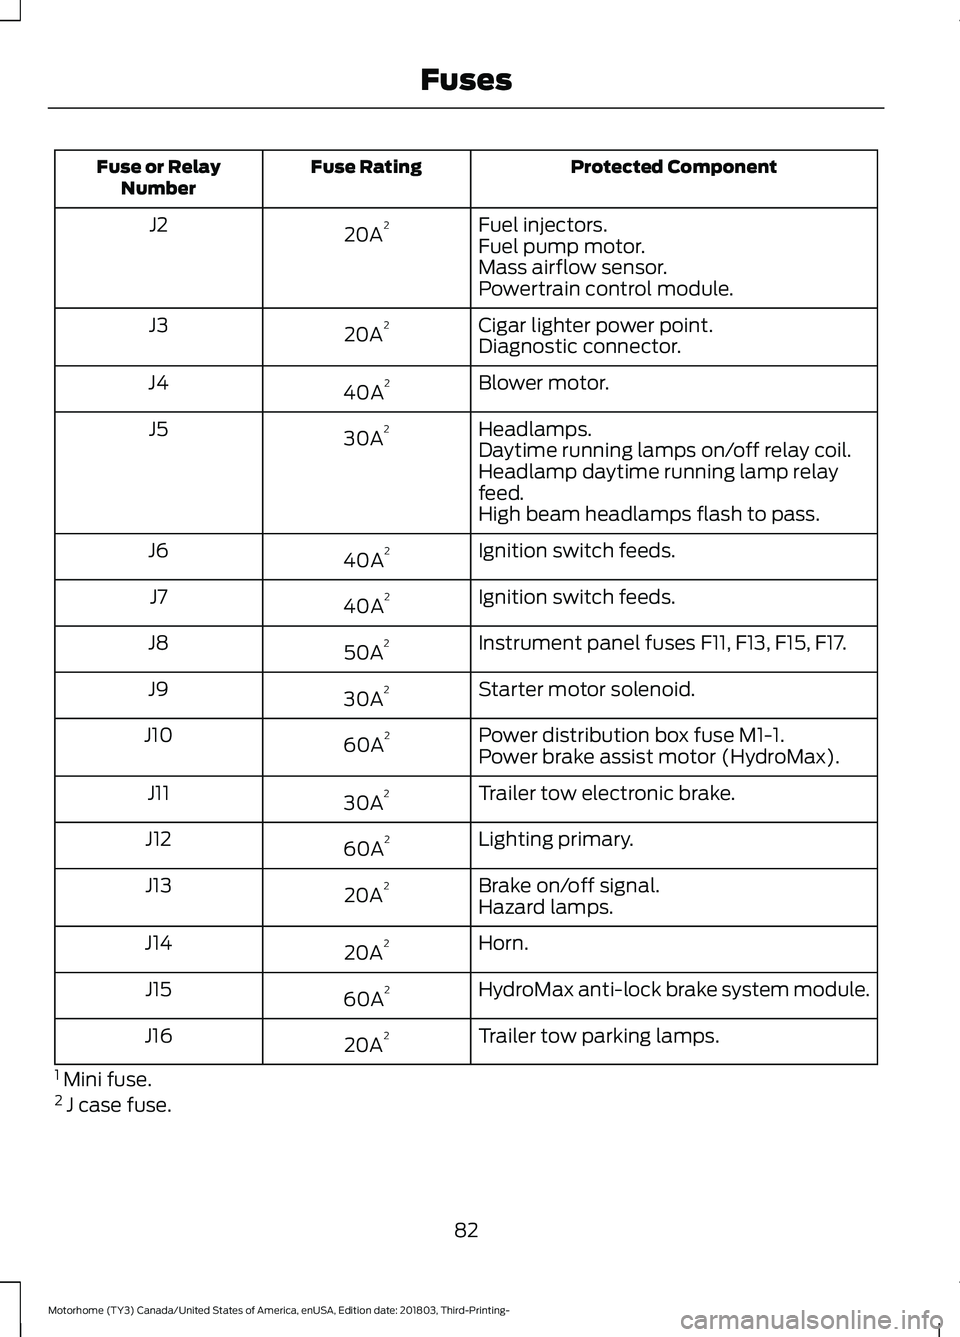
Protected ComponentFuse RatingFuse or RelayNumber
Fuel injectors.20A2J2Fuel pump motor.Mass airflow sensor.Powertrain control module.
Cigar lighter power point.20A2J3Diagnostic connector.
Blower motor.40A2J4
Headlamps.30A2J5Daytime running lamps on/off relay coil.Headlamp daytime running lamp relayfeed.High beam headlamps flash to pass.
Ignition switch feeds.40A2J6
Ignition switch feeds.40A2J7
Instrument panel fuses F11, F13, F15, F17.50A2J8
Starter motor solenoid.30A2J9
Power distribution box fuse M1-1.60A2J10Power brake assist motor (HydroMax).
Trailer tow electronic brake.30A2J11
Lighting primary.60A2J12
Brake on/off signal.20A2J13Hazard lamps.
Horn.20A2J14
HydroMax anti-lock brake system module.60A2J15
Trailer tow parking lamps.20A2J16
1 Mini fuse.2 J case fuse.
82
Motorhome (TY3) Canada/United States of America, enUSA, Edition date: 201803, Third-Printing-Fuses
Page 86 of 176
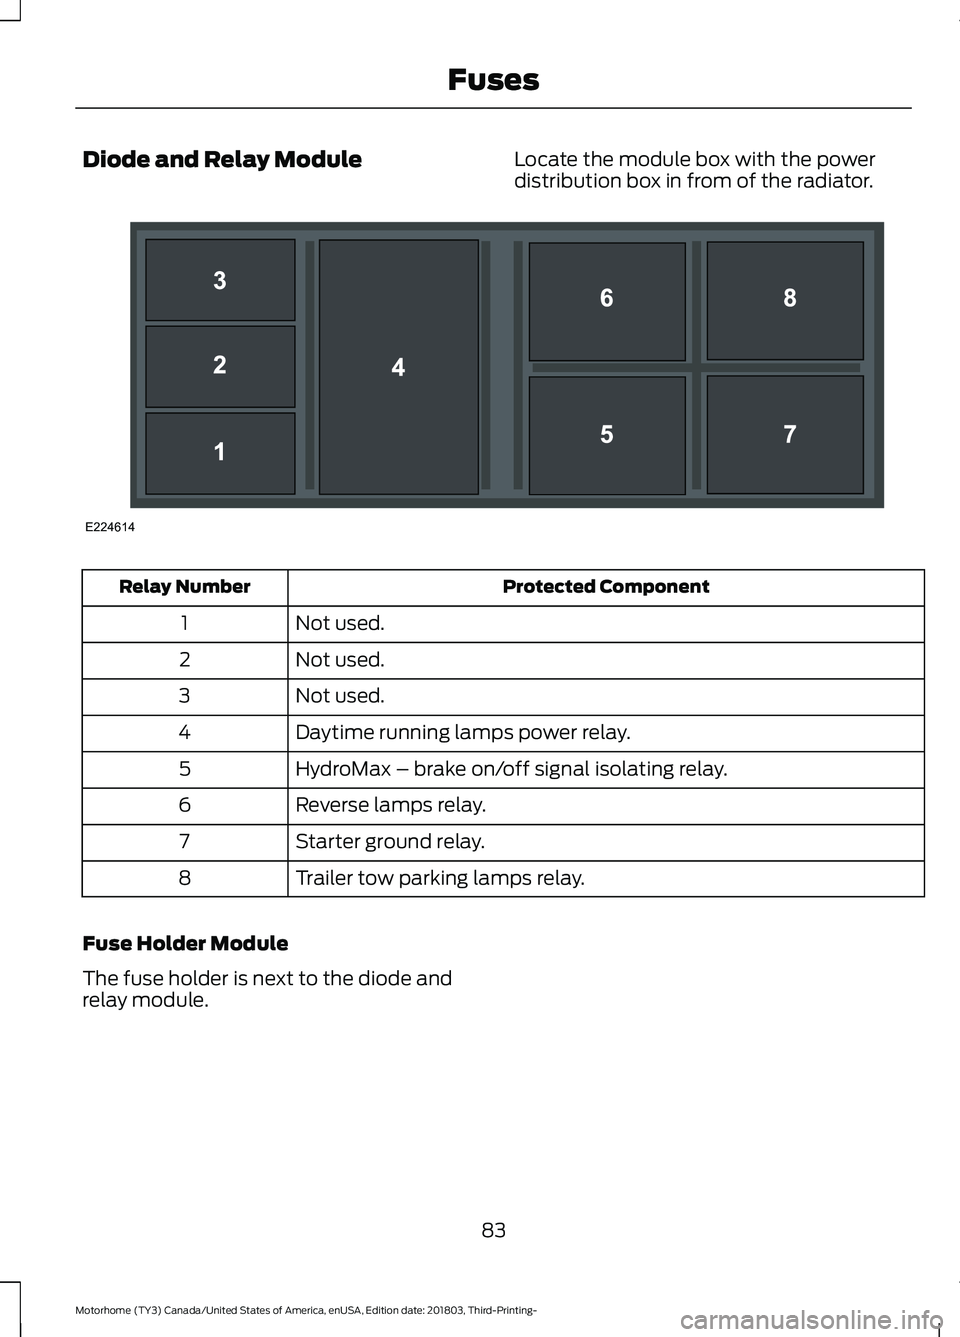
Diode and Relay ModuleLocate the module box with the powerdistribution box in from of the radiator.
Protected ComponentRelay Number
Not used.1
Not used.2
Not used.3
Daytime running lamps power relay.4
HydroMax – brake on/off signal isolating relay.5
Reverse lamps relay.6
Starter ground relay.7
Trailer tow parking lamps relay.8
Fuse Holder Module
The fuse holder is next to the diode andrelay module.
83
Motorhome (TY3) Canada/United States of America, enUSA, Edition date: 201803, Third-Printing-FusesE224614
Page 90 of 176
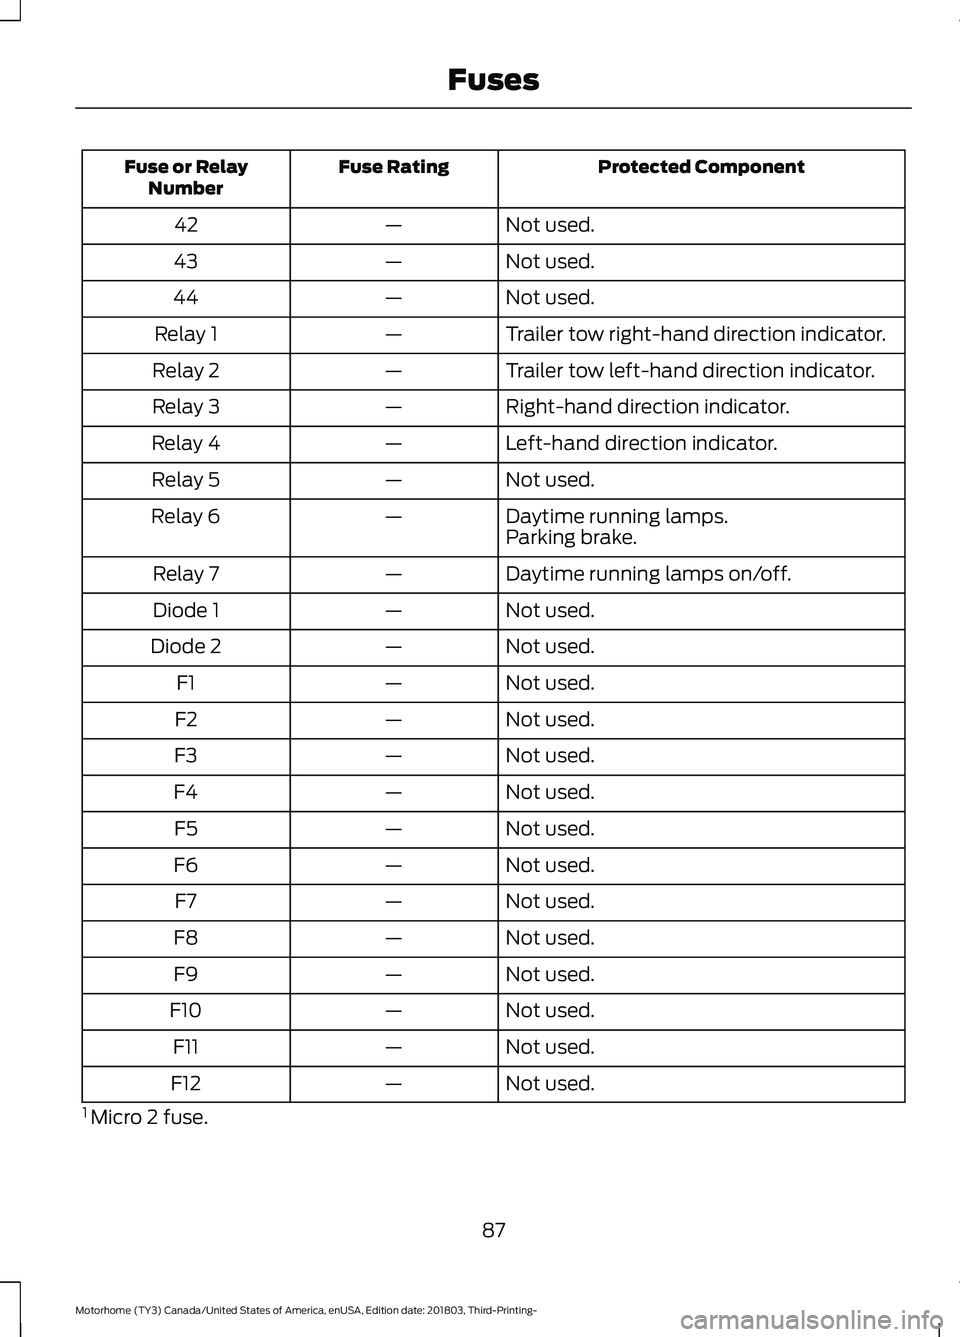
Protected ComponentFuse RatingFuse or RelayNumber
Not used.—42
Not used.—43
Not used.—44
Trailer tow right-hand direction indicator.—Relay 1
Trailer tow left-hand direction indicator.—Relay 2
Right-hand direction indicator.—Relay 3
Left-hand direction indicator.—Relay 4
Not used.—Relay 5
Daytime running lamps.—Relay 6Parking brake.
Daytime running lamps on/off.—Relay 7
Not used.—Diode 1
Not used.—Diode 2
Not used.—F1
Not used.—F2
Not used.—F3
Not used.—F4
Not used.—F5
Not used.—F6
Not used.—F7
Not used.—F8
Not used.—F9
Not used.—F10
Not used.—F11
Not used.—F12
1 Micro 2 fuse.
87
Motorhome (TY3) Canada/United States of America, enUSA, Edition date: 201803, Third-Printing-Fuses
Page 93 of 176
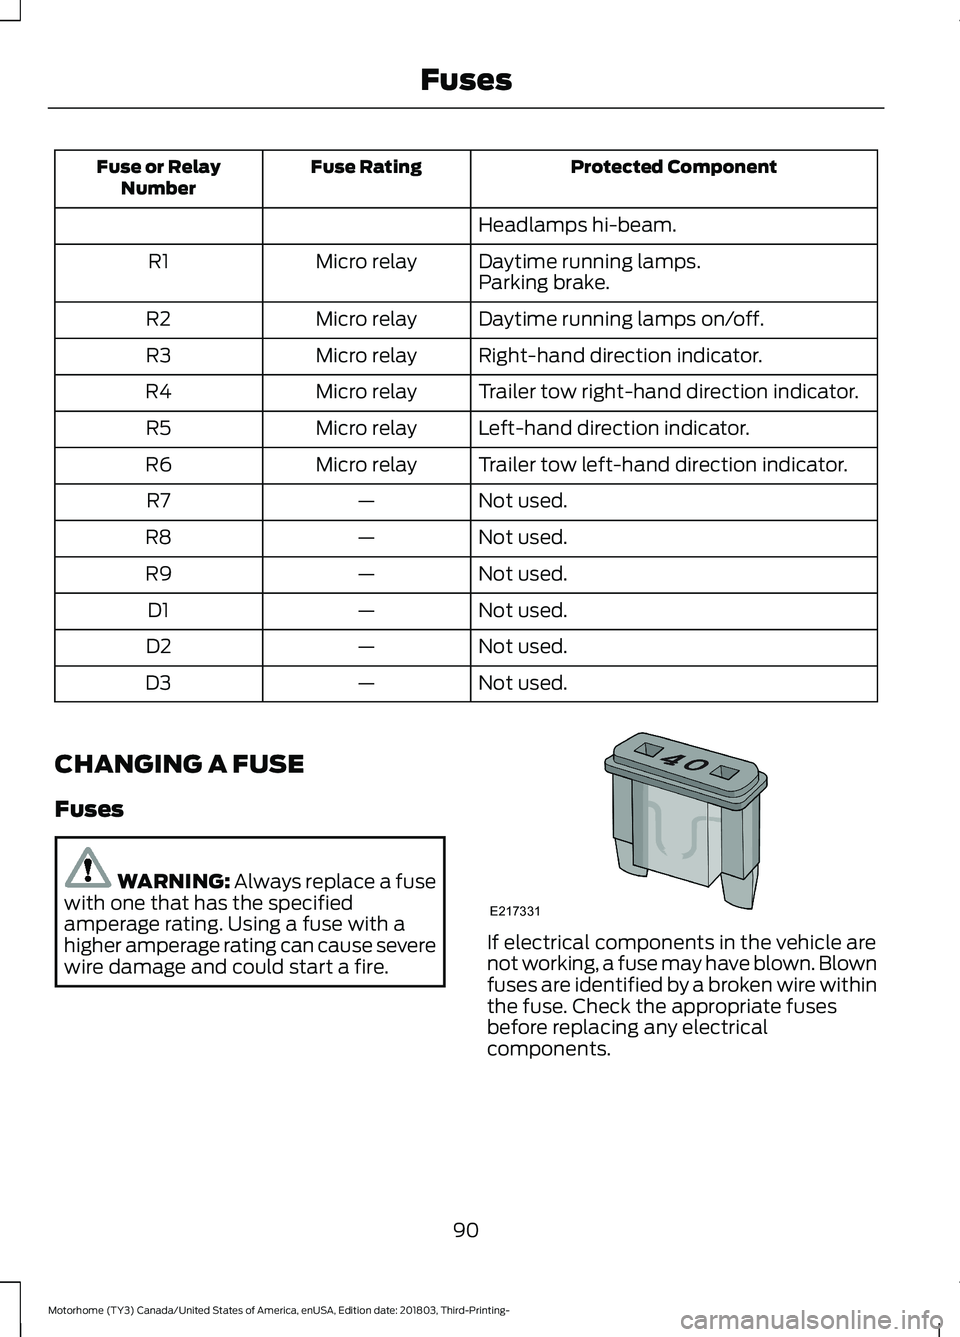
Protected ComponentFuse RatingFuse or RelayNumber
Headlamps hi-beam.
Daytime running lamps.Micro relayR1Parking brake.
Daytime running lamps on/off.Micro relayR2
Right-hand direction indicator.Micro relayR3
Trailer tow right-hand direction indicator.Micro relayR4
Left-hand direction indicator.Micro relayR5
Trailer tow left-hand direction indicator.Micro relayR6
Not used.—R7
Not used.—R8
Not used.—R9
Not used.—D1
Not used.—D2
Not used.—D3
CHANGING A FUSE
Fuses
WARNING: Always replace a fusewith one that has the specifiedamperage rating. Using a fuse with ahigher amperage rating can cause severewire damage and could start a fire.
If electrical components in the vehicle arenot working, a fuse may have blown. Blownfuses are identified by a broken wire withinthe fuse. Check the appropriate fusesbefore replacing any electricalcomponents.
90
Motorhome (TY3) Canada/United States of America, enUSA, Edition date: 201803, Third-Printing-FusesE217331
Page 95 of 176
GENERAL INFORMATION
Have your vehicle serviced regularly to helpmaintain its roadworthiness and resalevalue. There is a large network ofauthorized dealers that are there to helpyou with their professional servicingexpertise. We believe that their speciallytrained technicians are best qualified toservice your vehicle properly and expertly.They are supported by a wide range ofhighly specialized tools developedspecifically for servicing your vehicle.
If your vehicle requires professional service,an authorized dealer can provide thenecessary parts and service. Check yourwarranty information to find out whichparts and services are covered.
Use only recommended fuels, lubricants,fluids and service parts conforming tospecifications. Motorcraft® parts aredesigned and built to provide the bestperformance in your vehicle.
Precautions
•Do not work on a hot engine.
•Make sure that nothing gets caught inmoving parts.
•Do not work on a vehicle with theengine running in an enclosed space,unless you are sure you have enoughventilation.
•Keep all open flames and other burningmaterial (such as cigarettes) awayfrom the battery and all fuel relatedparts.
Working with the Engine Off
1.Set the parking brake and shift thetransmission to park (P).
2.Switch off the engine.
3.Block the wheels.
Working with the Engine On
WARNING: To reduce the risk ofvehicle damage and personal burninjuries, do not start your engine with theair cleaner removed and do not removeit while the engine is running.
1.Set the parking brake and shift thetransmission to park (P).
2.Block the wheels.
92
Motorhome (TY3) Canada/United States of America, enUSA, Edition date: 201803, Third-Printing-Maintenance
Page 98 of 176
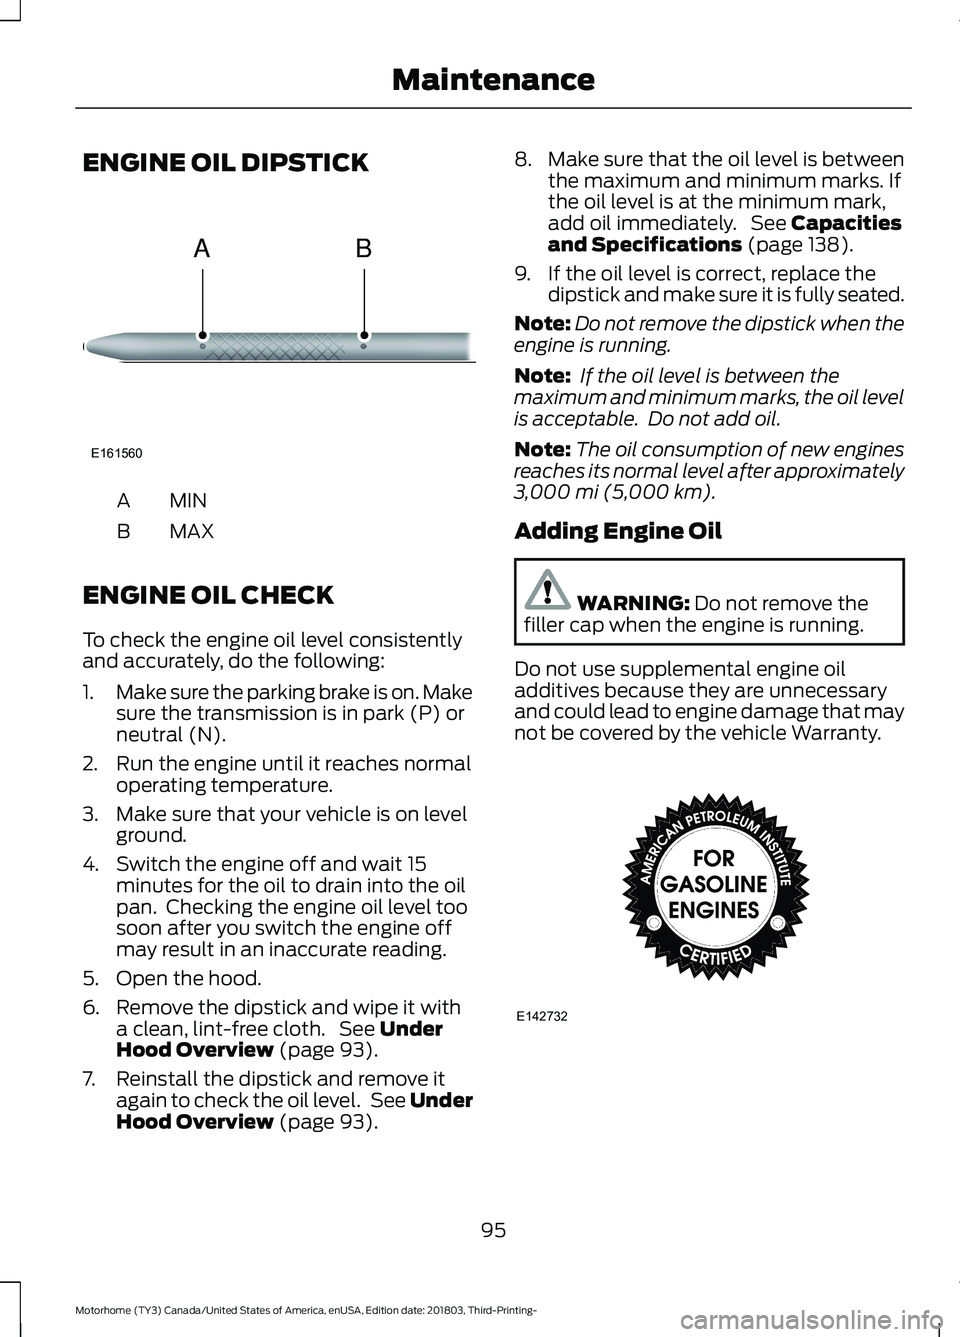
ENGINE OIL DIPSTICK
MINA
MAXB
ENGINE OIL CHECK
To check the engine oil level consistentlyand accurately, do the following:
1.Make sure the parking brake is on. Makesure the transmission is in park (P) orneutral (N).
2.Run the engine until it reaches normaloperating temperature.
3.Make sure that your vehicle is on levelground.
4.Switch the engine off and wait 15minutes for the oil to drain into the oilpan. Checking the engine oil level toosoon after you switch the engine offmay result in an inaccurate reading.
5.Open the hood.
6.Remove the dipstick and wipe it witha clean, lint-free cloth. See UnderHood Overview (page 93).
7.Reinstall the dipstick and remove itagain to check the oil level. See UnderHood Overview (page 93).
8.Make sure that the oil level is betweenthe maximum and minimum marks. Ifthe oil level is at the minimum mark,add oil immediately. See Capacitiesand Specifications (page 138).
9.If the oil level is correct, replace thedipstick and make sure it is fully seated.
Note:Do not remove the dipstick when theengine is running.
Note: If the oil level is between themaximum and minimum marks, the oil levelis acceptable. Do not add oil.
Note:The oil consumption of new enginesreaches its normal level after approximately3,000 mi (5,000 km).
Adding Engine Oil
WARNING: Do not remove thefiller cap when the engine is running.
Do not use supplemental engine oiladditives because they are unnecessaryand could lead to engine damage that maynot be covered by the vehicle Warranty.
95
Motorhome (TY3) Canada/United States of America, enUSA, Edition date: 201803, Third-Printing-MaintenanceE161560AB E142732