warning light FORD F-600 2022 User Guide
[x] Cancel search | Manufacturer: FORD, Model Year: 2022, Model line: F-600, Model: FORD F-600 2022Pages: 740, PDF Size: 12.6 MB
Page 68 of 740

Children must always be properly
restrained. Accident statistics suggest that
children are safer when properly restrained
in the rear seating positions than in the
front seating position. Failure to follow
these instructions may increase the risk of
injury in a crash.
If two adults and a child occupy a vehicle
without rear seats, properly restrain the
child in the center front seat unless doing
so would interfere with driving your vehicle.
This provides lap and shoulder belt
protection for all occupants, and airbag
protection for the adults. A child or infant
properly restrained in the center front seat
should not incur risk of serious injury from
the airbags.
CRASH SENSORS AND
AIRBAG INDICATOR
WARNING: Modifying or adding
equipment to the front of your vehicle
could affect the performance of the
airbag system, increasing the risk of
injury. This includes the hood, bumper
system, frame, front body structure, tow
hooks, hood pins, push bar and
snowplows. Your vehicle has a collection of crash and
occupant sensors. These sensors provide
information to the restraints control
module which activates the following:
•
Seatbelt pretensioners.
• Adaptive steering column.
• Driver airbag.
• Passenger airbag.
• Seat mounted side airbags.
• Safety Canopy.
Based on the type of crash, the restraints
control module deploys the appropriate
safety devices.
The restraints control module also
monitors the readiness of the above safety
devices plus the crash and occupant
sensors. The readiness of the safety
system is indicated by a warning indicator
light in the instrument cluster or by a
backup tone if the warning light is not
working. Routine maintenance of the
airbag is not required.
A difficulty with the system is indicated by
one or more of the following: The readiness light will not
illuminate immediately after you
switch the ignition on.
• The readiness light either flashes or
stays on.
• You hear a series of five tones. The
tone pattern repeats periodically until
the problem, the light or both are
repaired.
If any of these things happen, even
intermittently, have the supplemental
restraint system serviced immediately.
Unless serviced, the system may not
function properly in the event of a crash.
65
2022 Super Duty (TFE) Canada/United States of America, enUSA, Edition date: 202103, First-Printing AirbagsE142846 E67017
Page 99 of 740
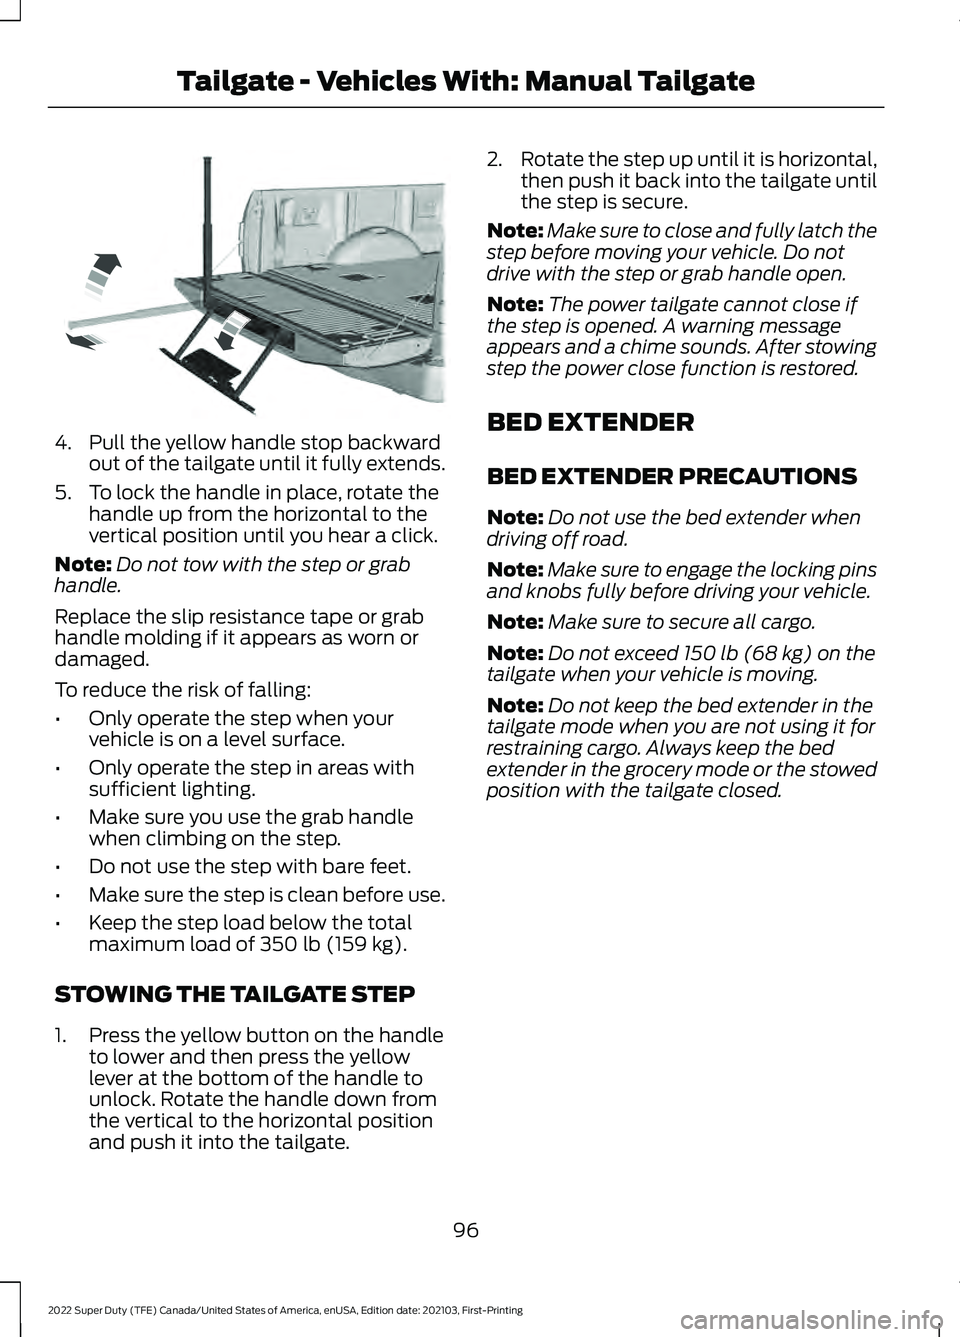
4. Pull the yellow handle stop backward
out of the tailgate until it fully extends.
5. To lock the handle in place, rotate the handle up from the horizontal to the
vertical position until you hear a click.
Note: Do not tow with the step or grab
handle.
Replace the slip resistance tape or grab
handle molding if it appears as worn or
damaged.
To reduce the risk of falling:
• Only operate the step when your
vehicle is on a level surface.
• Only operate the step in areas with
sufficient lighting.
• Make sure you use the grab handle
when climbing on the step.
• Do not use the step with bare feet.
• Make sure the step is clean before use.
• Keep the step load below the total
maximum load of 350 lb (159 kg).
STOWING THE TAILGATE STEP
1. Press the yellow button on the handle to lower and then press the yellow
lever at the bottom of the handle to
unlock. Rotate the handle down from
the vertical to the horizontal position
and push it into the tailgate. 2.
Rotate the step up until it is horizontal,
then push it back into the tailgate until
the step is secure.
Note: Make sure to close and fully latch the
step before moving your vehicle. Do not
drive with the step or grab handle open.
Note: The power tailgate cannot close if
the step is opened. A warning message
appears and a chime sounds. After stowing
step the power close function is restored.
BED EXTENDER
BED EXTENDER PRECAUTIONS
Note: Do not use the bed extender when
driving off road.
Note: Make sure to engage the locking pins
and knobs fully before driving your vehicle.
Note: Make sure to secure all cargo.
Note: Do not exceed
150 lb (68 kg) on the
tailgate when your vehicle is moving.
Note: Do not keep the bed extender in the
tailgate mode when you are not using it for
restraining cargo. Always keep the bed
extender in the grocery mode or the stowed
position with the tailgate closed.
96
2022 Super Duty (TFE) Canada/United States of America, enUSA, Edition date: 202103, First-Printing Tailgate - Vehicles With: Manual TailgateE189557
Page 104 of 740
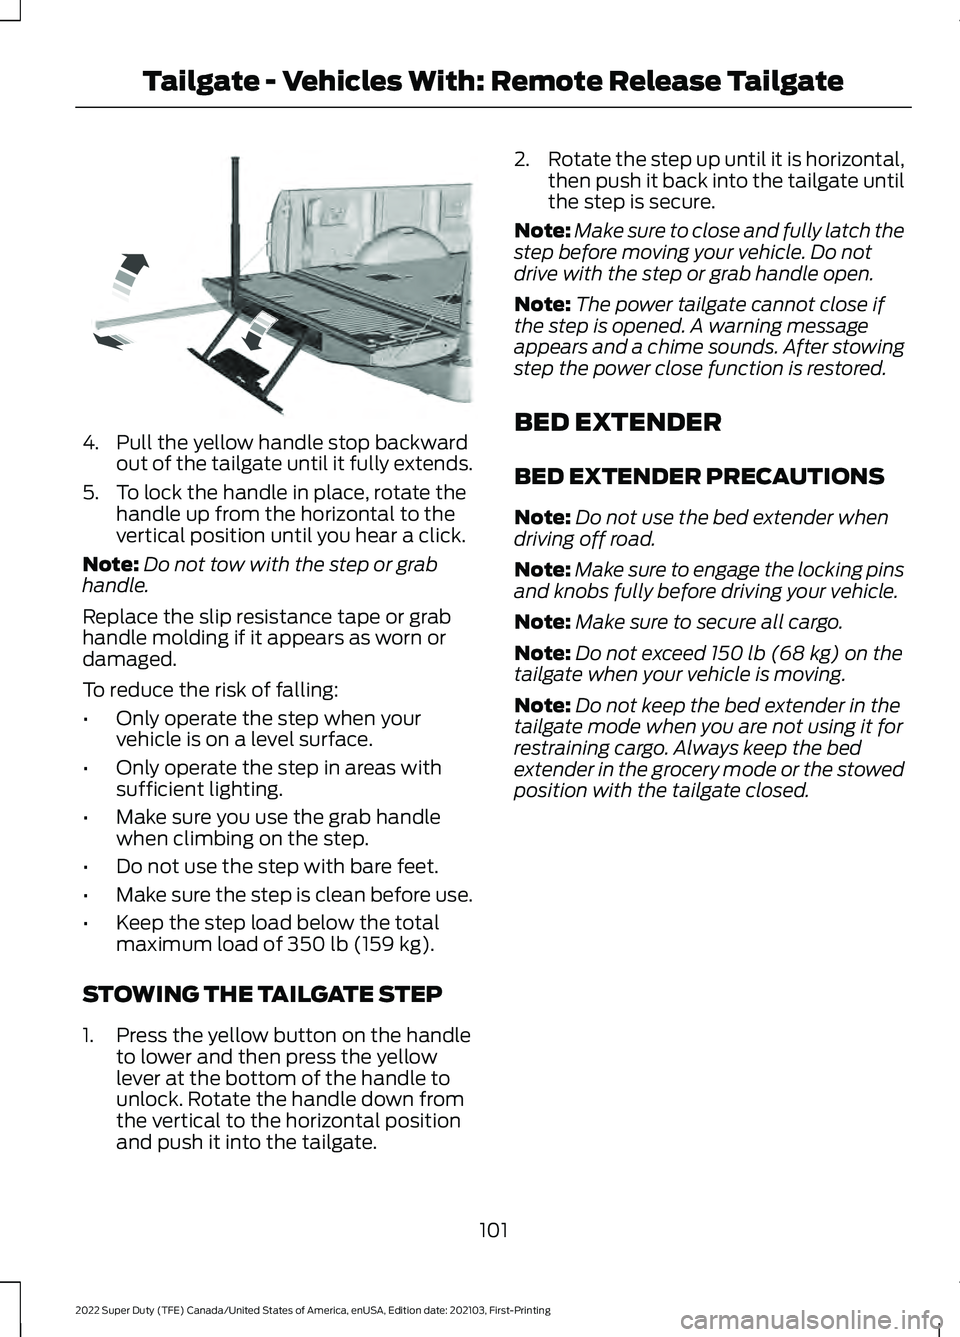
4. Pull the yellow handle stop backward
out of the tailgate until it fully extends.
5. To lock the handle in place, rotate the handle up from the horizontal to the
vertical position until you hear a click.
Note: Do not tow with the step or grab
handle.
Replace the slip resistance tape or grab
handle molding if it appears as worn or
damaged.
To reduce the risk of falling:
• Only operate the step when your
vehicle is on a level surface.
• Only operate the step in areas with
sufficient lighting.
• Make sure you use the grab handle
when climbing on the step.
• Do not use the step with bare feet.
• Make sure the step is clean before use.
• Keep the step load below the total
maximum load of 350 lb (159 kg).
STOWING THE TAILGATE STEP
1. Press the yellow button on the handle to lower and then press the yellow
lever at the bottom of the handle to
unlock. Rotate the handle down from
the vertical to the horizontal position
and push it into the tailgate. 2.
Rotate the step up until it is horizontal,
then push it back into the tailgate until
the step is secure.
Note: Make sure to close and fully latch the
step before moving your vehicle. Do not
drive with the step or grab handle open.
Note: The power tailgate cannot close if
the step is opened. A warning message
appears and a chime sounds. After stowing
step the power close function is restored.
BED EXTENDER
BED EXTENDER PRECAUTIONS
Note: Do not use the bed extender when
driving off road.
Note: Make sure to engage the locking pins
and knobs fully before driving your vehicle.
Note: Make sure to secure all cargo.
Note: Do not exceed
150 lb (68 kg) on the
tailgate when your vehicle is moving.
Note: Do not keep the bed extender in the
tailgate mode when you are not using it for
restraining cargo. Always keep the bed
extender in the grocery mode or the stowed
position with the tailgate closed.
101
2022 Super Duty (TFE) Canada/United States of America, enUSA, Edition date: 202103, First-Printing Tailgate - Vehicles With: Remote Release TailgateE189557
Page 122 of 740
How long may it take for the
acceptable condensation to be
cleared?
Clearing time may take as long as 48
hours under dry weather conditions.
How much condensation is
unacceptable? A water puddle inside the lamp.
Streaks, drip marks or large droplets
present on the interior of the lens.
What should I do if unacceptable
condensation is present? Have your vehicle checked as soon as
possible.
Why do my headlamps turn off when I
have them switched on when I switch
my vehicle off? The battery saver turns the headlamps
off after a short period of time after
you switch your vehicle off.
AUTOLAMPS
WHAT ARE AUTOLAMPS WARNING: The system does not
relieve you of your responsibility to drive
with due care and attention. You may
need to override the system if it does not
turn the headlamps on in low visibility
conditions, for example daytime fog.
Autolamps turn the headlamps on in low
light situations or when the windshield
wipers operate.
AUTOLAMP SETTINGS
1. Using the instrument cluster controls on the steering wheel, select Settings.
2. Select
Vehicle. 3. Select
Lighting.
4. Select
Autolamp Delay.
5. Select a setting and press the
OK
button.
EXTERIOR LAMPS
SWITCHING THE TURN SIGNAL
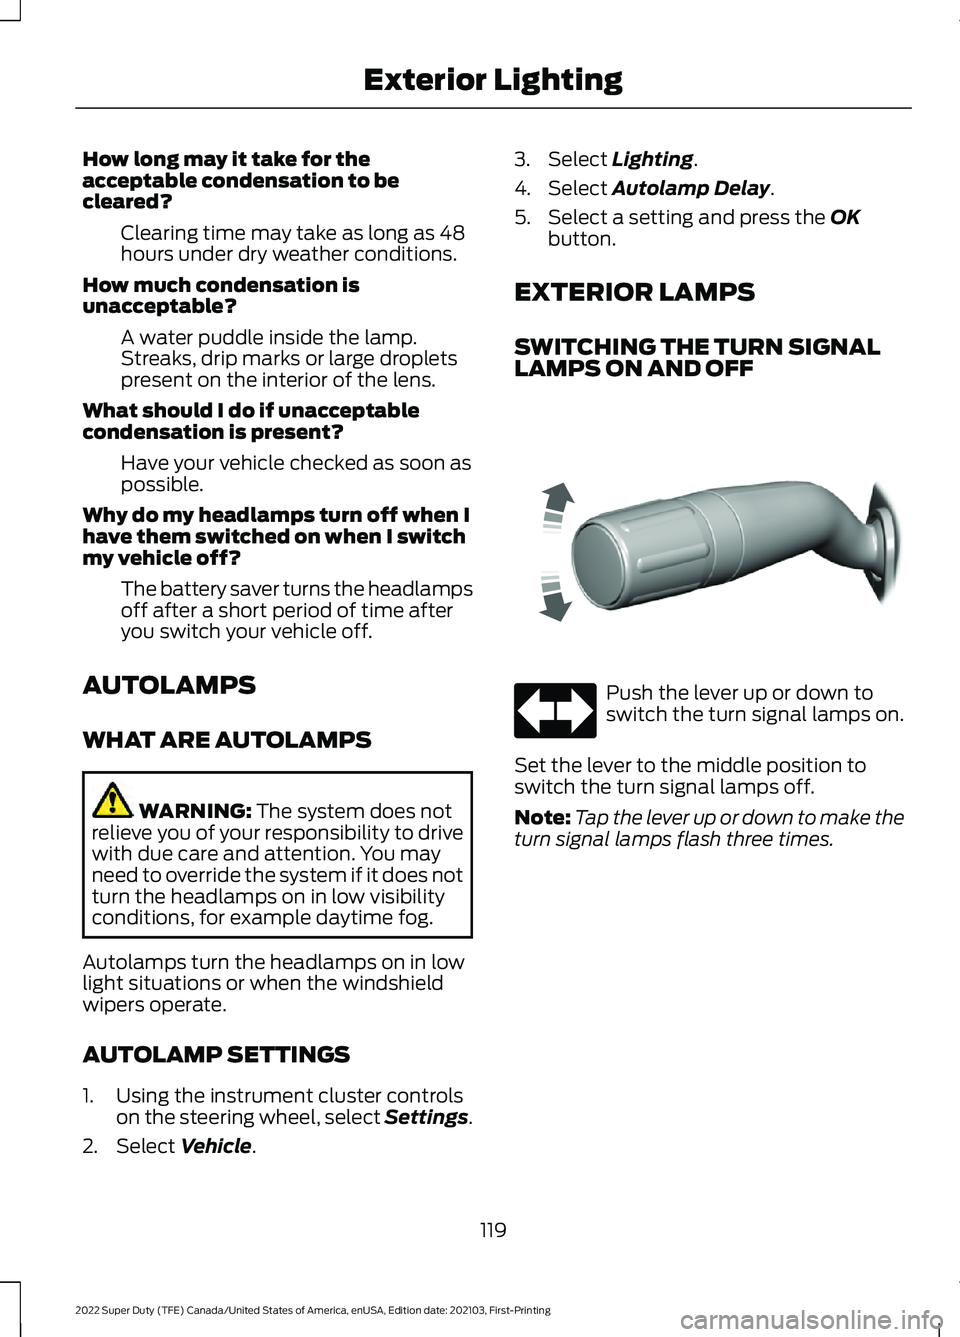
LAMPS ON AND OFF Push the lever up or down to
switch the turn signal lamps on.
Set the lever to the middle position to
switch the turn signal lamps off.
Note: Tap the lever up or down to make the
turn signal lamps flash three times.
119
2022 Super Duty (TFE) Canada/United States of America, enUSA, Edition date: 202103, First-Printing Exterior LightingE311431
Page 123 of 740
SWITCHING THE DAYTIME
RUNNING LAMPS ON AND OFF -
VEHICLES WITH: CONFIGURABLE
DAYTIME RUNNING LAMPS
WARNING: The daytime running
lamps system does not activate the rear
lamps and may not provide adequate
lighting during low visibility driving
conditions. Make sure you switch the
headlamps on, as appropriate, during all
low visibility conditions. Failure to do so
may result in a crash.
1. Using the instrument cluster controls on the steering wheel, select Settings.
2. Select
Vehicle.
3. Select
Lighting.
4. Switch
Daytime Running Lights on or
off.
The daytime running lamps turn on when
all of the following occur:
• You switch the system on.
• You switch your vehicle on.
• The transmission is not in park (P) for
vehicles with automatic transmissions
or you release the parking brake for
vehicles with manual transmissions.
• The lighting control is in the autolamps
position.
• The headlamps are off.
Note: Other lighting control positions do
not turn on the daytime running lamps. SWITCHING THE DAYTIME
RUNNING LAMPS ON AND OFF -
VEHICLES WITH: DAYTIME
RUNNING LAMPS (DRL) WARNING:
The daytime running
lamps system does not activate the rear
lamps and may not provide adequate
lighting during low visibility driving
conditions. Make sure you switch the
headlamps on, as appropriate, during all
low visibility conditions. Failure to do so
may result in a crash.
Daytime running lamps are always on
unless you switch on the headlamps or
your vehicle is in park (P).
SWITCHING THE FRONT FOG
LAMPS ON AND OFF
(If Equipped)
The front fog lamp button is on the lighting
control. Press the button to switch the
front fog lamps on or off.
Note: Only switch the front fog lamps on
during reduced visibility.
Note: The brightness of the daytime running
lamps may decrease when the front fog
lamps are switched on.
Note: When the lighting control is in the
autolamps position, you cannot switch the
fog lamps on unless the headlamps are on.
SWITCHING THE CARGO LAMPS
ON
(If Equipped) Press the button in the lighting
control or in the rear cargo box.
120
2022 Super Duty (TFE) Canada/United States of America, enUSA, Edition date: 202103, First-Printing Exterior Lighting E189587
Page 124 of 740
SWITCHING THE SPOT LAMPS ON
AND OFF (If Equipped)
The spot lamp buttons are near the lighting
control. Press the button to switch on the
left-hand spot lamp.
Press the button to switch on the
right-hand spot lamp.
Move the position of the exterior mirrors
to adjust the aim.
Note: The lighting control must be set to
the parking lamp position.
Note: The spot lamps illuminate the area
in front of and to the side of your vehicle.
EXTERIOR LAMP INDICATORS
Front Fog Lamp It illuminates when you switch
the front fog lamps on.
Turn Signal Lamp It flashes when you switch the
turn signal lamps on.
Note: An increase in the rate of flashing
warns of a failed turn signal lamp.
EXTERIOR LAMP AUDIBLE
WARNING
Exterior Lamps On
Sounds when you open the driver door and
the exterior lamps are on. AUTOMATIC HIGH BEAM
CONTROL (IF EQUIPPED)
HOW DOES AUTOMATIC HIGH
BEAM CONTROL WORK
Automatic high beam control turns the
high beams on if it is dark enough and no
other traffic is present. If it detects an
approaching vehicle ’s headlamps or tail
lamps, or street lighting ahead, the system
turns the high beams off.
A camera sensor, centrally mounted
behind the windshield of your vehicle,
continuously monitors conditions to turn
the high beams on and off.
121
2022 Super Duty (TFE) Canada/United States of America, enUSA, Edition date: 202103, First-Printing Exterior LightingE340436 E340437
Page 125 of 740
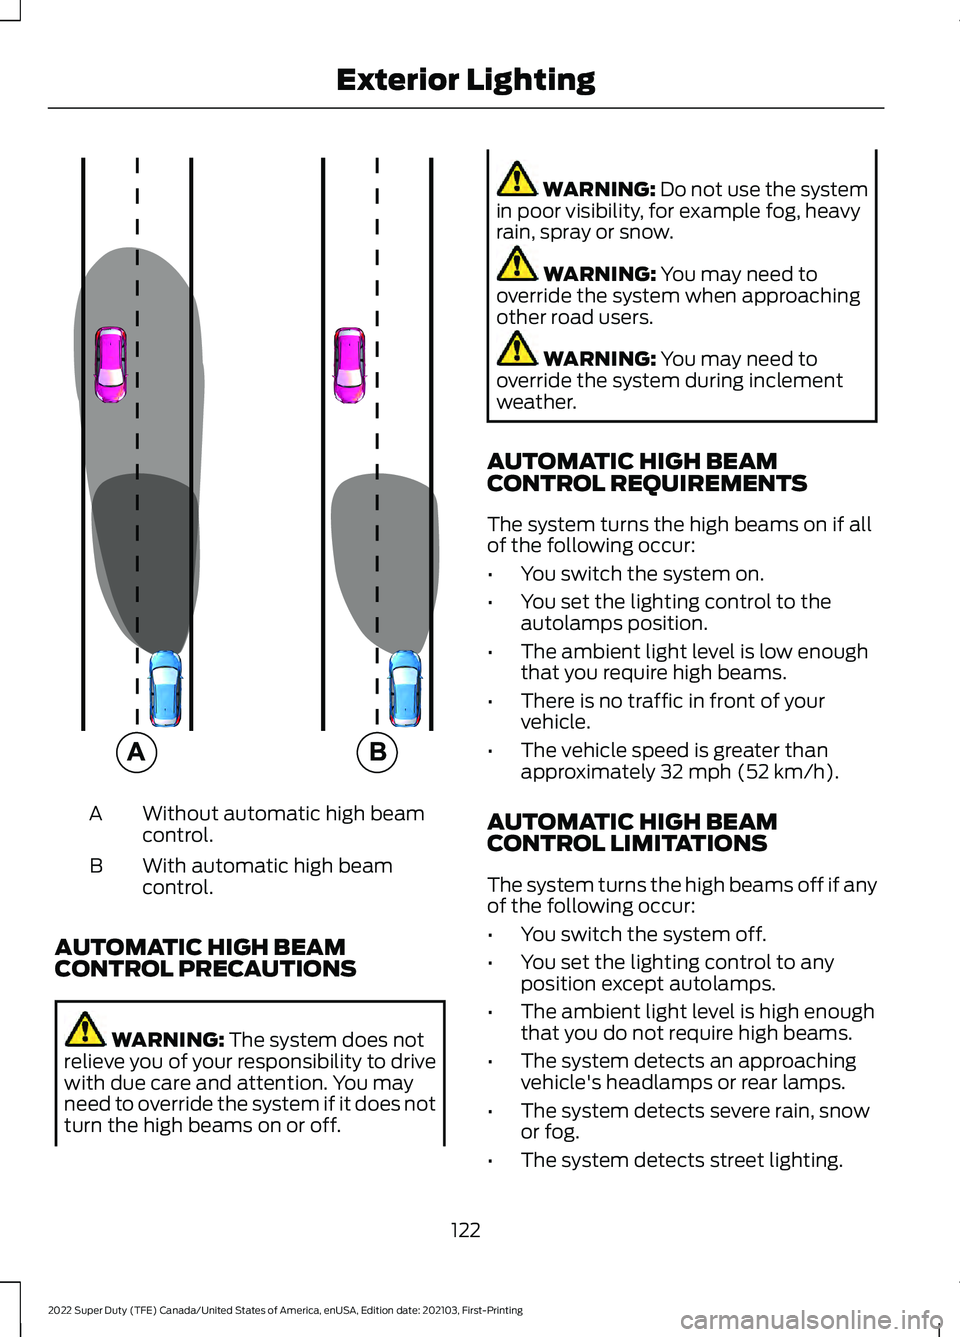
Without automatic high beam
control.
A
With automatic high beam
control.
B
AUTOMATIC HIGH BEAM
CONTROL PRECAUTIONS WARNING: The system does not
relieve you of your responsibility to drive
with due care and attention. You may
need to override the system if it does not
turn the high beams on or off. WARNING:
Do not use the system
in poor visibility, for example fog, heavy
rain, spray or snow. WARNING:
You may need to
override the system when approaching
other road users. WARNING:
You may need to
override the system during inclement
weather.
AUTOMATIC HIGH BEAM
CONTROL REQUIREMENTS
The system turns the high beams on if all
of the following occur:
• You switch the system on.
• You set the lighting control to the
autolamps position.
• The ambient light level is low enough
that you require high beams.
• There is no traffic in front of your
vehicle.
• The vehicle speed is greater than
approximately
32 mph (52 km/h).
AUTOMATIC HIGH BEAM
CONTROL LIMITATIONS
The system turns the high beams off if any
of the following occur:
• You switch the system off.
• You set the lighting control to any
position except autolamps.
• The ambient light level is high enough
that you do not require high beams.
• The system detects an approaching
vehicle's headlamps or rear lamps.
• The system detects severe rain, snow
or fog.
• The system detects street lighting.
122
2022 Super Duty (TFE) Canada/United States of America, enUSA, Edition date: 202103, First-Printing Exterior Lighting E327596
Page 129 of 740
OPENING AND CLOSING THE
WINDOWS
WARNING: Do not leave children
unattended in your vehicle and do not
let them play with the power windows.
Failure to follow this instruction could
result in personal injury. WARNING:
When closing the
power windows, verify they are free of
obstruction and make sure that children
and pets are not in the proximity of the
window openings. Press the window control switch
to open the window. Lift the
window control switch to close
the window.
Note: The power windows operate with the
ignition on, and for several minutes after you
switch the ignition off or until you open a
front door.
To reduce wind noise or pulsing noise when
one window is open, slightly open the
opposite window.
One-Touch Open
Fully press the window control switch and
release it. Press again or lift it to stop the
window.
One-Touch Close
Fully lift the window control switch and
release it. Press again or lift it to stop the
window.
Resetting One-Touch Close
Carry out all steps within 30 seconds of
starting the sequence.
1. Close the window. 2. Press and hold the window control
switch until the window is fully open.
Keep the window control switch
pressed for a few seconds.
3. Lift and hold the window control switch
until the window is fully closed. Keep
the window control switch held for a
few seconds.
4. Press and hold the window control switch until the window is fully open.
Keep the window control switch
pressed for a few seconds.
5. Lift and hold the window control switch
until the window is fully closed. Keep
the window control switch held for a
few seconds.
Note: Repeat the procedure if the window
does not close when you use one-touch.
WINDOW BOUNCE-BACK
WHAT IS WINDOW BOUNCE-BACK
The window stops and reverses if it detects
an obstruction when closing.
OVERRIDING WINDOW BOUNCE-
BACK WARNING:
If you override
bounce-back, the window does not
reverse if it detects an obstacle. Take
care when closing the windows to avoid
personal injury or damage to your
vehicle.
1. Close the window until it reaches the point of resistance and let it reverse.
2. Lift and hold the window control switch
within two seconds to override
bounce-back and close the window.
Bounce-back is now disabled and you
can close the window manually.
126
2022 Super Duty (TFE) Canada/United States of America, enUSA, Edition date: 202103, First-Printing Windows
Page 131 of 740
INTERIOR MIRROR
PRECAUTIONS
WARNING: Do not adjust the
mirrors when your vehicle is moving. This
could result in the loss of control of your
vehicle, serious personal injury or death.
Note: Do not clean the mirror housing or
glass with harsh abrasives, fuel or other
petroleum-based cleaning products.
MANUALLY DIMMING THE
INTERIOR MIRROR
Pull the tab below the mirror toward you
to reduce glare at night.
AUTO-DIMMING INTERIOR
MIRROR
(IF EQUIPPED)
WHAT IS THE AUTO-DIMMING
INTERIOR MIRROR
The mirror dims to reduce the effect of
bright light from behind. It returns to
normal when the bright light from behind
is no longer present or if you shift into
reverse (R).
AUTO-DIMMING INTERIOR
MIRROR LIMITATIONS
Do not block the sensors on the front and
back of the mirror.
Note: A rear center passenger or raised rear
center head restraint could prevent light
from reaching the sensor.
128
2022 Super Duty (TFE) Canada/United States of America, enUSA, Edition date: 202103, First-Printing Interior Mirror
Page 132 of 740
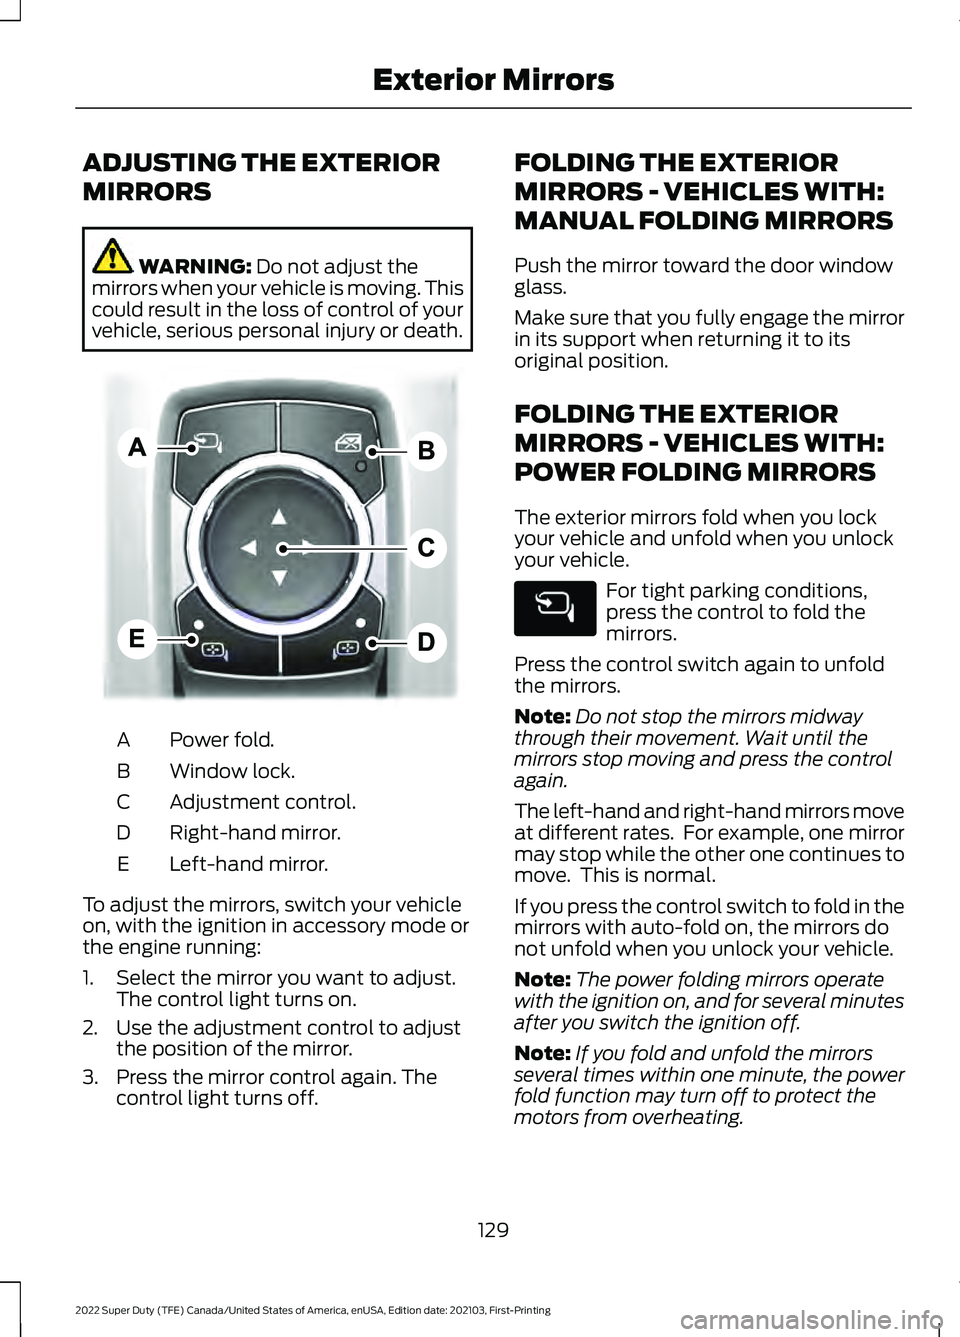
ADJUSTING THE EXTERIOR
MIRRORS
WARNING: Do not adjust the
mirrors when your vehicle is moving. This
could result in the loss of control of your
vehicle, serious personal injury or death. Power fold.
A
Window lock.
B
Adjustment control.
C
Right-hand mirror.
D
Left-hand mirror.
E
To adjust the mirrors, switch your vehicle
on, with the ignition in accessory mode or
the engine running:
1. Select the mirror you want to adjust. The control light turns on.
2. Use the adjustment control to adjust the position of the mirror.
3. Press the mirror control again. The control light turns off. FOLDING THE EXTERIOR
MIRRORS - VEHICLES WITH:
MANUAL FOLDING MIRRORS
Push the mirror toward the door window
glass.
Make sure that you fully engage the mirror
in its support when returning it to its
original position.
FOLDING THE EXTERIOR
MIRRORS - VEHICLES WITH:
POWER FOLDING MIRRORS
The exterior mirrors fold when you lock
your vehicle and unfold when you unlock
your vehicle.
For tight parking conditions,
press the control to fold the
mirrors.
Press the control switch again to unfold
the mirrors.
Note: Do not stop the mirrors midway
through their movement. Wait until the
mirrors stop moving and press the control
again.
The left-hand and right-hand mirrors move
at different rates. For example, one mirror
may stop while the other one continues to
move. This is normal.
If you press the control switch to fold in the
mirrors with auto-fold on, the mirrors do
not unfold when you unlock your vehicle.
Note: The power folding mirrors operate
with the ignition on, and for several minutes
after you switch the ignition off.
Note: If you fold and unfold the mirrors
several times within one minute, the power
fold function may turn off to protect the
motors from overheating.
129
2022 Super Duty (TFE) Canada/United States of America, enUSA, Edition date: 202103, First-Printing Exterior MirrorsE311081