ignition FORD F-600 2022 Manual PDF
[x] Cancel search | Manufacturer: FORD, Model Year: 2022, Model line: F-600, Model: FORD F-600 2022Pages: 740, PDF Size: 12.6 MB
Page 385 of 740
AUTOMATIC CRASH SHUTOFF
PRECAUTIONS
WARNING: If your vehicle has been
involved in a crash, have the fuel system
checked. Failure to follow this instruction
could result in fire, personal injury or
death.
RE-ENABLING YOUR VEHICLE
1. Switch the ignition off.
2. Attempt to start your vehicle.
3. Switch the ignition off.
4. Attempt to start your vehicle.
Note: If your vehicle does not start after the
third attempt, have your vehicle checked as
soon as possible.
RECOVERY TOWING
ACCESSING THE FRONT TOWING
POINT WARNING: Using recovery hooks
is dangerous and should only be done by
a person familiar with proper vehicle
recovery safety practices. Improper use
of recovery hooks may cause hook failure
or separation from the vehicle and could
result in serious injury or death. WARNING:
Slowly remove the
slack from the recovery strap prior to
pulling. Failure to do so can introduce
significantly higher loads which can
cause the recovery hooks to break off, or
the recovery strap to fail which can cause
serious injury or death. WARNING:
Never link two straps
together with a clevis pin. These heavy
metal objects could become projectiles
if the strap breaks and can cause serious
injury or death.
Your vehicle has frame-mounted front
recovery hooks.
Note: Do not apply a load to the recovery
hooks that is greater than the gross vehicle
weight rating of your vehicle.
Before using recovery hooks:
• Make sure all attaching points are
secure and capable of withstanding
the applied load.
• Do not use chains, cables or tow straps
with metal hook ends.
• Only use recovery straps that have a
minimum breaking strength two to
three times the gross vehicle weight of
the stuck vehicle.
• Make sure the recovery strap is in good
condition and free of visible cuts, tears
or damage.
• Use a damper device such as a tarp,
heavy blanket or piece of carpet, and
place it over the recovery strap to help
absorb the energy in the event the
strap breaks.
• Make sure the stuck vehicle is not
loaded heavier than its gross vehicle
weight rating specified on the
certification label.
• Align the tow vehicle and stuck vehicle
in a straight line, within 10 degrees.
• Keep bystanders to the sides of the
vehicle, at a distance of at least twice
the length of the recovery strap. This
helps avoid injury from the hazard of a
recovery hook or strap breaking, or a
vehicle lurching into their path.
382
2022 Super Duty (TFE) Canada/United States of America, enUSA, Edition date: 202103, First-Printing Crash and Breakdown Information
Page 387 of 740
TOWING YOUR VEHICLE
PRECAUTIONS
Use the following guidelines when towing
your vehicle. Failure to follow this
instruction could result in vehicle damage
not covered by the vehicle warranty.
Note:
Make sure you properly secure your
vehicle to the tow vehicle.
Note: If you are unsure of the vehicle ’s
configuration, contact an authorized dealer.
RECREATIONALLY TOWING
YOUR VEHICLE - 4X4 WARNING: Do not disconnect the
battery when recreationally towing your
vehicle. This prevents the transfer case
from shifting properly and could cause
the vehicle to roll, even if the
transmission is in park (P). WARNING:
Placing the transfer
case in its neutral position could cause
your vehicle to freely roll. Make sure you
press and hold the brake pedal and the
vehicle is in a secure, safe position when
you place the transfer case in its neutral
position.
Follow these guidelines if you have a need
for recreational towing. An example of
recreational towing would be towing your
vehicle behind a motorhome. These
guidelines are to make sure that you do
not damage the transmission. You can only tow your vehicle with all
wheels on the ground by placing the
transfer case in its neutral position and
engaging the recreational tow feature.
Perform the following steps after
positioning your vehicle behind the tow
vehicle and properly securing them
together.
Note:
Put your climate control system in
recirculated air mode to prevent exhaust
fumes from entering your vehicle.
Note: Failure to put the transfer case in its
neutral position can damage vehicle
components.
Note: You can check the towing status at
any time by opening the driver door or
turning the ignition to the accessory or on
position. Neutral Tow Enabled Leave
Transmission in Neutral
appears in the
instrument cluster display to confirm you
can recreationally tow your vehicle.
Note: If your vehicle has an anti-theft
alarm, make sure you switch perimeter
sensing on when towing. See
Setting the
Alarm Security Level (page 107).
Switching
Neutral Tow On
1. Place your vehicle in accessory mode by pressing the push button ignition
switch once without pressing the brake
pedal or by turning the ignition key to
the on position.
2. Press and hold the brake pedal.
3. Rotate the four-wheel drive control to 2H
.
4. Shift into neutral (N).
5. Using the instrument cluster controls on the steering wheel, select Settings.
6. Select
Advanced Settings.
7. Select
Vehicle.
8. Select
Neutral Tow.
384
2022 Super Duty (TFE) Canada/United States of America, enUSA, Edition date: 202103, First-Printing Towing Your Vehicle
Page 388 of 740
9. Press and hold the OK button until a
confirmation message appears in the
information display.
Note: If completed successfully, the
information display shows
Neutral Tow
Enabled Leave Transmission in Neutral.
This indicates that your vehicle is safe to
tow with all wheels on the ground.
Note: If you do not see a confirmation
message in the instrument cluster display,
you must perform the procedure again from
the beginning.
Note: You may hear noise as the transfer
case shifts into its neutral position. This is
normal.
10. Leave the transmission in neutral (N)
and switch your vehicle off by
pressing the push button ignition
switch once without pressing the
brake pedal or turning the key as far
toward the off position.
Note: Vehicles with keys do not turn to the
off position when the transmission is in
neutral (N). You must leave the key in the
ignition when towing. Use the keyless entry
keypad or an extra set of keys to lock and
unlock your vehicle.
Switching
Neutral Tow Off
1. With your vehicle properly secured to the tow vehicle, place your vehicle in
accessory mode by pressing the push
button ignition switch once without
pressing the brake pedal or by turning
the ignition key to the on position.
2. Press and hold the brake pedal.
3. Shift out of neutral (N).
4. Release the brake pedal.
Note: If completed successfully, the
instrument cluster displays 2H and Neutral
Tow Disabled
. Note:
You must perform the switching
neutral tow on and switching neutral tow
off procedures again from the beginning if
the indicator light and message do not
display.
Note: You may hear a noise as the transfer
case shifts out of its neutral position. This
is normal.
5. Apply the parking brake, then disconnect your vehicle from the tow
vehicle.
6. Release the parking brake, start the engine, and shift into drive (D) to make
sure the transfer case is out of the
neutral tow position.
7. If the transfer case does not successfully shift out of its neutral
position, set the parking brake. Have
your vehicle checked as soon as
possible.
Resolving the
Shift Delayed Pull
Forward Message
1. Press and hold the brake pedal.
2. Start your vehicle.
3. Shift into neutral (N).
4. With the vehicle running, shift into drive
(D) and let the vehicle roll forward up
to
3 ft (1 m).
Note: You may hear a noise as the transfer
case shifts out of its neutral position. This
is normal.
5. Make sure the instrument cluster displays
Neutral Tow Disabled.
385
2022 Super Duty (TFE) Canada/United States of America, enUSA, Edition date: 202103, First-Printing Towing Your Vehicle
Page 394 of 740
Protected Component
Rating
Item
Powertrain control module.
20 A
51
Compressed natural gas
(gas).
15 A
52
Fuel rail pressure relief
control (diesel).
Exhaust gas recirculation
stepper motor (gas).
20 A
53
Universal exhaust gas
oxygen sensors (gas).
Exhaust gas recirculation
cooler bypass (diesel).
Urea pump motor controller
(diesel).
Oxygen sensors.
A/C clutch relay power.
20 A
54
Fan clutch.
Rain sensor.
5 A
55
Windshield wipers.
30 A
56
Upfitter interface module.
10 A
57
Alternator sense line.
10 A
58
Power running boards.
30 A
59
Body control module -
battery power in feed 2.
40 A
60
Telescopic mirror motors.
10 A
61
Trailer brake control.
40 A
62
Aftermarket e-brake access.
Multi-contour seats.
15 A
63
Ignition coil (gas).
20 A
64
Glow plug module (diesel).
Nitrogen oxide module
(diesel).
Urea level and quality sensor
(diesel).
Fuel pump.
30 A
65
A/C clutch solenoid.
10 A
66
391
2022 Super Duty (TFE) Canada/United States of America, enUSA, Edition date: 202103, First-Printing Fuses
Page 397 of 740
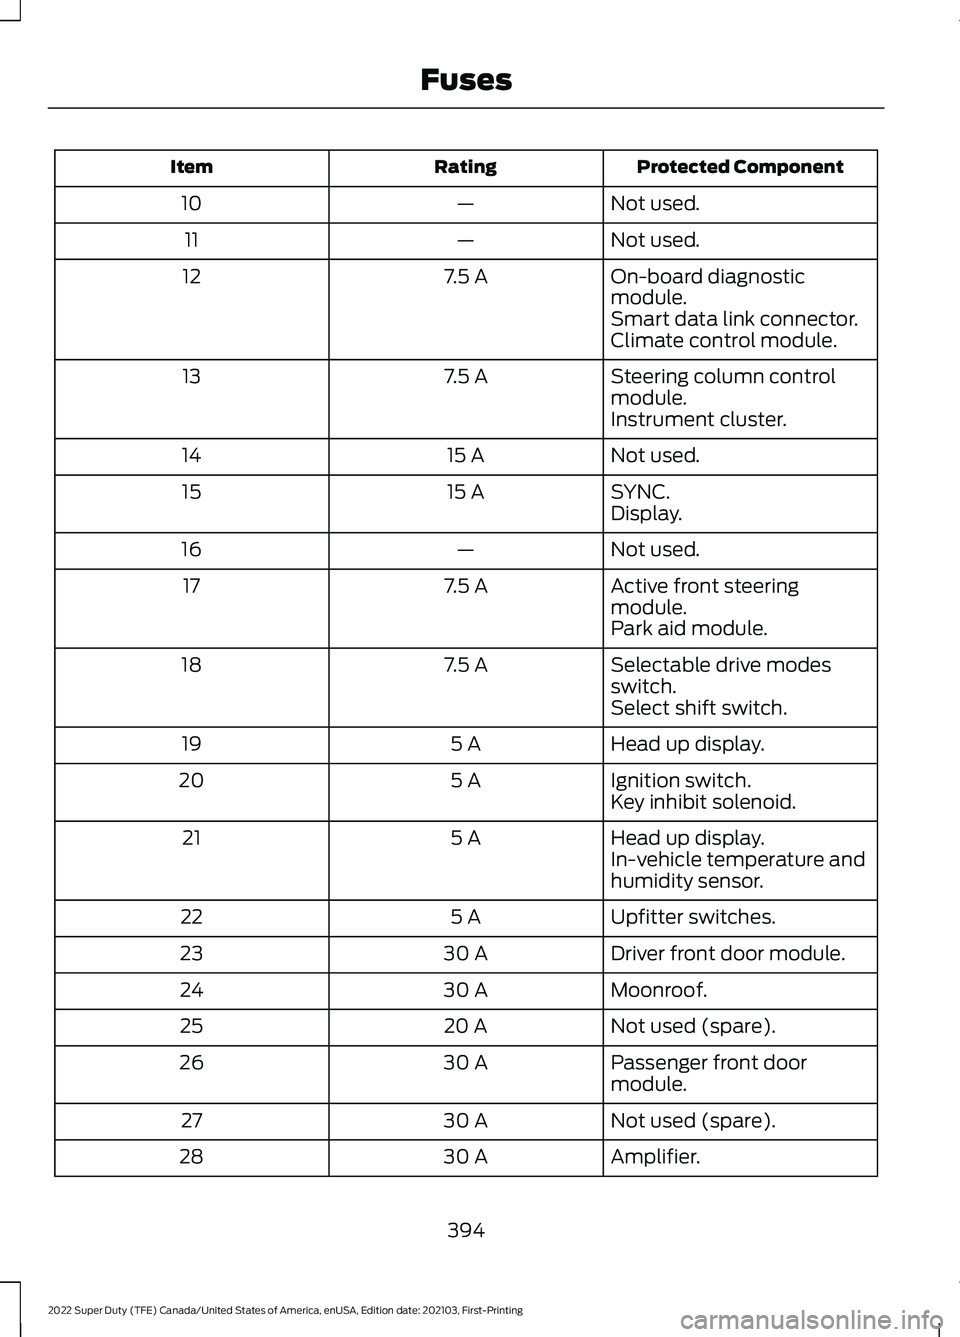
Protected Component
Rating
Item
Not used.
—
10
Not used.
—
11
On-board diagnostic
module.
7.5 A
12
Smart data link connector.
Climate control module.
Steering column control
module.
7.5 A
13
Instrument cluster.
Not used.
15 A
14
SYNC.
15 A
15
Display.
Not used.
—
16
Active front steering
module.
7.5 A
17
Park aid module.
Selectable drive modes
switch.
7.5 A
18
Select shift switch.
Head up display.
5 A
19
Ignition switch.
5 A
20
Key inhibit solenoid.
Head up display.
5 A
21
In-vehicle temperature and
humidity sensor.
Upfitter switches.
5 A
22
Driver front door module.
30 A
23
Moonroof.
30 A
24
Not used (spare).
20 A
25
Passenger front door
module.
30 A
26
Not used (spare).
30 A
27
Amplifier.
30 A
28
394
2022 Super Duty (TFE) Canada/United States of America, enUSA, Edition date: 202103, First-Printing Fuses
Page 413 of 740

To maintain correct operation of the
battery management system, if you add
any electrical devices to your vehicle, do
not connect the ground connection directly
to the negative battery terminal. A
connection at the negative battery terminal
can cause inaccurate measurements of
the battery condition and potential
incorrect system operation.
Note:
If you add electrical accessories or
components to your vehicle this may
adversely affect battery performance,
durability and the performance of other
electrical systems on your vehicle.
If you replace the battery make sure it
matches the electrical requirements of
your vehicle.
If you disconnect or replace the battery
and your vehicle has an automatic
transmission, it must relearn its adaptive
strategy. Because of this, the transmission
may shift firmly when first driven. This is
normal operation while the transmission
fully updates its operation to optimum
shift feel.
Remove and Reinstall the Battery
To disconnect or remove the battery, do
the following:
1. Apply the parking brake and switch the
ignition off.
2. Switch all electrical equipment off, for
example lights and radio.
3. Wait a minimum of two minutes before
disconnecting the battery.
Note: The engine management system has
a power hold function and remains powered
for a period of time after you switch the
ignition off. This is to allow diagnostic and
adaptive tables to be stored. Disconnecting
the battery without waiting can cause
damage not covered by the vehicle
Warranty. 4. Disconnect the negative battery cable
terminal.
5. Disconnect the positive battery cable terminal.
6. Remove the battery securing clamp.
7. Remove the battery.
8. To install, reverse the removal procedure.
Note: Before reconnecting the battery,
make sure the ignition remains switched off.
Note: Make sure the battery cable terminals
are fully tightened.
Note: After cleaning or replacing the
battery, make sure you reinstall the battery
cover or shield.
If you disconnect or replace the vehicle
battery, you must reset the following
features:
• Window bounce-back. See Window
Bounce-Back (page 126).
• Clock Settings.
• Pre-set radio stations.
• Steering Angle Sensor.
Note: To calibrate the steering angle
sensor, drive the vehicle above
30 mph
(50 km/h) for a minimum of 1.2 mi (2 km).
Make sure to drive straight ahead for a
minimum of 30 seconds. Several vehicle
functions are disabled and a warning light
could appear until the sensor is calibrated.
Battery Management System
The battery management system monitors
battery conditions and takes actions to
extend battery life. If excessive battery
drain is detected, the system temporarily
disables some of the following features:
• Heated rear window.
• Heated seats.
• Climate control.
• Heated steering wheel.
410
2022 Super Duty (TFE) Canada/United States of America, enUSA, Edition date: 202103, First-Printing Maintenance
Page 414 of 740
•
Audio unit.
• Navigation system.
A message may appear in the information
display to alert you that battery protection
actions are active.
After battery replacement, or in some
cases after charging the battery with an
external charger, the battery management
system requires eight hours of vehicle sleep
time to relearn the battery state of charge.
During this time your vehicle must remain
fully locked with the ignition off.
Note: If you add electrical accessories or
components to the vehicle, it may adversely
affect battery performance and durability.
This may also affect the performance of
other electrical systems in the vehicle.
Battery Disposal Make sure that you dispose of
old batteries in an
environmentally friendly way.
Seek advice from your local authority
about recycling old batteries.
ADJUSTING THE HEADLAMPS
Vertical Aim Adjustment
The headlamps on your vehicle are
properly aimed at the assembly plant. If
your vehicle has been in an accident, have
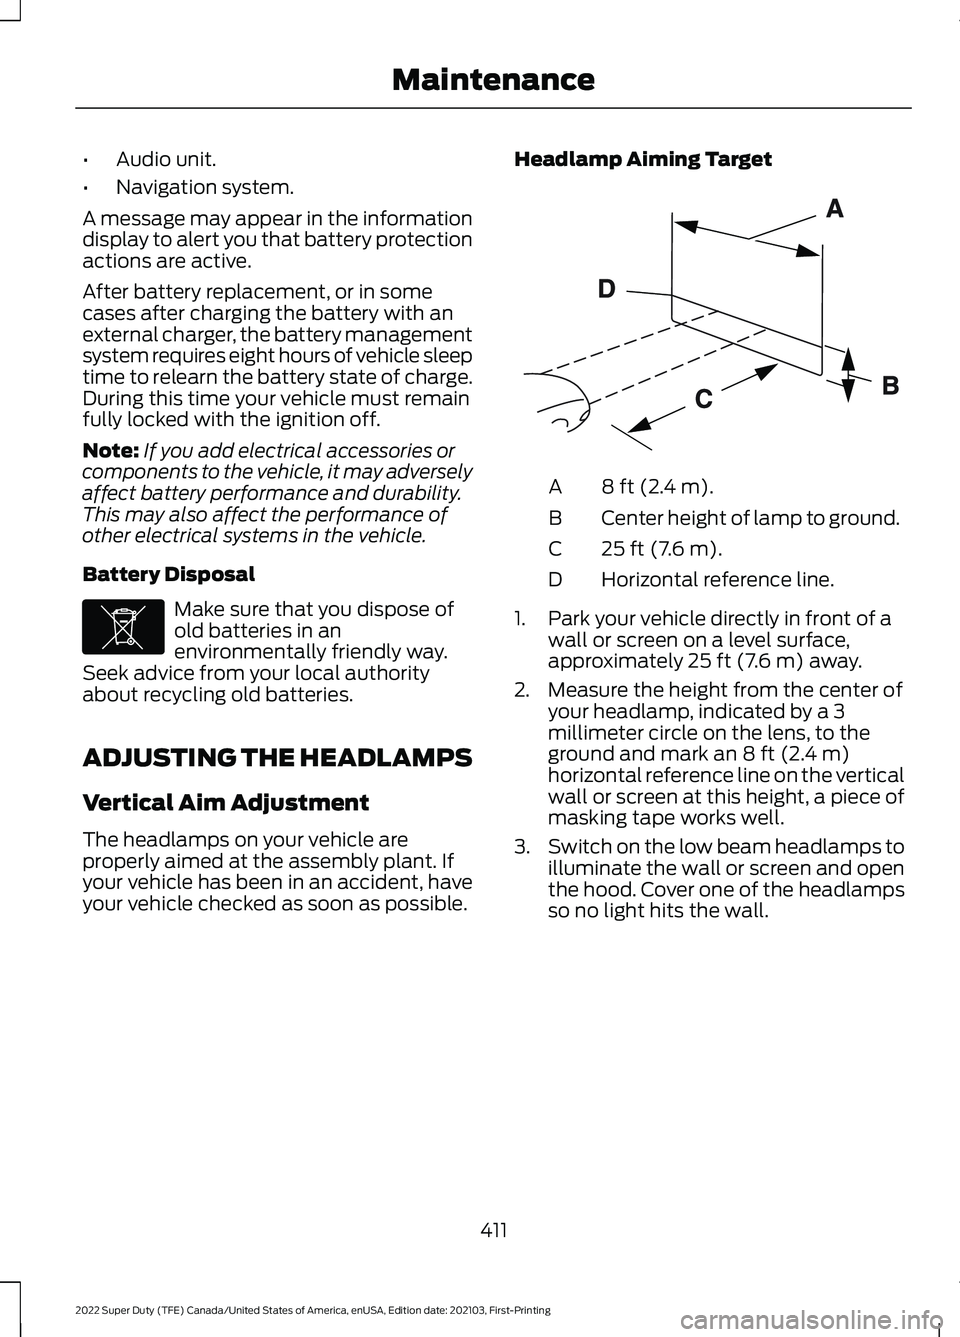
your vehicle checked as soon as possible. Headlamp Aiming Target 8 ft (2.4 m).
A
Center height of lamp to ground.
B
25 ft (7.6 m).
C
Horizontal reference line.
D
1. Park your vehicle directly in front of a wall or screen on a level surface,
approximately 25 ft (7.6 m) away.
2. Measure the height from the center of your headlamp, indicated by a 3
millimeter circle on the lens, to the
ground and mark an
8 ft (2.4 m)
horizontal reference line on the vertical
wall or screen at this height, a piece of
masking tape works well.
3. Switch on the low beam headlamps to
illuminate the wall or screen and open
the hood. Cover one of the headlamps
so no light hits the wall.
411
2022 Super Duty (TFE) Canada/United States of America, enUSA, Edition date: 202103, First-Printing MaintenanceE107998 E142592
Page 417 of 740
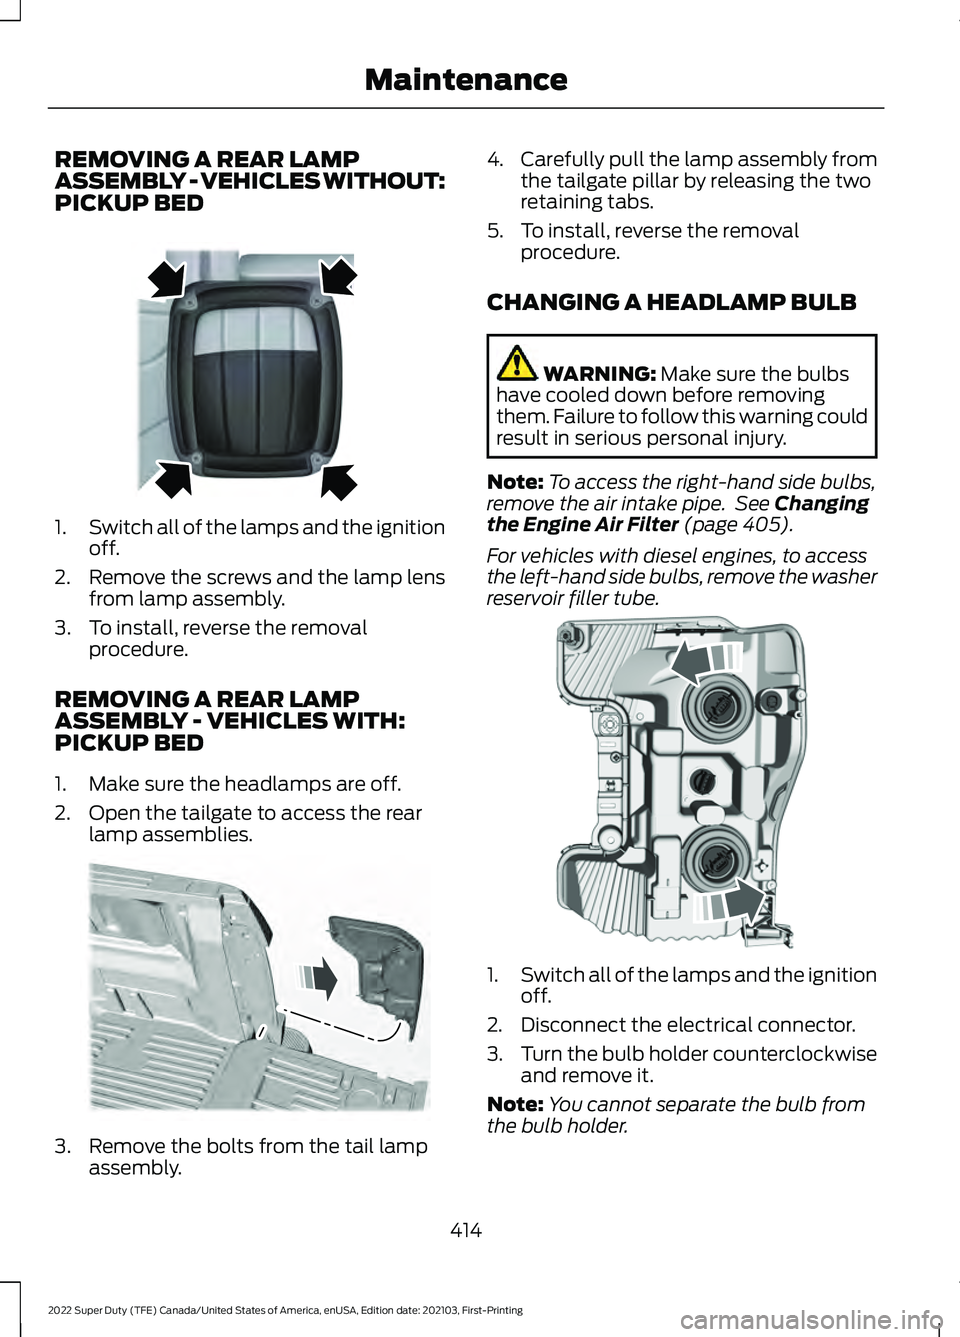
REMOVING A REAR LAMP
ASSEMBLY - VEHICLES WITHOUT:
PICKUP BED
1.
Switch all of the lamps and the ignition
off.
2. Remove the screws and the lamp lens from lamp assembly.
3. To install, reverse the removal procedure.
REMOVING A REAR LAMP
ASSEMBLY - VEHICLES WITH:
PICKUP BED
1. Make sure the headlamps are off.
2. Open the tailgate to access the rear lamp assemblies. 3. Remove the bolts from the tail lamp
assembly. 4.
Carefully pull the lamp assembly from
the tailgate pillar by releasing the two
retaining tabs.
5. To install, reverse the removal procedure.
CHANGING A HEADLAMP BULB WARNING: Make sure the bulbs
have cooled down before removing
them. Failure to follow this warning could
result in serious personal injury.
Note: To access the right-hand side bulbs,
remove the air intake pipe. See
Changing
the Engine Air Filter (page 405).
For vehicles with diesel engines, to access
the left-hand side bulbs, remove the washer
reservoir filler tube. 1.
Switch all of the lamps and the ignition
off.
2. Disconnect the electrical connector.
3. Turn the bulb holder counterclockwise
and remove it.
Note: You cannot separate the bulb from
the bulb holder.
414
2022 Super Duty (TFE) Canada/United States of America, enUSA, Edition date: 202103, First-Printing MaintenanceE163828 E187288 E224991
Page 418 of 740
4. To install, reverse the removal
procedure.
Note: Handle a halogen headlamp bulb
carefully and keep out of children ’s reach.
Grasp the bulb only by its plastic base and
do not touch the glass. The oil from your
hand could cause the bulb to break the next
time you operate the headlamps.
CHANGING A FRONT TURN
SIGNAL LAMP BULB WARNING: Make sure the bulbs
have cooled down before removing
them. Failure to follow this warning could
result in serious personal injury.
Note: To access the right-hand side bulbs,
remove the air intake pipe. See
Changing
the Engine Air Filter (page 405).
To access the left-hand side bulbs, remove
the washer reservoir filler tube. Vehicles with
diesel engine only. 1.
Switch all of the lamps and the ignition
off.
2. Disconnect the electrical connector.
3. Turn the bulb holder counterclockwise
and remove it. Note:
You cannot separate the bulb from
the bulb holder.
4. To install, reverse the removal procedure.
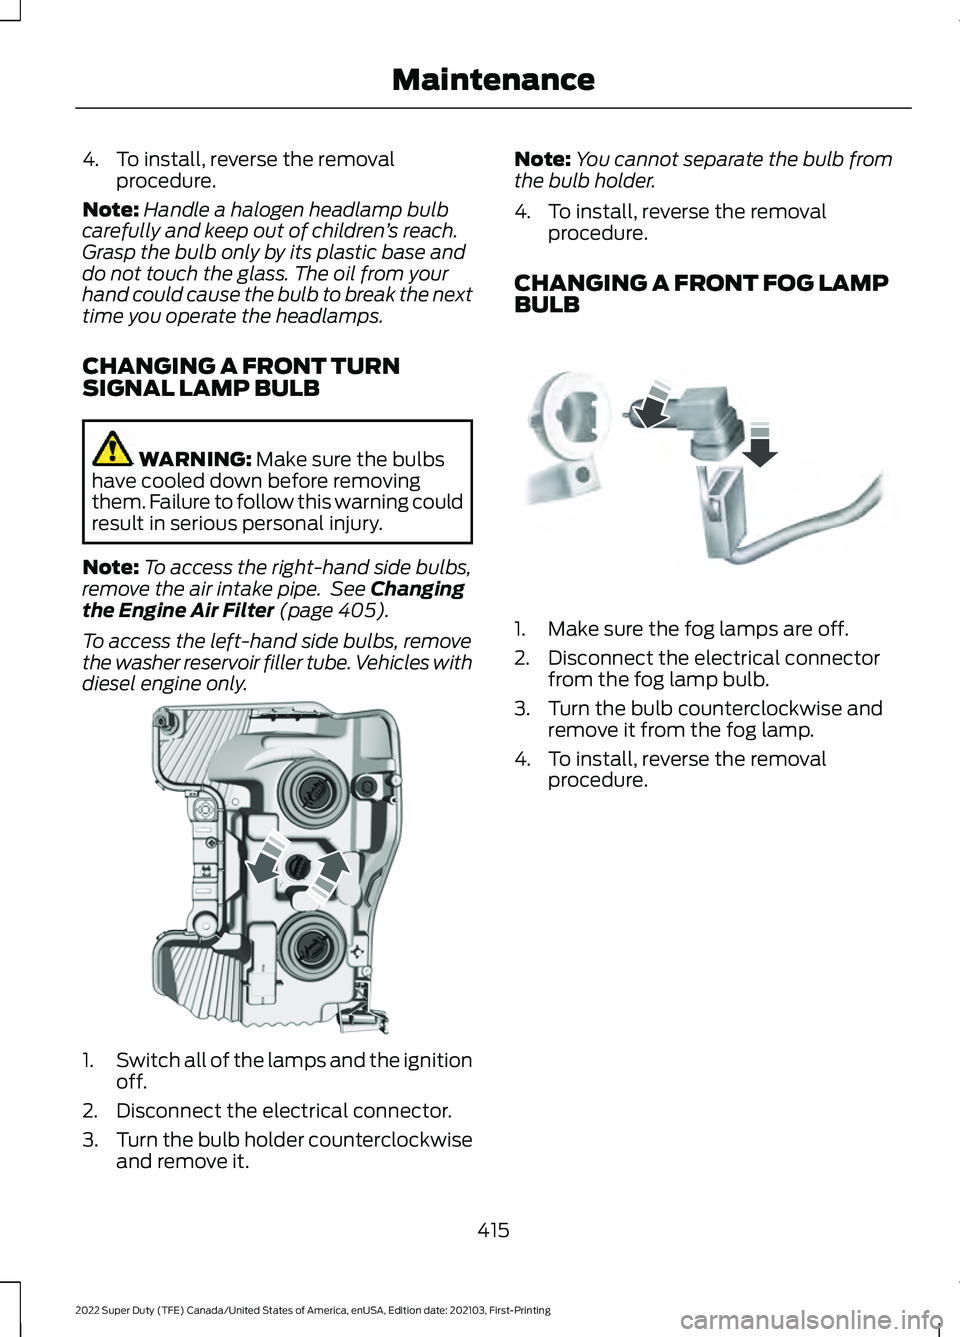
CHANGING A FRONT FOG LAMP
BULB 1. Make sure the fog lamps are off.
2. Disconnect the electrical connector
from the fog lamp bulb.
3. Turn the bulb counterclockwise and remove it from the fog lamp.
4. To install, reverse the removal procedure.
415
2022 Super Duty (TFE) Canada/United States of America, enUSA, Edition date: 202103, First-Printing MaintenanceE224990 E163826
Page 421 of 740
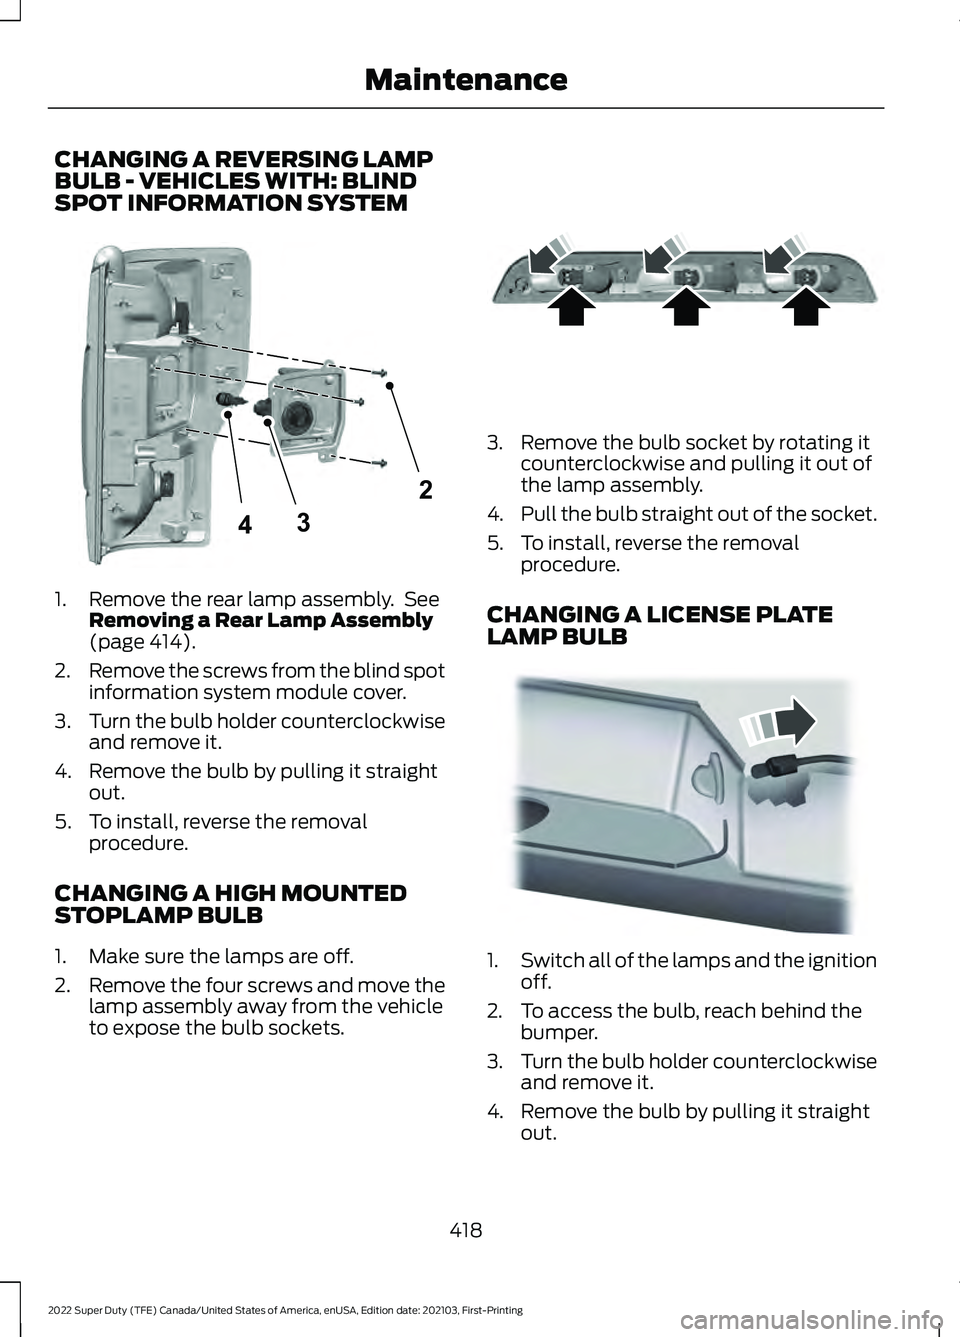
CHANGING A REVERSING LAMP
BULB - VEHICLES WITH: BLIND
SPOT INFORMATION SYSTEM
1. Remove the rear lamp assembly. See
Removing a Rear Lamp Assembly
(page 414).
2. Remove the screws from the blind spot
information system module cover.
3. Turn the bulb holder counterclockwise
and remove it.
4. Remove the bulb by pulling it straight out.
5. To install, reverse the removal procedure.
CHANGING A HIGH MOUNTED
STOPLAMP BULB
1. Make sure the lamps are off.
2. Remove the four screws and move the
lamp assembly away from the vehicle
to expose the bulb sockets. 3. Remove the bulb socket by rotating it
counterclockwise and pulling it out of
the lamp assembly.
4. Pull the bulb straight out of the socket.
5. To install, reverse the removal procedure.
CHANGING A LICENSE PLATE
LAMP BULB 1.
Switch all of the lamps and the ignition
off.
2. To access the bulb, reach behind the bumper.
3. Turn the bulb holder counterclockwise
and remove it.
4. Remove the bulb by pulling it straight out.
418
2022 Super Duty (TFE) Canada/United States of America, enUSA, Edition date: 202103, First-Printing Maintenance2
34E346930 E187290 E163830