ignition FORD F-600 2022 Workshop Manual
[x] Cancel search | Manufacturer: FORD, Model Year: 2022, Model line: F-600, Model: FORD F-600 2022Pages: 740, PDF Size: 12.6 MB
Page 228 of 740
.")
2. Move the gearshift lever into the
desired gear.
3. When you finish driving, come to a complete stop.
4. Pull lever toward the driver and move the gearshift lever and securely latch
it in park (P).
MANUALLY SHIFTING GEARS
SHIFTING USING THE BUTTONS
ON THE SELECTOR LEVER
Pressing the manual (M) button on the
shifter allows you to select the gear you
prefer. Only the current gear displays. Press
the + button to upshift or the – button to
downshift. Return the transmission to a
different gearshift position to deactivate
manual control or press manual (M).
Your vehicle has a SelectShift Automatic
transmission gearshift lever. This gives you
the ability to change gears up or down,
without a clutch, as preferred.
Note: To prevent the engine from running
at too low an RPM, which could cause it to
stall, SelectShift still makes some
downshifts if it determines that you have
not downshifted in time. Although
SelectShift makes some downshifts for you,
it still allows you to downshift at any time
if it determines that damage to the engine
from over-revving does not occur.
Note: SelectShift does not automatically
upshift, even if the engine is approaching
the RPM limit. Shift manually by pressing
the
+ button. Note:
Engine damage could occur if you
maintain excessive engine revving without
shifting. BRAKE SHIFT INTERLOCK
WHAT IS BRAKE SHIFT
INTERLOCK
Brake shift interlock prevents you from
shifting out of park (P) when you have
switched the ignition on and not pressed
the brake pedal.
BRAKE SHIFT INTERLOCK
PRECAUTIONS
WARNING:
Do not drive your
vehicle until you verify that the
stoplamps are working. WARNING:
When doing this
procedure, you need to take the
transmission out of park (P) which
means your vehicle can roll freely. To
avoid unwanted vehicle movement,
always fully apply the parking brake prior
to doing this procedure. Use wheels
chocks if appropriate.
225
2022 Super Duty (TFE) Canada/United States of America, enUSA, Edition date: 202103, First-Printing Automatic TransmissionE312894
Page 229 of 740

WARNING: If the parking brake is
fully released, but the brake warning
lamp remains illuminated, the brakes
may not be working properly. Have your
vehicle checked as soon as possible.
In the event of an electrical malfunction,
it is possible that a fuse has blown or the
stoplamps are not working. See
Fuse
Precautions (page 387).
If the vehicle battery has no charge, jump
start your vehicle.
USING BRAKE SHIFT INTERLOCK
Brake-Shift Interlock
The following procedure allows you to
move the gearshift lever from park (P):
1. Apply the parking brake. Switch the ignition key to 1 - 0, then remove the
key.
2. Move the steering column to the full down and full rearward position,
toward the driver seat.
3. Remove the gearshift lever boot.
4. Place your fingers into the hole where you removed the gearshift lever boot
and pull the top half of the shroud up
and forward to separate it from the
lower half of the shroud. There is a
hinge at the forward edge of the top
shroud. Roll the top half of the shroud
upward on the hinge point, then pull
straight rearward toward the driver
seat to remove.
5. Remove the top half of the shroud.
6. Remove the three fasteners under the column that secure the lower shroud
half to the column. 7. Pull the lock lever into the fully
unlocked position and remove the
lower shroud cover by pulling the lever
handle through the slot in the cover.
8. Apply the brake. Gently lift the override
disk and move the gearshift lever into
neutral (N). 9. Start your vehicle.
Perform steps 4 through 8 in reverse order
to get the shroud back together, making
sure to engage the hinge pivots between
the upper and lower halves of the shroud.
Keep slight pressure in the forward
direction as you rotate the halves together.
226
2022 Super Duty (TFE) Canada/United States of America, enUSA, Edition date: 202103, First-Printing Automatic TransmissionE163185 E163186
Page 232 of 740

WARNING: If the parking brake is
fully released, but the brake warning
lamp remains illuminated, the brakes
may not be working properly. Have your
vehicle checked as soon as possible. WARNING:
Do not become
overconfident in the ability of four-wheel
drive vehicles. Although a four-wheel
drive vehicle may accelerate better than
a two-wheel drive vehicle in low traction
situations, it won't stop any faster than
two-wheel drive vehicles. Always drive
at a safe speed.
Truck and utility vehicles can differ from
some other vehicles. Your vehicle could be
higher to allow it to travel over rough
terrain without getting stuck or damaging
underbody components. The differences
that make your vehicle so versatile also
make it handle differently than an ordinary
passenger car. Always maintain steering
wheel control, especially in rough terrain.
Since sudden changes in terrain can result
in abrupt steering wheel motion, make sure
you grip the steering wheel from the
outside. Do not grip the spokes. Drive
cautiously to avoid vehicle damage from
concealed objects such as rocks and
stumps. Drive slower in strong crosswinds
which can affect the normal steering
characteristics of your vehicle. Be
extremely careful when driving on
pavement made slippery by loose sand,
water, gravel, snow or ice. Note:
Do not use four-wheel drive high or
four-wheel drive low mode on dry, hard
surfaced roads. Doing so can produce
excessive noise, increase tire wear and can
damage drive components. Four-wheel
drive high or four-wheel drive low modes
are for consistently slippery or loose
surfaces. Use of four-wheel drive low mode
on these surfaces could produce some
noise, such as occasional clunks, but should
not damage drive components. When
transitioning from consistently loose or
slippery surfaces, be sure the four-wheel
drive systems not mechanically blocked
once on dry, hard surfaced roads in
two-wheel drive high.
Parking WARNING:
If the parking brake is
fully released, but the brake warning
lamp remains illuminated, the brakes
may not be working properly. Have your
vehicle checked as soon as possible. WARNING:
Apply the parking
brake, shift into park (P), switch the
ignition off and remove the key before
you leave your vehicle. Failure to follow
this instruction could result in personal
injury or death.
On some four-wheel drive vehicles, when
the transfer case is in the neutral (N)
position, the engine and transmission
disconnects from the rest of the driveline.
Therefore, the vehicle is free to roll even if
the automatic transmission is in park (P)
or the manual transmission is in gear. Do
not leave the vehicle unattended with the
transfer case in the neutral (N) position.
Always set the parking brake fully and turn
off the ignition when leaving the vehicle.
229
2022 Super Duty (TFE) Canada/United States of America, enUSA, Edition date: 202103, First-Printing Four-Wheel Drive
(If Equipped)
Page 236 of 740

Mud
Be cautious of sudden changes in vehicle
speed or direction when you are driving in
mud. Even four-wheel drive vehicles can
lose traction in slick mud. If your vehicle
does slide, steer in the direction of the slide
until you regain control of your vehicle.
After driving through mud, clean off residue
stuck to rotating driveshafts and tires.
Excess mud stuck on tires and rotating
driveshafts can cause an imbalance that
could damage drive components.
Water
If you must drive through high water, drive
slowly. Traction or brake capability may
be limited. When driving through water,
determine the depth and avoid water
higher than the bottom of the hubs. If the
ignition system gets wet, your vehicle may
stall. Once through water, test the brakes.
Wet brakes do not stop your vehicle as
effectively as dry brakes. Drying improves
by applying light pressure to the brake
pedal while moving slowly.
Note:
Driving through deep water may
damage the transmission. If the front or rear
axle is submerged in water, the axle
lubricant and power transfer unit lubricant
should be checked and changed if
necessary.
DRIVING ON HILLY OR SLOPING
TERRAIN
Although natural obstacles may make it
necessary to travel diagonally up or down
a hill or steep incline, you should try to drive
straight up or straight down. Note:
Avoid turning on steep slopes or hills.
A danger lies in losing traction, slipping
sideways and possible vehicle roll over.
Whenever driving on a hill, determine
beforehand the route you can use. Do not
drive over the crest of a hill without seeing
what conditions are on the other side. Do
not drive in reverse over a hill without the
aid of an observer.
When climbing a steep slope or hill, start
in a lower gear rather than downshifting to
a lower gear from a higher gear once the
ascent has started. This reduces strain on
the engine and the possibility of stalling.
If your vehicle stalls, do not try to
turnaround because this could cause
vehicle roll over. It is better to reverse back
to a safe location.
Apply just enough power to the wheels to
climb the hill. Too much power can cause
the tires to slip, spin or lose traction,
resulting in loss of vehicle control.
Descend a hill in the same gear you would
use to climb up the hill to avoid excessive
brake application and brake overheating.
Do not descend in neutral. Disengage
overdrive or move the transmission
selector lever to a lower gear. When
descending a steep hill, avoid sudden hard
braking as you could lose control. The front
wheels have to be turning in order to steer
your vehicle.
Note: If your vehicle has anti-lock brakes,
apply the brakes steadily. Do not pump the
brakes.
DRIVING ON SNOW AND ICE WARNING: If you are driving in
slippery conditions that require tire
chains or cables, then it is critical that
you drive cautiously. Keep speeds down,
allow for longer stopping distances and
avoid aggressive steering to reduce the
233
2022 Super Duty (TFE) Canada/United States of America, enUSA, Edition date: 202103, First-Printing Four-Wheel Drive
(If Equipped)
Page 244 of 740

1. Park your vehicle on a level surface.
2. Look at the brake fluid reservoir to see
where the brake fluid level is relative
to the MIN and the MAX marks on the
reservoir.
Note: To avoid fluid contamination, the
reservoir cap must remain in place and fully
tight, unless you are adding fluid.
Only use fluid that meets our
specifications. See Brakes (page 240).
BRAKE FLUID SPECIFICATION
See Brake Fluid Specification (page 241). BRAKES –
TROUBLESHOOTING
BRAKES – WARNING LAMPS If the ABS indicator illuminates
when you are driving, this
indicates a malfunction. Your
vehicle continues to have normal braking
without the anti-lock braking system
function. See an authorized dealer.
It also momentarily illuminates when you
switch the ignition on to confirm the lamp
is functional. If it does not illuminate when
you switch the ignition on, or begins to
flash at any time, have the system checked
by an authorized dealer. The brake indicator momentarily
illuminates when you switch the
ignition on to confirm the lamp
is functional. It may also illuminate when
you apply the parking brake and the
ignition is on. If it illuminates when your
vehicle is moving, make sure the parking
brake is disengaged. If the parking brake
is disengaged, this indicates low brake fluid
level or a brake system fault. See an
authorized dealer.
BRAKES – FREQUENTLY ASKED
QUESTIONS
Is it normal for my brakes to make
noise?
Occasional brake noise is normal. If a
metal-to-metal, continuous grinding,
or continuous squeal sound is present,
the brake lining could be worn-out.
Have the system checked by an
authorized dealer.
241
2022 Super Duty (TFE) Canada/United States of America, enUSA, Edition date: 202103, First-Printing BrakesE170684 E270480
Page 246 of 740
, switch the
ignition off and remove the key before
you leave your vehicle. Failure to follow
this instruction could res")
APPLYING THE PARKING
BRAKE
WARNING: Apply the parking
brake, shift into park (P), switch the
ignition off and remove the key before
you leave your vehicle. Failure to follow
this instruction could result in personal
injury or death.
Apply the parking brake whenever you park
your vehicle. Press the pedal downward to
set the parking brake. The brake warning
lamp in the instrument cluster will
illuminate and remains illuminated until
you release the parking brake. If you are parking your vehicle on a grade
or with a trailer, press and hold the brake
pedal down, then set the parking brake.
There may be a little vehicle movement as
the parking brake sets to hold the vehicle's
weight. This is normal and should be no
reason for concern. If needed, press and
hold the service brake pedal down, then
try reapplying the parking brake. Chock the
wheels if required. If the parking brake
cannot hold the weight of the vehicle, the
parking brake may need service or the
vehicle may be overloaded.
RELEASING THE PARKING
BRAKE
To release, pull the brake release lever
located at the lower left side of the
instrument panel.
PARKING BRAKE – TROUBLESHOOTING
PARKING BRAKE – INFORMATION MESSAGES Action
Message
The system has detected a fault, contact an authorized dealer as soon as possible.
Check Brake System
The brake fluid level is low, inspect the brake system immedi- ately.
Brake Fluid Level Low
You have set the parking brake and you have driven the vehicle
more than 3.1 mph (5 km/h). If the warning stays on after you
have released the parking brake, contact an authorized dealer.
Park Brake Engaged
243
2022 Super Duty (TFE) Canada/United States of America, enUSA, Edition date: 202103, First-Printing Parking Brake
Page 250 of 740

WHAT IS TRACTION CONTROL
The traction control system helps to avoid
drive wheel spin and loss of traction.
HOW DOES TRACTION
CONTROL WORK
If your vehicle begins to slide, the system
applies the brakes to individual wheels
and, when needed, reduces engine power
at the same time. If the wheels spin when
accelerating on slippery or loose surfaces,
the system reduces engine power in order
to increase traction.
SWITCHING TRACTION
CONTROL ON AND OFF
WARNING: Operating your vehicle
with the traction control disabled could
lead to an increased risk of loss of vehicle
control, vehicle rollover, personal injury
and death. The traction control system turns on each
time you switch the ignition on.
The button for the stability and traction
control system is on the instrument panel. Press and release the button to switch
traction control off. The stability control
system remains fully active, to switch it off,
press and hold the button for a few
seconds, then release.
When you switch traction control off, a
message and an illuminated icon appear
on the instrument cluster.
Press the switch again to turn the traction
control system back on to normal
operation.
If your vehicle is stuck in mud or snow,
switching traction control off may be
beneficial as this allows the wheels to spin.
Your vehicle may have MyKey restrictions
regarding this feature. See
What Is
MyKey (page 77).
TRACTION CONTROL
INDICATOR
Stability and Traction Control
Indicator If the indicator does not
illuminate when you switch the
ignition on, or remains on when
the engine is running, this indicates a
malfunction. Have your vehicle checked
by an authorized dealer as soon as
possible. The traction control off indicator
illuminates when you switch the
traction control system off, or
when an alternative stability control mode
is selected that requires the traction
control off depending on the drive mode
selected.
247
2022 Super Duty (TFE) Canada/United States of America, enUSA, Edition date: 202103, First-Printing Traction ControlE327252 E138639 E130458
Page 253 of 740
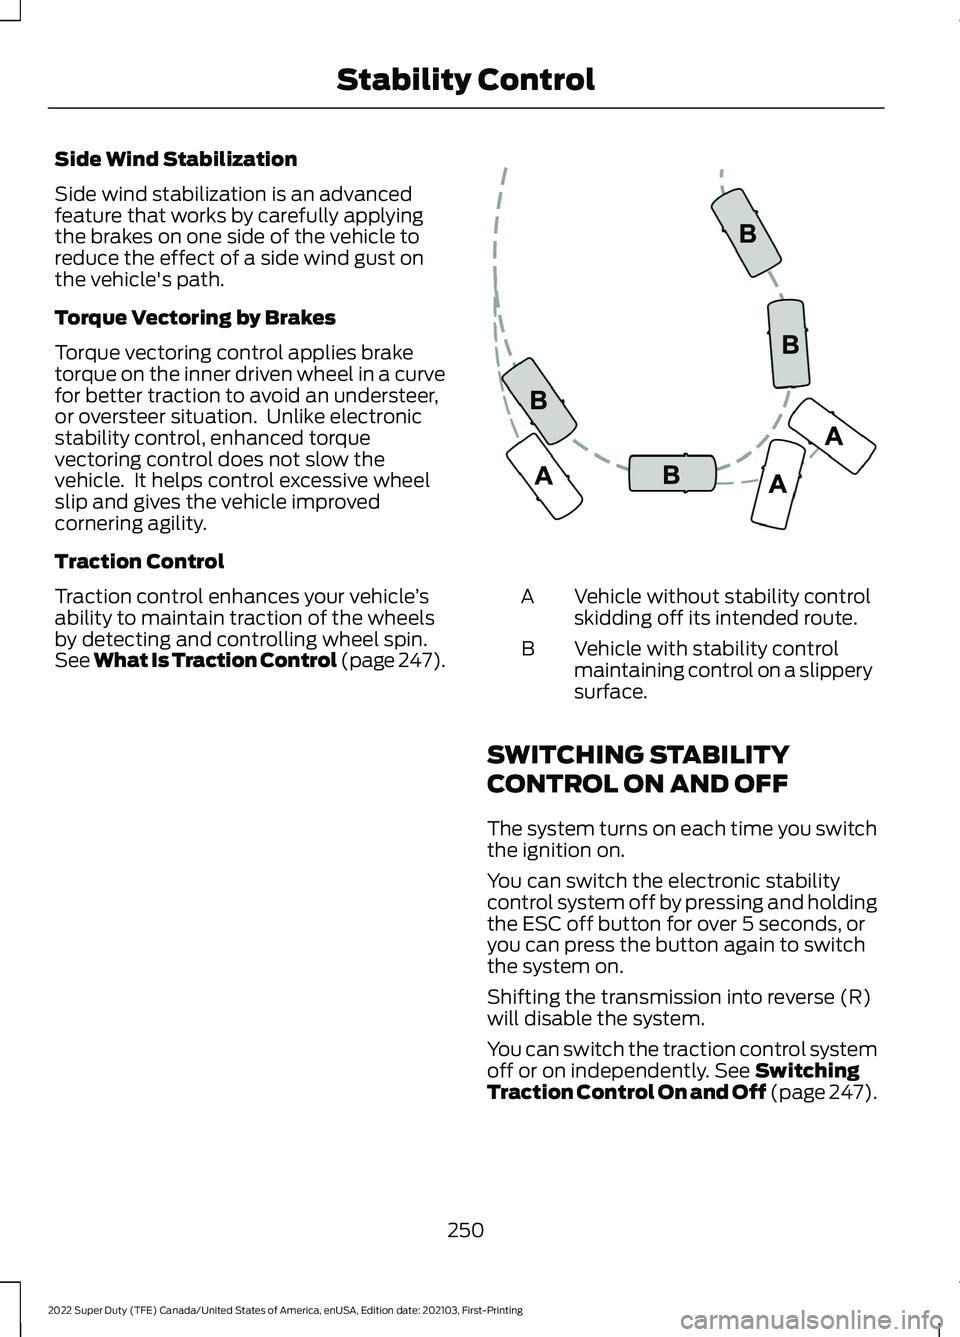
Side Wind Stabilization
Side wind stabilization is an advanced
feature that works by carefully applying
the brakes on one side of the vehicle to
reduce the effect of a side wind gust on
the vehicle's path.
Torque Vectoring by Brakes
Torque vectoring control applies brake
torque on the inner driven wheel in a curve
for better traction to avoid an understeer,
or oversteer situation. Unlike electronic
stability control, enhanced torque
vectoring control does not slow the
vehicle. It helps control excessive wheel
slip and gives the vehicle improved
cornering agility.
Traction Control
Traction control enhances your vehicle
’s
ability to maintain traction of the wheels
by detecting and controlling wheel spin.
See What Is Traction Control (page 247). Vehicle without stability control
skidding off its intended route.
A
Vehicle with stability control
maintaining control on a slippery
surface.
B
SWITCHING STABILITY
CONTROL ON AND OFF
The system turns on each time you switch
the ignition on.
You can switch the electronic stability
control system off by pressing and holding
the ESC off button for over 5 seconds, or
you can press the button again to switch
the system on.
Shifting the transmission into reverse (R)
will disable the system.
You can switch the traction control system
off or on independently.
See Switching
Traction Control On and Off (page 247).
250
2022 Super Duty (TFE) Canada/United States of America, enUSA, Edition date: 202103, First-Printing Stability ControlE72903
Page 259 of 740

HYDRAULIC POWER
STEERING
HYDRAULIC POWER STEERING
GUIDELINES
To help prevent damage to the power
steering system:
•
Do not hold the steering wheel at its
furthest turning points for more than
three to five seconds when the engine
is running.
• Avoid continuously steering back and
forth with elevated engine RPM as this
may overheat the system. If trying to
free a stuck vehicle, pause between
attempts to allow the power steering
system to cool or seek assistance.
Typical steering and driving maneuvers
allow the system to cool.
• Do not operate the vehicle if the power
steering pump fluid level is below the
MIN mark on the reservoir.
• Some noise is normal during operation.
If excessive, check for low power
steering pump fluid level before
seeking service by your dealer.
• Heavy or uneven efforts may be caused
by low power steering fluid. Check for
low power steering pump fluid level
before seeking service by your dealer.
• Do not fill the power steering pump
reservoir above the MAX mark on the
reservoir, as this may result in leaks
from the reservoir.
If the power steering system breaks down
or if you switch the engine off, you can
steer the vehicle manually, but it takes
more effort. If you have any steering components
serviced or replaced, install new fasteners.
Many fasteners have coatings with thread
adhesive, or have prevailing torque
features you cannot reuse. Do not reuse a
bolt or nut. Torque fasteners to
specifications.
Steering Tips
If the steering wanders or pulls, check for:
•
An improperly inflated tire.
• Uneven tire wear.
• Loose or worn suspension
components.
• Loose or worn steering components.
• Improper vehicle alignment.
Note: A high crown in the road or high
crosswinds may also make the steering
seem to wander or pull.
Electronic Torque Overlay Steering
(If Equipped) WARNING: The electric power
steering system has diagnostic checks
that continuously monitor the system. If
a fault is detected, a message displays
in the information display. Stop your
vehicle as soon as it is safe to do so.
Switch the ignition off. After at least 10
seconds, switch the ignition on and
watch the information display for a
steering system warning message. If a
steering system warning message
returns, have the system checked as
soon as possible. WARNING:
If the system detects
an error, you may not feel a difference in
the steering, however a serious condition
may exist. Have your vehicle checked as
soon as possible. Failure to do so may
result in loss of steering control.
256
2022 Super Duty (TFE) Canada/United States of America, enUSA, Edition date: 202103, First-Printing Steering
Page 273 of 740

WHAT IS CRUISE CONTROL
Cruise control lets you maintain a set
speed without keeping your foot on the
accelerator pedal.
Requirements
Use cruise control when the vehicle speed
is greater than 20 mph (30 km/h).
SWITCHING CRUISE CONTROL
ON AND OFF WARNING:
Do not use cruise
control on winding roads, in heavy traffic
or when the road surface is slippery. This
could result in loss of vehicle control,
serious injury or death.
The cruise controls are on the steering
wheel. See What Is Cruise Control (page
270
).
Switching Cruise Control On Press the button.
Switching Cruise Control Off Press the button when the
system is in standby mode.
The system also turns off when you switch
the ignition off.
Note: The set speed erases when you
switch the system off. SETTING THE CRUISE
CONTROL SPEED WARNING:
When you are going
downhill, your vehicle speed could
increase above the set speed. The
system does not apply the brakes.
Drive to the speed you prefer. Press either the Set+ or Set-
buttons to set the current speed.
Take your foot off the accelerator pedal.
Note: The indicator changes color in the
information display.
Changing the Set Speed Press the Set+ button to
increase the set speed in small
increments. Press and hold the
Set+ button to accelerate. Release the
button when you have reached your
preferred speed. Press the Set- button to
decrease the set speed in small
increments. Press and hold the
Set- button to decelerate. Release the
button when you have reached your
preferred speed.
Note: If you accelerate by pressing the
accelerator pedal, the set speed does not
change. When you release the accelerator
pedal, your vehicle returns to the speed that
you previously set.
270
2022 Super Duty (TFE) Canada/United States of America, enUSA, Edition date: 202103, First-Printing Cruise Control
(If Equipped)E265296 E265297