length FORD F-600 2022 Owners Manual
[x] Cancel search | Manufacturer: FORD, Model Year: 2022, Model line: F-600, Model: FORD F-600 2022Pages: 740, PDF Size: 12.6 MB
Page 4 of 740
Contacting Us
Contacting Us
..................................................17
Introduction
About This Publication ................................
19
Using This Publication ................................
20
Symbols Glossary
Symbols Used on Your Vehicle .................
21
Data Privacy
Data Privacy ....................................................
24
Service Data ....................................................
25
Event Data .......................................................
25
Settings Data ..................................................
26
Connected Vehicle Data .............................
26
Mobile Device Data - Vehicles With: SYNC 3 ...........................................................
27
Mobile Device Data - Vehicles With: SYNC 4 ..........................................................
27
Emergency Call System Data ...................
28
Visual Search
Steering Wheel - Vehicles With: SYNC 4 ........................................................................\
..
29
Steering Wheel - Vehicles With: SYNC 3 ........................................................................\
..
30
Instrument Panel ............................................
31
Vehicle Interior ................................................
32
Front Exterior ..................................................
33
Rear Exterior ....................................................
34
Child Safety
Child Safety Precautions ............................
35
Child Restraint Anchor Points ..................
36
Child Restraints ..............................................
38
Installing Child Restraints ..........................
39
Booster Seats .................................................
46
Child Safety Locks ........................................
48Seatbelts
Seatbelt Precautions
...................................
49
Fastening and Unfastening the Seatbelts ........................................................................\
..
50
Sensitive Locking Mode ...............................
51
Automatic Locking Mode ............................
51
Adjusting the Seatbelts During Pregnancy ....................................................
52
Adjusting the Seatbelt Height ..................
52
Adjusting the Seatbelt Length .................
53
Seatbelt Reminder ........................................
53
Checking the Seatbelts ...............................
55
Seatbelt Extensions .....................................
56
Airbags
How Do the Front Airbags Work ..............
57
How Do the Side Airbags Work ................
57
How Does the Safety Canopy ™ Work
........................................................................\
..
58
Airbag Precautions .......................................
59
Switching the Passenger Airbag On and Off ..................................................................
60
Properly Adjusting the Driver and Front Passenger Seats .......................................
64
Children and Airbags ...................................
64
Crash Sensors and Airbag Indicator ......
65
Disposing of Airbags ....................................
66
911 Assist
What Is 911 Assist ..........................................
67
How Does 911 Assist Work .........................
67
Emergency Call Requirements .................
67
Emergency Call Limitations ......................
68
Keys and Remote Controls
Remote Control Limitations .....................
69
Using the Remote Control .........................
69
Opening and Closing the Flip Key ..........
69
Removing the Key Blade ............................
70
Sounding the Panic Alarm .........................
70
1
2022 Super Duty (TFE) Canada/United States of America, enUSA, Edition date: 202103, First-Printing Table of Contents
Page 54 of 740
3. Insert the belt tongue into the proper
buckle for your seating position until
you hear a snap and feel it latch.
4. Make sure you securely fasten the tongue to the buckle by pulling on the
tongue.
While you are fastened in the seatbelt, the
seatbelt with a cinch tongue adjusts to
your movement. However, if you brake
hard, turn hard, or if your vehicle receives
an impact of 5 mph (8 km/h) or more, the
seatbelt locks and helps reduce your
forward movement.
SENSITIVE LOCKING MODE
WHAT IS SENSITIVE LOCKING
MODE
Sensitive locking mode is a seatbelt
retractor feature that allows shoulder belt
length adjustment according to your
movements and locking in response to
vehicle movement.
HOW DOES SENSITIVE LOCKING
MODE WORK
If the driver suddenly brakes, turns a corner
sharply, or the vehicle receives an impact
of about 5 mph (8 km/h) or more, the
seatbelts lock to help reduce forward
movement of the driver and passengers.
In addition, the seatbelt retractor locks if
you pull the seatbelt webbing out too
quickly. If the retractor locks, slowly lower
the height adjuster to allow the seatbelt
to retract.
If the retractor does not unlock, pull the
seatbelt out slowly then feed a small
length of webbing back toward the stowed
position. For rear seatbelts, recline the rear seat
backrest or push the seat backrest cushion
away from the seatbelt. Feed a small
length of webbing back toward the stowed
position.
AUTOMATIC LOCKING MODE
WHAT IS AUTOMATIC LOCKING
MODE
This feature keeps the seatbelts
pre-locked. The belt still retracts to remove
any slack in the shoulder belt.
WHEN TO USE AUTOMATIC
LOCKING MODE
Use this mode any time you install a child
restraint in a front seating position in a
Regular Cab, Super Cab, Crew Cab or any
rear seating position of a Super Cab or
Crew Cab. The optional front seat center
seatbelt in the Super Cab and Crew Cab
has a cinch mechanism. Properly restrain
children 12 years old and under in a rear
seat whenever possible. See
Child Safety
(page 35).
Note: Automatic locking mode is not
available on the driver seatbelt.
51
2022 Super Duty (TFE) Canada/United States of America, enUSA, Edition date: 202103, First-Printing Seatbelts
Page 56 of 740
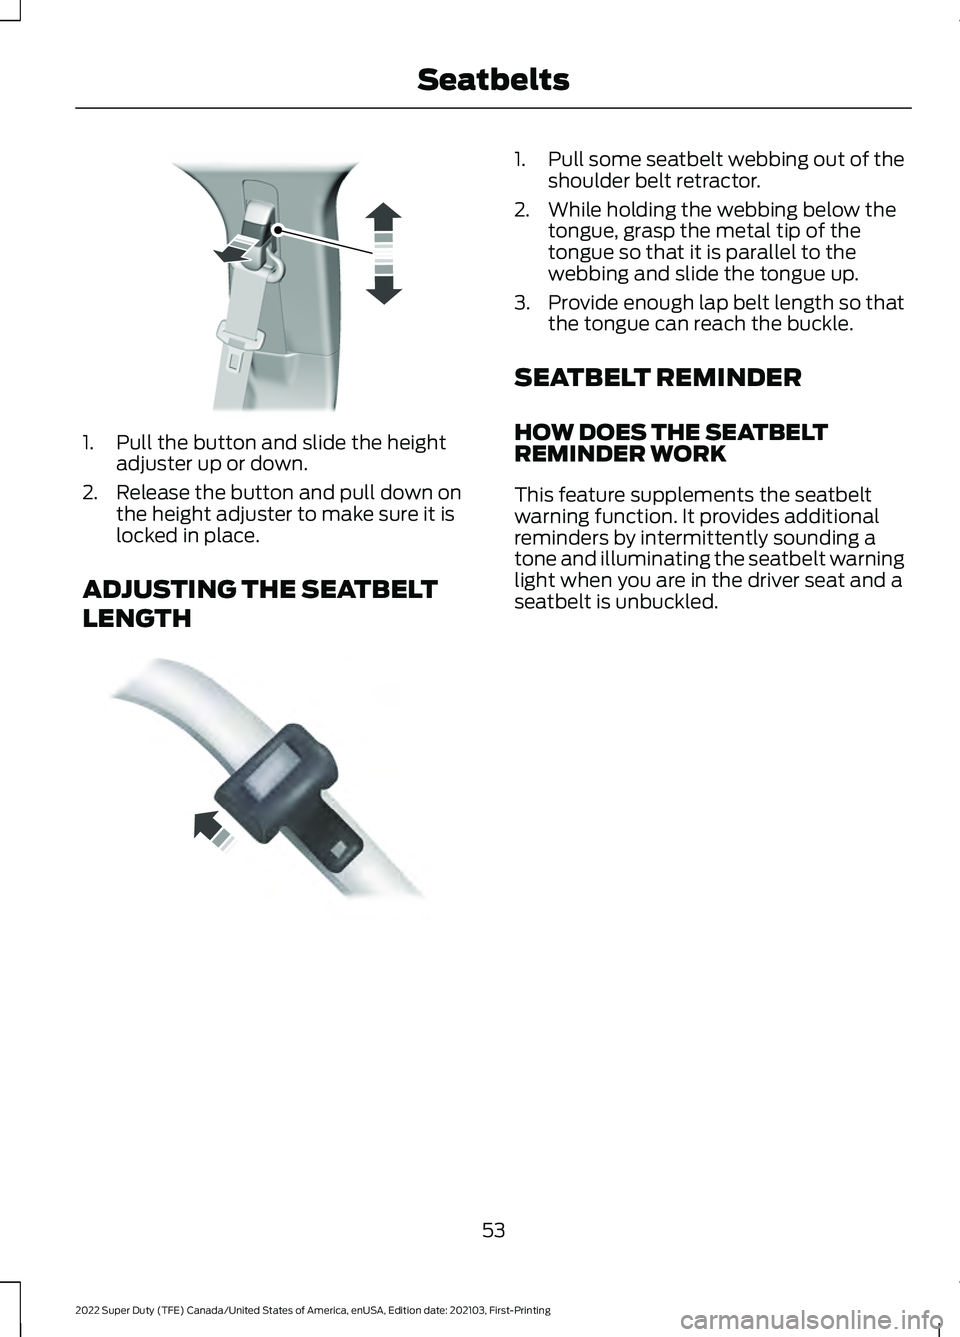
1. Pull the button and slide the height
adjuster up or down.
2. Release the button and pull down on the height adjuster to make sure it is
locked in place.
ADJUSTING THE SEATBELT
LENGTH 1.
Pull some seatbelt webbing out of the
shoulder belt retractor.
2. While holding the webbing below the tongue, grasp the metal tip of the
tongue so that it is parallel to the
webbing and slide the tongue up.
3. Provide enough lap belt length so that
the tongue can reach the buckle.
SEATBELT REMINDER
HOW DOES THE SEATBELT
REMINDER WORK
This feature supplements the seatbelt
warning function. It provides additional
reminders by intermittently sounding a
tone and illuminating the seatbelt warning
light when you are in the driver seat and a
seatbelt is unbuckled.
53
2022 Super Duty (TFE) Canada/United States of America, enUSA, Edition date: 202103, First-Printing SeatbeltsE145664 E162708
Page 298 of 740
BLIND SPOT INFORMATION
SYSTEM WITH TRAILER
COVERAGE
WHAT IS BLIND SPOT
INFORMATION SYSTEM WITH
TRAILER COVERAGE
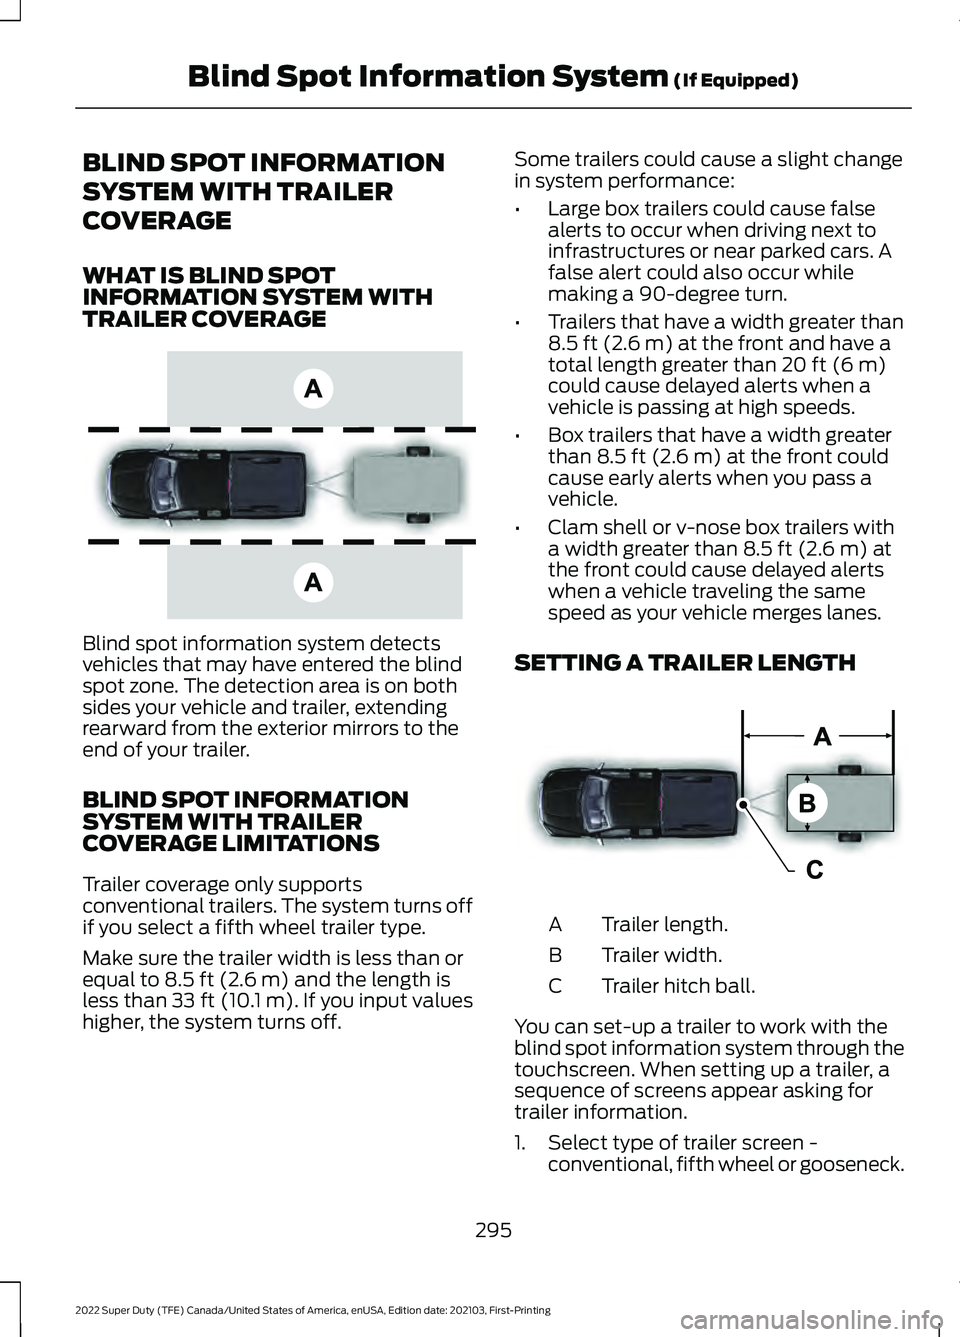
Blind spot information system detects
vehicles that may have entered the blind
spot zone. The detection area is on both
sides your vehicle and trailer, extending
rearward from the exterior mirrors to the
end of your trailer.
BLIND SPOT INFORMATION
SYSTEM WITH TRAILER
COVERAGE LIMITATIONS
Trailer coverage only supports
conventional trailers. The system turns off
if you select a fifth wheel trailer type.
Make sure the trailer width is less than or
equal to 8.5 ft (2.6 m) and the length is
less than 33 ft (10.1 m). If you input values
higher, the system turns off. Some trailers could cause a slight change
in system performance:
•
Large box trailers could cause false
alerts to occur when driving next to
infrastructures or near parked cars. A
false alert could also occur while
making a 90-degree turn.
• Trailers that have a width greater than
8.5 ft (2.6 m)
at the front and have a
total length greater than 20 ft (6 m)
could cause delayed alerts when a
vehicle is passing at high speeds.
• Box trailers that have a width greater
than
8.5 ft (2.6 m) at the front could
cause early alerts when you pass a
vehicle.
• Clam shell or v-nose box trailers with
a width greater than
8.5 ft (2.6 m) at
the front could cause delayed alerts
when a vehicle traveling the same
speed as your vehicle merges lanes.
SETTING A TRAILER LENGTH Trailer length.
A
Trailer width.
B
Trailer hitch ball.
C
You can set-up a trailer to work with the
blind spot information system through the
touchscreen. When setting up a trailer, a
sequence of screens appear asking for
trailer information.
1. Select type of trailer screen - conventional, fifth wheel or gooseneck.
295
2022 Super Duty (TFE) Canada/United States of America, enUSA, Edition date: 202103, First-Printing Blind Spot Information System
(If Equipped)E225007 E225008
Page 299 of 740
Note:
The system only supports
conventional trailers.
2. Do you want to set up blind spot with trailer screen? If no, the system turns
off. If yes, the menu goes to the next
screen.
3. Is the width less than 9 ft (2.7 m) and
length less than 33 ft (10.1 m)? If no,
the system turns off. If yes, the menu
goes to the next screen.
4. Trailer width measurement. Measure the width at the front of the trailer. It is
not measured at the widest point of
the trailer. The maximum width at the
front of the trailer the system can
support is
8.5 ft (2.6 m).
Note: You do not need to enter an exact
trailer width measurement. You only need
to confirm that the width of the trailer is less
than
9 ft (2.7 m).
5. Trailer length measurement. The trailer
length is the distance between the
trailer hitch ball and the rear of the
trailer. The maximum length that the
system can support is
33 ft (10.1 m).
6. Enter the length of trailer. The default setting is
18 ft (5.5 m). Toggling up or
down using the menu buttons
increases or decreases the
measurement by
3 ft (1 m). Select a
length that is equal to or within 3 ft
(1 m) of the actual measured length.
For example, if the actual measure
length is
25 ft (7.5 m), toggle the length
in the menu to 27 ft (8.2 m). The
system setup saves when you enter the
length of the trailer.
Note: If the trailer is a bike rack or cargo
rack with electrical lighting, enter a length
of
3 ft (1 m). Cross traffic alert remains on
for trailers with a length of 3 ft (1 m) or less. Note:
The system requires proper
measurement and measure entry to function
properly.
SELECTING A TRAILER
When you connect a trailer to your vehicle,
the trailer set up menu appears in the
touchscreen. This menu allows you to set
up a new trailer or choose from a
previously set up trailer. A warning
message appears and the system turns off
if you do not choose or add a new trailer.
Note: The warning message may not
appear until your vehicle reaches
22 mph
(35 km/h).
BLIND SPOT INFORMATION
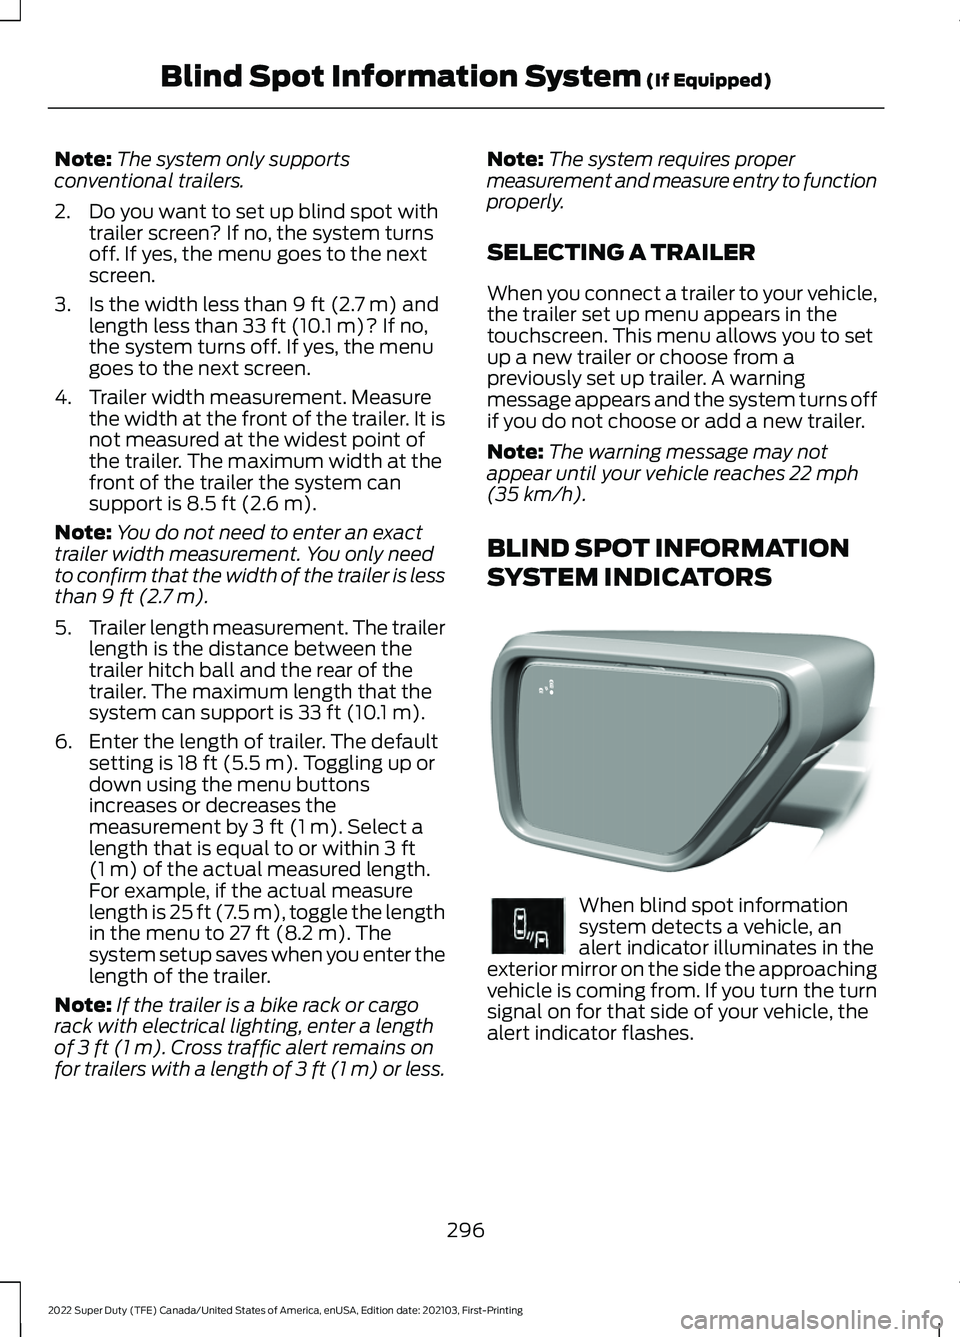
SYSTEM INDICATORS When blind spot information
system detects a vehicle, an
alert indicator illuminates in the
exterior mirror on the side the approaching
vehicle is coming from. If you turn the turn
signal on for that side of your vehicle, the
alert indicator flashes.
296
2022 Super Duty (TFE) Canada/United States of America, enUSA, Edition date: 202103, First-Printing Blind Spot Information System
(If Equipped)E309137 E249861E249861
Page 302 of 740
Cross Traffic Alert Limitations
with a Trailer Attached
The system remains on when you attach
a trailer in vehicles with blind spot
information system with trailer tow under
the following conditions:
•
You connect a trailer.
• The trailer is a bike rack or cargo rack
with a maximum length of 3 ft (1 m).
• You set the trailer length to
3 ft (1 m)
in the instrument cluster display.
Note: The system may not correctly operate
when towing a trailer. For vehicles with an
approved trailer tow module and tow bar,
the system turns off when you attach a
trailer. For vehicles with an aftermarket
trailer tow module or tow bar, we
recommend that you switch the system off
when you attach a trailer.
SWITCHING CROSS TRAFFIC
ALERT ON AND OFF -
VEHICLES WITH: 4.2 INCH
SCREEN
To switch the system on or off, use the
instrument cluster display:
1. Select
Driver Assist.
2. Select
Cross Traffic Alert.
3. Switch the feature on or off.
Note: The system switches on every time
you switch the ignition on. To permanently
switch the system off, contact an authorized
dealer. SWITCHING CROSS TRAFFIC
ALERT ON AND OFF -
VEHICLES WITH: 8 INCH
SCREEN
To switch the system on or off, use the
instrument cluster display:
1. Select
Driver Assist.
2. Select
Cross Traffic Alert.
3. Switch the feature on or off.
Note: The system switches on every time
you switch the ignition on. To permanently
switch the system off, contact an authorized
dealer.
LOCATING THE CROSS
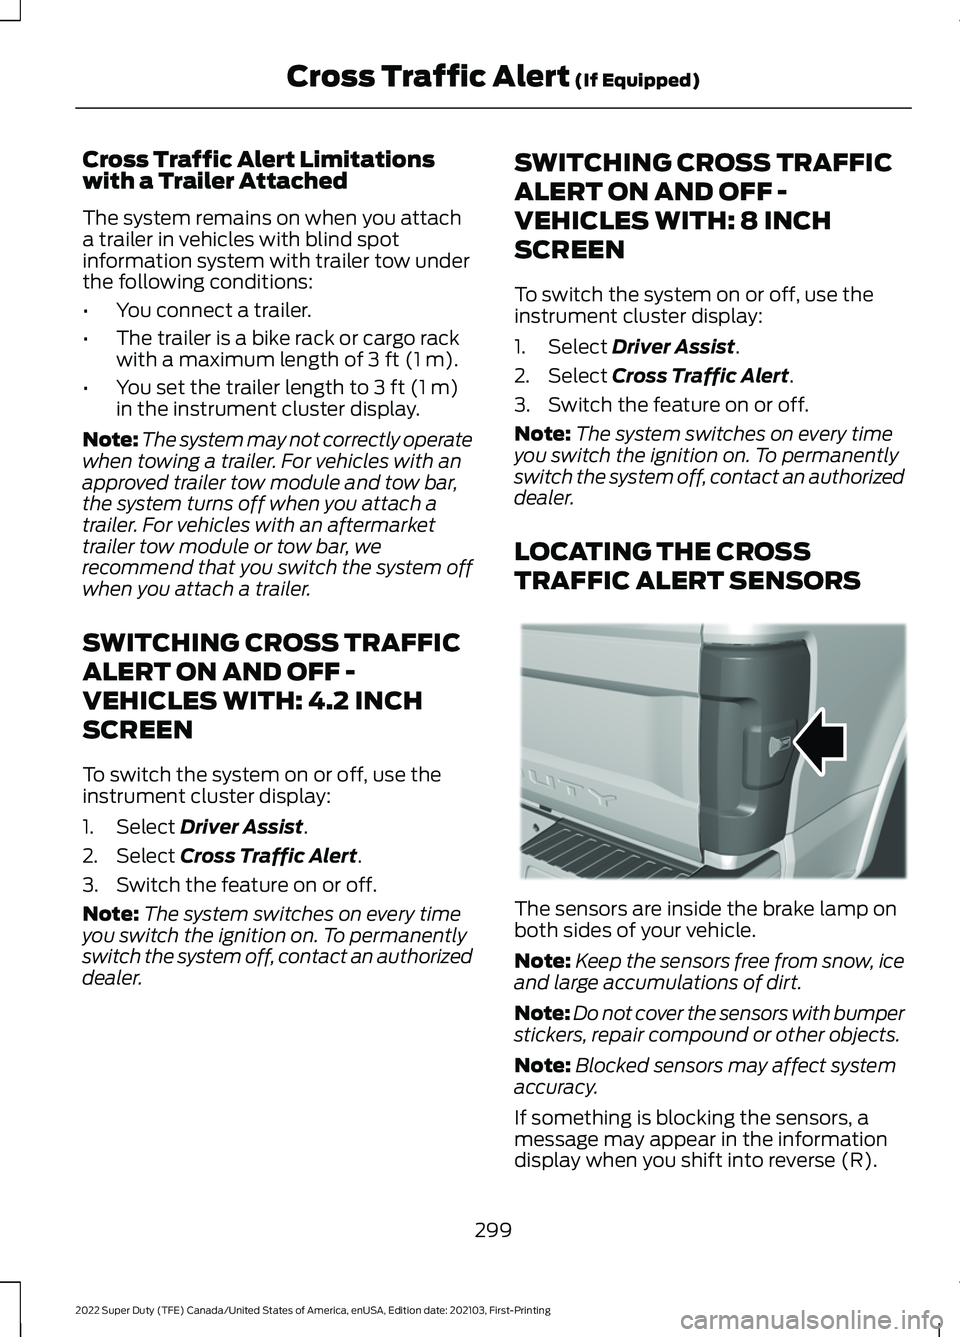
TRAFFIC ALERT SENSORS The sensors are inside the brake lamp on
both sides of your vehicle.
Note:
Keep the sensors free from snow, ice
and large accumulations of dirt.
Note: Do not cover the sensors with bumper
stickers, repair compound or other objects.
Note: Blocked sensors may affect system
accuracy.
If something is blocking the sensors, a
message may appear in the information
display when you shift into reverse (R).
299
2022 Super Duty (TFE) Canada/United States of America, enUSA, Edition date: 202103, First-Printing Cross Traffic Alert
(If Equipped)E231384
Page 345 of 740
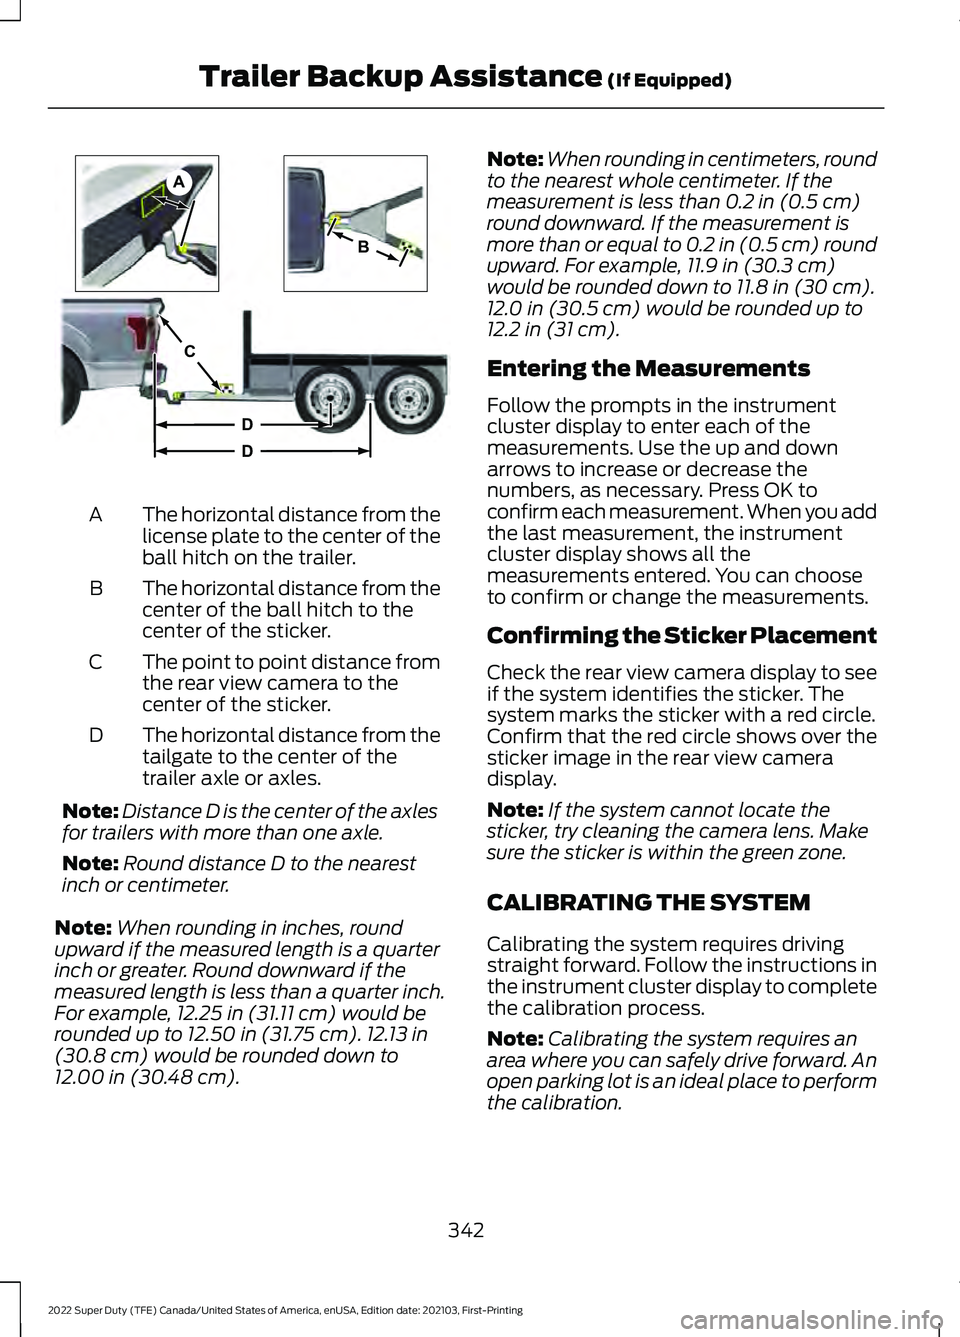
The horizontal distance from the
license plate to the center of the
ball hitch on the trailer.
A
The horizontal distance from the
center of the ball hitch to the
center of the sticker.
B
The point to point distance from
the rear view camera to the
center of the sticker.
C
The horizontal distance from the
tailgate to the center of the
trailer axle or axles.
D
Note: Distance D is the center of the axles
for trailers with more than one axle.
Note: Round distance D to the nearest
inch or centimeter.
Note: When rounding in inches, round
upward if the measured length is a quarter
inch or greater. Round downward if the
measured length is less than a quarter inch.
For example, 12.25 in (31.11 cm) would be
rounded up to 12.50 in (31.75 cm). 12.13 in
(30.8 cm) would be rounded down to
12.00 in (30.48 cm). Note:
When rounding in centimeters, round
to the nearest whole centimeter. If the
measurement is less than
0.2 in (0.5 cm)
round downward. If the measurement is
more than or equal to 0.2 in (0.5 cm) round
upward. For example, 11.9 in (30.3 cm)
would be rounded down to
11.8 in (30 cm).
12.0 in (30.5 cm) would be rounded up to
12.2 in (31 cm).
Entering the Measurements
Follow the prompts in the instrument
cluster display to enter each of the
measurements. Use the up and down
arrows to increase or decrease the
numbers, as necessary. Press OK to
confirm each measurement. When you add
the last measurement, the instrument
cluster display shows all the
measurements entered. You can choose
to confirm or change the measurements.
Confirming the Sticker Placement
Check the rear view camera display to see
if the system identifies the sticker. The
system marks the sticker with a red circle.
Confirm that the red circle shows over the
sticker image in the rear view camera
display.
Note: If the system cannot locate the
sticker, try cleaning the camera lens. Make
sure the sticker is within the green zone.
CALIBRATING THE SYSTEM
Calibrating the system requires driving
straight forward. Follow the instructions in
the instrument cluster display to complete
the calibration process.
Note: Calibrating the system requires an
area where you can safely drive forward. An
open parking lot is an ideal place to perform
the calibration.
342
2022 Super Duty (TFE) Canada/United States of America, enUSA, Edition date: 202103, First-Printing Trailer Backup Assistance
(If Equipped)A
B
C
D
DE209806
Page 346 of 740
Note:
Keep the steering wheel straight
when instructed to by the instrument cluster
display. If the steering wheel is in a turned
position during this instruction, the
calibration pauses.
Note: The system is designed to work with
drawbars that have a license plate to hitch
ball center measurement of 9– 20 in
(23–52 cm) when installed. Do not attempt
to use drawbars that have a length outside
of this range as the system performance
degrades and could cause improper system
function.
Note: The instrument cluster display shows
if you are going too slow or fast. Calibration
pauses if the speed is outside the required
range of
4– 24 mph (6– 39 km/h).
Note: For best results, do not calibrate the
system at night when calibrating the system
with the sticker.
SETTING UP THE TRAILER
BACKUP ASSISTANCE FOR A
FIFTH-WHEEL OR GOOSENECK
TRAILER
CONFIGURING THE TRAILER
You must configure a trailer in the system
to use trailer backup assistance. This is a
one-time setup process and the trailer
information is saved in the system for the
next time you use that trailer.
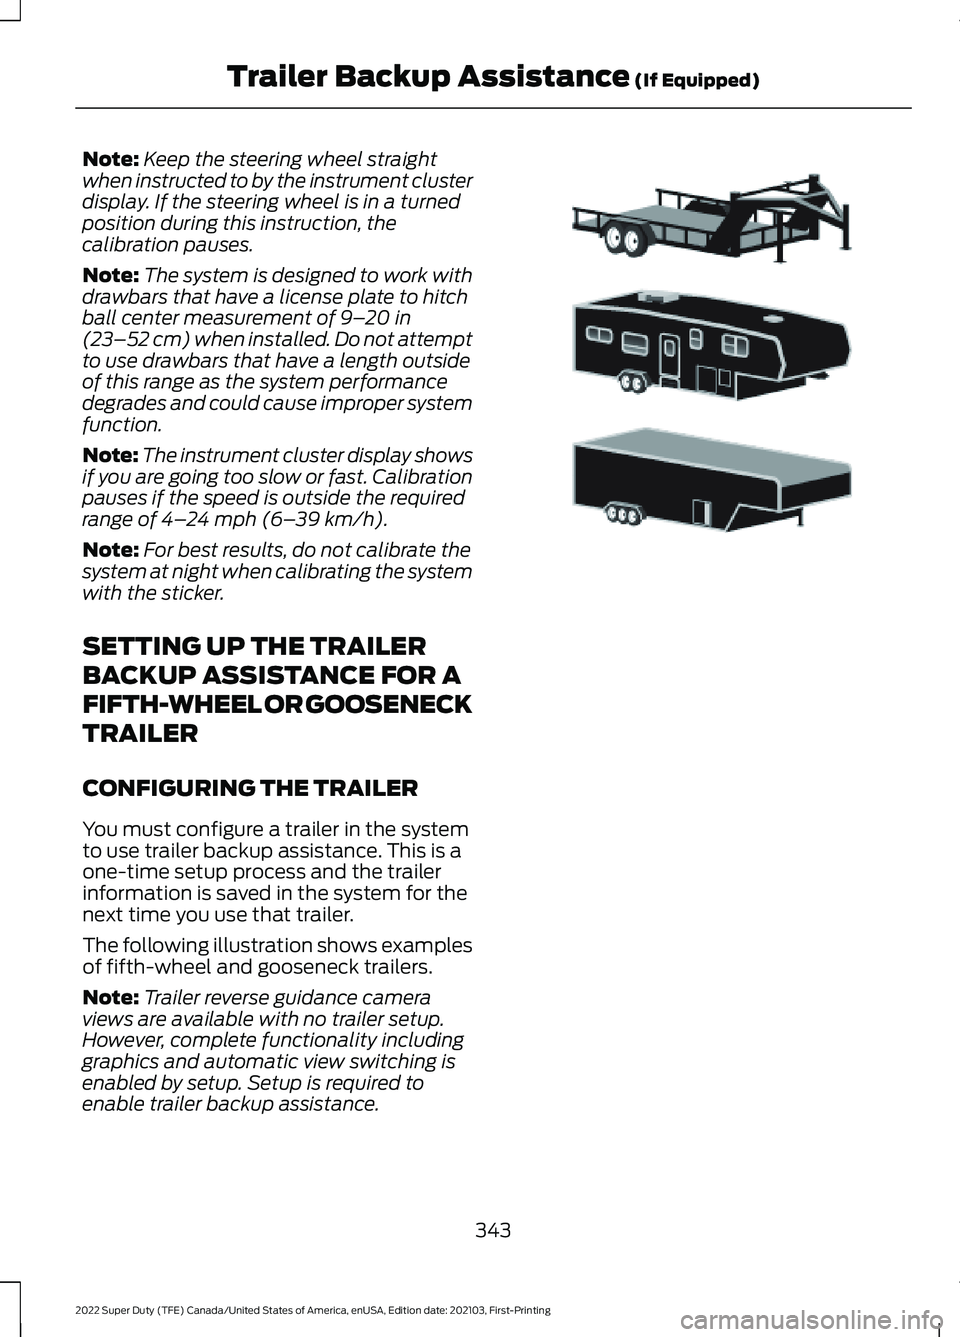
The following illustration shows examples
of fifth-wheel and gooseneck trailers.
Note: Trailer reverse guidance camera
views are available with no trailer setup.
However, complete functionality including
graphics and automatic view switching is
enabled by setup. Setup is required to
enable trailer backup assistance. 343
2022 Super Duty (TFE) Canada/United States of America, enUSA, Edition date: 202103, First-Printing Trailer Backup Assistance
(If Equipped)E311877
Page 348 of 740
Note:
Make sure the arrows on the sensor
housing are facing up. Mount the sensor to
a vertical part of the trailer that pivots and
moves when you turn your vehicle. Do not
mount to a stationary surface or to the truck
side of the fifth wheel-trailer hitch.
Note: You need to replace the 7/4 way
connector in the bumper with the
recommended 7/12 pin connector if your
vehicle did not come with the fifth-wheel
prep package. See your authorized dealer.
Note: If your vehicle has the fifth-wheel
prep package, you have everything you need.
If your vehicle does not have the fifth-wheel
prep package, see your authorized dealer to
purchase the sensor kit and the 7/12 pin
connector.
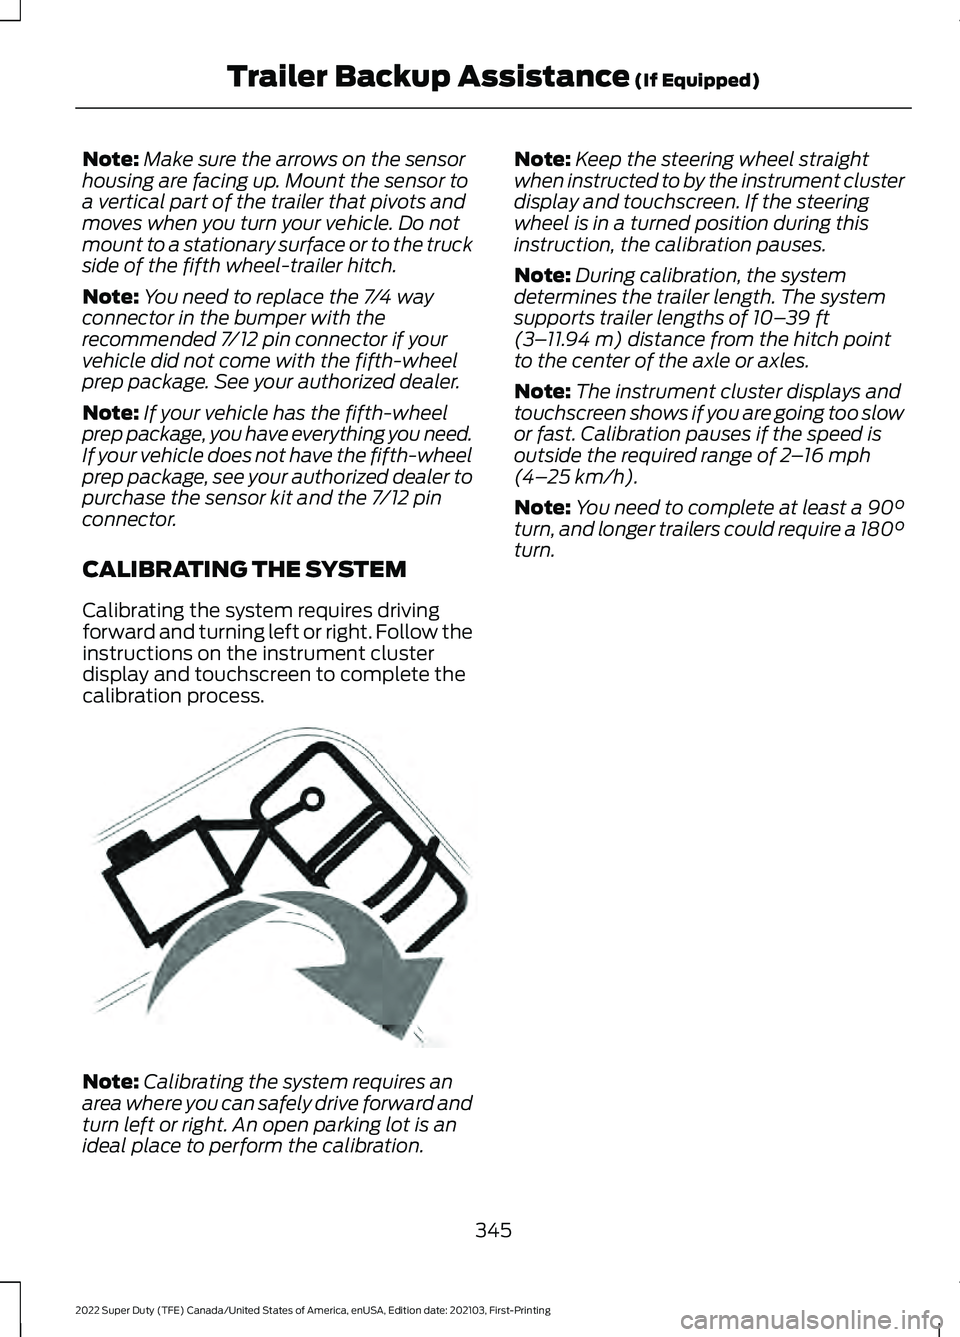
CALIBRATING THE SYSTEM
Calibrating the system requires driving
forward and turning left or right. Follow the
instructions on the instrument cluster
display and touchscreen to complete the
calibration process. Note:
Calibrating the system requires an
area where you can safely drive forward and
turn left or right. An open parking lot is an
ideal place to perform the calibration. Note:
Keep the steering wheel straight
when instructed to by the instrument cluster
display and touchscreen. If the steering
wheel is in a turned position during this
instruction, the calibration pauses.
Note: During calibration, the system
determines the trailer length. The system
supports trailer lengths of 10– 39 ft
(3– 11.94 m) distance from the hitch point
to the center of the axle or axles.
Note: The instrument cluster displays and
touchscreen shows if you are going too slow
or fast. Calibration pauses if the speed is
outside the required range of
2 – 16 mph
(4– 25 km/h).
Note: You need to complete at least a 90°
turn, and longer trailers could require a 180°
turn.
345
2022 Super Duty (TFE) Canada/United States of America, enUSA, Edition date: 202103, First-Printing Trailer Backup Assistance
(If Equipped)E346605
Page 350 of 740
Note:
The more you turn the knob, the
sharper the trailer turns.
Note: Quickly turning and releasing the
knob results in a jerky movement of the
vehicle.
Note: You may have to use the knob to
correct the trailer direction when attempting
to move the trailer straight back under some
conditions.
Note: For fifth-wheel and gooseneck
trailers, the weight and hitch position of
these trailers could make the trailer respond
differently to the knob input than
conventional trailers. You may need to
release the knob early or stop and pull
forward to align your truck and trailer when
returning to straight backing after making a
turn.
Note: Trailer maneuvering performance
could be compromised when using a
fifth-wheel sliding hitch or pivoting pin box
since the system does not know the pivot
point.
USING THE TRAILER BACKUP
ASSISTANCE VIEWS
Up to seven camera views could be
available when using trailer backup
assistance. Use the view that helps you the
most when reversing your vehicle and
trailer. 360° camera view. Shows a
360° view on the right-hand side
of the touchscreen with a rear
camera view on the left-hand side of the
touchscreen. Rear view camera view. Shows
your trailer hitch or what is
directly behind your vehicle.
Rear split view camera view.
Shows a
180° degree view of
what is behind your vehicle. Bed camera view. Shows the
truck bed.
Trailer AUX camera view. Shows
a rear view camera image of
what is behind your trailer. You
need to separately purchase this camera
and have it installed. Trailer reverse guidance view.
Shows you a view of the sides of
your truck and the trailer. In auto
mode, this view moves as the trailer moves
so that you do not have to adjust the
camera as you turn. Left and right arrows
let you see other camera views. Auto. Press to return to auto
view.
Note: Auto mode is the default setting.
Hitch Angle Graphic
The hitch angle graphic shows a small
representation of your truck and trailer with
visual feedback to help you monitor the
trailer. The graphic shows two different
colored lines for the trailer hitch angle. A
black line shows you where your trailer is
in relation to your vehicle. The white line
represents the amount the trailer can turn
based on knob input.
The graphic shows a yellow and red zone
for the hitch angle to warn you of a high
angle condition that could require you to
pull forward to reduce the hitch angle. The
angle limits for each zone vary based on
the trailer length.
The yellow zone indicates you are
approaching the maximum controllable
trailer angle for the system. When the
trailer enters this zone, it is more difficult
to reduce the trailer turn when backing up.
It may be necessary to put your vehicle
back into drive (D) and pull forward to get
the truck and trailer back to an in-line
position.
347
2022 Super Duty (TFE) Canada/United States of America, enUSA, Edition date: 202103, First-Printing Trailer Backup Assistance
(If Equipped)E310996 E310967 E310974 E310995 E311776 E310965 E315644