seats FORD F-650/750 2018 User Guide
[x] Cancel search | Manufacturer: FORD, Model Year: 2018, Model line: F-650/750, Model: FORD F-650/750 2018Pages: 386, PDF Size: 9.01 MB
Page 79 of 386
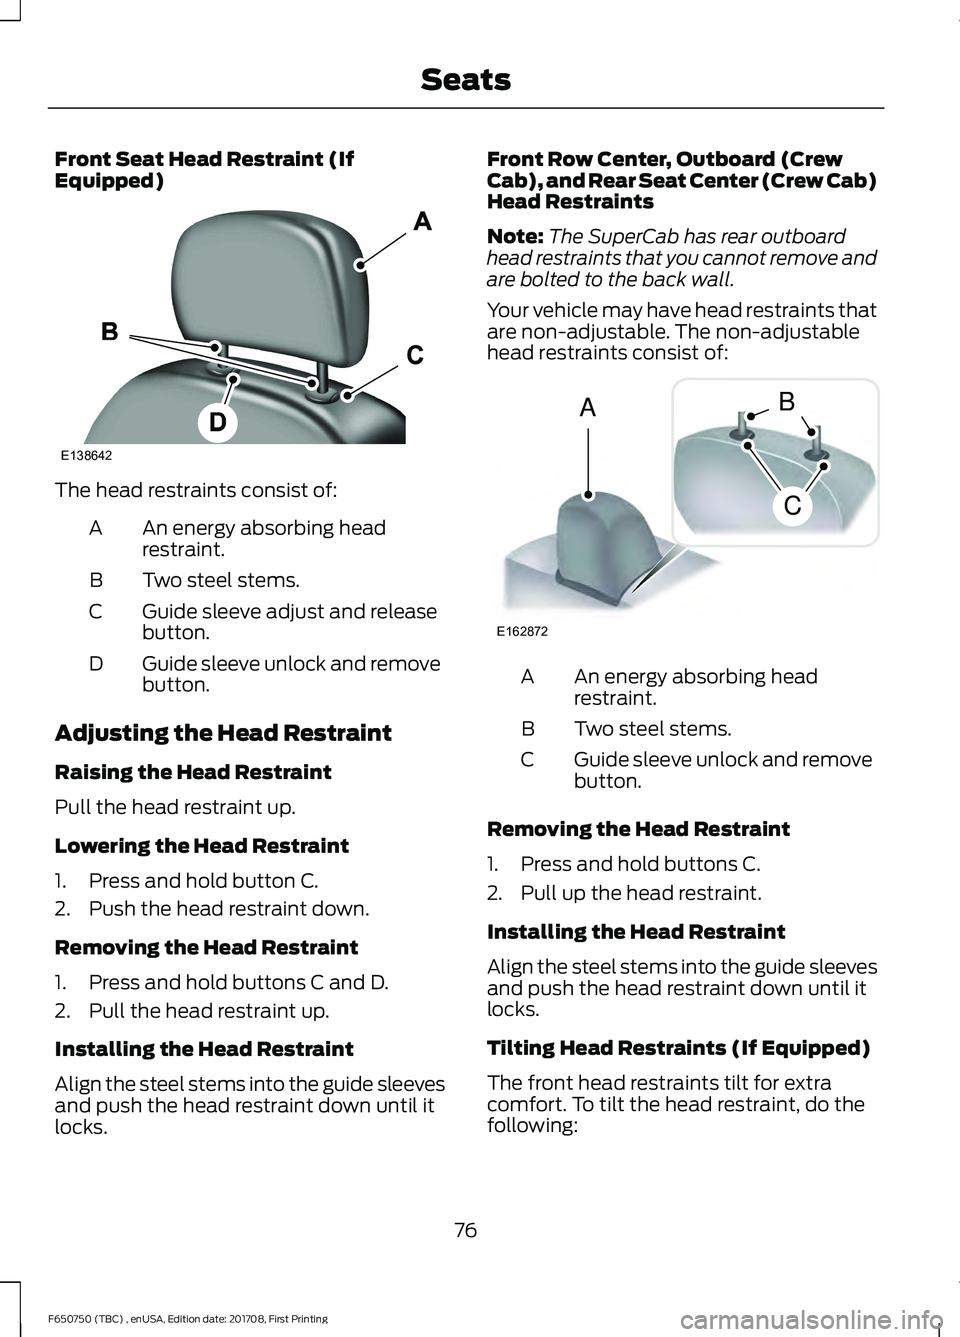
Front Seat Head Restraint (If
Equipped)
The head restraints consist of:
An energy absorbing head
restraint.
A
Two steel stems.
B
Guide sleeve adjust and release
button.
C
Guide sleeve unlock and remove
button.
D
Adjusting the Head Restraint
Raising the Head Restraint
Pull the head restraint up.
Lowering the Head Restraint
1. Press and hold button C.
2. Push the head restraint down.
Removing the Head Restraint
1. Press and hold buttons C and D.
2. Pull the head restraint up.
Installing the Head Restraint
Align the steel stems into the guide sleeves
and push the head restraint down until it
locks. Front Row Center, Outboard (Crew
Cab), and Rear Seat Center (Crew Cab)
Head Restraints
Note:
The SuperCab has rear outboard
head restraints that you cannot remove and
are bolted to the back wall.
Your vehicle may have head restraints that
are non-adjustable. The non-adjustable
head restraints consist of: An energy absorbing head
restraint.
A
Two steel stems.
B
Guide sleeve unlock and remove
button.
C
Removing the Head Restraint
1. Press and hold buttons C.
2. Pull up the head restraint.
Installing the Head Restraint
Align the steel stems into the guide sleeves
and push the head restraint down until it
locks.
Tilting Head Restraints (If Equipped)
The front head restraints tilt for extra
comfort. To tilt the head restraint, do the
following:
76
F650750 (TBC) , enUSA, Edition date: 201708, First Printing SeatsE138642 E162872
A
C
B
Page 80 of 386
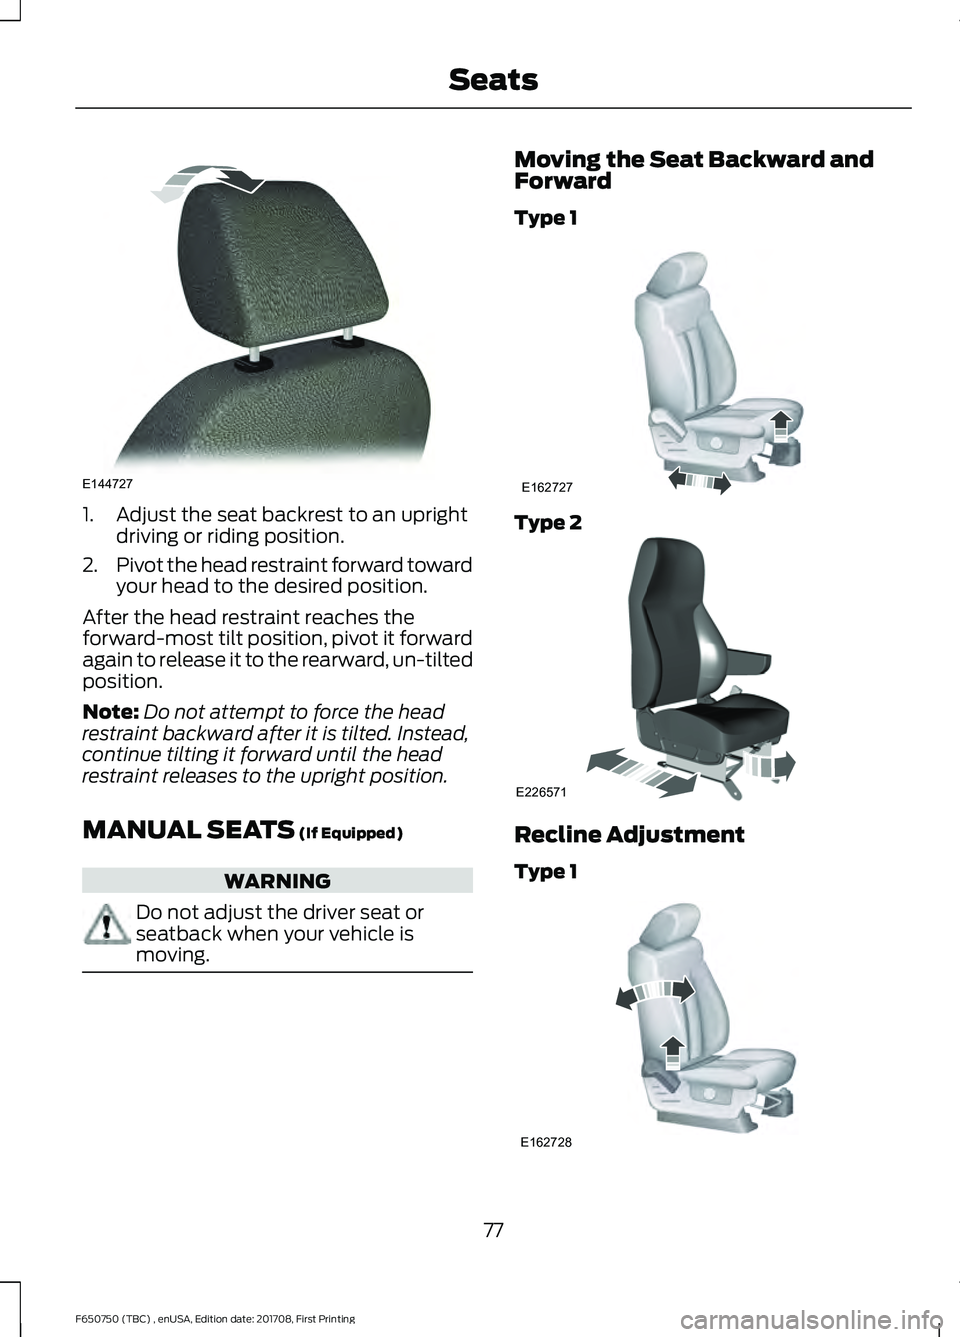
1. Adjust the seat backrest to an upright
driving or riding position.
2. Pivot the head restraint forward toward
your head to the desired position.
After the head restraint reaches the
forward-most tilt position, pivot it forward
again to release it to the rearward, un-tilted
position.
Note: Do not attempt to force the head
restraint backward after it is tilted. Instead,
continue tilting it forward until the head
restraint releases to the upright position.
MANUAL SEATS (If Equipped) WARNING
Do not adjust the driver seat or
seatback when your vehicle is
moving. Moving the Seat Backward and
Forward
Type 1
Type 2
Recline Adjustment
Type 1
77
F650750 (TBC) , enUSA, Edition date: 201708, First Printing SeatsE144727 E162727 E226571 E162728
Page 81 of 386
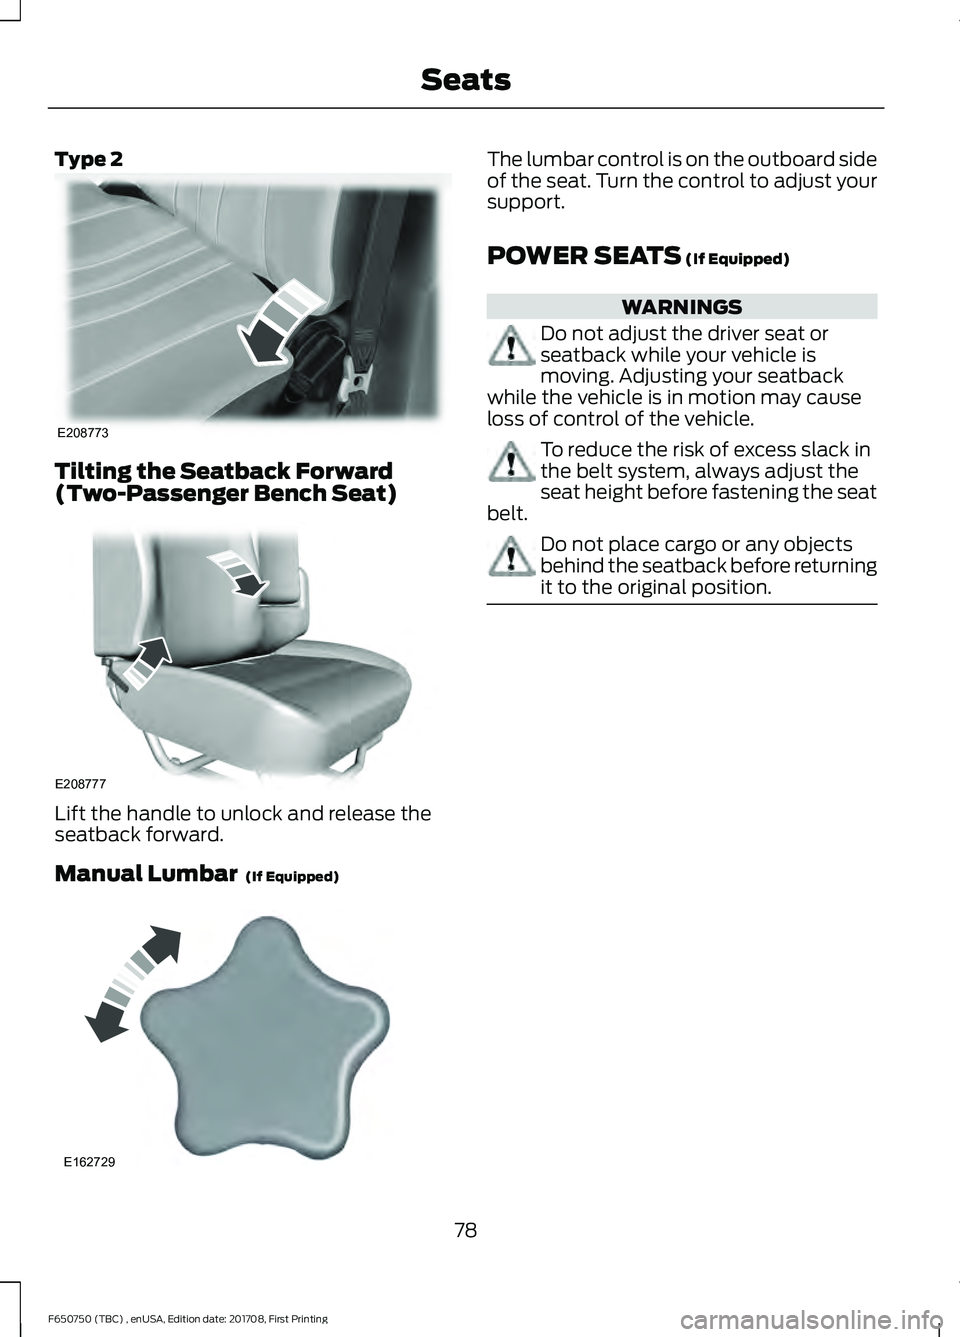
Type 2
Tilting the Seatback Forward
(Two-Passenger Bench Seat)
Lift the handle to unlock and release the
seatback forward.
Manual Lumbar (If Equipped) The lumbar control is on the outboard side
of the seat. Turn the control to adjust your
support.
POWER SEATS
(If Equipped)
WARNINGS
Do not adjust the driver seat or
seatback while your vehicle is
moving. Adjusting your seatback
while the vehicle is in motion may cause
loss of control of the vehicle. To reduce the risk of excess slack in
the belt system, always adjust the
seat height before fastening the seat
belt. Do not place cargo or any objects
behind the seatback before returning
it to the original position.
78
F650750 (TBC) , enUSA, Edition date: 201708, First Printing SeatsE208773 E208777 E162729
Page 82 of 386
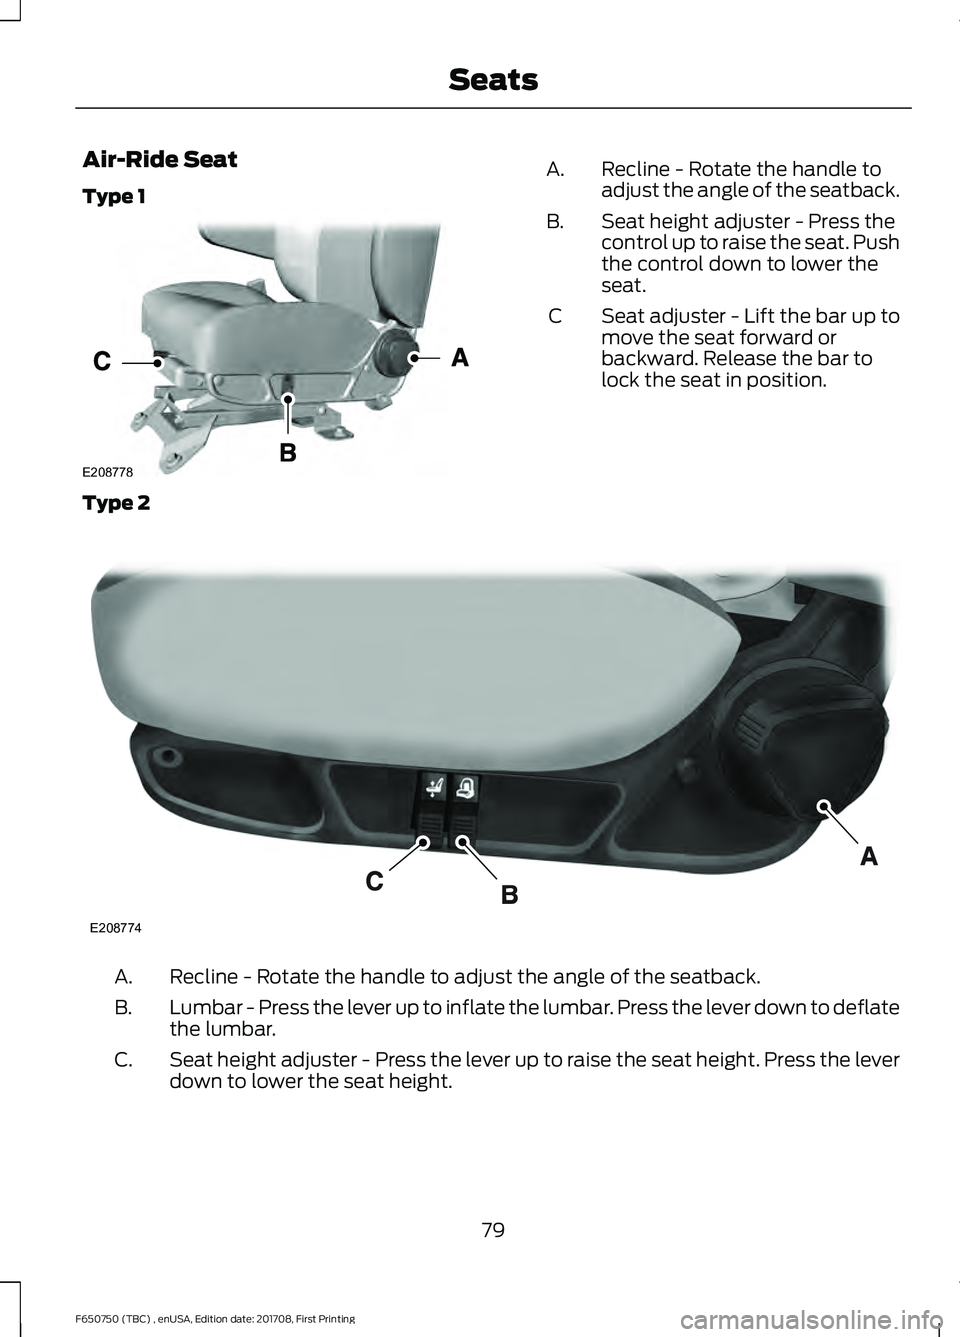
Air-Ride Seat
Type 1
Recline - Rotate the handle to
adjust the angle of the seatback.
A.
Seat height adjuster - Press the
control up to raise the seat. Push
the control down to lower the
seat.
B.
Seat adjuster - Lift the bar up to
move the seat forward or
backward. Release the bar to
lock the seat in position.
C
Type 2 Recline - Rotate the handle to adjust the angle of the seatback.
A.
Lumbar - Press the lever up to inflate the lumbar. Press the lever down to deflate
the lumbar.
B.
Seat height adjuster - Press the lever up to raise the seat height. Press the lever
down to lower the seat height.
C.
79
F650750 (TBC) , enUSA, Edition date: 201708, First Printing SeatsE208778 E208774
Page 83 of 386
REAR SEATS
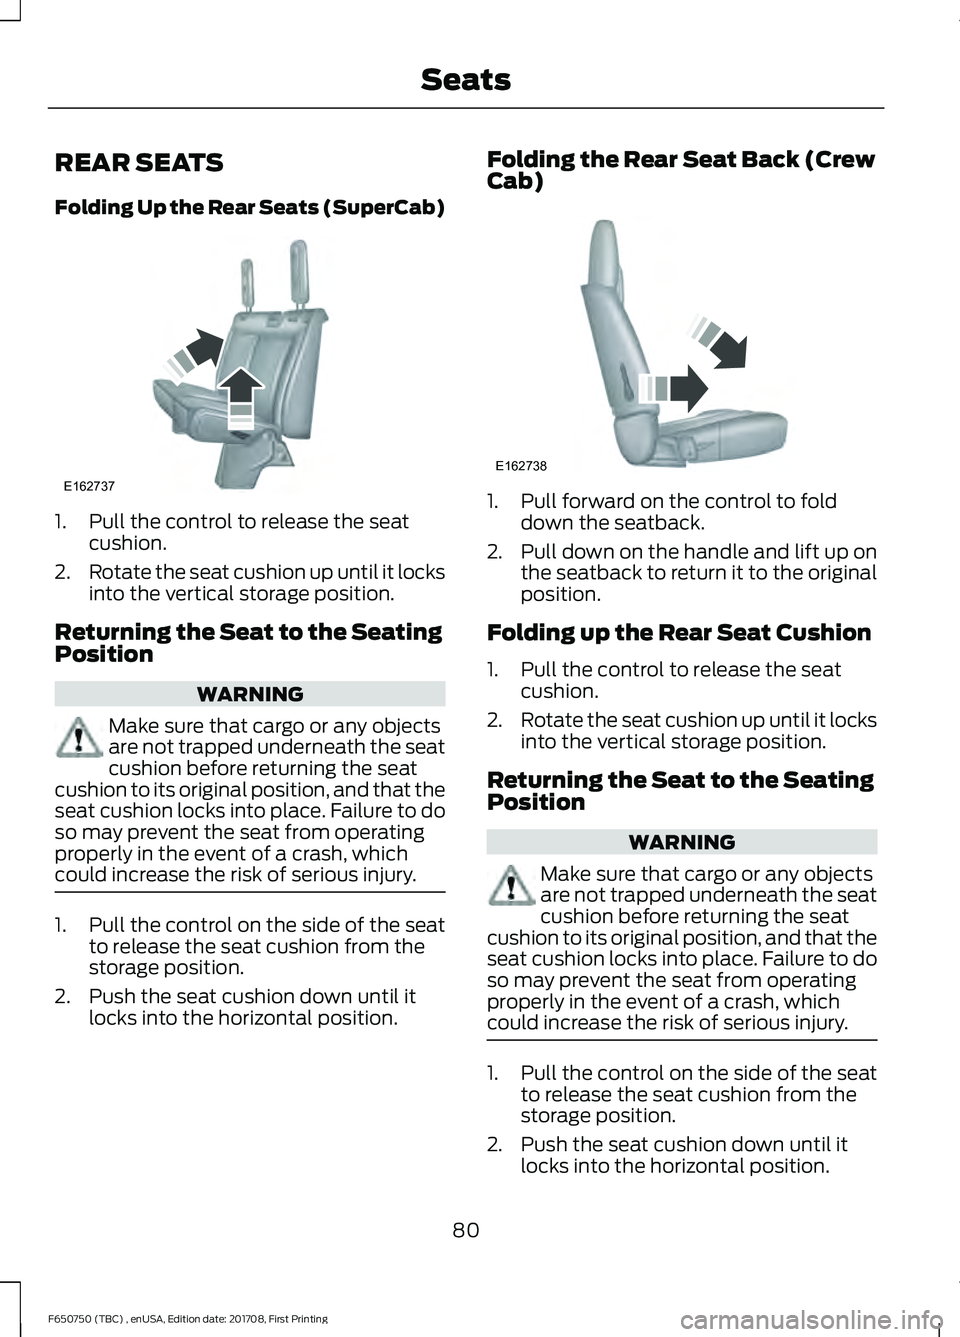
Folding Up the Rear Seats (SuperCab)
1. Pull the control to release the seat
cushion.
2. Rotate the seat cushion up until it locks
into the vertical storage position.
Returning the Seat to the Seating
Position WARNING
Make sure that cargo or any objects
are not trapped underneath the seat
cushion before returning the seat
cushion to its original position, and that the
seat cushion locks into place. Failure to do
so may prevent the seat from operating
properly in the event of a crash, which
could increase the risk of serious injury. 1. Pull the control on the side of the seat
to release the seat cushion from the
storage position.
2. Push the seat cushion down until it locks into the horizontal position. Folding the Rear Seat Back (Crew
Cab)
1. Pull forward on the control to fold
down the seatback.
2. Pull down on the handle and lift up on
the seatback to return it to the original
position.
Folding up the Rear Seat Cushion
1. Pull the control to release the seat cushion.
2. Rotate the seat cushion up until it locks
into the vertical storage position.
Returning the Seat to the Seating
Position WARNING
Make sure that cargo or any objects
are not trapped underneath the seat
cushion before returning the seat
cushion to its original position, and that the
seat cushion locks into place. Failure to do
so may prevent the seat from operating
properly in the event of a crash, which
could increase the risk of serious injury. 1. Pull the control on the side of the seat
to release the seat cushion from the
storage position.
2. Push the seat cushion down until it locks into the horizontal position.
80
F650750 (TBC) , enUSA, Edition date: 201708, First Printing SeatsE162737 E162738
Page 84 of 386
FRONT SEAT ARMREST
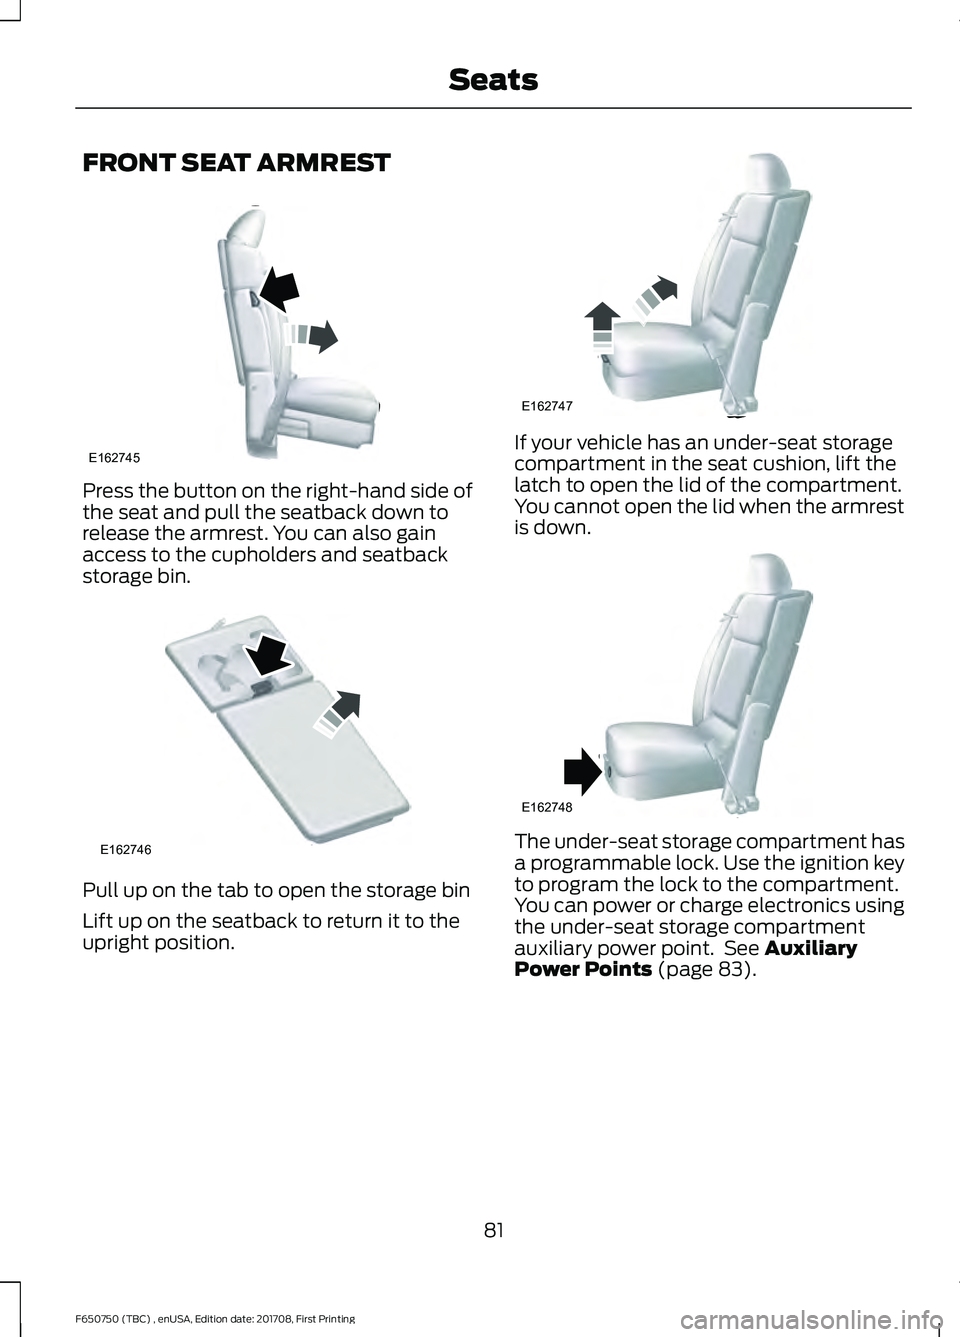
Press the button on the right-hand side of
the seat and pull the seatback down to
release the armrest. You can also gain
access to the cupholders and seatback
storage bin.
Pull up on the tab to open the storage bin
Lift up on the seatback to return it to the
upright position. If your vehicle has an under-seat storage
compartment in the seat cushion, lift the
latch to open the lid of the compartment.
You cannot open the lid when the armrest
is down.
The under-seat storage compartment has
a programmable lock. Use the ignition key
to program the lock to the compartment.
You can power or charge electronics using
the under-seat storage compartment
auxiliary power point. See Auxiliary
Power Points (page 83).
81
F650750 (TBC) , enUSA, Edition date: 201708, First Printing SeatsE162745 E162746 E162747 E162748
Page 85 of 386
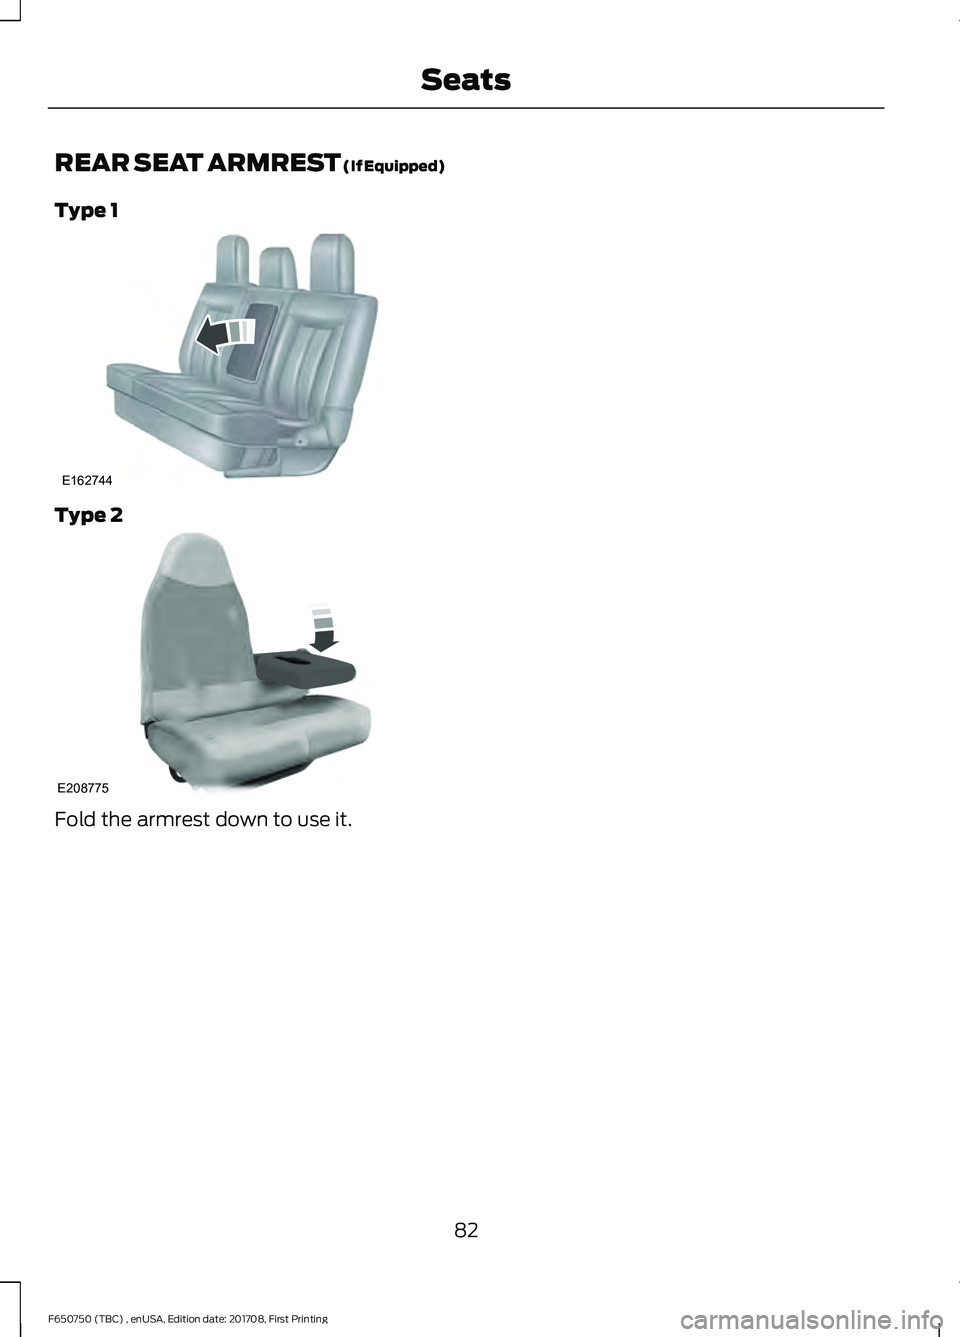
REAR SEAT ARMREST (If Equipped)
Type 1 Type 2
Fold the armrest down to use it.
82
F650750 (TBC) , enUSA, Edition date: 201708, First Printing SeatsE162744 E208775
Page 110 of 386
1. Remove the diesel exhaust fluid
container cap. Place the spout on to
the container and tighten it until you
feel a strong resistance.
2. Remove the diesel exhaust fluid tank filler cap.
3. Insert the spout in to the filler neck until
the seal on the spout seats on to the
filler neck. Pour the fluid in to the tank.
When the tank is full the fluid will stop
flowing automatically.
4. Return the container to the vertical position slightly below the diesel
exhaust fluid filler neck. Allow any fluid
remaining in the spout to drain back in
to the container.
5. Remove the spout from the diesel exhaust fluid filler neck. Replace the
diesel exhaust fluid tank cap.
6. Remove the spout from the diesel exhaust fluid container and replace the
cap.
Note: If there is diesel exhaust fluid left in
the container retain it for later use. The
spout is re-useable. Wash the spout with
clean water prior to storage. Do not use the
diesel exhaust fluid spout with any other
fluid.
Filling the Diesel Exhaust Fluid Tank in
Cold Climates
Diesel exhaust fluid may freeze if the
ambient temperature is below 12°F (-11°C).
Your vehicle has a preheating system
which allows diesel exhaust fluid to
operate below 12°F (-11°C). If you do not
use your vehicle for an extended period
when the ambient temperature is below
12°F (-11°C)
, the fluid in the tank may
freeze. If the tank is overfilled and the fluid
freezes it may damage the tank. This is not
covered by the vehicle warranty. Diesel Exhaust Fluid Warning
Messages and Vehicle Operations WARNINGS
Diesel exhaust fluid must be refilled
when low or replaced when
contaminated or your vehicle speed
becomes limited to 50 mph (80 km/h). In
these conditions, drive with caution and
refill diesel exhaust fluid immediately. If
the diesel exhaust fluid becomes empty
or contaminated and fluid is not replaced,
your vehicle becomes limited to engine idle
only once stopped. In these conditions, be
cautious where you stop your vehicle
because you may not be able to drive long
distances or maintain highway speeds until
you refill or replace the diesel exhaust fluid. Tampering with or disabling the
selective catalytic reduction system
results in severe vehicle performance
limitation including eventual speed limiting
to
5 mph (8 km/h). The information display shows a series of
messages about the amount of diesel
exhaust fluid available. A systems check
displays messages indicating the amount
of diesel exhaust fluid available or displays
a warning message indicating the
approximate distance remaining as the
fluid in the diesel exhaust fluid tank nears
empty. See
Information Messages
(page 66). As the diesel exhaust fluid level
nears empty, the warning
symbol displays and a series of
tones and messages starting at
500 mi
(800 km) remaining before diesel exhaust
fluid is depleted. The warning symbol and
messages continue until you refill the
diesel exhaust fluid tank.
107
F650750 (TBC) , enUSA, Edition date: 201708, First Printing Engine Emission ControlE163176
Page 137 of 386
PRINCIPLE OF OPERATION
WARNINGS
Vehicle modifications involving
braking system, aftermarket roof
racks, suspension, steering system,
tire construction and wheel and tire size
may change the handling characteristics
of your vehicle and may adversely affect
the performance of the electronic stability
control system. In addition, installing any
stereo loudspeakers may interfere with
and adversely affect the electronic stability
control system. Install any aftermarket
stereo loudspeaker as far as possible from
the front center console, the tunnel, and
the front seats in order to minimize the risk
of interfering with the electronic stability
control sensors. Reducing the
effectiveness of the electronic stability
control system could lead to an increased
risk of loss of vehicle control, vehicle
rollover, personal injury and death. Remember that even advanced
technology cannot defy the laws of
physics. It's always possible to lose
control of a vehicle due to inappropriate
driver input for the conditions. Aggressive
driving on any road condition can cause
you to lose control of your vehicle
increasing the risk of personal injury or
property damage. Activation of the
electronic stability control system is an
indication that at least some of the tires
have exceeded their ability to grip the road;
this could reduce the operator's ability to
control the vehicle potentially resulting in
a loss of vehicle control, vehicle rollover,
personal injury and death. If your electronic
stability control system activates, SLOW
DOWN. The system automatically turns on each
time you switch the ignition on. If a fault occurs in either the stability
control or the traction control system, you
may experience the following conditions:
•
The stability and traction control light
illuminates steadily.
• The stability control and traction
control systems do not enhance your
vehicle's ability to maintain traction of
the wheels.
Vehicles With: Hydraulic Brakes
If a driving condition activates either the
stability control or the traction control
system you may experience the following
conditions:
• The stability and traction control light
flashes rapidly.
• Your vehicle slows down.
• Reduced engine power.
• A vibration in the brake pedal.
• The brake pedal is stiffer than usual.
• If the driving condition is severe and
your foot is not on the brake, the brake
pedal may move as the system applies
higher brake force.
Vehicles With: Air Brakes
If a driving condition activates either the
stability control or the traction control
system you may experience the following
conditions:
• The stability and traction control light
flashes rapidly.
• Your vehicle slows down.
• Reduced engine power.
The stability control system has several
features built into it to help you maintain
control of your vehicle:
134
F650750 (TBC) , enUSA, Edition date: 201708, First Printing Stability Control (If Equipped)
Page 211 of 386
Note:
Electrical or electronic accessories
or components added to the vehicle by the
dealer or the owner may adversely affect
battery performance and durability.
Your vehicle is equipped with a Motorcraft
maintenance-free battery which normally
does not require additional water during
its life of service.
For longer, trouble-free operation, keep the
top of the battery clean and dry. Also,
make certain the battery cables are always
tightly fastened to the battery terminals.
If you see any corrosion on the battery or
terminals, remove the cables from the
terminals and clean with a wire brush. You
can neutralize the acid with a solution of
baking soda and water.
It is recommended that the negative
battery cable terminal be disconnected
from the battery if you plan to store your
vehicle for an extended period of time.
Because your vehicle ’s engine is
electronically controlled by a computer,
some control conditions are maintained
by power from the battery. When the
battery is disconnected or a new battery
is installed, the engine must relearn its idle
and fuel trim strategy for optimum
driveability and performance. To begin this
process
1. With the vehicle at a complete stop, set the parking brake.
2. Put the gearshift in park (P) or neutral (N) and turn off all accessories.
3. Start the engine. Run the engine until it reaches normal operating
temperature.
4. Allow the engine to idle for at least one
minute.
5. Turn the air conditioning (if equipped) on and allow the engine to idle for at
least one minute. 6. Release the parking brake. With your
foot on the brake pedal and with the
air conditioning on, put the vehicle in
drive (D) and allow the engine to idle
for at least one minute.
•If you do not allow the engine to
relearn its idle trim, the idle quality
of your vehicle may be adversely
affected until the idle trim is
eventually relearned.
7. Drive the vehicle to complete the relearning process
•The vehicle may need to be driven
10 mi (16 km) or more to relearn the
idle and fuel trim strategy along
with the ethanol content for flexible
fuel vehicles.
If the battery has been disconnected or a
new battery has been installed, the clock
and radio settings must be reset once the
battery is reconnected.
Always dispose of automotive
batteries in a responsible manner.
Follow your local authorized standards
for disposal. Call your local authorized
recycling center to find out more about
recycling automotive batteries.
Battery Management System (If
Equipped)
The battery management system (BMS)
monitors battery conditions and takes
actions to extend battery life. If excessive
battery drain is detected, the system may
temporarily disable certain electrical
features to protect the battery. Those
electrical accessories affected include the
rear defrost, heated/cooled seats, climate
control fan, heated steering wheel, audio
and navigation system. A message may be
shown in the information displays to alert
208
F650750 (TBC) , enUSA, Edition date: 201708, First Printing Maintenance