warning FORD F-650/750 2022 Owners Manual
[x] Cancel search | Manufacturer: FORD, Model Year: 2022, Model line: F-650/750, Model: FORD F-650/750 2022Pages: 379, PDF Size: 5.29 MB
Page 202 of 379
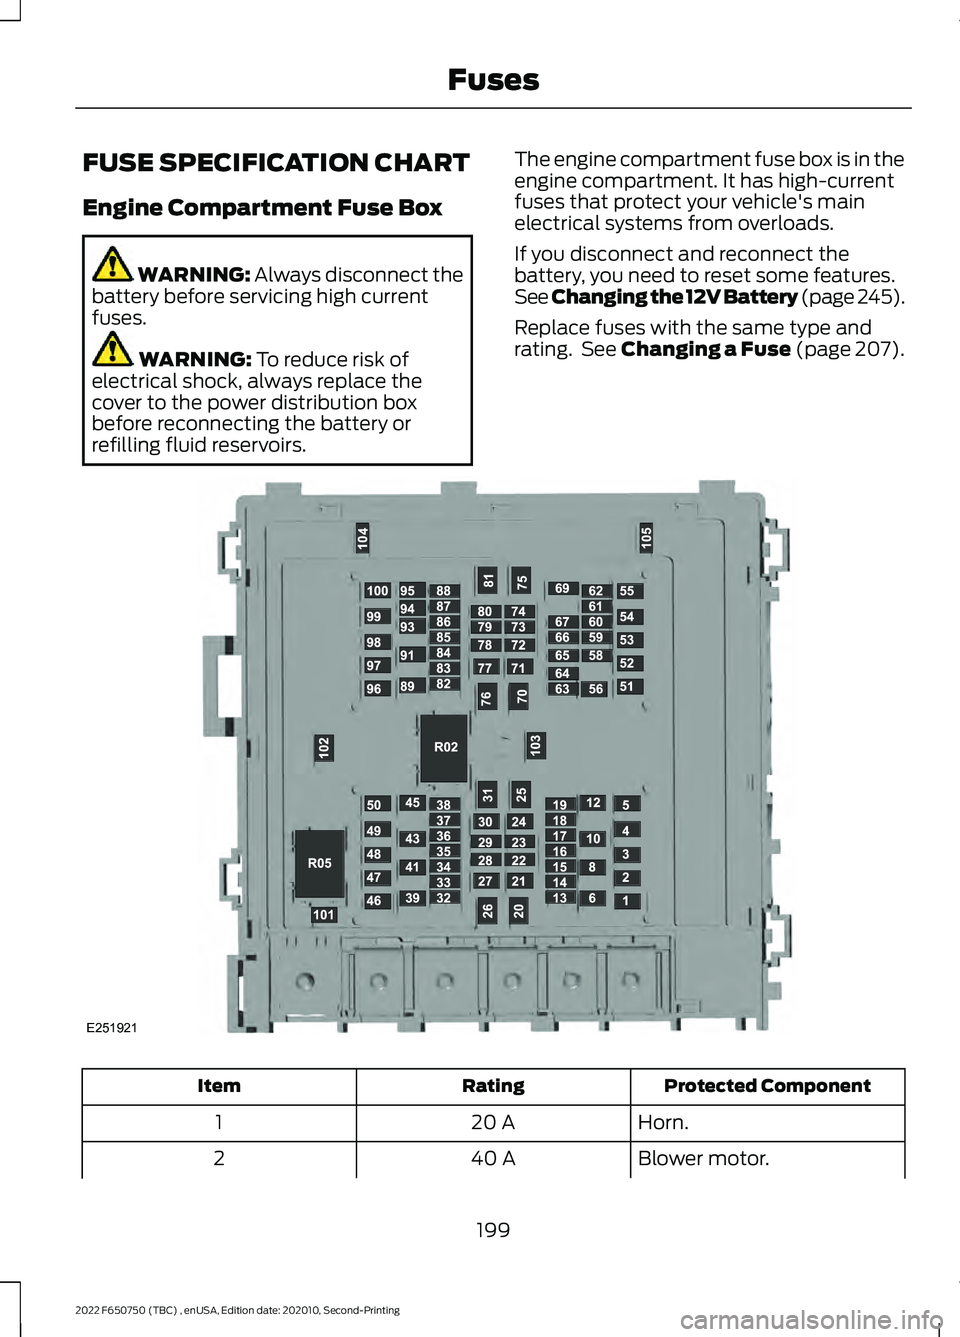
FUSE SPECIFICATION CHART
Engine Compartment Fuse Box
WARNING: Always disconnect the
battery before servicing high current
fuses. WARNING:
To reduce risk of
electrical shock, always replace the
cover to the power distribution box
before reconnecting the battery or
refilling fluid reservoirs. The engine compartment fuse box is in the
engine compartment. It has high-current
fuses that protect your vehicle's main
electrical systems from overloads.
If you disconnect and reconnect the
battery, you need to reset some features.
See Changing the 12V Battery (page 245
).
Replace fuses with the same type and
rating. See Changing a Fuse (page 207). Protected Component
Rating
Item
Horn.
20 A
1
Blower motor.
40 A
2
199
2022 F650750 (TBC) , enUSA, Edition date: 202010, Second-Printing FusesE251921
Page 210 of 379
Protected Component
Rating
Item
Customer access stoplamp
signal.
Brake on-off isolation relay.
Trailer tow stoplamp relay.
Upfitter interface module.
10 A
31
Remote radio frequency
receiver.
Radio.
20 A
32
Not used.
—
33
Not used.
—
34
Tow haul switch.
5 A
35
Lane departure warning
camera.
15 A
36
Not used.
—
37
Left-hand front power
window switch (four
window units).
30 A
38
Note: Spare fuse amperage may vary.
CHANGING A FUSE
Fuses WARNING: Always replace a fuse
with one that has the specified
amperage rating. Using a fuse with a
higher amperage rating can cause severe
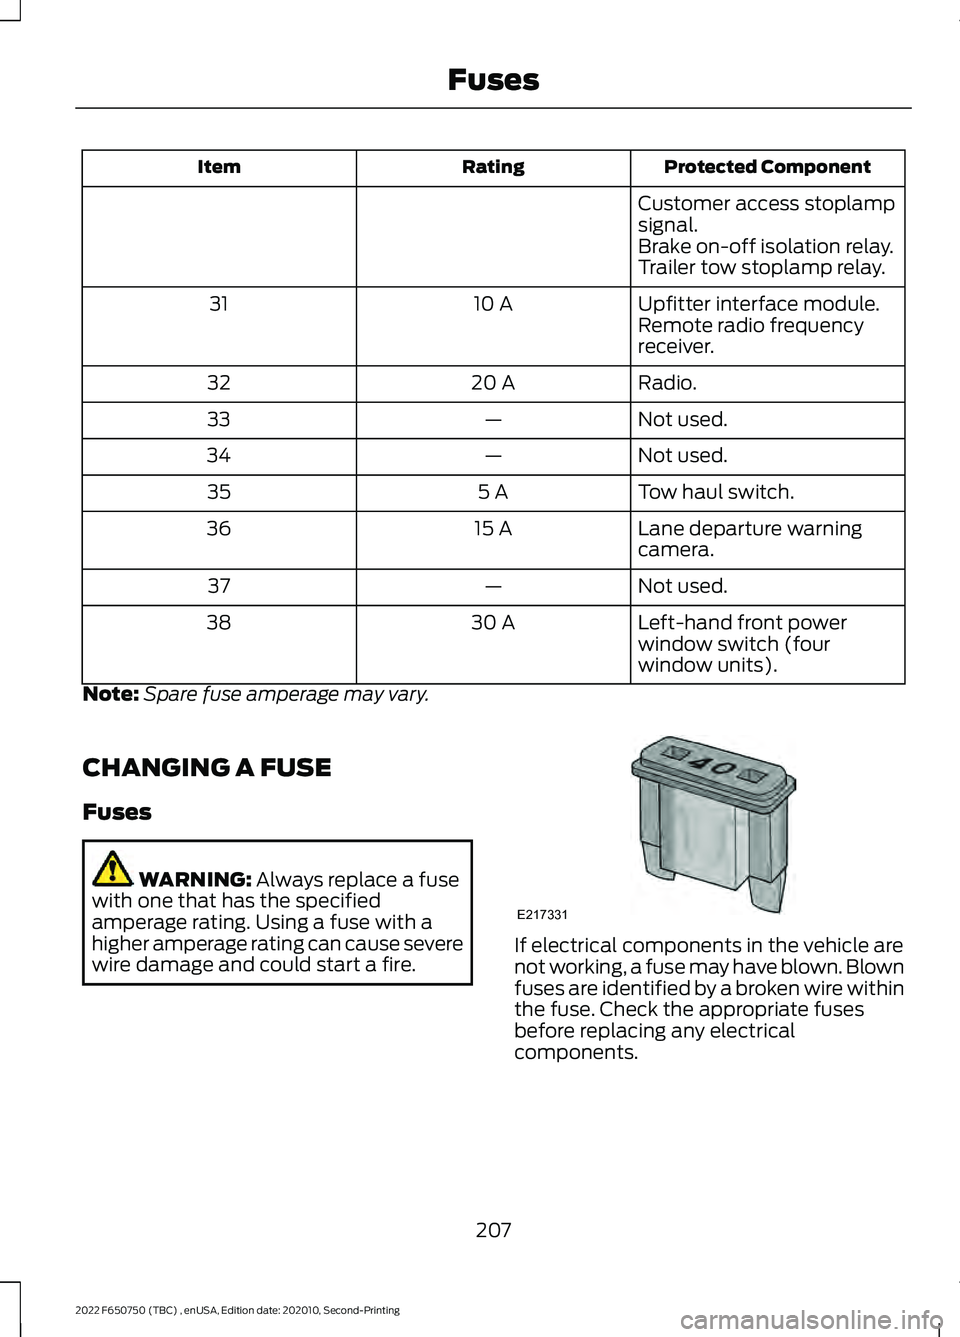
wire damage and could start a fire. If electrical components in the vehicle are
not working, a fuse may have blown. Blown
fuses are identified by a broken wire within
the fuse. Check the appropriate fuses
before replacing any electrical
components.
207
2022 F650750 (TBC) , enUSA, Edition date: 202010, Second-Printing FusesE217331
Page 212 of 379
VEHICLE INSPECTION
INFORMATION
To make sure your vehicle is ready to
operate, conduct a pre-trip inspection at
the beginning of each work period. Follow
the steps listed in this section to verify a
proper vehicle inspection procedure.
WARNING: Exercise great caution
when working on a vehicle equipped with
an automatic fan clutch. The fan starts
in motion only after the engine coolant
reaches a predetermined temperature
or the refrigerant pressure (if equipped
with air conditioning) reaches a
predetermined setting. The fan starts at
this point with no advance warning.
Never reach near, or permit objects to
protrude into, the fan blade radius while
the engine is running as this could result
in vehicle damage, personal injury or
death. WARNING:
Do not operate the
vehicle if any suspension conditions
listed in the following charts are evident.
Loss of steering or suspension could
result in property damage, personal injury
or death. WARNING:
If a wheel must be
changed, obtain expert tire service help.
Mounting and un-mounting of tires
should only be performed by a qualified
technician using necessary safety
procedures and equipment, otherwise
the result could be property damage,
personal injury or death.
Note: Always make sure you apply the
parking brake before starting the engine. Engine compartment (with engine off)
Use the dipstick to verify the oil level is in the proper operating
range. See
Engine Oil Dipstick (page 223).
Engine oil
Look through the plastic reservoir and verify the coolant level
is within the proper operating range. Do not remove the
pressure cap until the coolant has cooled. See
Engine
Coolant Check (page 237).
Engine coolant
Verify that the fluid level is in the proper operating range. See
Power Steering Fluid Check
(page 244).
Power steering fluid
Remove the master cylinder caps and inspect the fluid level.
See
Brake Fluid Check (page 243).
Brake fluid
209
2022 F650750 (TBC) , enUSA, Edition date: 202010, Second-Printing Vehicle Inspection Guide
Page 213 of 379
Engine compartment (with engine off)
Inspect for glazing, fraying or cracking. There should be no
more than 5-7 cracks per rib, per 1 in (2.5 cm)
Belts (fan, alternator,
water pump and air
conditioning
compressor)
Inspect for signs of fluid puddles or dripping fluid on the
ground under the engine, or the underside of the engine.
Fluid leaks
Inspect for debris that may have collected on the HVAC air
inlet grille or inside the exterior module as this may reduce
system performance.
HVAC air inlet Engine starting (with parking brake applied)
Before entering the cab, verify that the vehicle is equipped
with spare electrical fuses (if used), three red reflective
triangles, a properly charged and rated fire extinguisher and
wheel chocks.
Safety and emergency
equipment
Walk around the vehicle and verify all steps and grab handles,
inside and out (as well as behind), are tight and clean. Use
extreme caution and a three-point stance at all times.
Inspect door latches for proper closing, latching and locking.
Set the parking brake. Make sure the gearshift lever is in
neutral (N) or park (P) (if equipped with a park position).
Starting the engine
Diesel engine:
Turn the key to the on position. Turn the key
to start when the wait to start indicator light in the instrument
cluster turns off.
Gasoline engine:
Turn the key to start, and then release it
as soon as the engine starts.
Verify pressure builds to normal operating range.
Engine oil pressure
A tone indicating low air pressure should sound immediately
after the engine starts but before the compressor has built-
up pressure. The tone should stop when the air pressure
reaches
70 psi (483 kPa). Let the air pressure build to
governed cutout pressure, which should occur between
115– 130 psi (793–896 kPa)
.
Low air pressure warning
tone (if equipped with an
air compressor)
Press the accelerator and verify that it operates smoothly,
without any binding or irregular feel. Release the pedal and
verify the engine returns to idle speed immediately.
Accelerator
210
2022 F650750 (TBC) , enUSA, Edition date: 202010, Second-Printing Vehicle Inspection Guide
Page 214 of 379
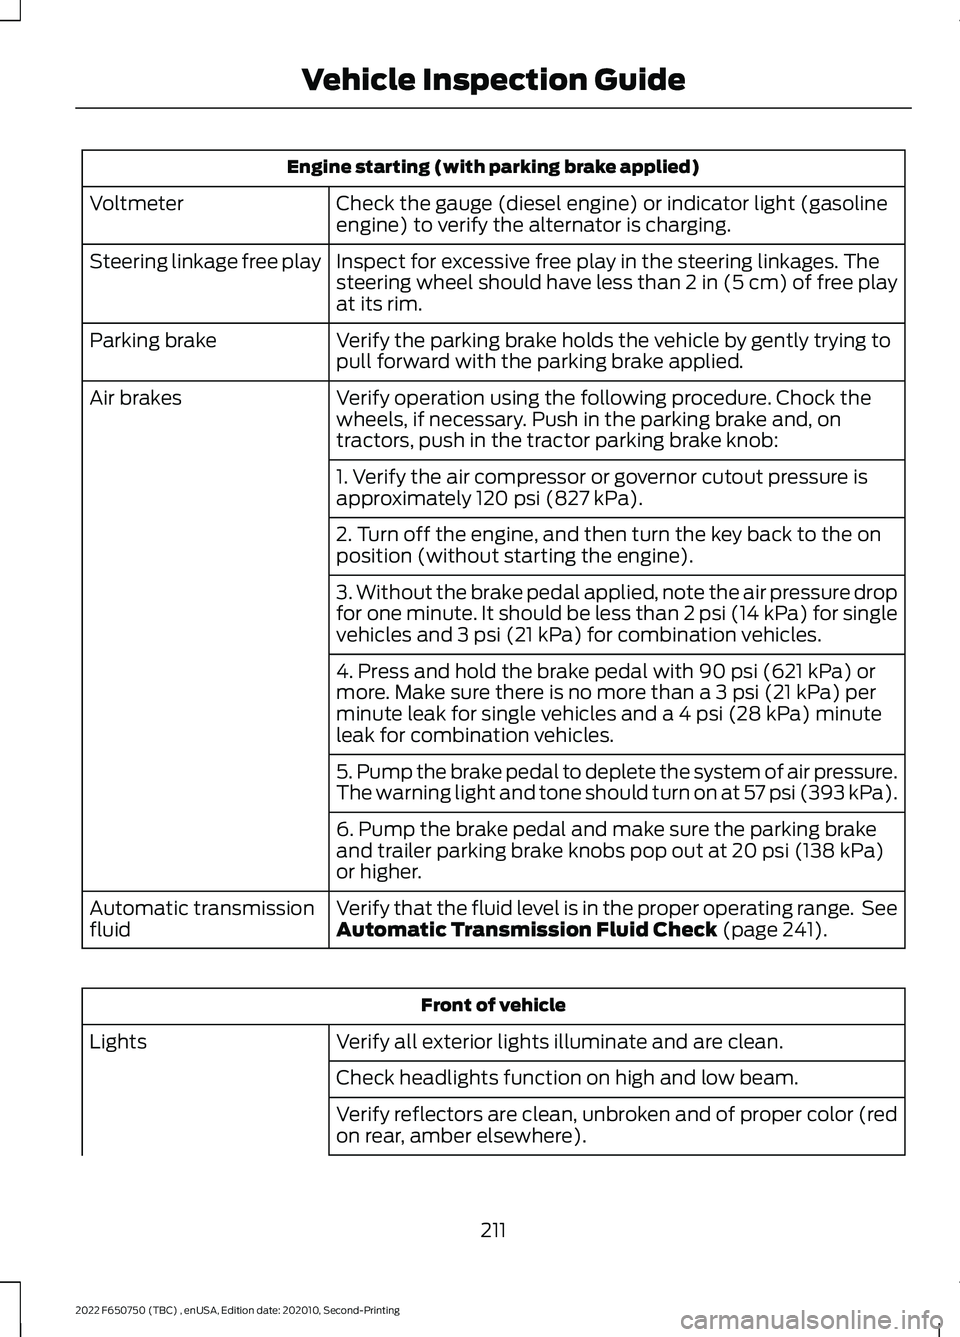
Engine starting (with parking brake applied)
Check the gauge (diesel engine) or indicator light (gasoline
engine) to verify the alternator is charging.
Voltmeter
Inspect for excessive free play in the steering linkages. The
steering wheel should have less than 2 in (5 cm) of free play
at its rim.
Steering linkage free play
Verify the parking brake holds the vehicle by gently trying to
pull forward with the parking brake applied.
Parking brake
Verify operation using the following procedure. Chock the
wheels, if necessary. Push in the parking brake and, on
tractors, push in the tractor parking brake knob:
Air brakes
1. Verify the air compressor or governor cutout pressure is
approximately 120 psi (827 kPa).
2. Turn off the engine, and then turn the key back to the on
position (without starting the engine).
3. Without the brake pedal applied, note the air pressure drop
for one minute. It should be less than 2 psi (14 kPa) for single
vehicles and
3 psi (21 kPa) for combination vehicles.
4. Press and hold the brake pedal with
90 psi (621 kPa) or
more. Make sure there is no more than a 3 psi (21 kPa) per
minute leak for single vehicles and a 4 psi (28 kPa) minute
leak for combination vehicles.
5. Pump the brake pedal to deplete the system of air pressure.
The warning light and tone should turn on at 57 psi (393 kPa).
6. Pump the brake pedal and make sure the parking brake
and trailer parking brake knobs pop out at
20 psi (138 kPa)
or higher.
Verify that the fluid level is in the proper operating range. See
Automatic Transmission Fluid Check
(page 241).
Automatic transmission
fluid Front of vehicle
Verify all exterior lights illuminate and are clean.
Lights
Check headlights function on high and low beam.
Verify reflectors are clean, unbroken and of proper color (red
on rear, amber elsewhere).
211
2022 F650750 (TBC) , enUSA, Edition date: 202010, Second-Printing Vehicle Inspection Guide
Page 219 of 379
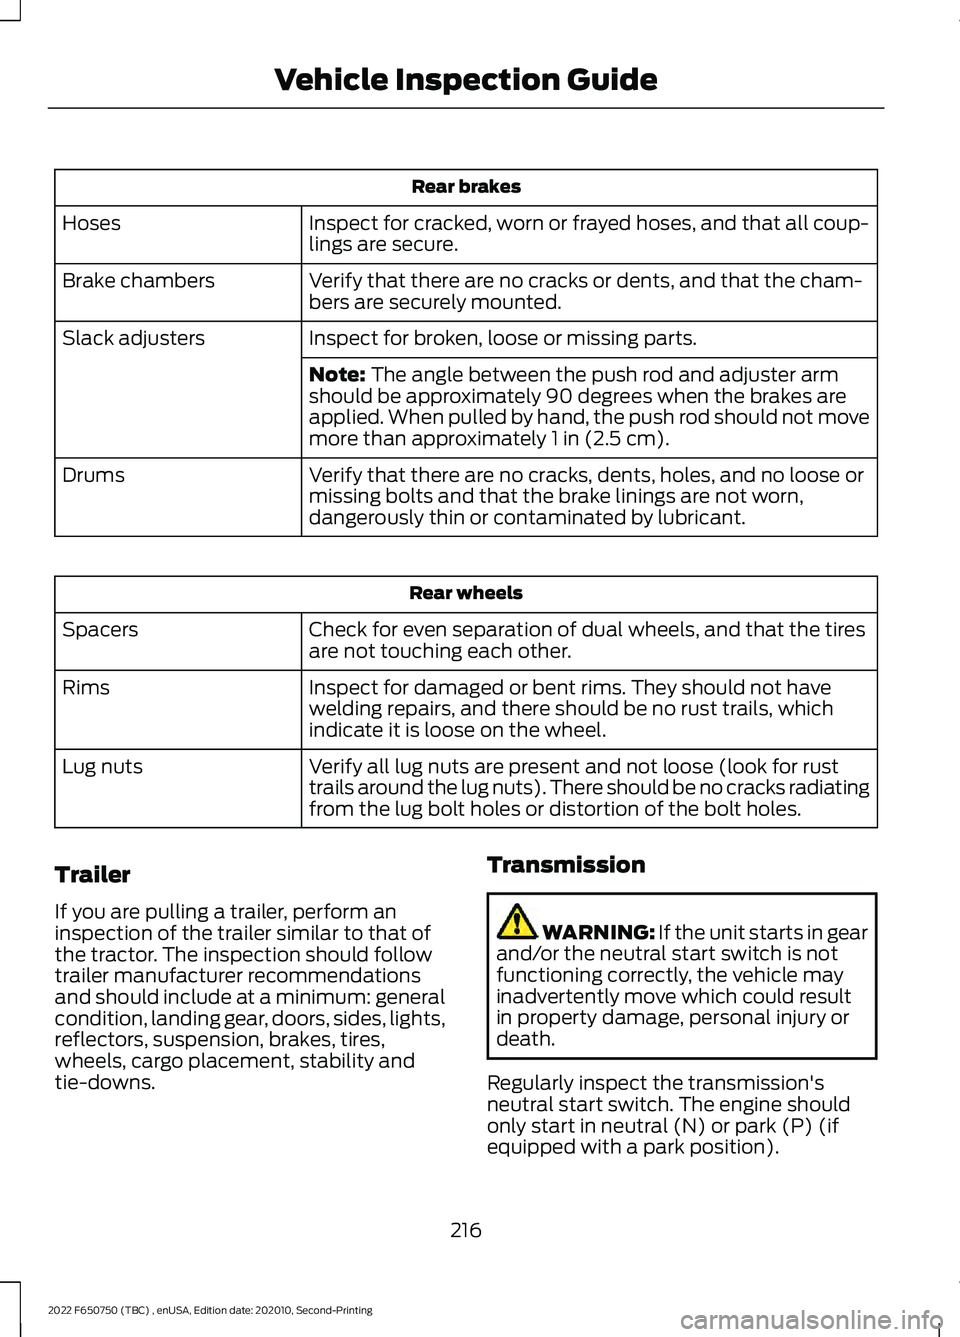
Rear brakes
Inspect for cracked, worn or frayed hoses, and that all coup-
lings are secure.
Hoses
Verify that there are no cracks or dents, and that the cham-
bers are securely mounted.
Brake chambers
Inspect for broken, loose or missing parts.
Slack adjusters
Note: The angle between the push rod and adjuster arm
should be approximately 90 degrees when the brakes are
applied. When pulled by hand, the push rod should not move
more than approximately
1 in (2.5 cm).
Verify that there are no cracks, dents, holes, and no loose or
missing bolts and that the brake linings are not worn,
dangerously thin or contaminated by lubricant.
Drums Rear wheels
Check for even separation of dual wheels, and that the tires
are not touching each other.
Spacers
Inspect for damaged or bent rims. They should not have
welding repairs, and there should be no rust trails, which
indicate it is loose on the wheel.
Rims
Verify all lug nuts are present and not loose (look for rust
trails around the lug nuts). There should be no cracks radiating
from the lug bolt holes or distortion of the bolt holes.
Lug nuts
Trailer
If you are pulling a trailer, perform an
inspection of the trailer similar to that of
the tractor. The inspection should follow
trailer manufacturer recommendations
and should include at a minimum: general
condition, landing gear, doors, sides, lights,
reflectors, suspension, brakes, tires,
wheels, cargo placement, stability and
tie-downs. Transmission WARNING:
If the unit starts in gear
and/or the neutral start switch is not
functioning correctly, the vehicle may
inadvertently move which could result
in property damage, personal injury or
death.
Regularly inspect the transmission's
neutral start switch. The engine should
only start in neutral (N) or park (P) (if
equipped with a park position).
216
2022 F650750 (TBC) , enUSA, Edition date: 202010, Second-Printing Vehicle Inspection Guide
Page 221 of 379
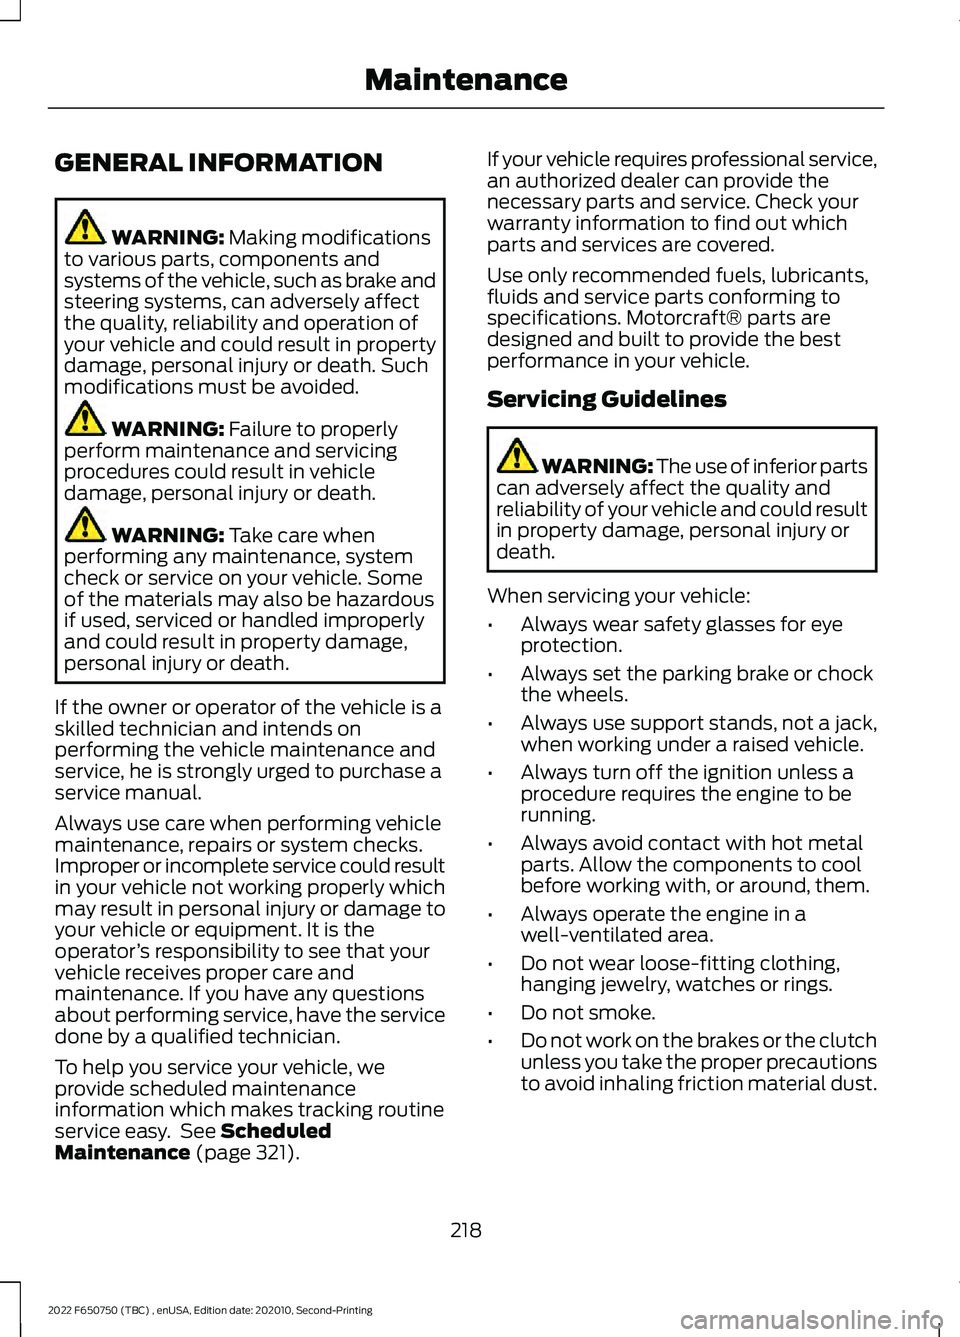
GENERAL INFORMATION
WARNING: Making modifications
to various parts, components and
systems of the vehicle, such as brake and
steering systems, can adversely affect
the quality, reliability and operation of
your vehicle and could result in property
damage, personal injury or death. Such
modifications must be avoided. WARNING:
Failure to properly
perform maintenance and servicing
procedures could result in vehicle
damage, personal injury or death. WARNING:
Take care when
performing any maintenance, system
check or service on your vehicle. Some
of the materials may also be hazardous
if used, serviced or handled improperly
and could result in property damage,
personal injury or death.
If the owner or operator of the vehicle is a
skilled technician and intends on
performing the vehicle maintenance and
service, he is strongly urged to purchase a
service manual.
Always use care when performing vehicle
maintenance, repairs or system checks.
Improper or incomplete service could result
in your vehicle not working properly which
may result in personal injury or damage to
your vehicle or equipment. It is the
operator ’s responsibility to see that your
vehicle receives proper care and
maintenance. If you have any questions
about performing service, have the service
done by a qualified technician.
To help you service your vehicle, we
provide scheduled maintenance
information which makes tracking routine
service easy. See
Scheduled
Maintenance (page 321). If your vehicle requires professional service,
an authorized dealer can provide the
necessary parts and service. Check your
warranty information to find out which
parts and services are covered.
Use only recommended fuels, lubricants,
fluids and service parts conforming to
specifications. Motorcraft® parts are
designed and built to provide the best
performance in your vehicle.
Servicing Guidelines
WARNING: The use of inferior parts
can adversely affect the quality and
reliability of your vehicle and could result
in property damage, personal injury or
death.
When servicing your vehicle:
• Always wear safety glasses for eye
protection.
• Always set the parking brake or chock
the wheels.
• Always use support stands, not a jack,
when working under a raised vehicle.
• Always turn off the ignition unless a
procedure requires the engine to be
running.
• Always avoid contact with hot metal
parts. Allow the components to cool
before working with, or around, them.
• Always operate the engine in a
well-ventilated area.
• Do not wear loose-fitting clothing,
hanging jewelry, watches or rings.
• Do not smoke.
• Do not work on the brakes or the clutch
unless you take the proper precautions
to avoid inhaling friction material dust.
218
2022 F650750 (TBC) , enUSA, Edition date: 202010, Second-Printing Maintenance
Page 222 of 379
Quality service parts are available through
an authorized dealer. If dealer parts are not
used, make sure the replacement parts are
of equivalent quality.
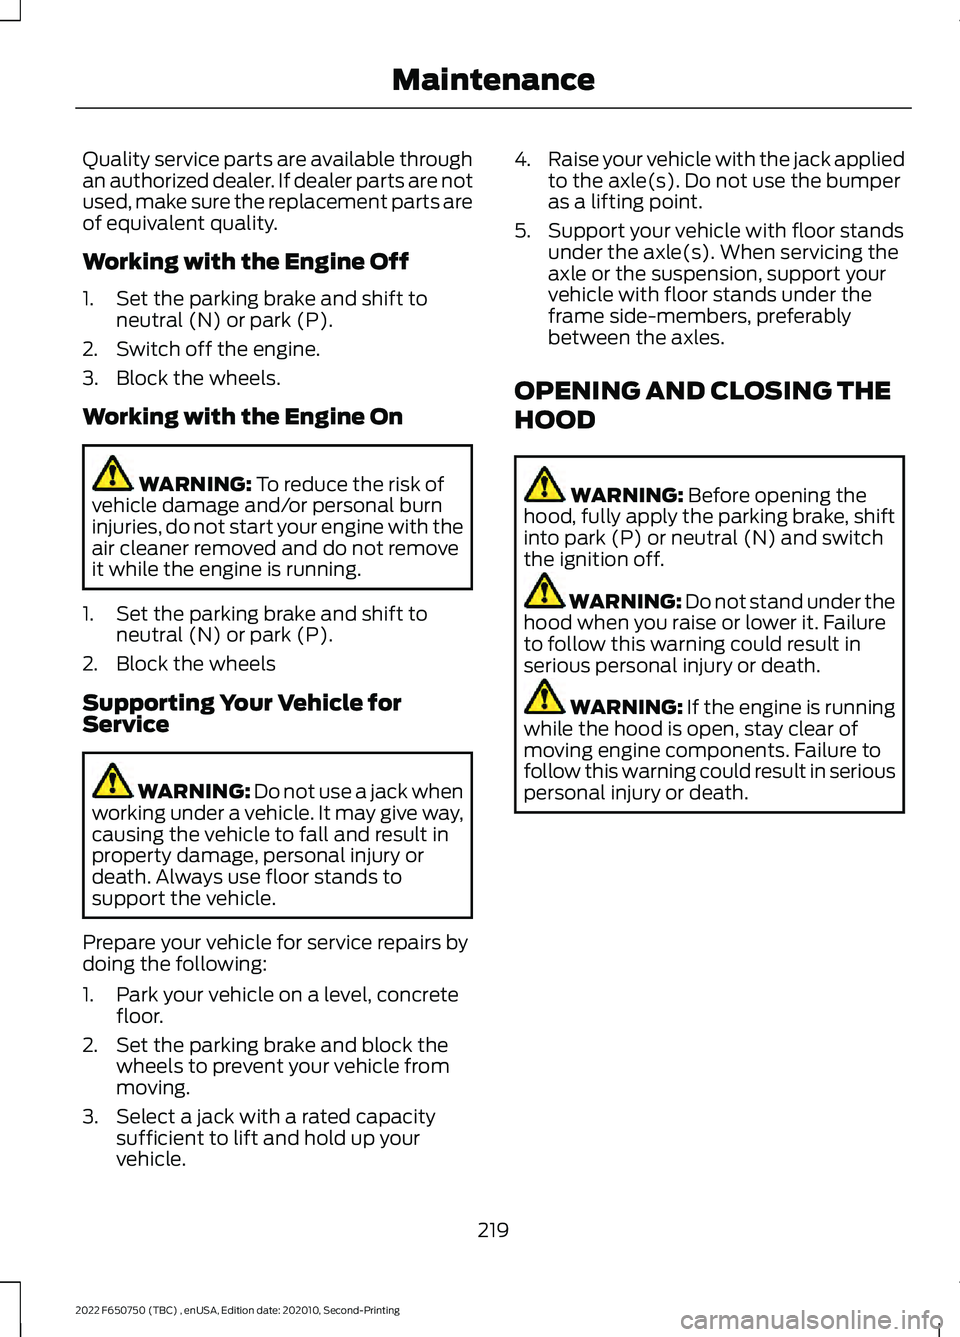
Working with the Engine Off
1. Set the parking brake and shift to
neutral (N) or park (P).
2. Switch off the engine.
3. Block the wheels.
Working with the Engine On WARNING: To reduce the risk of
vehicle damage and/or personal burn
injuries, do not start your engine with the
air cleaner removed and do not remove
it while the engine is running.
1. Set the parking brake and shift to neutral (N) or park (P).
2. Block the wheels
Supporting Your Vehicle for
Service WARNING:
Do not use a jack when
working under a vehicle. It may give way,
causing the vehicle to fall and result in
property damage, personal injury or
death. Always use floor stands to
support the vehicle.
Prepare your vehicle for service repairs by
doing the following:
1. Park your vehicle on a level, concrete floor.
2. Set the parking brake and block the wheels to prevent your vehicle from
moving.
3. Select a jack with a rated capacity sufficient to lift and hold up your
vehicle. 4.
Raise your vehicle with the jack applied
to the axle(s). Do not use the bumper
as a lifting point.
5. Support your vehicle with floor stands under the axle(s). When servicing the
axle or the suspension, support your
vehicle with floor stands under the
frame side-members, preferably
between the axles.
OPENING AND CLOSING THE
HOOD WARNING:
Before opening the
hood, fully apply the parking brake, shift
into park (P) or neutral (N) and switch
the ignition off. WARNING:
Do not stand under the
hood when you raise or lower it. Failure
to follow this warning could result in
serious personal injury or death. WARNING: If the engine is running
while the hood is open, stay clear of
moving engine components. Failure to
follow this warning could result in serious
personal injury or death.
219
2022 F650750 (TBC) , enUSA, Edition date: 202010, Second-Printing Maintenance
Page 226 of 379
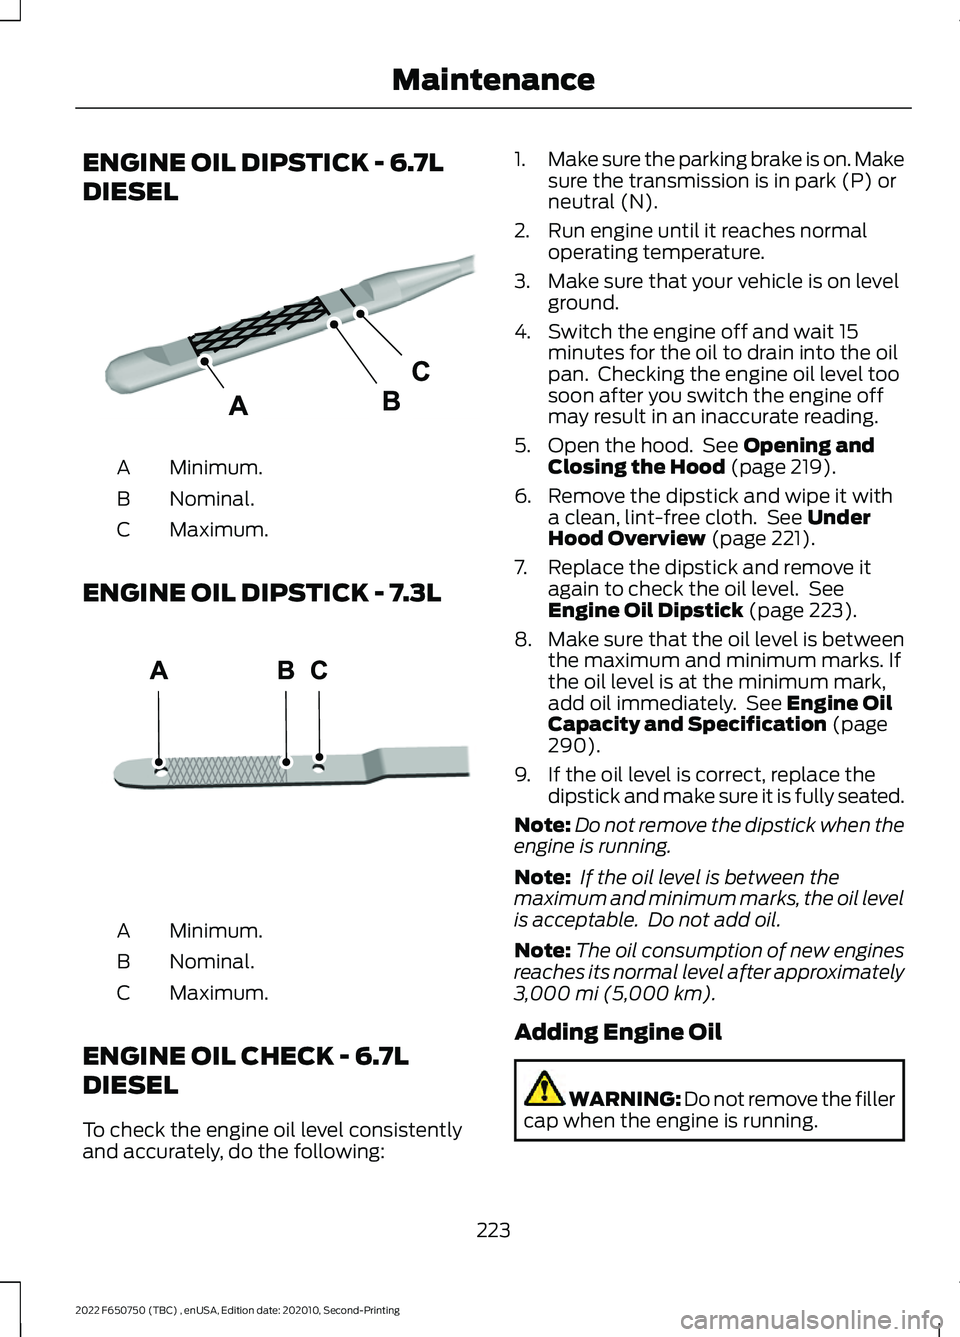
ENGINE OIL DIPSTICK - 6.7L
DIESEL
Minimum.
A
Nominal.
B
Maximum.
C
ENGINE OIL DIPSTICK - 7.3L Minimum.
A
Nominal.
B
Maximum.
C
ENGINE OIL CHECK - 6.7L
DIESEL
To check the engine oil level consistently
and accurately, do the following: 1.
Make sure the parking brake is on. Make
sure the transmission is in park (P) or
neutral (N).
2. Run engine until it reaches normal operating temperature.
3. Make sure that your vehicle is on level ground.
4. Switch the engine off and wait 15 minutes for the oil to drain into the oil
pan. Checking the engine oil level too
soon after you switch the engine off
may result in an inaccurate reading.
5. Open the hood. See Opening and
Closing the Hood (page 219).
6. Remove the dipstick and wipe it with a clean, lint-free cloth. See
Under
Hood Overview (page 221).
7. Replace the dipstick and remove it again to check the oil level. See
Engine Oil Dipstick
(page 223).
8. Make sure that the oil level is between
the maximum and minimum marks. If
the oil level is at the minimum mark,
add oil immediately. See
Engine Oil
Capacity and Specification (page
290).
9. If the oil level is correct, replace the dipstick and make sure it is fully seated.
Note: Do not remove the dipstick when the
engine is running.
Note: If the oil level is between the
maximum and minimum marks, the oil level
is acceptable. Do not add oil.
Note: The oil consumption of new engines
reaches its normal level after approximately
3,000 mi (5,000 km)
.
Adding Engine Oil WARNING: Do not remove the filler
cap when the engine is running.
223
2022 F650750 (TBC) , enUSA, Edition date: 202010, Second-Printing MaintenanceE249448 E250320
Page 227 of 379
Do not use supplemental engine oil
additives because they are unnecessary
and could lead to engine damage that may
not be covered by the vehicle Warranty.
To top up the engine oil level do the
following:
1. Clean the area surrounding the engine
oil filler cap before you remove it.
2. Remove the engine oil filler cap. See Under Hood Overview (page 221).
Turn it counterclockwise and remove
it.
3. Add engine oil of the proper viscosity and grade that meets Ford
specifications. See
Engine Oil
Capacity and Specification (page
290). You may have to use a funnel to
pour the engine oil into the opening.
4. Recheck the oil level.
5. If the oil level is correct, replace the dipstick and make sure it is fully seated.
6. Replace the engine oil filler cap. Turn it clockwise until you feel a strong
resistance.
Note: Do not add oil further than the
maximum mark. Oil levels above the
maximum mark may cause engine damage.
Note: Make sure you install the oil filler cap
correctly.
Note: Soak up any spillage with an
absorbent cloth immediately.
Engine lubrication for severe
service operation
The following conditions define severe
operation for which engine operation with
SAE 5W-40 oil which meets Ford
specification, WSS-M2C171-F1, is
recommended. Oil and oil filter change
intervals will be determined by the
Intelligent Oil Life Monitor™ as noted
previously. ENGINE OIL CHECK - 7.3L
1. Make sure that your vehicle is on level
ground.
2. Check the oil level before starting the engine, or switch the engine off after
warm up and wait 10 minutes for the
oil to drain into the oil pan.
3. Remove the dipstick and wipe it with a clean, lint-free cloth.
4. Reinstall the dipstick and make sure it is fully seated.
5. Remove the dipstick again to check the
oil level.
Note: If the oil level is between the
maximum and minimum marks, the oil level
is acceptable. Do not add oil.
6. If the oil level is at the minimum mark, immediately add oil.
7. Reinstall the dipstick. Make sure it is fully seated.
Note: The oil consumption of new engines
reaches its normal level after approximately
3,000 mi (5,000 km)
.
Adding Engine Oil WARNING:
Do not add engine oil
when the engine is hot. Failure to follow
this instruction could result in personal
injury. WARNING: Do not remove the filler
cap when the engine is running.
Do not use supplemental engine oil
additives because they are unnecessary
and could lead to engine damage that the
vehicle warranty may not cover.
1. Clean the area surrounding the engine oil filler cap before you remove it.
2. Remove the engine oil filler cap.
224
2022 F650750 (TBC) , enUSA, Edition date: 202010, Second-Printing Maintenance