FORD F150 1997 10.G Owners Manual
F150 1997 10.G
FORD
FORD
https://www.carmanualsonline.info/img/11/5016/w960_5016-0.png
FORD F150 1997 10.G Owners Manual
Trending: remote start, wheelbase, towing, service schedule, Relay fuses, brake light, tailgate
Page 141 of 219
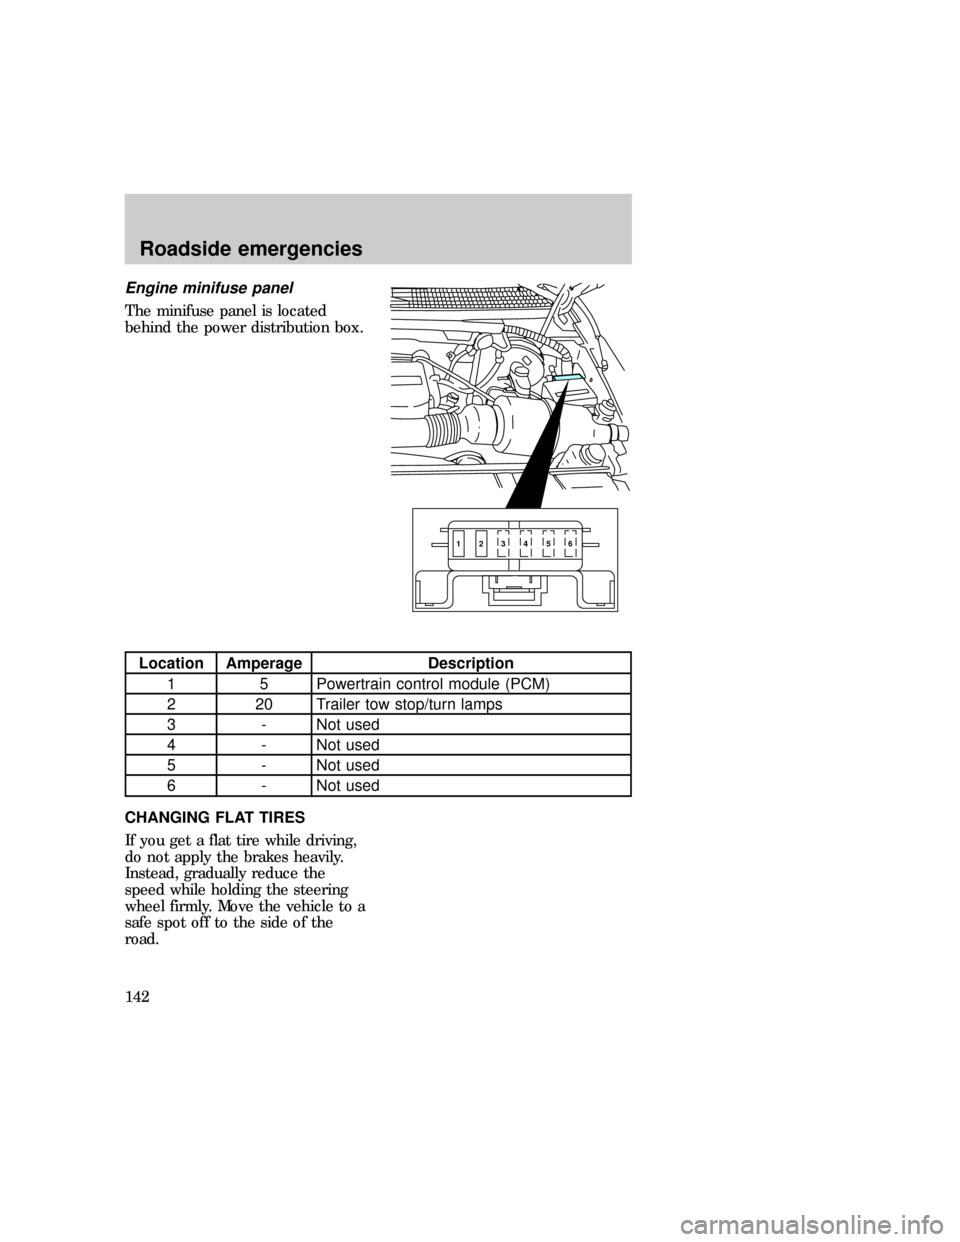
Engine minifuse panel
The minifuse panel is located
behind the power distribution box.
Location Amperage Description
1 5 Powertrain control module (PCM)
2 20 Trailer tow stop/turn lamps
3 - Not used
4 - Not used
5 - Not used
6 - Not used
CHANGING FLAT TIRES
If you get a flat tire while driving,
do not apply the brakes heavily.
Instead, gradually reduce the
speed while holding the steering
wheel firmly. Move the vehicle to a
safe spot off to the side of the
road.
123456
f12_minifuses
f12_flat_tires
f12_change_proc
Roadside emergencies
142
Page 142 of 219
Tire change procedure
1. Park on a level surface.
2. Activate the hazard flashers.
3. Set the parking brake.
4. Place the gearshift in P (Park)
(automatic transmission) or R
(Reverse) (manual transmission).
For 4WD vehicles equipped with
Lever-operated transfer case, make
sure that the lever is not in the N
(Neutral) position.
5. Block the diagonally opposite
wheel.
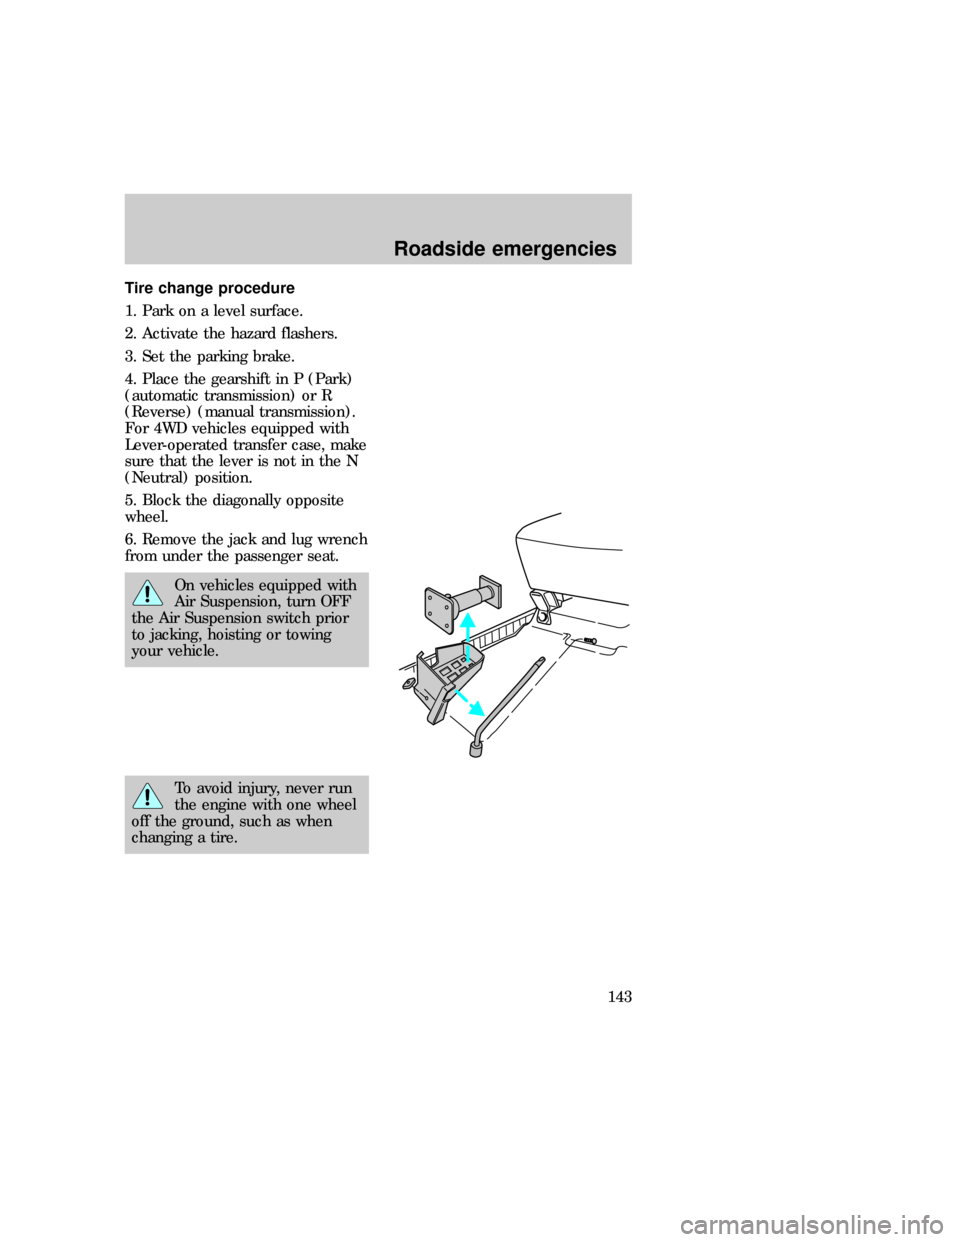
6. Remove the jack and lug wrench
from under the passenger seat.
On vehicles equipped with
Air Suspension, turn OFF
the Air Suspension switch prior
to jacking, hoisting or towing
your vehicle.
To avoid injury, never run
the engine with one wheel
off the ground, such as when
changing a tire.
f12_removing_spare
Roadside emergencies
143
Page 143 of 219
Removing spare from storage
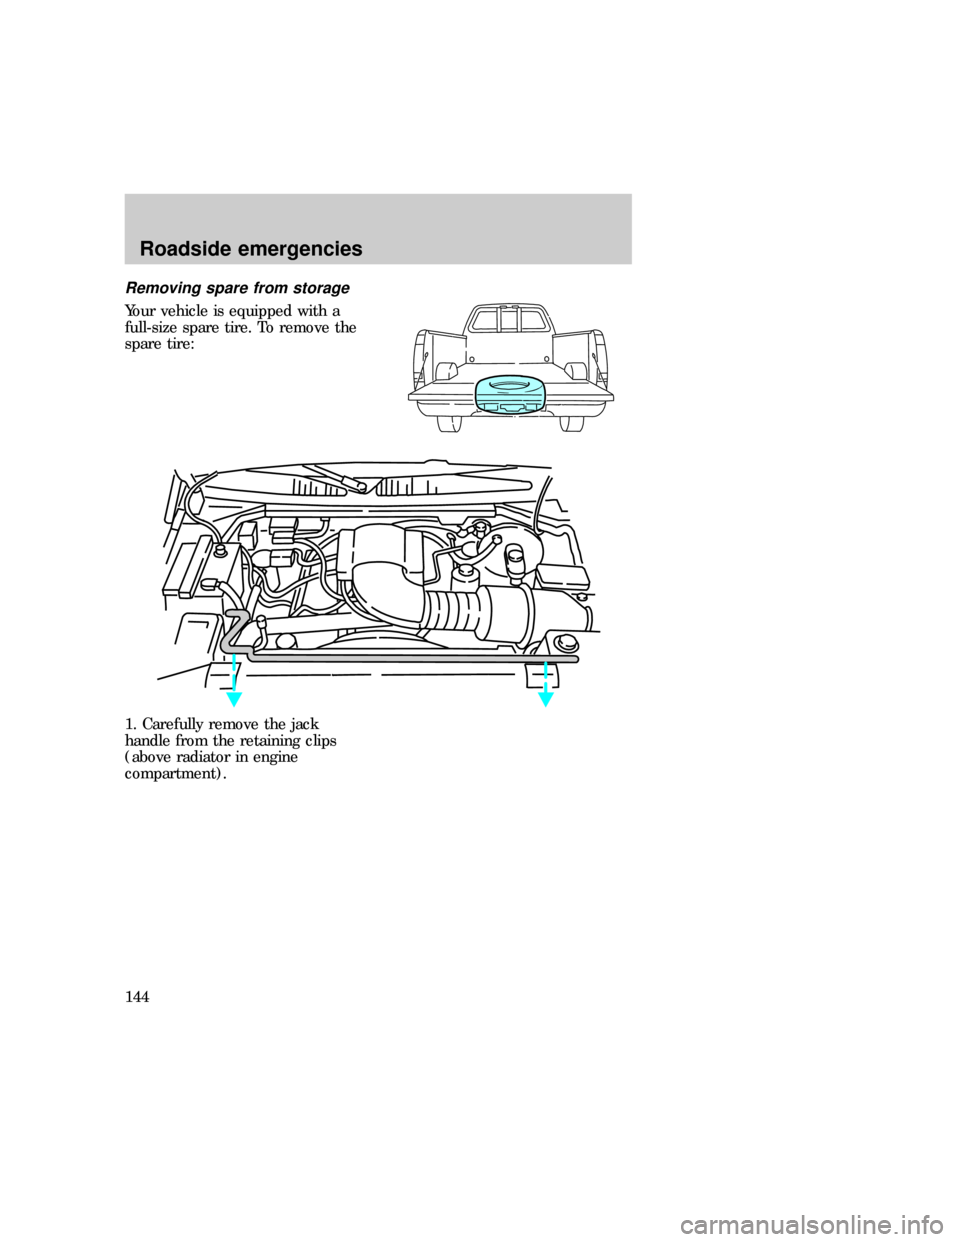
Your vehicle is equipped with a
full-size spare tire. To remove the
spare tire:
1. Carefully remove the jack
handle from the retaining clips
(above radiator in engine
compartment).
Roadside emergencies
144
Page 144 of 219
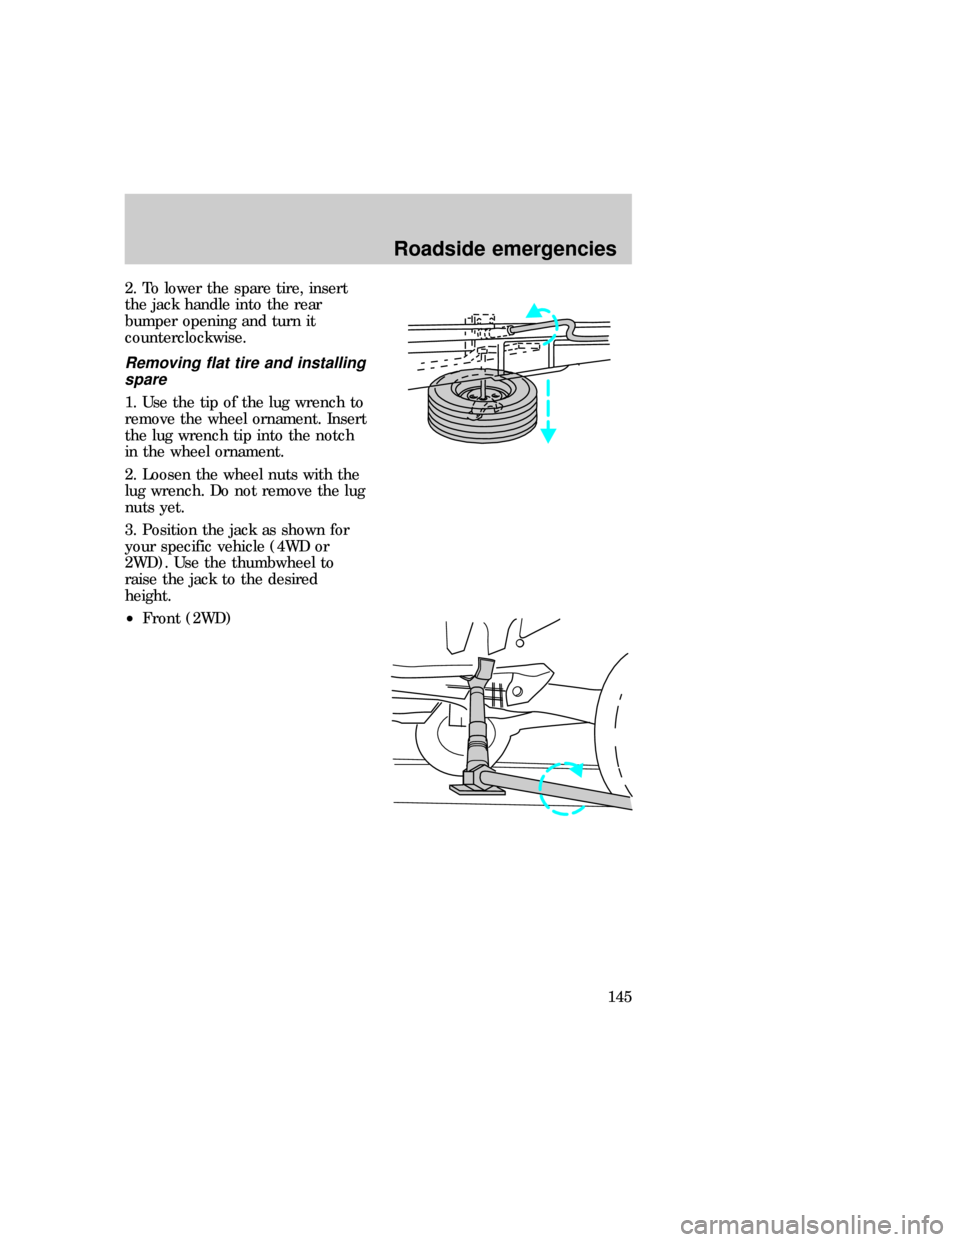
2. To lower the spare tire, insert
the jack handle into the rear
bumper opening and turn it
counterclockwise.
Removing flat tire and installing
spare
1. Use the tip of the lug wrench to
remove the wheel ornament. Insert
the lug wrench tip into the notch
in the wheel ornament.
2. Loosen the wheel nuts with the
lug wrench. Do not remove the lug
nuts yet.
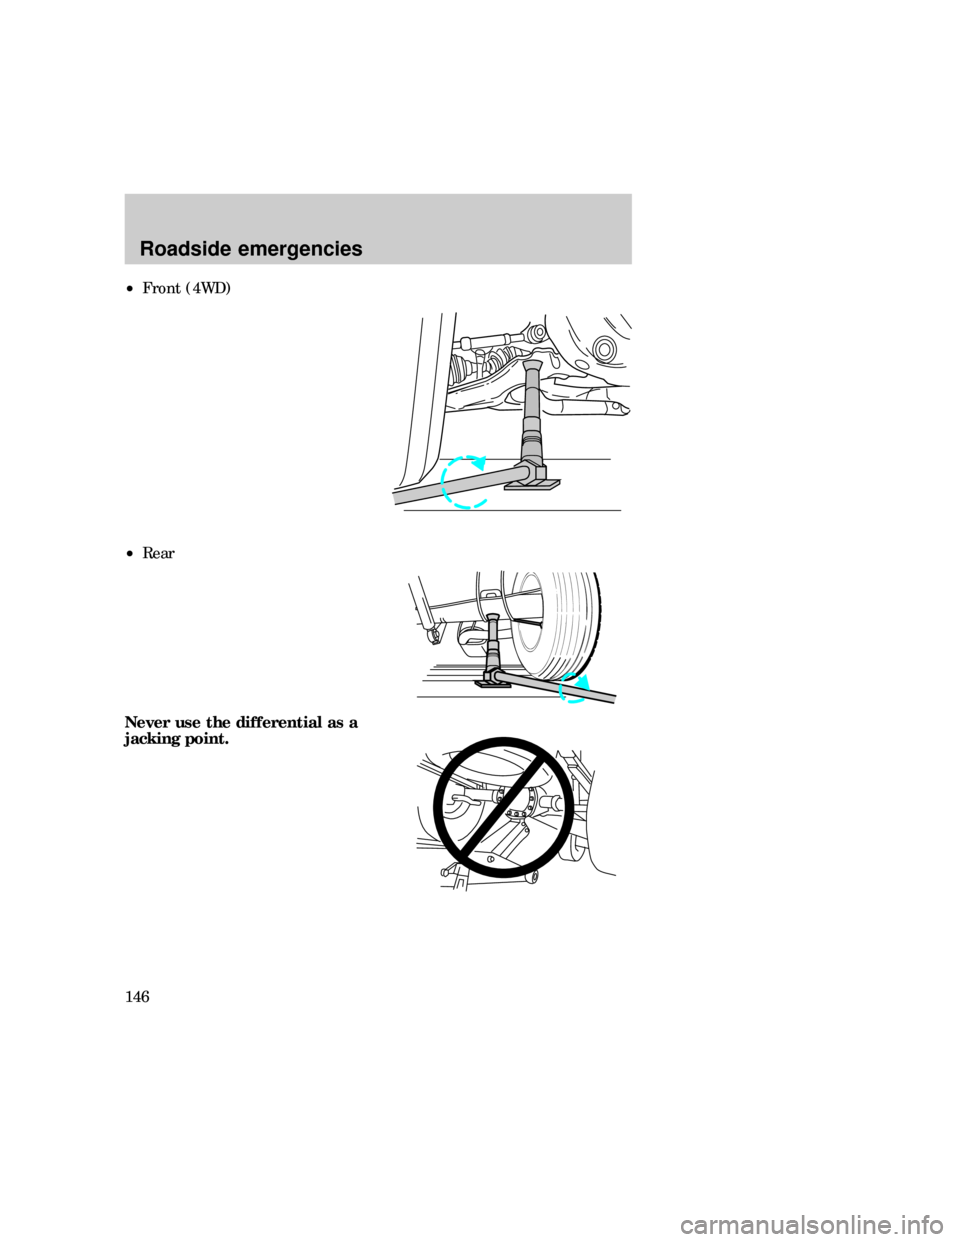
3. Position the jack as shown for
your specific vehicle (4WD or
2WD). Use the thumbwheel to
raise the jack to the desired
height.
²Front (2WD)
f12_removing_flat
Roadside emergencies
145
Page 145 of 219
²Front (4WD)
²Rear
Never use the differential as a
jacking point.
Roadside emergencies
146
Page 146 of 219
4. Raise the vehicle high enough
for the spare tire to clear the
ground when installed.
5. Remove the wheel lug nuts.
6. Remove the flat tire and install
the spare.
7. Install the lug nuts and tighten
until the wheel is seated.
Installing wheels without a
good metal-to-metal
contact at the wheel mounting
surface can cause the wheel lug
nuts to loosen and could allow
the wheel to come off while the
vehicle is in motion.
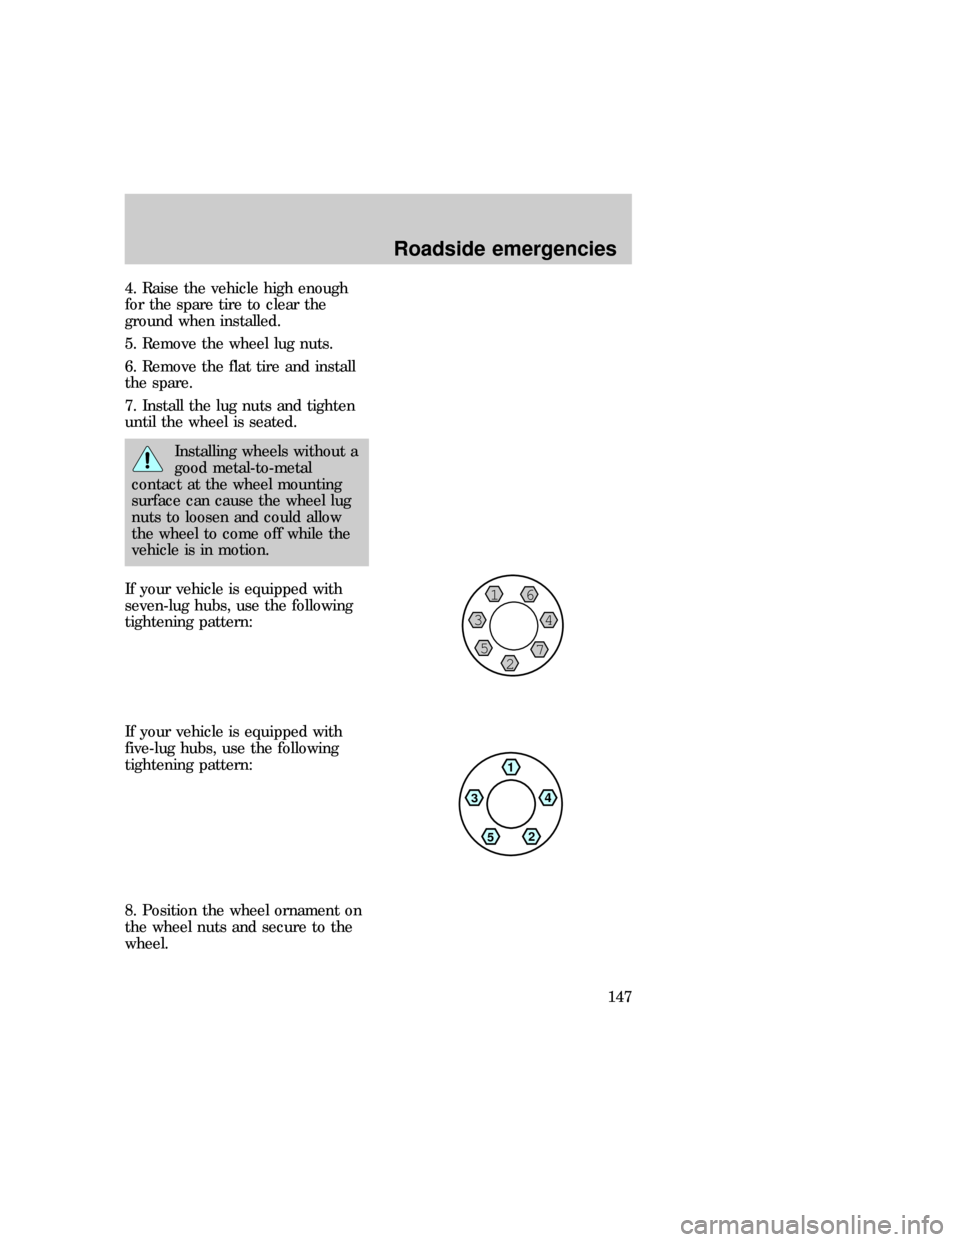
If your vehicle is equipped with
seven-lug hubs, use the following
tightening pattern:
If your vehicle is equipped with
five-lug hubs, use the following
tightening pattern:
8. Position the wheel ornament on
the wheel nuts and secure to the
wheel.
16
34
7 5
2
1
4
2
5 3
Roadside emergencies
147
Page 147 of 219
9. To stow the flat tire, lay the tire
on the ground with the inboard
side facing up. Install the retainer
through the wheel center and slide
the wheel under the vehicle. Turn
the spare handle clockwise until
the tire is raised to its original
position underneath the vehicle.
The spare handle ratchets when
the tire is raised to the stowed
position. It will not allow you to
overtighten.
10. Unblock the wheel.
11. Stow the jacking equipment
under the passenger seat and stow
the jack handle in the engine
compartment.
12. As soon as possible, tighten the
wheel nuts with a torque wrench
to 115±165 Nm (85±115 lb-ft).
JUMP STARTING YOUR
VEHICLE
The gases around the
battery can explode if
exposed to flames, sparks, or lit
cigarettes. An explosion could
result in injury or vehicle
damage.
Do not push-start your
vehicle. You could damage
the catalytic converter. For
further information, seeJumper
Cablesin the Index.
com_jump-starting.01
Roadside emergencies
148
Page 148 of 219
Batteries contain sulfuric
acid which burns skin,
eyes, and clothing.
CONNECTING THE JUMPER
CABLES
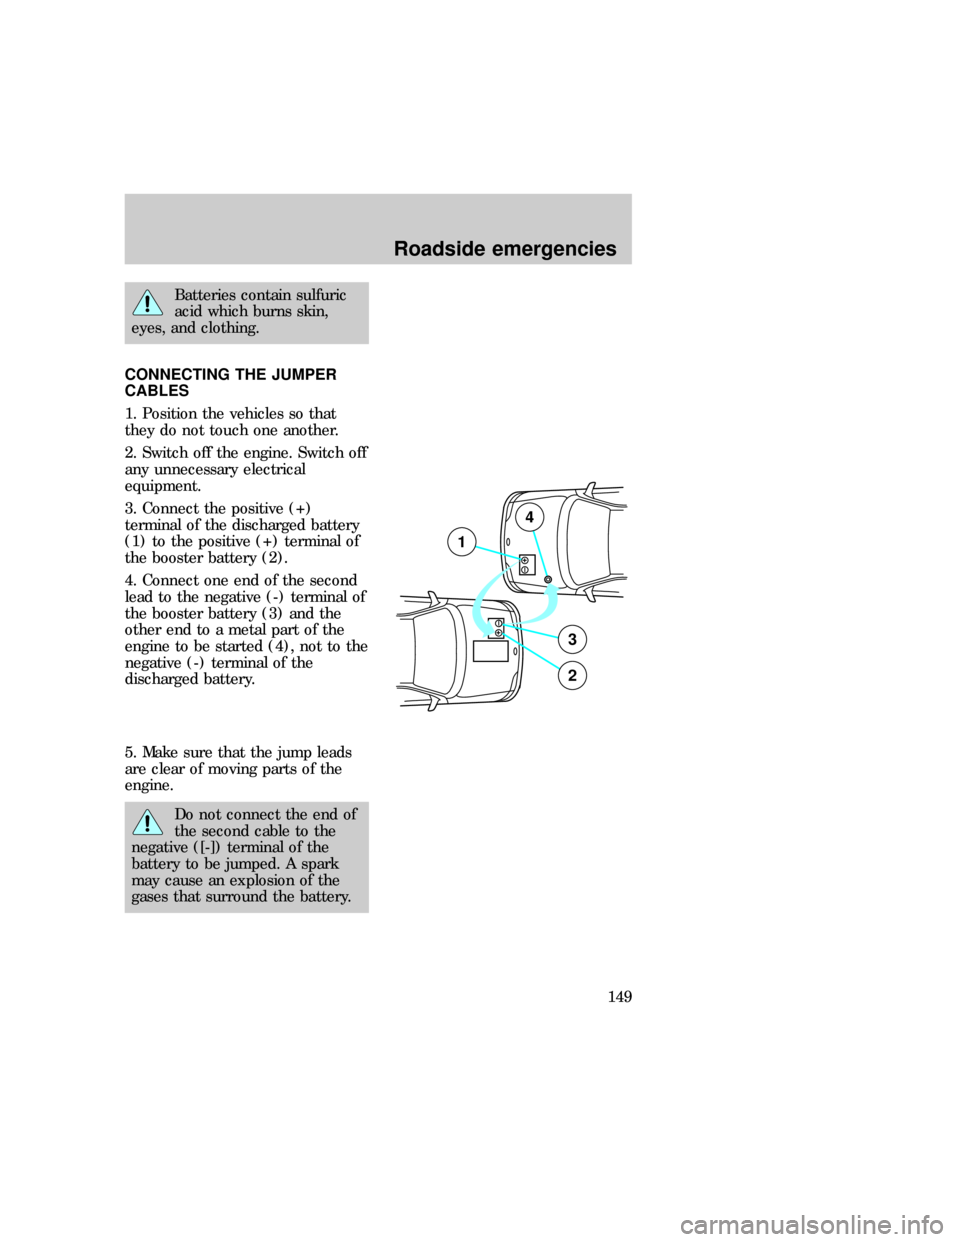
1. Position the vehicles so that
they do not touch one another.
2. Switch off the engine. Switch off
any unnecessary electrical
equipment.
3. Connect the positive (+)
terminal of the discharged battery
(1) to the positive (+) terminal of
the booster battery (2).
4. Connect one end of the second
lead to the negative (-) terminal of
the booster battery (3) and the
other end to a metal part of the
engine to be started (4), not to the
negative (-) terminal of the
discharged battery.
5. Make sure that the jump leads
are clear of moving parts of the
engine.
Do not connect the end of
the second cable to the
negative ([-]) terminal of the
battery to be jumped. A spark
may cause an explosion of the
gases that surround the battery.
+–
+–
3
2
1
4
com_connecting_cables.01
com_jump_starting.01
Roadside emergencies
149
Page 149 of 219
JUMP STARTING
1. Start the booster vehicle and
run the engine at moderately
increased speed.
2. Start the engine of the vehicle
with the discharged battery.
3. Once the engine has been
started, run both vehicles for a
further three minutes before
disconnecting the leads.
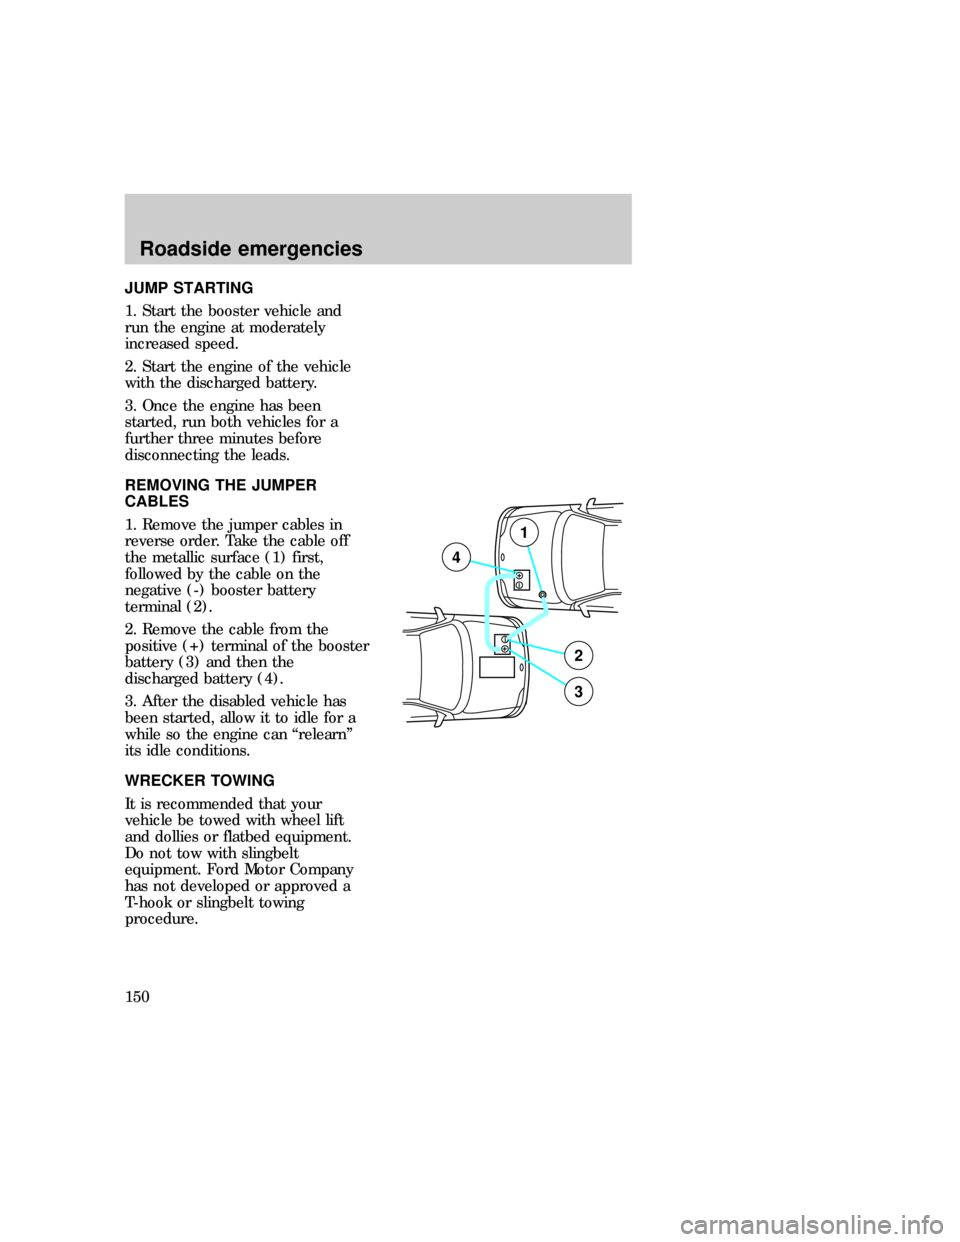
REMOVING THE JUMPER
CABLES
1. Remove the jumper cables in
reverse order. Take the cable off
the metallic surface (1) first,
followed by the cable on the
negative (-) booster battery
terminal (2).
2. Remove the cable from the
positive (+) terminal of the booster
battery (3) and then the
discharged battery (4).
3. After the disabled vehicle has
been started, allow it to idle for a
while so the engine can ªrelearnº
its idle conditions.
WRECKER TOWING
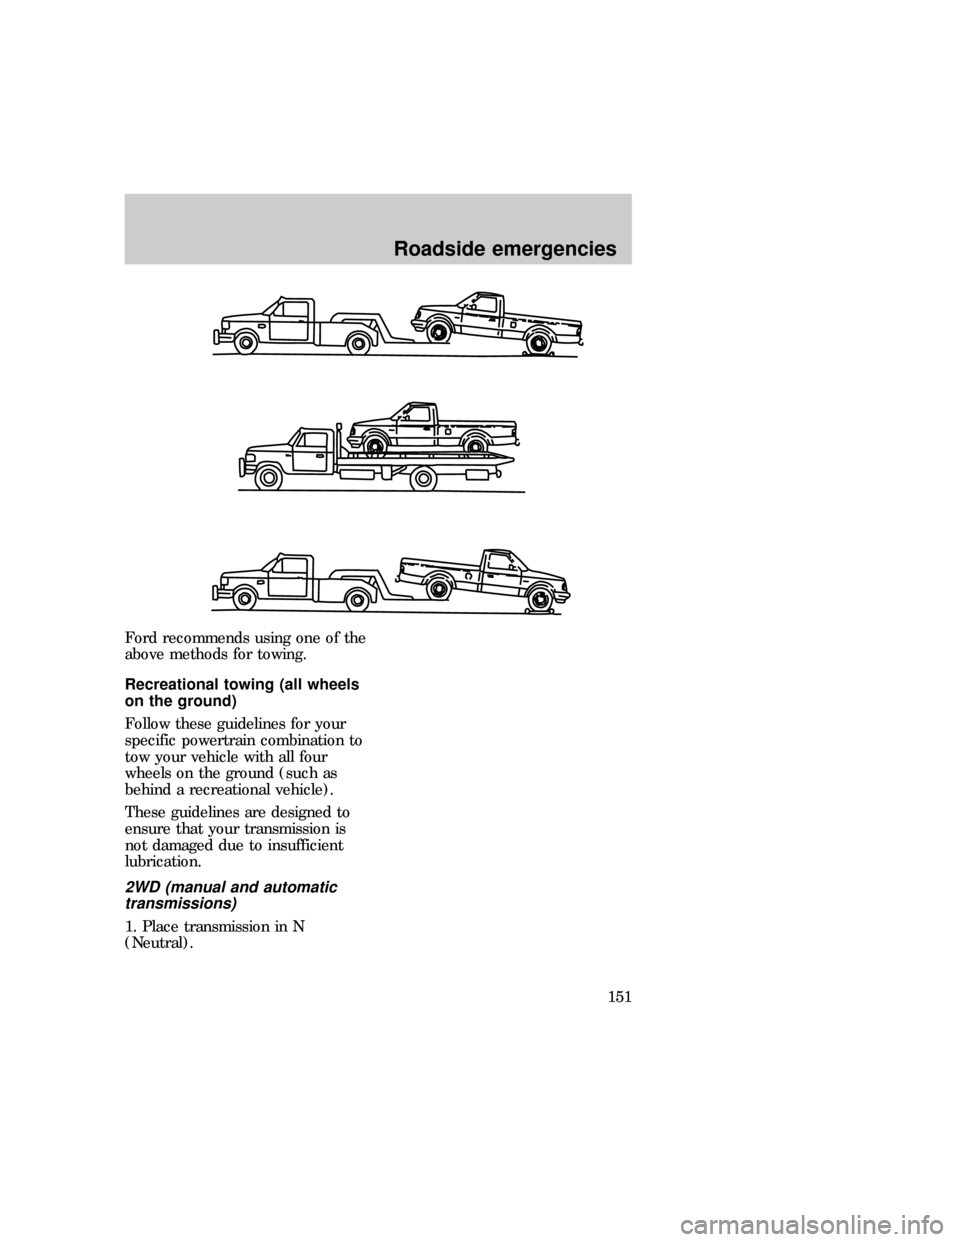
It is recommended that your
vehicle be towed with wheel lift
and dollies or flatbed equipment.
Do not tow with slingbelt
equipment. Ford Motor Company
has not developed or approved a
T-hook or slingbelt towing
procedure.
+–
+–
2
3
4
1
com_removing_cables.01
f12_wrecker
Roadside emergencies
150
Page 150 of 219
Ford recommends using one of the
above methods for towing.
Recreational towing (all wheels
on the ground)
Follow these guidelines for your
specific powertrain combination to
tow your vehicle with all four
wheels on the ground (such as
behind a recreational vehicle).
These guidelines are designed to
ensure that your transmission is
not damaged due to insufficient
lubrication.
2WD (manual and automatic
transmissions)
1. Place transmission in N
(Neutral).
f12_recreational_towing
Roadside emergencies
151
Trending: lights, recommended oil, headlamp, open hood, lock, turn signal bulb, diagram
