fuel FORD F150 2004 11.G Herritage User Guide
[x] Cancel search | Manufacturer: FORD, Model Year: 2004, Model line: F150, Model: FORD F150 2004 11.GPages: 248, PDF Size: 6.72 MB
Page 107 of 248
Starting the engine
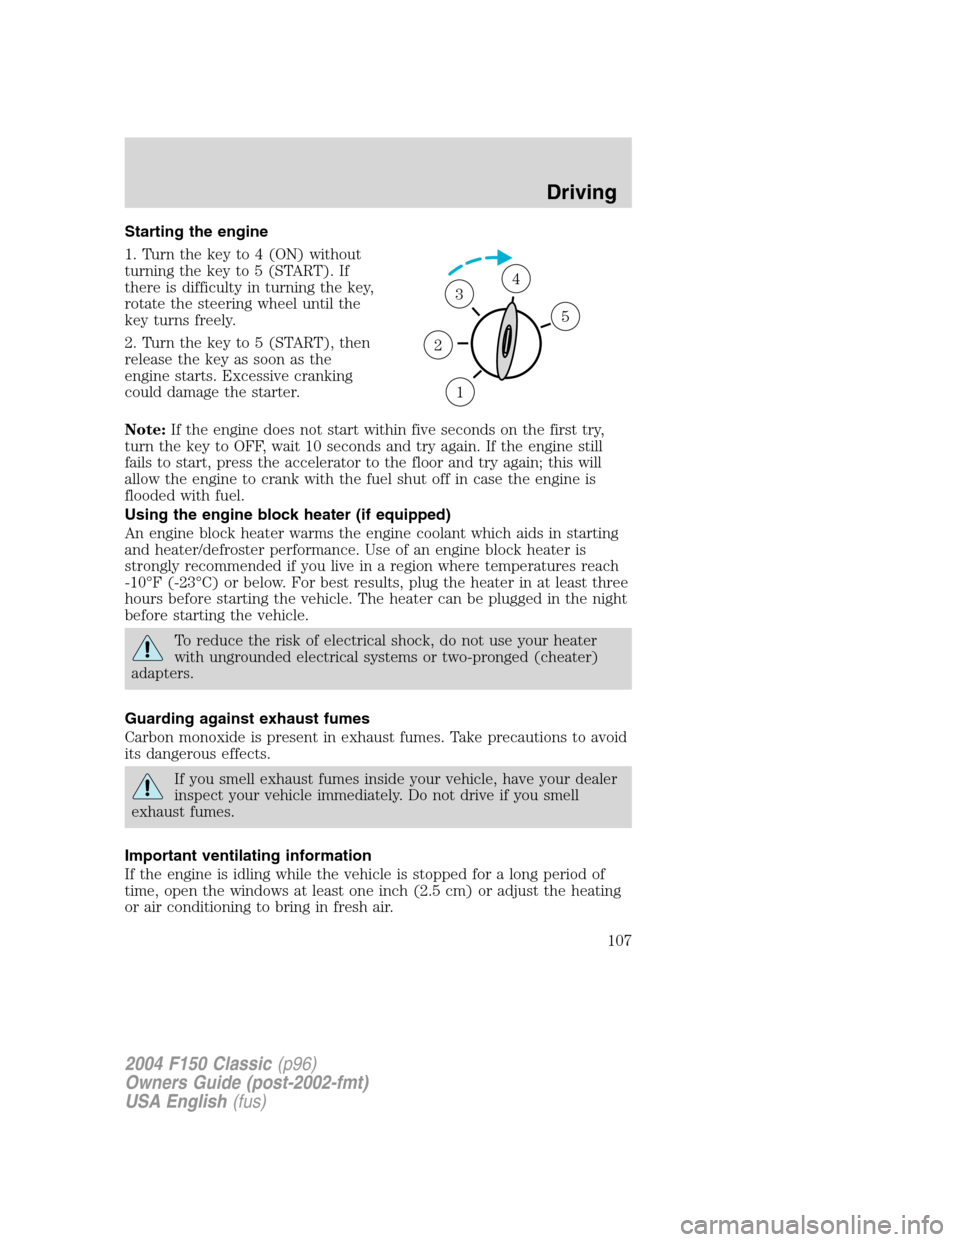
1. Turn the key to 4 (ON) without
turning the key to 5 (START). If
there is difficulty in turning the key,
rotate the steering wheel until the
key turns freely.
2. Turn the key to 5 (START), then
release the key as soon as the
engine starts. Excessive cranking
could damage the starter.
Note:If the engine does not start within five seconds on the first try,
turn the key to OFF, wait 10 seconds and try again. If the engine still
fails to start, press the accelerator to the floor and try again; this will
allow the engine to crank with the fuel shut off in case the engine is
flooded with fuel.
Using the engine block heater (if equipped)
An engine block heater warms the engine coolant which aids in starting
and heater/defroster performance. Use of an engine block heater is
strongly recommended if you live in a region where temperatures reach
-10°F (-23°C) or below. For best results, plug the heater in at least three
hours before starting the vehicle. The heater can be plugged in the night
before starting the vehicle.
To reduce the risk of electrical shock, do not use your heater
with ungrounded electrical systems or two-pronged (cheater)
adapters.
Guarding against exhaust fumes
Carbon monoxide is present in exhaust fumes. Take precautions to avoid
its dangerous effects.
If you smell exhaust fumes inside your vehicle, have your dealer
inspect your vehicle immediately. Do not drive if you smell
exhaust fumes.
Important ventilating information
If the engine is idling while the vehicle is stopped for a long period of
time, open the windows at least one inch (2.5 cm) or adjust the heating
or air conditioning to bring in fresh air.
1
2
34
5
2004 F150 Classic(p96)
Owners Guide (post-2002-fmt)
USA English(fus)
Driving
107
Page 113 of 248
N (Neutral)
With the gearshift lever in N (Neutral), the vehicle can be started and is
free to roll. Hold the brake pedal down while in this position.
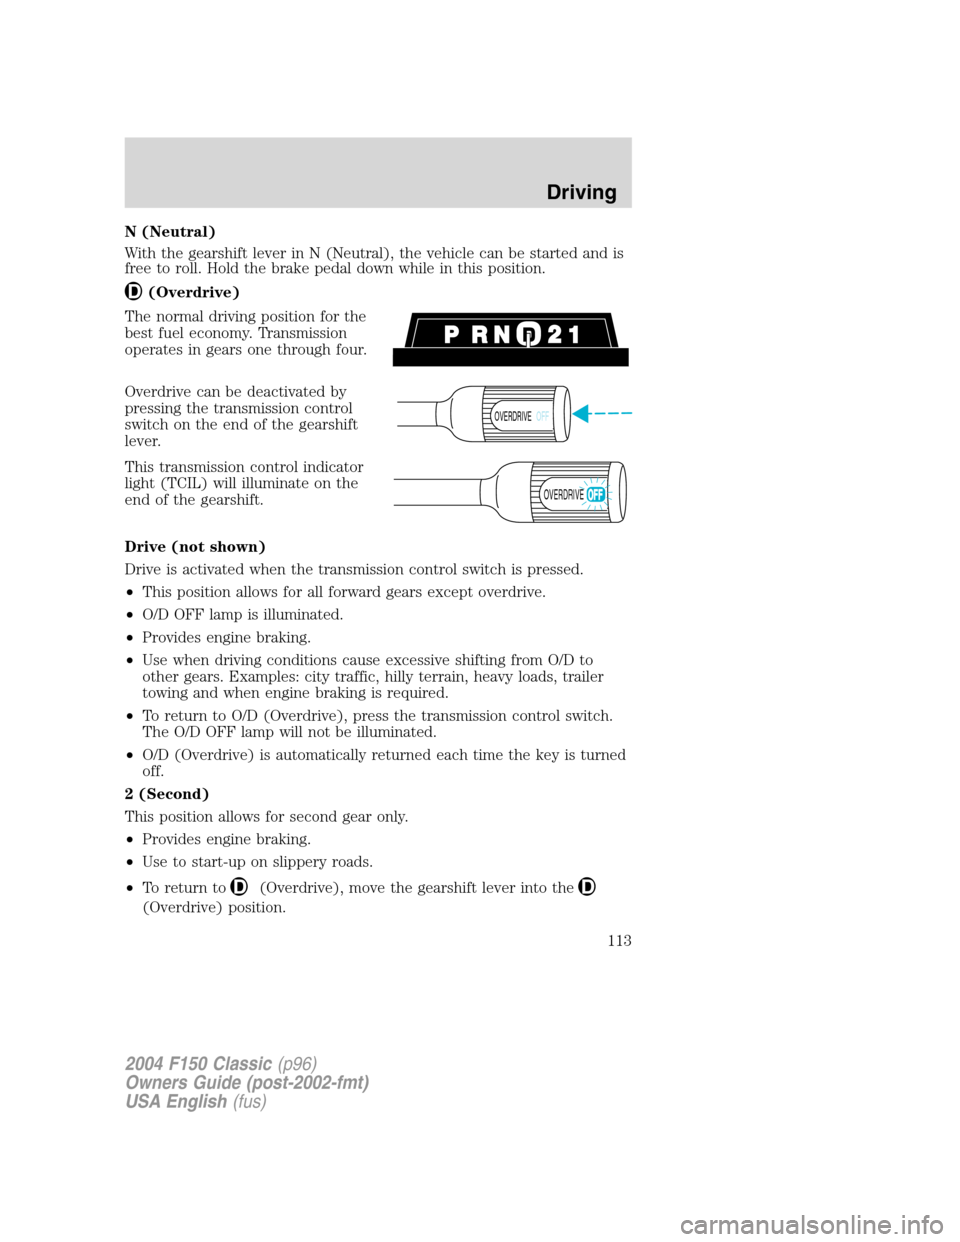
(Overdrive)
The normal driving position for the
best fuel economy. Transmission
operates in gears one through four.
Overdrive can be deactivated by
pressing the transmission control
switch on the end of the gearshift
lever.
This transmission control indicator
light (TCIL) will illuminate on the
end of the gearshift.
Drive (not shown)
Drive is activated when the transmission control switch is pressed.
•This position allows for all forward gears except overdrive.
•O/D OFF lamp is illuminated.
•Provides engine braking.
•Use when driving conditions cause excessive shifting from O/D to
other gears. Examples: city traffic, hilly terrain, heavy loads, trailer
towing and when engine braking is required.
•To return to O/D (Overdrive), press the transmission control switch.
The O/D OFF lamp will not be illuminated.
•O/D (Overdrive) is automatically returned each time the key is turned
off.
2 (Second)
This position allows for second gear only.
•Provides engine braking.
•Use to start-up on slippery roads.
•To return to
(Overdrive), move the gearshift lever into the
(Overdrive) position.
OVERDRIVEOFF
OVERDRIVE
2004 F150 Classic(p96)
Owners Guide (post-2002-fmt)
USA English(fus)
Driving
113
Page 115 of 248
3. Start the engine, then press the brake pedal and release the parking
brake.
4. Move the gearshift lever to the desired gear, then slowly release the
clutch pedal while slowly pressing on the accelerator.
During each shift, the clutch pedal must be fully depressed to the floor.
Failure to fully depress the clutch pedal to the floor may cause increased
shift efforts, prematurely wear transmission components or damage the
transmission. Make sure the floor mat is properly positioned so it doesn’t
interfere with the full extension of the clutch pedal.
Do not drive with your foot resting on the clutch pedal or use the clutch
pedal to hold your vehicle at a standstill while waiting on a hill. These
actions will reduce the life of the clutch.
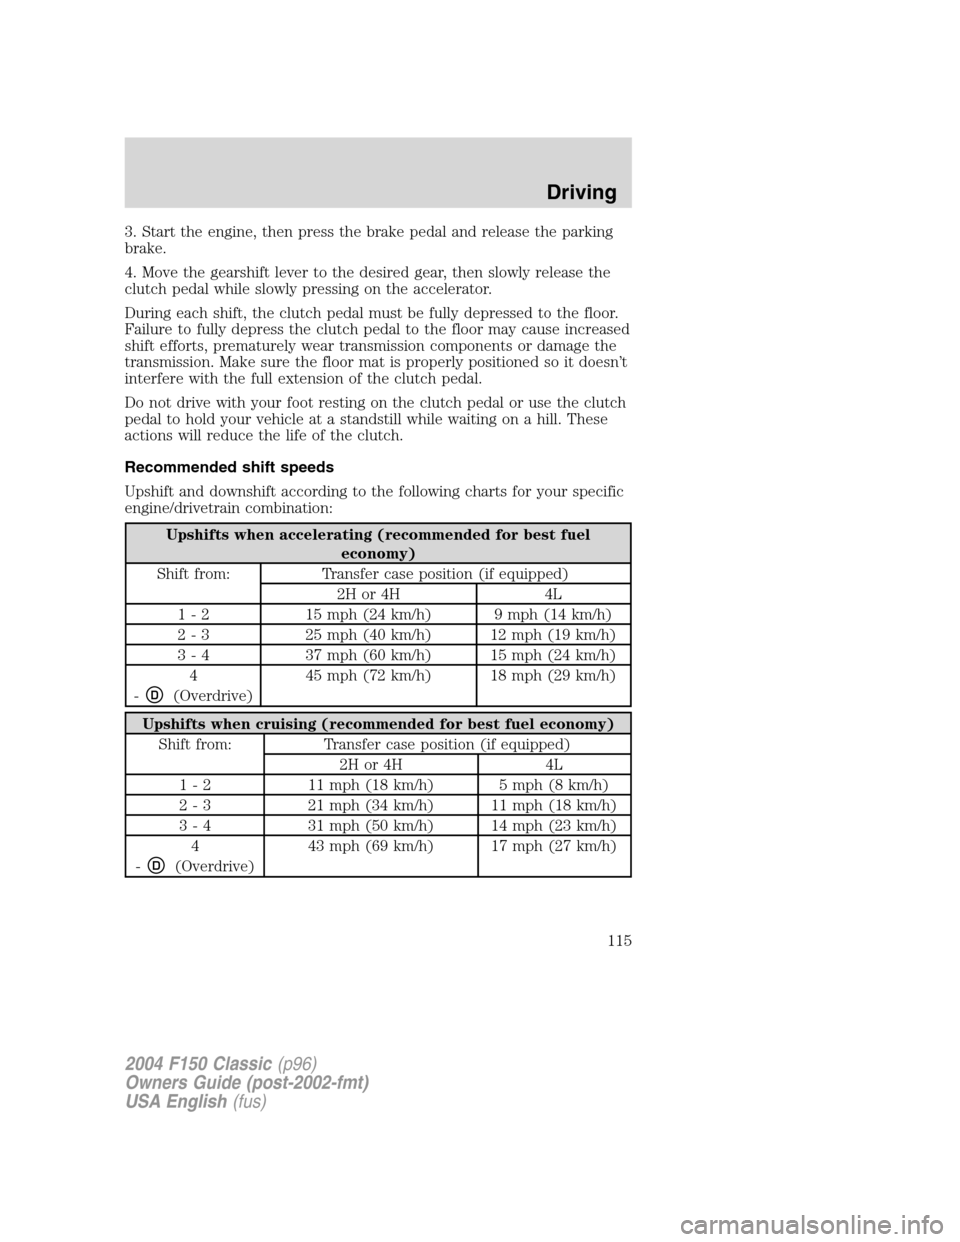
Recommended shift speeds
Upshift and downshift according to the following charts for your specific
engine/drivetrain combination:
Upshifts when accelerating (recommended for best fuel
economy)
Shift from: Transfer case position (if equipped)
2H or 4H 4L
1 - 2 15 mph (24 km/h) 9 mph (14 km/h)
2 - 3 25 mph (40 km/h) 12 mph (19 km/h)
3 - 4 37 mph (60 km/h) 15 mph (24 km/h)
4
-
D(Overdrive)45 mph (72 km/h) 18 mph (29 km/h)
Upshifts when cruising (recommended for best fuel economy)
Shift from: Transfer case position (if equipped)
2H or 4H 4L
1 - 2 11 mph (18 km/h) 5 mph (8 km/h)
2 - 3 21 mph (34 km/h) 11 mph (18 km/h)
3 - 4 31 mph (50 km/h) 14 mph (23 km/h)
4
-
D(Overdrive)43 mph (69 km/h) 17 mph (27 km/h)
2004 F150 Classic(p96)
Owners Guide (post-2002-fmt)
USA English(fus)
Driving
115
Page 118 of 248
Using a manual 4WD system (if equipped)
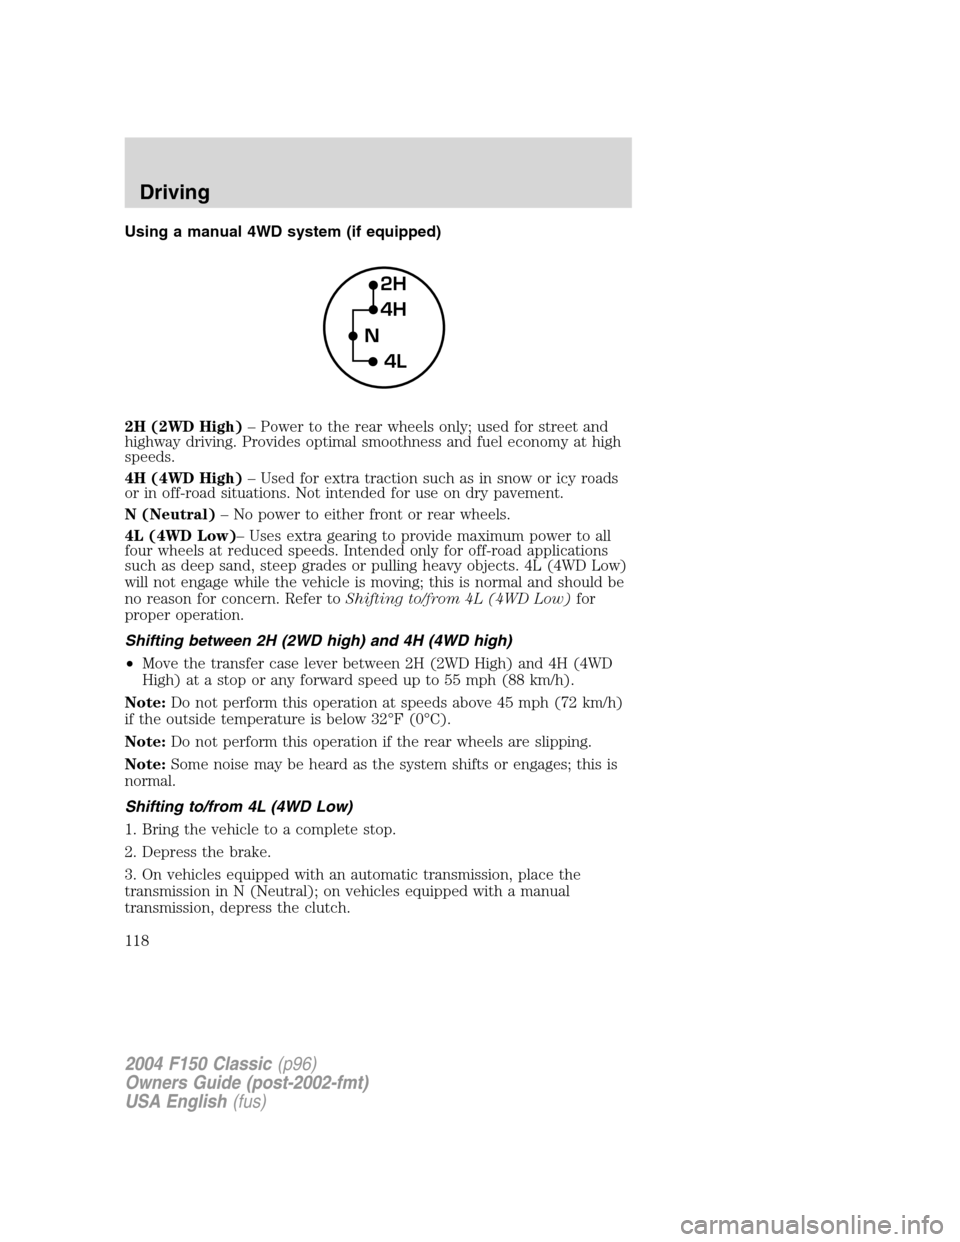
2H (2WD High)–Power to the rear wheels only; used for street and
highway driving. Provides optimal smoothness and fuel economy at high
speeds.
4H (4WD High)–Used for extra traction such as in snow or icy roads
or in off-road situations. Not intended for use on dry pavement.
N (Neutral)–No power to either front or rear wheels.
4L (4WD Low)–Uses extra gearing to provide maximum power to all
four wheels at reduced speeds. Intended only for off-road applications
such as deep sand, steep grades or pulling heavy objects. 4L (4WD Low)
will not engage while the vehicle is moving; this is normal and should be
no reason for concern. Refer toShifting to/from 4L (4WD Low)for
proper operation.
Shifting between 2H (2WD high) and 4H (4WD high)
•Move the transfer case lever between 2H (2WD High) and 4H (4WD
High) at a stop or any forward speed up to 55 mph (88 km/h).
Note:Do not perform this operation at speeds above 45 mph (72 km/h)
if the outside temperature is below 32°F(0°C).
Note:Do not perform this operation if the rear wheels are slipping.
Note:Some noise may be heard as the system shifts or engages; this is
normal.
Shifting to/from 4L (4WD Low)
1. Bring the vehicle to a complete stop.
2. Depress the brake.
3. On vehicles equipped with an automatic transmission, place the
transmission in N (Neutral); on vehicles equipped with a manual
transmission, depress the clutch.
2H
4H
4L N
2004 F150 Classic(p96)
Owners Guide (post-2002-fmt)
USA English(fus)
Driving
118
Page 119 of 248
4. Move the transfer case lever through N (Neutral) directly to the
desired position. The LOW RANGE indicator will illuminate once the
transfer case has engaged.
•If the transfer casewill notengage into 4L (4WD Low), drive abve 5
mph (8 km/h), then repeat steps 1 through 4.
Note:Some noise may be heard as the system shifts or engages; this is
normal.
Note:For proper operation in 4WD Low, ensure the transfer case shift
lever is moved entirely rearward into the 4L (4WD Low) positions and
that the LOW RANGE light is illuminated.
Using the N (Neutral) position
The transfer case N (Neutral) position overrides the transmission
and puts the vehicle in neutral regardless of transmission
gearshift lever position. The vehicle can move forward or
backward.
This position should only be used when towing the vehicle.
Do not leave the vehicle unattended with the transfer case in the
N (Neutral) position. Always set the parking brake fully and turn
off the ignition when leaving the vehicle.
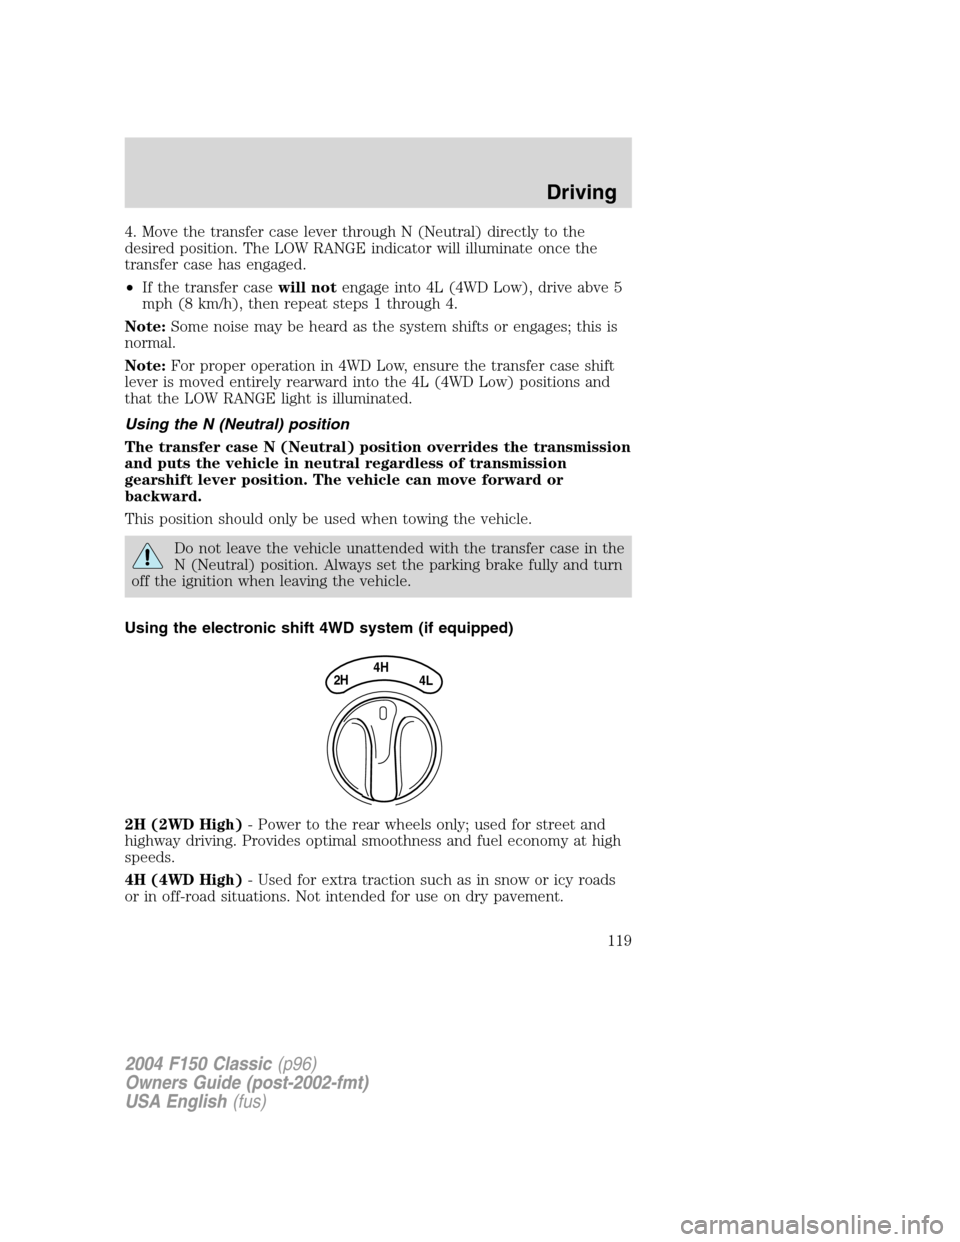
Using the electronic shift 4WD system (if equipped)
2H (2WD High)- Power to the rear wheels only; used for street and
highway driving. Provides optimal smoothness and fuel economy at high
speeds.
4H (4WD High)- Used for extra traction such as in snow or icy roads
or in off-road situations. Not intended for use on dry pavement.
4H
2H4L
2004 F150 Classic(p96)
Owners Guide (post-2002-fmt)
USA English(fus)
Driving
119
Page 129 of 248
Failure to maintain your vehicle properly may void the warranty, increase
your repair cost, reduce vehicle performance and operational capabilities
and adversely affect driver and passenger safety. Frequent inspection of
vehicle chassis components is recommended if the vehicle is subjected to
heavy off-road usage.
DRIVING THROUGH WATER
If driving through deep or standing water is unavoidable, proceed very
slowly especially when the depth is not known. Never drive through
water that is higher than the bottom of the hubs (for trucks) or the
bottom of the wheel rims (for cars). When driving through water,
traction or brake capability may be limited. Also, water may enter your
engine’s air intake and severely damage your engine or your vehicle may
stall.Driving through deep water where the transmission vent
tube is submerged may allow water into the transmission and
cause internal transmission damage.
Once through the water, always dry the brakes by moving your
vehicle slowly while applying light pressure on the brake pedal.
Wet brakes do not stop the vehicle as quickly as dry brakes.
VEHICLE LOADING–WITH AND WITHOUT A TRAILER
This section will guide you in the proper loading of your vehicle and/or
trailer, to keep your loaded vehicle weight within its design rating
capability, with or without a trailer. Properly loading your vehicle will
provide maximum return of vehicle design performance. Before loading
your vehicle, familiarize yourself with the following terms for determining
your vehicle’s weight ratings, with or without a trailer, from the vehicle’s
Safety Certification Label and Tire Label:
Base Curb Weight–is the weight of the vehicle including a full tank of
fuel and all standard equipment. It does not include passengers, cargo, or
optional equipment.
Vehicle Curb Weight–is the weight of your new vehicle when you
picked it up from your dealer plus any aftermarket equipment.
2004 F150 Classic(p96)
Owners Guide (post-2002-fmt)
USA English(fus)
Driving
129
Page 141 of 248
GETTING ROADSIDE ASSISTANCE
To fully assist you should you have a vehicle concern, Ford Motor
Company offers a complimentary roadside assistance program. This
program is separate from the New Vehicle Limited Warranty. The service
is available:
•24–hours, seven days a week
•for the New Vehicle Limited Warranty period of three years or 36,000
miles (60,000 km), whichever occurs first on Ford and Mercury
vehicles, and four years or 50,000 miles (80,000 km) on Lincoln
vehicles.
Roadside assistance will cover:
•changing a flat tire
•jump-starts
•lock-out assistance
•limited fuel delivery
•towing of your disabled vehicle to the nearest Ford Motor Company
dealership, or your selling dealer if within 35 miles (56.3 km) of the
nearest Ford Motor Company dealership (one tow per disablement).
Even non-warranty related tows, like accidents or getting stuck in the
mud or snow, are covered (some exclusions apply, such as impound
towing or repossession).
Canadian customers refer to your Owner Information Guide for
information on:
•coverage period
•exact fuel amounts
•towing of your disabled vehicle
•emergency travel expense reimbursement
•travel planning benefits
USING ROADSIDE ASSISTANCE
Complete the roadside assistance identification card and place it in your
wallet for quick reference. In the United States, this card is found in the
Owner Guide portfolio in the glove compartment in Ford vehicles and is
mailed to you if you own a Mercury or Lincoln. In Canada, the card is
found in theOwner Information Guidein the glove compartment.
U.S. Ford or Mercury vehicle customers who require roadside assistance,
call 1–800–241–3673; Lincoln vehicle customers call 1–800–521–4140.
2004 F150 Classic(p96)
Owners Guide (post-2002-fmt)
USA English(fus)
Roadside Emergencies
Roadside Emergencies
141
Page 142 of 248
Canadian customers who require roadside assistance, call
1–800–665–2006.
If you need to arrange roadside assistance for yourself, Ford Motor
Company will reimburse a reasonable amount. To obtain reimbursement
information, U.S. Ford or Mercury vehicles customers call
1-800-241-3673; Lincoln vehicle customers call 1–800–521–4140.
Canadian customers who need to obtain reimbursement information, call
1–800–665–2006.
ROADSIDE COVERAGE BEYOND BASIC WARRANTY
In the United States, you may purchase additional roadside assistance
coverage beyond this period through the Ford Auto Club by contacting
your Ford or Lincoln Mercury dealer.
Similarly in Canada, for uninterrupted Roadside Assistance coverage, you
may purchase extended coverage prior to your Basic Warranty’s Roadside
Assistance expiring. For more information and enrollment, contact
1–877–294–2582 or visit our website at www.ford.ca.
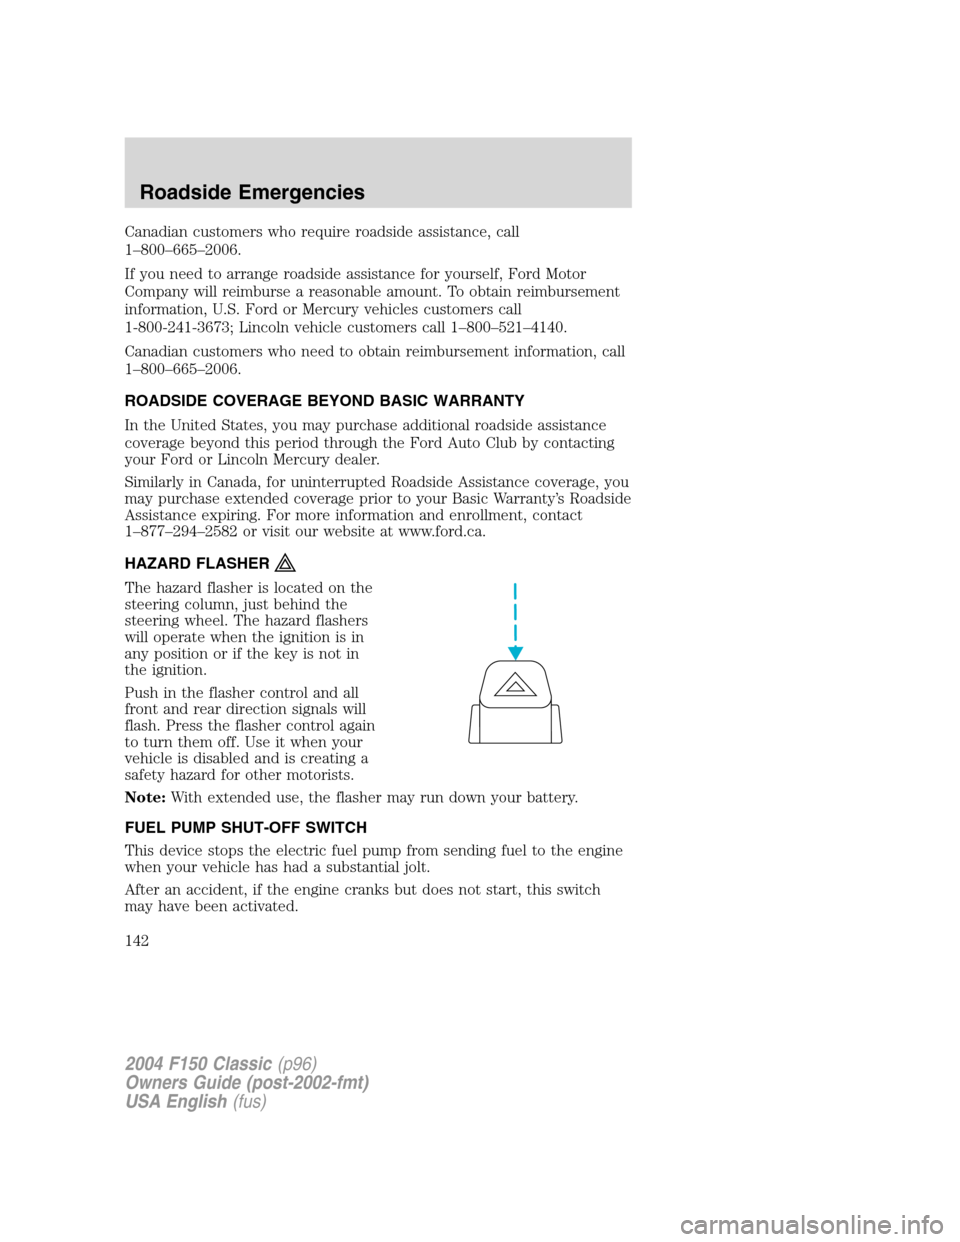
HAZARD FLASHER
The hazard flasher is located on the
steering column, just behind the
steering wheel. The hazard flashers
will operate when the ignition is in
any position or if the key is not in
the ignition.
Push in the flasher control and all
front and rear direction signals will
flash. Press the flasher control again
to turn them off. Use it when your
vehicle is disabled and is creating a
safety hazard for other motorists.
Note:With extended use, the flasher may run down your battery.
FUEL PUMP SHUT-OFF SWITCH
This device stops the electric fuel pump from sending fuel to the engine
when your vehicle has had a substantial jolt.
After an accident, if the engine cranks but does not start, this switch
may have been activated.
2004 F150 Classic(p96)
Owners Guide (post-2002-fmt)
USA English(fus)
Roadside Emergencies
142
Page 143 of 248
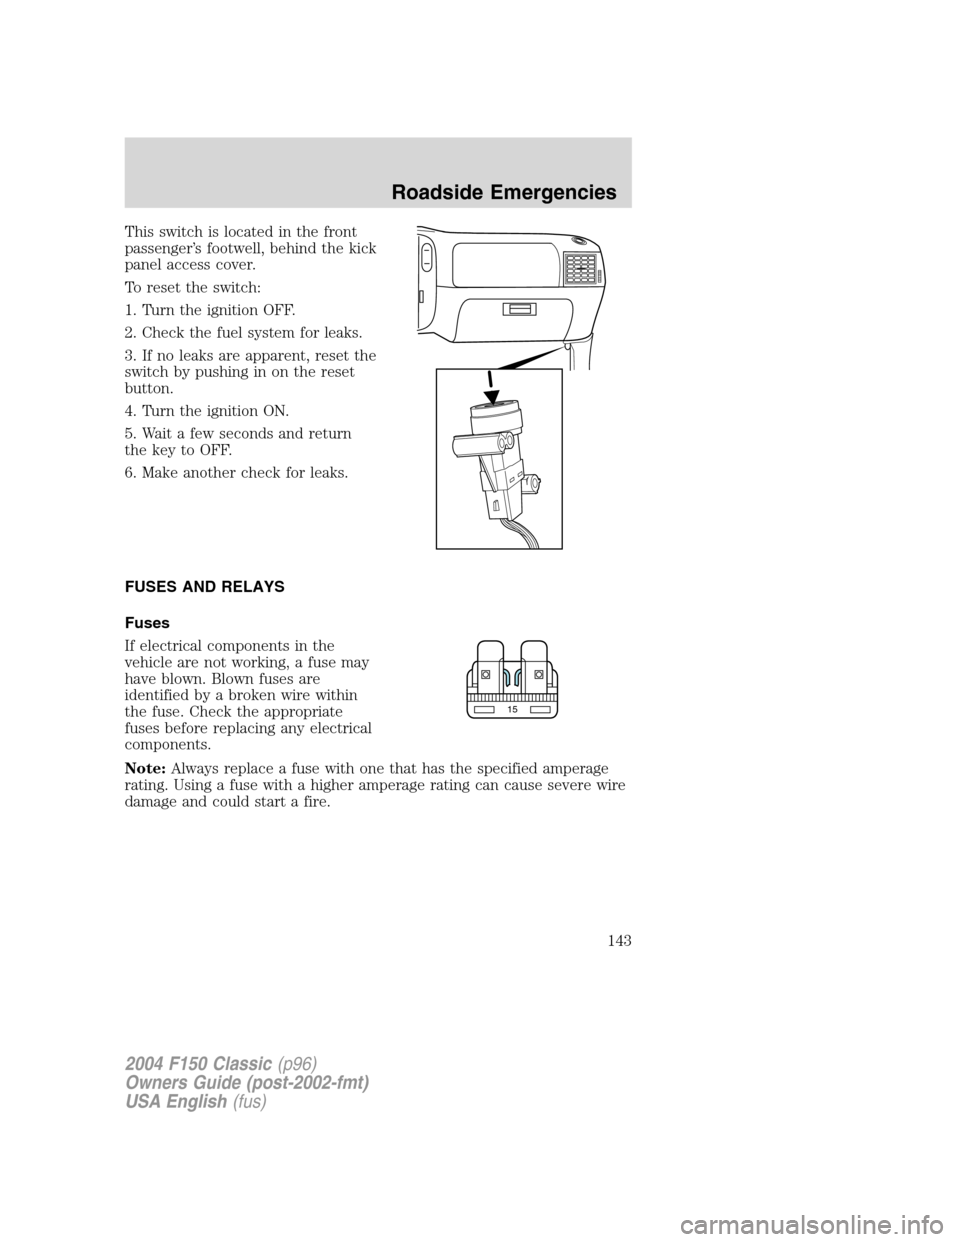
This switch is located in the front
passenger’s footwell, behind the kick
panel access cover.
To reset the switch:
1. Turn the ignition OFF.
2. Check the fuel system for leaks.
3. If no leaks are apparent, reset the
switch by pushing in on the reset
button.
4. Turn the ignition ON.
5. Wait a few seconds and return
the key to OFF.
6. Make another check for leaks.
FUSES AND RELAYS
Fuses
If electrical components in the
vehicle are not working, a fuse may
have blown. Blown fuses are
identified by a broken wire within
the fuse. Check the appropriate
fuses before replacing any electrical
components.
Note:Always replace a fuse with one that has the specified amperage
rating. Using a fuse with a higher amperage rating can cause severe wire
damage and could start a fire.
15
2004 F150 Classic(p96)
Owners Guide (post-2002-fmt)
USA English(fus)
Roadside Emergencies
143
Page 148 of 248
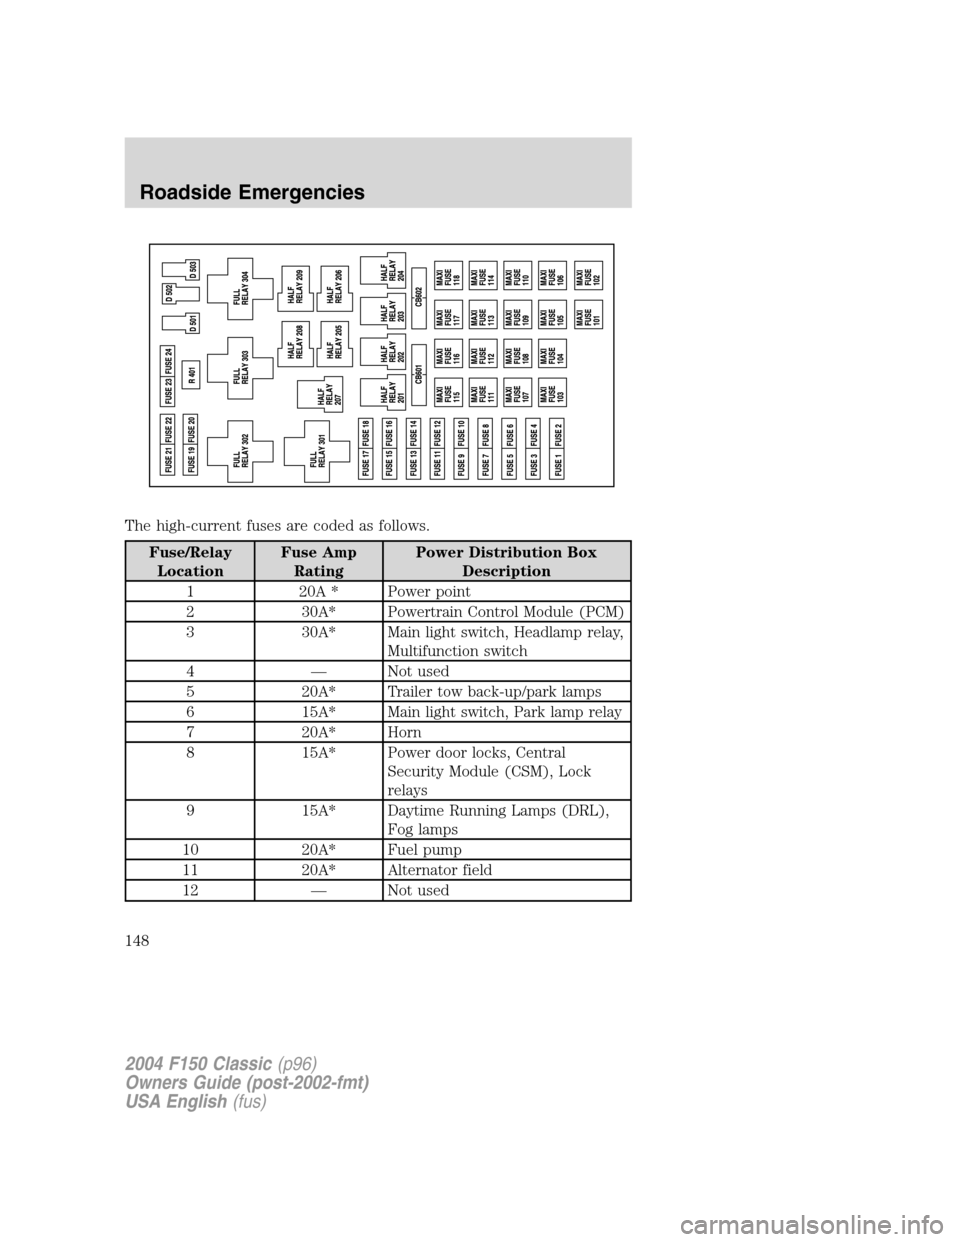
The high-current fuses are coded as follows.
Fuse/Relay
LocationFuse Amp
RatingPower Distribution Box
Description
1 20A * Power point
2 30A* Powertrain Control Module (PCM)
3 30A* Main light switch, Headlamp relay,
Multifunction switch
4—Not used
5 20A* Trailer tow back-up/park lamps
6 15A* Main light switch, Park lamp relay
7 20A* Horn
8 15A* Power door locks, Central
Security Module (CSM), Lock
relays
9 15A* Daytime Running Lamps (DRL),
Fog lamps
10 20A* Fuel pump
11 20A* Alternator field
12—Not used
2004 F150 Classic(p96)
Owners Guide (post-2002-fmt)
USA English(fus)
Roadside Emergencies
148