battery FORD F150 2004 11.G Herritage Owners Manual
[x] Cancel search | Manufacturer: FORD, Model Year: 2004, Model line: F150, Model: FORD F150 2004 11.GPages: 248, PDF Size: 6.72 MB
Page 3 of 248
Maintenance and Specifications 181
Engine compartment 183
Engine oil 185
Battery 189
Fuel information 196
Air filter(s) 213
Tire Information 215
Part numbers 227
Refill capacities 228
Lubricant specifications 231
Accessories 240
Index 243
All rights reserved. Reproduction by any means, electronic or mechanical
including photocopying, recording or by any information storage and retrieval
system or translation in whole or part is not permitted without written
authorization from Ford Motor Company. Ford may change the contents without
notice and without incurring obligation.
Copyright © 2004 Ford Motor Company
Table of Contents
3
2004 F150 Classic(p96)
Owners Guide (post-2002-fmt)
USA English(fus)
Page 9 of 248
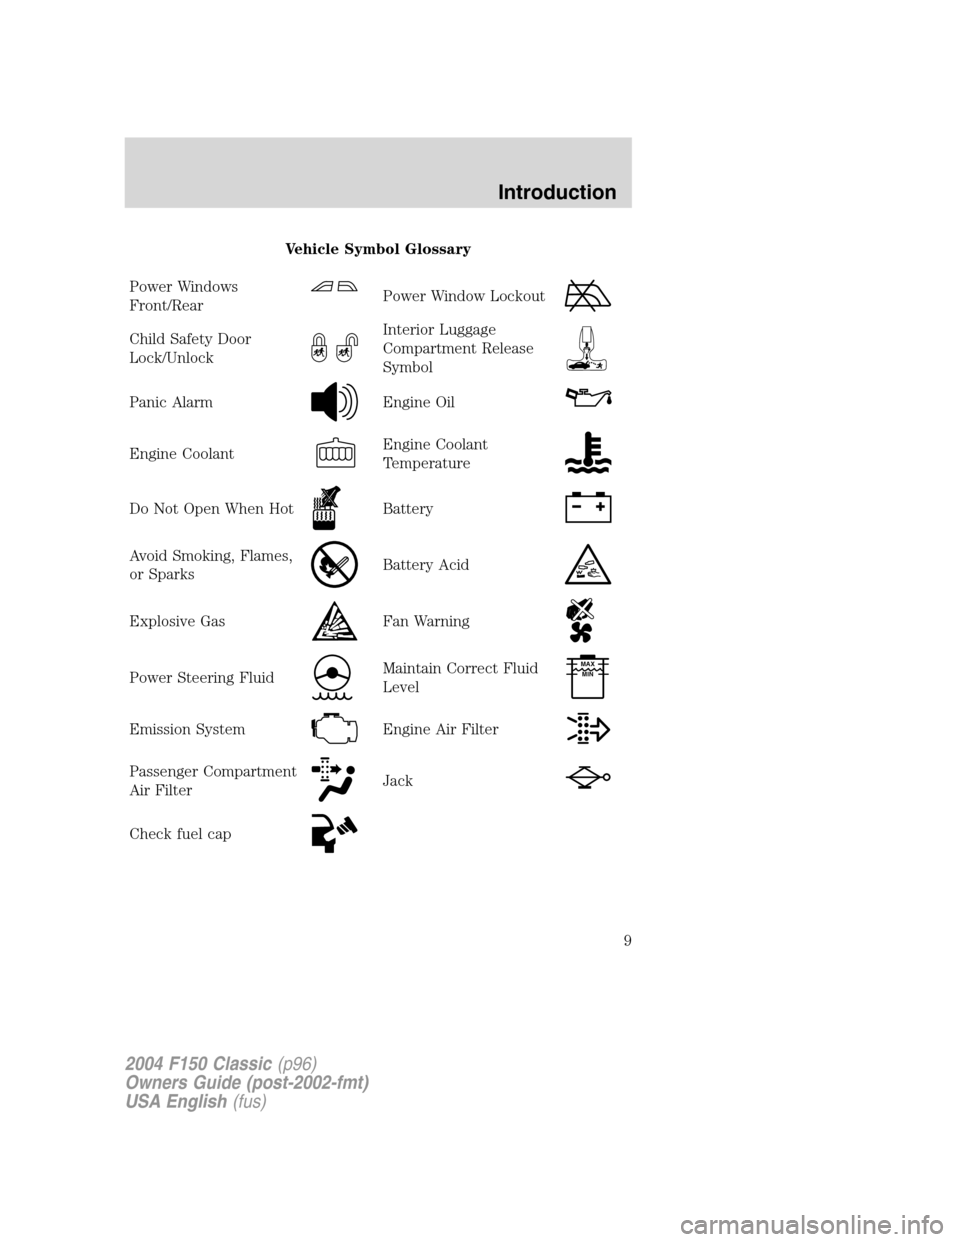
Vehicle Symbol Glossary
Power Windows
Front/Rear
Power Window Lockout
Child Safety Door
Lock/UnlockInterior Luggage
Compartment Release
Symbol
Panic AlarmEngine Oil
Engine CoolantEngine Coolant
Temperature
Do Not Open When HotBattery
Avoid Smoking, Flames,
or SparksBattery Acid
Explosive GasFan Warning
Power Steering FluidMaintain Correct Fluid
LevelMAX
MIN
Emission SystemEngine Air Filter
Passenger Compartment
Air FilterJack
Check fuel cap
2004 F150 Classic(p96)
Owners Guide (post-2002-fmt)
USA English(fus)
Introduction
9
Page 12 of 248
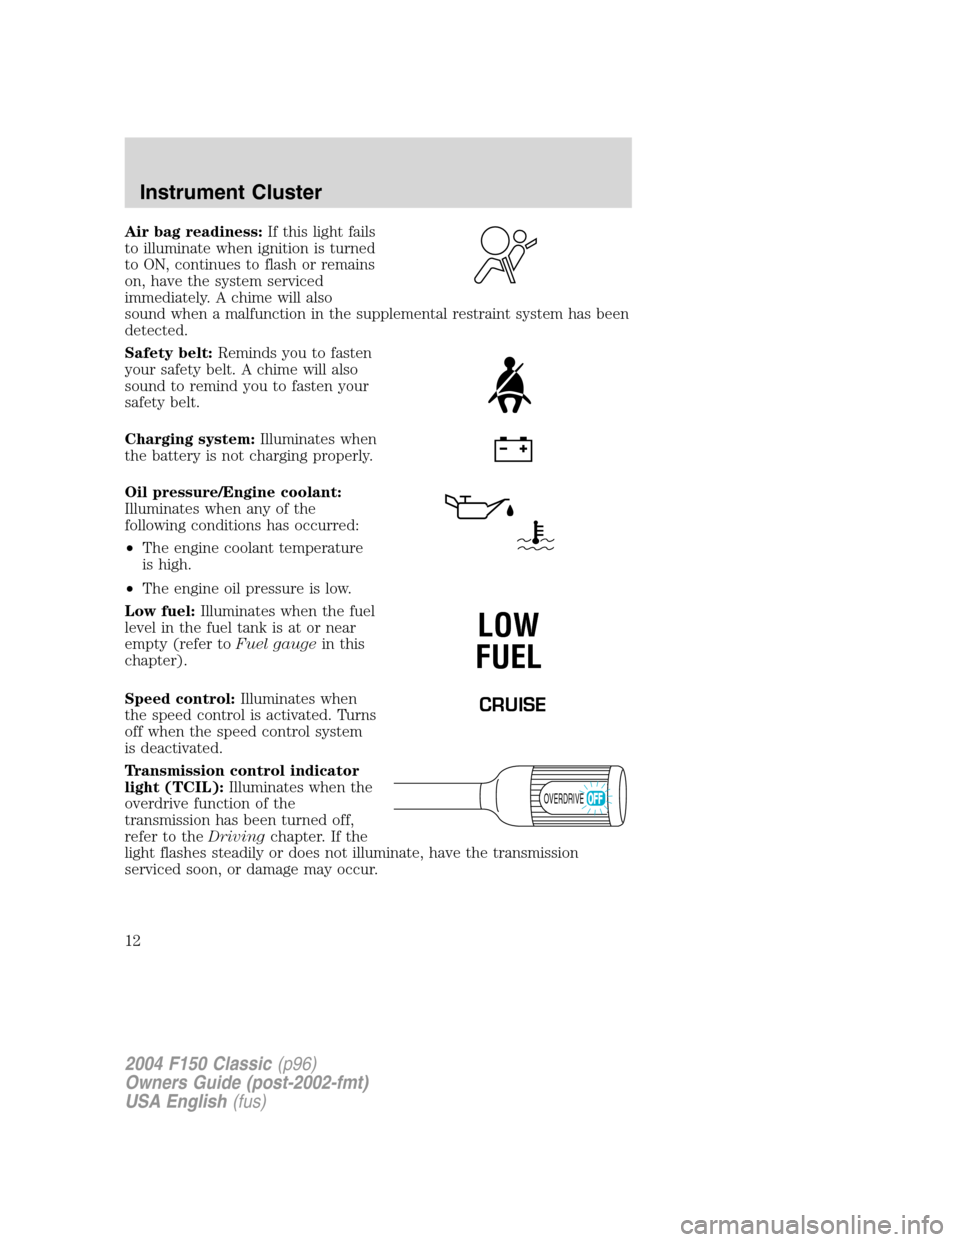
Air bag readiness:If this light fails
to illuminate when ignition is turned
to ON, continues to flash or remains
on, have the system serviced
immediately. A chime will also
sound when a malfunction in the supplemental restraint system has been
detected.
Safety belt:Reminds you to fasten
your safety belt. A chime will also
sound to remind you to fasten your
safety belt.
Charging system:Illuminates when
the battery is not charging properly.
Oil pressure/Engine coolant:
Illuminates when any of the
following conditions has occurred:
•The engine coolant temperature
is high.
•The engine oil pressure is low.
Low fuel:Illuminates when the fuel
level in the fuel tank is at or near
empty (refer toFuel gaugein this
chapter).
Speed control:Illuminates when
the speed control is activated. Turns
off when the speed control system
is deactivated.
Transmission control indicator
light (TCIL):Illuminates when the
overdrive function of the
transmission has been turned off,
refer to theDrivingchapter. If the
light flashes steadily or does not illuminate, have the transmission
serviced soon, or damage may occur.
LOW
FUEL
CRUISE
OVERDRIVE
2004 F150 Classic(p96)
Owners Guide (post-2002-fmt)
USA English(fus)
Instrument Cluster
12
Page 16 of 248
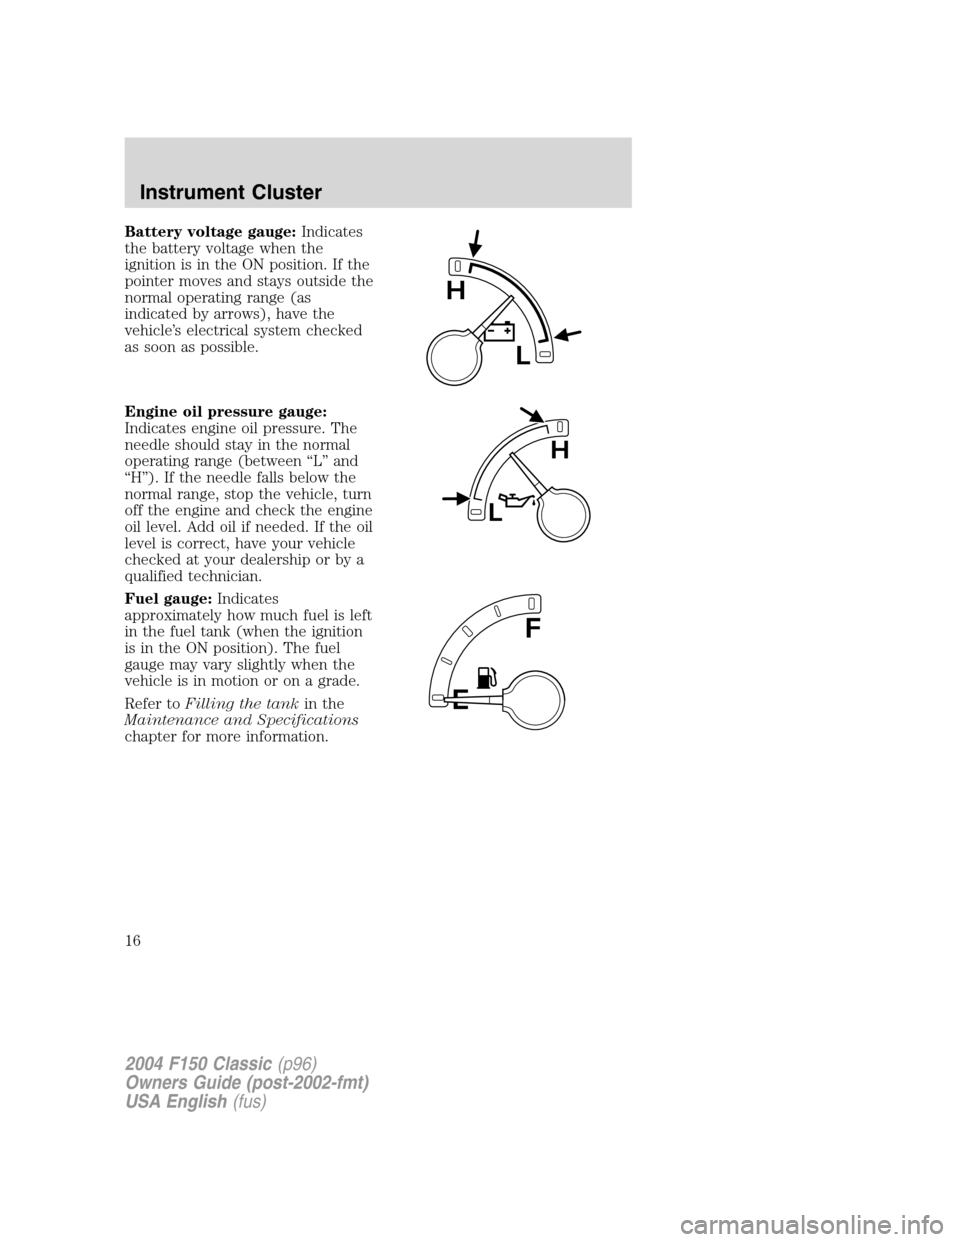
Battery voltage gauge:Indicates
the battery voltage when the
ignition is in the ON position. If the
pointer moves and stays outside the
normal operating range (as
indicated by arrows), have the
vehicle’s electrical system checked
as soon as possible.
Engine oil pressure gauge:
Indicates engine oil pressure. The
needle should stay in the normal
operating range (between“L”and
“H”). If the needle falls below the
normal range, stop the vehicle, turn
off the engine and check the engine
oil level. Add oil if needed. If the oil
level is correct, have your vehicle
checked at your dealership or by a
qualified technician.
Fuel gauge:Indicates
approximately how much fuel is left
in the fuel tank (when the ignition
is in the ON position). The fuel
gauge may vary slightly when the
vehicle is in motion or on a grade.
Refer toFilling the tankin the
Maintenance and Specifications
chapter for more information.
L
H
L
H
E
F
2004 F150 Classic(p96)
Owners Guide (post-2002-fmt)
USA English(fus)
Instrument Cluster
16
Page 57 of 248
•the ignition is turned to the 4 (ON) position, or
•using the UNLOCK
control on your remote entry transmitter or
unlocking via the keyless entry keypad (if equipped).
Power door lock disable feature — activation/deactivation
Please see your dealer in order to activate/deactivate this feature.
Sounding a panic alarm
Press
to activate the alarm. Press again or turn the ignition to 1
(ACCESSORY) or 4 (ON) to deactivate.
Note:The panic alarm will only operate when the ignition is in the 3
(OFF) position.
Replacing the battery
The remote entry transmitter uses one coin type three-volt lithium
battery CR2032 or equivalent.
To replace the battery:
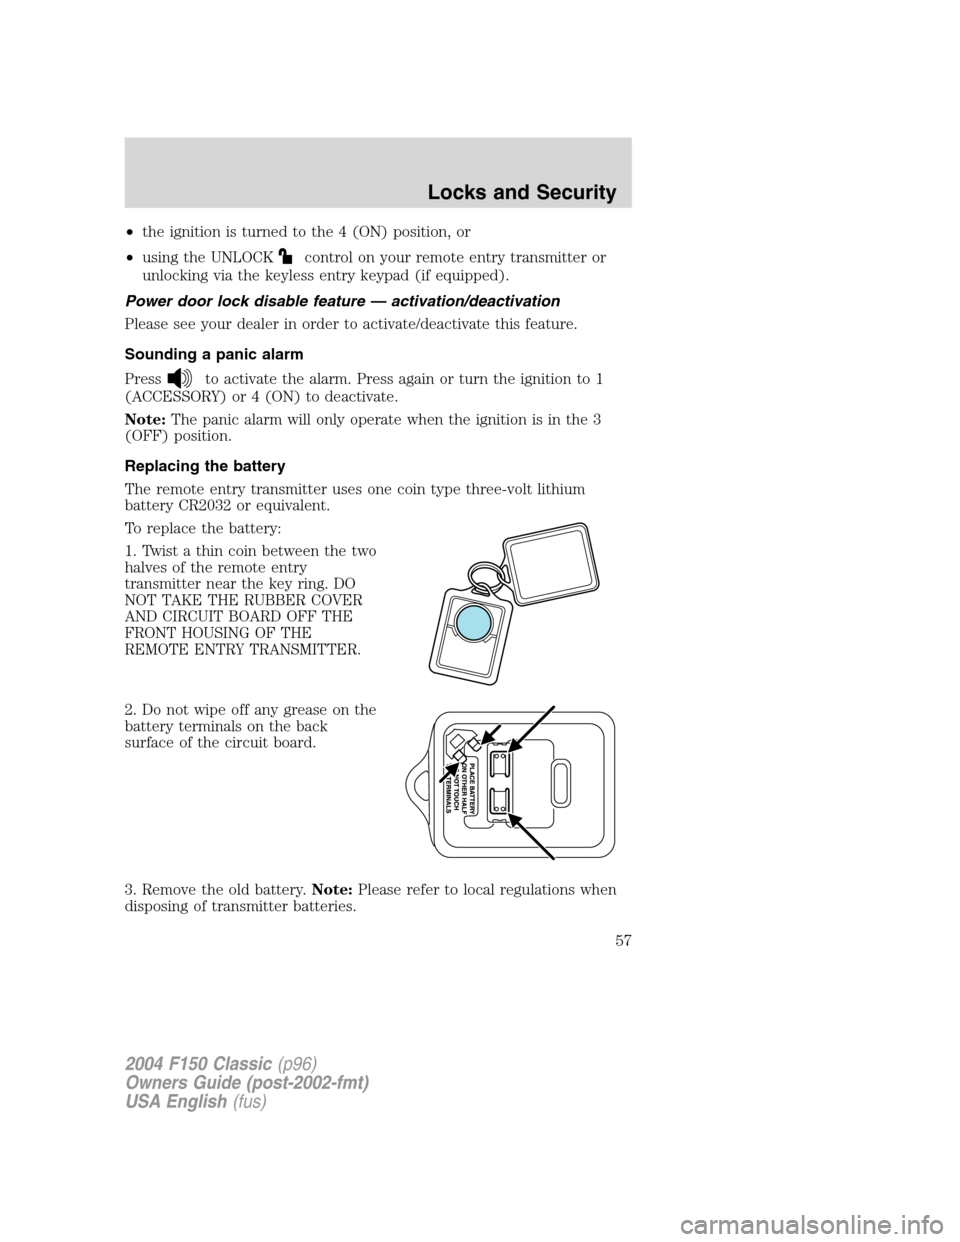
1. Twist a thin coin between the two
halves of the remote entry
transmitter near the key ring. DO
NOT TAKE THE RUBBER COVER
AND CIRCUIT BOARD OFF THE
FRONT HOUSING OF THE
REMOTE ENTRY TRANSMITTER.
2. Do not wipe off any grease on the
battery terminals on the back
surface of the circuit board.
3. Remove the old battery.Note:Please refer to local regulations when
disposing of transmitter batteries.
2004 F150 Classic(p96)
Owners Guide (post-2002-fmt)
USA English(fus)
Locks and Security
57
Page 58 of 248
4. Insert the new battery. Refer to the diagram inside the remote entry
transmitter for the correct orientation of the battery. Press the battery
down to ensure that the battery is fully seated in the battery housing
cavity.
5. Snap the two halves back together.
Note:Replacement of the battery willnotcause the remote transmitter
to become deprogrammed from your vehicle. The remote transmitter
should operate normally after battery replacement.
Replacing lost remote entry transmitters
If you would like to have your remote entry transmitter reprogrammed
because you lost one, or would like to buy additional remote entry
transmitters, you can either reprogram them yourself, or takeall
remote entry transmittersto your authorized dealer for
reprogramming.
How to reprogram your remote entry transmitters
You must haveall remote entry transmitters(maximum of four)
available before beginning this procedure.
To reprogram the remote entry
transmitters:
1. Ensure the vehicle is
electronically unlocked.
2. Put the key in the ignition.
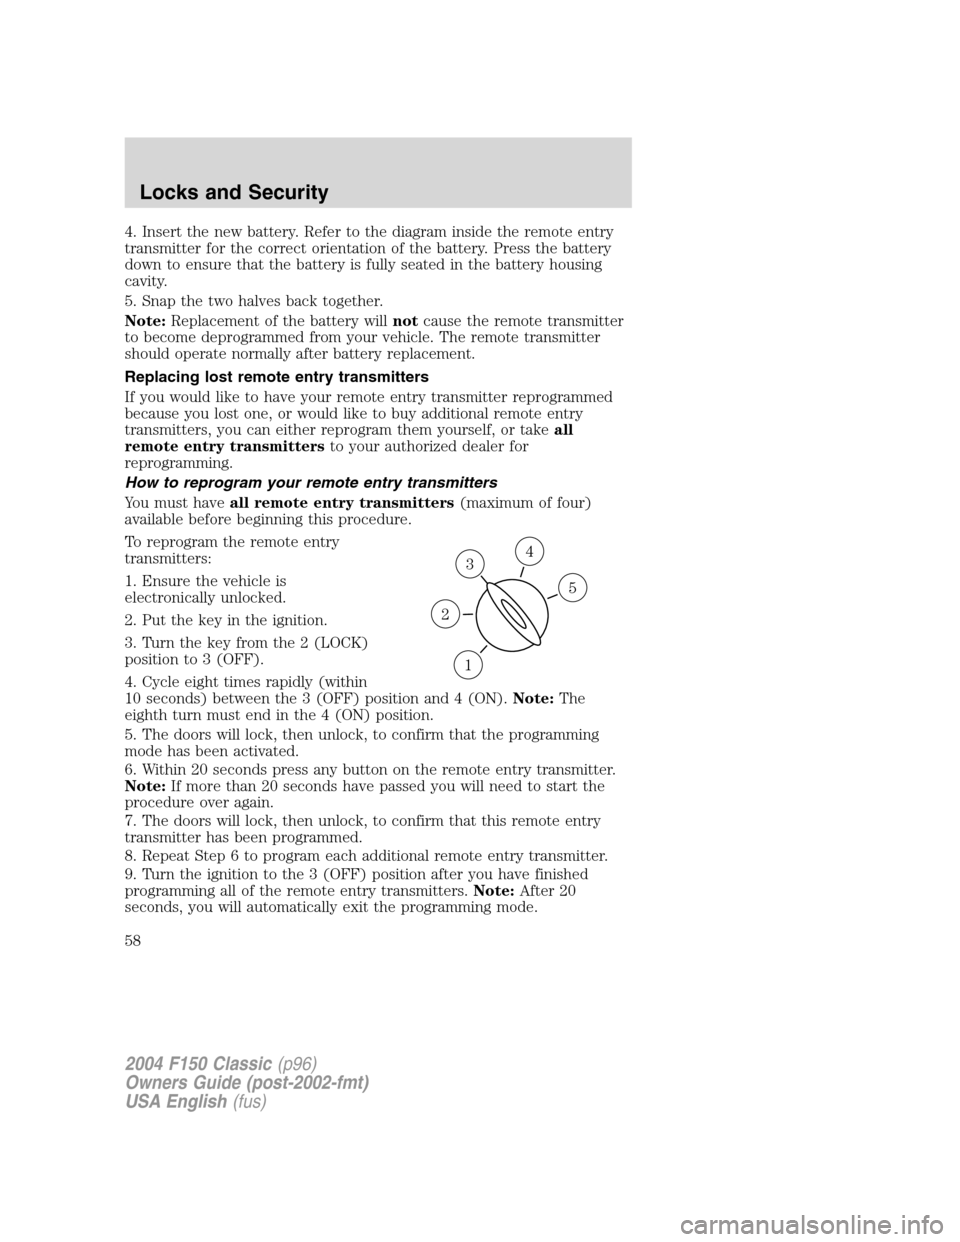
3. Turn the key from the 2 (LOCK)
position to 3 (OFF).
4. Cycle eight times rapidly (within
10 seconds) between the 3 (OFF) position and 4 (ON).Note:The
eighth turn must end in the 4 (ON) position.
5. The doors will lock, then unlock, to confirm that the programming
mode has been activated.
6. Within 20 seconds press any button on the remote entry transmitter.
Note:If more than 20 seconds have passed you will need to start the
procedure over again.
7. The doors will lock, then unlock, to confirm that this remote entry
transmitter has been programmed.
8. Repeat Step 6 to program each additional remote entry transmitter.
9. Turn the ignition to the 3 (OFF) position after you have finished
programming all of the remote entry transmitters.Note:After 20
seconds, you will automatically exit the programming mode.
3
1
2
5
4
2004 F150 Classic(p96)
Owners Guide (post-2002-fmt)
USA English(fus)
Locks and Security
58
Page 59 of 248
10. The doors will lock, then unlock, to confirm that the programming
mode has been exited.
Illuminated entry
The interior lamps illuminate when the remote entry system is used to
unlock the door(s) or sound the personal alarm.
The illuminated entry system will turn off the interior lights if:
•the ignition switch is turned to the 4 (ON) position, or
•the vehicle is locked using the keyless entry keypad (if equipped),
•the remote transmitter lock control is pressed, or
•after 25 seconds of illumination.
The dimmer control mustnotbe set to the off position for the
illuminated entry system to operate.
The inside lights will not turn off if:
•they have been turned on with the dimmer control, or
•any door is open.
The battery saver will shut off the interior lamps 30 minutes after the
last door is closed, even if the dimmer control is on.
Autolock (if equipped)
This feature will automatically lock all the doors when:
•all the doors are closed,
•the ignition is in the 4 (ON) position,
•the gearshift lever is shifted into R (Reverse) or a forward gear and
•the brake pedal is released.
This feature will also automatically relock all the doors when:
•the ignition is running and any door is opened then closed, and
•you put the vehicle in motion by releasing the brake pedal.
Deactivating/activating the autolock feature
Before following the procedure, make sure that the ignition is in the 3
(OFF) position and all vehicle doors are closed.
You must complete Steps 1-7 within 30 seconds or the procedure will
have to be repeated. If the procedure needs to be repeated, you must
wait 30 seconds.
2004 F150 Classic(p96)
Owners Guide (post-2002-fmt)
USA English(fus)
Locks and Security
59
Page 112 of 248
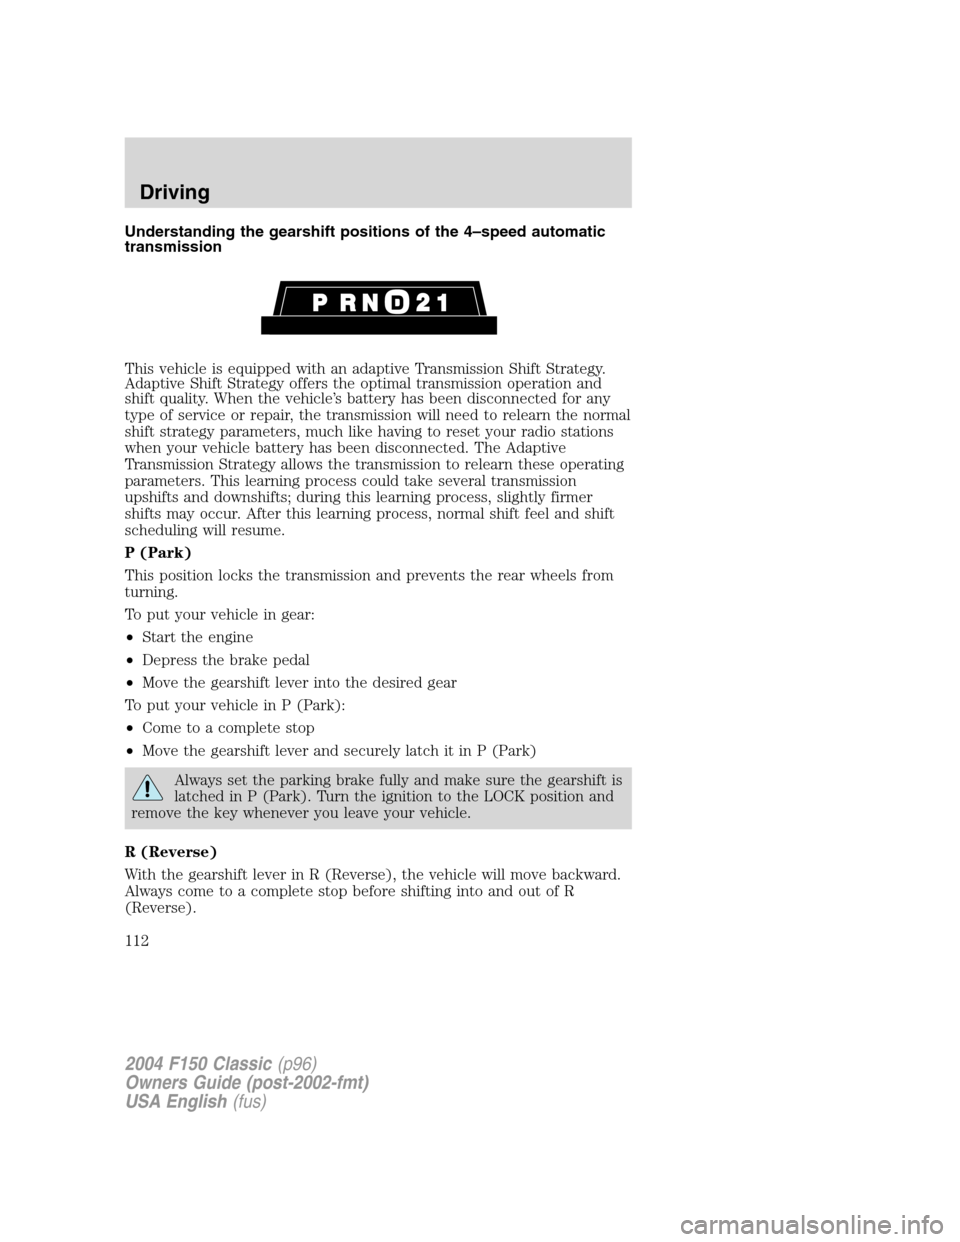
Understanding the gearshift positions of the 4–speed automatic
transmission
This vehicle is equipped with an adaptive Transmission Shift Strategy.
Adaptive Shift Strategy offers the optimal transmission operation and
shift quality. When the vehicle’s battery has been disconnected for any
type of service or repair, the transmission will need to relearn the normal
shift strategy parameters, much like having to reset your radio stations
when your vehicle battery has been disconnected. The Adaptive
Transmission Strategy allows the transmission to relearn these operating
parameters. This learning process could take several transmission
upshifts and downshifts; during this learning process, slightly firmer
shifts may occur. After this learning process, normal shift feel and shift
scheduling will resume.
P (Park)
This position locks the transmission and prevents the rear wheels from
turning.
To put your vehicle in gear:
•Start the engine
•Depress the brake pedal
•Move the gearshift lever into the desired gear
To put your vehicle in P (Park):
•Come to a complete stop
•Move the gearshift lever and securely latch it in P (Park)
Always set the parking brake fully and make sure the gearshift is
latched in P (Park). Turn the ignition to the LOCK position and
remove the key whenever you leave your vehicle.
R (Reverse)
With the gearshift lever in R (Reverse), the vehicle will move backward.
Always come to a complete stop before shifting into and out of R
(Reverse).
2004 F150 Classic(p96)
Owners Guide (post-2002-fmt)
USA English(fus)
Driving
112
Page 142 of 248
Canadian customers who require roadside assistance, call
1–800–665–2006.
If you need to arrange roadside assistance for yourself, Ford Motor
Company will reimburse a reasonable amount. To obtain reimbursement
information, U.S. Ford or Mercury vehicles customers call
1-800-241-3673; Lincoln vehicle customers call 1–800–521–4140.
Canadian customers who need to obtain reimbursement information, call
1–800–665–2006.
ROADSIDE COVERAGE BEYOND BASIC WARRANTY
In the United States, you may purchase additional roadside assistance
coverage beyond this period through the Ford Auto Club by contacting
your Ford or Lincoln Mercury dealer.
Similarly in Canada, for uninterrupted Roadside Assistance coverage, you
may purchase extended coverage prior to your Basic Warranty’s Roadside
Assistance expiring. For more information and enrollment, contact
1–877–294–2582 or visit our website at www.ford.ca.
HAZARD FLASHER
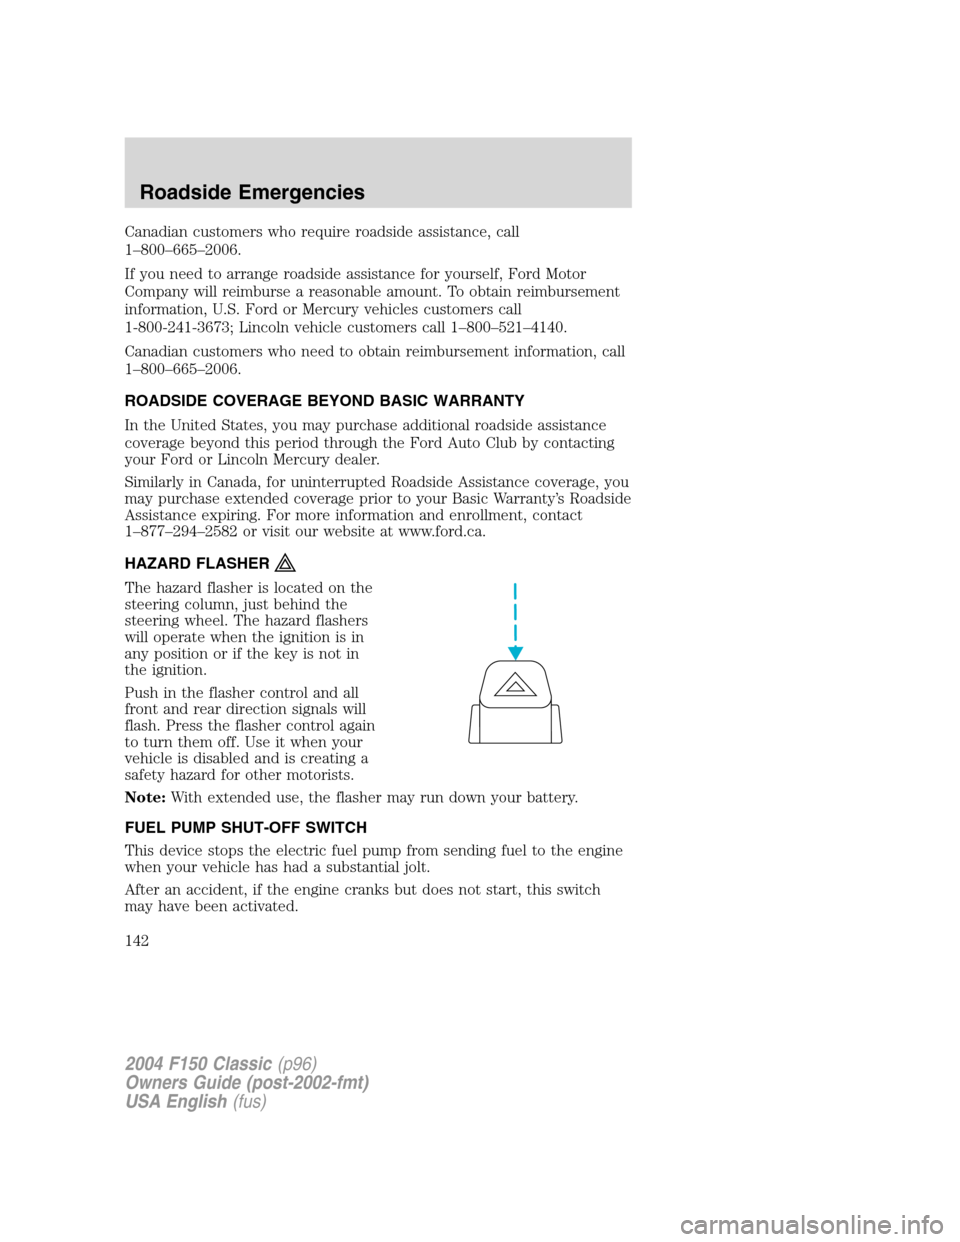
The hazard flasher is located on the
steering column, just behind the
steering wheel. The hazard flashers
will operate when the ignition is in
any position or if the key is not in
the ignition.
Push in the flasher control and all
front and rear direction signals will
flash. Press the flasher control again
to turn them off. Use it when your
vehicle is disabled and is creating a
safety hazard for other motorists.
Note:With extended use, the flasher may run down your battery.
FUEL PUMP SHUT-OFF SWITCH
This device stops the electric fuel pump from sending fuel to the engine
when your vehicle has had a substantial jolt.
After an accident, if the engine cranks but does not start, this switch
may have been activated.
2004 F150 Classic(p96)
Owners Guide (post-2002-fmt)
USA English(fus)
Roadside Emergencies
142
Page 146 of 248
Fuse/Relay
LocationFuse Amp
RatingPassenger Compartment Fuse
Panel Description
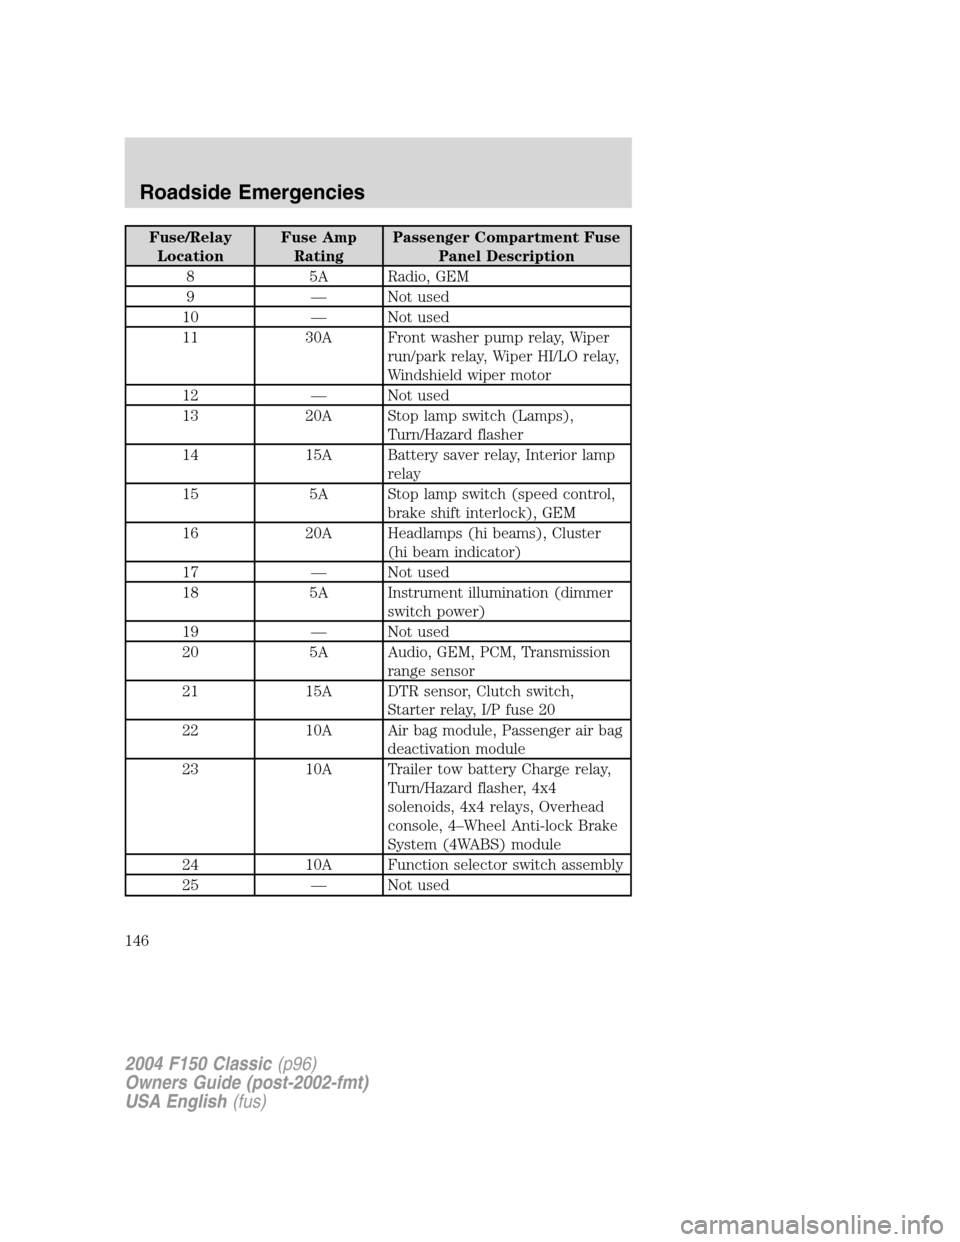
8 5A Radio, GEM
9—Not used
10—Not used
11 30A Front washer pump relay, Wiper
run/park relay, Wiper HI/LO relay,
Windshield wiper motor
12—Not used
13 20A Stop lamp switch (Lamps),
Turn/Hazard flasher
14 15A Battery saver relay, Interior lamp
relay
15 5A Stop lamp switch (speed control,
brake shift interlock), GEM
16 20A Headlamps (hi beams), Cluster
(hi beam indicator)
17—Not used
18 5A Instrument illumination (dimmer
switch power)
19—Not used
20 5A Audio, GEM, PCM, Transmission
range sensor
21 15A DTR sensor, Clutch switch,
Starter relay, I/P fuse 20
22 10A Air bag module, Passenger air bag
deactivation module
23 10A Trailer tow battery Charge relay,
Turn/Hazard flasher, 4x4
solenoids, 4x4 relays, Overhead
console, 4–Wheel Anti-lock Brake
System (4WABS) module
24 10A Function selector switch assembly
25—Not used
2004 F150 Classic(p96)
Owners Guide (post-2002-fmt)
USA English(fus)
Roadside Emergencies
146