fuse FORD F150 2004 11.G Owners Manual
[x] Cancel search | Manufacturer: FORD, Model Year: 2004, Model line: F150, Model: FORD F150 2004 11.GPages: 280, PDF Size: 4.13 MB
Page 2 of 280
Locks and Security 82
Keys 82
Locks 82
Anti-theft system 85
Seating and Safety Restraints 97
Seating 97
Safety restraints 102
Air bags 118
Child restraints 129
Driving 144
Starting 144
Brakes 149
Transmission operation 151
Trailer towing 173
Roadside Emergencies 186
Getting roadside assistance 186
Hazard flasher switch 187
Fuel pump shut-off switch 187
Fuses and relays 188
Changing tires 195
Jump starting 201
Wrecker towing 206
Customer Assistance 207
Reporting safety defects (U.S. only) 215
Cleaning 216
Table of Contents
2
Page 8 of 280
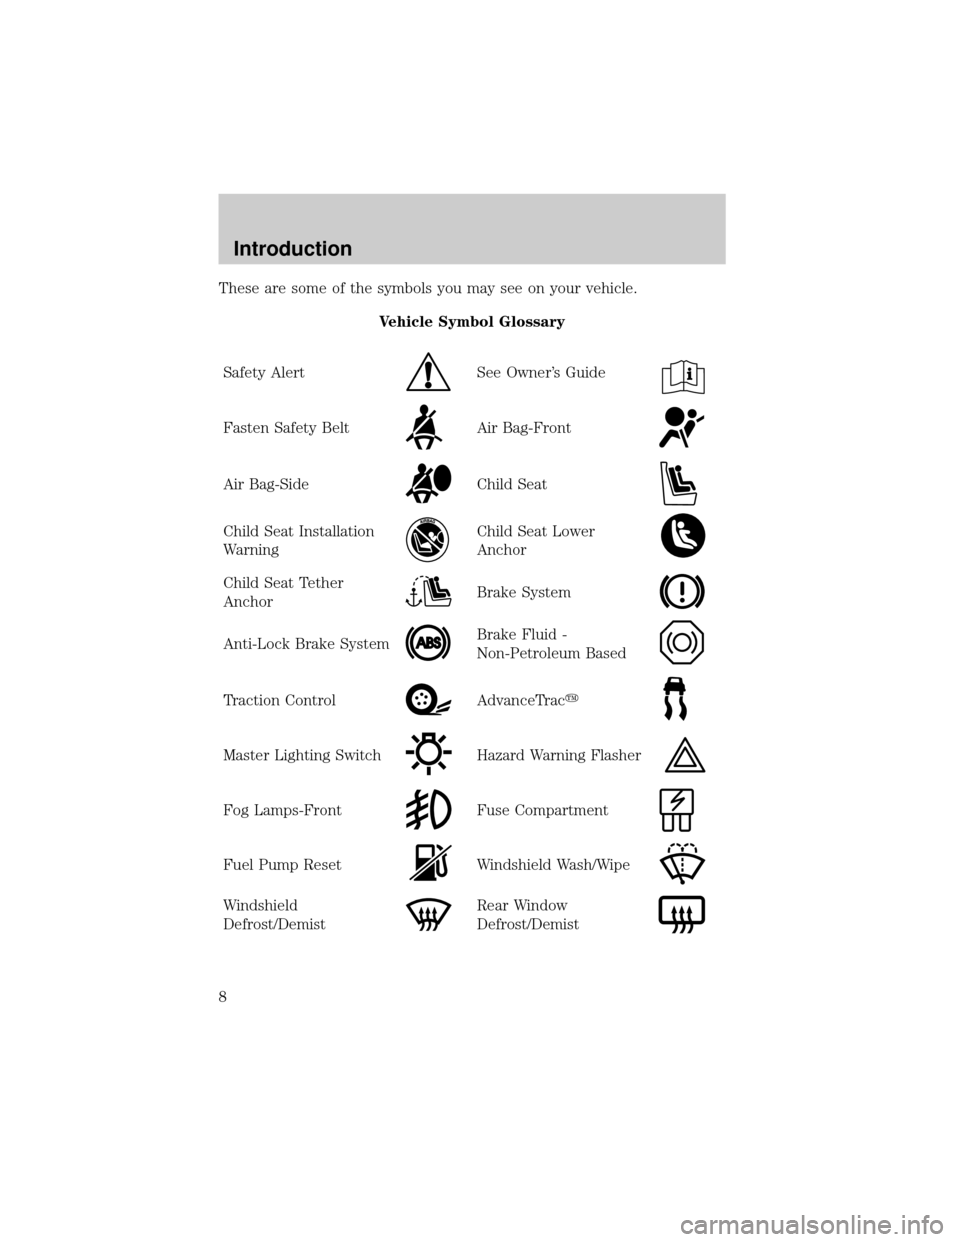
These are some of the symbols you may see on your vehicle.
Vehicle Symbol Glossary
Safety Alert
See Owner's Guide
Fasten Safety BeltAir Bag-Front
Air Bag-SideChild Seat
Child Seat Installation
WarningChild Seat Lower
Anchor
Child Seat Tether
AnchorBrake System
Anti-Lock Brake SystemBrake Fluid -
Non-Petroleum Based
Traction ControlAdvanceTracy
Master Lighting SwitchHazard Warning Flasher
Fog Lamps-FrontFuse Compartment
Fuel Pump ResetWindshield Wash/Wipe
Windshield
Defrost/DemistRear Window
Defrost/Demist
Introduction
8
Page 119 of 280
The National Highway Traffic Safety Administration (NHTSA)
recommends a minimum distance of at least 25 cm (10 inches)
between an occupant's chest and the driver air bag cover.
Never place your arms or feet over the air bag module as a
deploying air bag can result in serious fractures or other injuries.
To properly position yourself away from the air bag:
²Move your seat to the rear as far as you can while still reaching the
pedals comfortably.
²Recline the seat slightly one or two degrees from the upright position.
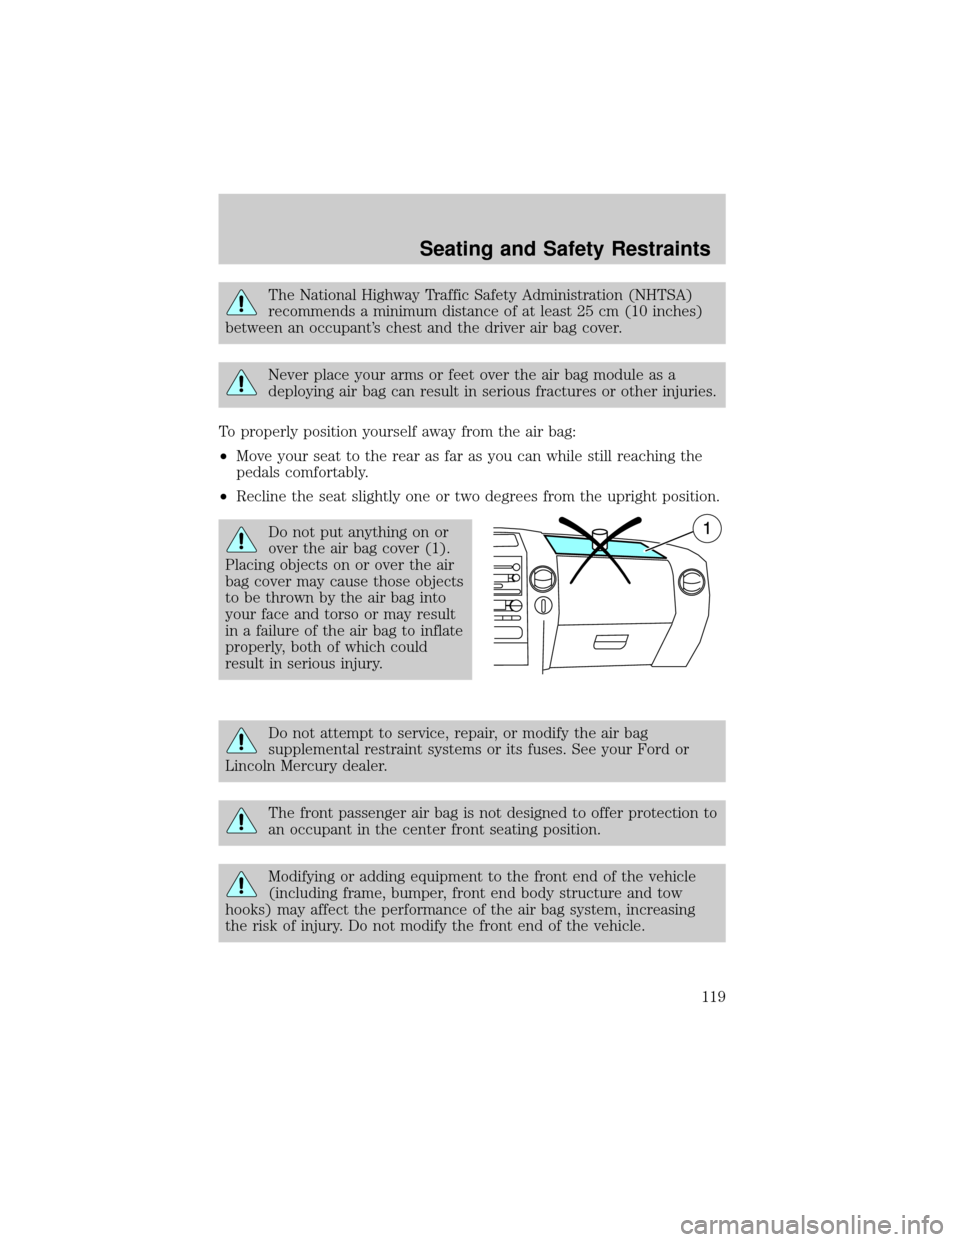
Do not put anything on or
over the air bag cover (1).
Placing objects on or over the air
bag cover may cause those objects
to be thrown by the air bag into
your face and torso or may result
in a failure of the air bag to inflate
properly, both of which could
result in serious injury.
Do not attempt to service, repair, or modify the air bag
supplemental restraint systems or its fuses. See your Ford or
Lincoln Mercury dealer.
The front passenger air bag is not designed to offer protection to
an occupant in the center front seating position.
Modifying or adding equipment to the front end of the vehicle
(including frame, bumper, front end body structure and tow
hooks) may affect the performance of the air bag system, increasing
the risk of injury. Do not modify the front end of the vehicle.
Seating and Safety Restraints
119
Page 151 of 280
TRACTION-LOK AXLE (IF EQUIPPED)
This axle provides added traction on slippery surfaces, particularly when
one wheel is on a poor traction surface. Under normal conditions, the
Traction-Lok axle functions like a standard rear axle.
PREPARING TO DRIVE YOUR VEHICLE
Utility vehicles have a significantly higher rollover rate than
other types of vehicles.
In a rollover crash, an unbelted person is significantly more likely
to die than a person wearing a safety belt.
Your vehicle has larger tires and increased ground clearance, giving the
vehicle a higher center of gravity than a passenger car.
Vehicles with a higher center of gravity such as utility and
four-wheel drive vehicles handle differently than vehicles with a
lower center of gravity. Utility and four-wheel drive vehicles arenot
designed for cornering at speeds as high as passenger cars any more
than low-slung sports cars are designed to perform satisfactorily under
off-road conditions. Avoid sharp turns, excessive speed and abrupt
maneuvers in these vehicles. Failure to drive cautiously could result in
an increased risk of loss of vehicle control, vehicle rollover, personal
injury and death.
Loaded vehicles, with a higher center of gravity, may handle
differently than unloaded vehicles. Extra precautions, such as
slower speeds and increased stopping distance, should be taken when
driving a heavily loaded vehicle.
AUTOMATIC TRANSMISSION OPERATION
Brake-shift interlock - column-shift transmission
This vehicle is equipped with a park/brake-shift interlock feature that
prevents the gearshift lever from being moved from P (Park) when the
ignition is in the ON position unless brake pedal is depressed.
If you cannot move the gearshift lever out of P (Park) with ignition in
the ON position and the brake pedal depressed, it is possible that a fuse
Driving
151
Page 152 of 280
has blown or the vehicle's brakelamps are not operating properly. Refer
toFuses and relaysin theRoadside emergencieschapter.
If the fuse is not blown, perform the following procedure:
1. Apply the parking brake, turn the ignition to OFF/LOCK, then remove
the key.
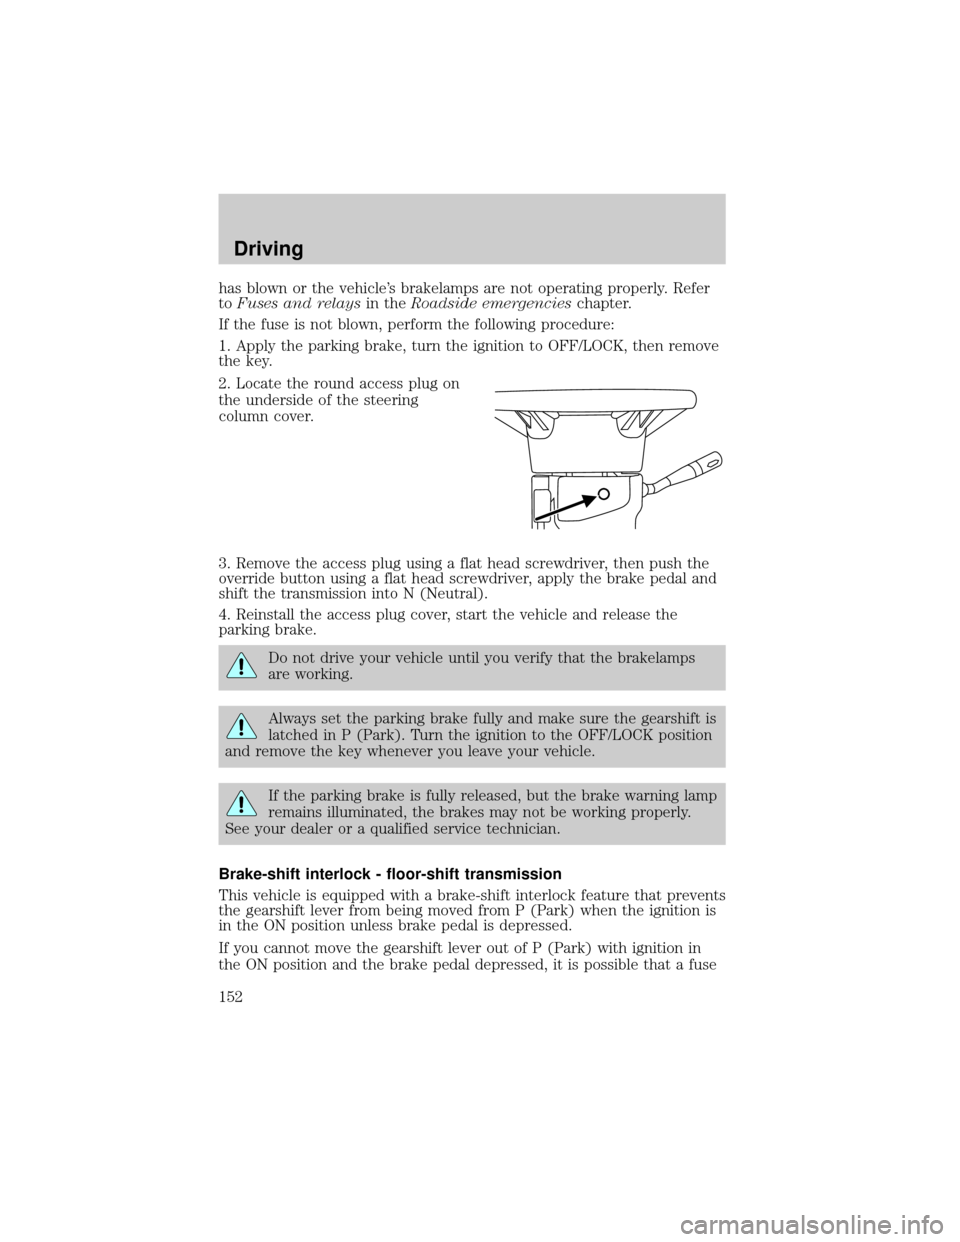
2. Locate the round access plug on
the underside of the steering
column cover.
3. Remove the access plug using a flat head screwdriver, then push the
override button using a flat head screwdriver, apply the brake pedal and
shift the transmission into N (Neutral).
4. Reinstall the access plug cover, start the vehicle and release the
parking brake.
Do not drive your vehicle until you verify that the brakelamps
are working.
Always set the parking brake fully and make sure the gearshift is
latched in P (Park). Turn the ignition to the OFF/LOCK position
and remove the key whenever you leave your vehicle.
If the parking brake is fully released, but the brake warning lamp
remains illuminated, the brakes may not be working properly.
See your dealer or a qualified service technician.
Brake-shift interlock - floor-shift transmission
This vehicle is equipped with a brake-shift interlock feature that prevents
the gearshift lever from being moved from P (Park) when the ignition is
in the ON position unless brake pedal is depressed.
If you cannot move the gearshift lever out of P (Park) with ignition in
the ON position and the brake pedal depressed, it is possible that a fuse
Driving
152
Page 153 of 280
has blown or the vehicle's brakelamps are not operating properly. Refer
toFuses and relaysin theRoadside emergencieschapter.
If the fuse is not blown, perform the following procedure:
1. Apply the parking brake, turn the ignition to LOCK, then remove the
key.
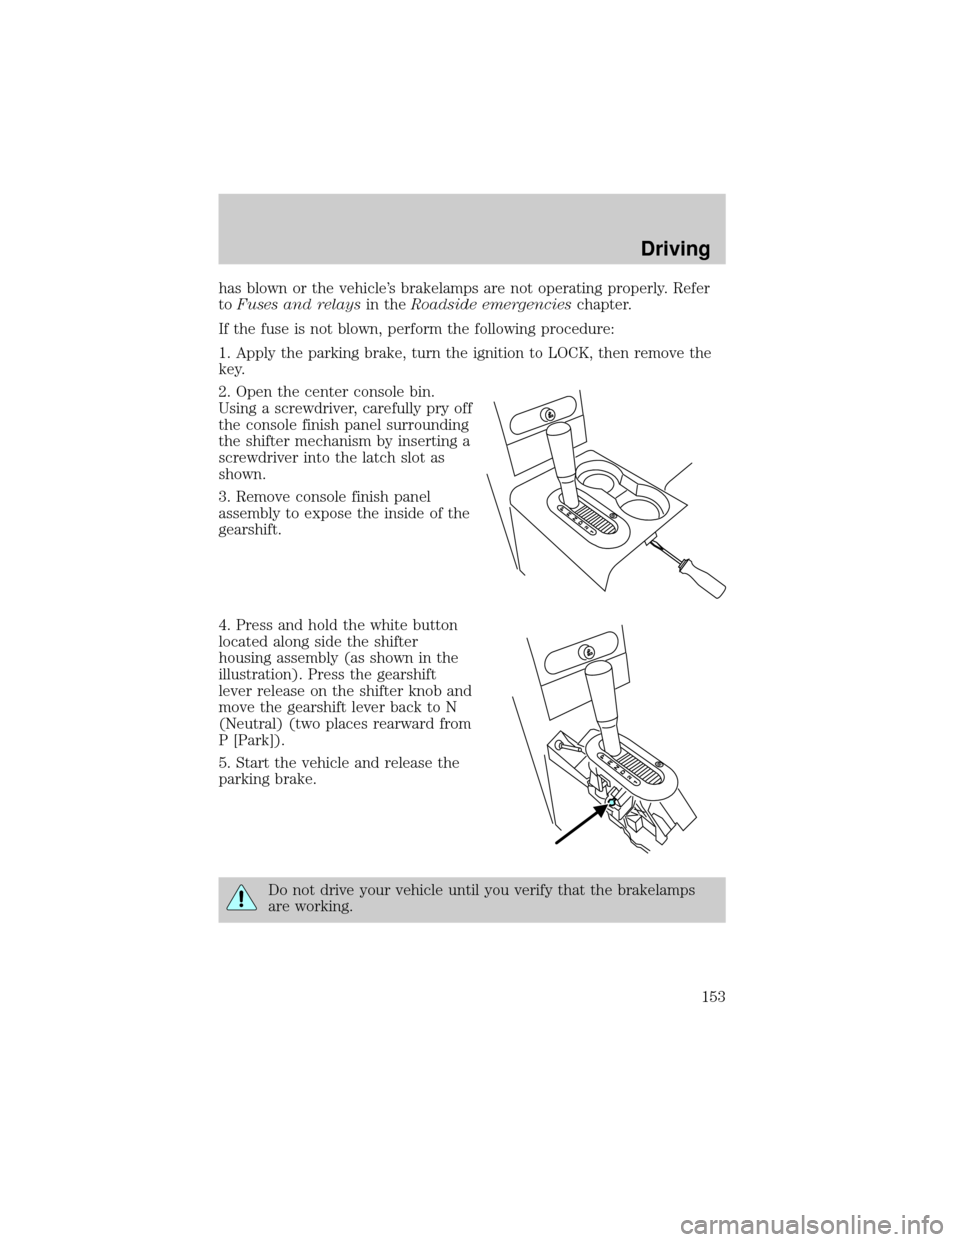
2. Open the center console bin.
Using a screwdriver, carefully pry off
the console finish panel surrounding
the shifter mechanism by inserting a
screwdriver into the latch slot as
shown.
3. Remove console finish panel
assembly to expose the inside of the
gearshift.
4. Press and hold the white button
located along side the shifter
housing assembly (as shown in the
illustration). Press the gearshift
lever release on the shifter knob and
move the gearshift lever back to N
(Neutral) (two places rearward from
P [Park]).
5. Start the vehicle and release the
parking brake.
Do not drive your vehicle until you verify that the brakelamps
are working.
Driving
153
Page 184 of 280
Operating the vehicle with the snowplow attached
Ford recommends that the F±150 be limited to low speed, personal-use
snow removal. Do not use your vehicle for snow removal until it has
been driven at least 800 km (500 miles).
The attached snowplow blade restricts airflow to the radiator, and may
cause the engine to run at a higher temperature:
²If you are driving more than 24 km (15 miles) where outside air
temperatures are above freezing, then angle the plow blade to full left
or right to maximize airflow to the radiator.
²If you are driving less than 24 km (15 miles) at speeds up to 64 km/h
(40 mph) in cold weather you will not need to adjust blade position
Snowplowing with your air bag equipped vehicle
Your vehicle is equipped with a driver and passenger air bag
Supplemental Restraint System (SRS) The SRS is designed to activate in
certain frontal and offset frontal collisions when the vehicle sustains
sufficient longitudinal deceleration.
Careless or high speed driving while plowing snow which results in
sufficient vehicle decelerations can deploy the air bag. Such driving also
increases the risk of accidents.
All occupants of the vehicle, including the driver, should always
properly wear their safety belts, even when an air bag (SRS) is
provided.
Never remove or defeat the ªtripping mechanismsº designed into the
snow removal equipment by its manufacturer. Doing so may cause
damage to the vehicle and the snow removal equipment as well as
possible air bag deployment.
Do not attempt to service, repair, or modify the Air Bag
Supplemental Restraint System or its fuses. See your Ford or
Lincoln Mercury dealer.
Transmission operation while plowing
²Shift transfer case to 4L (4WD Low) when plowing in small areas at
speeds below 8 km/h (5 mph).
²Shift transfer case to 4H (4WD High) when plowing larger areas or
light snow at higher speeds. Do not exceed 24 km/h (15 mph).
Driving
184
Page 188 of 280
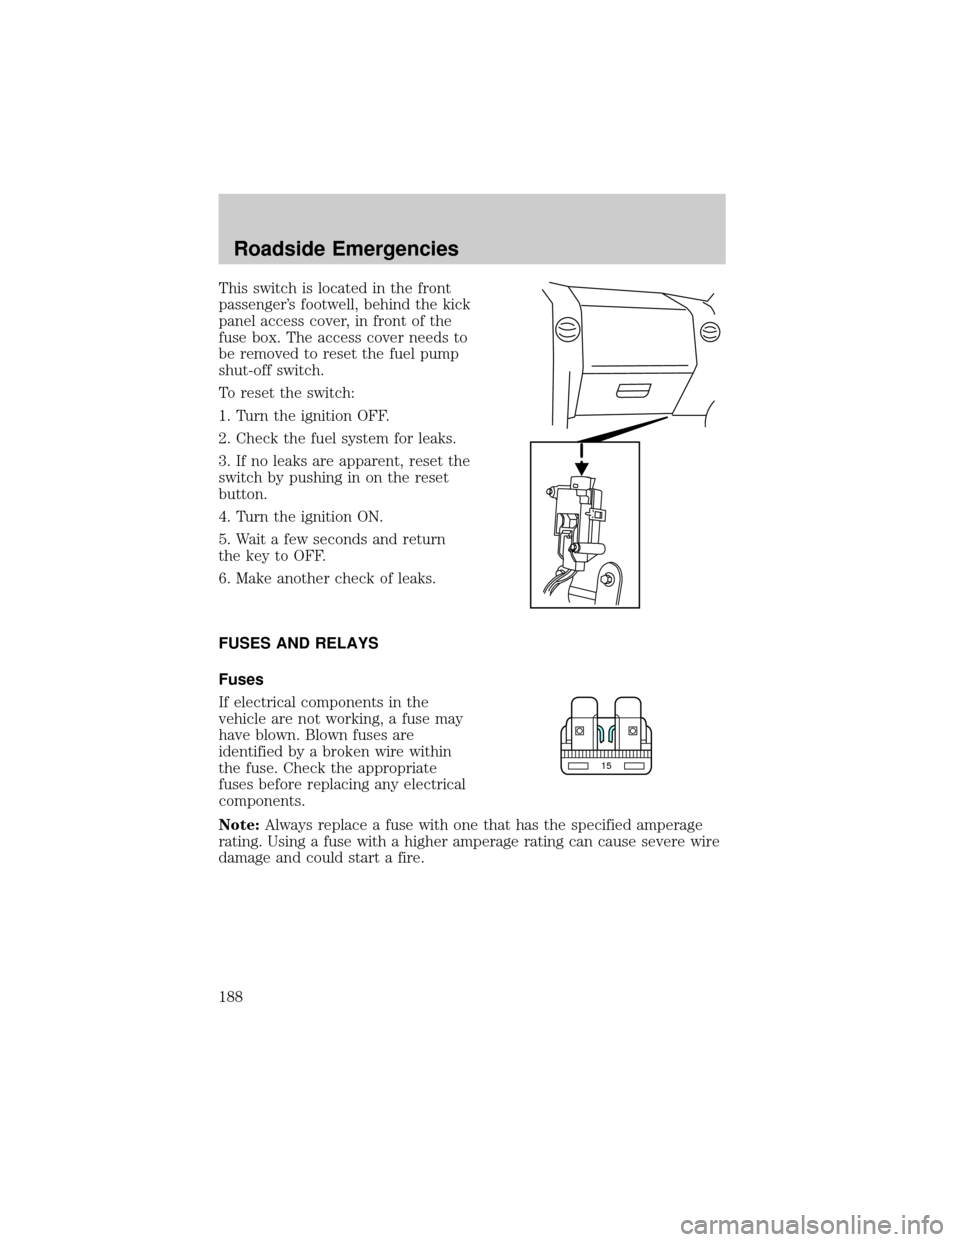
This switch is located in the front
passenger's footwell, behind the kick
panel access cover, in front of the
fuse box. The access cover needs to
be removed to reset the fuel pump
shut-off switch.
To reset the switch:
1. Turn the ignition OFF.
2. Check the fuel system for leaks.
3. If no leaks are apparent, reset the
switch by pushing in on the reset
button.
4. Turn the ignition ON.
5. Wait a few seconds and return
the key to OFF.
6. Make another check of leaks.
FUSES AND RELAYS
Fuses
If electrical components in the
vehicle are not working, a fuse may
have blown. Blown fuses are
identified by a broken wire within
the fuse. Check the appropriate
fuses before replacing any electrical
components.
Note:Always replace a fuse with one that has the specified amperage
rating. Using a fuse with a higher amperage rating can cause severe wire
damage and could start a fire.
15
Roadside Emergencies
188
Page 189 of 280
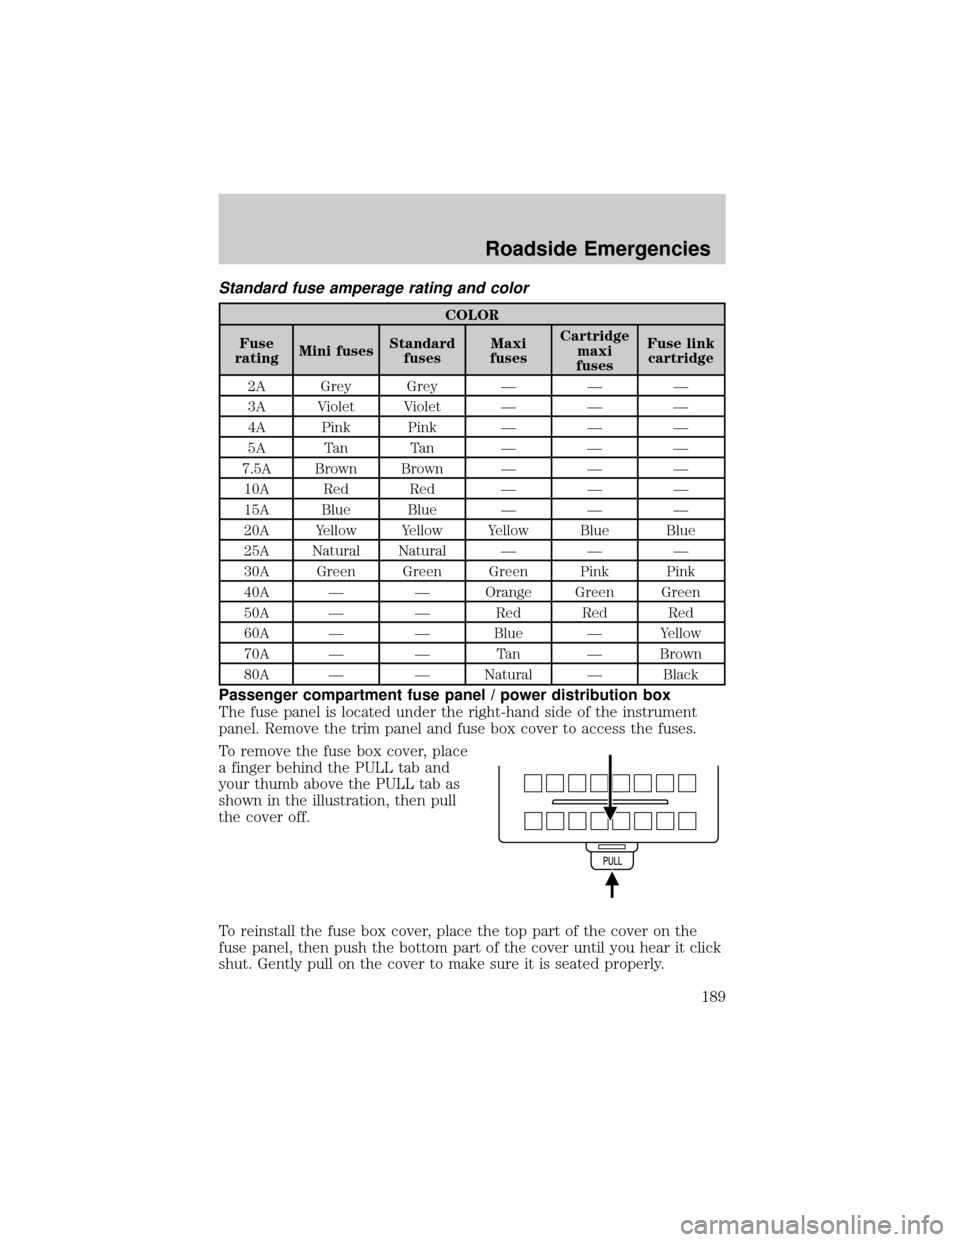
Standard fuse amperage rating and color
COLOR
Fuse
ratingMini fusesStandard
fusesMaxi
fusesCartridge
maxi
fusesFuse link
cartridge
2A Grey Grey Ð Ð Ð
3A Violet Violet Ð Ð Ð
4A Pink Pink Ð Ð Ð
5A Tan Tan Ð Ð Ð
7.5A Brown Brown Ð Ð Ð
10A Red Red Ð Ð Ð
15A Blue Blue Ð Ð Ð
20A Yellow Yellow Yellow Blue Blue
25A Natural Natural Ð Ð Ð
30A Green Green Green Pink Pink
40A Ð Ð Orange Green Green
50A Ð Ð Red Red Red
60A Ð Ð Blue Ð Yellow
70A Ð Ð Tan Ð Brown
80A Ð Ð Natural Ð Black
Passenger compartment fuse panel / power distribution box
The fuse panel is located under the right-hand side of the instrument
panel. Remove the trim panel and fuse box cover to access the fuses.
To remove the fuse box cover, place
a finger behind the PULL tab and
your thumb above the PULL tab as
shown in the illustration, then pull
the cover off.
To reinstall the fuse box cover, place the top part of the cover on the
fuse panel, then push the bottom part of the cover until you hear it click
shut. Gently pull on the cover to make sure it is seated properly.
Roadside Emergencies
189
Page 190 of 280
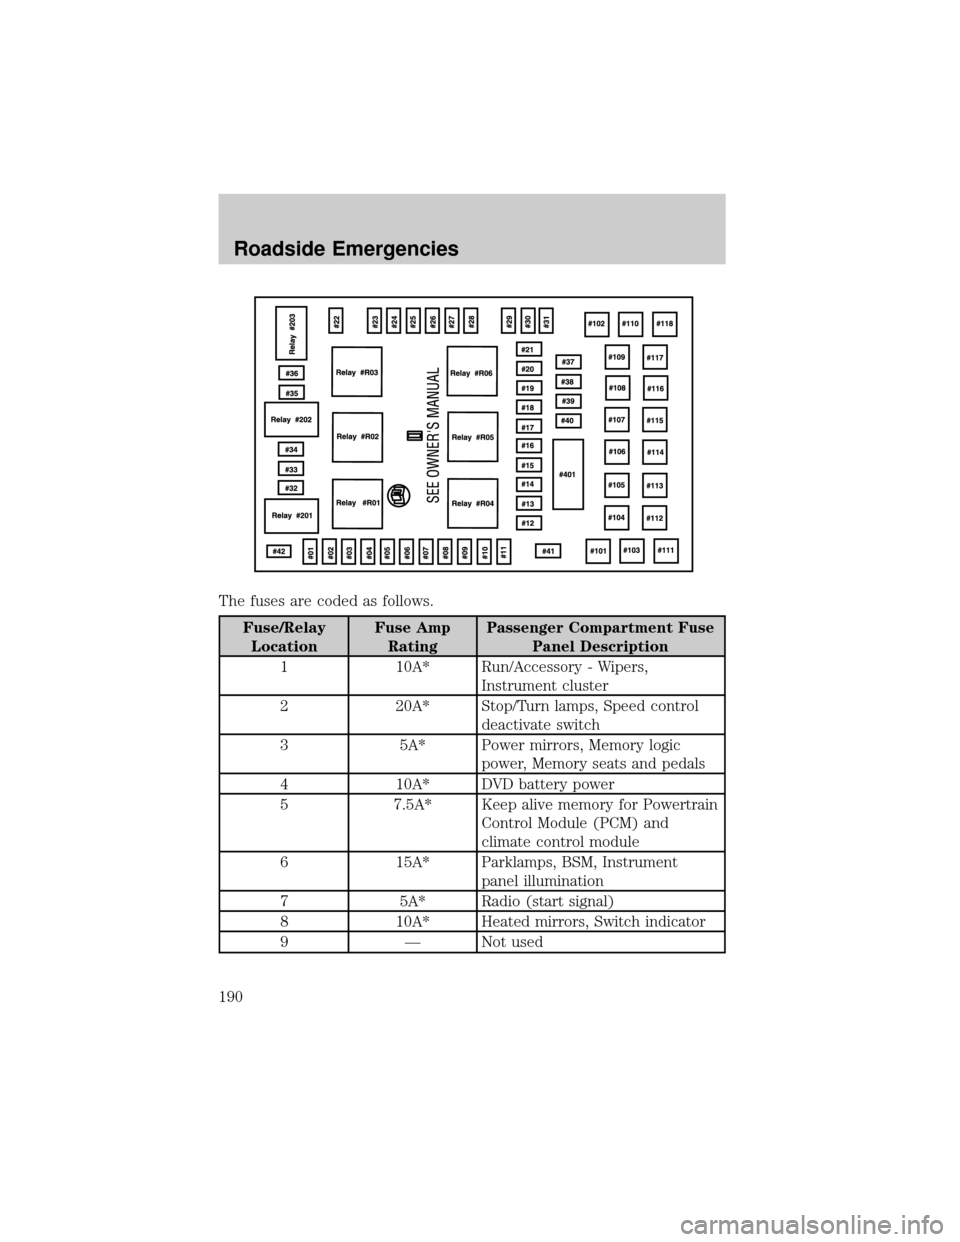
The fuses are coded as follows.
Fuse/Relay
LocationFuse Amp
RatingPassenger Compartment Fuse
Panel Description
1 10A* Run/Accessory - Wipers,
Instrument cluster
2 20A* Stop/Turn lamps, Speed control
deactivate switch
3 5A* Power mirrors, Memory logic
power, Memory seats and pedals
4 10A* DVD battery power
5 7.5A* Keep alive memory for Powertrain
Control Module (PCM) and
climate control module
6 15A* Parklamps, BSM, Instrument
panel illumination
7 5A* Radio (start signal)
8 10A* Heated mirrors, Switch indicator
9 Ð Not used
Roadside Emergencies
190