FORD F150 2011 12.G Owners Manual
Manufacturer: FORD, Model Year: 2011, Model line: F150, Model: FORD F150 2011 12.GPages: 461, PDF Size: 3.1 MB
Page 291 of 461
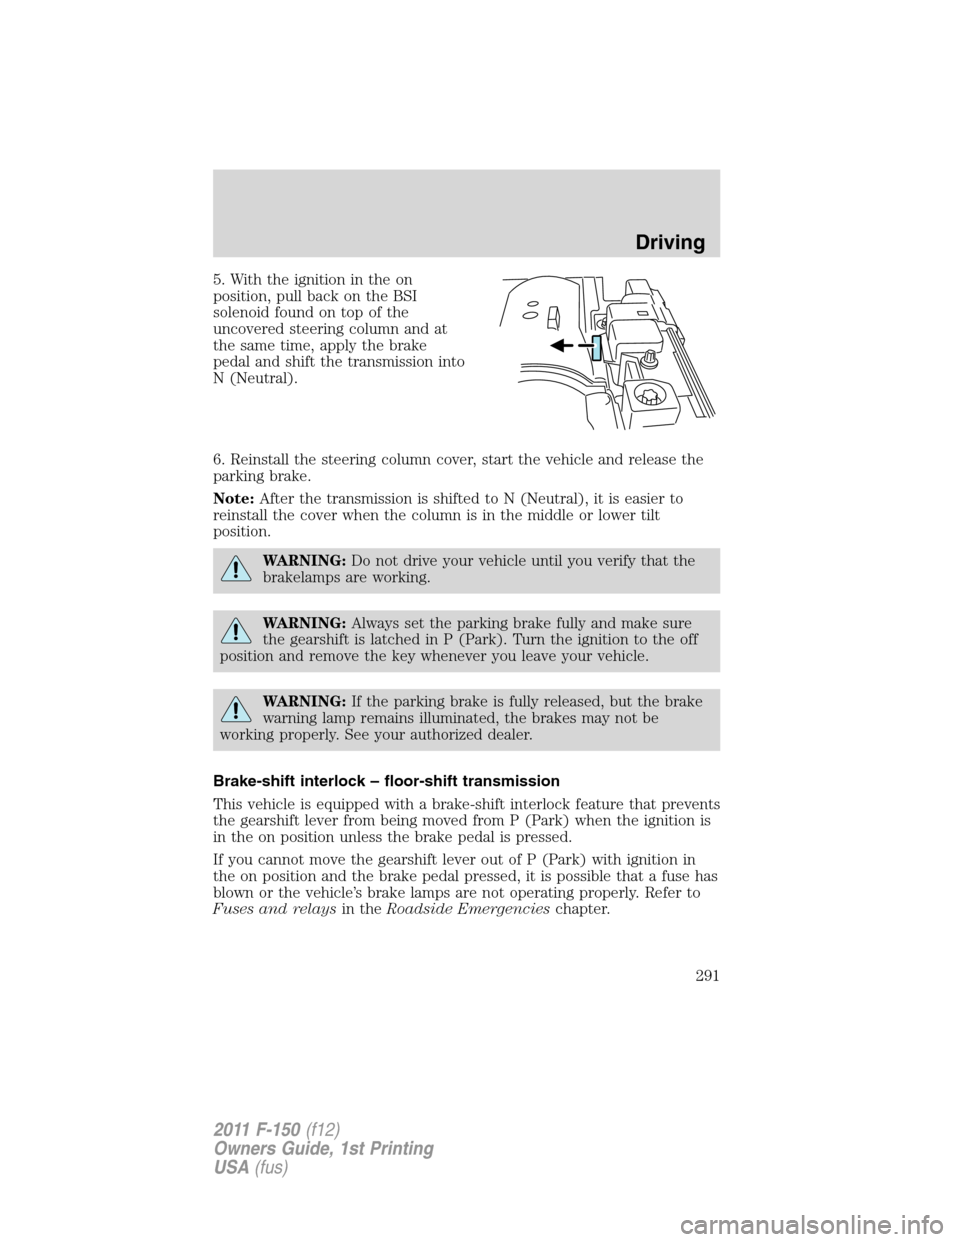
5. With the ignition in the on
position, pull back on the BSI
solenoid found on top of the
uncovered steering column and at
the same time, apply the brake
pedal and shift the transmission into
N (Neutral).
6. Reinstall the steering column cover, start the vehicle and release the
parking brake.
Note:After the transmission is shifted to N (Neutral), it is easier to
reinstall the cover when the column is in the middle or lower tilt
position.
WARNING:Do not drive your vehicle until you verify that the
brakelamps are working.
WARNING:Always set the parking brake fully and make sure
the gearshift is latched in P (Park). Turn the ignition to the off
position and remove the key whenever you leave your vehicle.
WARNING:If the parking brake is fully released, but the brake
warning lamp remains illuminated, the brakes may not be
working properly. See your authorized dealer.
Brake-shift interlock – floor-shift transmission
This vehicle is equipped with a brake-shift interlock feature that prevents
the gearshift lever from being moved from P (Park) when the ignition is
in the on position unless the brake pedal is pressed.
If you cannot move the gearshift lever out of P (Park) with ignition in
the on position and the brake pedal pressed, it is possible that a fuse has
blown or the vehicle’s brake lamps are not operating properly. Refer to
Fuses and relaysin theRoadside Emergencieschapter.
Driving
291
2011 F-150(f12)
Owners Guide, 1st Printing
USA(fus)
Page 292 of 461
If the fuse is not blown and the brake lamps are working properly, the
following procedure will allow you to move the gearshift lever from P
(Park):
1. Apply the parking brake, turn the
ignition key to the off position, and
remove the key.
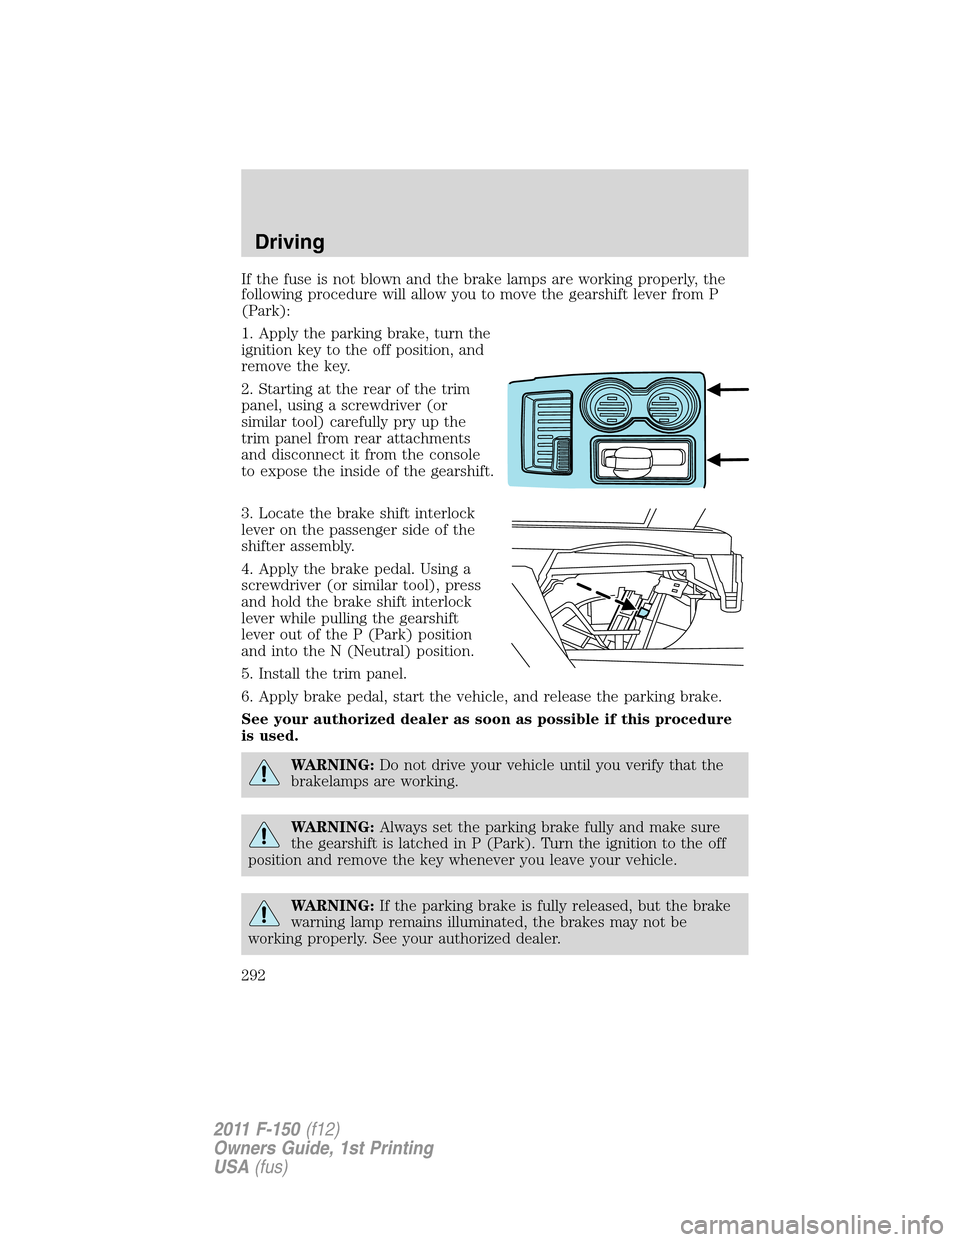
2. Starting at the rear of the trim
panel, using a screwdriver (or
similar tool) carefully pry up the
trim panel from rear attachments
and disconnect it from the console
to expose the inside of the gearshift.
3. Locate the brake shift interlock
lever on the passenger side of the
shifter assembly.
4. Apply the brake pedal. Using a
screwdriver (or similar tool), press
and hold the brake shift interlock
lever while pulling the gearshift
lever out of the P (Park) position
and into the N (Neutral) position.
5. Install the trim panel.
6. Apply brake pedal, start the vehicle, and release the parking brake.
See your authorized dealer as soon as possible if this procedure
is used.
WARNING:Do not drive your vehicle until you verify that the
brakelamps are working.
WARNING:Always set the parking brake fully and make sure
the gearshift is latched in P (Park). Turn the ignition to the off
position and remove the key whenever you leave your vehicle.
WARNING:If the parking brake is fully released, but the brake
warning lamp remains illuminated, the brakes may not be
working properly. See your authorized dealer.
Driving
292
2011 F-150(f12)
Owners Guide, 1st Printing
USA(fus)
Page 293 of 461
AUTOMATIC TRANSMISSION OPERATION
Understanding the shift positions of the 6-speed automatic
transmission
This vehicle is equipped with an adaptive transmission shift strategy. The
adaptive transmission shift strategy offers the optimal transmission
operation and shift quality. When the engine is turned off, the shift data
which includes the adaptive information will be stored automatically in
the powertrain control module (PCM). If the battery is disconnected for
any reason, the stored information from the last time the key was turned
to off will be read. This way, no information will be lost with any battery
removal or battery disconnect.
P (Park)
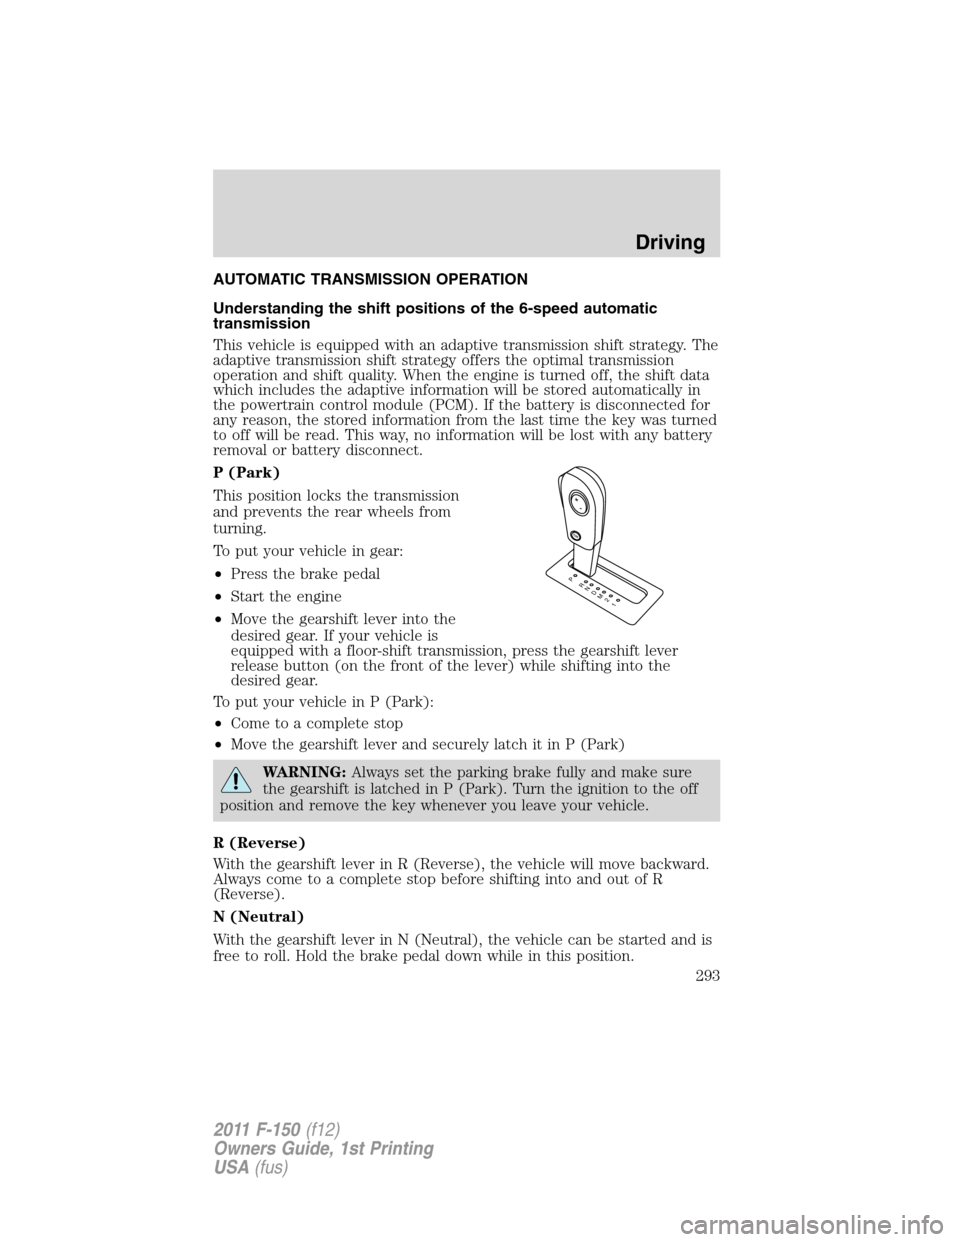
This position locks the transmission
and prevents the rear wheels from
turning.
To put your vehicle in gear:
•Press the brake pedal
•Start the engine
•Move the gearshift lever into the
desired gear. If your vehicle is
equipped with a floor-shift transmission, press the gearshift lever
release button (on the front of the lever) while shifting into the
desired gear.
To put your vehicle in P (Park):
•Come to a complete stop
•Move the gearshift lever and securely latch it in P (Park)
WARNING:Always set the parking brake fully and make sure
the gearshift is latched in P (Park). Turn the ignition to the off
position and remove the key whenever you leave your vehicle.
R (Reverse)
With the gearshift lever in R (Reverse), the vehicle will move backward.
Always come to a complete stop before shifting into and out of R
(Reverse).
N (Neutral)
With the gearshift lever in N (Neutral), the vehicle can be started and is
free to roll. Hold the brake pedal down while in this position.
T/H
PR
N
D
M
2
1
+
-
Driving
293
2011 F-150(f12)
Owners Guide, 1st Printing
USA(fus)
Page 294 of 461
D (Drive) with Tow/Haul Off
The normal driving position for the best fuel economy. Transmission
operates in gears one through six.
D (Drive) with Tow/Haul On
The Tow/Haul feature improves transmission operation when towing a
trailer or a heavy load. All transmission gear ranges are available when
using Tow/Haul.
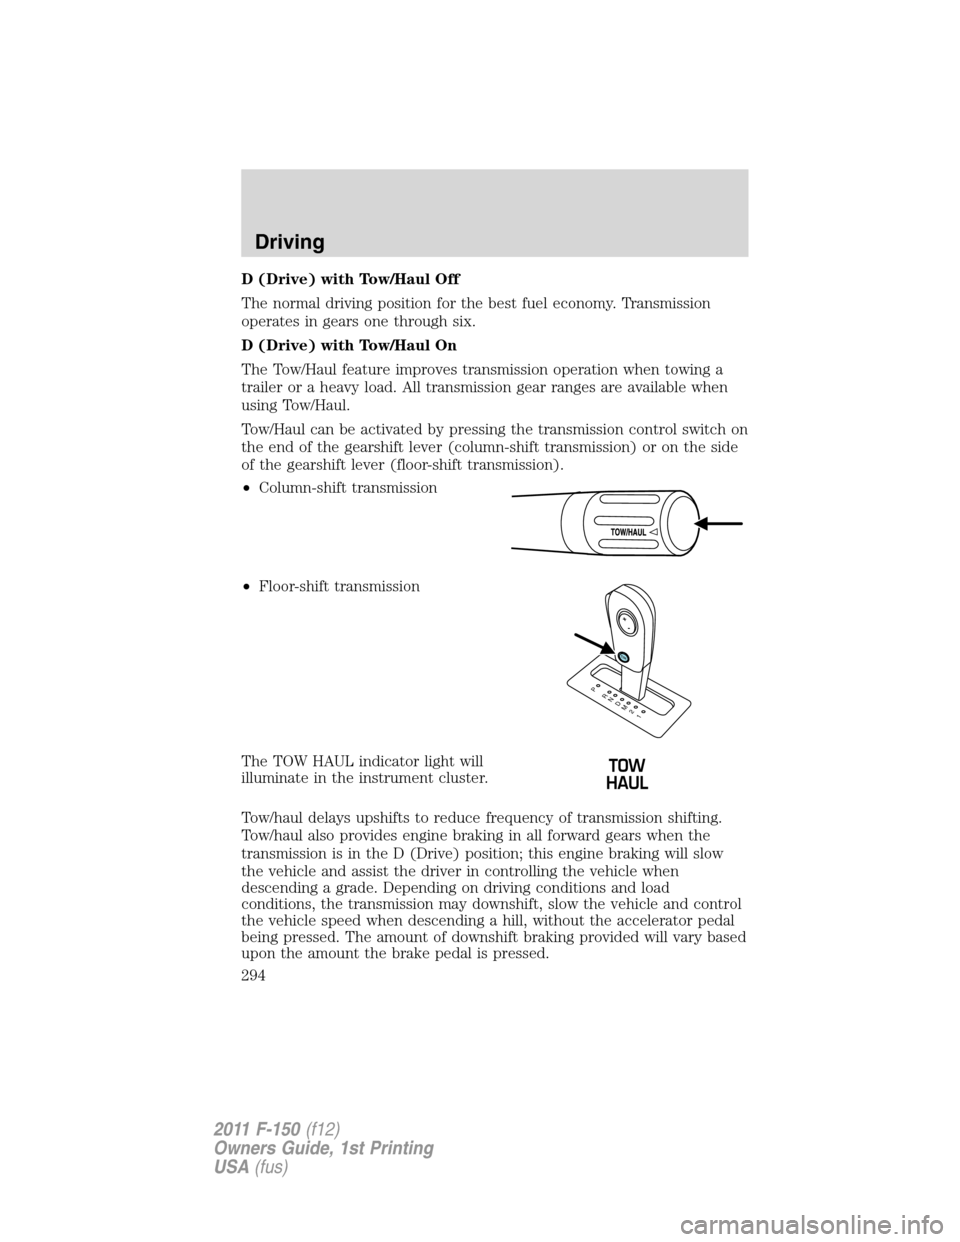
Tow/Haul can be activated by pressing the transmission control switch on
the end of the gearshift lever (column-shift transmission) or on the side
of the gearshift lever (floor-shift transmission).
•Column-shift transmission
•Floor-shift transmission
The TOW HAUL indicator light will
illuminate in the instrument cluster.
Tow/haul delays upshifts to reduce frequency of transmission shifting.
Tow/haul also provides engine braking in all forward gears when the
transmission is in the D (Drive) position; this engine braking will slow
the vehicle and assist the driver in controlling the vehicle when
descending a grade. Depending on driving conditions and load
conditions, the transmission may downshift, slow the vehicle and control
the vehicle speed when descending a hill, without the accelerator pedal
being pressed. The amount of downshift braking provided will vary based
upon the amount the brake pedal is pressed.
T/H
PR
N
D
M
2
1
+
-
Driving
294
2011 F-150(f12)
Owners Guide, 1st Printing
USA(fus)
Page 295 of 461
To deactivate the tow/haul feature and return to normal driving mode,
press the button on the end of the gearshift lever. The TOW HAUL light
will no longer be illuminated. Tow/haul will also deactivate when the
vehicle is powered down.
WARNING:Do not use the tow/haul feature when driving in icy
or slippery conditions as the increased engine braking can cause
the rear wheels to slide and the vehicle to swing around with the
possible loss of vehicle control.
3 (Third) (column-shift only)
Transmission operates in third gear only.
Used for improved traction on slippery roads. Selecting 3 (Third)
provides engine braking.
2 (Second)
Transmission operates in 2nd gear only.
Use 2 (Second) to start-up on slippery roads or to provide additional
engine braking on downgrades.
1 (First)
•Transmission operates in 1st gear only.
•Provides maximum engine braking.
•Allows upshifts by moving gearshift lever.
•Will not downshift into 1 (First) at high speeds; allows for 1 (First)
when vehicle reaches slower speeds.
Forced downshifts
•Allowed in D (Drive) only.
•Press the accelerator to the floor.
•Allows transmission to select an appropriate gear.
Understanding your SelectShift Automatic™ transmission (SST)
gearshift lever
This vehicle is equipped with a SelectShift Automatic™ transmission
(SST) gearshift lever. The SST is an automatic transmission with the
ability for the driver to change gears up or down (without a clutch) as
desired. The SST feature has two modes: PRS and M mode.
Driving
295
2011 F-150(f12)
Owners Guide, 1st Printing
USA(fus)
Page 296 of 461
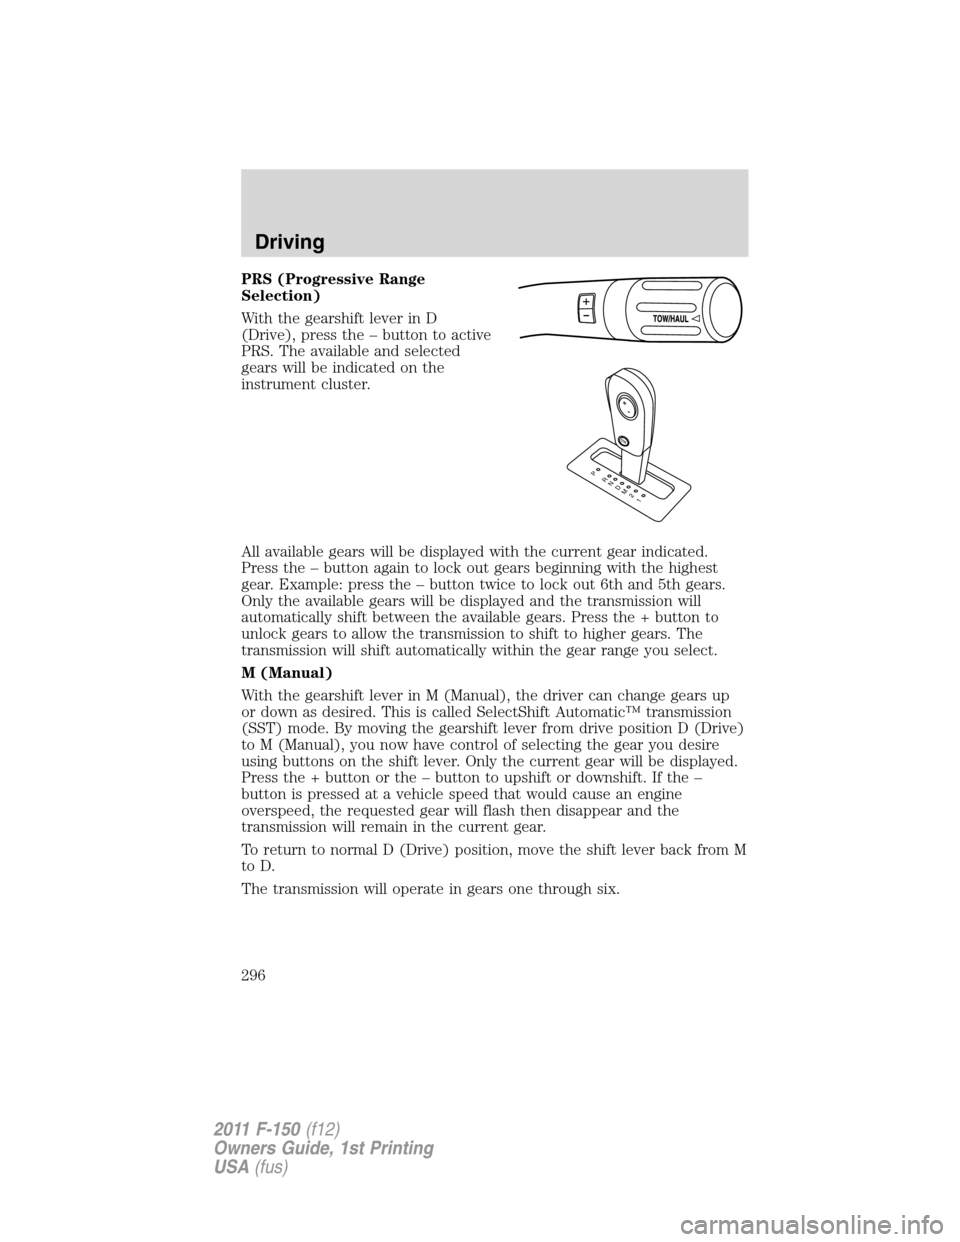
PRS (Progressive Range
Selection)
With the gearshift lever in D
(Drive), press the – button to active
PRS. The available and selected
gears will be indicated on the
instrument cluster.
All available gears will be displayed with the current gear indicated.
Press the – button again to lock out gears beginning with the highest
gear. Example: press the – button twice to lock out 6th and 5th gears.
Only the available gears will be displayed and the transmission will
automatically shift between the available gears. Press the + button to
unlock gears to allow the transmission to shift to higher gears. The
transmission will shift automatically within the gear range you select.
M (Manual)
With the gearshift lever in M (Manual), the driver can change gears up
or down as desired. This is called SelectShift Automatic™ transmission
(SST) mode. By moving the gearshift lever from drive position D (Drive)
to M (Manual), you now have control of selecting the gear you desire
using buttons on the shift lever. Only the current gear will be displayed.
Press the + button or the – button to upshift or downshift. If the –
button is pressed at a vehicle speed that would cause an engine
overspeed, the requested gear will flash then disappear and the
transmission will remain in the current gear.
To return to normal D (Drive) position, move the shift lever back from M
to D.
The transmission will operate in gears one through six.
T/H
PR
N
D
M
2
1
+
-
Driving
296
2011 F-150(f12)
Owners Guide, 1st Printing
USA(fus)
Page 297 of 461
Recommended shift speeds
Upshift according to the following chart:
Upshifts when accelerating
Shift from:
1 – 2 15 mph (24 km/h)
2 – 3 25 mph (40 km/h)
3 – 4 40 mph (64 km/h)
4 – 5 45 mph (72 km/h)
5 – 6 50 mph (80 km/h)
In order to prevent the engine from running at too low an RPM, which
may cause it to stall, the SST will still automatically make some
downshifts if it has determined that you have not downshifted in time.
Although the SST will make some downshifts for you, it will still allow
you to downshift at any time as long as the SST determines that the
engine will not be damaged from over-revving.
The SST will not automatically upshift, even if the engine is approaching
the RPM limit. It must be shifted manually by pressing the + button.
Engine damage may occur if excessive engine revving is held
without shifting.
If your vehicle gets stuck in mud or snow
If your vehicle gets stuck in mud or snow, it may be rocked out by
shifting between forward and reverse gears, stopping between shifts in a
steady pattern. Press lightly on the accelerator in each gear.
Do not rock the vehicle if the engine is not at normal operating
temperature or damage to the transmission may occur.
Do not rock the vehicle for more than a minute or damage to the
transmission and tires may occur, or the engine may overheat.
Driving
297
2011 F-150(f12)
Owners Guide, 1st Printing
USA(fus)
Page 298 of 461
REVERSE SENSING SYSTEM (IF EQUIPPED)
The Reverse Sensing System (RSS) sounds a tone to warn the driver of
obstacles near the rear bumper when R (Reverse) is selected and the
vehicle is moving at speeds less than 3 mph (5 km/h). The system is not
effective at speeds above 3 mph (5 km/h) and may not detect certain
angular or moving objects.
WARNING:To help avoid personal injury, please read and
understand the limitations of the reverse sensing system as
contained in this section. Reverse sensing is only an aid for some
(generally large and fixed) objects when moving in reverse on a flat
surface at “parking speeds”. Inclement weather may also affect the
function of the RSS; this may include reduced performance or a false
activation.
WARNING:To help avoid personal injury, always use caution
when in reverse and when using the RSS.
WARNING:This system is not designed to prevent contact with
small or moving objects. The system is designed to provide a
warning to assist the driver in detecting large stationary objects to
avoid damaging the vehicle. The system may not detect smaller
objects, particularly those close to the ground.
WARNING:Certain add-on devices such as large trailer hitches,
bike or surfboard racks and any device that may block the
normal detection zone of the RSS system may create false beeps.
Driving
298
2011 F-150(f12)
Owners Guide, 1st Printing
USA(fus)
Page 299 of 461
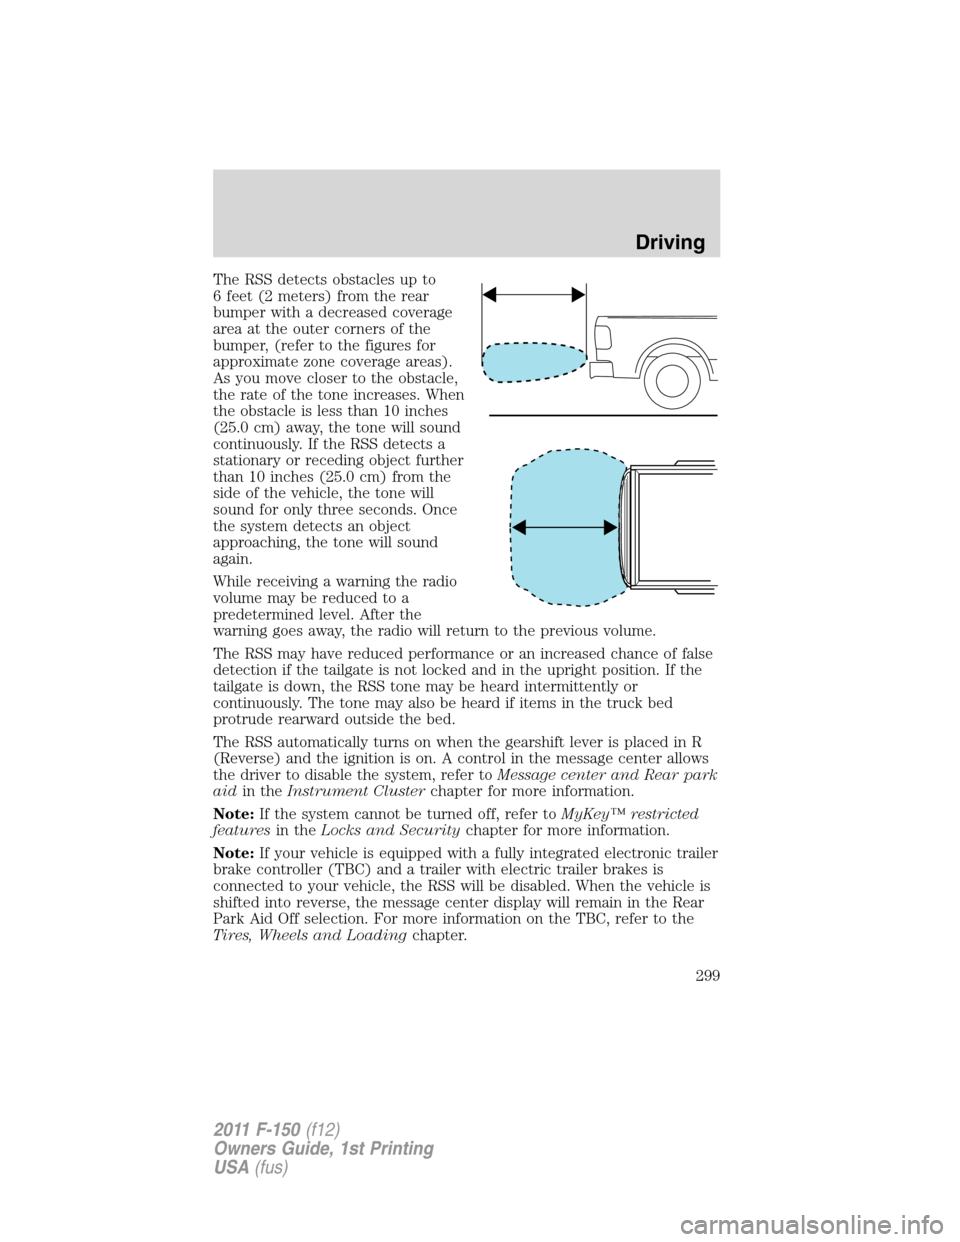
The RSS detects obstacles up to
6 feet (2 meters) from the rear
bumper with a decreased coverage
area at the outer corners of the
bumper, (refer to the figures for
approximate zone coverage areas).
As you move closer to the obstacle,
the rate of the tone increases. When
the obstacle is less than 10 inches
(25.0 cm) away, the tone will sound
continuously. If the RSS detects a
stationary or receding object further
than 10 inches (25.0 cm) from the
side of the vehicle, the tone will
sound for only three seconds. Once
the system detects an object
approaching, the tone will sound
again.
While receiving a warning the radio
volume may be reduced to a
predetermined level. After the
warning goes away, the radio will return to the previous volume.
The RSS may have reduced performance or an increased chance of false
detection if the tailgate is not locked and in the upright position. If the
tailgate is down, the RSS tone may be heard intermittently or
continuously. The tone may also be heard if items in the truck bed
protrude rearward outside the bed.
The RSS automatically turns on when the gearshift lever is placed in R
(Reverse) and the ignition is on. A control in the message center allows
the driver to disable the system, refer toMessage center and Rear park
aidin theInstrument Clusterchapter for more information.
Note:If the system cannot be turned off, refer toMyKey™ restricted
featuresin theLocks and Securitychapter for more information.
Note:If your vehicle is equipped with a fully integrated electronic trailer
brake controller (TBC) and a trailer with electric trailer brakes is
connected to your vehicle, the RSS will be disabled. When the vehicle is
shifted into reverse, the message center display will remain in the Rear
Park Aid Off selection. For more information on the TBC, refer to the
Tires, Wheels and Loadingchapter.
Driving
299
2011 F-150(f12)
Owners Guide, 1st Printing
USA(fus)
Page 300 of 461
Keep the RSS sensors (located on the rear bumper/fascia) free
from snow, ice and large accumulations of dirt (do not clean the
sensors with sharp objects). If the sensors are covered, it will
affect the accuracy of the RSS.
If your vehicle sustains damage to the rear bumper/fascia, leaving
it misaligned or bent, the sensing zone may be altered causing
inaccurate measurement of obstacles or false alarms.
REARVIEW CAMERA SYSTEM (IF EQUIPPED)
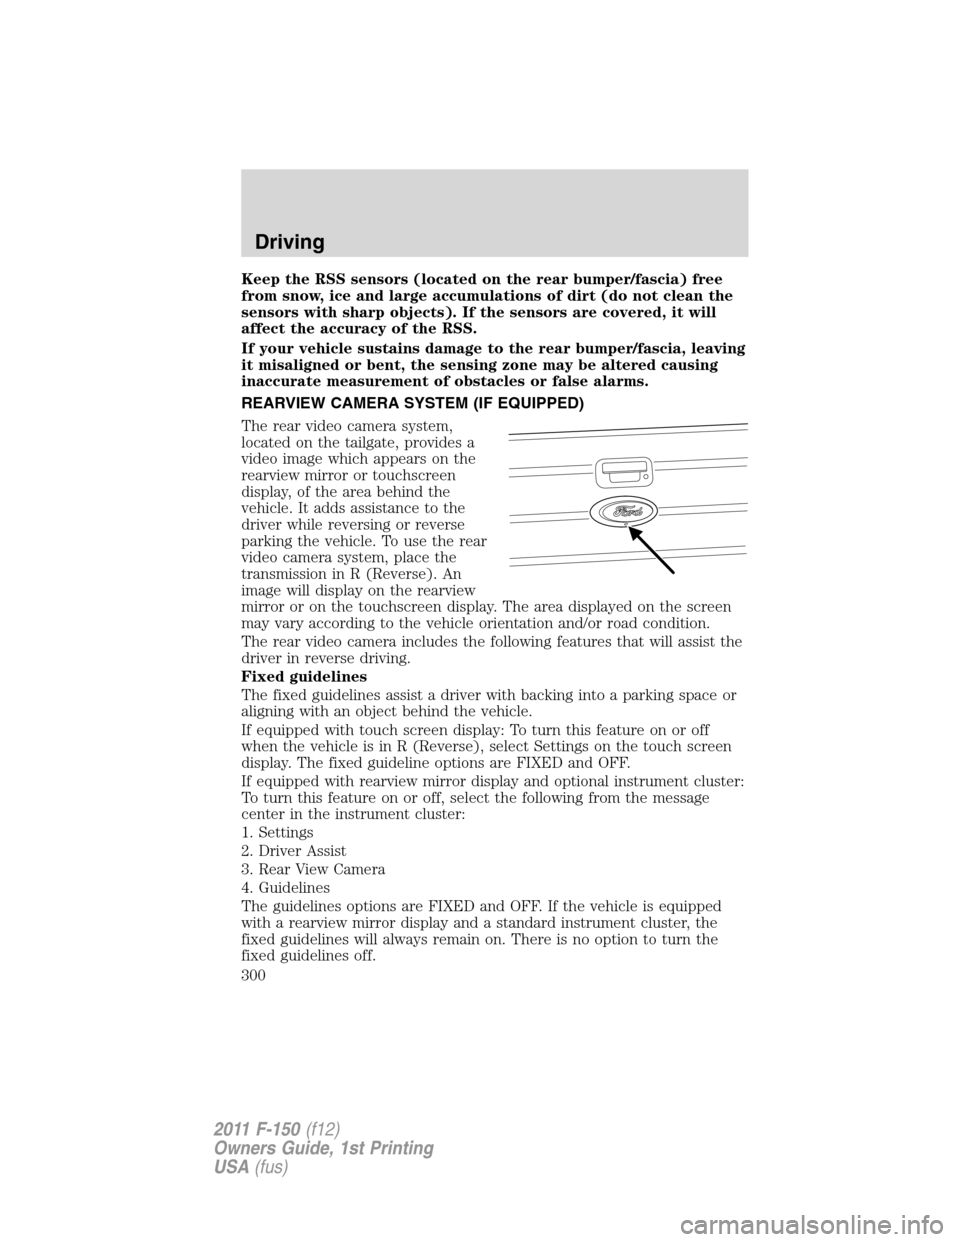
The rear video camera system,
located on the tailgate, provides a
video image which appears on the
rearview mirror or touchscreen
display, of the area behind the
vehicle. It adds assistance to the
driver while reversing or reverse
parking the vehicle. To use the rear
video camera system, place the
transmission in R (Reverse). An
image will display on the rearview
mirror or on the touchscreen display. The area displayed on the screen
may vary according to the vehicle orientation and/or road condition.
The rear video camera includes the following features that will assist the
driver in reverse driving.
Fixed guidelines
The fixed guidelines assist a driver with backing into a parking space or
aligning with an object behind the vehicle.
If equipped with touch screen display: To turn this feature on or off
when the vehicle is in R (Reverse), select Settings on the touch screen
display. The fixed guideline options are FIXED and OFF.
If equipped with rearview mirror display and optional instrument cluster:
To turn this feature on or off, select the following from the message
center in the instrument cluster:
1. Settings
2. Driver Assist
3. Rear View Camera
4. Guidelines
The guidelines options are FIXED and OFF. If the vehicle is equipped
with a rearview mirror display and a standard instrument cluster, the
fixed guidelines will always remain on. There is no option to turn the
fixed guidelines off.
Driving
300
2011 F-150(f12)
Owners Guide, 1st Printing
USA(fus)