towing FORD F150 2014 12.G Owners Manual
[x] Cancel search | Manufacturer: FORD, Model Year: 2014, Model line: F150, Model: FORD F150 2014 12.GPages: 472, PDF Size: 4.62 MB
Page 6 of 472
Transmission
Automatic Transmission............................147
Four-Wheel Drive
Using Four-Wheel Drive
.............................153
Rear Axle
Limited Slip Differential..............................161
Electronic Locking Differential
.................161
Brakes
General Information
....................................163
Hints on Driving With Anti-Lock Brakes...........................................................163
Parking Brake.................................................164
Hill Start Assist..............................................164
Traction Control
Principle of Operation................................166
Using Traction Control...............................166
Stability Control
Principle of Operation.................................167
Using Stability Control...............................168
Terrain Response
Principle of Operation.................................170
Using Hill Descent Control........................170
Parking Aids
Parking Aid
.......................................................172
Rear View Camera........................................173
Cruise Control
Principle of Operation.................................176
Using Cruise Control
....................................176
Driving Aids
Steering
.............................................................177 Load Carrying
Load Limit
........................................................179
Tailgate.............................................................186
Towing
Towing a Trailer..............................................191
Trailer Sway Control....................................192
Recommended Towing Weights............192
Essential Towing Checks...........................201
Transporting the Vehicle
...........................207
Towing the Vehicle on Four Wheels......208
Driving Hints
Breaking-In......................................................210
Economical Driving
......................................210
Driving Through Water.................................211
Floor Mats.........................................................211
Snowplowing..................................................212
Roadside Emergencies
Roadside Assistance...................................215
Hazard Warning Flashers
..........................216
Fuel Shutoff....................................................216
Jump Starting the Vehicle.........................216
Post-Crash Alert System
...........................218
Customer Assistance
Getting the Services You Need................219
In California (U.S. Only)
............................220
The Better Business Bureau (BBB) Auto Line Program (U.S. Only).......................221
Utilizing the Mediation/Arbitration Program (Canada Only)
........................221
Getting Assistance Outside the U.S. and Canada........................................................222
Ordering Additional Owner's Literature.....................................................223
Reporting Safety Defects (U.S. Only).............................................................223
Reporting Safety Defects (Canada Only).............................................................224
3
F150 (TF6) , enUSA Table of Contents
Page 80 of 472
Fold-Away Exterior Mirrors
Push the mirror toward the door window
glass. Make sure that you fully engage the
mirror in its support when returning it to its
original position.
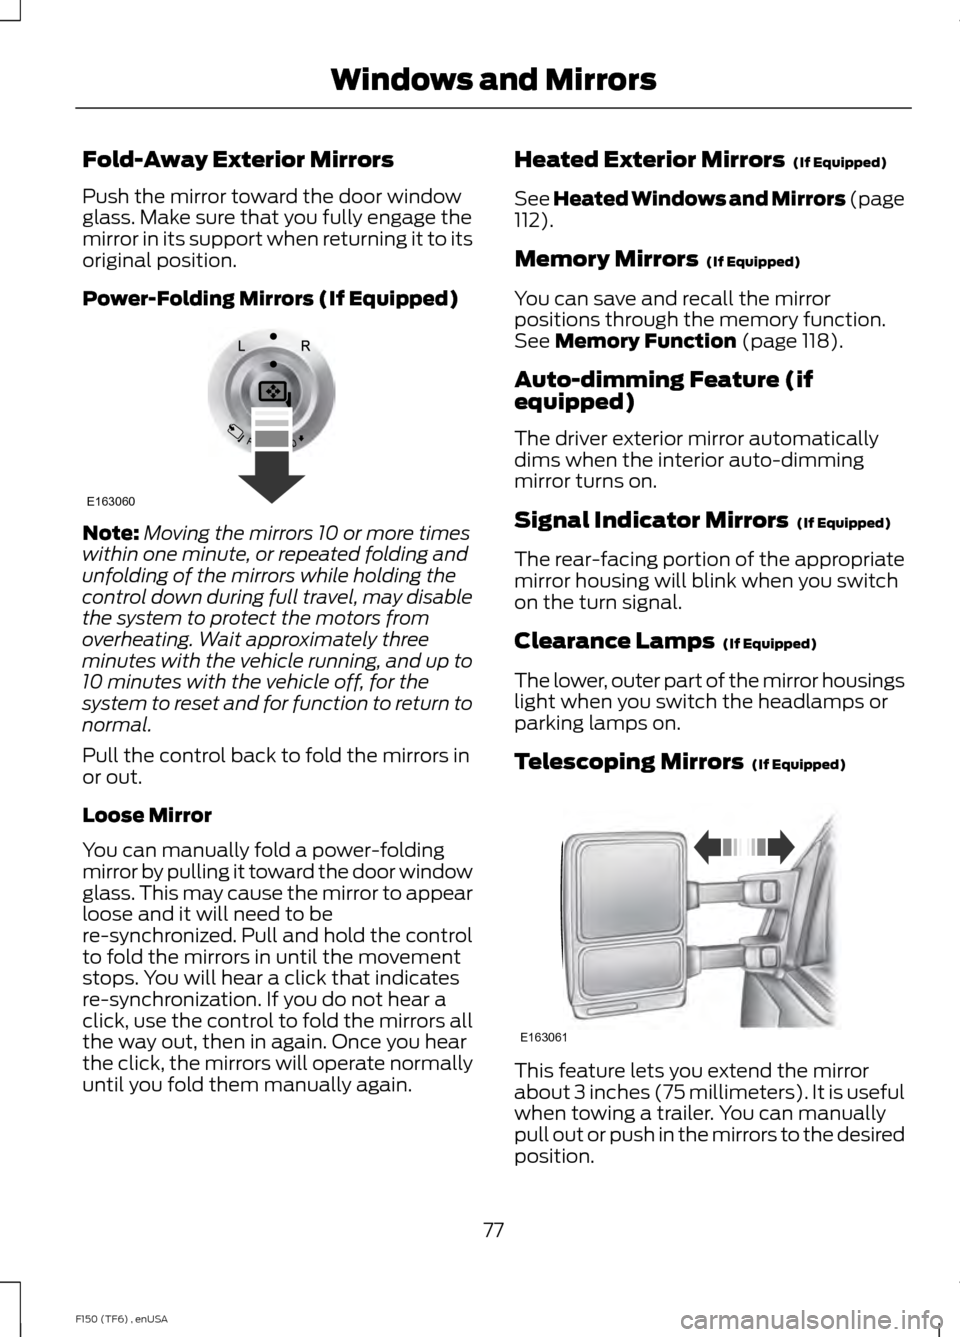
Power-Folding Mirrors (If Equipped)
Note:
Moving the mirrors 10 or more times
within one minute, or repeated folding and
unfolding of the mirrors while holding the
control down during full travel, may disable
the system to protect the motors from
overheating. Wait approximately three
minutes with the vehicle running, and up to
10 minutes with the vehicle off, for the
system to reset and for function to return to
normal.
Pull the control back to fold the mirrors in
or out.
Loose Mirror
You can manually fold a power-folding
mirror by pulling it toward the door window
glass. This may cause the mirror to appear
loose and it will need to be
re-synchronized. Pull and hold the control
to fold the mirrors in until the movement
stops. You will hear a click that indicates
re-synchronization. If you do not hear a
click, use the control to fold the mirrors all
the way out, then in again. Once you hear
the click, the mirrors will operate normally
until you fold them manually again. Heated Exterior Mirrors (If Equipped)
See Heated Windows and Mirrors (page
112
).
Memory Mirrors
(If Equipped)
You can save and recall the mirror
positions through the memory function.
See
Memory Function (page 118).
Auto-dimming Feature (if
equipped)
The driver exterior mirror automatically
dims when the interior auto-dimming
mirror turns on.
Signal Indicator Mirrors
(If Equipped)
The rear-facing portion of the appropriate
mirror housing will blink when you switch
on the turn signal.
Clearance Lamps
(If Equipped)
The lower, outer part of the mirror housings
light when you switch the headlamps or
parking lamps on.
Telescoping Mirrors
(If Equipped) This feature lets you extend the mirror
about 3 inches (75 millimeters). It is useful
when towing a trailer. You can manually
pull out or push in the mirrors to the desired
position.
77
F150 (TF6) , enUSA Windows and MirrorsE163060 E163061
Page 85 of 472
Engine Oil Pressure Gauge
Indicates engine oil pressure. The needle
should stay in the normal operating range
(between L and H). If the needle falls
below the normal range, stop the vehicle,
turn off the engine and check the engine
oil level. Add oil if needed. If the oil level is
correct, have your vehicle checked by your
authorized dealer.
Engine Coolant Temperature
Gauge
WARNING
Never remove the coolant reservoir
cap while the engine is running or hot.
Indicates engine coolant temperature. At
normal operating temperature, the level
indicator will be in the normal range. If the
engine coolant temperature exceeds the
normal range, stop the vehicle as soon as
safely possible, switch off the engine and
let the engine cool.
Fuel Gauge
Switch the ignition on. The fuel gauge will
indicate approximately how much fuel is
left in the fuel tank. The fuel gauge may
vary slightly when your vehicle is moving
or on a gradient. The arrow adjacent to the
fuel pump symbol indicates on which side
of the vehicle the fuel filler door is located.
Transmission Fluid Temperature
Gauge
Indicates transmission fluid temperature.
At normal operating temperature, the level
indicator will be in the normal range. If the
transmission fluid temperature exceeds
the normal range, stop the vehicle as soon
as safely possible and verify the airflow is
not restricted such as snow or debris
blocking airflow through the grill. Also,
higher than normal operating temperature can be caused by special operation
conditions (i.e. snowplowing, towing or
off-road use). Refer to Special operating
conditions in the scheduled maintenance
information for instructions. Operating the
transmission for extended periods of time
with the gauge in the higher than normal
area may cause internal transmission
damage. Altering the severity of the driving
conditions is recommended to lower the
transmission temperature into the normal
range. If the gauge continues to show high
temperatures, see your authorized dealer.
Information Display
Odometer
Located in the bottom of the information
display Registers the accumulated
distance your vehicle has traveled.
Trip Computer
See General Information (page 87).
Vehicle Settings and Personalization
See
General Information (page 87).
WARNING LAMPS AND
INDICATORS
The following warning lamps and
indicators will alert you to a vehicle
condition that may become serious. Some
lamps will illuminate when you start your
vehicle to make sure they work. If any
lamps remain on after starting your vehicle,
refer to the respective system warning
lamp for further information.
Note: Some warning indicators appear in
the information display and function the
same as a warning lamp but do not display
when you start your vehicle.
82
F150 (TF6) , enUSA Instrument Cluster
Page 96 of 472
Gal used
Shows the amount of fuel used for a given
trip.
Avg MPG
Shows the average distance traveled per
unit of fuel used for a given trip.
Fuel Economy Use the arrow buttons to choose
the desired fuel economy
display.
Fuel Economy
Instant MPG (L/100km)
Fuel Econ.
mi (km) to E
AVG MPG (L/100km)
5, 10, 30 Minutes or Last 5 Resets
Options
Fuel Hist.
Hold OK to Reset, this resets the currently
displayed fuel economy information.
Instant MPG
Shows your instantaneous fuel usage.
mi to E
Shows the approximate distance your
vehicle can travel before running out of
fuel.
Average MPG
Shows the average fuel usage based on
time. Press and hold OK to reset this value. Fuel Hist.
Shows fuel usage as a bar graph based on
time. The graph is updated each minute
with the fuel economy that was achieved
during the prior 5, 10, 30 minutes of driving.
Truck Apps In this mode, off-road
information depicted with
graphics and trailer towing
application options are available.
Note: Some items are optional and may
not appear. Truck Apps
AdvanceTrac® mode, hill descent control, off-road mode, off-road camera:
Displays which modes are active. (SVT Raptor)
Off Road
Pitch and bank angle (in degrees)
Steering angle (in degrees)
Differential lock/unlock
Torque flow 4X4 System
Press OK for Info
93
F150 (TF6) , enUSA Information DisplaysE163180 E163181
Page 99 of 472
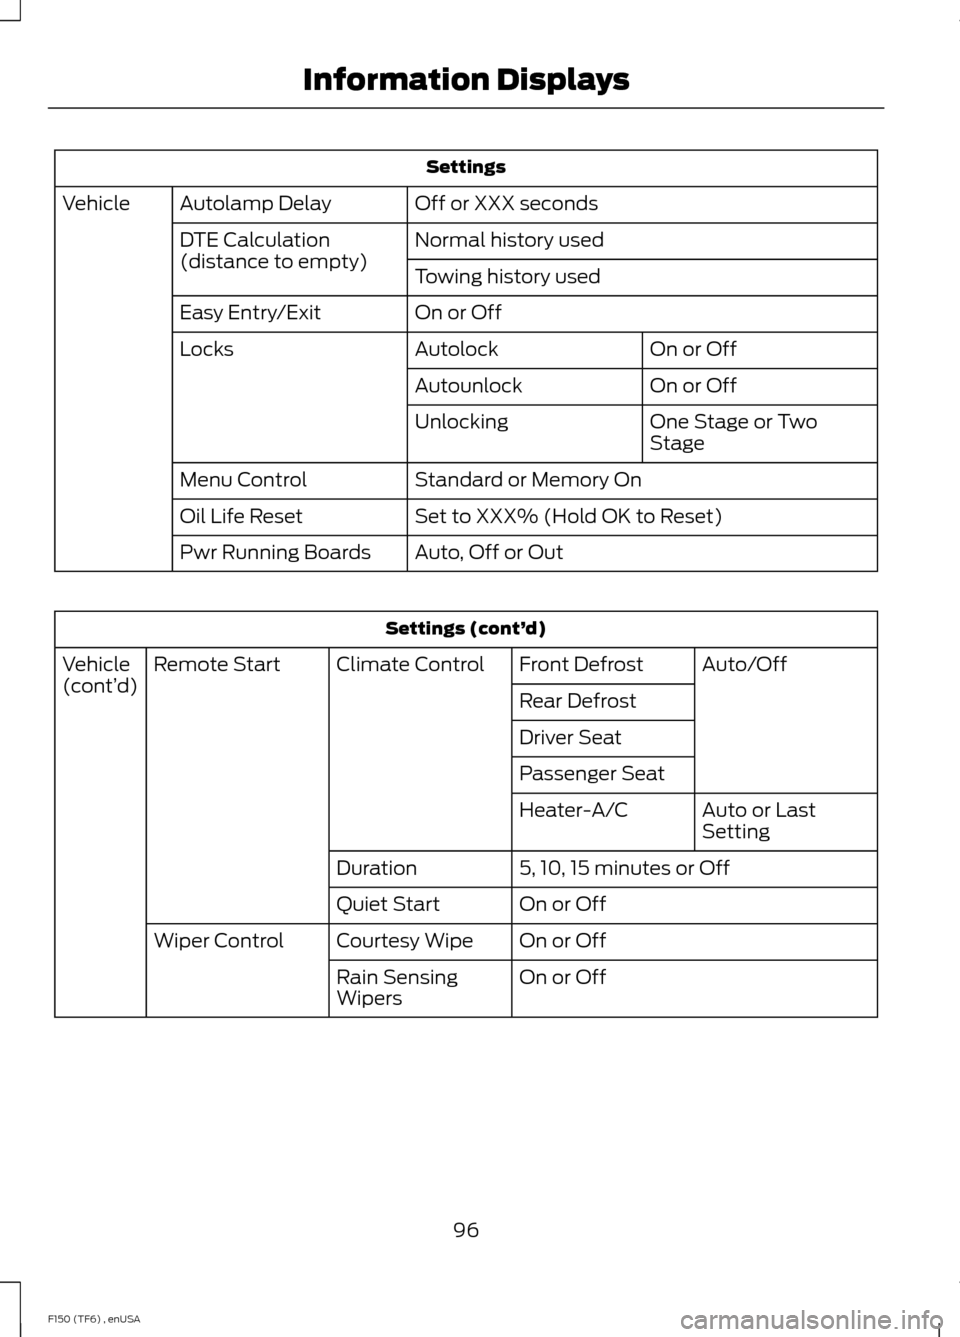
Settings
Off or XXX seconds
Autolamp Delay
Vehicle
Normal history used
DTE Calculation
(distance to empty)
Towing history used
On or Off
Easy Entry/Exit
On or Off
Autolock
Locks
On or Off
Autounlock
One Stage or Two
Stage
Unlocking
Standard or Memory On
Menu Control
Set to XXX% (Hold OK to Reset)
Oil Life Reset
Auto, Off or Out
Pwr Running Boards Settings (cont’
d)
Auto/Off
Front Defrost
Climate Control
Remote Start
Vehicle
(cont’ d)
Rear Defrost
Driver Seat
Passenger Seat
Auto or Last
Setting
Heater-A/C
5, 10, 15 minutes or Off
Duration
On or Off
Quiet Start
On or Off
Courtesy Wipe
Wiper Control
On or Off
Rain Sensing
Wipers
96
F150 (TF6) , enUSA Information Displays
Page 108 of 472
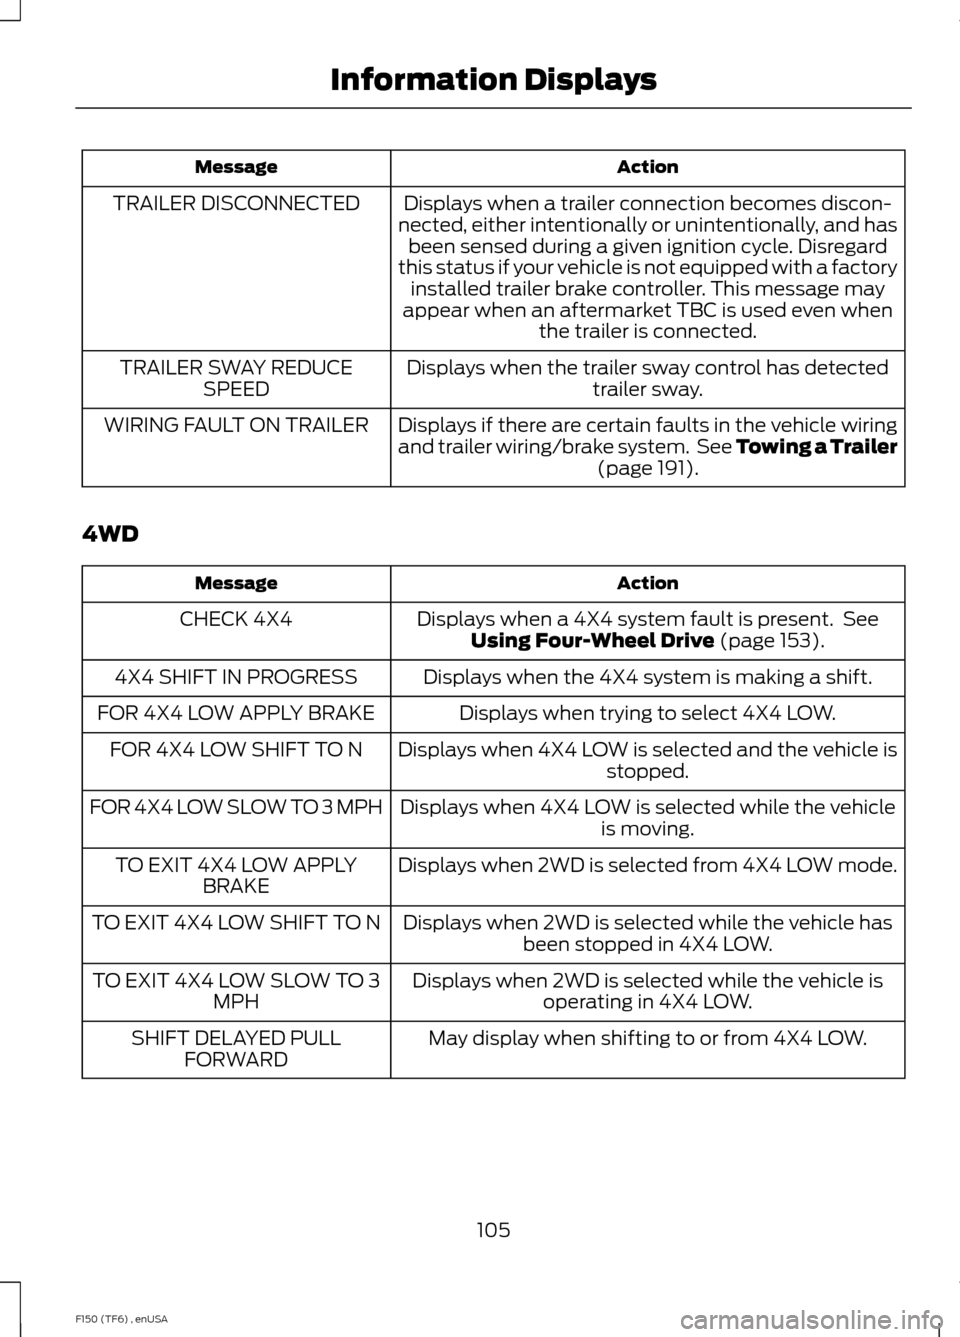
Action
Message
Displays when a trailer connection becomes discon-
nected, either intentionally or unintentionally, and has been sensed during a given ignition cycle. Disregard
this status if your vehicle is not equipped with a factory installed trailer brake controller. This message may
appear when an aftermarket TBC is used even when the trailer is connected.
TRAILER DISCONNECTED
Displays when the trailer sway control has detectedtrailer sway.
TRAILER SWAY REDUCE
SPEED
Displays if there are certain faults in the vehicle wiring
and trailer wiring/brake system. See Towing a Trailer (page 191).
WIRING FAULT ON TRAILER
4WD Action
Message
Displays when a 4X4 system fault is present. SeeUsing Four-Wheel Drive
(page 153).
CHECK 4X4
Displays when the 4X4 system is making a shift.
4X4 SHIFT IN PROGRESS
Displays when trying to select 4X4 LOW.
FOR 4X4 LOW APPLY BRAKE
Displays when 4X4 LOW is selected and the vehicle isstopped.
FOR 4X4 LOW SHIFT TO N
Displays when 4X4 LOW is selected while the vehicleis moving.
FOR 4X4 LOW SLOW TO 3 MPH
Displays when 2WD is selected from 4X4 LOW mode.
TO EXIT 4X4 LOW APPLY
BRAKE
Displays when 2WD is selected while the vehicle hasbeen stopped in 4X4 LOW.
TO EXIT 4X4 LOW SHIFT TO N
Displays when 2WD is selected while the vehicle isoperating in 4X4 LOW.
TO EXIT 4X4 LOW SLOW TO 3
MPH
May display when shifting to or from 4X4 LOW.
SHIFT DELAYED PULL
FORWARD
105
F150 (TF6) , enUSA Information Displays
Page 147 of 472
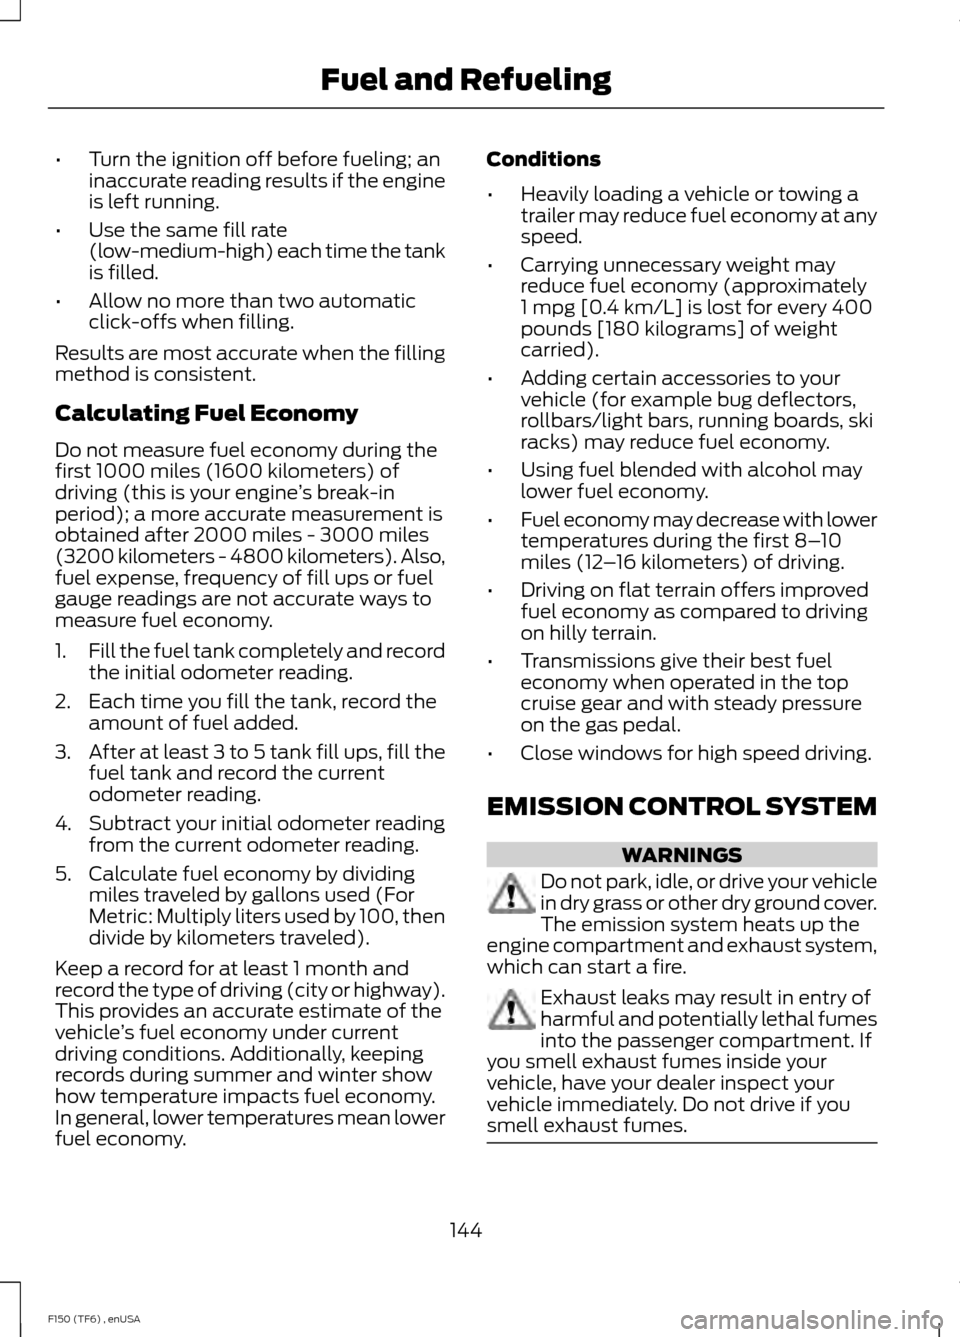
•
Turn the ignition off before fueling; an
inaccurate reading results if the engine
is left running.
• Use the same fill rate
(low-medium-high) each time the tank
is filled.
• Allow no more than two automatic
click-offs when filling.
Results are most accurate when the filling
method is consistent.
Calculating Fuel Economy
Do not measure fuel economy during the
first 1000 miles (1600 kilometers) of
driving (this is your engine ’s break-in
period); a more accurate measurement is
obtained after 2000 miles - 3000 miles
(3200 kilometers - 4800 kilometers). Also,
fuel expense, frequency of fill ups or fuel
gauge readings are not accurate ways to
measure fuel economy.
1. Fill the fuel tank completely and record
the initial odometer reading.
2. Each time you fill the tank, record the amount of fuel added.
3. After at least 3 to 5 tank fill ups, fill the
fuel tank and record the current
odometer reading.
4. Subtract your initial odometer reading from the current odometer reading.
5. Calculate fuel economy by dividing miles traveled by gallons used (For
Metric: Multiply liters used by 100, then
divide by kilometers traveled).
Keep a record for at least 1 month and
record the type of driving (city or highway).
This provides an accurate estimate of the
vehicle ’s fuel economy under current
driving conditions. Additionally, keeping
records during summer and winter show
how temperature impacts fuel economy.
In general, lower temperatures mean lower
fuel economy. Conditions
•
Heavily loading a vehicle or towing a
trailer may reduce fuel economy at any
speed.
• Carrying unnecessary weight may
reduce fuel economy (approximately
1 mpg [0.4 km/L] is lost for every 400
pounds [180 kilograms] of weight
carried).
• Adding certain accessories to your
vehicle (for example bug deflectors,
rollbars/light bars, running boards, ski
racks) may reduce fuel economy.
• Using fuel blended with alcohol may
lower fuel economy.
• Fuel economy may decrease with lower
temperatures during the first 8– 10
miles (12 –16 kilometers) of driving.
• Driving on flat terrain offers improved
fuel economy as compared to driving
on hilly terrain.
• Transmissions give their best fuel
economy when operated in the top
cruise gear and with steady pressure
on the gas pedal.
• Close windows for high speed driving.
EMISSION CONTROL SYSTEM WARNINGS
Do not park, idle, or drive your vehicle
in dry grass or other dry ground cover.
The emission system heats up the
engine compartment and exhaust system,
which can start a fire. Exhaust leaks may result in entry of
harmful and potentially lethal fumes
into the passenger compartment. If
you smell exhaust fumes inside your
vehicle, have your dealer inspect your
vehicle immediately. Do not drive if you
smell exhaust fumes. 144
F150 (TF6) , enUSA Fuel and Refueling
Page 151 of 472
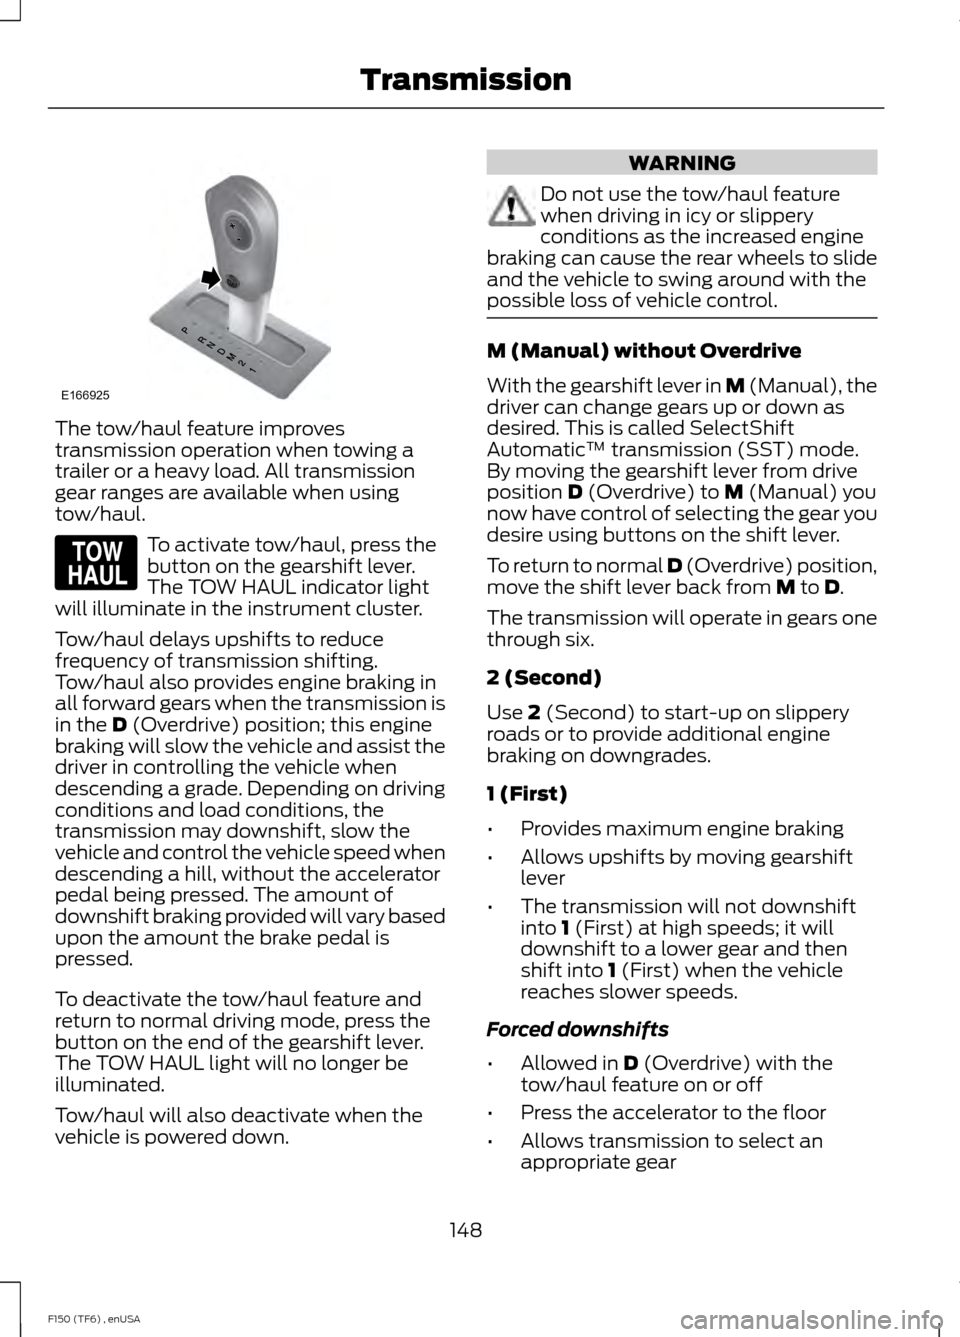
The tow/haul feature improves
transmission operation when towing a
trailer or a heavy load. All transmission
gear ranges are available when using
tow/haul.
To activate tow/haul, press the
button on the gearshift lever.
The TOW HAUL indicator light
will illuminate in the instrument cluster.
Tow/haul delays upshifts to reduce
frequency of transmission shifting.
Tow/haul also provides engine braking in
all forward gears when the transmission is
in the D (Overdrive) position; this engine
braking will slow the vehicle and assist the
driver in controlling the vehicle when
descending a grade. Depending on driving
conditions and load conditions, the
transmission may downshift, slow the
vehicle and control the vehicle speed when
descending a hill, without the accelerator
pedal being pressed. The amount of
downshift braking provided will vary based
upon the amount the brake pedal is
pressed.
To deactivate the tow/haul feature and
return to normal driving mode, press the
button on the end of the gearshift lever.
The TOW HAUL light will no longer be
illuminated.
Tow/haul will also deactivate when the
vehicle is powered down. WARNING
Do not use the tow/haul feature
when driving in icy or slippery
conditions as the increased engine
braking can cause the rear wheels to slide
and the vehicle to swing around with the
possible loss of vehicle control. M (Manual) without Overdrive
With the gearshift lever in M (Manual), the
driver can change gears up or down as
desired. This is called SelectShift
Automatic
™ transmission (SST) mode.
By moving the gearshift lever from drive
position
D (Overdrive) to M (Manual) you
now have control of selecting the gear you
desire using buttons on the shift lever.
To return to normal
D (Overdrive) position,
move the shift lever back from M to D.
The transmission will operate in gears one
through six.
2 (Second)
Use
2 (Second) to start-up on slippery
roads or to provide additional engine
braking on downgrades.
1 (First)
• Provides maximum engine braking
• Allows upshifts by moving gearshift
lever
• The transmission will not downshift
into
1 (First) at high speeds; it will
downshift to a lower gear and then
shift into
1 (First) when the vehicle
reaches slower speeds.
Forced downshifts
• Allowed in
D (Overdrive) with the
tow/haul feature on or off
• Press the accelerator to the floor
• Allows transmission to select an
appropriate gear
148
F150 (TF6) , enUSA TransmissionE166925 E161509
Page 177 of 472
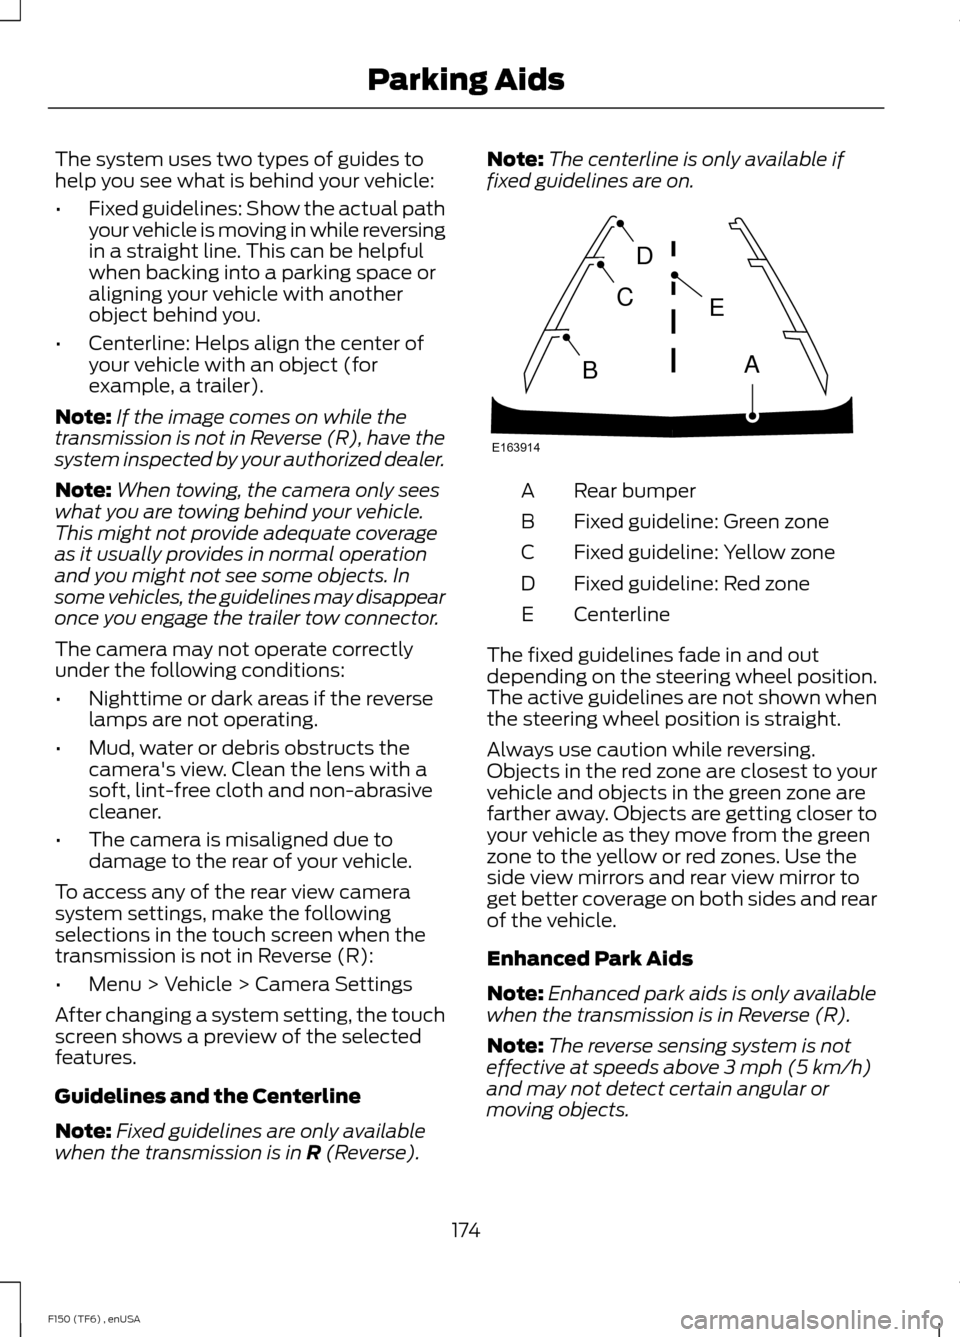
The system uses two types of guides to
help you see what is behind your vehicle:
•
Fixed guidelines: Show the actual path
your vehicle is moving in while reversing
in a straight line. This can be helpful
when backing into a parking space or
aligning your vehicle with another
object behind you.
• Centerline: Helps align the center of
your vehicle with an object (for
example, a trailer).
Note: If the image comes on while the
transmission is not in Reverse (R), have the
system inspected by your authorized dealer.
Note: When towing, the camera only sees
what you are towing behind your vehicle.
This might not provide adequate coverage
as it usually provides in normal operation
and you might not see some objects. In
some vehicles, the guidelines may disappear
once you engage the trailer tow connector.
The camera may not operate correctly
under the following conditions:
• Nighttime or dark areas if the reverse
lamps are not operating.
• Mud, water or debris obstructs the
camera's view. Clean the lens with a
soft, lint-free cloth and non-abrasive
cleaner.
• The camera is misaligned due to
damage to the rear of your vehicle.
To access any of the rear view camera
system settings, make the following
selections in the touch screen when the
transmission is not in Reverse (R):
• Menu > Vehicle > Camera Settings
After changing a system setting, the touch
screen shows a preview of the selected
features.
Guidelines and the Centerline
Note: Fixed guidelines are only available
when the transmission is in R (Reverse). Note:
The centerline is only available if
fixed guidelines are on. Rear bumper
A
Fixed guideline: Green zone
B
Fixed guideline: Yellow zone
C
Fixed guideline: Red zone
D
Centerline
E
The fixed guidelines fade in and out
depending on the steering wheel position.
The active guidelines are not shown when
the steering wheel position is straight.
Always use caution while reversing.
Objects in the red zone are closest to your
vehicle and objects in the green zone are
farther away. Objects are getting closer to
your vehicle as they move from the green
zone to the yellow or red zones. Use the
side view mirrors and rear view mirror to
get better coverage on both sides and rear
of the vehicle.
Enhanced Park Aids
Note: Enhanced park aids is only available
when the transmission is in Reverse (R).
Note: The reverse sensing system is not
effective at speeds above 3 mph (5 km/h)
and may not detect certain angular or
moving objects.
174
F150 (TF6) , enUSA Parking AidsE163914
A
E
D
C
B
Page 184 of 472
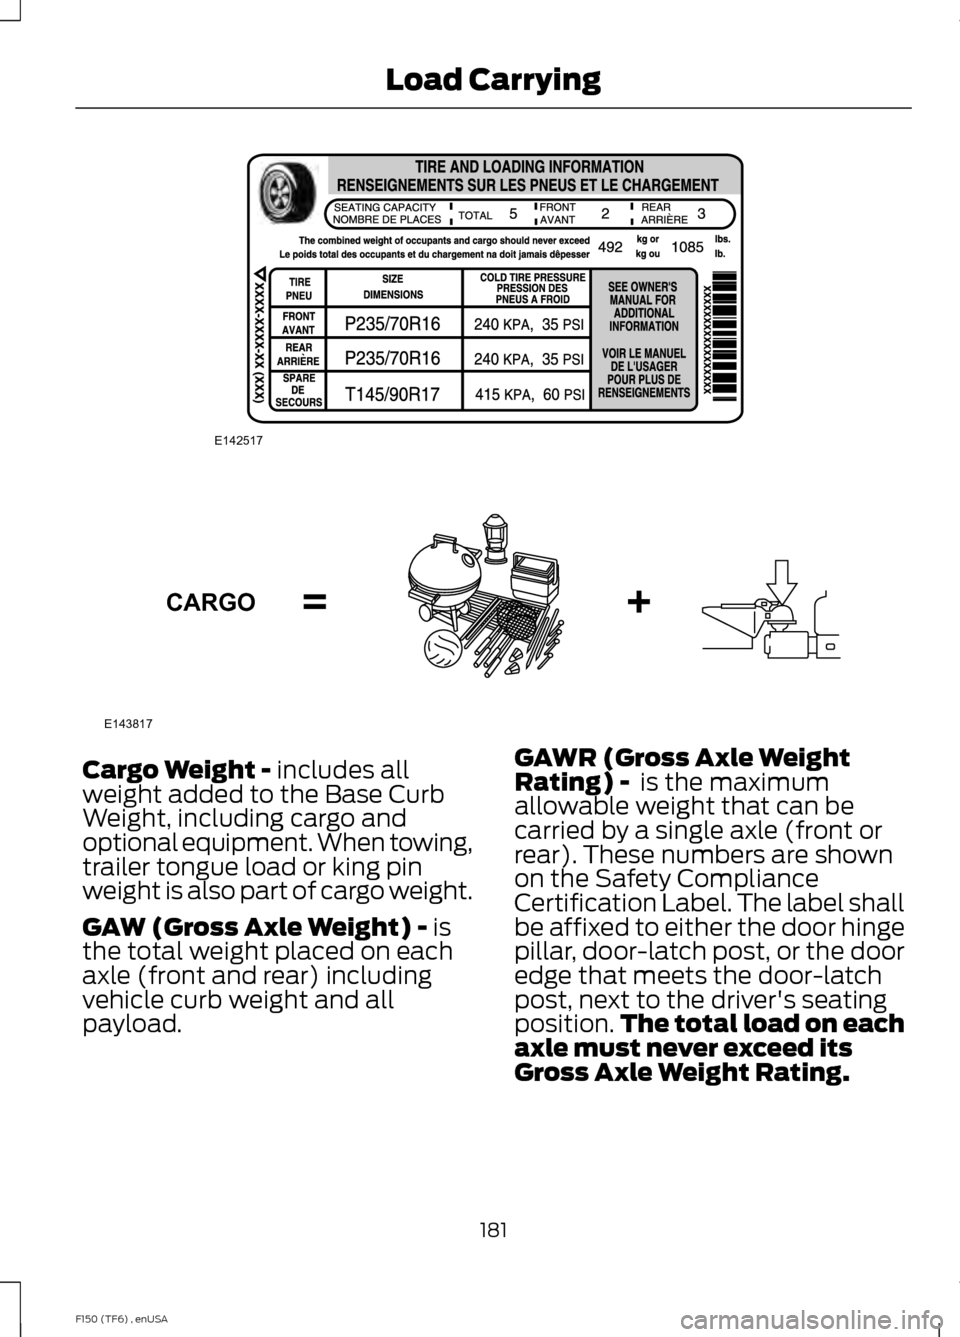
Cargo Weight - includes all
weight added to the Base Curb
Weight, including cargo and
optional equipment. When towing,
trailer tongue load or king pin
weight is also part of cargo weight.
GAW (Gross Axle Weight) -
is
the total weight placed on each
axle (front and rear) including
vehicle curb weight and all
payload. GAWR (Gross Axle Weight
Rating) -
is the maximum
allowable weight that can be
carried by a single axle (front or
rear). These numbers are shown
on the Safety Compliance
Certification Label. The label shall
be affixed to either the door hinge
pillar, door-latch post, or the door
edge that meets the door-latch
post, next to the driver's seating
position. The total load on each
axle must never exceed its
Gross Axle Weight Rating.
181
F150 (TF6) , enUSA Load CarryingE142517 E143817CARGO