lock FORD F150 2015 13.G Quick Reference Guide
[x] Cancel search | Manufacturer: FORD, Model Year: 2015, Model line: F150, Model: FORD F150 2015 13.GPages: 12, PDF Size: 2.81 MB
Page 3 of 12

3
15
6
7
8
7
566
8
4231
4
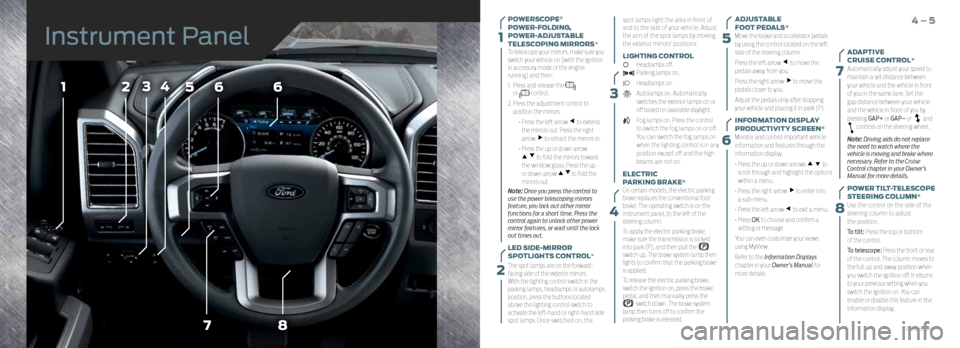
POWERSCOPE®
POWER-FOLDING,
POWER-ADJUSTABLE
TELESCOPING MIRRORS*
To telescope your mirrors, make sure you
switch your vehicle on (with the ignition
in accessory mode or the engine
running) and then:
1. Press and release the
or control.
2. Press the adjustment control to
position the mirrors.
• Press the left arrow
to extend
the mirrors out. Press the right
arrow
to retract the mirrors in.
• Press the up or down arrow
to fold the mirrors toward
the window glass. Press the up
or down arrow
to fold the
mirrors out.
Note: Once you press the control to
use the power telescoping mirrors
feature, you lock out other mirror
functions for a short time. Press the
control again to unlock other power
mirror features, or wait until the lock
out times out.
LED SIDE-MIRROR
SPOTLIGHTS CONTROL*
The spot lamps are on the forward-
facing side of the exterior mirrors.
With the lighting control switch in the
parking lamps, headlamps or autolamps
position, press the buttons located
above the lighting control switch to
activate the left-hand or right-hand side
spot lamps. Once switched on, the spot lamps light the area in front of
and to the side of your vehicle. Adjust
the aim of the spot lamps by moving
the exterior mirrors' positions.
LIGHTING CONTROL
Headlamps off. Parking lamps on.
Headlamps on.
Autolamps on. Automatically
switches the exterior lamps on or
off based on available daylight.
Fog lamps on. Press the control
to switch the fog lamps on or off.
You can switch the fog lamps on
when the lighting control is in any
position except off and the high
beams are not on.
ELECTRIC
PARKING BRAKE*
On certain models, the electric parking
brake replaces the conventional foot
brake. The operating switch is on the
instrument panel, to the left of the
steering column.
To apply the electric parking brake,
make sure the transmission is locked
into park (P), and then pull the
switch up. The brake system lamp then
lights to confirm that the parking brake
is applied.
To release the electric parking brake,
switch the ignition on, press the brake
pedal, and then manually press the
switch down. The brake system
lamp then turns off to confirm the
parking brake is released. ADJUSTABLE
FOOT PEDALS*
Move the brake and accelerator pedals
by using the control located on the left
side of the steering column.
Press the left arrow
to move the
pedals away from you.
Press the right arrow
to move the
pedals closer to you.
Adjust the pedals only after stopping
your vehicle and placing it in park (P).
INFORMATION DISPLAY
PRODUCTIVITY SCREEN*
Monitor and control important vehicle
information and features through the
information display.
• Press the up or down arrows
to
scroll through and highlight the options
within a menu.
• Press the right arrow
to enter into
a sub-menu.
• Press the left arrow
to exit a menu.
• Press OK to choose and confirm a
setting or message.
You can even customize your views
using MyView.
Refer to the Information Displays
chapter in your Owner’s Manual for
more details.
4 – 5
ADAPTIVE
CRUISE CONTROL*
Automatically adjust your speed to
maintain a set distance between
your vehicle and the vehicle in front
of you in the same lane. Set the
gap distance between your vehicle
and the vehicle in front of you by
pressing GAP+ or GAP– or
and controls on the steering wheel.
Note: Driving aids do not replace
the need to watch where the
vehicle is moving and brake where
necessary. Refer to the Cruise
Control chapter in your Owner’s
Manual for more details.
POWER TILT-TELESCOPE
STEERING COLUMN*
Use the control on the side of the
steering column to adjust
the position.
To tilt: Press the top or bottom
of the control.
To telescope: Press the front or rear
of the control. The column moves to
the full up and away position when
you switch the ignition off. It returns
to your previous setting when you
switch the ignition on. You can
enable or disable this feature in the
information display.
Instrument Panel
2
*if equipped
Page 4 of 12

9
10
11
12
109
12
1113
13
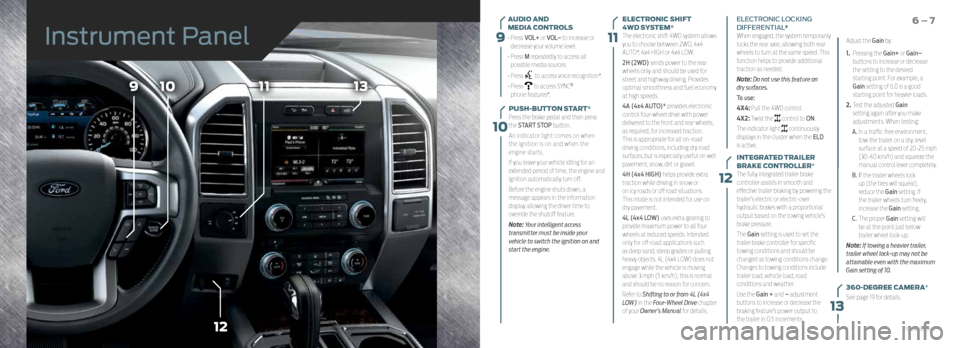
AUDIO AND
MEDIA CONTROLS
• Press VOL+ or VOL– to increase or
decrease your volume level.
• Press M repeatedly to access all
possible media sources.
• Press
to access voice recognition*.
• Press
to access SYNC®
phone features*.
PUSH-BUTTON START*
Press the brake pedal and then press
the START STOP button.
An indicator light comes on when
the ignition is on and when the
engine starts.
If you leave your vehicle idling for an
extended period of time, the engine and
ignition automatically turn off.
Before the engine shuts down, a
message appears in the information
display allowing the driver time to
override the shutoff feature.
Note: Your intelligent access
transmitter must be inside your
vehicle to switch the ignition on and
start the engine.
6 – 7ELECTRONIC SHIFT
4WD SYSTEM*
The electronic shift 4WD system allows
you to choose between 2WD, 4x4
AUTO*, 4x4 HIGH or 4x4 LOW.
2H (2WD) sends power to the rear
wheels only and should be used for
street and highway driving. Provides
optimal smoothness and fuel economy
at high speeds.
4A (4x4 AUTO)* provides electronic
control four-wheel drive with power
delivered to the front and rear wheels,
as required, for increased traction.
This is appropriate for all on-road
driving conditions, including dry road
surfaces, but is especially useful on wet
pavement, snow, dirt or gravel.
4H (4x4 HIGH) helps provide extra
traction while driving in snow or
on icy roads or off road situations.
This mode is not intended for use on
dry pavement.
4L (4x4 LOW) uses extra gearing to
provide maximum power to all four
wheels at reduced speeds. Intended
only for off-road applications such
as deep sand, steep grades or pulling
heavy objects. 4L (4x4 LOW) does not
engage while the vehicle is moving
above 3 mph (5 km/h); this is normal
and should be no reason for concern.
Refer to Shifting to or from 4L (4x4
LOW) in the Four-Wheel Drive chapter
of your Owner’s Manual for details. ELECTRONIC LOCKING
DIFFERENTIAL*
When engaged, the system temporarily
locks the rear axle, allowing both rear
wheels to turn at the same speed. This
function helps to provide additional
traction as needed.
Note: Do not use this feature on
dry surfaces.
To use:
4X4: Pull the 4WD control.
4X2: Twist the
control to ON.
The indicator light
continuously
displays in the cluster when the ELD
is active.
INTEGRATED TRAILER
BRAKE CONTROLLER*
The fully integrated trailer brake
controller assists in smooth and
effective trailer braking by powering the
trailer’s electric or electric-over
hydraulic brakes with a proportional
output based on the towing vehicle’s
brake pressure.
The Gain setting is used to set the
trailer brake controller for specific
towing conditions and should be
changed as towing conditions change.
Changes to towing conditions include
trailer load, vehicle load, road
conditions and weather.
Use the Gain + and – adjustment
buttons to increase or decrease the
braking feature’s power output to
the trailer in 0.5 increments. Adjust the Gain by:
1.
Pressing the Gain+ or Gain–
buttons to increase or decrease
the setting to the desired
starting point. For example, a
Gain setting of 6.0 is a good
starting point for heavier loads.
2. Test the adjusted Gain
setting again after you make
adjustments. When testing:
A. In a traffic-free environment,
tow the trailer on a dry, level
surface at a speed of 20-25 mph
(30-40 km/h) and squeeze the
manual control lever completely.
B. If the trailer wheels lock
up (the tires will squeal),
reduce the Gain setting. If
the trailer wheels turn freely,
increase the Gain setting.
C. The proper Gain setting will
be at the point just below
trailer wheel lock-up.
Note: If towing a heavier trailer,
trailer wheel lock-up may not be
attainable even with the maximum
Gain setting of 10.
360-DEGREE CAMERA*
See page 19 for details.
Instrument Panel
*if equipped
Page 5 of 12

14
15
17
18
19
181715161419
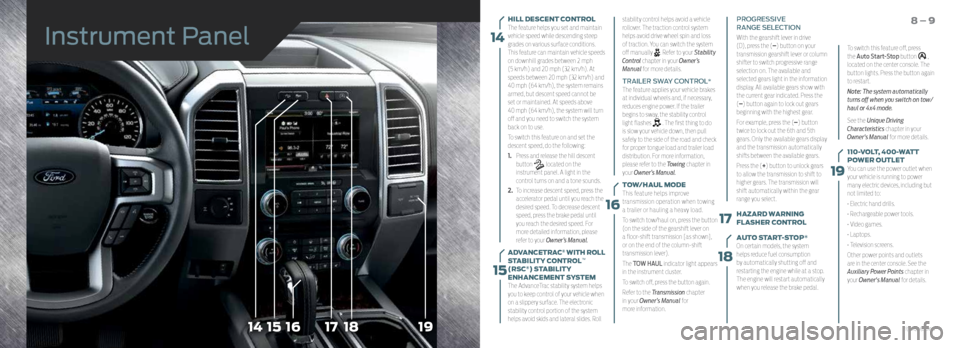
HILL DESCENT CONTROL
The feature helps you set and maintain
vehicle speed while descending steep
grades on various surface conditions.
This feature can maintain vehicle speeds
on downhill grades between 2 mph
(5 km/h) and 20 mph (32 km/h). At
speeds between 20 mph (32 km/h) and
40 mph (64 km/h), the system remains
armed, but descent speed cannot be
set or maintained. At speeds above
40 mph (64 km/h), the system will turn
off and you need to switch the system
back on to use.
To switch this feature on and set the
descent speed, do the following:
1. Press and release the hill descent
button
located on the
instrument panel. A light in the
control turns on and a tone sounds.
2. To increase descent speed, press the
accelerator pedal until you reach the
desired speed. To decrease descent
speed, press the brake pedal until
you reach the desired speed. For
more detailed information, please
refer to your Owner’s Manual.
ADVANCETRAC
® WITH ROLL
STABILITY CONTROL™
(RSC®) STABILITY
ENHANCEMENT SYSTEM
The AdvanceTrac stability system helps
you to keep control of your vehicle when
on a slippery surface. The electronic
stability control portion of the system
helps avoid skids and lateral slides. Roll AUTO START-STOP
*
On certain models, the system
helps reduce fuel consumption
by automatically shutting off and
restarting the engine while at a stop.
The engine will restart automatically
when you release the brake pedal.
8 – 9
To switch this feature off, press
the Auto Start-Stop button ,
located on the center console. The
button lights. Press the button again
to restart.
Note: The system automatically
turns off when you switch on tow/
haul or 4x4 mode.
See the Unique Driving
Characteristics chapter in your
Owner's Manual for more details.
110-VOLT, 400-WATT
POWER OUTLET
You can use the power outlet when
your vehicle is running to power
many electric devices, including but
not limited to:
• Electric hand drills.
• Rechargeable power tools.
• Video games.
• Laptops.
• Television screens.
Other power points and outlets
are in the center console. See the
Auxiliary Power Points chapter in
your Owner's Manual for details.
stability control helps avoid a vehicle
rollover. The traction control system
helps avoid drive wheel spin and loss
of traction. You can switch the system
off manually . Refer to your Stability
Control chapter in your Owner’s
Manual for more details.
TRAILER SWAY CONTROL*
The feature applies your vehicle brakes
at individual wheels and, if necessary,
reduces engine power. If the trailer
begins to sway, the stability control
light flashes
. The first thing to do
is slow your vehicle down, then pull
safely to the side of the road and check
for proper tongue load and trailer load
distribution. For more information,
please refer to the Towing chapter in
your Owner’s Manual.
TOW/HAUL MODE
This feature helps improve
transmission operation when towing
a trailer or hauling a heavy load.
To switch tow/haul on, press the button
(on the side of the gearshift lever on
a floor-shift transmission [as shown],
or on the end of the column-shift
transmission lever).
The TOW HAUL indicator light appears
in the instrument cluster.
To switch off, press the button again.
Refer to the Transmission chapter
in your Owner’s Manual for
more information. PROGRESSIVE
RANGE SELECTION
With the gearshift lever in drive
(D), press the (–) button on your
transmission gearshift lever or column
shifter to switch progressive range
selection on. The available and
selected gears light in the information
display. All available gears show with
the current gear indicated. Press the
(–) button again to lock out gears
beginning with the highest gear.
For example, press the (–) button
twice to lock out the 6th and 5th
gears. Only the available gears display
and the transmission automatically
shifts between the available gears.
Press the (+) button to unlock gears
to allow the transmission to shift to
higher gears. The transmission will
shift automatically within the gear
range you select.
HAZARD WARNING
FLASHER CONTROL
16
Instrument Panel
*if equipped
Page 11 of 12

REMOTE ENTRY SYSTEM FEATURES*
Press
once to unlock the driver door. Press again within three seconds to
unlock all of the doors and tailgate*.
Press
once to lock all the doors and the tailgate*. Press again within three
seconds to confirm that you closed and locked all of the doors and tailgate*.
Press
to activate the panic alarm. Press again or switch the ignition on to
deactivate the panic alarm.
Car finder: Press
twice within three seconds. The horn sounds and the
direction indicators flash. We recommend that you use this method to locate
your vehicle, rather than using the panic alarm.
REMOTE TAILGATE RELEASE*
With the tailgate unlocked, you can open the power tailgate by using the
remote transmitter. Press
twice within three seconds.
POWER RUNNING BOARDS*
The running boards automatically extend down and out when you open the
door. This can help you enter and exit your vehicle. When you close the doors,
the running boards return to the stowed position after a two-second delay. To
operate the Power Deploy feature manually, use the information display. TAILGATE STEP*
Use the step to make entering the truck bed easier. This feature includes a step
up into the box and a handle. These items store inside the tailgate.
To use:
1.
Lower the tailgate.
2. Push the button in the center of the tailgate moulding. The step pops out
approximately 1 inch (2.5 centimeters).
3. Pull the step out and away from the tailgate, and lower.
4. Pull the yellow handle stop out and away from the tailgate.
5. Lift the yellow handle up by rotating it from a horizontal position to a
vertical one until you hear a sound, indicating that the handle locked
into place.
To close:
1. Close the step panel then lift and fully close the step into the tailgate.
2. Move the yellow lever on the grab handle to the unlock position and lower
the handle.
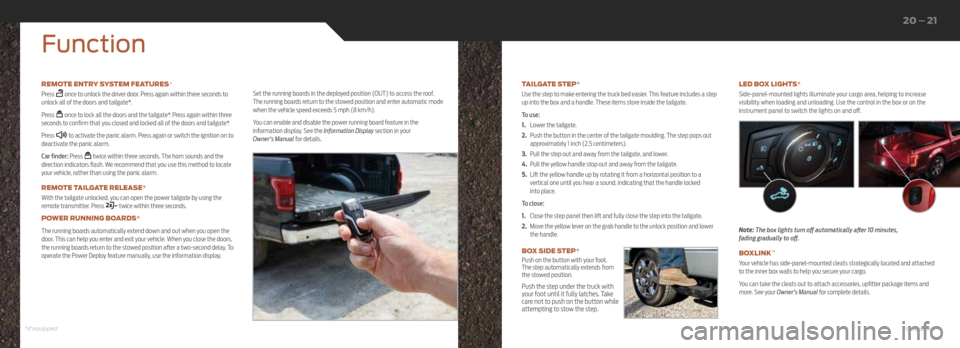
BOX SIDE STEP*
Push on the button with your foot.
The step automatically extends from
the stowed position.
Push the step under the truck with
your foot until it fully latches. Take
care not to push on the button while
attempting to stow the step.
LED BOX LIGHTS*
Side-panel-mounted lights illuminate your cargo area, helping to increase
visibility when loading and unloading. Use the control in the box or on the
instrument panel to switch the lights on and off.
Note: The box lights turn off automatically after 10 minutes,
fading gradually to off.
BOXLINK
™
Your vehicle has side-panel-mounted cleats strategically located and attached
to the inner box walls to help you secure your cargo.
You can take the cleats out to attach accessories, upfitter package items and
more. See your Owner's Manual for complete details.
Function
Set the running boards in the deployed position (OUT) to access the roof.
The running boards return to the stowed position and enter automatic mode
when the vehicle speed exceeds 5 mph (8 km/h).
You can enable and disable the power running board feature in the
information display. See the Information Display section in your
Owner's Manual for details.
*if equipped
20 – 21
*if equipped*if equipped