steering FORD F150 2015 13.G Quick Reference Guide
[x] Cancel search | Manufacturer: FORD, Model Year: 2015, Model line: F150, Model: FORD F150 2015 13.GPages: 12, PDF Size: 2.81 MB
Page 3 of 12

3
15
6
7
8
7
566
8
4231
4
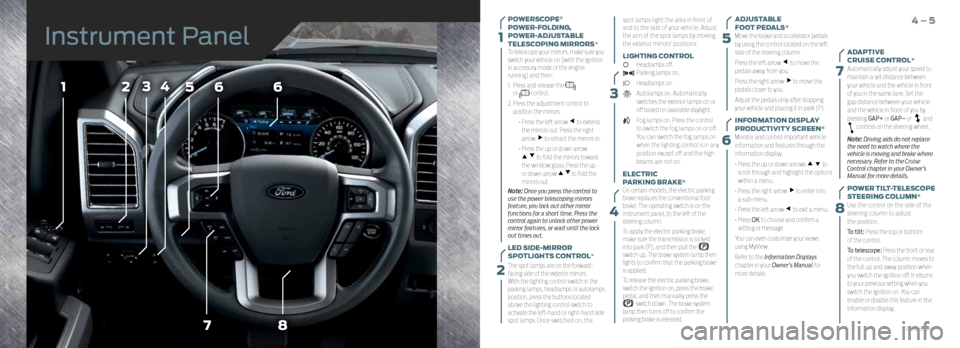
POWERSCOPE®
POWER-FOLDING,
POWER-ADJUSTABLE
TELESCOPING MIRRORS*
To telescope your mirrors, make sure you
switch your vehicle on (with the ignition
in accessory mode or the engine
running) and then:
1. Press and release the
or control.
2. Press the adjustment control to
position the mirrors.
• Press the left arrow
to extend
the mirrors out. Press the right
arrow
to retract the mirrors in.
• Press the up or down arrow
to fold the mirrors toward
the window glass. Press the up
or down arrow
to fold the
mirrors out.
Note: Once you press the control to
use the power telescoping mirrors
feature, you lock out other mirror
functions for a short time. Press the
control again to unlock other power
mirror features, or wait until the lock
out times out.
LED SIDE-MIRROR
SPOTLIGHTS CONTROL*
The spot lamps are on the forward-
facing side of the exterior mirrors.
With the lighting control switch in the
parking lamps, headlamps or autolamps
position, press the buttons located
above the lighting control switch to
activate the left-hand or right-hand side
spot lamps. Once switched on, the spot lamps light the area in front of
and to the side of your vehicle. Adjust
the aim of the spot lamps by moving
the exterior mirrors' positions.
LIGHTING CONTROL
Headlamps off. Parking lamps on.
Headlamps on.
Autolamps on. Automatically
switches the exterior lamps on or
off based on available daylight.
Fog lamps on. Press the control
to switch the fog lamps on or off.
You can switch the fog lamps on
when the lighting control is in any
position except off and the high
beams are not on.
ELECTRIC
PARKING BRAKE*
On certain models, the electric parking
brake replaces the conventional foot
brake. The operating switch is on the
instrument panel, to the left of the
steering column.
To apply the electric parking brake,
make sure the transmission is locked
into park (P), and then pull the
switch up. The brake system lamp then
lights to confirm that the parking brake
is applied.
To release the electric parking brake,
switch the ignition on, press the brake
pedal, and then manually press the
switch down. The brake system
lamp then turns off to confirm the
parking brake is released. ADJUSTABLE
FOOT PEDALS*
Move the brake and accelerator pedals
by using the control located on the left
side of the steering column.
Press the left arrow
to move the
pedals away from you.
Press the right arrow
to move the
pedals closer to you.
Adjust the pedals only after stopping
your vehicle and placing it in park (P).
INFORMATION DISPLAY
PRODUCTIVITY SCREEN*
Monitor and control important vehicle
information and features through the
information display.
• Press the up or down arrows
to
scroll through and highlight the options
within a menu.
• Press the right arrow
to enter into
a sub-menu.
• Press the left arrow
to exit a menu.
• Press OK to choose and confirm a
setting or message.
You can even customize your views
using MyView.
Refer to the Information Displays
chapter in your Owner’s Manual for
more details.
4 – 5
ADAPTIVE
CRUISE CONTROL*
Automatically adjust your speed to
maintain a set distance between
your vehicle and the vehicle in front
of you in the same lane. Set the
gap distance between your vehicle
and the vehicle in front of you by
pressing GAP+ or GAP– or
and controls on the steering wheel.
Note: Driving aids do not replace
the need to watch where the
vehicle is moving and brake where
necessary. Refer to the Cruise
Control chapter in your Owner’s
Manual for more details.
POWER TILT-TELESCOPE
STEERING COLUMN*
Use the control on the side of the
steering column to adjust
the position.
To tilt: Press the top or bottom
of the control.
To telescope: Press the front or rear
of the control. The column moves to
the full up and away position when
you switch the ignition off. It returns
to your previous setting when you
switch the ignition on. You can
enable or disable this feature in the
information display.
Instrument Panel
2
*if equipped
Page 9 of 12

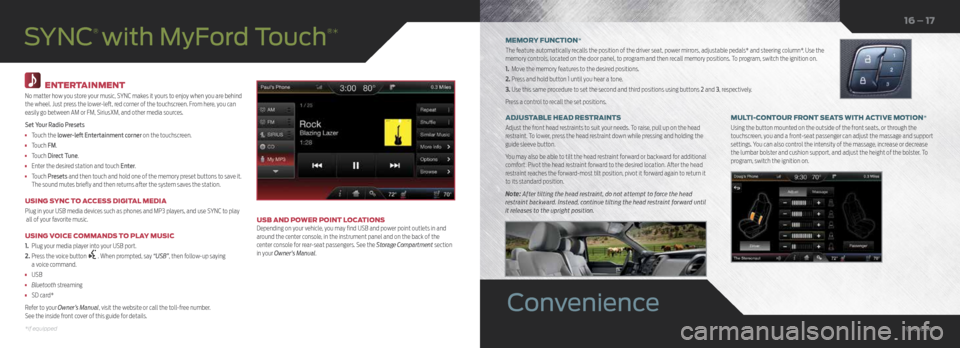
ENTERTAINMENT
No matter how you store your music, SYNC makes it yours to enjoy when you are behind
the wheel. Just press the lower-left, red corner of the touchscreen. From here, you can
easily go between AM or FM, SiriusXM, and other media sources.
Set Your Radio Presets
• Touch the lower-left Entertainment corner on the touchscreen.
• Touch FM.
• Touch Direct Tune.
• Enter the desired station and touch Enter.
• Touch Presets and then touch and hold one of the memory preset buttons to save it.
The sound mutes briefly and then returns after the system saves the station.
USING SYNC TO ACCESS DIGITAL MEDIA
Plug in your USB media devices such as phones and MP3 players, and use SYNC to play
all of your favorite music.
USING VOICE COMMANDS TO PLAY MUSIC
1. Plug your media player into your USB port.
2. Press the voice button
. When prompted, say “USB” , then follow-up saying
a voice command.
• USB
• Bluetooth streaming
• SD card*
Refer to your Owner’s Manual, visit the website or call the toll-free number.
See the inside front cover of this guide for details.
USB AND POWER POINT LOCATIONS
Depending on your vehicle, you may find USB and power point outlets in and
around the center console, in the instrument panel and on the back of the
center console for rear-seat passengers. See the Storage Compartment section
in your Owner's Manual.
SYNC
® with MyFord Touch
®*MEMORY FUNCTION*
The feature automatically recalls the position of the driver seat, power mirrors, adjustable pedals* and steering column*. Use the
memory controls, located on the door panel, to program and then recall memory positions. To program, switch the ignition on.
1. Move the memory features to the desired positions.
2. Press and hold button 1 until you hear a tone.
3. Use this same procedure to set the second and third positions using buttons 2 and 3, respectively.
Press a control to recall the set positions.
MULTI-CONTOUR FRONT SEATS WITH ACTIVE MOTION*
Using the button mounted on the outside of the front seats, or through the
touchscreen, you and a front-seat passenger can adjust the massage and support
settings. You can also control the intensity of the massage, increase or decrease
the lumbar bolster and cushion support, and adjust the height of the bolster. To
program, switch the ignition on.
ADJUSTABLE HEAD RESTRAINTS
Adjust the front head restraints to suit your needs. To raise, pull up on the head
restraint. To lower, press the head restraint down while pressing and holding the
guide sleeve button.
You may also be able to tilt the head restraint forward or backward for additional
comfort. Pivot the head restraint forward to the desired location. After the head
restraint reaches the forward-most tilt position, pivot it forward again to return it
to its standard position.
Note:
After tilting the head restraint, do not attempt to force the head
restraint backward. Instead, continue tilting the head restraint forward until
it releases to the upright position.
16 – 17
Convenience
*if equipped*if equipped
Page 10 of 12

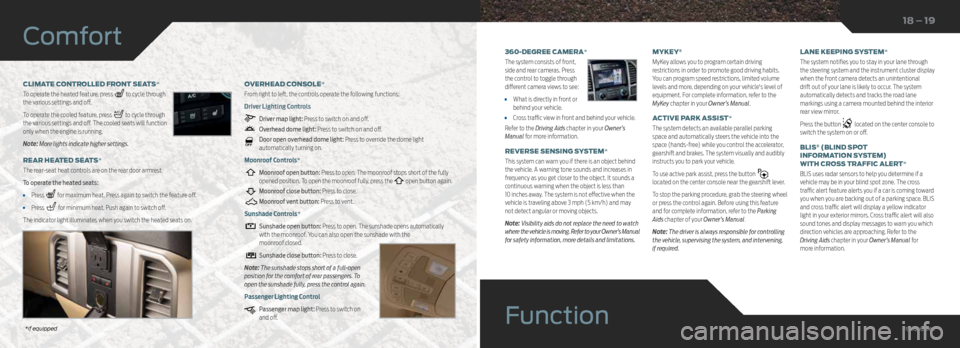
CLIMATE CONTROLLED FRONT SEATS*
To operate the heated feature, press
to cycle through
the various settings and off.
To operate the cooled feature, press
to cycle through
the various settings and off. The cooled seats will function
only when the engine is running.
Note: More lights indicate higher settings.
REAR HEATED SEATS*
The rear-seat heat controls are on the rear door armrest.
To operate the heated seats:
• Press for maximum heat. Press again to switch the feature off.
• Press for minimum heat. Push again to switch off.
The indicator light illuminates when you switch the heated seats on. OVERHEAD CONSOLE*
From right to left, the controls operate the following functions:
Driver Lighting Controls
Driver map light: Press to switch on and off.
Overhead dome light: Press to switch on and off.
Door open overhead dome light: Press to override the dome light
automatically turning on.
Moonroof Controls*
Moonroof open button: Press to open. The moonroof stops short of the fully
opened position. To open the moonroof fully, press the open button again.
Moonroof close button: Press to close.
Moonroof vent button: Press to vent.
Sunshade Controls*
Sunshade open button: Press to open. The sunshade opens automatically
with the moonroof. You can also open the sunshade with the
moonroof closed.
Sunshade close button: Press to close.
Note: The sunshade stops short of a full-open
position for the comfort of rear passengers. To
open the sunshade fully, press the control again.
Passenger Lighting Control
Passenger map light: Press to switch on
and off.
Function
18 – 19
Comfort
360-DEGREE CAMERA*
The system consists of front,
side and rear cameras. Press
the control to toggle through
different camera views to see:
• What is directly in front or
behind your vehicle.
• Cross traffic view in front and behind your vehicle.
Refer to the Driving Aids chapter in your Owner’s
Manual for more information.
REVERSE SENSING SYSTEM*
This system can warn you if there is an object behind
the vehicle. A warning tone sounds and increases in
frequency as you get closer to the object. It sounds a
continuous warning when the object is less than
10 inches away. The system is not effective when the
vehicle is traveling above 3 mph (5 km/h) and may
not detect angular or moving objects.
Note: Visibility aids do not replace the need to watch
where the vehicle is moving. Refer to your Owner’s Manual
for safety information, more details and limitations.
MYKEY
®
MyKey allows you to program certain driving
restrictions in order to promote good driving habits.
You can program speed restrictions, limited volume
levels and more, depending on your vehicle's level of
equipment. For complete information, refer to the
MyKey chapter in your Owner’s Manual.
ACTIVE PARK ASSIST*
The system detects an available parallel parking
space and automatically steers the vehicle into the
space (hands-free) while you control the accelerator,
gearshift and brakes. The system visually and audibly
instructs you to park your vehicle.
To use active park assist, press the button
located on the center console near the gearshift lever.
To stop the parking procedure, grab the steering wheel
or press the control again. Before using this feature
and for complete information, refer to the Parking
Aids chapter of your Owner’s Manual.
Note: The driver is always responsible for controlling
the vehicle, supervising the system, and intervening,
if required. LANE KEEPING SYSTEM*
The system notifies you to stay in your lane through
the steering system and the instrument cluster display
when the front camera detects an unintentional
drift out of your lane is likely to occur. The system
automatically detects and tracks the road lane
markings using a camera mounted behind the interior
rear view mirror.
Press the button
located on the center console to
switch the system on or off.
BLIS
® (BLIND SPOT
INFORMATION SYSTEM)
WITH CROSS TRAFFIC ALERT*
BLIS uses radar sensors to help you determine if a
vehicle may be in your blind spot zone. The cross
traffic alert feature alerts you if a car is coming toward
you when you are backing out of a parking space. BLIS
and cross traffic alert will display a yellow indicator
light in your exterior mirrors. Cross traffic alert will also
sound tones and display messages to warn you which
direction vehicles are approaching. Refer to the
Driving Aids chapter in your Owner’s Manual for
more information.
*if equipped
*if equipped*if equipped