remove seats FORD F250 2006 Owners Manual
[x] Cancel search | Manufacturer: FORD, Model Year: 2006, Model line: F250, Model: FORD F250 2006Pages: 312, PDF Size: 3.19 MB
Page 7 of 312
Vehicle Modification Data Recording
Some aftermarket products may cause severe engine and/or transmission
damage; refer to theWhat is not coveredsection inThe new vehicle
limited warranty for your vehiclechapter of your vehicle’sWarranty
Guidefor more information. Some vehicles are equipped with
Powertrain Control Systems that can detect and store information about
vehicle modifications that increase horsepower and torque output; this
information cannot be erased and will stay in the system’s memory even
if the modification is removed. When a dealer or repair facility works on
your vehicle, it may be necessary for them to access the information in
the Powertrain Control System. This information will likely identify if any
unauthorized modifications have been made to the system and may be
used to determine if repairs will be covered by warranty.
Special instructions
For your added safety, your vehicle is fitted with sophisticated electronic
controls.
Please read the sectionSupplemental restraint system (SRS)
in theSeating and Safety Restraintschapter. Failure to follow
the specific warnings and instructions could result in personal injury.
Front seat mounted rear-facing child or infant seats should
NEVERbe placed in front of an active passenger airbag.
Cell phone use
The use of Mobile Communications Equipment has become increasingly
important in the conduct of business and personal affairs. However,
drivers must not compromise their own or others’ safety when using
such equipment. Mobile Communications can enhance personal safety
and security when appropriately used, particularly in emergency
situations. Safety must be paramount when using mobile communications
equipment to avoid negating these benefits.
Mobile Communication Equipment includes, but is not limited to cellular
phones, pagers, portable email devices, in-vehicle communications
systems, telematics devices and portable two-way radios.
A driver’s first responsibility is the safe operation of the vehicle.
The most important thing you can do to prevent a crash is to
avoid distractions and pay attention to the road. Wait until it is safe to
operate Mobile Communications Equipment.
2006 F-250/350/450/550(f23)
Owners Guide (post-2002-fmt)
USA(fus)
Introduction
7
Page 33 of 312
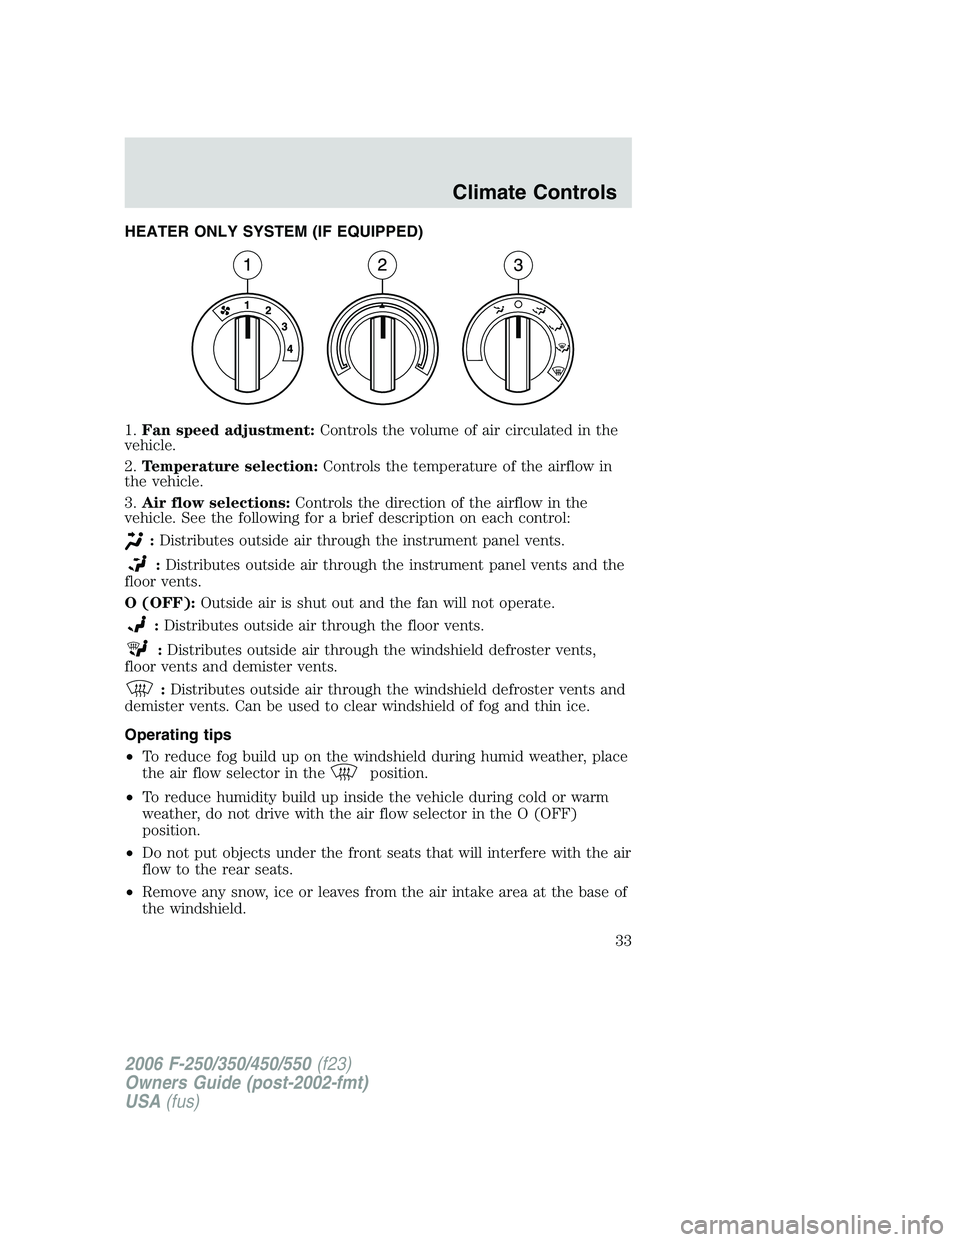
HEATER ONLY SYSTEM (IF EQUIPPED)
1.Fan speed adjustment:Controls the volume of air circulated in the
vehicle.
2.Temperature selection:Controls the temperature of the airflow in
the vehicle.
3.Air flow selections:Controls the direction of the airflow in the
vehicle. See the following for a brief description on each control:
:Distributes outside air through the instrument panel vents.
:Distributes outside air through the instrument panel vents and the
floor vents.
O (OFF):Outside air is shut out and the fan will not operate.
:Distributes outside air through the floor vents.
:Distributes outside air through the windshield defroster vents,
floor vents and demister vents.
:Distributes outside air through the windshield defroster vents and
demister vents. Can be used to clear windshield of fog and thin ice.
Operating tips
•To reduce fog build up on the windshield during humid weather, place
the air flow selector in the
position.
•To reduce humidity build up inside the vehicle during cold or warm
weather, do not drive with the air flow selector in the O (OFF)
position.
•Do not put objects under the front seats that will interfere with the air
flow to the rear seats.
•Remove any snow, ice or leaves from the air intake area at the base of
the windshield.
2006 F-250/350/450/550(f23)
Owners Guide (post-2002-fmt)
USA(fus)
Climate Controls
33
Page 35 of 312
:Distributes outside air through the instrument panel vents, floor
vents and center console vents (if equipped).
O (OFF):Outside air is shut out and the climate system is turned off.
:Distributes outside air through the floor vents.
:Distributes outside air through the windshield defroster vents,
floor vents and demister vents.
:Distributes outside air through the windshield defroster vents and
demister vents.
Operating tips
•To reduce fog build up on the windshield during humid weather, place
the air flow selector in the
position.
•To reduce humidity build up inside the vehicle, do not drive with the
air flow selector in the O (OFF) position.
•Do not put objects under the front seats that will interfere with the
airflow to the rear seats.
•Remove any snow, ice or leaves from the air intake area at the base of
the windshield.
•To improve the A/C cool down, drive with the windows slightly open
for 2–3 minutes after start up or until the vehicle has been “aired out.”
For maximum cooling performance (MAX A/C) in MAX A/C mode:
•Move the temperature control to the coolest setting.
•Set the fan to the highest speed initially, then adjust in order to
maintain comfort.
To aid in side window defogging and demisting in cold weather:
1. Select
.
2. Select A/C.
3. Set the temperature control to maintain comfort.
4. Set the fan speed to highest setting.
5. Direct the outer instrument panel vents towards the side windows.
Do not place objects on top of the instrument panel as these
objects may become projectiles in a collision or sudden stop.
2006 F-250/350/450/550(f23)
Owners Guide (post-2002-fmt)
USA(fus)
Climate Controls
35
Page 99 of 312
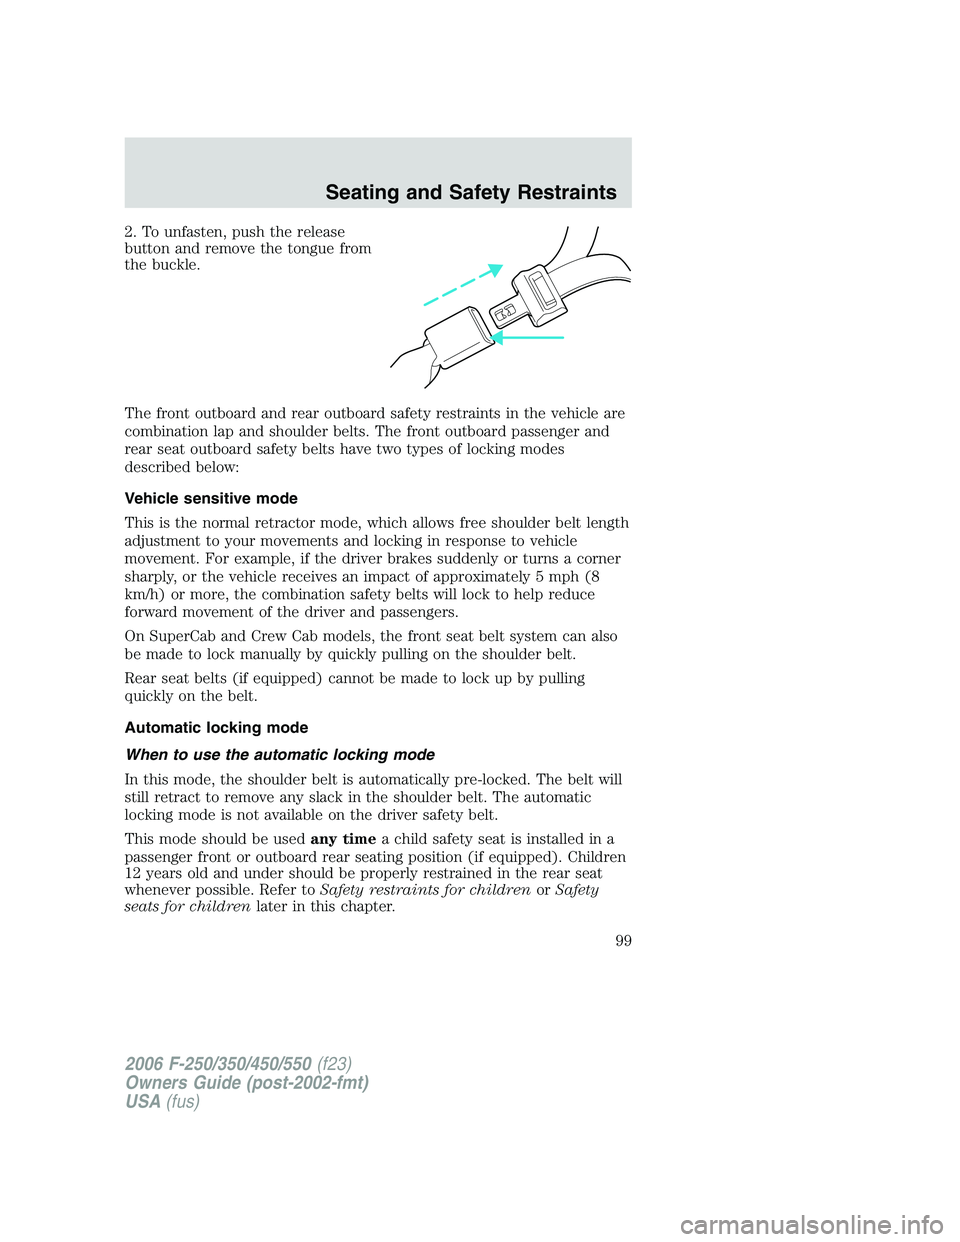
2. To unfasten, push the release
button and remove the tongue from
the buckle.
The front outboard and rear outboard safety restraints in the vehicle are
combination lap and shoulder belts. The front outboard passenger and
rear seat outboard safety belts have two types of locking modes
described below:
Vehicle sensitive mode
This is the normal retractor mode, which allows free shoulder belt length
adjustment to your movements and locking in response to vehicle
movement. For example, if the driver brakes suddenly or turns a corner
sharply, or the vehicle receives an impact of approximately 5 mph (8
km/h) or more, the combination safety belts will lock to help reduce
forward movement of the driver and passengers.
On SuperCab and Crew Cab models, the front seat belt system can also
be made to lock manually by quickly pulling on the shoulder belt.
Rear seat belts (if equipped) cannot be made to lock up by pulling
quickly on the belt.
Automatic locking mode
When to use the automatic locking mode
In this mode, the shoulder belt is automatically pre-locked. The belt will
still retract to remove any slack in the shoulder belt. The automatic
locking mode is not available on the driver safety belt.
This mode should be usedany timea child safety seat is installed in a
passenger front or outboard rear seating position (if equipped). Children
12 years old and under should be properly restrained in the rear seat
whenever possible. Refer toSafety restraints for childrenorSafety
seats for childrenlater in this chapter.
2006 F-250/350/450/550(f23)
Owners Guide (post-2002-fmt)
USA(fus)
Seating and Safety Restraints
99
Page 113 of 312
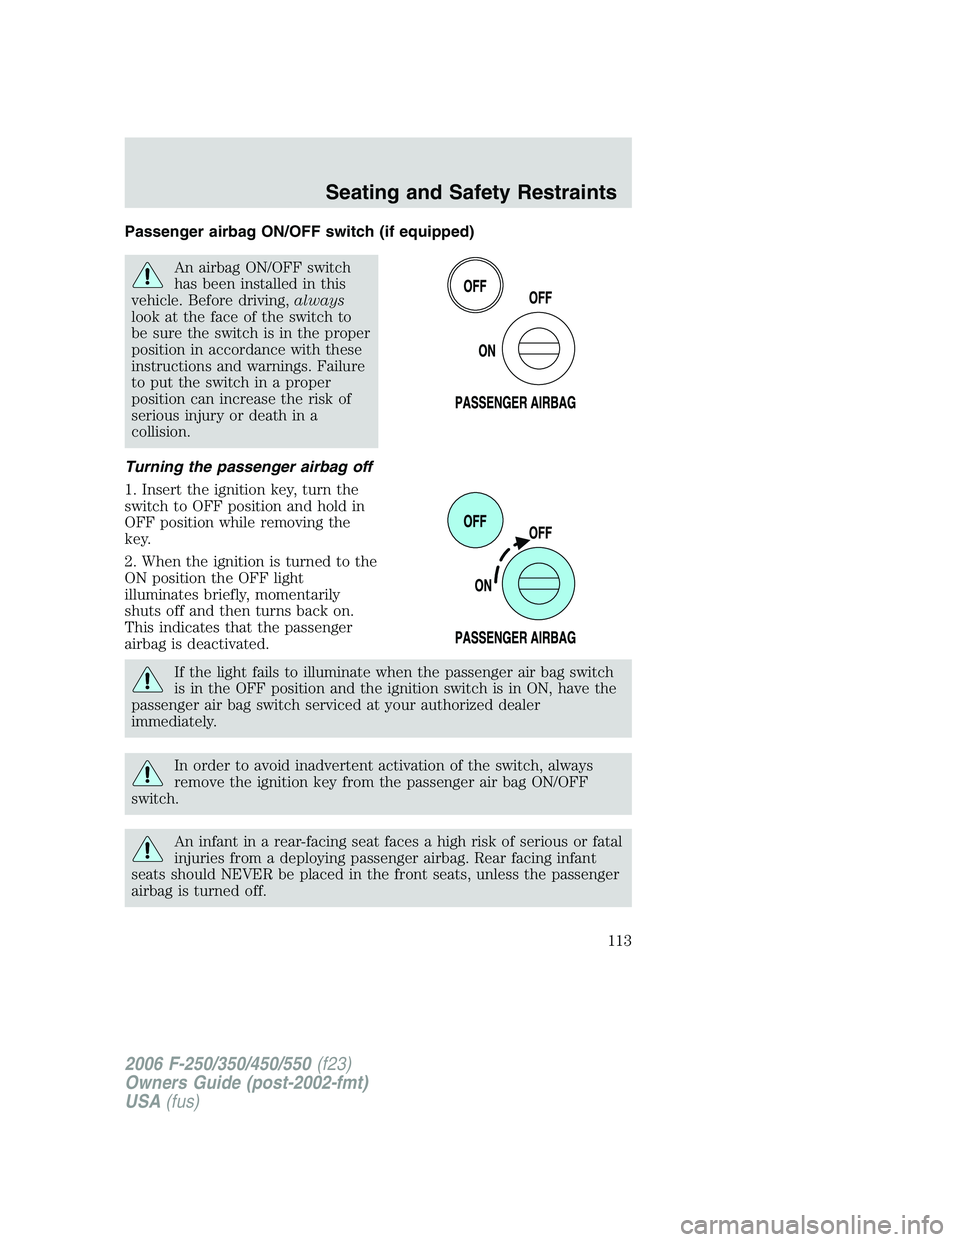
Passenger airbag ON/OFF switch (if equipped)
An airbag ON/OFF switch
has been installed in this
vehicle. Before driving,always
look at the face of the switch to
be sure the switch is in the proper
position in accordance with these
instructions and warnings. Failure
to put the switch in a proper
position can increase the risk of
serious injury or death in a
collision.
Turning the passenger airbag off
1. Insert the ignition key, turn the
switch to OFF position and hold in
OFF position while removing the
key.
2. When the ignition is turned to the
ON position the OFF light
illuminates briefly, momentarily
shuts off and then turns back on.
This indicates that the passenger
airbag is deactivated.
If the light fails to illuminate when the passenger air bag switch
is in the OFF position and the ignition switch is in ON, have the
passenger air bag switch serviced at your authorized dealer
immediately.
In order to avoid inadvertent activation of the switch, always
remove the ignition key from the passenger air bag ON/OFF
switch.
An infant in a rear-facing seat faces a high risk of serious or fatal
injuries from a deploying passenger airbag. Rear facing infant
seats should NEVER be placed in the front seats, unless the passenger
airbag is turned off.
2006 F-250/350/450/550(f23)
Owners Guide (post-2002-fmt)
USA(fus)
Seating and Safety Restraints
113
Page 119 of 312
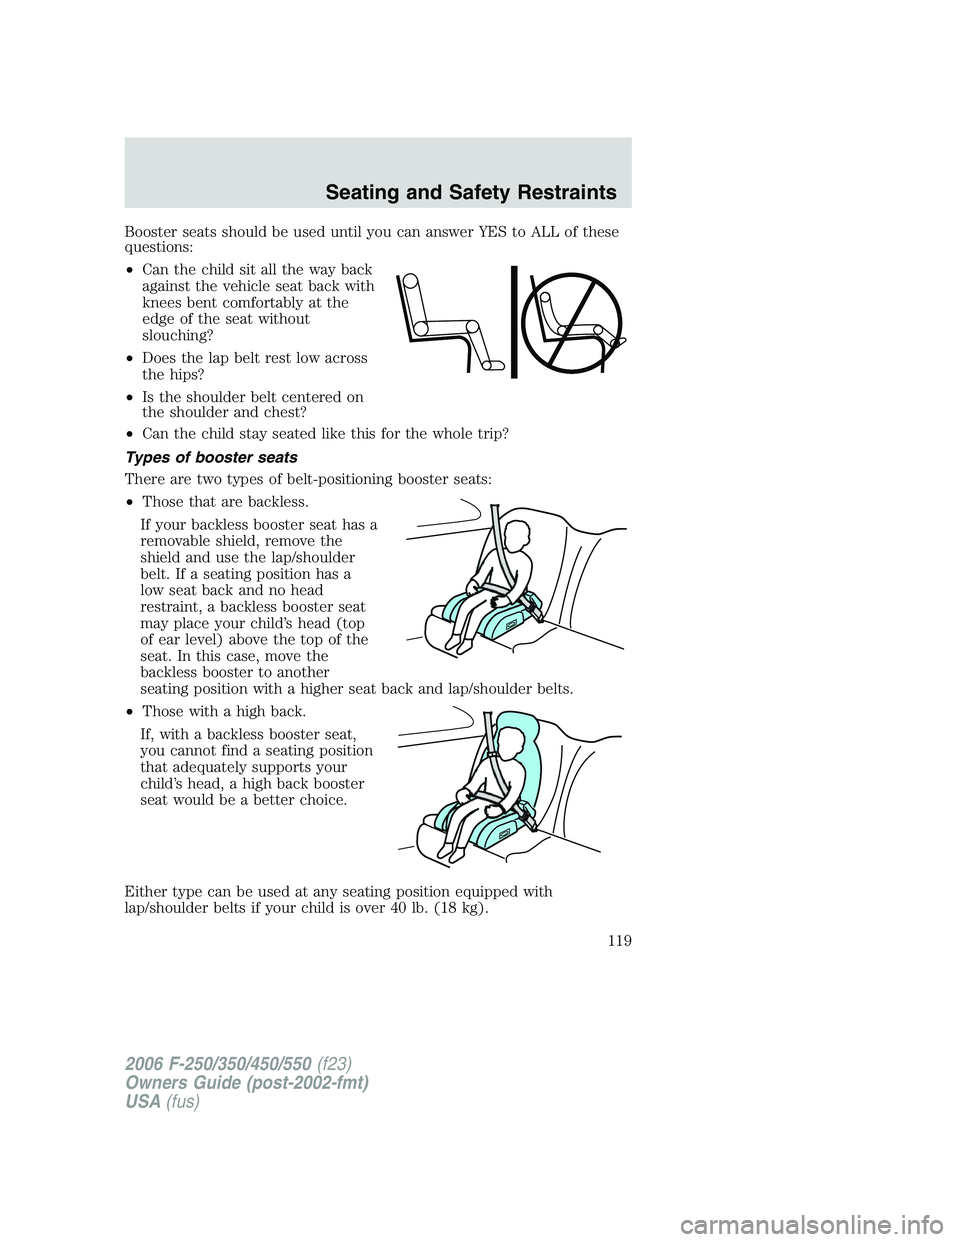
Booster seats should be used until you can answer YES to ALL of these
questions:
•Can the child sit all the way back
against the vehicle seat back with
knees bent comfortably at the
edge of the seat without
slouching?
•Does the lap belt rest low across
the hips?
•Is the shoulder belt centered on
the shoulder and chest?
•Can the child stay seated like this for the whole trip?
Types of booster seats
There are two types of belt-positioning booster seats:
•Those that are backless.
If your backless booster seat has a
removable shield, remove the
shield and use the lap/shoulder
belt. If a seating position has a
low seat back and no head
restraint, a backless booster seat
may place your child’s head (top
of ear level) above the top of the
seat. In this case, move the
backless booster to another
seating position with a higher seat back and lap/shoulder belts.
•Those with a high back.
If, with a backless booster seat,
you cannot find a seating position
that adequately supports your
child’s head, a high back booster
seat would be a better choice.
Either type can be used at any seating position equipped with
lap/shoulder belts if your child is over 40 lb. (18 kg).
2006 F-250/350/450/550(f23)
Owners Guide (post-2002-fmt)
USA(fus)
Seating and Safety Restraints
119
Page 124 of 312
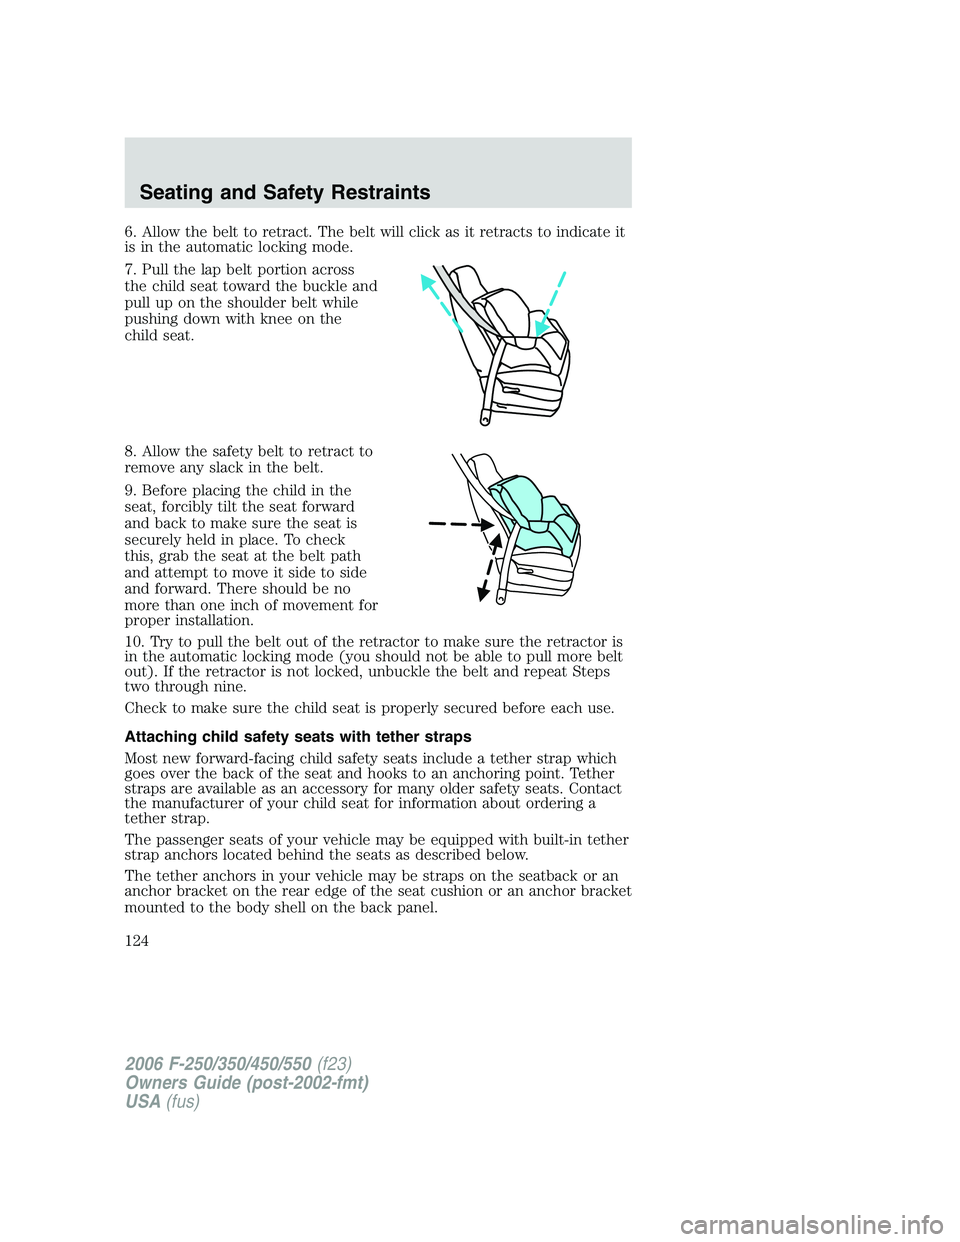
6. Allow the belt to retract. The belt will click as it retracts to indicate it
is in the automatic locking mode.
7. Pull the lap belt portion across
the child seat toward the buckle and
pull up on the shoulder belt while
pushing down with knee on the
child seat.
8. Allow the safety belt to retract to
remove any slack in the belt.
9. Before placing the child in the
seat, forcibly tilt the seat forward
and back to make sure the seat is
securely held in place. To check
this, grab the seat at the belt path
and attempt to move it side to side
and forward. There should be no
more than one inch of movement for
proper installation.
10. Try to pull the belt out of the retractor to make sure the retractor is
in the automatic locking mode (you should not be able to pull more belt
out). If the retractor is not locked, unbuckle the belt and repeat Steps
two through nine.
Check to make sure the child seat is properly secured before each use.
Attaching child safety seats with tether straps
Most new forward-facing child safety seats include a tether strap which
goes over the back of the seat and hooks to an anchoring point. Tether
straps are available as an accessory for many older safety seats. Contact
the manufacturer of your child seat for information about ordering a
tether strap.
The passenger seats of your vehicle may be equipped with built-in tether
strap anchors located behind the seats as described below.
The tether anchors in your vehicle may be straps on the seatback or an
anchor bracket on the rear edge of the seat cushion or an anchor bracket
mounted to the body shell on the back panel.
2006 F-250/350/450/550(f23)
Owners Guide (post-2002-fmt)
USA(fus)
Seating and Safety Restraints
124
Page 245 of 312
Do not use chemical solvents or strong detergents when cleaning
the steering wheel or instrument panel to avoid contamination of
the airbag system.
•Be certain to wash or wipe your hands clean if you have been in
contact with certain products such as insect repellent and suntan
lotion in order to avoid possible damage to the interior painted
surfaces.
INTERIOR TRIM
•Clean the interior trim areas with a damp cloth, then dry by wiping
with a dry, soft, clean cloth.
•Do not use household or glass cleaners as these may damage the
finish.
INTERIOR
For fabric, carpets, cloth seats and safety belts:
•Remove dust and loose dirt with a vacuum cleaner.
•Remove light stains and soil with Motorcraft Professional Strength
Carpet & Upholstery Cleaner (ZC-54).
•If grease or tar is present on the material, spot-clean the area first
with Motorcraft Spot and Stain Remover (ZC-14).
•If a ring forms on the fabric after spot cleaning, clean the entire area
immediately (but do not oversaturate) or the ring will set.
•Do not use household cleaning products or glass cleaners, which can
stain and discolor the fabric and affect the flame retardant abilities of
the seat materials.
Do not use cleaning solvents, bleach or dye on the vehicle’s
seatbelts, as these actions may weaken the belt webbing.
LEATHER SEATS (IF EQUIPPED, EXCEPT FOR THE KING RANCH
F–250 AND F–350 CREWCAB)
Your leather seating surfaces have a clear, protective coating over the
leather.
For King Ranch F-250 and F-350 CrewCab leather seats, refer to
separate section in this chapter.
•To clean, use a soft cloth with Motorcraft Deluxe Leather and Vinyl
Cleaner (ZC-11–A). Dry the area with a soft cloth.
2006 F-250/350/450/550(f23)
Owners Guide (post-2002-fmt)
USA(fus)
Cleaning
245
Page 246 of 312
•To help maintain its resiliency and color, use the Motorcraft Deluxe
Leather Care Kit (ZC-11–D), available from your authorized dealer.
•Do not use household cleaning products, alcohol solutions, solvents or
cleaners intended for rubber, vinyl and plastics, or oil/petroleum-based
leather conditioners. These products may cause premature wearing of
the clear, protective coating on the seat.
Note:In some instances, color or dye transfer can occur when wet
clothing comes in contact with leather upholstery. If this occurs, the
leather should be cleaned immediately to avoid permanent staining.
LEATHER SEATS FOR THE KING RANCH F-250 AND F-350
CREWCAB ONLY (IF EQUIPPED)
Your vehicle is equipped with seating covered in premium, top-grain
leather which is extremely durable, but still requires special care and
maintenance in order to ensure longevity and comfort.
Regular cleaning and conditioning will maintain the appearance of the
leather. Failure to care for the leather can result in drying out and fading
of the material.
Note:In some instances, color or dye transfer can occur when wet
clothing comes in contact with leather upholstery. If this occurs, the
leather should be cleaned immediately to avoid permanent staining.
Cleaning
For dirt, use a vacuum cleaner then use a clean, damp cloth or soft
brush.
For routine cleaning, wipe the surface with a soft, damp cloth. For more
thorough cleaning, wipe the surface with a mild soap. If the leather
cannot be completely cleaned using a mild soap and water solution, the
leather may be cleaned using a commercially available cleaning product
“Tanners Preserve Leather Cleaner” and a 3M “Type T” scrubbing pad.
•Clean spills as quickly as possible.
•Test any cleaner or stain remover on an inconspicuous part of the
leather as cleaners may darken the leather. For more specific cleaning
information, contact the King Ranch Saddle Shop at 1–800–282–KING
(5464).
•Do not spill coffee, ketchup, mustard, orange juice or oil-based
products on the leather as they may permanently stain the leather.
•Do not use household cleaning products, alcohol solutions, solvents or
cleaners intended for rubber, vinyl or plastics.
2006 F-250/350/450/550(f23)
Owners Guide (post-2002-fmt)
USA(fus)
Cleaning
246