headlamp FORD F250 2013 User Guide
[x] Cancel search | Manufacturer: FORD, Model Year: 2013, Model line: F250, Model: FORD F250 2013Pages: 577, PDF Size: 7.74 MB
Page 299 of 577
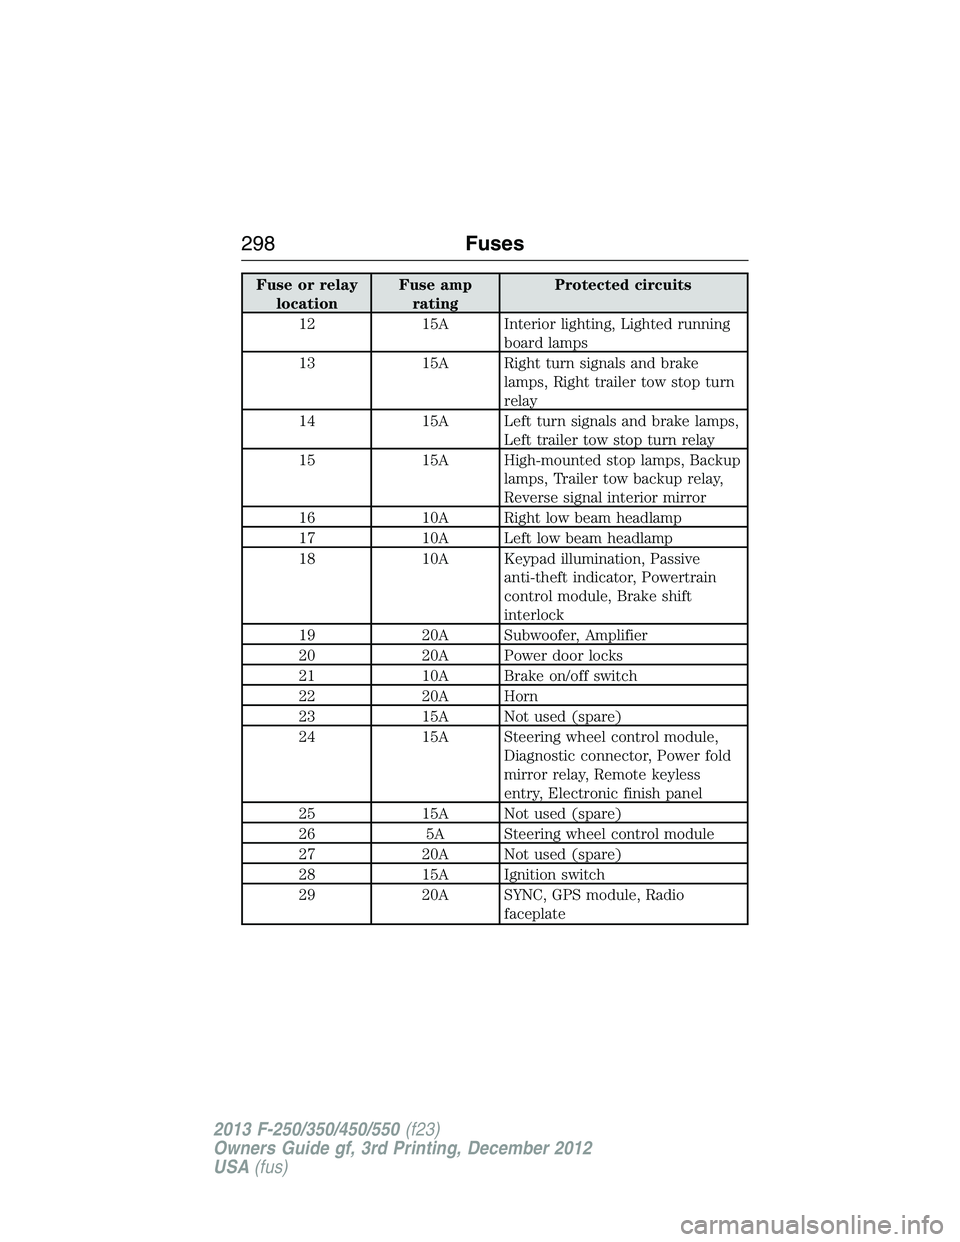
Fuse or relay
locationFuse amp
ratingProtected circuits
12 15A Interior lighting, Lighted running
board lamps
13 15A Right turn signals and brake
lamps, Right trailer tow stop turn
relay
14 15A Left turn signals and brake lamps,
Left trailer tow stop turn relay
15 15A High-mounted stop lamps, Backup
lamps, Trailer tow backup relay,
Reverse signal interior mirror
16 10A Right low beam headlamp
17 10A Left low beam headlamp
18 10A Keypad illumination, Passive
anti-theft indicator, Powertrain
control module, Brake shift
interlock
19 20A Subwoofer, Amplifier
20 20A Power door locks
21 10A Brake on/off switch
22 20A Horn
23 15A Not used (spare)
24 15A Steering wheel control module,
Diagnostic connector, Power fold
mirror relay, Remote keyless
entry, Electronic finish panel
25 15A Not used (spare)
26 5A Steering wheel control module
27 20A Not used (spare)
28 15A Ignition switch
29 20A SYNC, GPS module, Radio
faceplate
298Fuses
2013 F-250/350/450/550(f23)
Owners Guide gf, 3rd Printing, December 2012
USA(fus)
Page 300 of 577
Fuse or relay
locationFuse amp
ratingProtected circuits
30 15A Parking lamp relay, Trailer tow
parking lamp relay
31 5A Trailer brake controller (brake
signal), Customer access
32 15A Moonroof motor, Telescoping
mirror switch, Auto dimming
mirrors, Power inverter, Driver
and passenger door lock switch
illumination, Rear heated seat
switch illumination
33 10A Restraint control module
34 10A Heated steering wheel module,
Rear heated seats module
35 5A Select shift switch, Reverse park
aid module, Trailer brake control
module
36 10A Fuel tank select switch
37 10A PTC heater
38 10A AM/FM radio faceplate
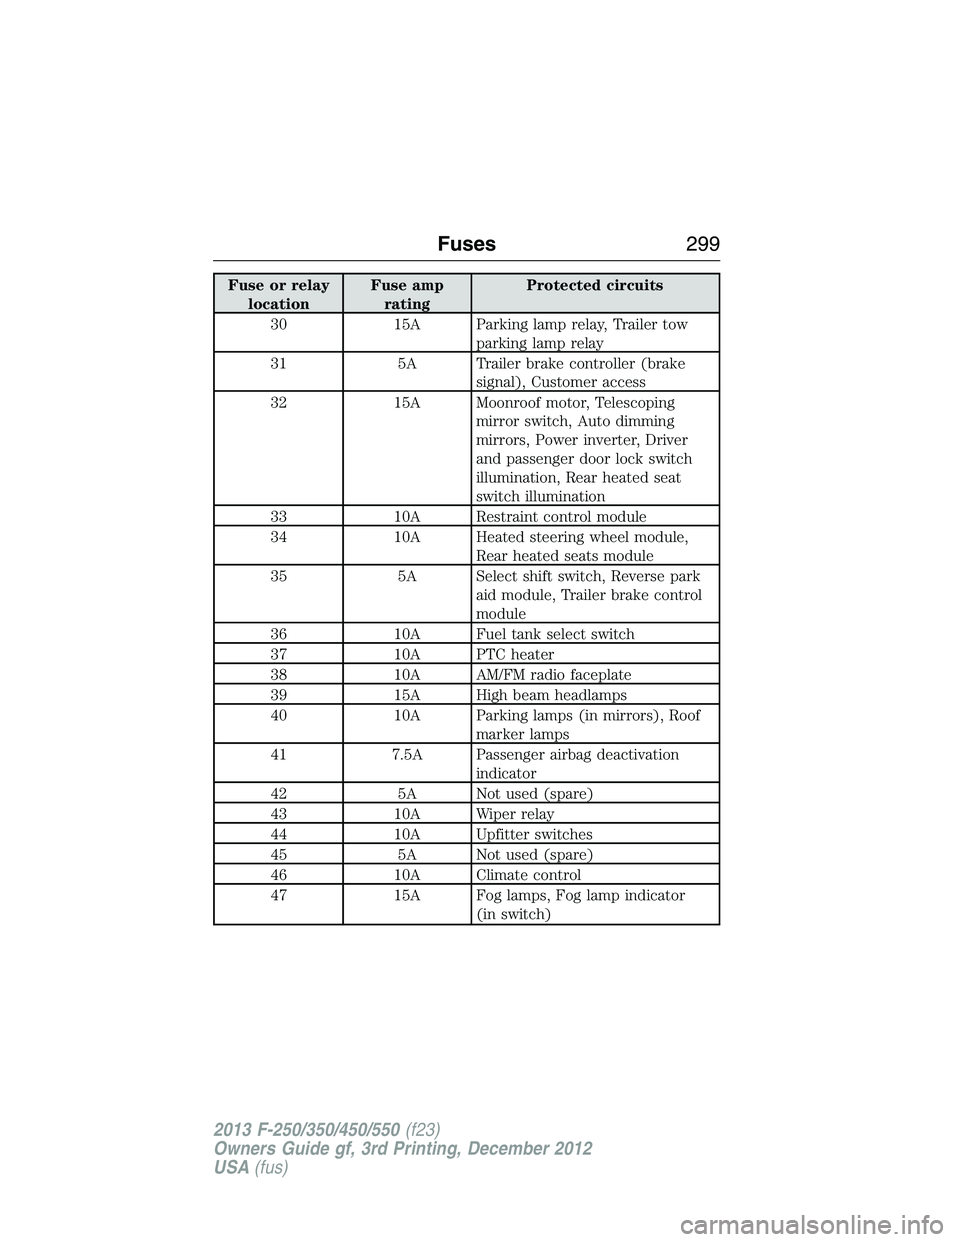
39 15A High beam headlamps
40 10A Parking lamps (in mirrors), Roof
marker lamps
41 7.5A Passenger airbag deactivation
indicator
42 5A Not used (spare)
43 10A Wiper relay
44 10A Upfitter switches
45 5A Not used (spare)
46 10A Climate control
47 15A Fog lamps, Fog lamp indicator
(in switch)
Fuses299
2013 F-250/350/450/550(f23)
Owners Guide gf, 3rd Printing, December 2012
USA(fus)
Page 326 of 577
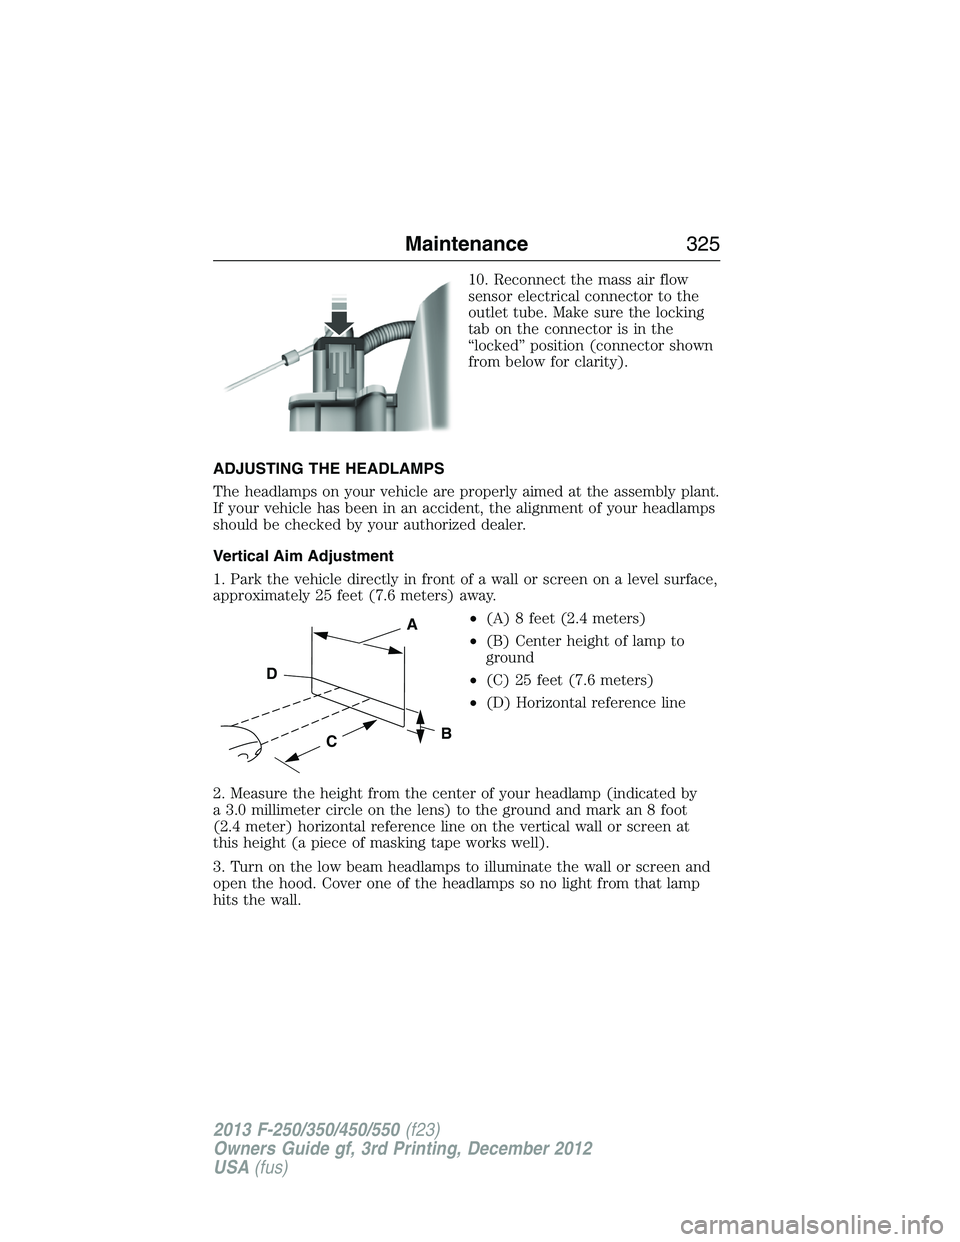
10. Reconnect the mass air flow
sensor electrical connector to the
outlet tube. Make sure the locking
tab on the connector is in the
“locked” position (connector shown
from below for clarity).
ADJUSTING THE HEADLAMPS
The headlamps on your vehicle are properly aimed at the assembly plant.
If your vehicle has been in an accident, the alignment of your headlamps
should be checked by your authorized dealer.
Vertical Aim Adjustment
1. Park the vehicle directly in front of a wall or screen on a level surface,
approximately 25 feet (7.6 meters) away.
•(A) 8 feet (2.4 meters)
•(B) Center height of lamp to
ground
•(C) 25 feet (7.6 meters)
•(D) Horizontal reference line
2. Measure the height from the center of your headlamp (indicated by
a 3.0 millimeter circle on the lens) to the ground and mark an 8 foot
(2.4 meter) horizontal reference line on the vertical wall or screen at
this height (a piece of masking tape works well).
3. Turn on the low beam headlamps to illuminate the wall or screen and
open the hood. Cover one of the headlamps so no light from that lamp
hits the wall.
C
A
B
D
Maintenance325
2013 F-250/350/450/550(f23)
Owners Guide gf, 3rd Printing, December 2012
USA(fus)
Page 327 of 577
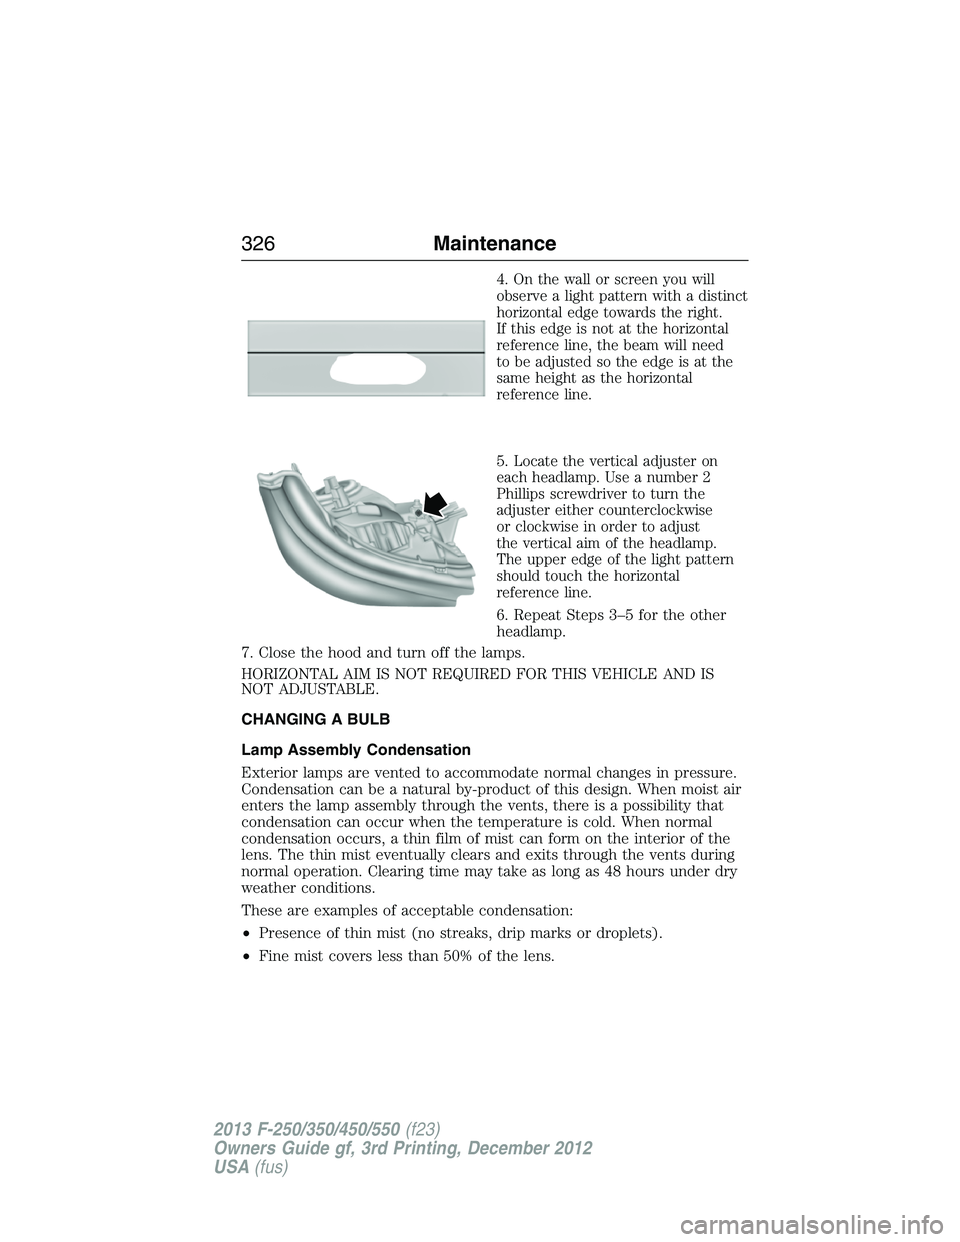
4.On the wall or screen you will
observe a light pattern with a distinct
horizontal edge towards the right.
If this edge is not at the horizontal
reference line, the beam will need
to be adjusted so the edge is at the
same height as the horizontal
reference line.
5.Locate the vertical adjuster on
each headlamp. Use a number 2
Phillips screwdriver to turn the
adjuster either counterclockwise
or clockwise in order to adjust
the vertical aim of the headlamp.
The upper edge of the light pattern
should touch the horizontal
reference line.
6. Repeat Steps 3–5 for the other
headlamp.
7. Close the hood and turn off the lamps.
HORIZONTAL AIM IS NOT REQUIRED FOR THIS VEHICLE AND IS
NOT ADJUSTABLE.
CHANGING A BULB
Lamp Assembly Condensation
Exterior lamps are vented to accommodate normal changes in pressure.
Condensation can be a natural by-product of this design. When moist air
enters the lamp assembly through the vents, there is a possibility that
condensation can occur when the temperature is cold. When normal
condensation occurs, a thin film of mist can form on the interior of the
lens. The thin mist eventually clears and exits through the vents during
normal operation. Clearing time may take as long as 48 hours under dry
weather conditions.
These are examples of acceptable condensation:
•Presence of thin mist (no streaks, drip marks or droplets).
•Fine mist covers less than 50% of the lens.
326Maintenance
2013 F-250/350/450/550(f23)
Owners Guide gf, 3rd Printing, December 2012
USA(fus)
Page 328 of 577
These are examples of unacceptable moisture (usually caused by a lamp
water leak):
•Water puddle inside the lamp.
•Large water droplets, drip marks or streaks present on the interior of
the lens.
Take your vehicle to a dealer for service if any of the above conditions of
unacceptable moisture are present.
Replacing Headlamps, Park Lamps, Turn Lamps
1. Make sure that the exterior lamps are off, then open the hood.
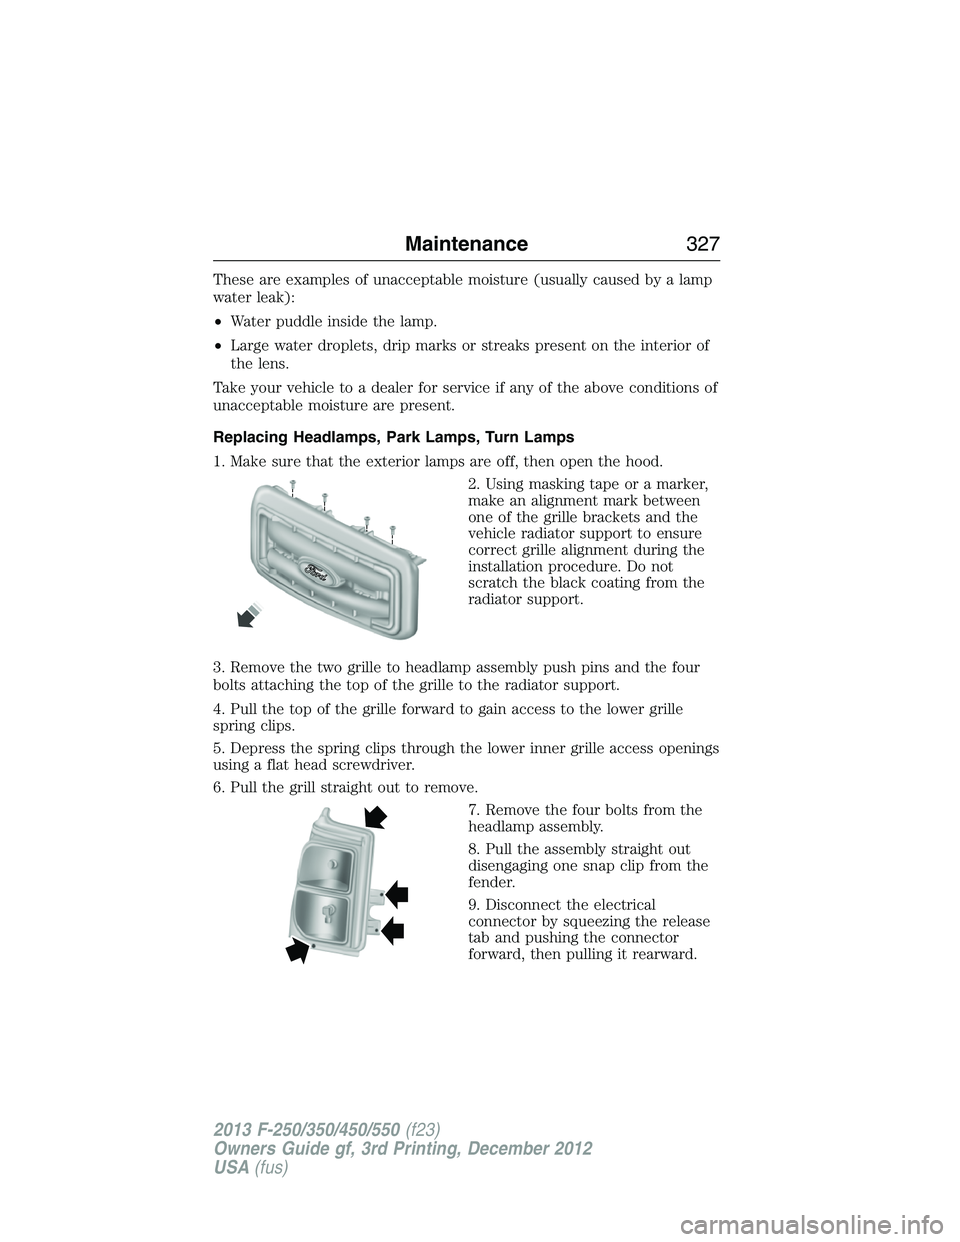
2. Using masking tape or a marker,
make an alignment mark between
one of the grille brackets and the
vehicle radiator support to ensure
correct grille alignment during the
installation procedure. Do not
scratch the black coating from the
radiator support.
3. Remove the two grille to headlamp assembly push pins and the four
bolts attaching the top of the grille to the radiator support.
4. Pull the top of the grille forward to gain access to the lower grille
spring clips.
5. Depress the spring clips through the lower inner grille access openings
using a flat head screwdriver.
6. Pull the grill straight out to remove.
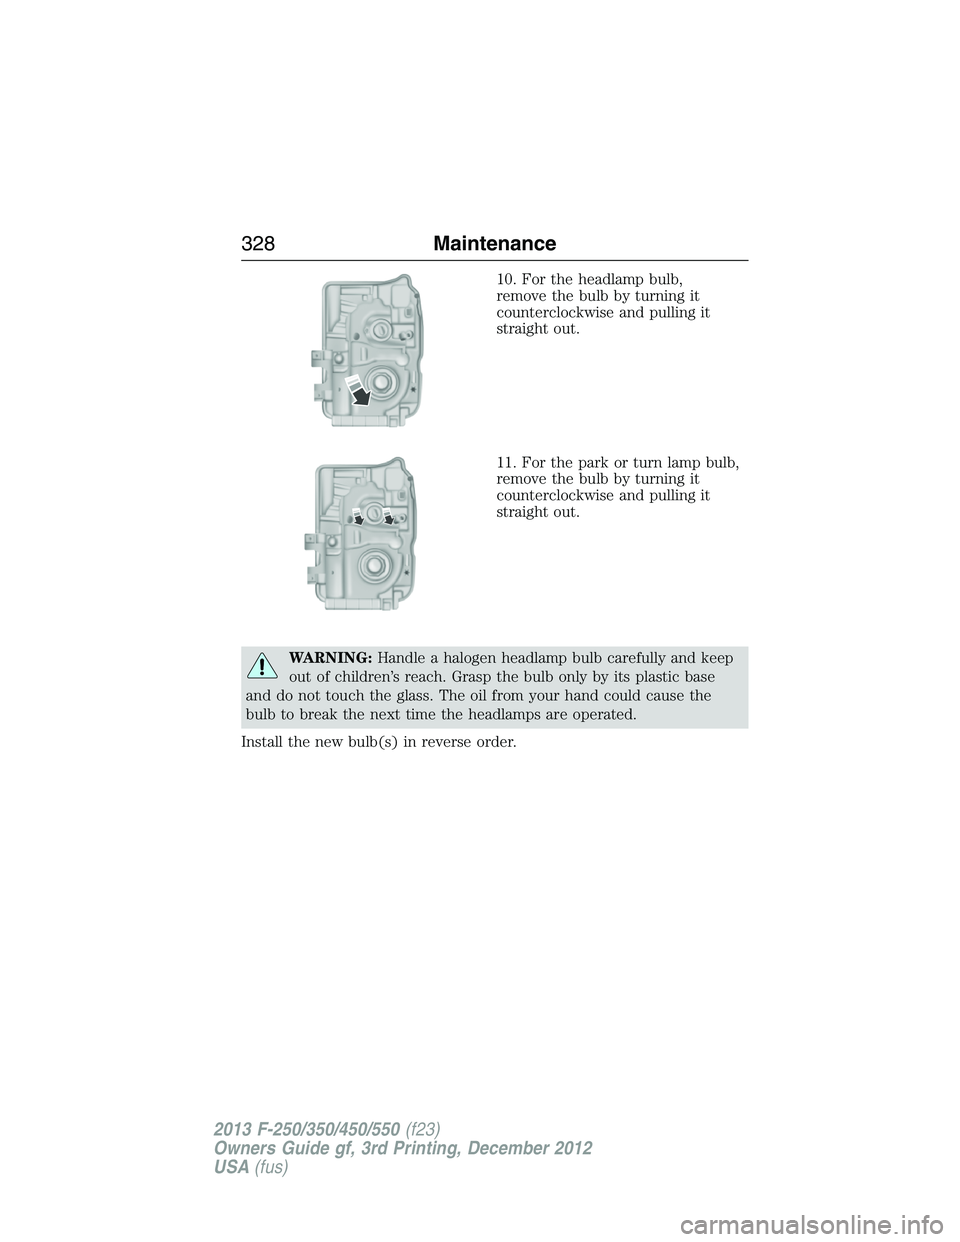
7. Remove the four bolts from the
headlamp assembly.
8. Pull the assembly straight out
disengaging one snap clip from the
fender.
9. Disconnect the electrical
connector by squeezing the release
tab and pushing the connector
forward, then pulling it rearward.
Maintenance327
2013 F-250/350/450/550(f23)
Owners Guide gf, 3rd Printing, December 2012
USA(fus)
Page 329 of 577
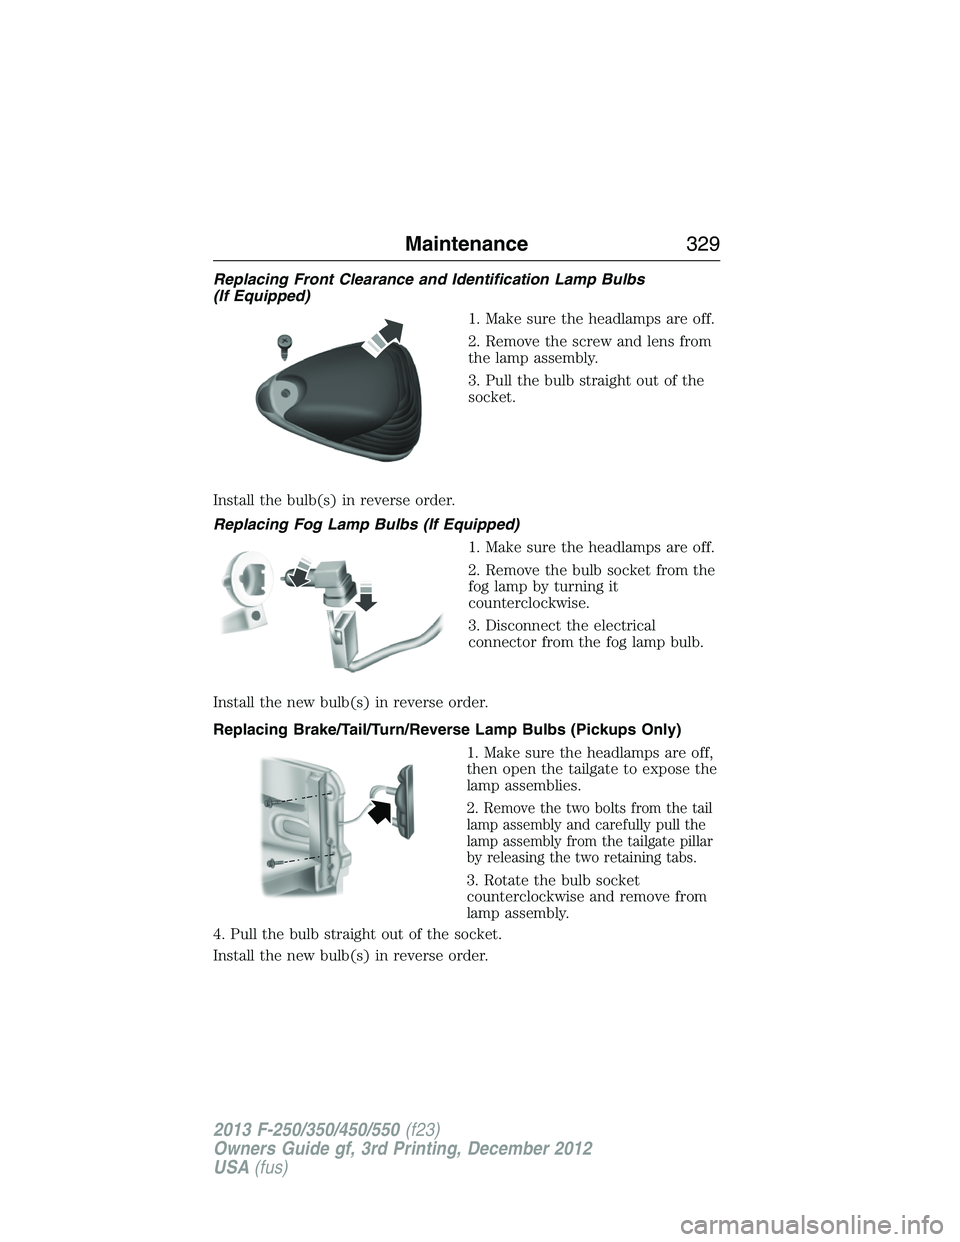
10. For the headlamp bulb,
remove the bulb by turning it
counterclockwise and pulling it
straight out.
11. For the park or turn lamp bulb,
remove the bulb by turning it
counterclockwise and pulling it
straight out.
WARNING:Handle a halogen headlamp bulb carefully and keep
out of children’s reach. Grasp the bulb only by its plastic base
and do not touch the glass. The oil from your hand could cause the
bulb to break the next time the headlamps are operated.
Install the new bulb(s) in reverse order.
328Maintenance
2013 F-250/350/450/550(f23)
Owners Guide gf, 3rd Printing, December 2012
USA(fus)
Page 330 of 577
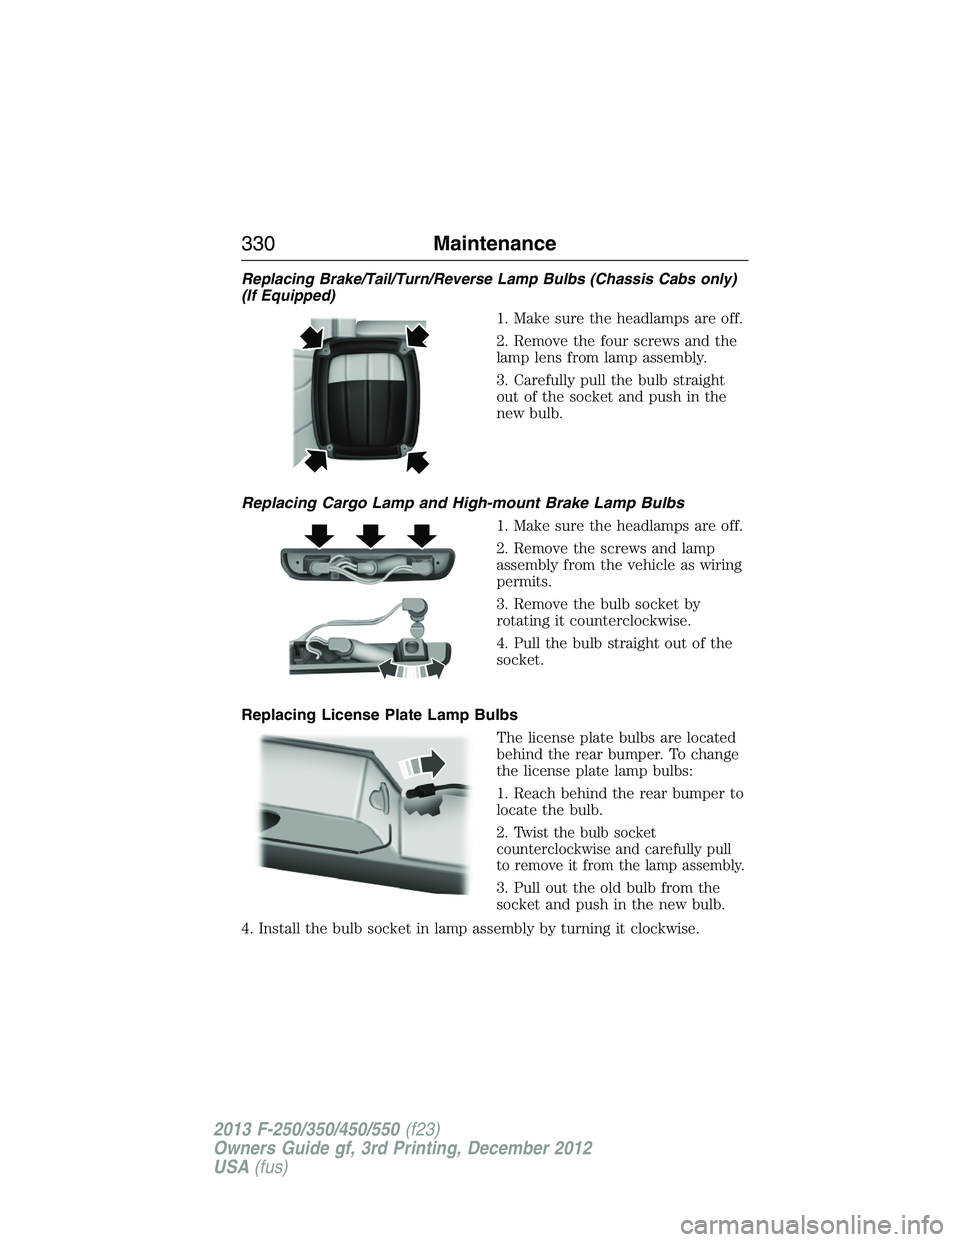
Replacing Front Clearance and Identification Lamp Bulbs
(If Equipped)
1. Make sure the headlamps are off.
2. Remove the screw and lens from
the lamp assembly.
3. Pull the bulb straight out of the
socket.
Install the bulb(s) in reverse order.
Replacing Fog Lamp Bulbs (If Equipped)
1. Make sure the headlamps are off.
2. Remove the bulb socket from the
fog lamp by turning it
counterclockwise.
3. Disconnect the electrical
connector from the fog lamp bulb.
Install the new bulb(s) in reverse order.
Replacing Brake/Tail/Turn/Reverse Lamp Bulbs (Pickups Only)
1. Make sure the headlamps are off,
then open the tailgate to expose the
lamp assemblies.
2.
Remove the two bolts from the tail
lamp assembly and carefully pull the
lamp assembly from the tailgate pillar
by releasing the two retaining tabs.
3. Rotate the bulb socket
counterclockwise and remove from
lamp assembly.
4. Pull the bulb straight out of the socket.
Install the new bulb(s) in reverse order.
Maintenance329
2013 F-250/350/450/550(f23)
Owners Guide gf, 3rd Printing, December 2012
USA(fus)
Page 331 of 577
Replacing Brake/Tail/Turn/Reverse Lamp Bulbs (Chassis Cabs only)
(If Equipped)
1. Make sure the headlamps are off.
2. Remove the four screws and the
lamp lens from lamp assembly.
3. Carefully pull the bulb straight
out of the socket and push in the
new bulb.
Replacing Cargo Lamp and High-mount Brake Lamp Bulbs
1. Make sure the headlamps are off.
2. Remove the screws and lamp
assembly from the vehicle as wiring
permits.
3. Remove the bulb socket by
rotating it counterclockwise.
4. Pull the bulb straight out of the
socket.
Replacing License Plate Lamp Bulbs
The license plate bulbs are located
behind the rear bumper. To change
the license plate lamp bulbs:
1. Reach behind the rear bumper to
locate the bulb.
2.
Twist the bulb socket
counterclockwise and carefully pull
to remove it from the lamp assembly.
3. Pull out the old bulb from the
socket and push in the new bulb.
4. Install the bulb socket in lamp assembly by turning it clockwise.
330Maintenance
2013 F-250/350/450/550(f23)
Owners Guide gf, 3rd Printing, December 2012
USA(fus)
Page 332 of 577
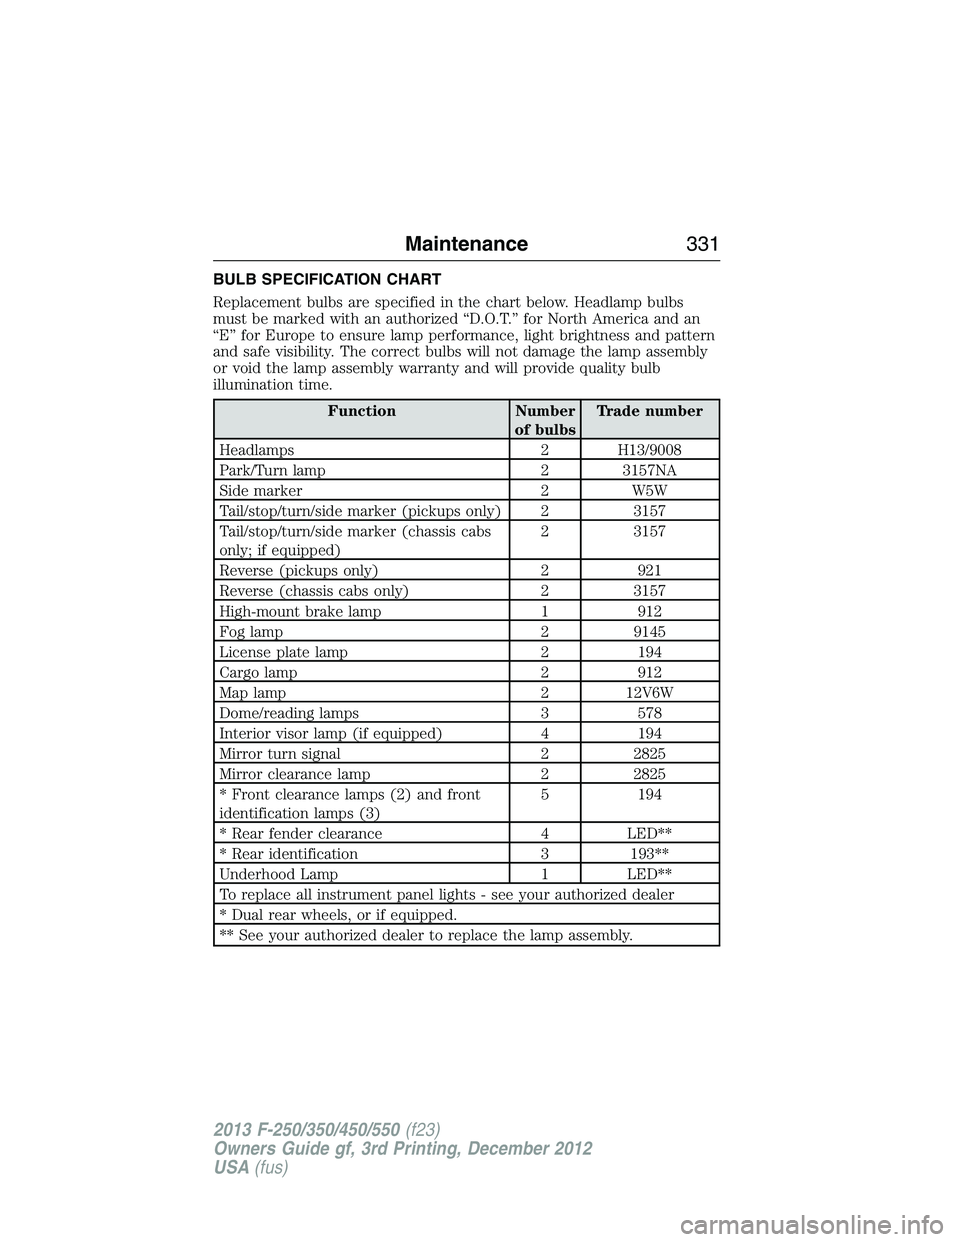
BULB SPECIFICATION CHART
Replacement bulbs are specified in the chart below. Headlamp bulbs
must be marked with an authorized “D.O.T.” for North America and an
“E” for Europe to ensure lamp performance, light brightness and pattern
and safe visibility. The correct bulbs will not damage the lamp assembly
or void the lamp assembly warranty and will provide quality bulb
illumination time.
Function Number
of bulbsTrade number
Headlamps 2 H13/9008
Park/Turn lamp 2 3157NA
Side marker 2 W5W
Tail/stop/turn/side marker (pickups only) 2 3157
Tail/stop/turn/side marker (chassis cabs
only; if equipped)2 3157
Reverse (pickups only) 2 921
Reverse (chassis cabs only) 2 3157
High-mount brake lamp 1 912
Fog lamp 2 9145
License plate lamp 2 194
Cargo lamp 2 912
Map lamp 2 12V6W
Dome/reading lamps 3 578
Interior visor lamp (if equipped) 4 194
Mirror turn signal 2 2825
Mirror clearance lamp 2 2825
* Front clearance lamps (2) and front
identification lamps (3)5 194
* Rear fender clearance 4 LED**
* Rear identification 3 193**
Underhood Lamp 1 LED**
To replace all instrument panel lights - see your authorized dealer
* Dual rear wheels, or if equipped.
** See your authorized dealer to replace the lamp assembly.
Maintenance331
2013 F-250/350/450/550(f23)
Owners Guide gf, 3rd Printing, December 2012
USA(fus)
Page 573 of 577
Fuel - flex fuel vehicle
(FFV) .................................188, 191
Fuses ..........................290–291, 296
G
Garage door opener ..........168, 172
Gas cap (see Fuel cap) ............193
Gauges .........................................97
H
Hazard flashers .........................278
HD Radio™ ...............................482
Headlamps ...................................85
aiming ......................................325
autolamp system .......................86
bulb specifications ..................331
checking alignment ................325
daytime running lights .............87
flash to pass ..............................85
high beam .................................85
replacing bulbs .......................327
turning on and off ....................85
Head restraints .........................155
Heated steering wheel ..............534
Heating ..............................146, 148
Help ............................................533
Hill descent mode .....................230
Hill start assist ..........................208
Homelink wireless control
system ........................................172
Hood ..........................................303
How to use voice commands ...473
I
Ignition ...............................183, 389Illuminated visor mirror .............95
Information displays .................104
Inspection/maintenance (I/M)
testing ........................................198
Instrument panel
cleaning ...........................336–337
cluster ........................................99
lighting up panel and
interior .......................................87
J
Jack ............................................371
positioning ...............................371
storage .....................................371
Joining two calls
(multiparty/conference call) ....429
Jump-starting your vehicle ......279
K
Keyless entry system
autolock .....................................73
keypad .......................................75
locking and unlocking doors ....76
programming entry code .........75
Keys .......................................62, 77
positions of the ignition .........183
L
Lamps ..........................................85
autolamp system .......................86
bulb replacement
specifications chart ................331
daytime running light ...............87
fog lamps ...................................88
headlamps .................................85
headlamps, flash to pass ..........85
instrument panel, dimming .....87
572Index
2013 F-250/350/450/550(f23)
Owners Guide gf, 3rd Printing, December 2012
USA(fus)