oil dipstick FORD F250 2016 Owners Manual
[x] Cancel search | Manufacturer: FORD, Model Year: 2016, Model line: F250, Model: FORD F250 2016Pages: 507, PDF Size: 6.81 MB
Page 7 of 507
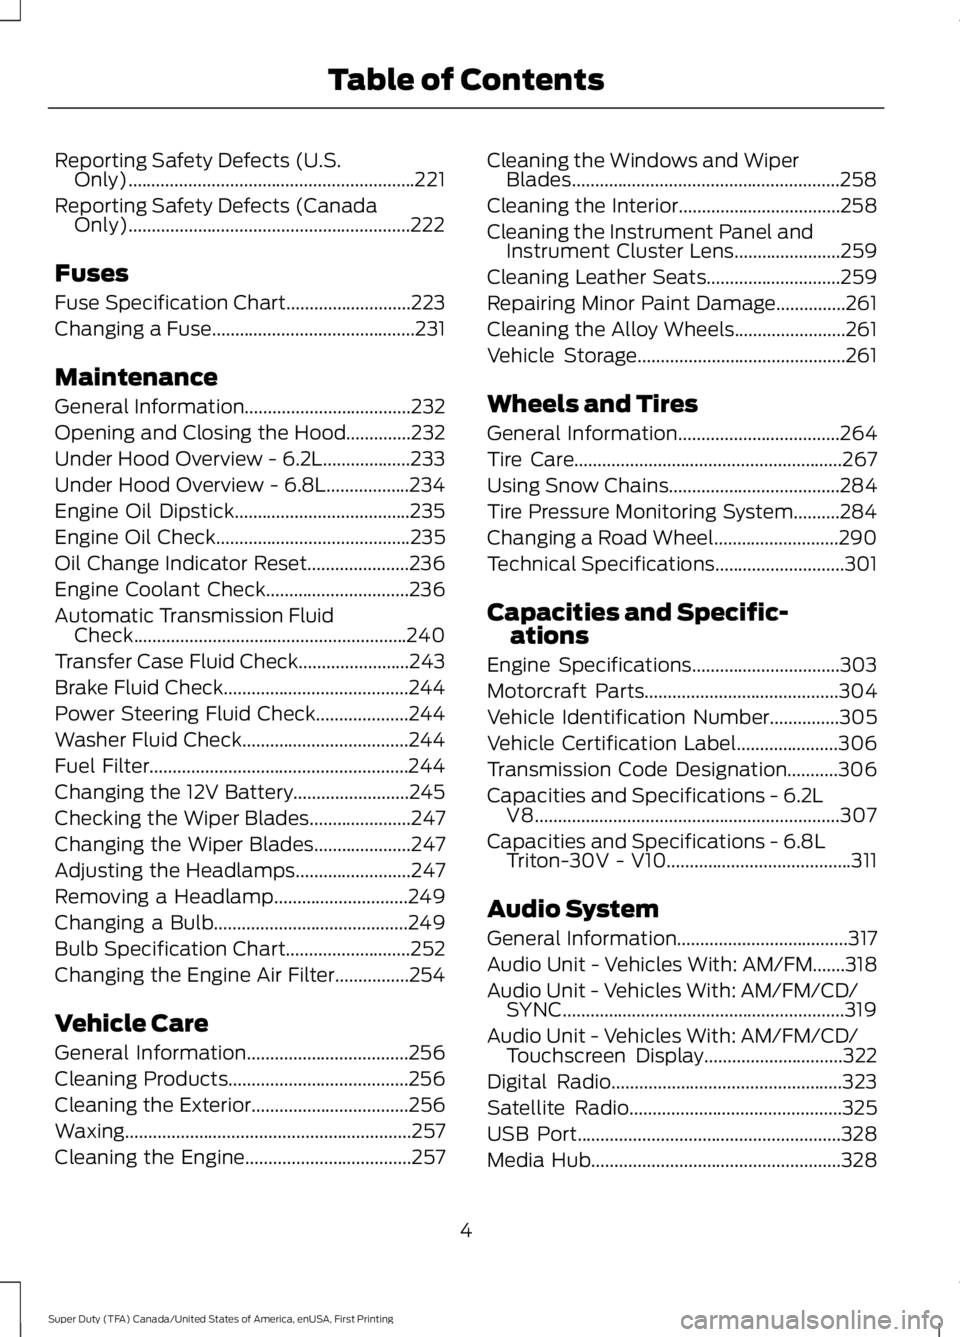
Reporting Safety Defects (U.S.
Only)..............................................................221
Reporting Safety Defects (Canada Only).............................................................222
Fuses
Fuse Specification Chart...........................223
Changing a Fuse............................................231
Maintenance
General Information
....................................232
Opening and Closing the Hood..............232
Under Hood Overview - 6.2L...................233
Under Hood Overview - 6.8L..................234
Engine Oil Dipstick......................................235
Engine Oil Check
..........................................235
Oil Change Indicator Reset......................236
Engine Coolant Check
...............................236
Automatic Transmission Fluid Check...........................................................240
Transfer Case Fluid Check........................243
Brake Fluid Check........................................244
Power Steering Fluid Check....................244
Washer Fluid Check
....................................244
Fuel Filter........................................................244
Changing the 12V Battery.........................245
Checking the Wiper Blades
......................247
Changing the Wiper Blades
.....................247
Adjusting the Headlamps.........................247
Removing a Headlamp.............................249
Changing a Bulb..........................................249
Bulb Specification Chart
...........................252
Changing the Engine Air Filter................254
Vehicle Care
General Information...................................256
Cleaning Products.......................................256
Cleaning the Exterior
..................................256
Waxing
..............................................................257
Cleaning the Engine....................................257 Cleaning the Windows and Wiper
Blades..........................................................258
Cleaning the Interior
...................................258
Cleaning the Instrument Panel and Instrument Cluster Lens
.......................259
Cleaning Leather Seats.............................259
Repairing Minor Paint Damage...............261
Cleaning the Alloy Wheels........................261
Vehicle Storage.............................................261
Wheels and Tires
General Information
...................................264
Tire Care..........................................................267
Using Snow Chains
.....................................284
Tire Pressure Monitoring System..........284
Changing a Road Wheel...........................290
Technical Specifications
............................301
Capacities and Specific- ations
Engine Specifications
................................303
Motorcraft Parts
..........................................304
Vehicle Identification Number...............305
Vehicle Certification Label
......................306
Transmission Code Designation...........306
Capacities and Specifications -
6.2L
V8..................................................................307
Capacities and Specifications -
6.8L
Triton-30V - V10........................................311
Audio System
General Information
.....................................317
Audio Unit - Vehicles With: AM/FM.......318
Audio Unit - Vehicles With: AM/FM/CD/ SYNC.............................................................319
Audio Unit - Vehicles With: AM/FM/CD/ Touchscreen Display
..............................322
Digital Radio..................................................323
Satellite Radio
..............................................325
USB Port
.........................................................328
Media Hub
......................................................328
4
Super Duty (TFA) Canada/United States of America, enUSA, First Printing Table of Contents
Page 236 of 507
2. Go to the front of the vehicle and
locate the secondary release lever,
which is located under the front of the
hood, to your right of the center of the
vehicle (driver's side), toward the
headlight.
3. Release the hood latch by pushing the secondary release lever to your left,
toward the center of the vehicle.
4. Raise the hood. 5.
To close the hood, lower the hood and
allow it to drop the last 8 to 11 inches
(20 to 30 centimeters).
Note: Make sure that the hood is closed
properly.
UNDER HOOD OVERVIEW -
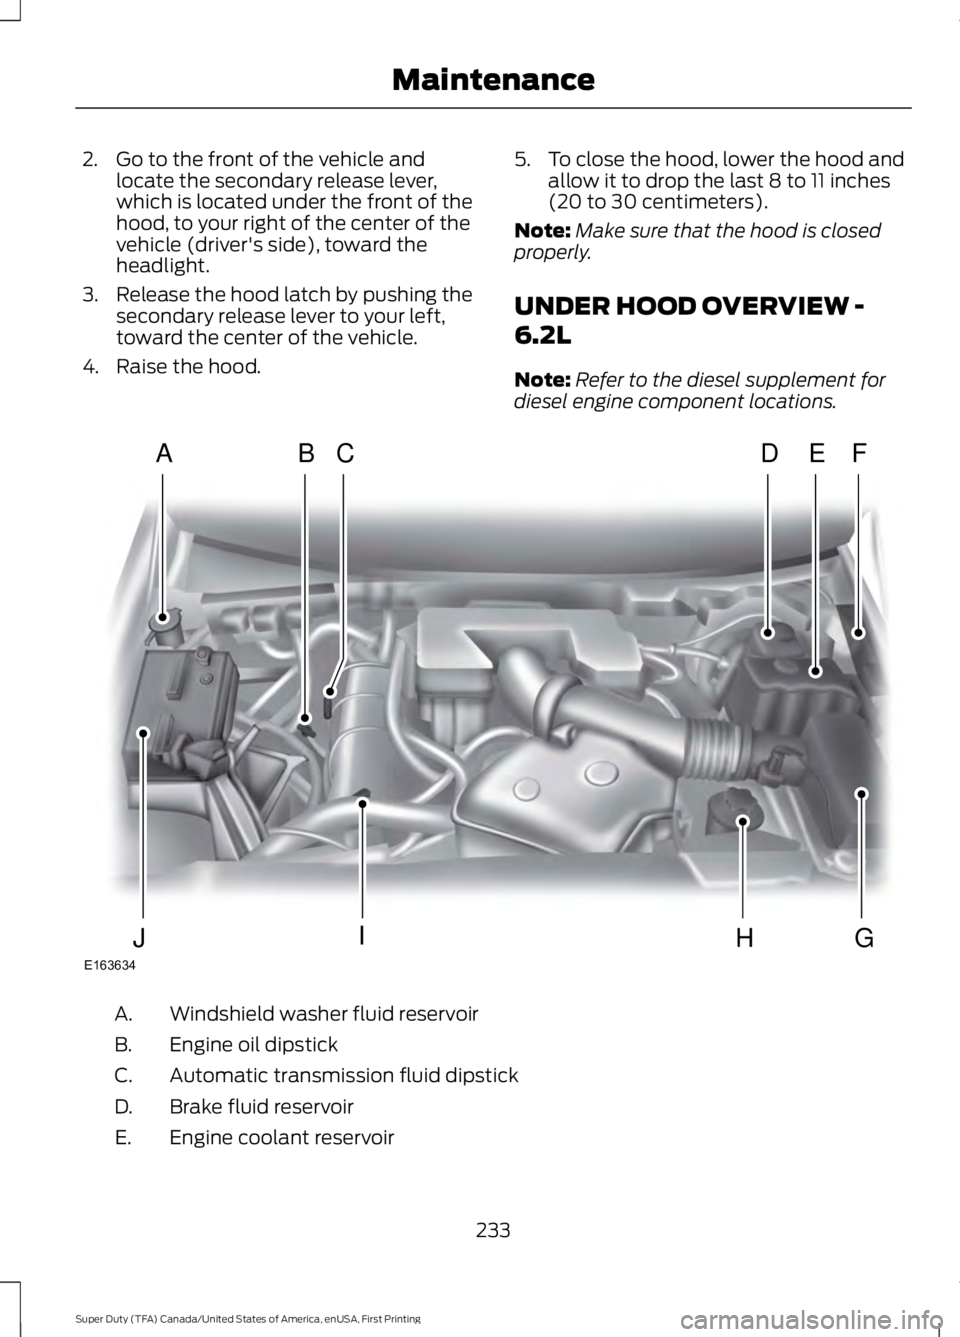
6.2L
Note: Refer to the diesel supplement for
diesel engine component locations. Windshield washer fluid reservoir
A.
Engine oil dipstick
B.
Automatic transmission fluid dipstick
C.
Brake fluid reservoir
D.
Engine coolant reservoir
E.
233
Super Duty (TFA) Canada/United States of America, enUSA, First Printing MaintenanceE163634
ADFEBC
GHIJ
Page 237 of 507
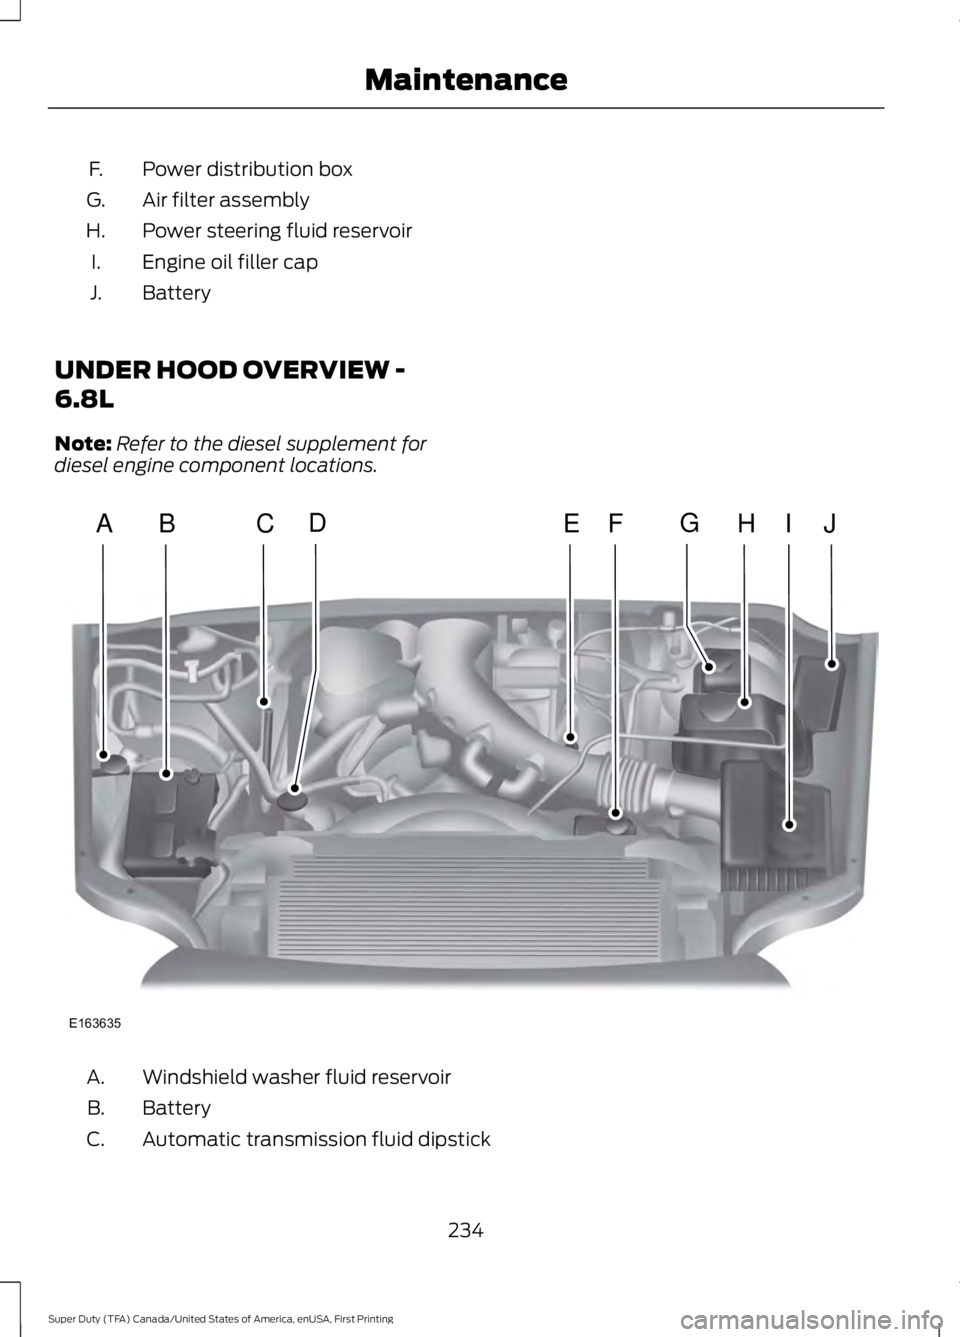
Power distribution box
F.
Air filter assembly
G.
Power steering fluid reservoir
H.
Engine oil filler cap
I.
Battery
J.
UNDER HOOD OVERVIEW -
6.8L
Note: Refer to the diesel supplement for
diesel engine component locations. Windshield washer fluid reservoir
A.
Battery
B.
Automatic transmission fluid dipstick
C.
234
Super Duty (TFA) Canada/United States of America, enUSA, First Printing MaintenanceE163635
ABCEHIJFDG
Page 238 of 507
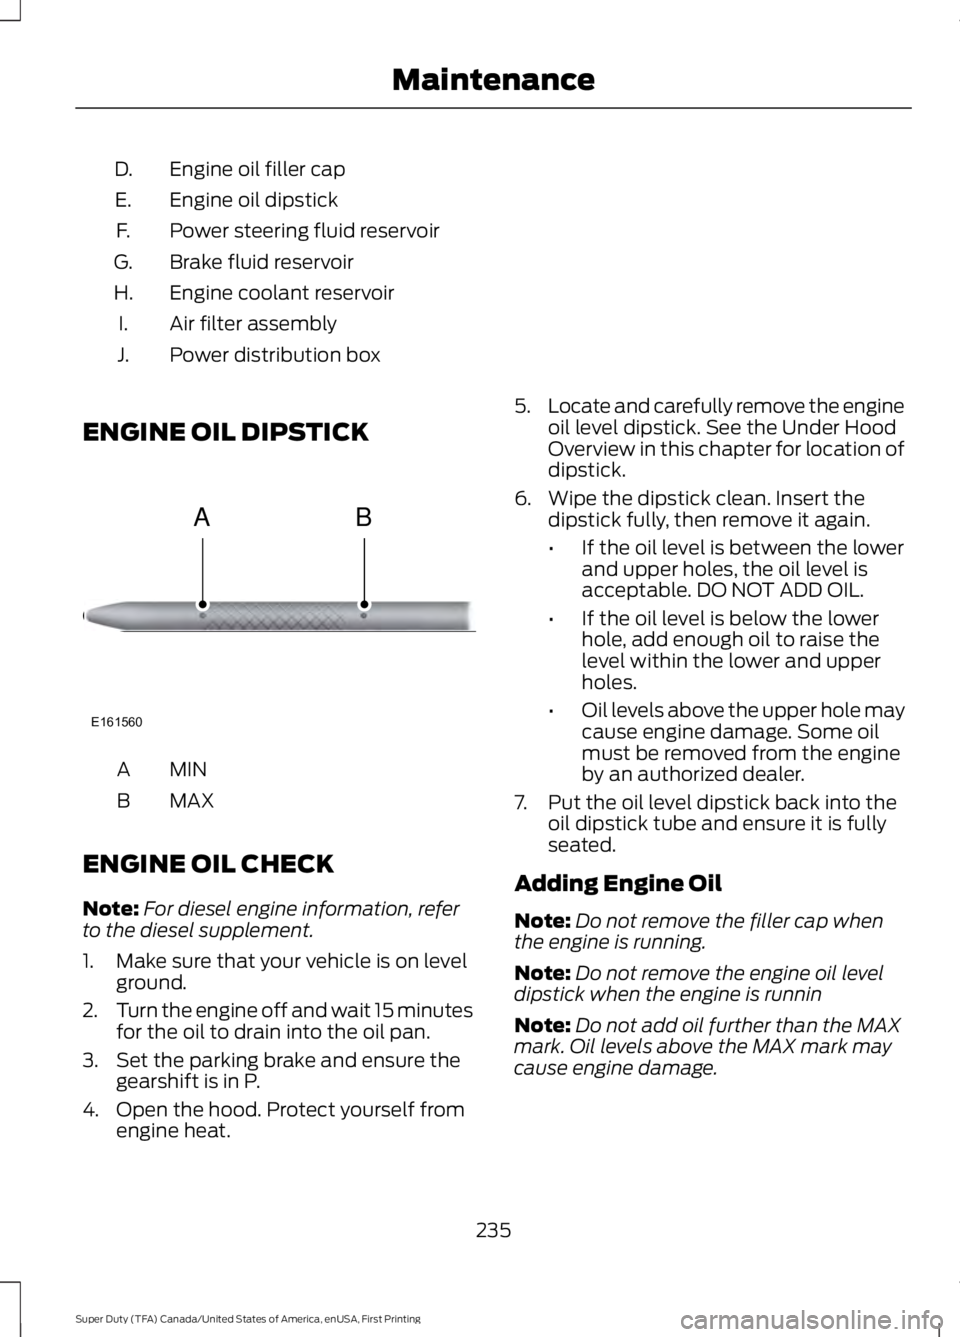
Engine oil filler cap
D.
Engine oil dipstick
E.
Power steering fluid reservoir
F.
Brake fluid reservoir
G.
Engine coolant reservoir
H.
Air filter assembly
I.
Power distribution box
J.
ENGINE OIL DIPSTICK MINA
MAX
B
ENGINE OIL CHECK
Note: For diesel engine information, refer
to the diesel supplement.
1. Make sure that your vehicle is on level ground.
2. Turn the engine off and wait 15 minutes
for the oil to drain into the oil pan.
3. Set the parking brake and ensure the gearshift is in P.
4. Open the hood. Protect yourself from engine heat. 5.
Locate and carefully remove the engine
oil level dipstick. See the Under Hood
Overview in this chapter for location of
dipstick.
6. Wipe the dipstick clean. Insert the dipstick fully, then remove it again.
•If the oil level is between the lower
and upper holes, the oil level is
acceptable. DO NOT ADD OIL.
• If the oil level is below the lower
hole, add enough oil to raise the
level within the lower and upper
holes.
• Oil levels above the upper hole may
cause engine damage. Some oil
must be removed from the engine
by an authorized dealer.
7. Put the oil level dipstick back into the oil dipstick tube and ensure it is fully
seated.
Adding Engine Oil
Note: Do not remove the filler cap when
the engine is running.
Note: Do not remove the engine oil level
dipstick when the engine is runnin
Note: Do not add oil further than the MAX
mark. Oil levels above the MAX mark may
cause engine damage.
235
Super Duty (TFA) Canada/United States of America, enUSA, First Printing MaintenanceE161560
AB
Page 239 of 507
Only use oils certified for gasoline engines
by the American Petroleum Institute (API).
An oil with this trademark symbol
conforms to the current engine and
emission system protection standards and
fuel economy requirements of the
International Lubricants Specification
Advisory Council (ILSAC), comprised of
U.S. and Japanese automobile
manufacturers.
1. Check the engine oil level.
2. If the engine oil level is not within the
normal range, add engine oil that
meets Ford specifications. See
Capacities and Specifications for more
information.
3. Remove the engine oil filler cap and use a funnel to pour the engine oil into
the opening.
4. Recheck the engine oil level. Make sure
the oil level is not above the normal
operating range on the engine oil level
dipstick.
5. Install the engine oil level dipstick and ensure it is fully seated.
6. Fully install the engine oil filler cap by turning the filler cap clockwise until
three clicks are heard or until the cap
is fully seated. OIL CHANGE INDICATOR
RESET
Resetting the Oil Life Monitoring
System
Only reset the oil life monitoring system
after changing the engine oil and oil filter.
1.
Switch the ignition on. Do not start the
engine. For vehicles with push-button
start, press and hold the start button
for two seconds without pressing the
brake pedal. Do not start the engine.
2. Press the accelerator and brake pedals
at the same time.
3. Keep the accelerator and brake pedals
fully pressed.
4. After three seconds, a message confirming that the reset is in progress
will be displayed.
5. After 25 seconds, a message confirming that the reset is complete
will be displayed.
6. Release the accelerator and brake pedals.
7. The message confirming that the reset
is complete will no longer be displayed.
8. Switch the ignition off. For vehicles with
push-button start, press the start
button to switch the ignition off.
ENGINE COOLANT CHECK WARNINGS
Do not add engine coolant when the
engine is hot. Steam and scalding
liquids released from a hot cooling
system can burn you badly. Also, you can
be burned if you spill coolant on hot engine
parts.
236
Super Duty (TFA) Canada/United States of America, enUSA, First Printing MaintenanceE142732
Page 500 of 507
Driving Through Water..............................208
DRL
See: Daytime Running Lamps......................... 73
E
Economical Driving.....................................207
Electronic Locking Differential.................167 Activating the Electronic Locking
Differential........................................................ 167
Emission Control System
..........................148
On-Board Diagnostics (OBD-II)................... 149
Readiness for Inspection/Maintenance (I/M) Testing................................................... 150
End User License Agreement..................472 SYNC End User License Agreement
(EULA).............................................................. 472
Engine Block Heater....................................142 Using the Engine Block Heater...................... 143
Engine Coolant Check
...............................236
Adding Engine Coolant.................................... 237
Recycled Engine Coolant................................ 238
Severe Climates................................................. 238
What You Should Know About Fail-Safe Cooling.............................................................. 239
Engine Immobilizer See: Passive Anti-Theft System..................... 64
Engine Oil Check
..........................................235
Adding Engine Oil.............................................. 235
Engine Oil Dipstick......................................235
Engine Specifications
................................303
Drivebelt Routing............................................... 303
Entertainment..............................................395 AM/FM Radio...................................................... 395
Bluetooth Audio.................................................. 410
CD........................................................................\
... 405
SD Card Slot and USB Port........................... 407
SIRIUS® Satellite Radio (If Activated)........................................................ 401
Supported Media Players, Formats and Metadata Information................................. 410
Environment......................................................14 Essential Towing Checks...........................196
Before Towing a Trailer.................................... 202
Dynamic Hitching Using the Rear View Camera System.............................................. 197
Hitches................................................................... 198
Integrated Trailer Brake Controller.............200
Launching or Retrieving a Boat or Personal Watercraft (PWC)........................................ 203
Safety Chains....................................................... 199
Trailer Brakes....................................................... 199
Trailer Lamps....................................................... 202
Trailer Towing Connector................................. 197
When Towing a Trailer..................................... 202
Event Data Recording See: Data Recording.............................................. 9
Export Unique Options..................................13
Extended Service Plan (ESP)
..................451
SERVICE PLANS (CANADA ONLY)............452
SERVICE PLANS (U.S. Only).......................... 451
Exterior Mirrors
.................................................77
Clearance Lamps................................................. 78
Fold-Away Exterior Mirrors................................ 77
Heated Exterior Mirrors...................................... 78
Memory Mirrors..................................................... 78
Power Exterior Mirrors......................................... 77
Telescoping Mirrors.............................................. 78
F
Fastening the Safety Belts
.........................30
Fastening the Cinch Tongue.............................. 31
Safety Belt Extension Assembly..................... 33
Safety Belt Locking Modes............................... 32
Using Safety Belts During Pregnancy............31
Using the Safety Belt with Cinch Tongue (Front Center and Rear Center Seats
Only).................................................................... 30
Floor Mats
......................................................208
Fog Lamps - Front See: Front Fog Lamps......................................... 73
Foot Pedals See: Adjusting the Pedals................................. 69
Ford Credit
..........................................................11
(U.S. Only)................................................................. 11
Four-Wheel Drive
.........................................158
Front Fog Lamps.............................................73
Front Seat Armrest.......................................127
Fuel and Refueling.......................................144
497
Super Duty (TFA) Canada/United States of America, enUSA, First Printing Index