tow FORD F250 2016 Owners Manual
[x] Cancel search | Manufacturer: FORD, Model Year: 2016, Model line: F250, Model: FORD F250 2016Pages: 507, PDF Size: 6.81 MB
Page 6 of 507
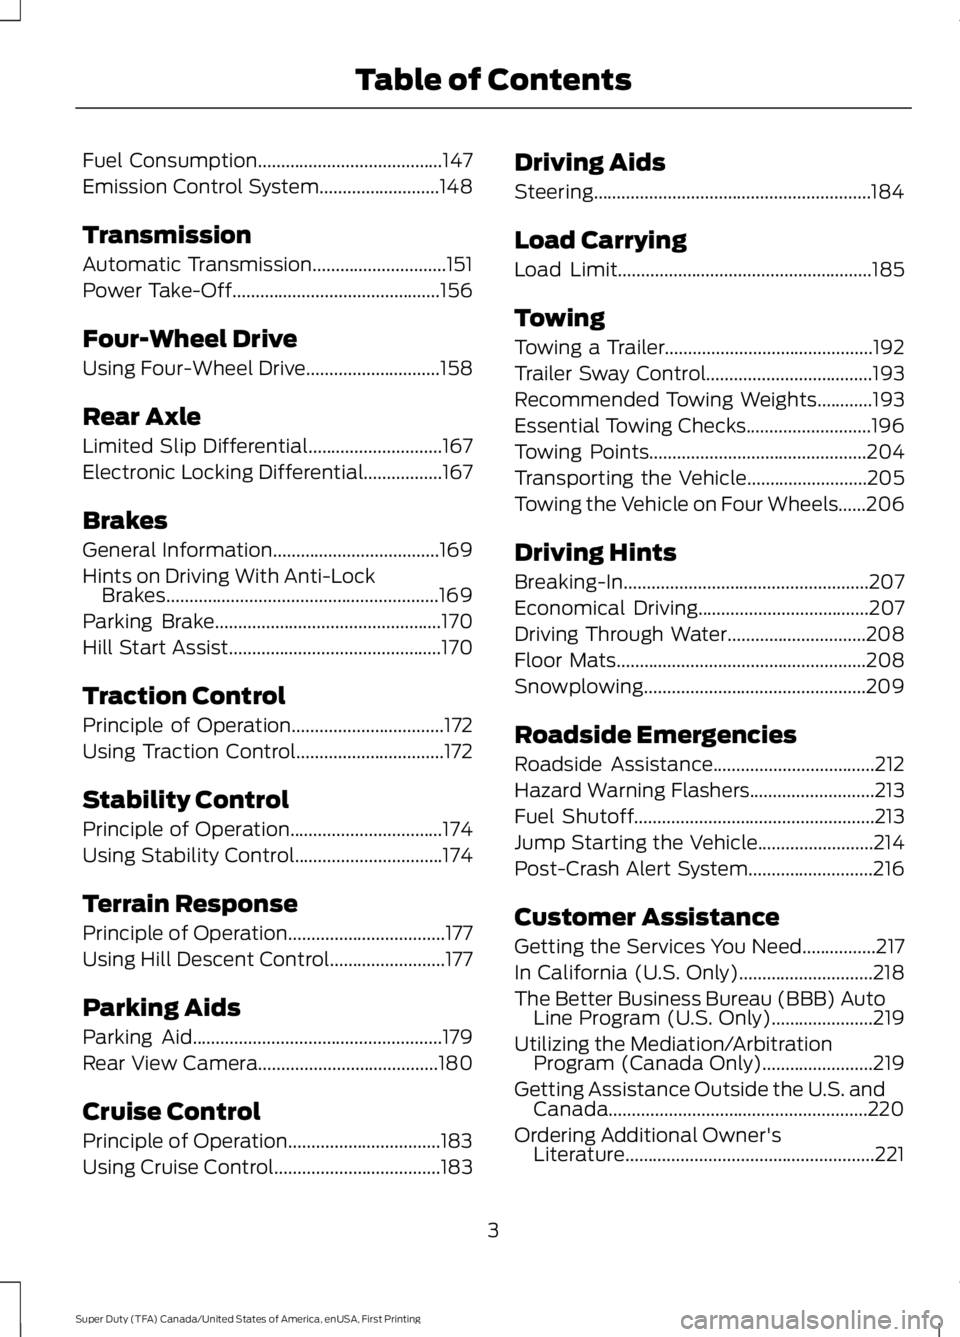
Fuel Consumption........................................147
Emission Control System..........................148
Transmission
Automatic Transmission.............................151
Power Take-Off.............................................156
Four-Wheel Drive
Using Four-Wheel Drive.............................158
Rear Axle
Limited Slip Differential.............................167
Electronic Locking Differential
.................167
Brakes
General Information
....................................169
Hints on Driving With Anti-Lock Brakes...........................................................169
Parking Brake
.................................................170
Hill Start Assist..............................................170
Traction Control
Principle of Operation
.................................172
Using Traction Control................................172
Stability Control
Principle of Operation.................................174
Using Stability Control
................................174
Terrain Response
Principle of Operation..................................177
Using Hill Descent Control.........................177
Parking Aids
Parking Aid
......................................................179
Rear View Camera.......................................180
Cruise Control
Principle of Operation.................................183
Using Cruise Control
....................................183 Driving Aids
Steering............................................................184
Load Carrying
Load Limit
.......................................................185
Towing
Towing a Trailer.............................................192
Trailer Sway Control....................................193
Recommended Towing Weights............193
Essential Towing Checks...........................196
Towing Points
...............................................204
Transporting the Vehicle..........................205
Towing the Vehicle on Four Wheels......206
Driving Hints
Breaking-In
.....................................................207
Economical Driving
.....................................207
Driving Through Water..............................208
Floor Mats
......................................................208
Snowplowing................................................209
Roadside Emergencies
Roadside Assistance
...................................212
Hazard Warning Flashers
...........................213
Fuel Shutoff
....................................................213
Jump Starting the Vehicle.........................214
Post-Crash Alert System...........................216
Customer Assistance
Getting the Services You Need................217
In California (U.S. Only)
.............................218
The Better Business Bureau (BBB) Auto Line Program (U.S. Only)......................219
Utilizing the Mediation/Arbitration Program (Canada Only)........................219
Getting Assistance Outside the U.S. and Canada........................................................220
Ordering Additional Owner's Literature......................................................221
3
Super Duty (TFA) Canada/United States of America, enUSA, First Printing Table of Contents
Page 17 of 507
PROTECTING THE
ENVIRONMENT
You must play your part in protecting the
environment. Correct vehicle usage and
the authorized disposal of waste, cleaning
and lubrication materials are significant
steps toward this aim.
14
Super Duty (TFA) Canada/United States of America, enUSA, First Printing Environment
Page 22 of 507
necessary to remove the remaining
slack that will exist once the extra
weight of the child is added to the child
restraint. It also helps to achieve the
proper snugness of the child seat to
your vehicle. Sometimes, a slight lean
toward the buckle will help to remove
remaining slack from the belt.
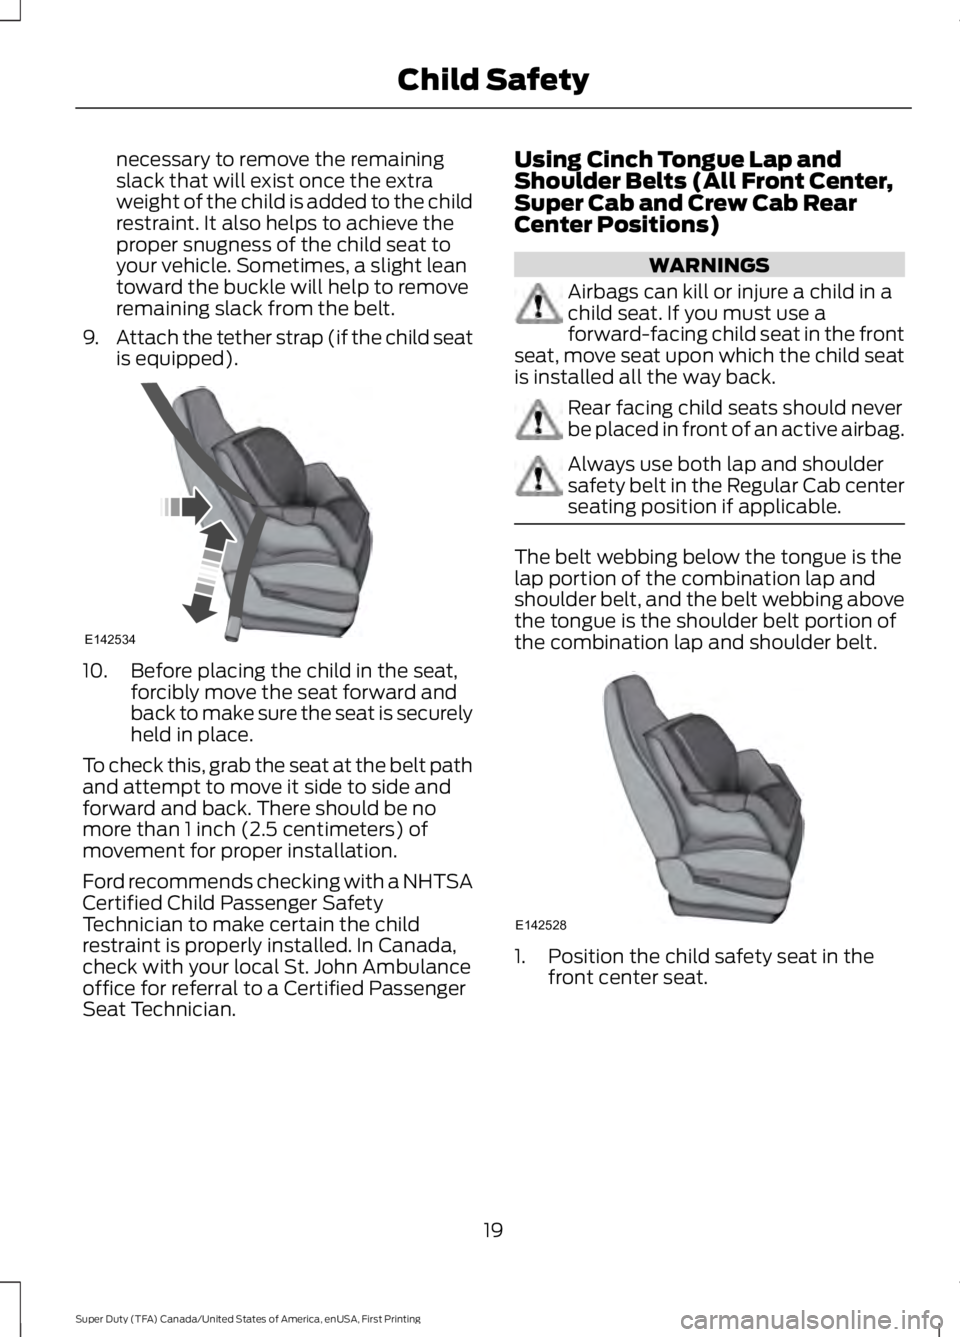
9. Attach the tether strap (if the child seat
is equipped). 10. Before placing the child in the seat,
forcibly move the seat forward and
back to make sure the seat is securely
held in place.
To check this, grab the seat at the belt path
and attempt to move it side to side and
forward and back. There should be no
more than 1 inch (2.5 centimeters) of
movement for proper installation.
Ford recommends checking with a NHTSA
Certified Child Passenger Safety
Technician to make certain the child
restraint is properly installed. In Canada,
check with your local St. John Ambulance
office for referral to a Certified Passenger
Seat Technician. Using Cinch Tongue Lap and
Shoulder Belts (All Front Center,
Super Cab and Crew Cab Rear
Center Positions) WARNINGS
Airbags can kill or injure a child in a
child seat. If you must use a
forward-facing child seat in the front
seat, move seat upon which the child seat
is installed all the way back. Rear facing child seats should never
be placed in front of an active airbag.
Always use both lap and shoulder
safety belt in the Regular Cab center
seating position if applicable.
The belt webbing below the tongue is the
lap portion of the combination lap and
shoulder belt, and the belt webbing above
the tongue is the shoulder belt portion of
the combination lap and shoulder belt.
1. Position the child safety seat in the
front center seat.
19
Super Duty (TFA) Canada/United States of America, enUSA, First Printing Child SafetyE142534 E142528
Page 30 of 507
WARNINGS
manufacturer. A safety seat that is
improperly installed or utilized, is
inappropriate for your child's height, age,
or weight or does not properly fit the child
may increase the risk of serious injury or
death. Never let a passenger hold a child on
his or her lap while your vehicle is
moving. The passenger cannot
protect the child from injury in a crash,
which may result in serious injury or death. Never use pillows, books, or towels
to boost a child. They can slide
around and increase the likelihood
of injury or death in a crash. WARNINGS
Always restrain an unoccupied child
seat or booster seat. These objects
may become projectiles in a crash or
sudden stop, which may increase the risk
of serious injury. Never place, or allow a child to place,
the shoulder belt under a child's arm
or behind the back because it
reduces the protection for the upper part
of the body and may increase the risk of
injury or death in a crash. To avoid risk of injury, do not leave
children or pets unattended in your
vehicle.
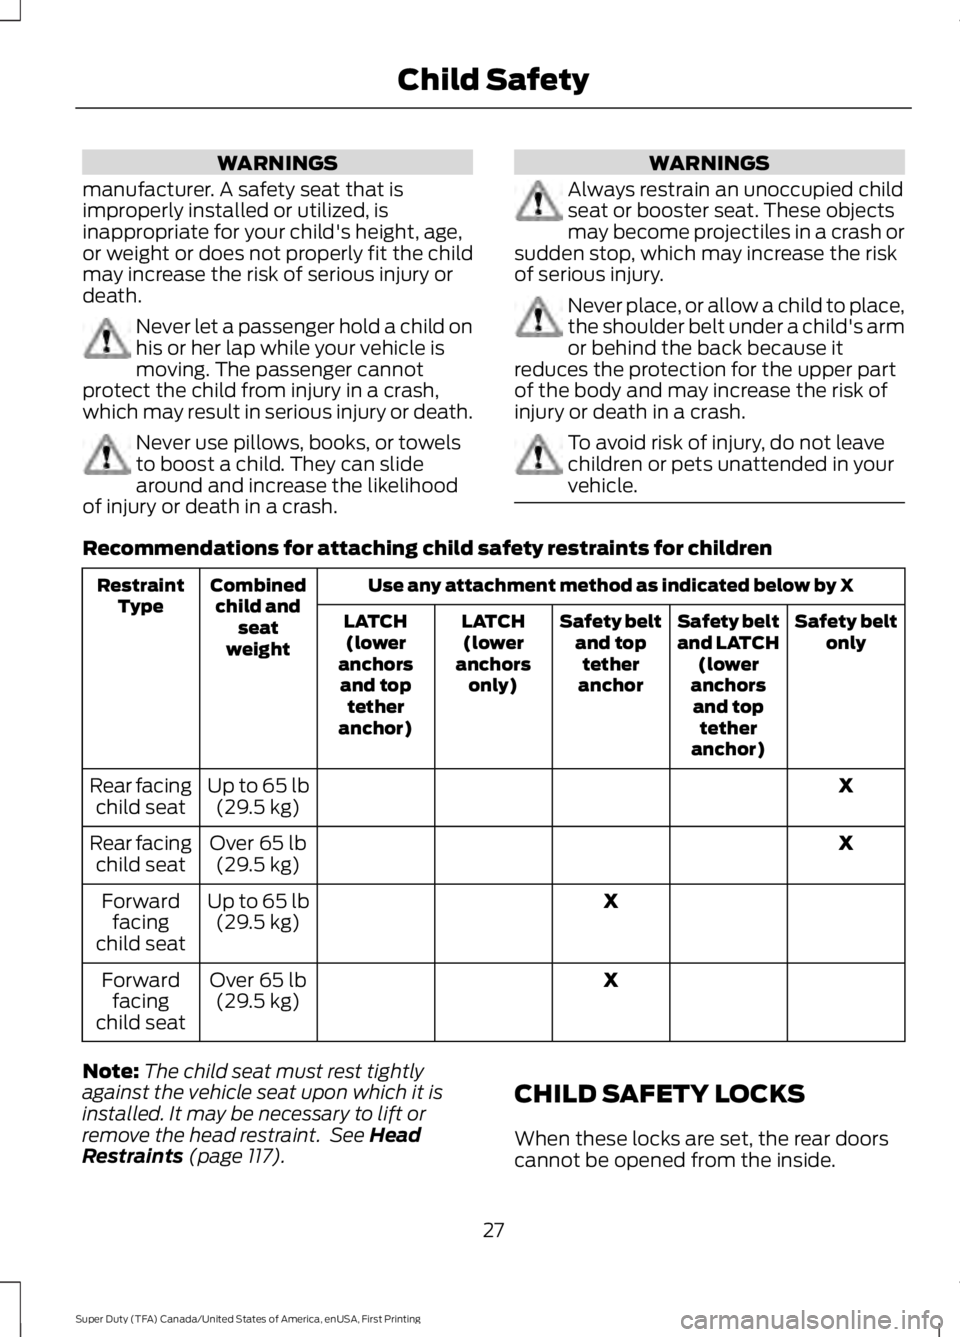
Recommendations for attaching child safety restraints for children
Use any attachment method as indicated below by X
Combined
child and seat
weight
Restraint
Type Safety belt
only
Safety belt
and LATCH
(lower
anchors and top tether
anchor)
Safety belt
and toptether
anchor
LATCH
(lower
anchors only)
LATCH
(lower
anchors and top tether
anchor)
X
Up to 65 lb
(29.5 kg)
Rear facing
child seat
X
Over 65 lb
(29.5 kg)
Rear facing
child seat
X
Up to 65 lb
(29.5 kg)
Forward
facing
child seat
X
Over 65 lb
(29.5 kg)
Forward
facing
child seat
Note: The child seat must rest tightly
against the vehicle seat upon which it is
installed. It may be necessary to lift or
remove the head restraint. See Head
Restraints (page 117). CHILD SAFETY LOCKS
When these locks are set, the rear doors
cannot be opened from the inside.
27
Super Duty (TFA) Canada/United States of America, enUSA, First Printing Child Safety
Page 33 of 507
The safety belt pretensioners at the front
seating positions are designed to tighten
the safety belts when activated. In frontal
and near-frontal crashes, side crashes and
rollovers, the safety belt pretensioners may
be activated alone or, if the crash is of
sufficient severity, together with the front
airbags.
FASTENING THE SAFETY
BELTS
The front outboard and rear safety
restraints in the vehicle are combination
lap and shoulder belts.
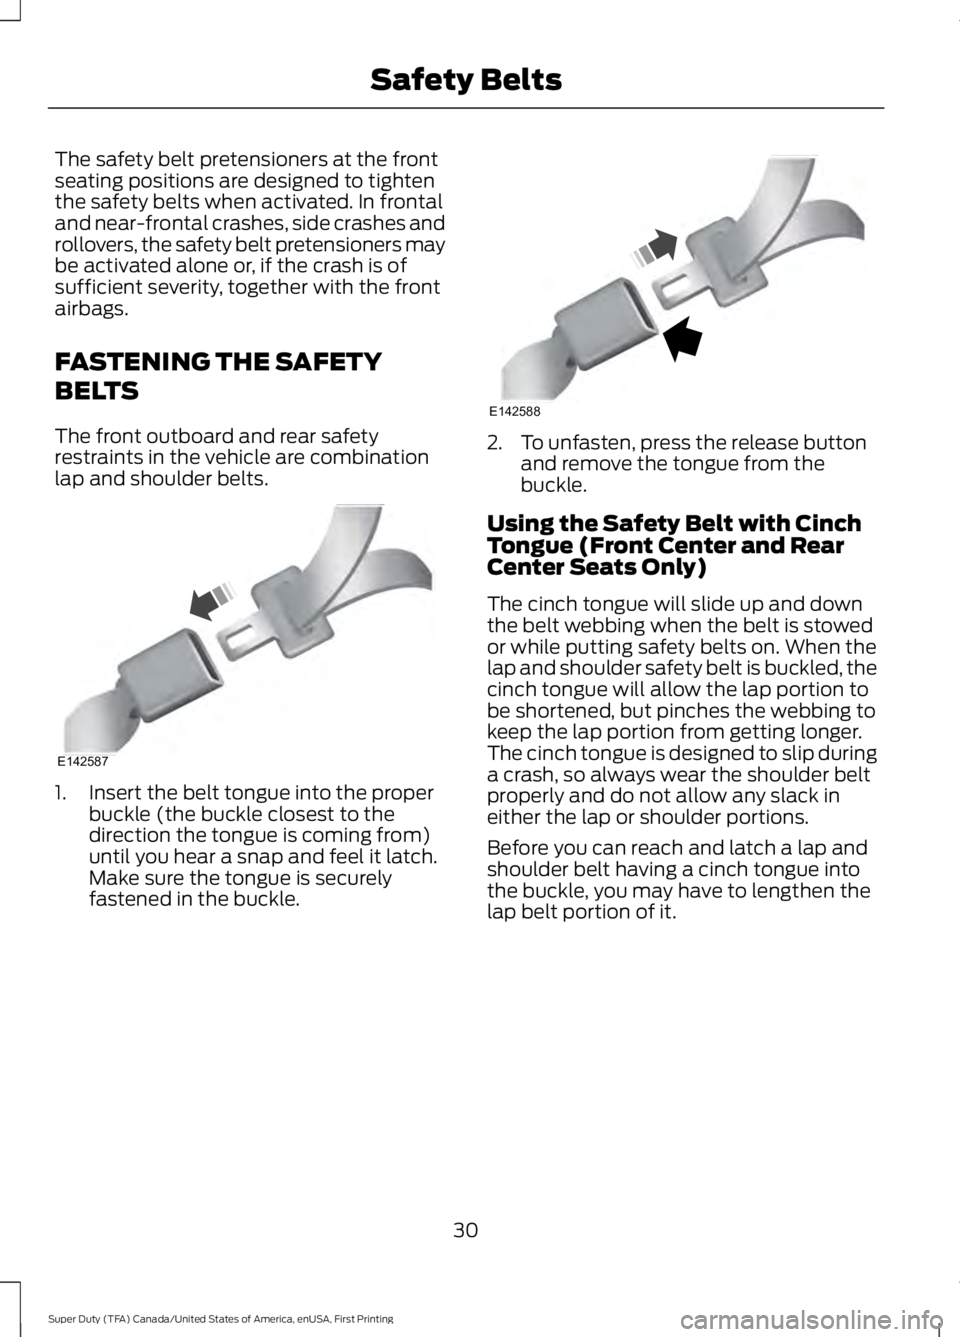
1. Insert the belt tongue into the proper
buckle (the buckle closest to the
direction the tongue is coming from)
until you hear a snap and feel it latch.
Make sure the tongue is securely
fastened in the buckle. 2. To unfasten, press the release button
and remove the tongue from the
buckle.
Using the Safety Belt with Cinch
Tongue (Front Center and Rear
Center Seats Only)
The cinch tongue will slide up and down
the belt webbing when the belt is stowed
or while putting safety belts on. When the
lap and shoulder safety belt is buckled, the
cinch tongue will allow the lap portion to
be shortened, but pinches the webbing to
keep the lap portion from getting longer.
The cinch tongue is designed to slip during
a crash, so always wear the shoulder belt
properly and do not allow any slack in
either the lap or shoulder portions.
Before you can reach and latch a lap and
shoulder belt having a cinch tongue into
the buckle, you may have to lengthen the
lap belt portion of it.
30
Super Duty (TFA) Canada/United States of America, enUSA, First Printing Safety BeltsE142587 E142588
Page 48 of 507
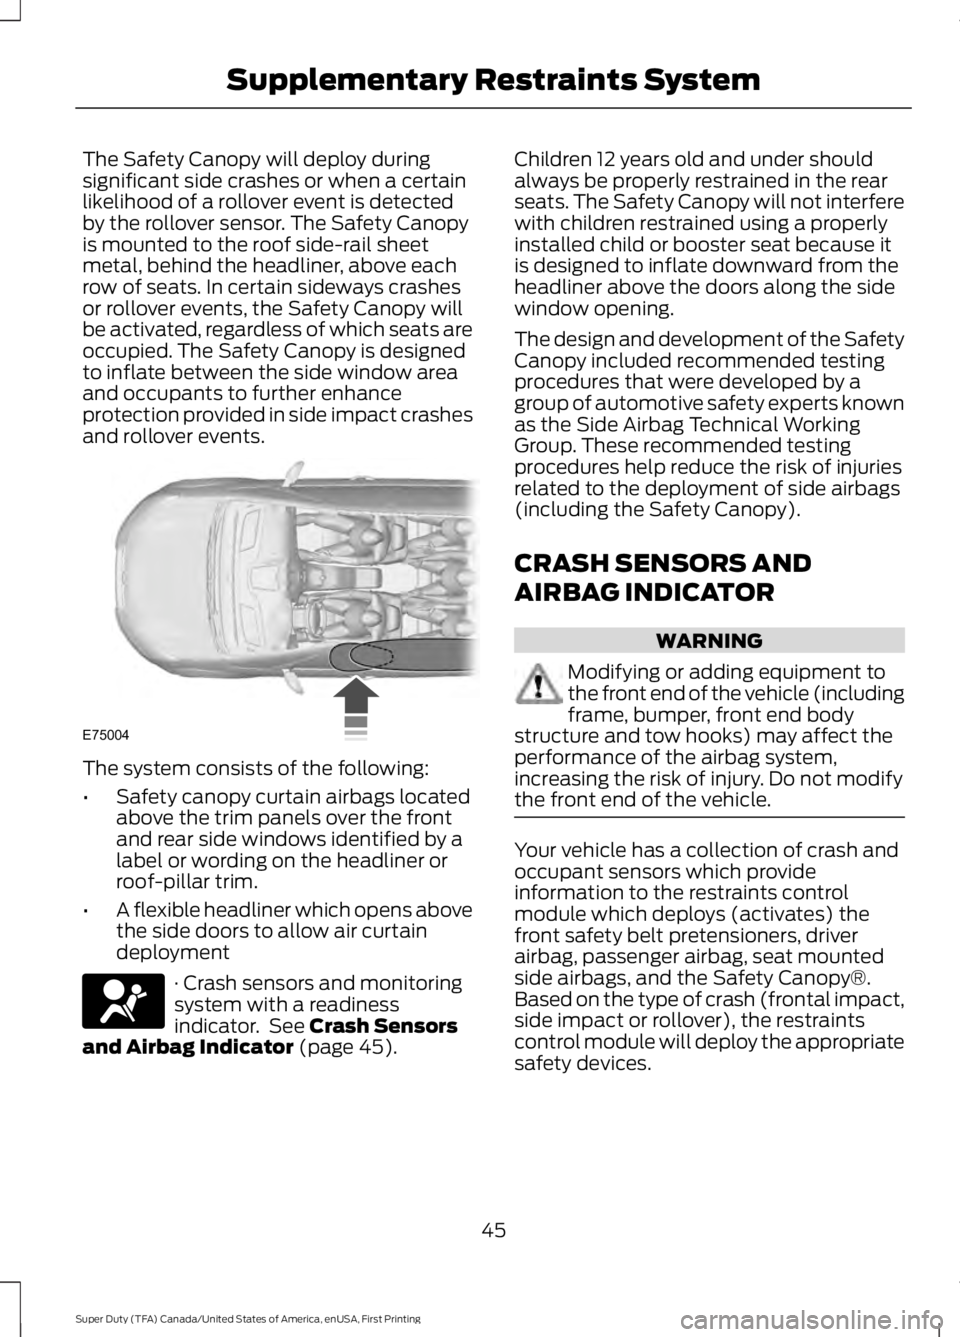
The Safety Canopy will deploy during
significant side crashes or when a certain
likelihood of a rollover event is detected
by the rollover sensor. The Safety Canopy
is mounted to the roof side-rail sheet
metal, behind the headliner, above each
row of seats. In certain sideways crashes
or rollover events, the Safety Canopy will
be activated, regardless of which seats are
occupied. The Safety Canopy is designed
to inflate between the side window area
and occupants to further enhance
protection provided in side impact crashes
and rollover events.
The system consists of the following:
•
Safety canopy curtain airbags located
above the trim panels over the front
and rear side windows identified by a
label or wording on the headliner or
roof-pillar trim.
• A flexible headliner which opens above
the side doors to allow air curtain
deployment · Crash sensors and monitoring
system with a readiness
indicator. See Crash Sensors
and Airbag Indicator (page 45). Children 12 years old and under should
always be properly restrained in the rear
seats. The Safety Canopy will not interfere
with children restrained using a properly
installed child or booster seat because it
is designed to inflate downward from the
headliner above the doors along the side
window opening.
The design and development of the Safety
Canopy included recommended testing
procedures that were developed by a
group of automotive safety experts known
as the Side Airbag Technical Working
Group. These recommended testing
procedures help reduce the risk of injuries
related to the deployment of side airbags
(including the Safety Canopy).
CRASH SENSORS AND
AIRBAG INDICATOR
WARNING
Modifying or adding equipment to
the front end of the vehicle (including
frame, bumper, front end body
structure and tow hooks) may affect the
performance of the airbag system,
increasing the risk of injury. Do not modify
the front end of the vehicle. Your vehicle has a collection of crash and
occupant sensors which provide
information to the restraints control
module which deploys (activates) the
front safety belt pretensioners, driver
airbag, passenger airbag, seat mounted
side airbags, and the Safety Canopy®.
Based on the type of crash (frontal impact,
side impact or rollover), the restraints
control module will deploy the appropriate
safety devices.
45
Super Duty (TFA) Canada/United States of America, enUSA, First Printing Supplementary Restraints SystemE75004
Page 50 of 507
GENERAL INFORMATION ON
RADIO FREQUENCIES
This device complies with Part 15 of the
FCC Rules and with Industry Canada
license-exempt RSS standard(s).
Operation is subject to the following two
conditions: (1) This device may not cause
harmful interference, and (2) This device
must accept any interference received,
including interference that may cause
undesired operation.
Note:
Changes or modifications not
expressively approved by the party
responsible for compliance could void the
user's authority to operate the equipment.
The term IC before the radio certification
number only signifies that Industry Canada
technical specifications were met.
The typical operating range for your
transmitter is approximately 33 feet (10
meters). Vehicles with the remote start
feature will have a greater range. One of
the following could cause a decrease in
operating range:
• weather conditions
• nearby radio towers
• structures around the vehicle
• other vehicles parked next to your
vehicle
The radio frequency used by your remote
control can also be used by other short
distance radio transmissions, for example
amateur radios, medical equipment,
wireless headphones, remote controls and
alarm systems. If the frequencies are
jammed, you will not be able to use your
remote control. You can lock and unlock
the doors with the key.
Note: Make sure to lock your vehicle before
leaving it unattended.
Note: If you are in range, the remote control
will operate if you press any button
unintentionally. Note:
The remote control contains sensitive
electrical components. Exposure to moisture
or impact may cause permanent damage.
REMOTE CONTROL
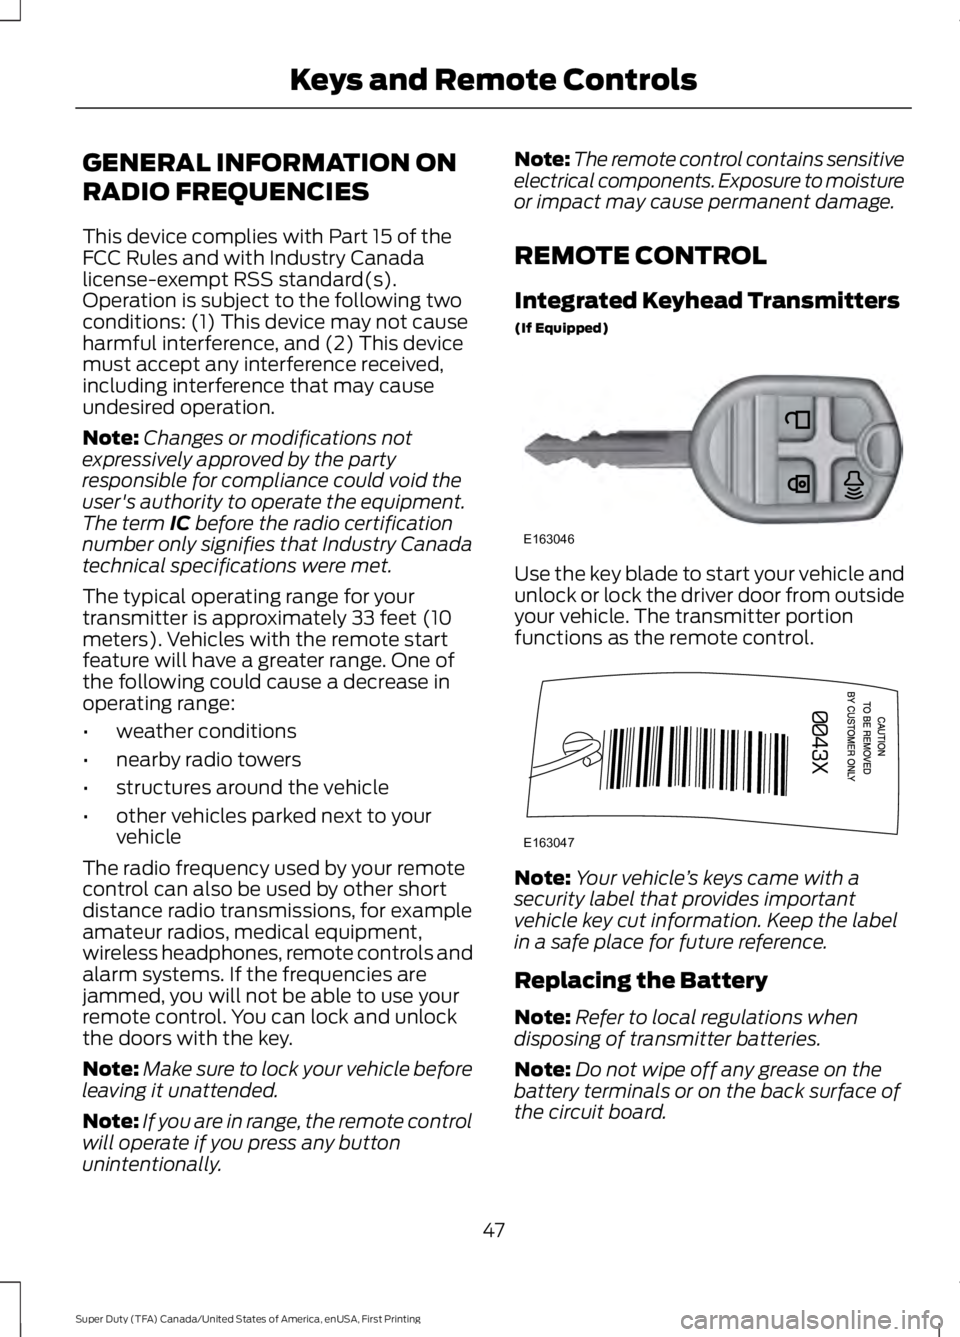
Integrated Keyhead Transmitters
(If Equipped) Use the key blade to start your vehicle and
unlock or lock the driver door from outside
your vehicle. The transmitter portion
functions as the remote control.
Note:
Your vehicle ’s keys came with a
security label that provides important
vehicle key cut information. Keep the label
in a safe place for future reference.
Replacing the Battery
Note: Refer to local regulations when
disposing of transmitter batteries.
Note: Do not wipe off any grease on the
battery terminals or on the back surface of
the circuit board.
47
Super Duty (TFA) Canada/United States of America, enUSA, First Printing Keys and Remote ControlsE163046 E163047
Page 64 of 507
7. Lift the tailgate to a 45-degree angle
from horizontal.
8. Lift the right side off its hinge.
9. Lift the tailgate to an 80-degree angle
from horizontal.
10. Remove the tailgate from the left side
hinge by sliding it to the right.
Reverse the steps to reinstall the tailgate.
TAILGATE STEP (If Equipped)
To reduce the risk of falling:
• Only operate the step when your
vehicle is on a level surface.
• Only operate the step in areas with
sufficient lighting.
• Always open the step panel to widen
the step.
• Always use the grab handle when
climbing on the step.
• Do not use the step with bare feet.
• Make sure the step is clean before use.
• Keep the step load, you plus the load,
below
350 lb (159 kg).
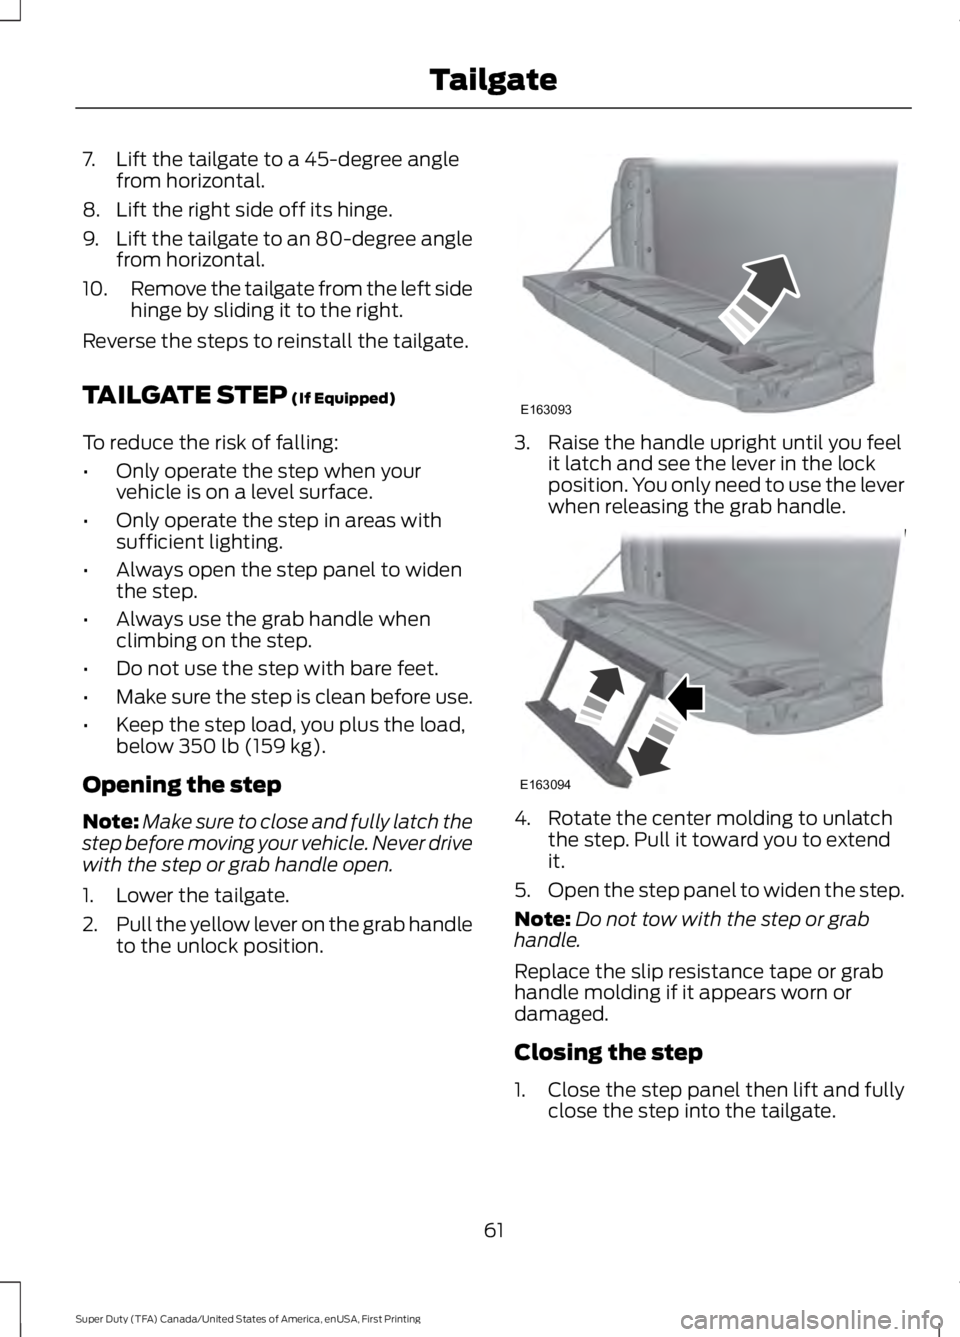
Opening the step
Note: Make sure to close and fully latch the
step before moving your vehicle. Never drive
with the step or grab handle open.
1. Lower the tailgate.
2. Pull the yellow lever on the grab handle
to the unlock position. 3. Raise the handle upright until you feel
it latch and see the lever in the lock
position. You only need to use the lever
when releasing the grab handle. 4. Rotate the center molding to unlatch
the step. Pull it toward you to extend
it.
5. Open the step panel to widen the step.
Note: Do not tow with the step or grab
handle.
Replace the slip resistance tape or grab
handle molding if it appears worn or
damaged.
Closing the step
1. Close the step panel then lift and fully close the step into the tailgate.
61
Super Duty (TFA) Canada/United States of America, enUSA, First Printing TailgateE163093 E163094
Page 65 of 507
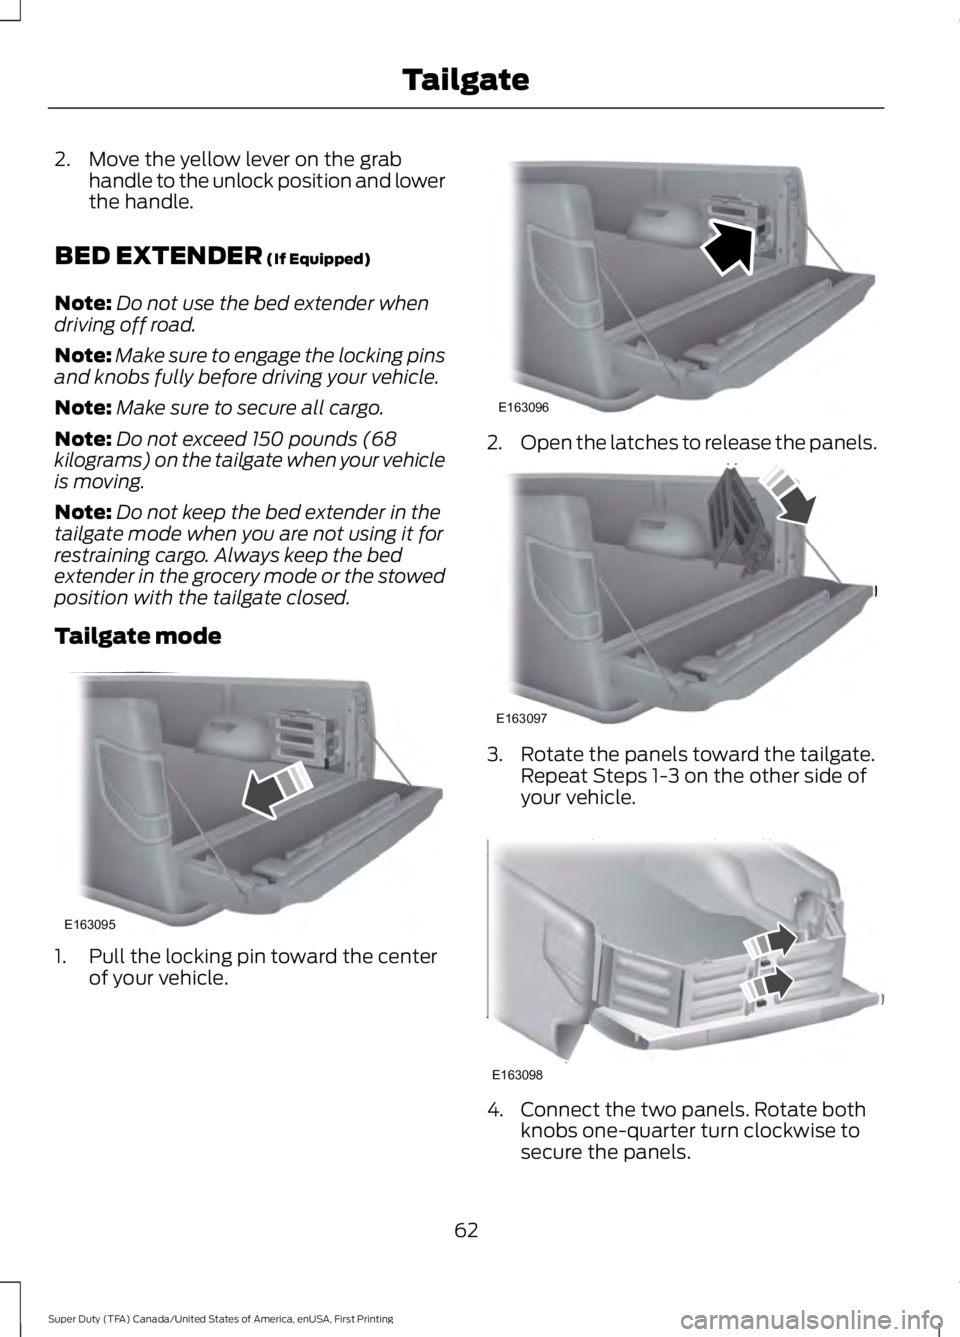
2. Move the yellow lever on the grab
handle to the unlock position and lower
the handle.
BED EXTENDER (If Equipped)
Note: Do not use the bed extender when
driving off road.
Note: Make sure to engage the locking pins
and knobs fully before driving your vehicle.
Note: Make sure to secure all cargo.
Note: Do not exceed 150 pounds (68
kilograms) on the tailgate when your vehicle
is moving.
Note: Do not keep the bed extender in the
tailgate mode when you are not using it for
restraining cargo. Always keep the bed
extender in the grocery mode or the stowed
position with the tailgate closed.
Tailgate mode 1. Pull the locking pin toward the center
of your vehicle. 2.
Open the latches to release the panels. 3. Rotate the panels toward the tailgate.
Repeat Steps 1-3 on the other side of
your vehicle. 4. Connect the two panels. Rotate both
knobs one-quarter turn clockwise to
secure the panels.
62
Super Duty (TFA) Canada/United States of America, enUSA, First Printing TailgateE163095 E163096 E163097 E163098
Page 67 of 507
PASSIVE ANTI-THEFT
SYSTEM (If Equipped)
Note: The system is not compatible with
non-Ford aftermarket remote start systems.
Use of these systems may result in vehicle
starting problems and a loss of security
protection.
Note: Metallic objects, electronic devices
or a second coded key on the same key
chain may cause vehicle starting problems
if they are too close to the key when starting
the engine. Prevent these objects from
touching the coded key while starting the
engine. Switch the ignition off, move all
objects on the key chain away from the
coded key and restart the engine if a
problem occurs.
Note: Do not leave a duplicate coded key
in the vehicle. Always take your keys and
lock all doors when leaving the vehicle.
SecuriLock ™
The system is an engine immobilization
system. It helps prevent the engine from
starting unless you use a coded key
programmed to your vehicle. Using the
wrong key may prevent the engine from
starting. A message may appear in the
information display.
If you are unable to start the engine with a
correctly coded key, the system has
malfunctioned. A message may appear in
the information display.
Automatic Arming
The system arms immediately after you
switch the ignition off.
Automatic Disarming
Switching the ignition on with a coded key
disarms the system. Replacement Keys
Note:
Your vehicle may have two integrated
keyhead transmitters.
The integrated keyhead transmitter
functions as a programmed ignition key. It
operates all the locks, starts the vehicle
and acts as a remote control.
If your programmed transmitters or
standard SecuriLock coded keys are lost
or stolen and you do not have an extra
coded key, you will need to have your
vehicle towed to an authorized dealer. You
need to erase the key codes from your
vehicle and program new coded keys.
Store an extra programmed key away from
your vehicle in a safe place to help prevent
any inconveniences. See an authorized
dealer to purchase additional spare or
replacement keys.
Programming a Spare Key
Note: You can program a maximum of eight
coded keys to your vehicle. Only four of
these can be integrated keyhead
transmitters.
You can program your own integrated
keyhead transmitter or standard
SecuriLock coded keys to your vehicle. This
procedure will program both the engine
immobilizer keycode and the remote entry
portion of the remote control to your
vehicle.
Only use integrated keyhead transmitters
or standard SecuriLock keys.
You must have two previously
programmed coded keys and the new
unprogrammed key readily accessible. See
an authorized dealer to have the spare key
programmed if two previously
programmed coded keys are not available.
Read and understand the entire procedure
before you begin.
64
Super Duty (TFA) Canada/United States of America, enUSA, First Printing Security