air filter FORD F250 SUPER DUTY 2014 Owners Manual
[x] Cancel search | Manufacturer: FORD, Model Year: 2014, Model line: F250 SUPER DUTY, Model: FORD F250 SUPER DUTY 2014Pages: 460, PDF Size: 6.55 MB
Page 7 of 460
Fuse Specification Chart............................215
Maintenance
General Information....................................223
Opening and Closing the Hood..............223
Under Hood Overview - 6.2L...................224
Under Hood Overview - 6.8L...................225
Engine Oil Dipstick......................................226
Engine Oil Check..........................................226
Engine Coolant Check................................227
Automatic Transmission FluidCheck.............................................................231
Transfer Case Fluid Check........................234
Brake Fluid Check........................................234
Power Steering Fluid Check.....................234
Washer Fluid Check....................................235
Fuel Filter........................................................235
Changing the 12V Battery.........................235
Checking the Wiper Blades......................237
Changing the Wiper Blades......................237
Adjusting the Headlamps.........................238
Removing a Headlamp..............................239
Changing a Bulb............................................241
Bulb Specification Chart...........................243
Changing the Engine Air Filter................245
Vehicle Care
General Information....................................247
Cleaning Products.......................................247
Cleaning the Exterior..................................247
Waxing.............................................................248
Cleaning the Engine...................................248
Cleaning the Exhaust.................................249
Cleaning the Windows and WiperBlades..........................................................249
Cleaning the Interior...................................250
Cleaning the Instrument Panel andInstrument Cluster Lens.......................250
Cleaning Leather Seats..............................251
Repairing Minor Paint Damage................251
Cleaning the Alloy Wheels........................251
Vehicle Storage.............................................252
Wheels and Tires
General Information...................................254
Tire Care..........................................................256
Using Snow Chains......................................273
Tire Pressure Monitoring System...........273
Changing a Road Wheel............................279
Technical Specifications..........................290
Capacities and Specific-ations
Engine Specifications................................292
Motorcraft Parts...........................................293
Vehicle Identification Number................294
Vehicle Certification Label.......................294
Transmission Code Designation............295
Technical Specifications..........................296
Audio System
General Information....................................301
Audio unit - Vehicles With: AM/FM......302
Audio unit - Vehicles With: AM/FM/CD/SYNC............................................................303
Audio unit - Vehicles With: Sony AM/FM/CD.................................................................305
Digital Radio..................................................306
Satellite Radio..............................................309
Audio Input Jack.............................................311
USB Port...........................................................312
Media Hub.......................................................312
SYNC™
General Information....................................313
Using Voice Recognition............................315
Using SYNC™ With Your Phone.............317
SYNC™ Applications and Services......328
Using SYNC™ With Your MediaPlayer...........................................................335
4
Super Duty (TFA)
Table of Contents
Page 11 of 460
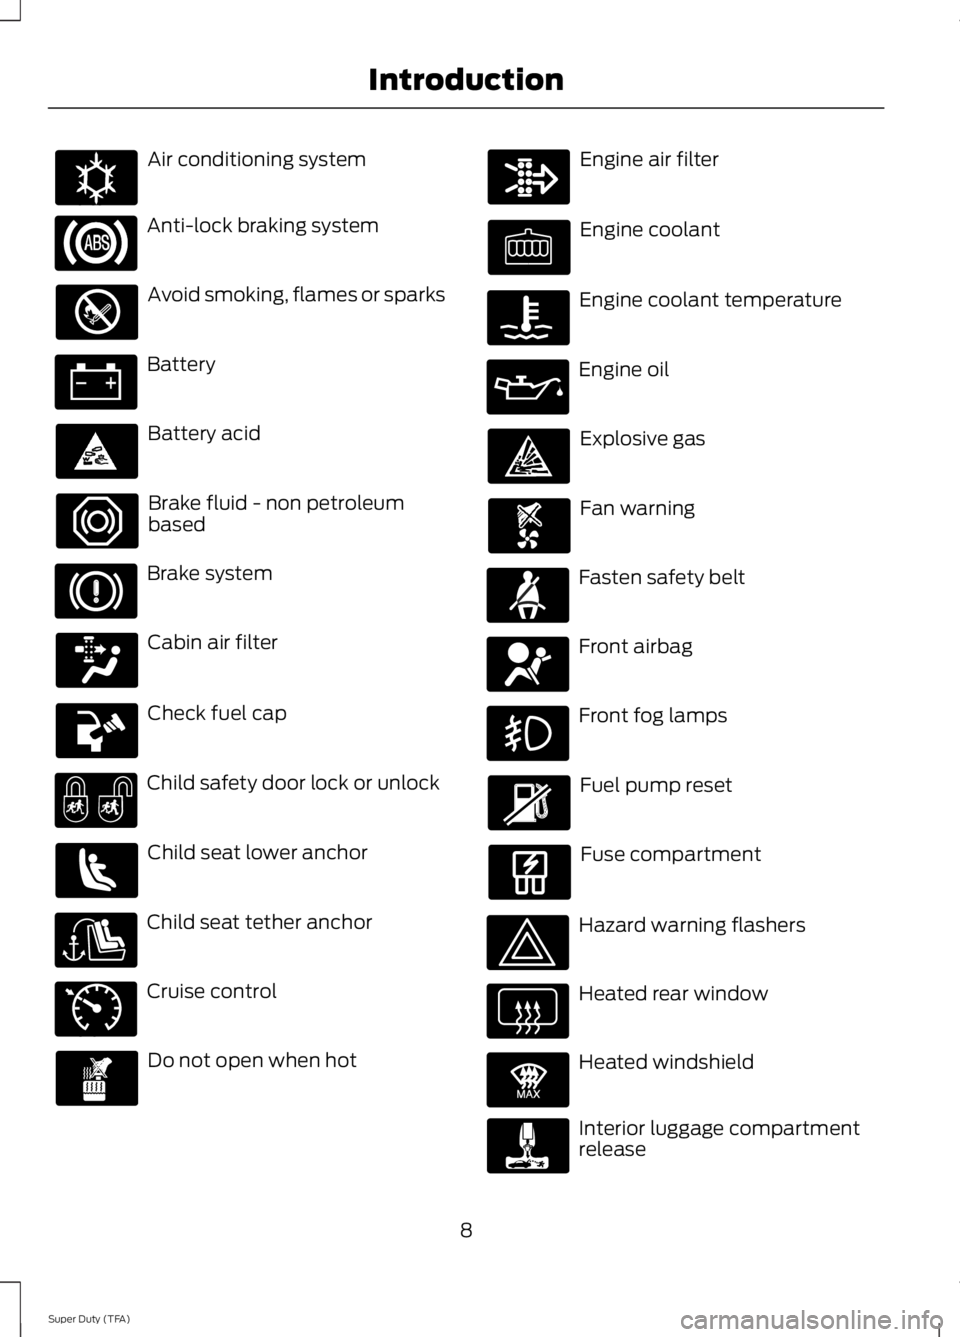
Air conditioning system
Anti-lock braking system
Avoid smoking, flames or sparks
Battery
Battery acid
Brake fluid - non petroleumbased
Brake system
Cabin air filter
Check fuel cap
Child safety door lock or unlock
Child seat lower anchor
Child seat tether anchor
Cruise control
Do not open when hot
Engine air filter
Engine coolant
Engine coolant temperature
Engine oil
Explosive gas
Fan warning
Fasten safety belt
Front airbag
Front fog lamps
Fuel pump reset
Fuse compartment
Hazard warning flashers
Heated rear window
Heated windshield
Interior luggage compartmentrelease
8
Super Duty (TFA)
IntroductionE162384 E71340 E91392
Page 85 of 460
INFO
TRIP A/B
XXX° (if equipped)
MYKEY MILES (km) (if programmed)
XXX MILES (km) TO E
XX.X AVG MPG (L/100km)
MPG (L/km)
TIMER
TBC GAIN (if equipped)
EXHAUST FILTER (diesel only)
TRIP A/B
Registers the distance of individualjourneys. Press and release the INFObutton until TRIP A/B appears in thedisplay (this represents the trip mode).Press and hold the RESET button to reset.
XXX° (outside air temperature)
This displays the outside temperature.
MYKEY MILES (km)
For more information, See Principle ofOperation (page 50).
XXX MILES (km) TO E
This displays an estimate of approximatelyhow far you can drive with the fuelremaining in your tank under normal drivingconditions. Remember to turn the ignitionoff when refueling to allow this feature tocorrectly detect the added fuel.
Distance to empty is calculated using arunning average fuel economy, which isbased on your recent driving history of 500miles (800 km).
This value is not the same as the averagefuel economy display. The running averagefuel economy is re-initialized to a factorydefault value if the battery is disconnected.
XX.X AVG MPG (L/100km)
Average fuel economy displays youraverage fuel economy in miles/gallon orliters/100 km.
MPG (L/km)
Displays the instantaneous fuel economyas a bar graph. Your vehicle must bemoving to calculate instantaneous fueleconomy. Instantaneous fuel economycannot be reset.
TIMER
Displays the trip elapsed drive time. Pressand release RESET to pause the timer.Press and hold RESET to reset the timer.
TBC GAIN
Displays the level of trailer brake gain or ifthe trailer is not connected.
82
Super Duty (TFA)
Information Displays
Page 119 of 460
VENTILATED SEATS (IF EQUIPPED)
The ventilated seats will only functionwhen the engine is running.
To operate the ventilated seats, press theventilated seat symbol to cycle throughthe various cooling settings and off. Coolersettings are indicated by more indicatorlights.
If the engine falls below 350 RPM whilethe ventilated seats are on, the feature willturn itself off. You will need to reactivateit.
Heated and Ventilated Seats AirFilter Replacement (If Equipped)
The heated and ventilated seat systemincludes air filters. You must replace themperiodically.
The filter is located under each front seat.Access the filter from the second rowfoot-well area. Move the front seats all theway to the full front and full up positionsto ease access.
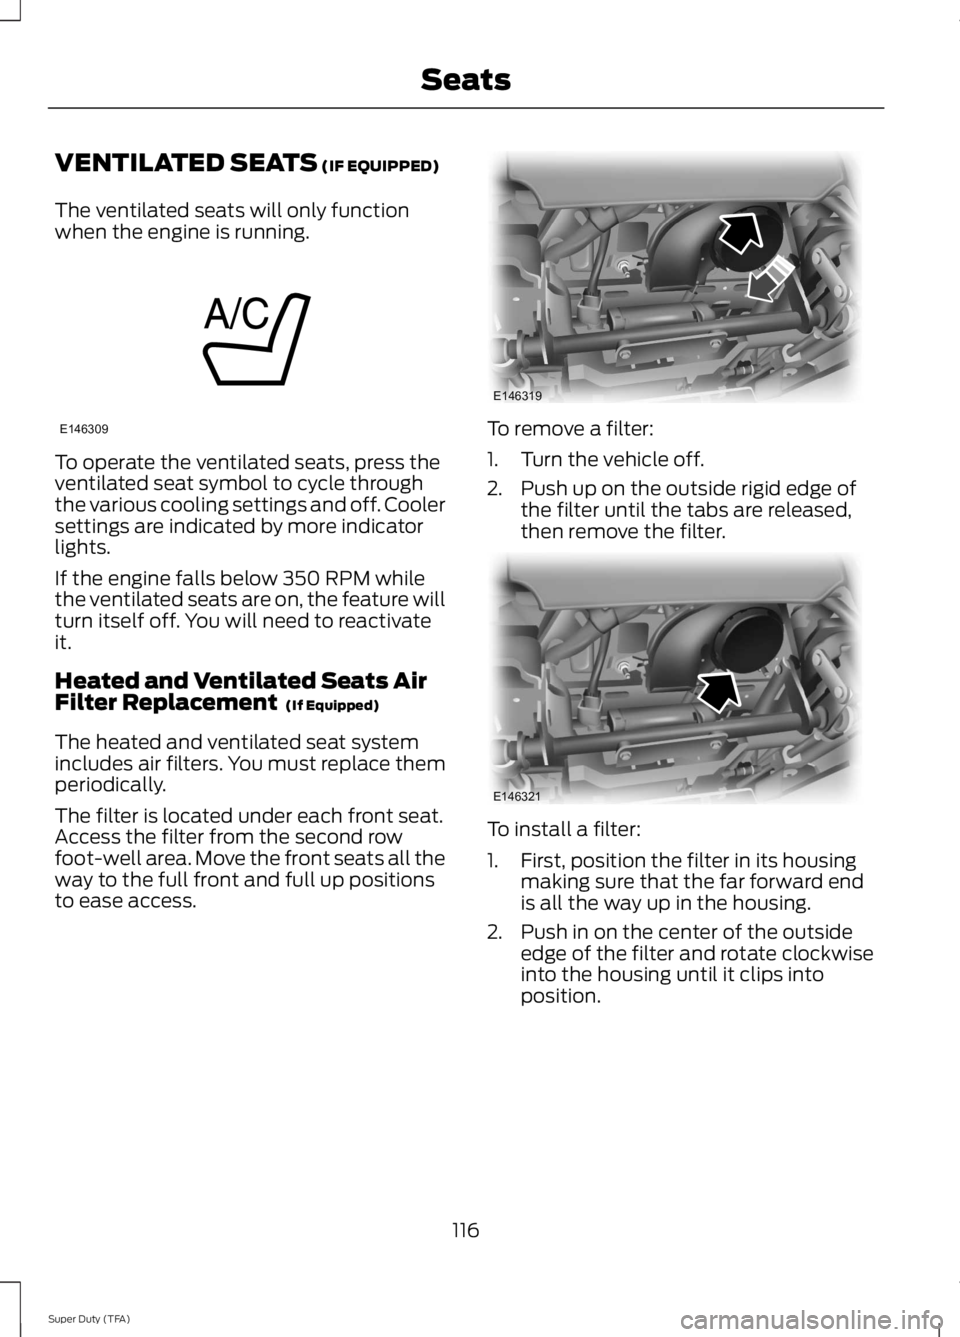
To remove a filter:
1. Turn the vehicle off.
2. Push up on the outside rigid edge ofthe filter until the tabs are released,then remove the filter.
To install a filter:
1. First, position the filter in its housingmaking sure that the far forward endis all the way up in the housing.
2. Push in on the center of the outsideedge of the filter and rotate clockwiseinto the housing until it clips intoposition.
116
Super Duty (TFA)
SeatsE146309 E146319 E146321
Page 228 of 460
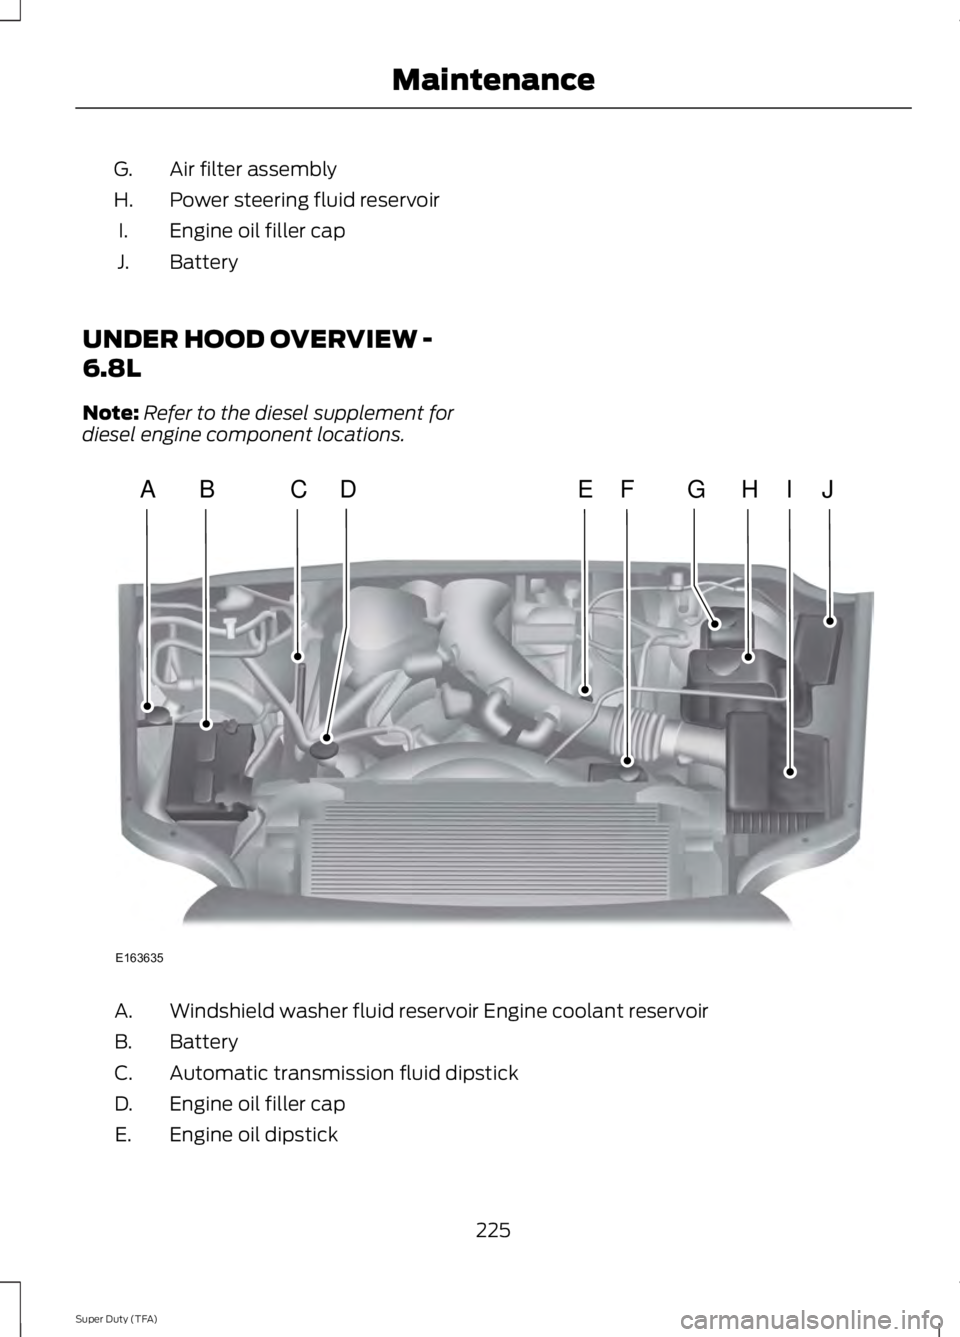
Air filter assemblyG.
Power steering fluid reservoirH.
Engine oil filler capI.
BatteryJ.
UNDER HOOD OVERVIEW -
6.8L
Note:Refer to the diesel supplement fordiesel engine component locations.
Windshield washer fluid reservoir Engine coolant reservoirA.
BatteryB.
Automatic transmission fluid dipstickC.
Engine oil filler capD.
Engine oil dipstickE.
225
Super Duty (TFA)
MaintenanceE163635
ABCEHIJFDG
Page 229 of 460
Power steering fluid reservoirF.
Brake fluid reservoirG.
Engine coolant reservoirH.
Air filter assemblyI.
Power distribution boxJ.
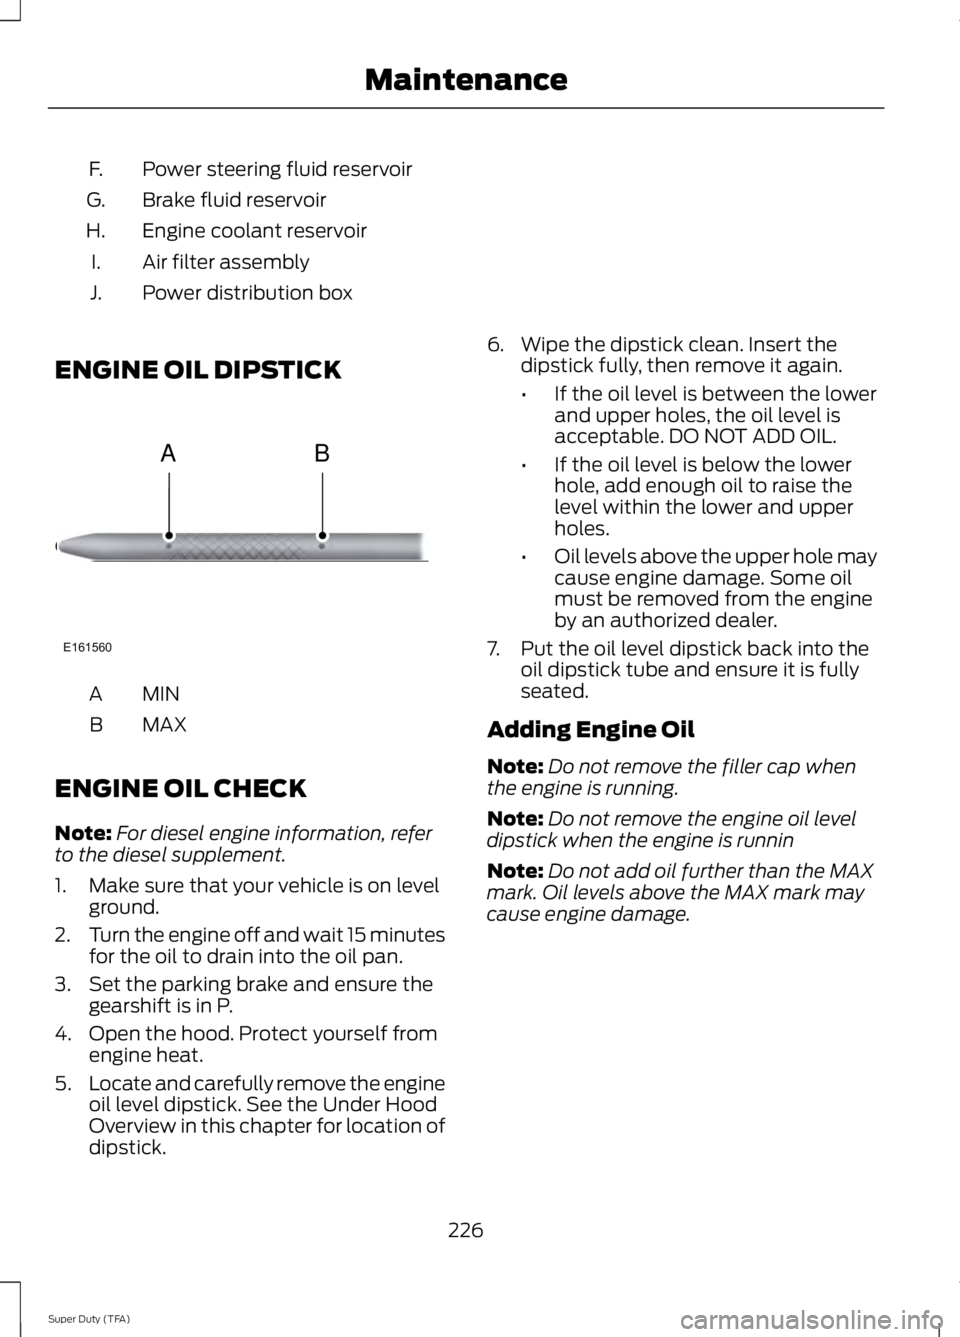
ENGINE OIL DIPSTICK
MINA
MAXB
ENGINE OIL CHECK
Note:For diesel engine information, referto the diesel supplement.
1. Make sure that your vehicle is on levelground.
2.Turn the engine off and wait 15 minutesfor the oil to drain into the oil pan.
3. Set the parking brake and ensure thegearshift is in P.
4. Open the hood. Protect yourself fromengine heat.
5.Locate and carefully remove the engineoil level dipstick. See the Under HoodOverview in this chapter for location ofdipstick.
6. Wipe the dipstick clean. Insert thedipstick fully, then remove it again.
•If the oil level is between the lowerand upper holes, the oil level isacceptable. DO NOT ADD OIL.
•If the oil level is below the lowerhole, add enough oil to raise thelevel within the lower and upperholes.
•Oil levels above the upper hole maycause engine damage. Some oilmust be removed from the engineby an authorized dealer.
7. Put the oil level dipstick back into theoil dipstick tube and ensure it is fullyseated.
Adding Engine Oil
Note:Do not remove the filler cap whenthe engine is running.
Note:Do not remove the engine oil leveldipstick when the engine is runnin
Note:Do not add oil further than the MAXmark. Oil levels above the MAX mark maycause engine damage.
226
Super Duty (TFA)
MaintenanceE161560
AB
Page 238 of 460
6. Recheck the fluid level in the reservoir.Do not add fluid if the level is betweenthe MIN and MAX range.
7. If the fluid is low, add fluid in smallamounts, continuously checking thelevel until it is between the MIN andMAX range. For proper fluid type, SeeCapacities and Specifications (page292). Be sure to put the cap back on thereservoir.
WASHER FLUID CHECK
WARNING
If you operate your vehicle intemperatures below 40°F (5°C), usewasher fluid with antifreezeprotection. Failure to use washer fluid withantifreeze protection in cold weather couldresult in impaired windshield vision andincrease the risk of injury or accident.
Add fluid to fill the reservoir if the level islow. Only use a washer fluid that meetsFord specifications. See Capacities andSpecifications (page 292).
State or local regulations on volatileorganic compounds may restrict the useof methanol, a common windshield washerantifreeze additive. Washer fluidscontaining non-methanol antifreezeagents should be used only if they providecold weather protection without damagingthe vehicle’s paint finish, wiper blades orwasher system.
FUEL FILTER
Your vehicle is equipped with a lifetimefuel filter that is integrated with the fueltank. Regular maintenance or replacementis not needed.
CHANGING THE 12V BATTERY
WARNINGS
This vehicle may be equipped withmore than one battery, removal ofcable from only one battery does notdisconnect the vehicle electrical system.Be sure to disconnect cables from allbatteries when disconnecting power.Failure to do so may cause seriouspersonal injury or property damage.
Batteries normally produce explosivegases which can cause personalinjury. Therefore, do not allowflames, sparks or lighted substances tocome near the battery. When working nearthe battery, always shield your face andprotect your eyes. Always provide properventilation.
When lifting a plastic-cased battery,excessive pressure on the end wallscould cause acid to flow through thevent caps, resulting in personal injury anddamage to the vehicle or battery. Lift thebattery with a battery carrier or with yourhands on opposite corners.
Keep batteries out of reach ofchildren. Batteries contain sulfuricacid. Avoid contact with skin, eyes orclothing. Shield your eyes when workingnear the battery to protect against possiblesplashing of acid solution. In case of acidcontact with skin or eyes, flushimmediately with water for a minimum of15 minutes and get prompt medicalattention. If acid is swallowed, call aphysician immediately.
Note:If your battery has a cover/shield,make sure it is reinstalled after the batteryhas been cleaned or replaced.
Note:Battery posts, terminals and relatedaccessories contain lead and leadcompounds. Wash hands after handling.
235
Super Duty (TFA)
Maintenance
Page 248 of 460
CHANGING THE ENGINE AIR
FILTER
WARNINGS
To reduce the risk of vehicle damageand personal burn injuries, do notstart your engine with the air cleanerremoved and do not remove it while theengine is running.
To reduce the risk of vehicle damageand personal burn injuries, do notstart your engine with the air cleanerremoved and do not remove it while theengine is running.
Note:Failure to use the correct air filterelement may result in severe enginedamage. The customer warranty may bevoid for any damage to the engine if thecorrect air filter element is not used.
When changing the air filter element, useonly the air filter element listed. SeeCapacities and Specifications (page292).
Change the air filter element at the properinterval. See Scheduled Maintenance(page 430).
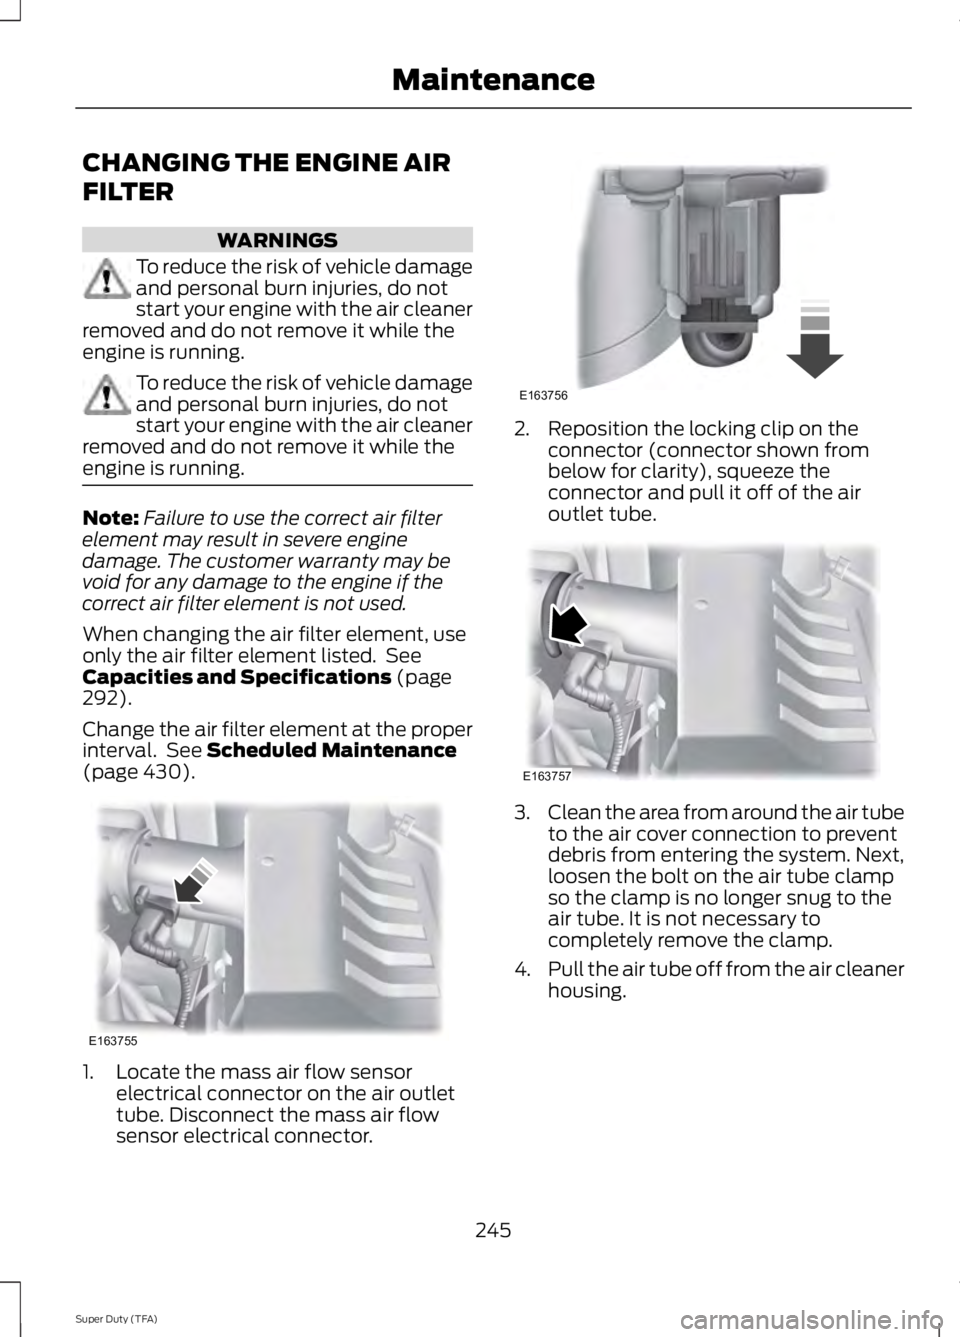
1. Locate the mass air flow sensorelectrical connector on the air outlettube. Disconnect the mass air flowsensor electrical connector.
2. Reposition the locking clip on theconnector (connector shown frombelow for clarity), squeeze theconnector and pull it off of the airoutlet tube.
3.Clean the area from around the air tubeto the air cover connection to preventdebris from entering the system. Next,loosen the bolt on the air tube clampso the clamp is no longer snug to theair tube. It is not necessary tocompletely remove the clamp.
4.Pull the air tube off from the air cleanerhousing.
245
Super Duty (TFA)
MaintenanceE163755 E163756 E163757
Page 249 of 460
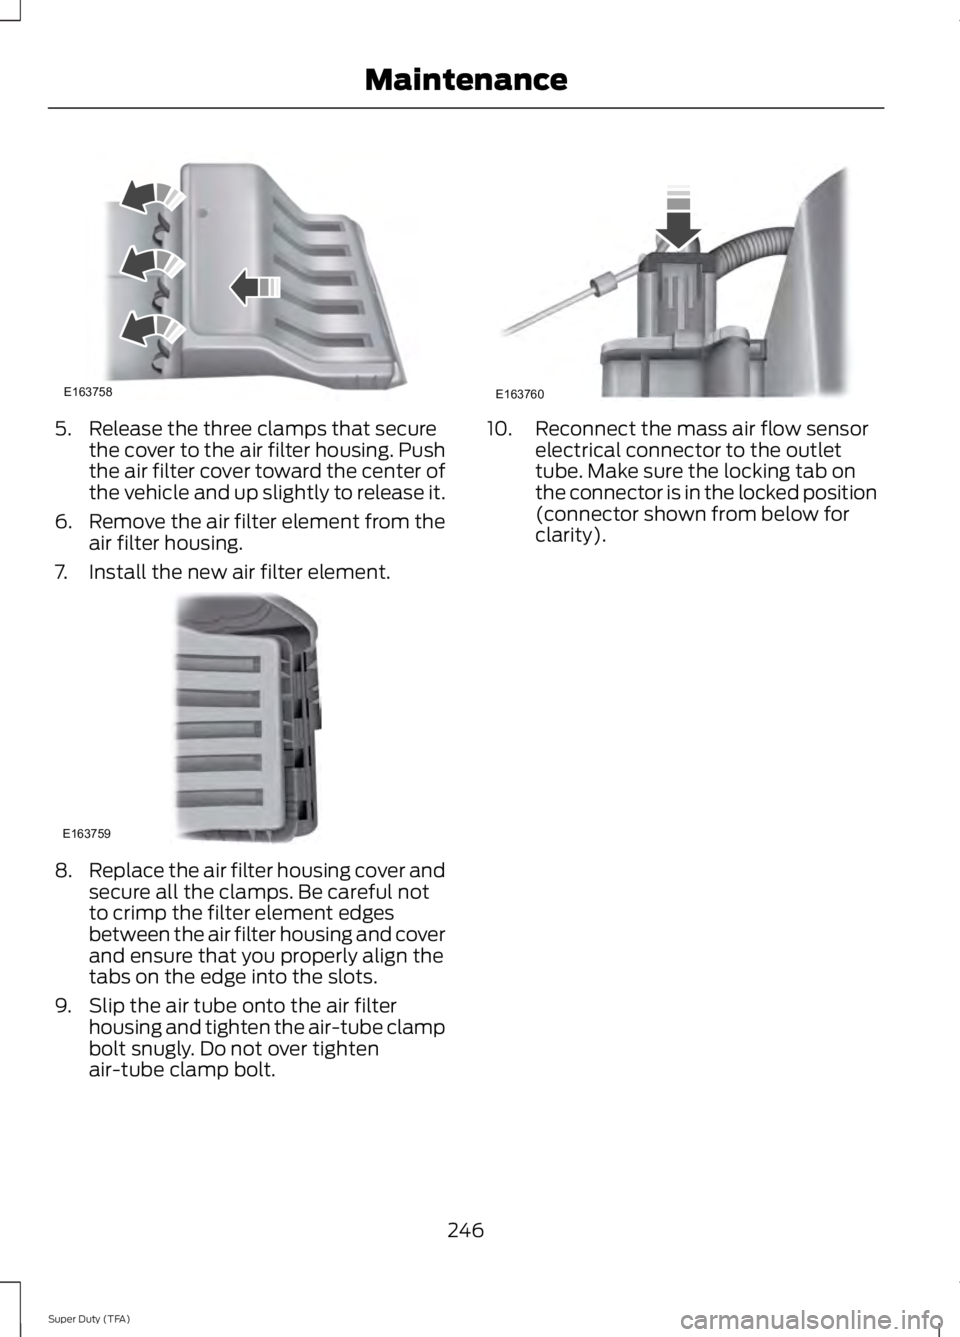
5. Release the three clamps that securethe cover to the air filter housing. Pushthe air filter cover toward the center ofthe vehicle and up slightly to release it.
6.Remove the air filter element from theair filter housing.
7. Install the new air filter element.
8.Replace the air filter housing cover andsecure all the clamps. Be careful notto crimp the filter element edgesbetween the air filter housing and coverand ensure that you properly align thetabs on the edge into the slots.
9. Slip the air tube onto the air filterhousing and tighten the air-tube clampbolt snugly. Do not over tightenair-tube clamp bolt.
10. Reconnect the mass air flow sensorelectrical connector to the outlettube. Make sure the locking tab onthe connector is in the locked position(connector shown from below forclarity).
246
Super Duty (TFA)
MaintenanceE163758 E163759 E163760
Page 252 of 460
•Never wash or rinse any ignition coil,spark plug wire or spark plug well, orthe area in and around these locations.
•Cover the battery, power distributionbox, and air filter assembly to preventwater damage when cleaning theengine.
CLEANING THE EXHAUST
WARNINGS
Failure to maintain the functionalholes, in the tailpipe section of theexhaust, clean and free of debris orforeign material may result in the holesbecoming blocked or plugged. Do notmodify or remove the tail-pipe section.Blocked or plugged holes orremoval/modification of the system couldresult in elevated exhaust gastemperatures which may result invehicle/property damage or personalinjury.
The normal operating temperatureof the exhaust system is very high.Never work around or attempt torepair any part of the exhaust system untilit has cooled. Use special care whenworking around the diesel oxidationcatalytic converter and/or the dieselparticulate filter (DPF). The dieseloxidation catalytic converter and/or theDPF heats up to a high temperature afteronly a short period of engine operation andcan stay hot even after the engine is turnedoff. Failure to follow these instructions mayresult in personal injury.
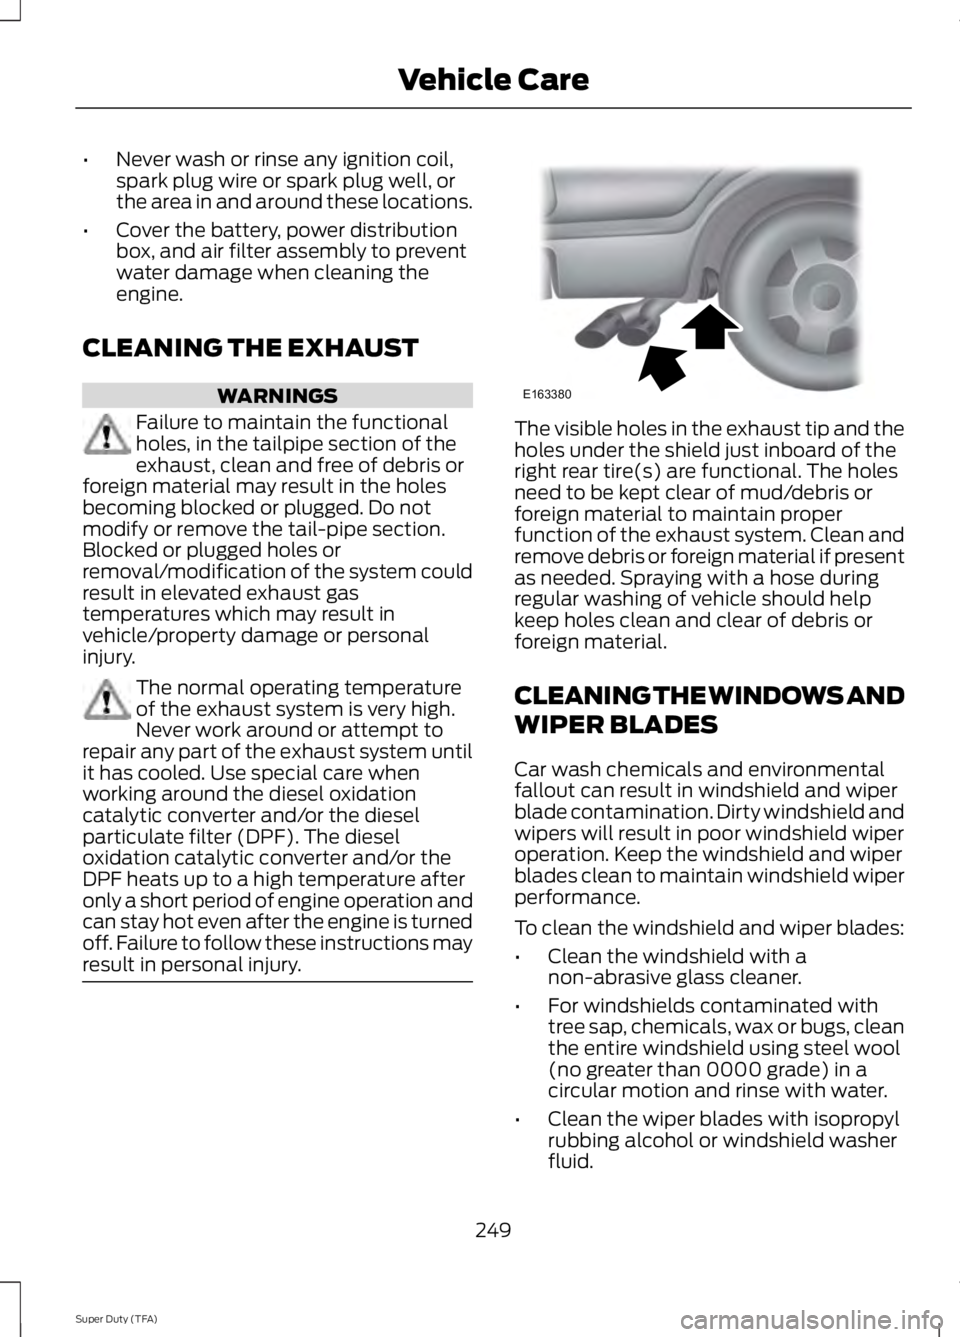
The visible holes in the exhaust tip and theholes under the shield just inboard of theright rear tire(s) are functional. The holesneed to be kept clear of mud/debris orforeign material to maintain properfunction of the exhaust system. Clean andremove debris or foreign material if presentas needed. Spraying with a hose duringregular washing of vehicle should helpkeep holes clean and clear of debris orforeign material.
CLEANING THE WINDOWS AND
WIPER BLADES
Car wash chemicals and environmentalfallout can result in windshield and wiperblade contamination. Dirty windshield andwipers will result in poor windshield wiperoperation. Keep the windshield and wiperblades clean to maintain windshield wiperperformance.
To clean the windshield and wiper blades:
•Clean the windshield with anon-abrasive glass cleaner.
•For windshields contaminated withtree sap, chemicals, wax or bugs, cleanthe entire windshield using steel wool(no greater than 0000 grade) in acircular motion and rinse with water.
•Clean the wiper blades with isopropylrubbing alcohol or windshield washerfluid.
249
Super Duty (TFA)
Vehicle CareE163380