FORD F250 SUPER DUTY 2015 Owners Manual
Manufacturer: FORD, Model Year: 2015, Model line: F250 SUPER DUTY, Model: FORD F250 SUPER DUTY 2015Pages: 470, PDF Size: 18.27 MB
Page 111 of 470
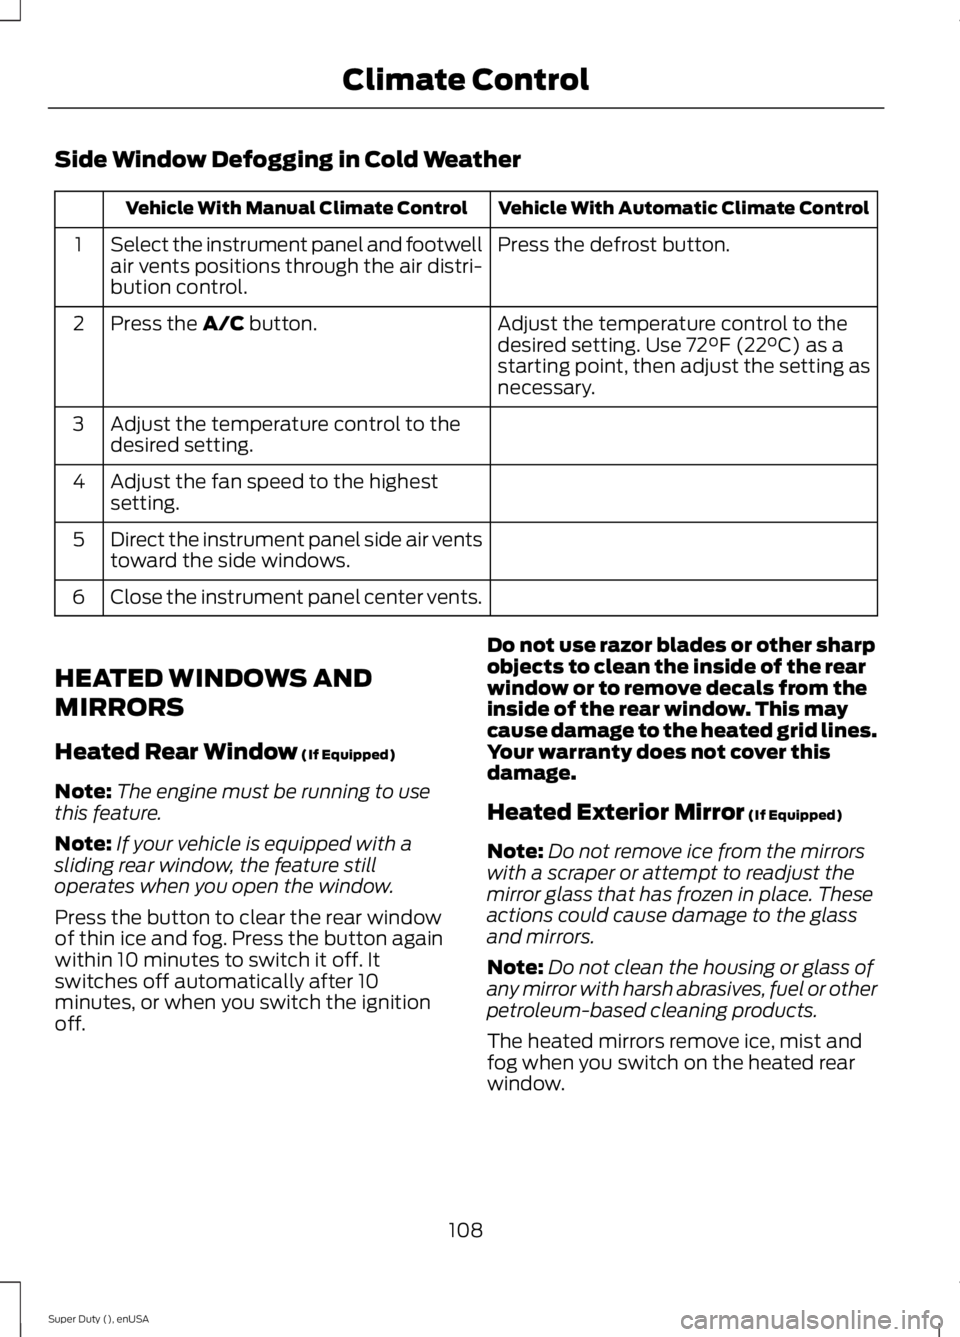
Side Window Defogging in Cold Weather
Vehicle With Automatic Climate ControlVehicle With Manual Climate Control
Press the defrost button.Select the instrument panel and footwellair vents positions through the air distri-bution control.
1
Adjust the temperature control to thedesired setting. Use 72°F (22°C) as astarting point, then adjust the setting asnecessary.
Press the A/C button.2
Adjust the temperature control to thedesired setting.3
Adjust the fan speed to the highestsetting.4
Direct the instrument panel side air ventstoward the side windows.5
Close the instrument panel center vents.6
HEATED WINDOWS AND
MIRRORS
Heated Rear Window (If Equipped)
Note:The engine must be running to usethis feature.
Note:If your vehicle is equipped with asliding rear window, the feature stilloperates when you open the window.
Press the button to clear the rear windowof thin ice and fog. Press the button againwithin 10 minutes to switch it off. Itswitches off automatically after 10minutes, or when you switch the ignitionoff.
Do not use razor blades or other sharpobjects to clean the inside of the rearwindow or to remove decals from theinside of the rear window. This maycause damage to the heated grid lines.Your warranty does not cover thisdamage.
Heated Exterior Mirror (If Equipped)
Note:Do not remove ice from the mirrorswith a scraper or attempt to readjust themirror glass that has frozen in place. Theseactions could cause damage to the glassand mirrors.
Note:Do not clean the housing or glass ofany mirror with harsh abrasives, fuel or otherpetroleum-based cleaning products.
The heated mirrors remove ice, mist andfog when you switch on the heated rearwindow.
108
Super Duty (), enUSA
Climate Control
Page 112 of 470
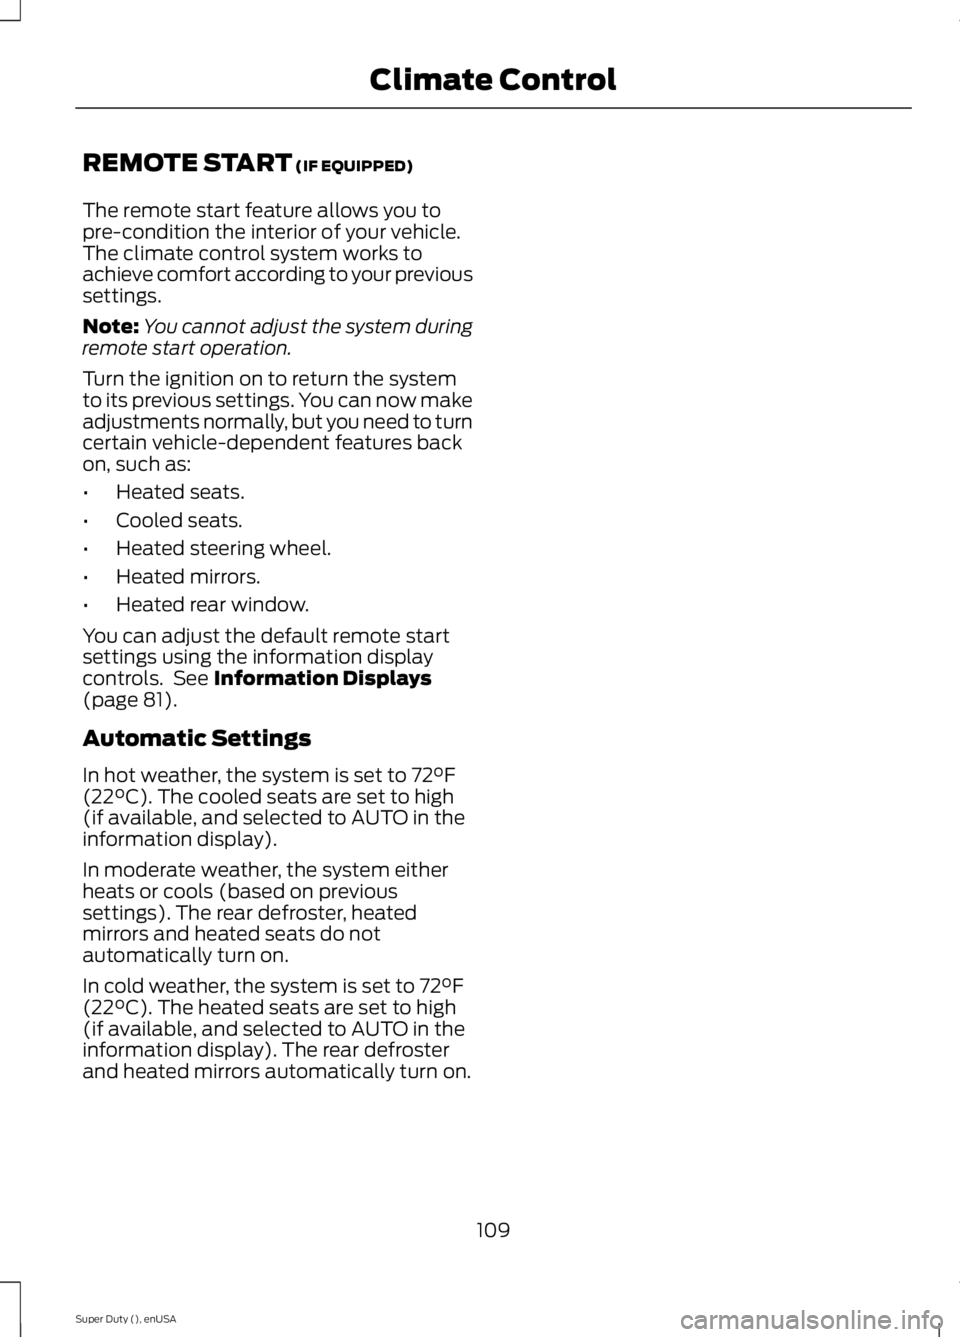
REMOTE START (IF EQUIPPED)
The remote start feature allows you topre-condition the interior of your vehicle.The climate control system works toachieve comfort according to your previoussettings.
Note:You cannot adjust the system duringremote start operation.
Turn the ignition on to return the systemto its previous settings. You can now makeadjustments normally, but you need to turncertain vehicle-dependent features backon, such as:
•Heated seats.
•Cooled seats.
•Heated steering wheel.
•Heated mirrors.
•Heated rear window.
You can adjust the default remote startsettings using the information displaycontrols. See Information Displays(page 81).
Automatic Settings
In hot weather, the system is set to 72°F(22°C). The cooled seats are set to high(if available, and selected to AUTO in theinformation display).
In moderate weather, the system eitherheats or cools (based on previoussettings). The rear defroster, heatedmirrors and heated seats do notautomatically turn on.
In cold weather, the system is set to 72°F(22°C). The heated seats are set to high(if available, and selected to AUTO in theinformation display). The rear defrosterand heated mirrors automatically turn on.
109
Super Duty (), enUSA
Climate Control
Page 113 of 470
SITTING IN THE CORRECT
POSITION
WARNINGS
Sitting improperly, out of position orwith the seat back reclined too farcan take weight off the seat cushionand affect the decision of the passengersensing system, resulting in serious injuryor death in the event of a crash. Always situpright against your seat back, with yourfeet on the floor.
Do not recline the seat back as thiscan cause the occupant to slideunder the safety belt, resulting inserious injury in the event of a crash.
Do not place objects higher than theseat back to reduce the risk ofserious injury in the event of a crashor during heavy braking.
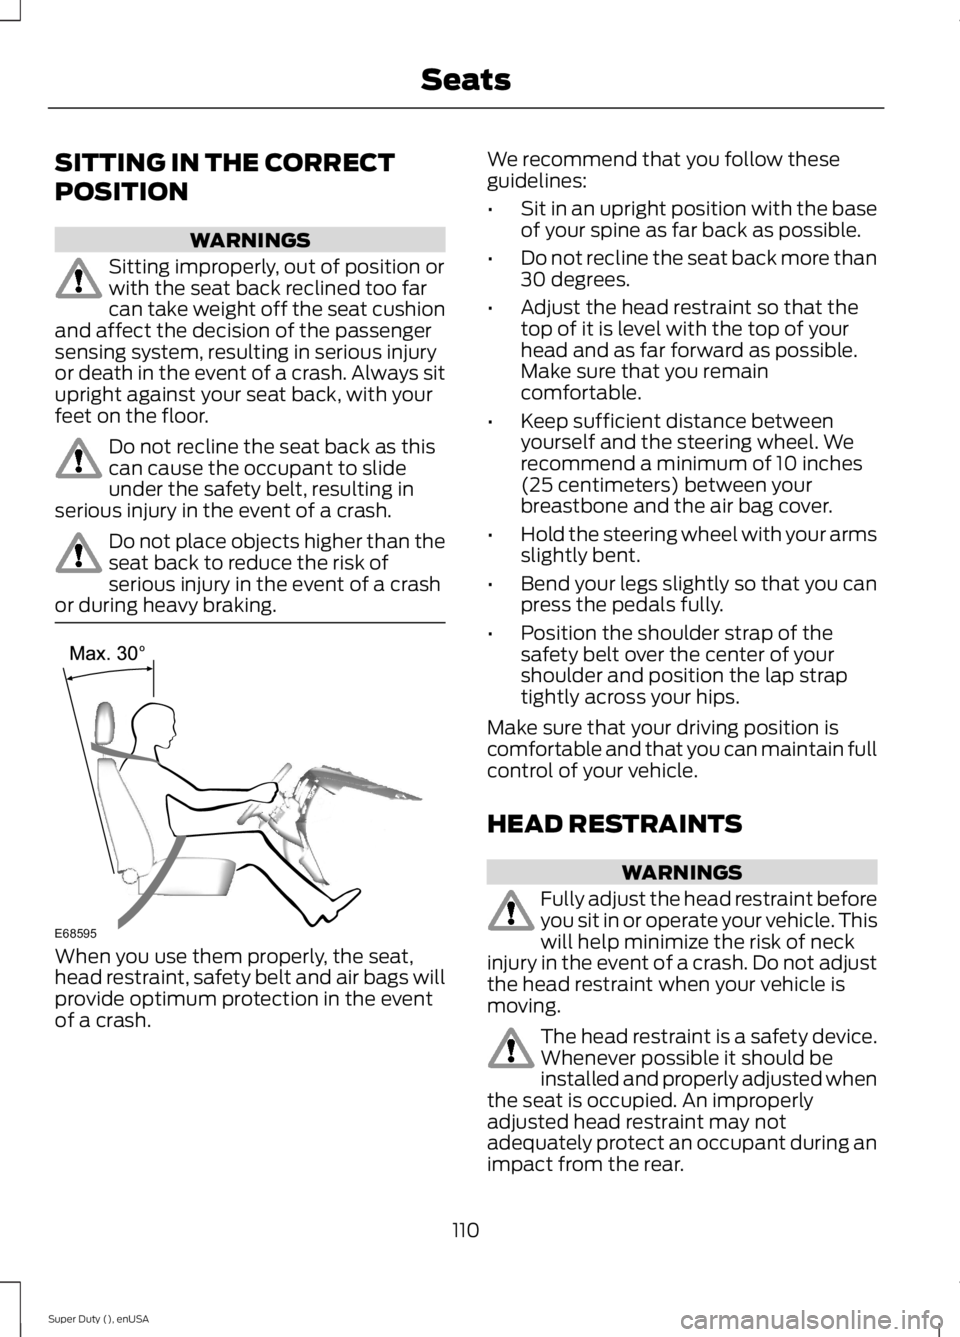
When you use them properly, the seat,head restraint, safety belt and air bags willprovide optimum protection in the eventof a crash.
We recommend that you follow theseguidelines:
•Sit in an upright position with the baseof your spine as far back as possible.
•Do not recline the seat back more than30 degrees.
•Adjust the head restraint so that thetop of it is level with the top of yourhead and as far forward as possible.Make sure that you remaincomfortable.
•Keep sufficient distance betweenyourself and the steering wheel. Werecommend a minimum of 10 inches(25 centimeters) between yourbreastbone and the air bag cover.
•Hold the steering wheel with your armsslightly bent.
•Bend your legs slightly so that you canpress the pedals fully.
•Position the shoulder strap of thesafety belt over the center of yourshoulder and position the lap straptightly across your hips.
Make sure that your driving position iscomfortable and that you can maintain fullcontrol of your vehicle.
HEAD RESTRAINTS
WARNINGS
Fully adjust the head restraint beforeyou sit in or operate your vehicle. Thiswill help minimize the risk of neckinjury in the event of a crash. Do not adjustthe head restraint when your vehicle ismoving.
The head restraint is a safety device.Whenever possible it should beinstalled and properly adjusted whenthe seat is occupied. An improperlyadjusted head restraint may notadequately protect an occupant during animpact from the rear.
110
Super Duty (), enUSA
SeatsE68595
Page 114 of 470
WARNINGS
Install the head restraint properly tohelp minimize the risk of neck injuryin the event of a crash.
Note:Adjust the seat back to an uprightdriving position before adjusting the headrestraint. Adjust the head restraint so thatthe top of it is level with the top of your headand as far forward as possible. Make surethat you remain comfortable. If you areextremely tall, adjust the head restraint toits highest position.
Front Seat Head Restraint
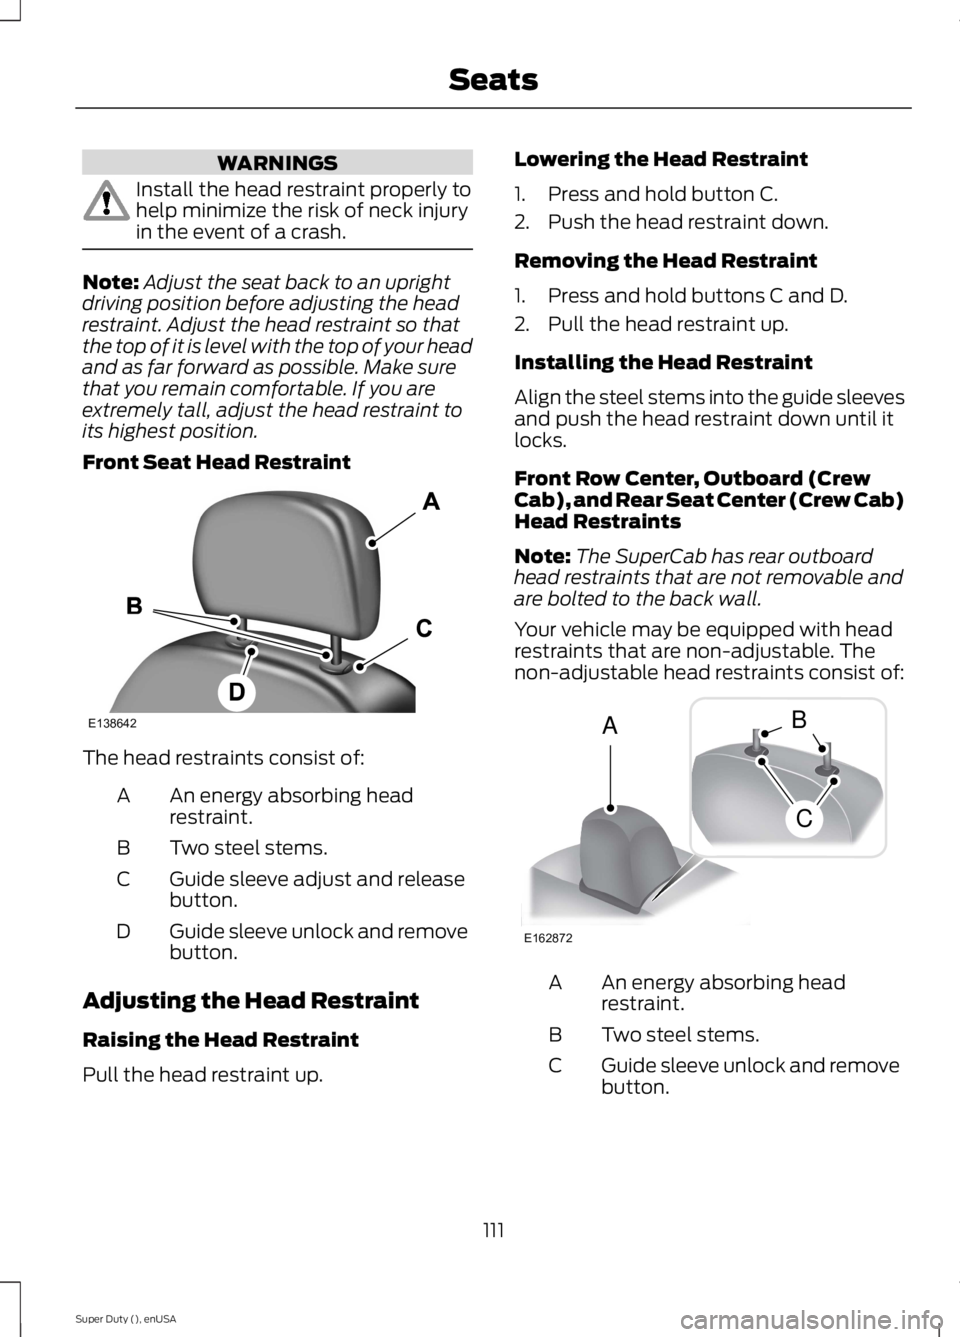
The head restraints consist of:
An energy absorbing headrestraint.A
Two steel stems.B
Guide sleeve adjust and releasebutton.C
Guide sleeve unlock and removebutton.D
Adjusting the Head Restraint
Raising the Head Restraint
Pull the head restraint up.
Lowering the Head Restraint
1. Press and hold button C.
2. Push the head restraint down.
Removing the Head Restraint
1. Press and hold buttons C and D.
2. Pull the head restraint up.
Installing the Head Restraint
Align the steel stems into the guide sleevesand push the head restraint down until itlocks.
Front Row Center, Outboard (CrewCab), and Rear Seat Center (Crew Cab)Head Restraints
Note:The SuperCab has rear outboardhead restraints that are not removable andare bolted to the back wall.
Your vehicle may be equipped with headrestraints that are non-adjustable. Thenon-adjustable head restraints consist of:
An energy absorbing headrestraint.A
Two steel stems.B
Guide sleeve unlock and removebutton.C
111
Super Duty (), enUSA
SeatsE138642 E162872
A
C
B
Page 115 of 470
Removing the Head Restraint
1. Press and hold buttons C.
2. Pull up the head restraint.
Installing the Head Restraint
Align the steel stems into the guide sleevesand push the head restraint down until itlocks.
Tilting Head Restraints (If Equipped)
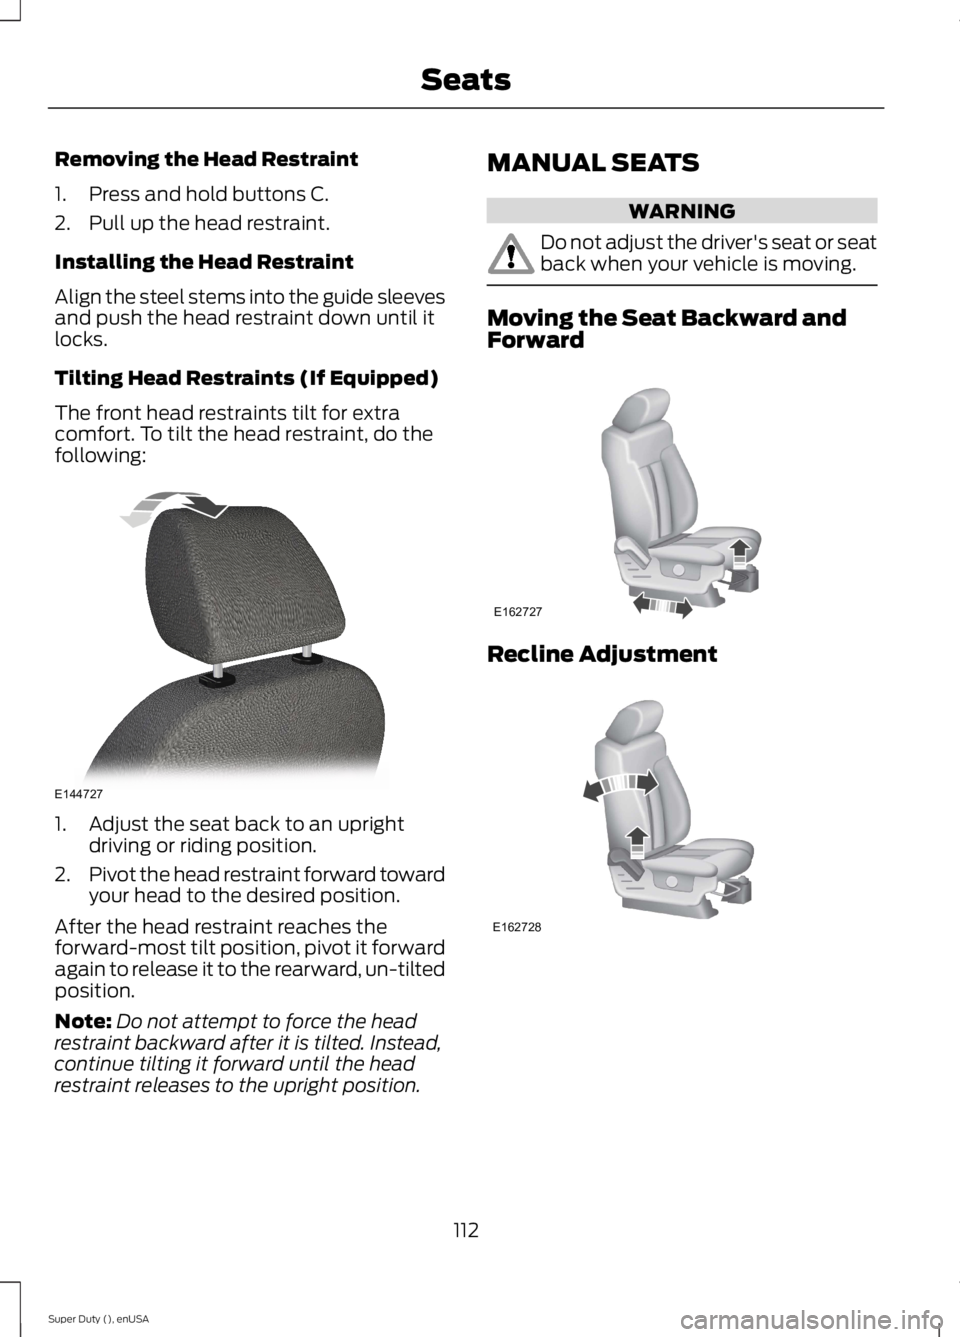
The front head restraints tilt for extracomfort. To tilt the head restraint, do thefollowing:
1. Adjust the seat back to an uprightdriving or riding position.
2.Pivot the head restraint forward towardyour head to the desired position.
After the head restraint reaches theforward-most tilt position, pivot it forwardagain to release it to the rearward, un-tiltedposition.
Note:Do not attempt to force the headrestraint backward after it is tilted. Instead,continue tilting it forward until the headrestraint releases to the upright position.
MANUAL SEATS
WARNING
Do not adjust the driver's seat or seatback when your vehicle is moving.
Moving the Seat Backward andForward
Recline Adjustment
112
Super Duty (), enUSA
SeatsE144727 E162727 E162728
Page 116 of 470
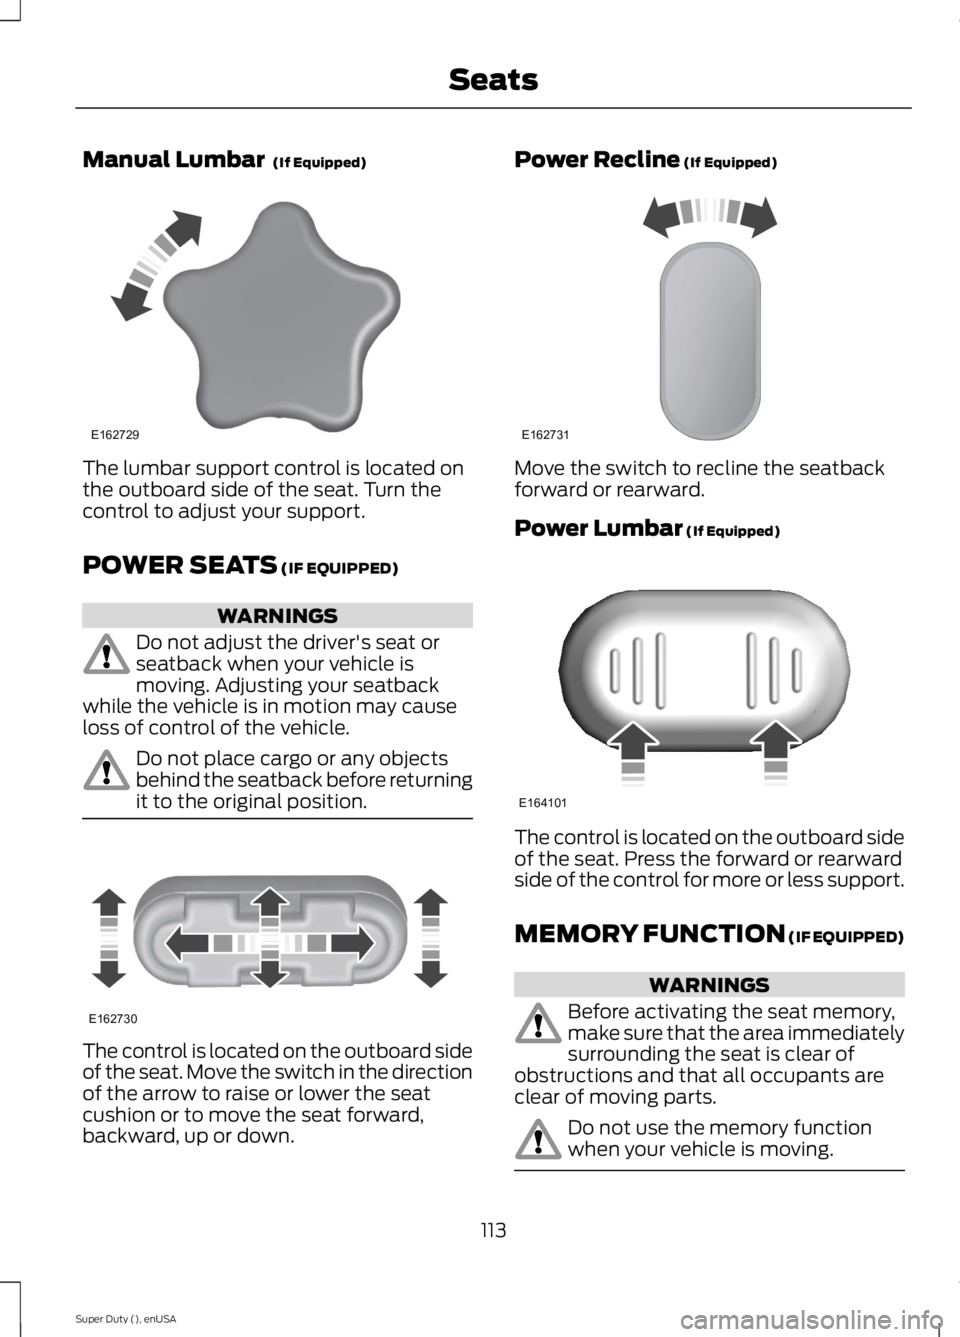
Manual Lumbar (If Equipped)
The lumbar support control is located onthe outboard side of the seat. Turn thecontrol to adjust your support.
POWER SEATS (IF EQUIPPED)
WARNINGS
Do not adjust the driver's seat orseatback when your vehicle ismoving. Adjusting your seatbackwhile the vehicle is in motion may causeloss of control of the vehicle.
Do not place cargo or any objectsbehind the seatback before returningit to the original position.
The control is located on the outboard sideof the seat. Move the switch in the directionof the arrow to raise or lower the seatcushion or to move the seat forward,backward, up or down.
Power Recline (If Equipped)
Move the switch to recline the seatbackforward or rearward.
Power Lumbar (If Equipped)
The control is located on the outboard sideof the seat. Press the forward or rearwardside of the control for more or less support.
MEMORY FUNCTION (IF EQUIPPED)
WARNINGS
Before activating the seat memory,make sure that the area immediatelysurrounding the seat is clear ofobstructions and that all occupants areclear of moving parts.
Do not use the memory functionwhen your vehicle is moving.
113
Super Duty (), enUSA
SeatsE162729 E162730 E162731 E164101
Page 117 of 470
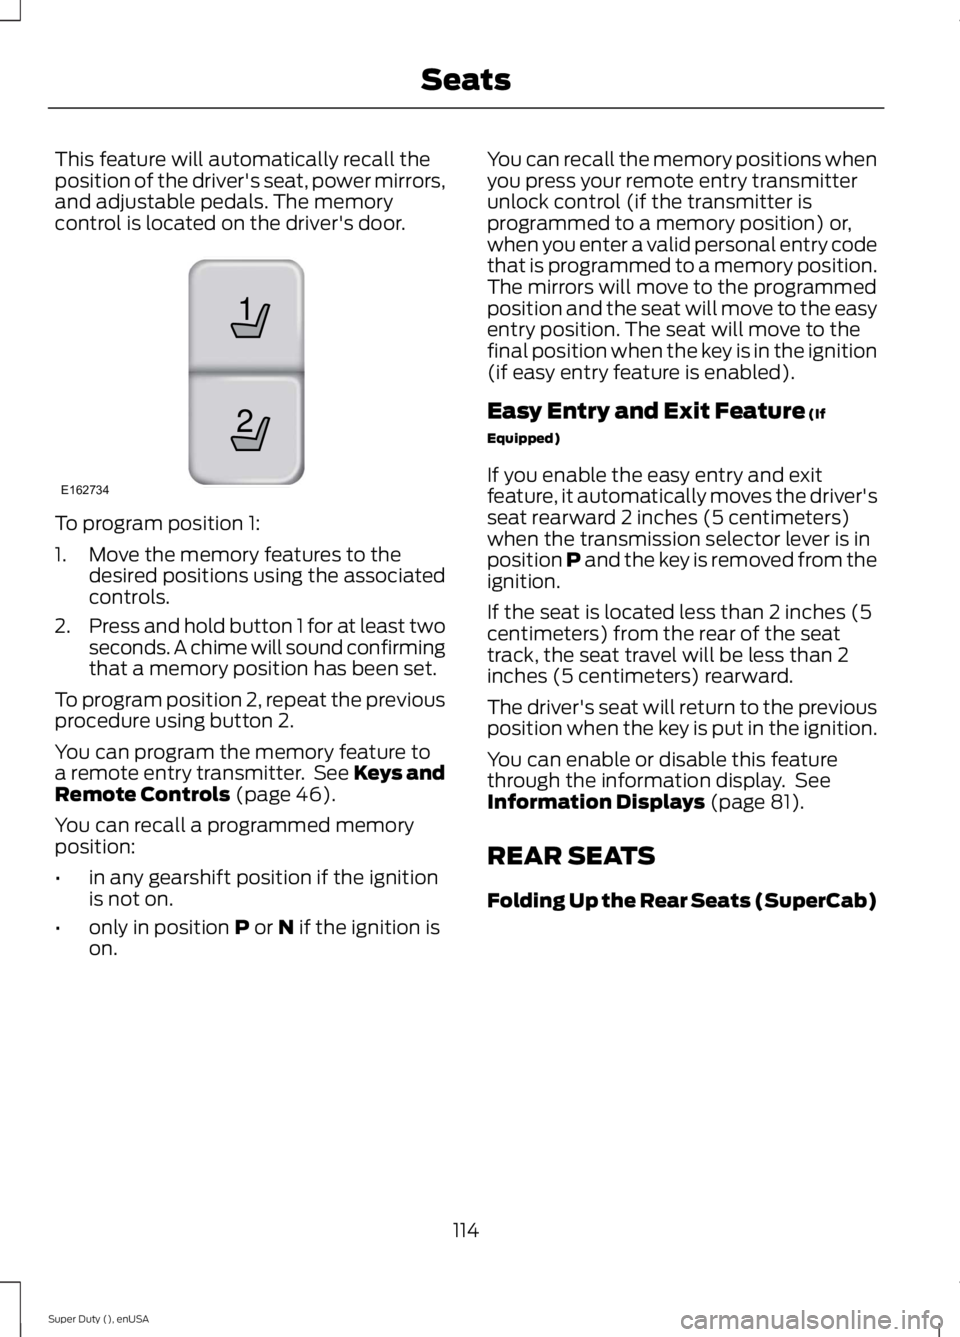
This feature will automatically recall theposition of the driver's seat, power mirrors,and adjustable pedals. The memorycontrol is located on the driver's door.
To program position 1:
1. Move the memory features to thedesired positions using the associatedcontrols.
2.Press and hold button 1 for at least twoseconds. A chime will sound confirmingthat a memory position has been set.
To program position 2, repeat the previousprocedure using button 2.
You can program the memory feature toa remote entry transmitter. See Keys andRemote Controls (page 46).
You can recall a programmed memoryposition:
•in any gearshift position if the ignitionis not on.
•only in position P or N if the ignition ison.
You can recall the memory positions whenyou press your remote entry transmitterunlock control (if the transmitter isprogrammed to a memory position) or,when you enter a valid personal entry codethat is programmed to a memory position.The mirrors will move to the programmedposition and the seat will move to the easyentry position. The seat will move to thefinal position when the key is in the ignition(if easy entry feature is enabled).
Easy Entry and Exit Feature (If
Equipped)
If you enable the easy entry and exitfeature, it automatically moves the driver'sseat rearward 2 inches (5 centimeters)when the transmission selector lever is inposition P and the key is removed from theignition.
If the seat is located less than 2 inches (5centimeters) from the rear of the seattrack, the seat travel will be less than 2inches (5 centimeters) rearward.
The driver's seat will return to the previousposition when the key is put in the ignition.
You can enable or disable this featurethrough the information display. SeeInformation Displays (page 81).
REAR SEATS
Folding Up the Rear Seats (SuperCab)
114
Super Duty (), enUSA
Seats21
E162734
Page 118 of 470
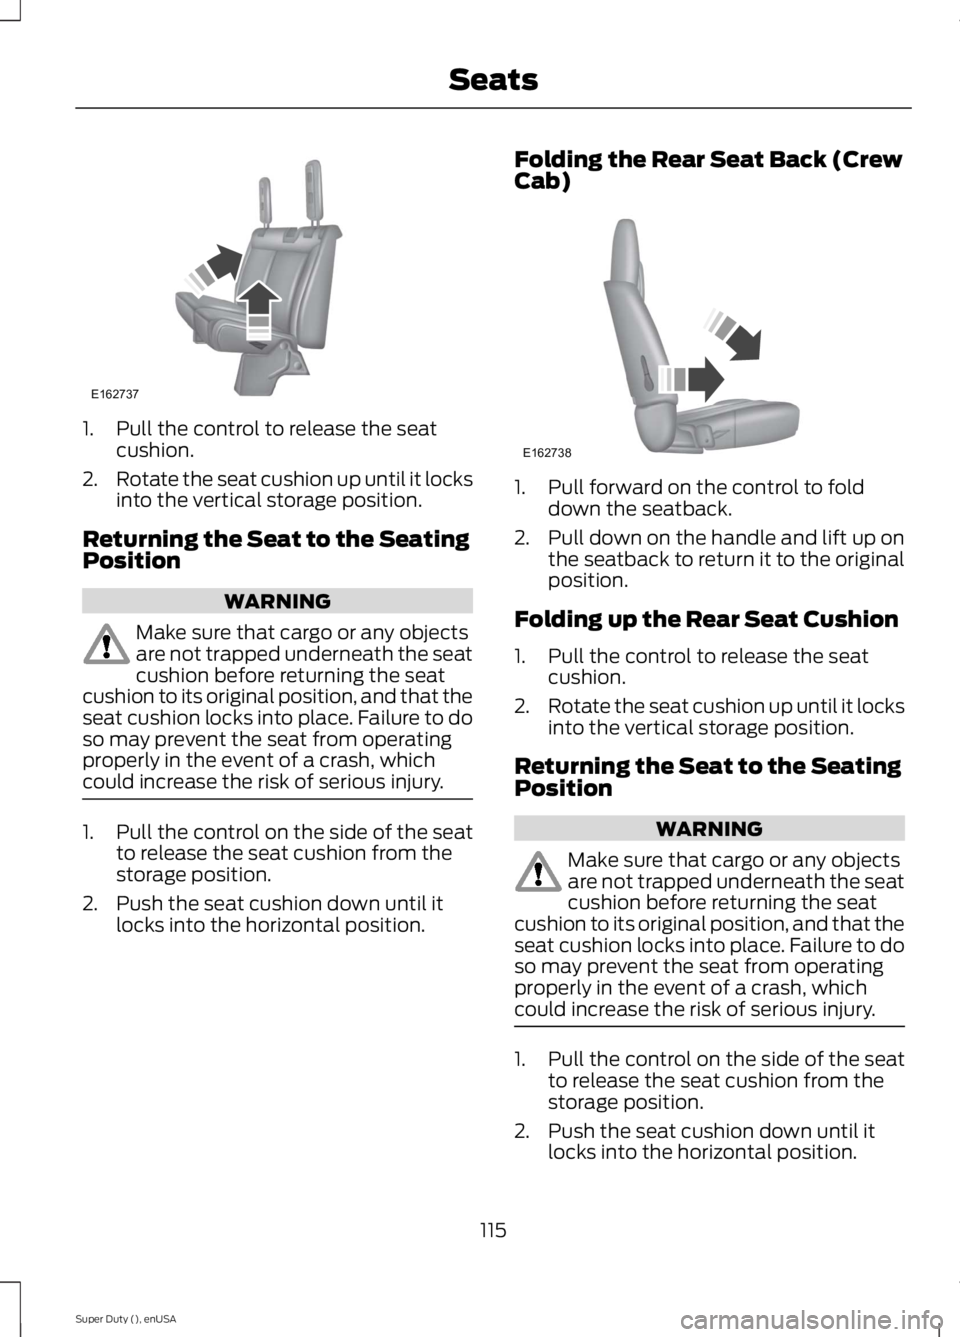
1. Pull the control to release the seatcushion.
2.Rotate the seat cushion up until it locksinto the vertical storage position.
Returning the Seat to the SeatingPosition
WARNING
Make sure that cargo or any objectsare not trapped underneath the seatcushion before returning the seatcushion to its original position, and that theseat cushion locks into place. Failure to doso may prevent the seat from operatingproperly in the event of a crash, whichcould increase the risk of serious injury.
1. Pull the control on the side of the seatto release the seat cushion from thestorage position.
2. Push the seat cushion down until itlocks into the horizontal position.
Folding the Rear Seat Back (CrewCab)
1. Pull forward on the control to folddown the seatback.
2.Pull down on the handle and lift up onthe seatback to return it to the originalposition.
Folding up the Rear Seat Cushion
1. Pull the control to release the seatcushion.
2.Rotate the seat cushion up until it locksinto the vertical storage position.
Returning the Seat to the SeatingPosition
WARNING
Make sure that cargo or any objectsare not trapped underneath the seatcushion before returning the seatcushion to its original position, and that theseat cushion locks into place. Failure to doso may prevent the seat from operatingproperly in the event of a crash, whichcould increase the risk of serious injury.
1. Pull the control on the side of the seatto release the seat cushion from thestorage position.
2. Push the seat cushion down until itlocks into the horizontal position.
115
Super Duty (), enUSA
SeatsE162737 E162738
Page 119 of 470
Rear Under Seat Storage (CrewCab) (If Equipped)
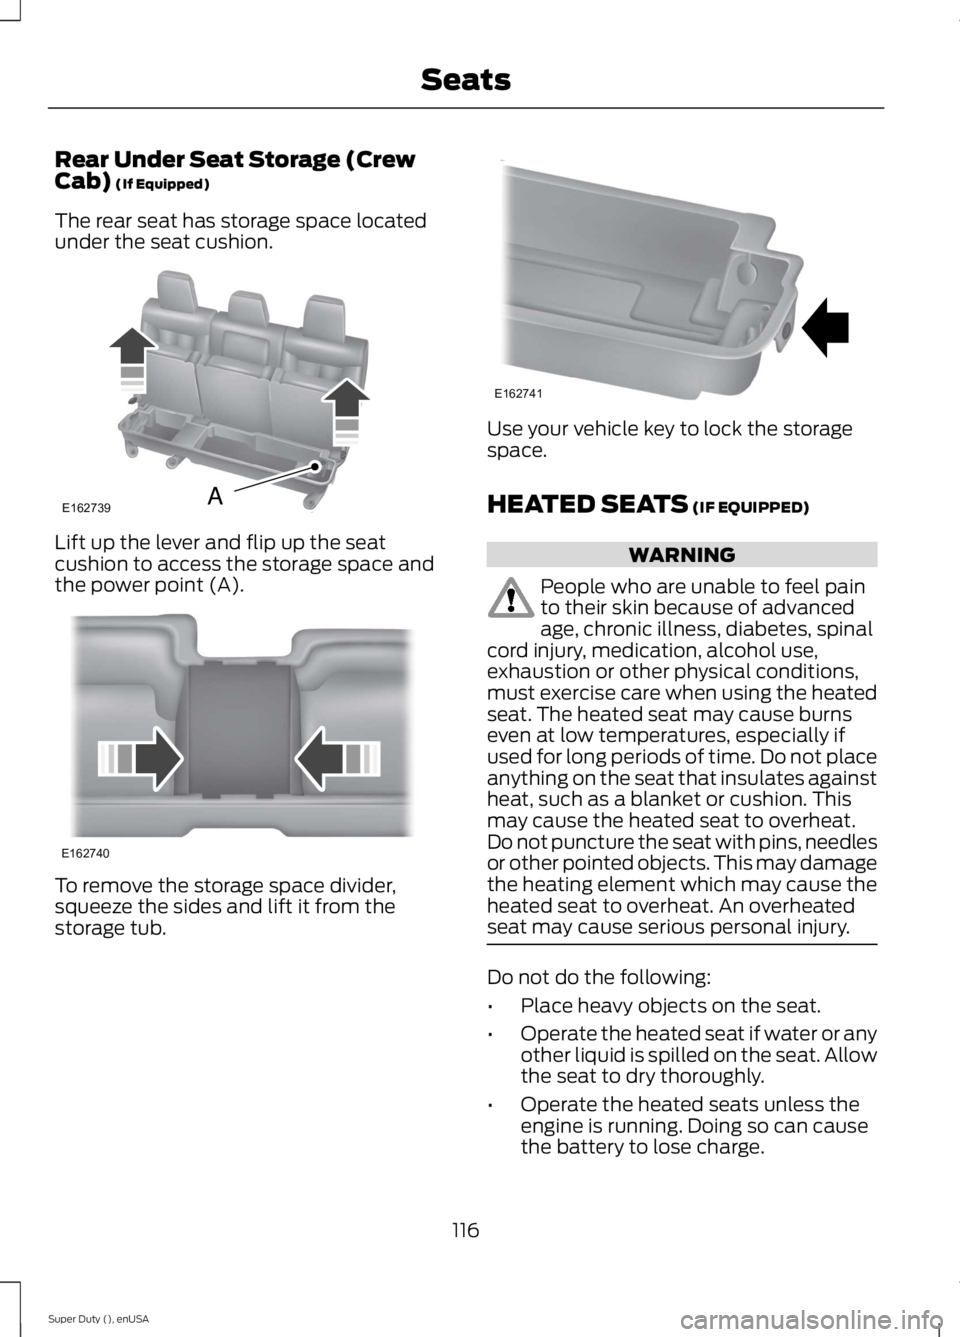
The rear seat has storage space locatedunder the seat cushion.
Lift up the lever and flip up the seatcushion to access the storage space andthe power point (A).
To remove the storage space divider,squeeze the sides and lift it from thestorage tub.
Use your vehicle key to lock the storagespace.
HEATED SEATS (IF EQUIPPED)
WARNING
People who are unable to feel painto their skin because of advancedage, chronic illness, diabetes, spinalcord injury, medication, alcohol use,exhaustion or other physical conditions,must exercise care when using the heatedseat. The heated seat may cause burnseven at low temperatures, especially ifused for long periods of time. Do not placeanything on the seat that insulates againstheat, such as a blanket or cushion. Thismay cause the heated seat to overheat.Do not puncture the seat with pins, needlesor other pointed objects. This may damagethe heating element which may cause theheated seat to overheat. An overheatedseat may cause serious personal injury.
Do not do the following:
•Place heavy objects on the seat.
•Operate the heated seat if water or anyother liquid is spilled on the seat. Allowthe seat to dry thoroughly.
•Operate the heated seats unless theengine is running. Doing so can causethe battery to lose charge.
116
Super Duty (), enUSA
SeatsE162739A E162740 E162741
Page 120 of 470
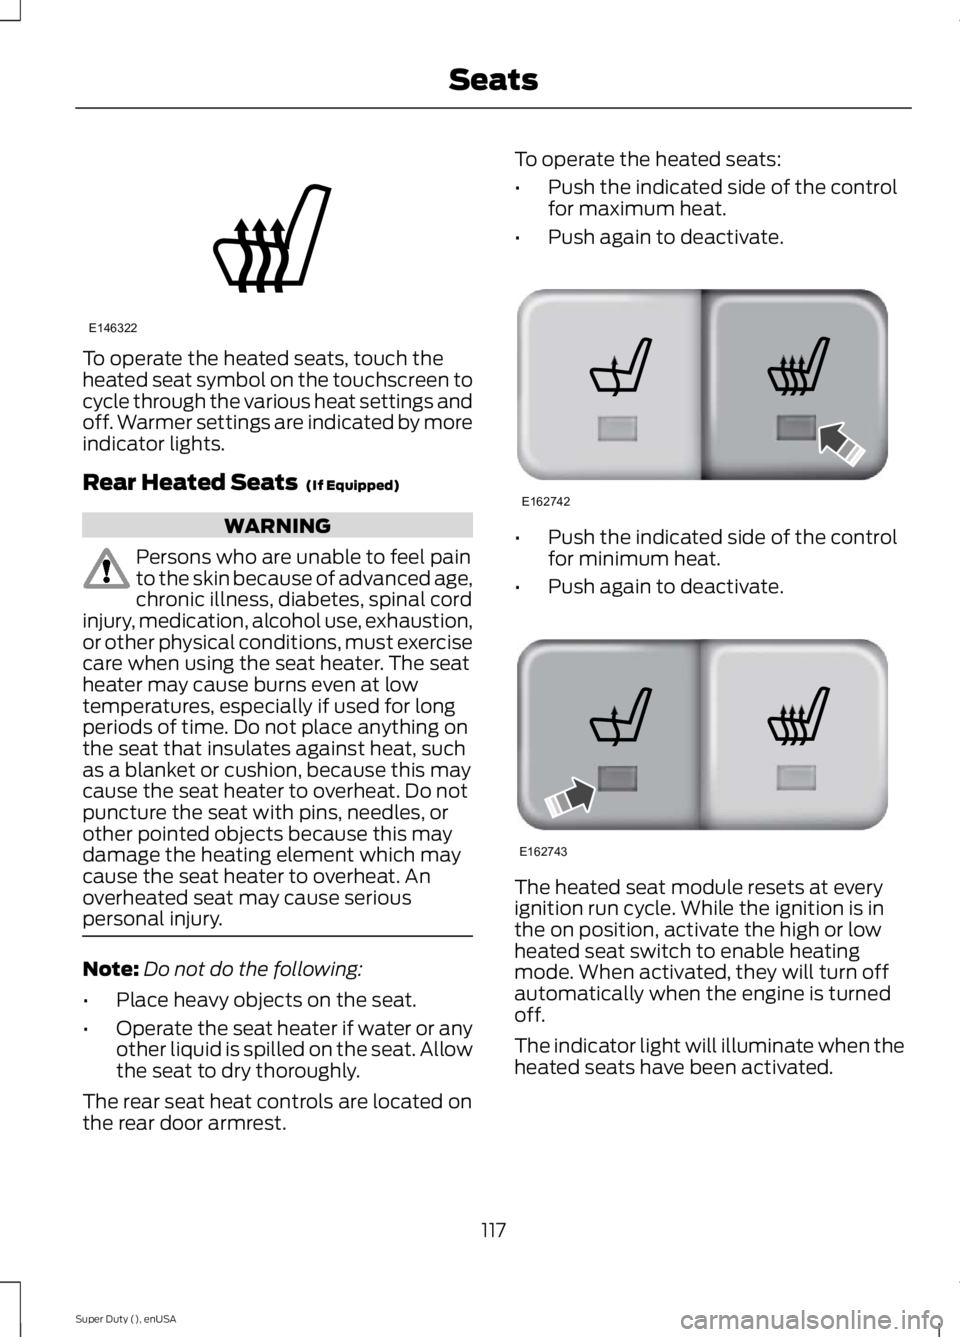
To operate the heated seats, touch theheated seat symbol on the touchscreen tocycle through the various heat settings andoff. Warmer settings are indicated by moreindicator lights.
Rear Heated Seats (If Equipped)
WARNING
Persons who are unable to feel painto the skin because of advanced age,chronic illness, diabetes, spinal cordinjury, medication, alcohol use, exhaustion,or other physical conditions, must exercisecare when using the seat heater. The seatheater may cause burns even at lowtemperatures, especially if used for longperiods of time. Do not place anything onthe seat that insulates against heat, suchas a blanket or cushion, because this maycause the seat heater to overheat. Do notpuncture the seat with pins, needles, orother pointed objects because this maydamage the heating element which maycause the seat heater to overheat. Anoverheated seat may cause seriouspersonal injury.
Note:Do not do the following:
•Place heavy objects on the seat.
•Operate the seat heater if water or anyother liquid is spilled on the seat. Allowthe seat to dry thoroughly.
The rear seat heat controls are located onthe rear door armrest.
To operate the heated seats:
•Push the indicated side of the controlfor maximum heat.
•Push again to deactivate.
•Push the indicated side of the controlfor minimum heat.
•Push again to deactivate.
The heated seat module resets at everyignition run cycle. While the ignition is inthe on position, activate the high or lowheated seat switch to enable heatingmode. When activated, they will turn offautomatically when the engine is turnedoff.
The indicator light will illuminate when theheated seats have been activated.
117
Super Duty (), enUSA
SeatsE146322 E162742 E162743