FORD F250 SUPER DUTY 2017 Owners Manual
Manufacturer: FORD, Model Year: 2017, Model line: F250 SUPER DUTY, Model: FORD F250 SUPER DUTY 2017Pages: 642, PDF Size: 12.35 MB
Page 151 of 642
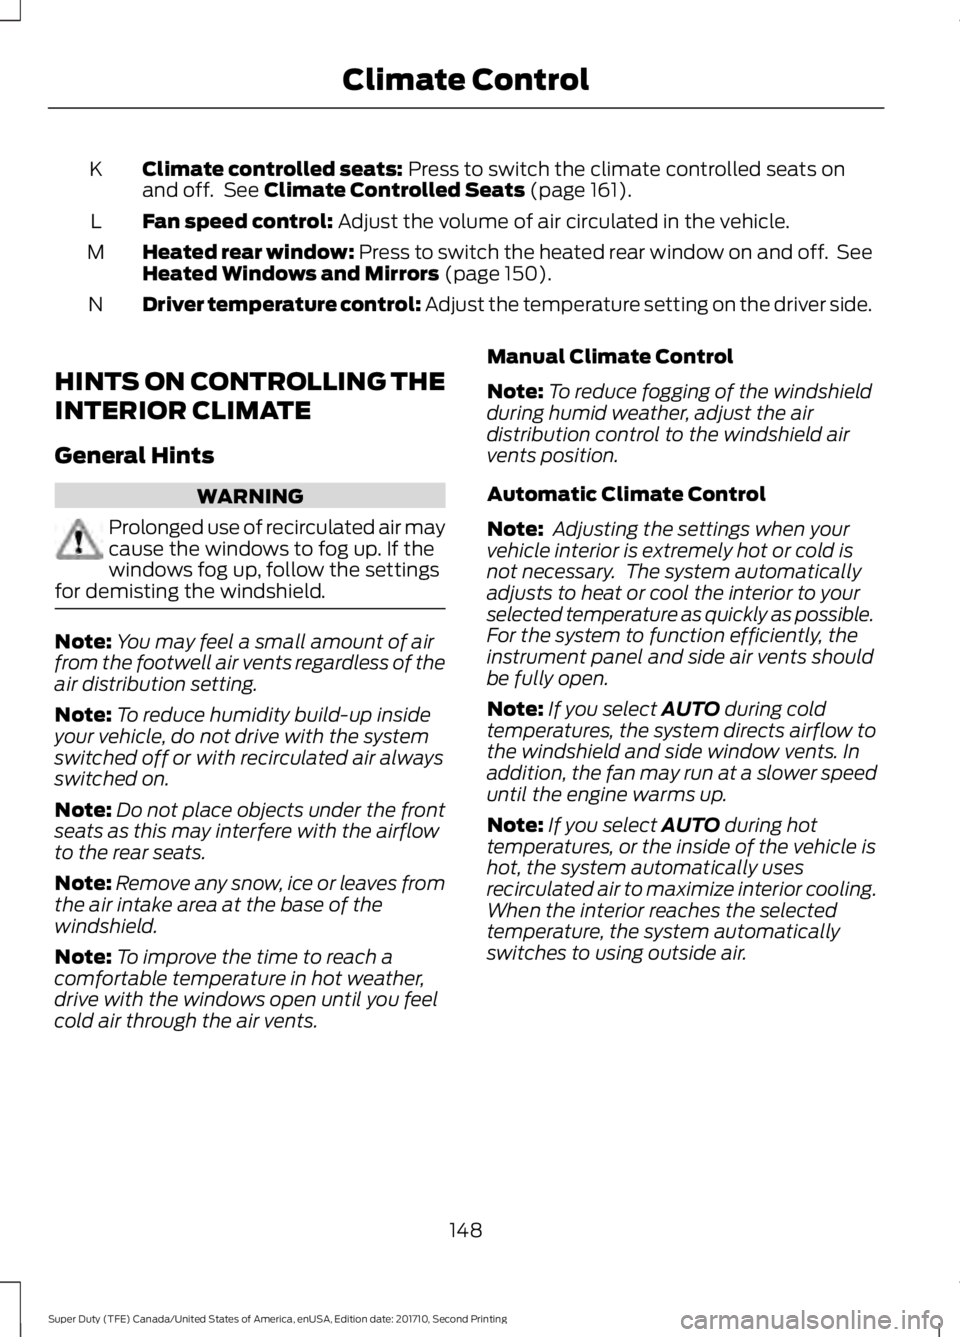
Climate controlled seats: Press to switch the climate controlled seats onand off. See Climate Controlled Seats (page 161).K
Fan speed control: Adjust the volume of air circulated in the vehicle.L
Heated rear window: Press to switch the heated rear window on and off. SeeHeated Windows and Mirrors (page 150).M
Driver temperature control: Adjust the temperature setting on the driver side.N
HINTS ON CONTROLLING THE
INTERIOR CLIMATE
General Hints
WARNING
Prolonged use of recirculated air maycause the windows to fog up. If thewindows fog up, follow the settingsfor demisting the windshield.
Note:You may feel a small amount of airfrom the footwell air vents regardless of theair distribution setting.
Note:To reduce humidity build-up insideyour vehicle, do not drive with the systemswitched off or with recirculated air alwaysswitched on.
Note:Do not place objects under the frontseats as this may interfere with the airflowto the rear seats.
Note:Remove any snow, ice or leaves fromthe air intake area at the base of thewindshield.
Note:To improve the time to reach acomfortable temperature in hot weather,drive with the windows open until you feelcold air through the air vents.
Manual Climate Control
Note:To reduce fogging of the windshieldduring humid weather, adjust the airdistribution control to the windshield airvents position.
Automatic Climate Control
Note: Adjusting the settings when yourvehicle interior is extremely hot or cold isnot necessary. The system automaticallyadjusts to heat or cool the interior to yourselected temperature as quickly as possible.For the system to function efficiently, theinstrument panel and side air vents shouldbe fully open.
Note:If you select AUTO during coldtemperatures, the system directs airflow tothe windshield and side window vents. Inaddition, the fan may run at a slower speeduntil the engine warms up.
Note:If you select AUTO during hottemperatures, or the inside of the vehicle ishot, the system automatically usesrecirculated air to maximize interior cooling.When the interior reaches the selectedtemperature, the system automaticallyswitches to using outside air.
148
Super Duty (TFE) Canada/United States of America, enUSA, Edition date: 201710, Second Printing
Climate Control
Page 152 of 642
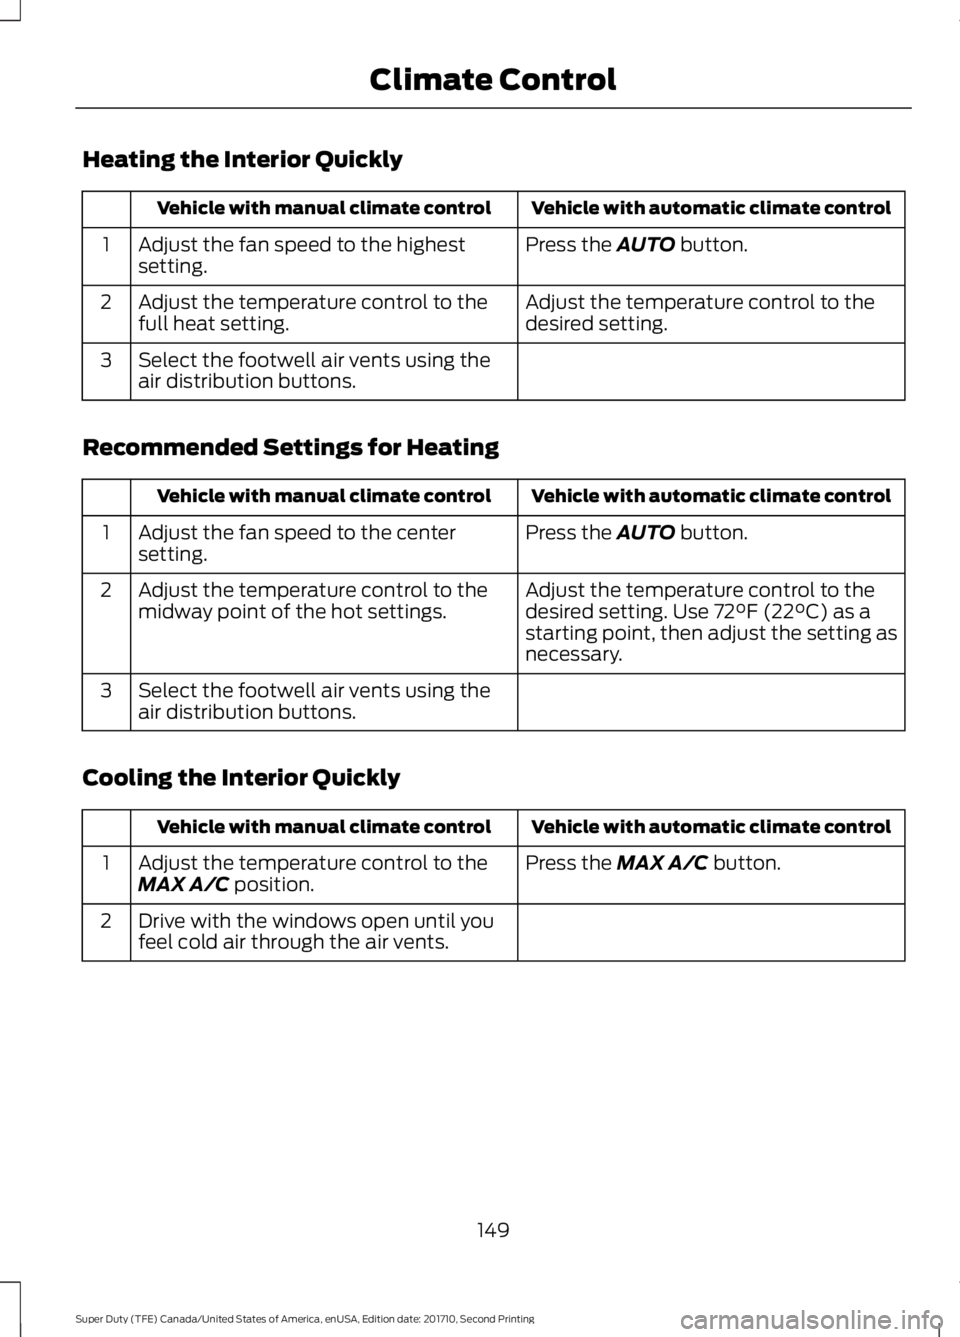
Heating the Interior Quickly
Vehicle with automatic climate controlVehicle with manual climate control
Press the AUTO button.Adjust the fan speed to the highestsetting.1
Adjust the temperature control to thedesired setting.Adjust the temperature control to thefull heat setting.2
Select the footwell air vents using theair distribution buttons.3
Recommended Settings for Heating
Vehicle with automatic climate controlVehicle with manual climate control
Press the AUTO button.Adjust the fan speed to the centersetting.1
Adjust the temperature control to thedesired setting. Use 72°F (22°C) as astarting point, then adjust the setting asnecessary.
Adjust the temperature control to themidway point of the hot settings.2
Select the footwell air vents using theair distribution buttons.3
Cooling the Interior Quickly
Vehicle with automatic climate controlVehicle with manual climate control
Press the MAX A/C button.Adjust the temperature control to theMAX A/C position.1
Drive with the windows open until youfeel cold air through the air vents.2
149
Super Duty (TFE) Canada/United States of America, enUSA, Edition date: 201710, Second Printing
Climate Control
Page 153 of 642
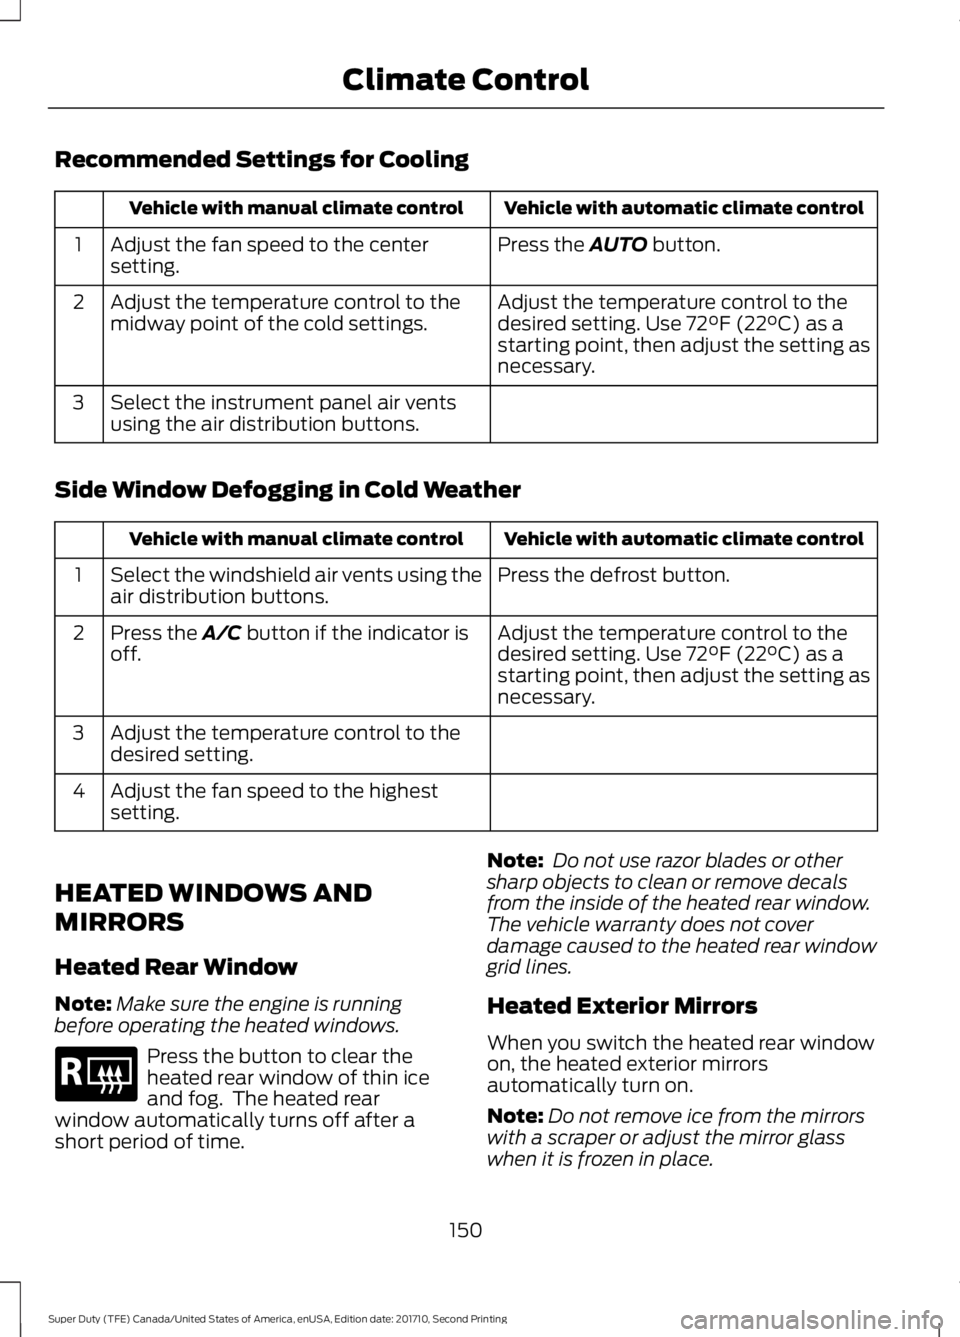
Recommended Settings for Cooling
Vehicle with automatic climate controlVehicle with manual climate control
Press the AUTO button.Adjust the fan speed to the centersetting.1
Adjust the temperature control to thedesired setting. Use 72°F (22°C) as astarting point, then adjust the setting asnecessary.
Adjust the temperature control to themidway point of the cold settings.2
Select the instrument panel air ventsusing the air distribution buttons.3
Side Window Defogging in Cold Weather
Vehicle with automatic climate controlVehicle with manual climate control
Press the defrost button.Select the windshield air vents using theair distribution buttons.1
Adjust the temperature control to thedesired setting. Use 72°F (22°C) as astarting point, then adjust the setting asnecessary.
Press the A/C button if the indicator isoff.2
Adjust the temperature control to thedesired setting.3
Adjust the fan speed to the highestsetting.4
HEATED WINDOWS AND
MIRRORS
Heated Rear Window
Note:Make sure the engine is runningbefore operating the heated windows.
Press the button to clear theheated rear window of thin iceand fog. The heated rearwindow automatically turns off after ashort period of time.
Note: Do not use razor blades or othersharp objects to clean or remove decalsfrom the inside of the heated rear window.The vehicle warranty does not coverdamage caused to the heated rear windowgrid lines.
Heated Exterior Mirrors
When you switch the heated rear windowon, the heated exterior mirrorsautomatically turn on.
Note:Do not remove ice from the mirrorswith a scraper or adjust the mirror glasswhen it is frozen in place.
150
Super Duty (TFE) Canada/United States of America, enUSA, Edition date: 201710, Second Printing
Climate ControlE184884
Page 154 of 642
Note:Do not clean the mirror housing orglass with harsh abrasives, fuel or otherpetroleum-based cleaning products.
HEATED EXTERIOR MIRRORS
Note:Do not remove ice from the mirrorswith a scraper or adjust the mirror glasswhen it is frozen in place.
Note:Do not clean the mirror housing orglass with harsh abrasives, fuel or otherpetroleum-based cleaning products.
The heated exterior mirrors will removeice, mist and fog.
CABIN AIR FILTER
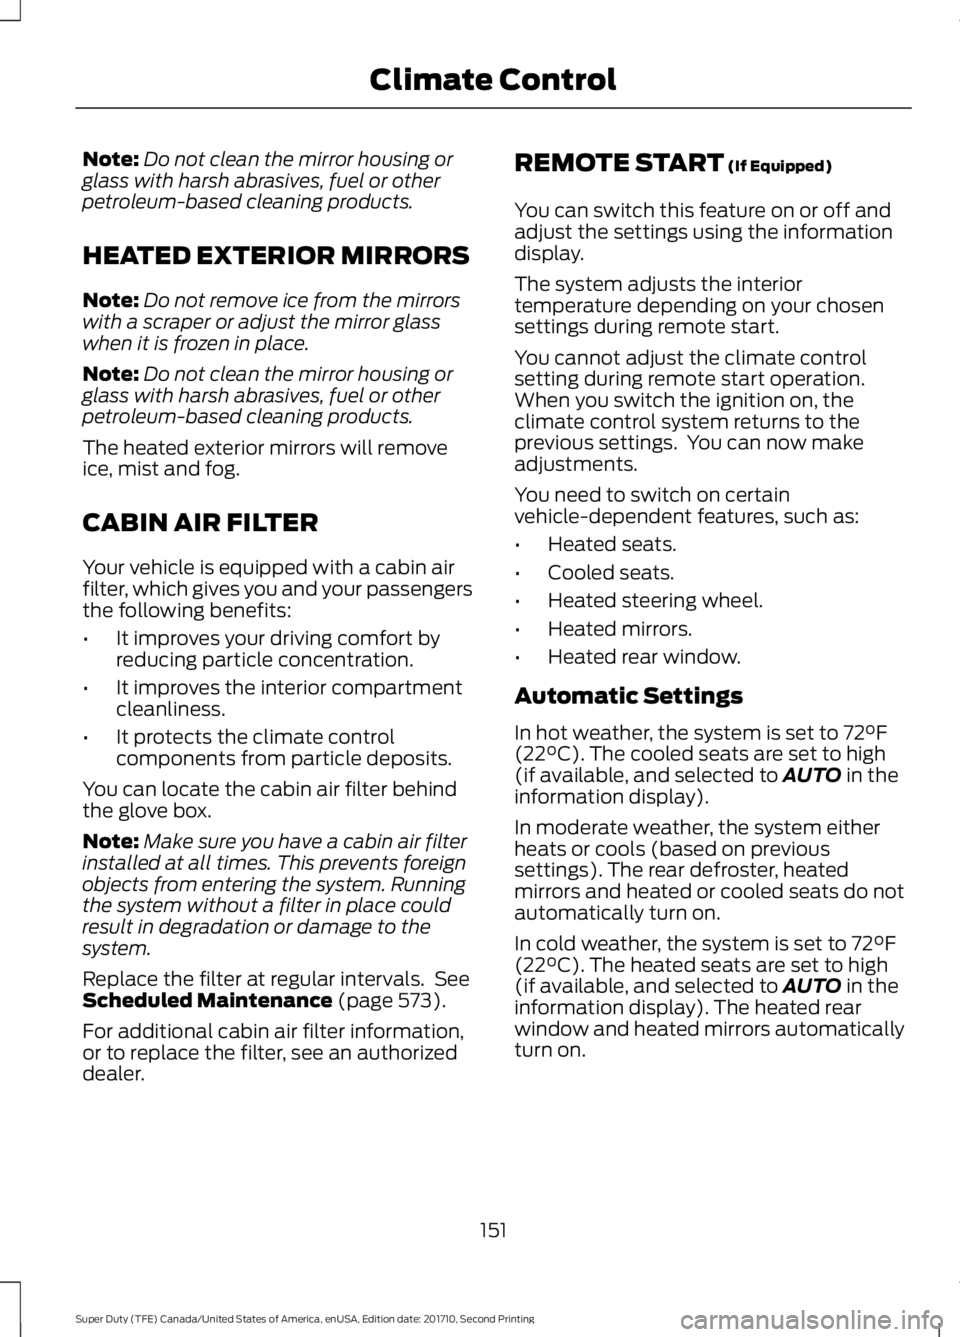
Your vehicle is equipped with a cabin airfilter, which gives you and your passengersthe following benefits:
•It improves your driving comfort byreducing particle concentration.
•It improves the interior compartmentcleanliness.
•It protects the climate controlcomponents from particle deposits.
You can locate the cabin air filter behindthe glove box.
Note:Make sure you have a cabin air filterinstalled at all times. This prevents foreignobjects from entering the system. Runningthe system without a filter in place couldresult in degradation or damage to thesystem.
Replace the filter at regular intervals. SeeScheduled Maintenance (page 573).
For additional cabin air filter information,or to replace the filter, see an authorizeddealer.
REMOTE START (If Equipped)
You can switch this feature on or off andadjust the settings using the informationdisplay.
The system adjusts the interiortemperature depending on your chosensettings during remote start.
You cannot adjust the climate controlsetting during remote start operation.When you switch the ignition on, theclimate control system returns to theprevious settings. You can now makeadjustments.
You need to switch on certainvehicle-dependent features, such as:
•Heated seats.
•Cooled seats.
•Heated steering wheel.
•Heated mirrors.
•Heated rear window.
Automatic Settings
In hot weather, the system is set to 72°F(22°C). The cooled seats are set to high(if available, and selected to AUTO in theinformation display).
In moderate weather, the system eitherheats or cools (based on previoussettings). The rear defroster, heatedmirrors and heated or cooled seats do notautomatically turn on.
In cold weather, the system is set to 72°F(22°C). The heated seats are set to high(if available, and selected to AUTO in theinformation display). The heated rearwindow and heated mirrors automaticallyturn on.
151
Super Duty (TFE) Canada/United States of America, enUSA, Edition date: 201710, Second Printing
Climate Control
Page 155 of 642
SITTING IN THE CORRECT
POSITION
WARNINGS
Sitting improperly, out of position orwith the seatback reclined too farcan take weight off the seat cushionand affect the decision of the passengersensing system, resulting in serious injuryor death in the event of a crash. Always situpright against your seat back, with yourfeet on the floor.
Do not recline the seatback as thiscan cause the occupant to slideunder the safety belt, resulting inserious injury in the event of a crash.
Do not place objects higher than theseatback to reduce the risk of seriousinjury in the event of a crash or duringheavy braking.
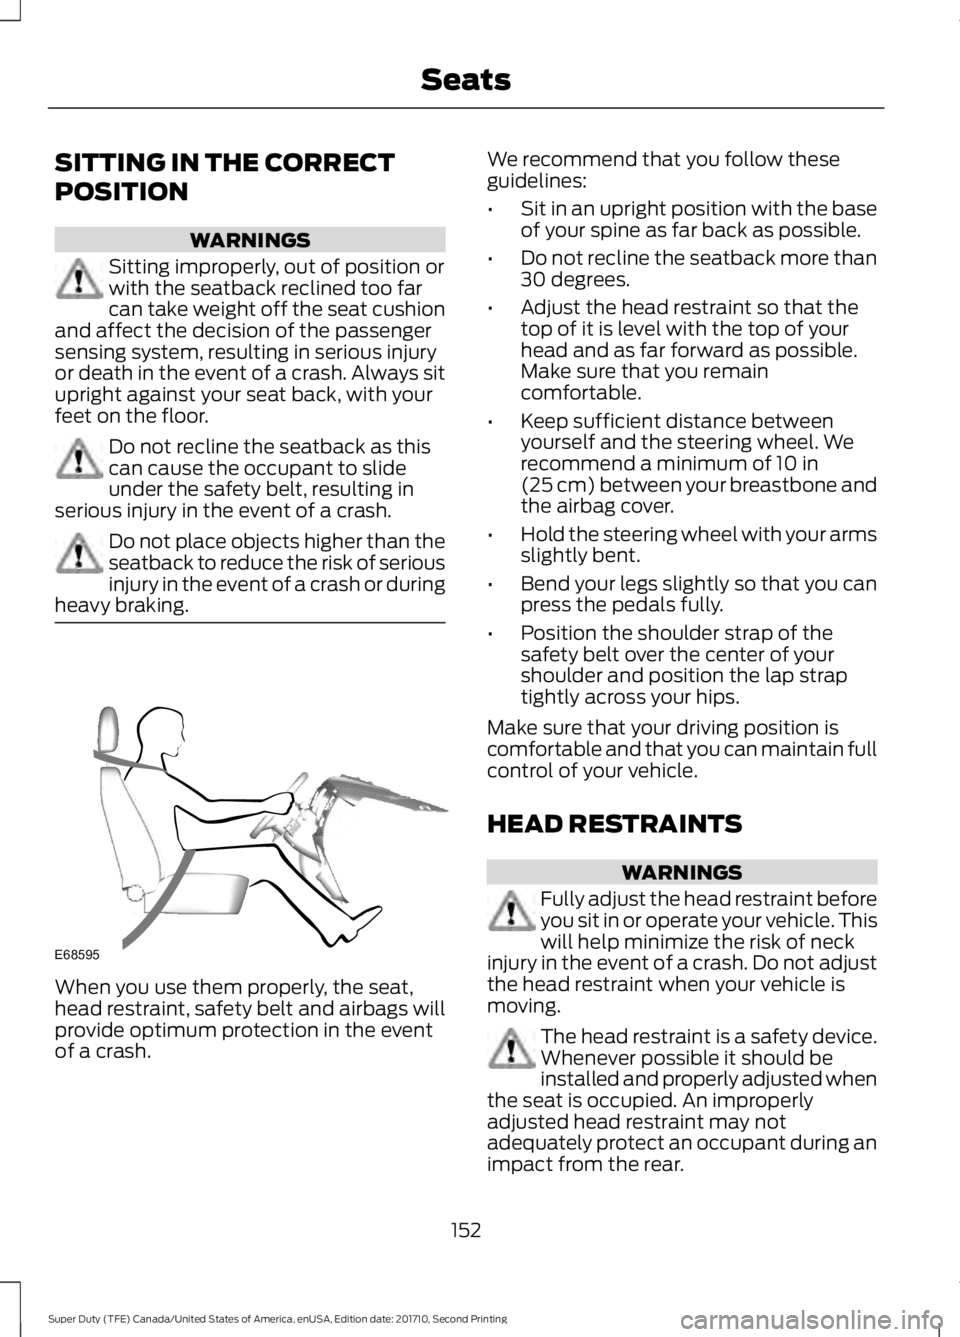
When you use them properly, the seat,head restraint, safety belt and airbags willprovide optimum protection in the eventof a crash.
We recommend that you follow theseguidelines:
•Sit in an upright position with the baseof your spine as far back as possible.
•Do not recline the seatback more than30 degrees.
•Adjust the head restraint so that thetop of it is level with the top of yourhead and as far forward as possible.Make sure that you remaincomfortable.
•Keep sufficient distance betweenyourself and the steering wheel. Werecommend a minimum of 10 in(25 cm) between your breastbone andthe airbag cover.
•Hold the steering wheel with your armsslightly bent.
•Bend your legs slightly so that you canpress the pedals fully.
•Position the shoulder strap of thesafety belt over the center of yourshoulder and position the lap straptightly across your hips.
Make sure that your driving position iscomfortable and that you can maintain fullcontrol of your vehicle.
HEAD RESTRAINTS
WARNINGS
Fully adjust the head restraint beforeyou sit in or operate your vehicle. Thiswill help minimize the risk of neckinjury in the event of a crash. Do not adjustthe head restraint when your vehicle ismoving.
The head restraint is a safety device.Whenever possible it should beinstalled and properly adjusted whenthe seat is occupied. An improperlyadjusted head restraint may notadequately protect an occupant during animpact from the rear.
152
Super Duty (TFE) Canada/United States of America, enUSA, Edition date: 201710, Second Printing
SeatsE68595
Page 156 of 642
WARNINGS
Install the head restraint properly tohelp minimize the risk of neck injuryin the event of a crash.
Note:Adjust the seatback to an uprightdriving position before adjusting the headrestraint. Adjust the head restraint so thatthe top of it is level with the top of your headand as far forward as possible. Make surethat you remain comfortable. If you areextremely tall, adjust the head restraint toits highest position.
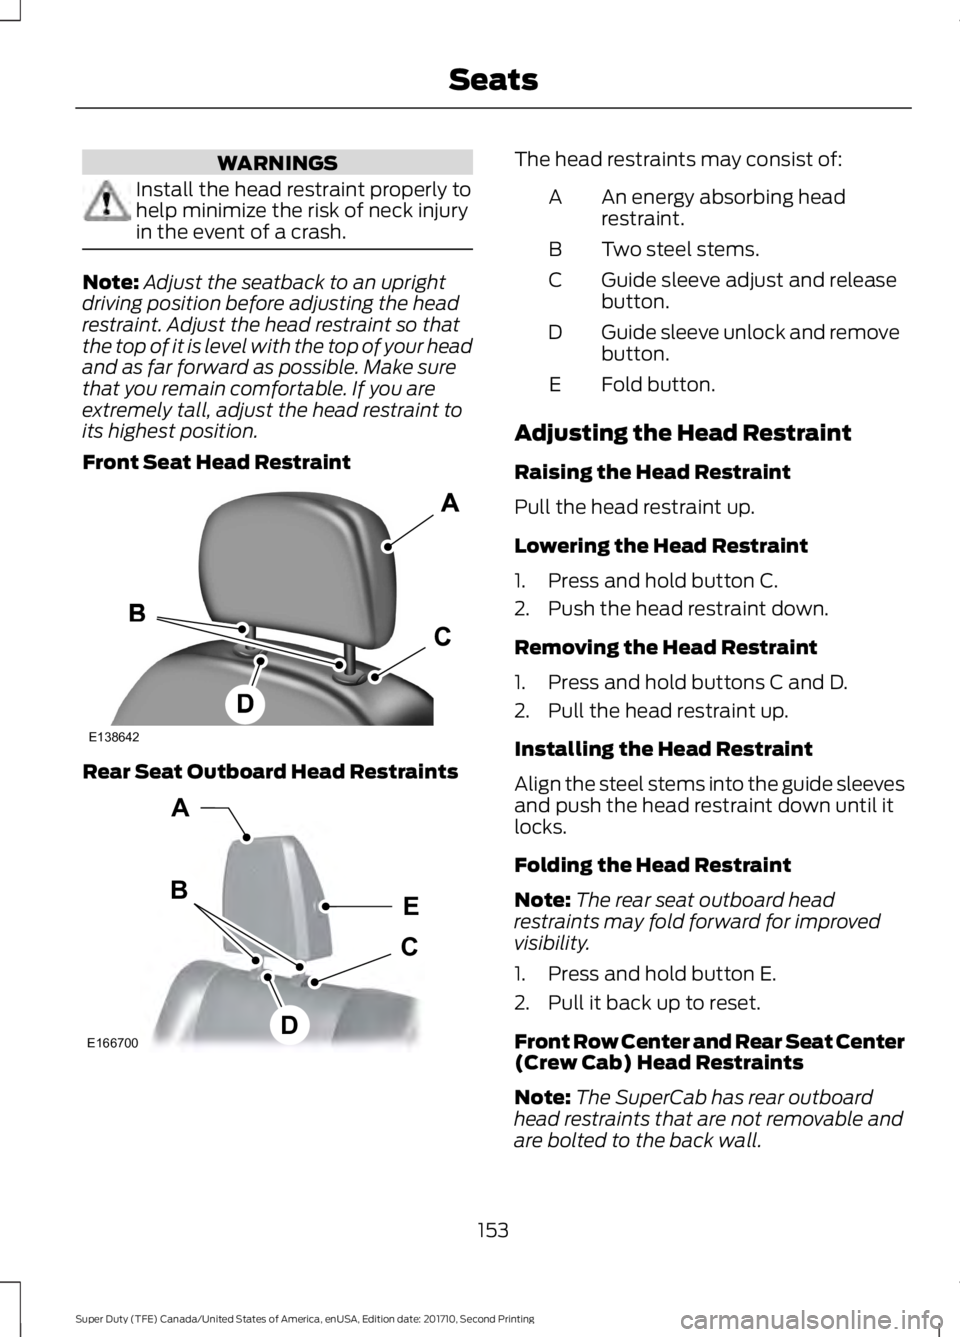
Front Seat Head Restraint
Rear Seat Outboard Head Restraints
The head restraints may consist of:
An energy absorbing headrestraint.A
Two steel stems.B
Guide sleeve adjust and releasebutton.C
Guide sleeve unlock and removebutton.D
Fold button.E
Adjusting the Head Restraint
Raising the Head Restraint
Pull the head restraint up.
Lowering the Head Restraint
1. Press and hold button C.
2. Push the head restraint down.
Removing the Head Restraint
1. Press and hold buttons C and D.
2. Pull the head restraint up.
Installing the Head Restraint
Align the steel stems into the guide sleevesand push the head restraint down until itlocks.
Folding the Head Restraint
Note:The rear seat outboard headrestraints may fold forward for improvedvisibility.
1. Press and hold button E.
2. Pull it back up to reset.
Front Row Center and Rear Seat Center(Crew Cab) Head Restraints
Note:The SuperCab has rear outboardhead restraints that are not removable andare bolted to the back wall.
153
Super Duty (TFE) Canada/United States of America, enUSA, Edition date: 201710, Second Printing
SeatsE138642 E166700
E
D
C
B
A
Page 157 of 642
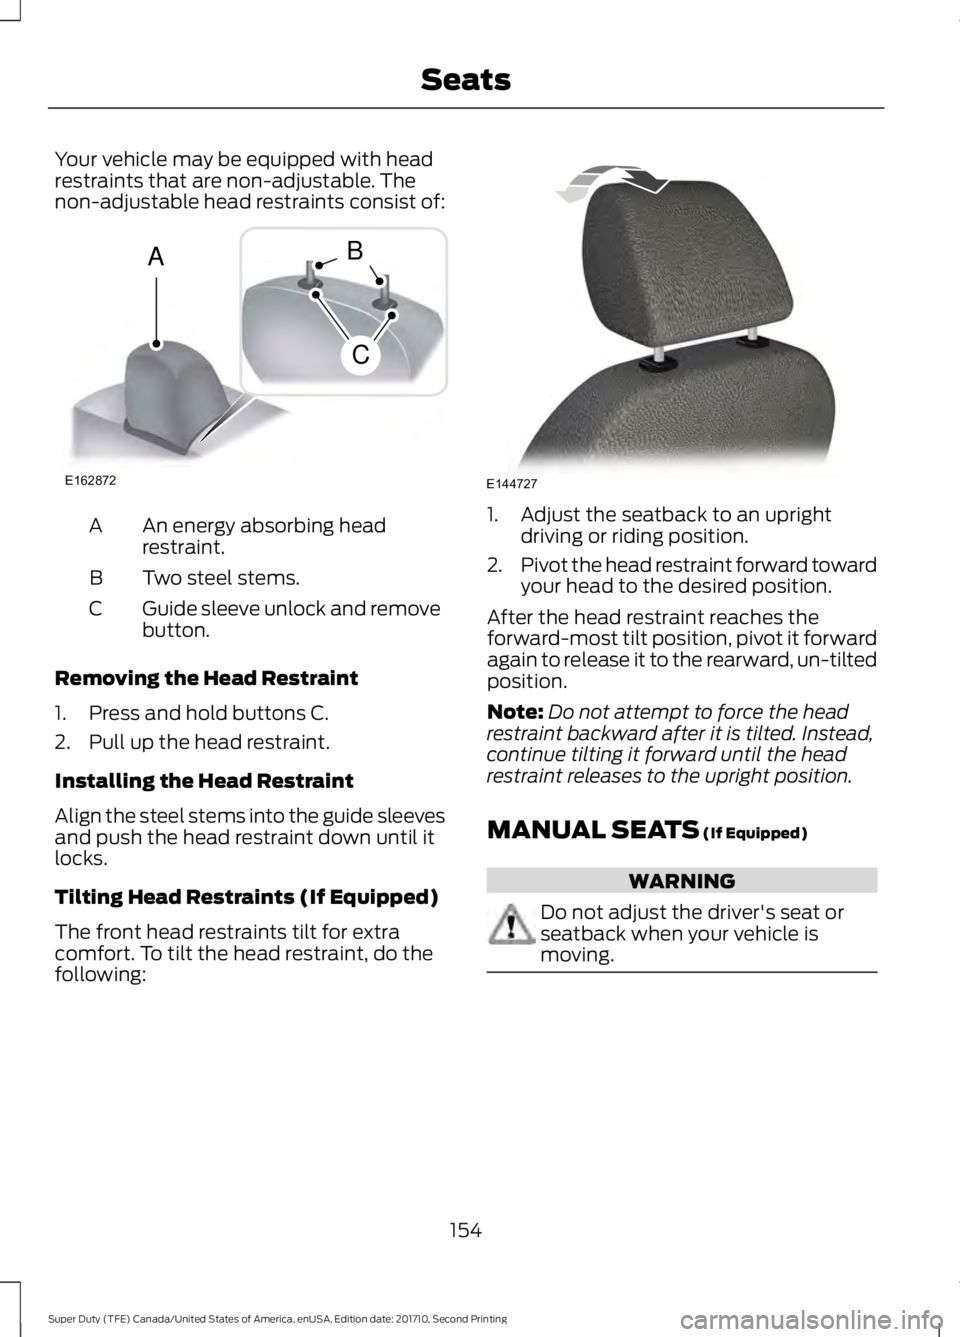
Your vehicle may be equipped with headrestraints that are non-adjustable. Thenon-adjustable head restraints consist of:
An energy absorbing headrestraint.A
Two steel stems.B
Guide sleeve unlock and removebutton.C
Removing the Head Restraint
1. Press and hold buttons C.
2. Pull up the head restraint.
Installing the Head Restraint
Align the steel stems into the guide sleevesand push the head restraint down until itlocks.
Tilting Head Restraints (If Equipped)
The front head restraints tilt for extracomfort. To tilt the head restraint, do thefollowing:
1. Adjust the seatback to an uprightdriving or riding position.
2.Pivot the head restraint forward towardyour head to the desired position.
After the head restraint reaches theforward-most tilt position, pivot it forwardagain to release it to the rearward, un-tiltedposition.
Note:Do not attempt to force the headrestraint backward after it is tilted. Instead,continue tilting it forward until the headrestraint releases to the upright position.
MANUAL SEATS (If Equipped)
WARNING
Do not adjust the driver's seat orseatback when your vehicle ismoving.
154
Super Duty (TFE) Canada/United States of America, enUSA, Edition date: 201710, Second Printing
SeatsE162872
A
C
B E144727
Page 158 of 642
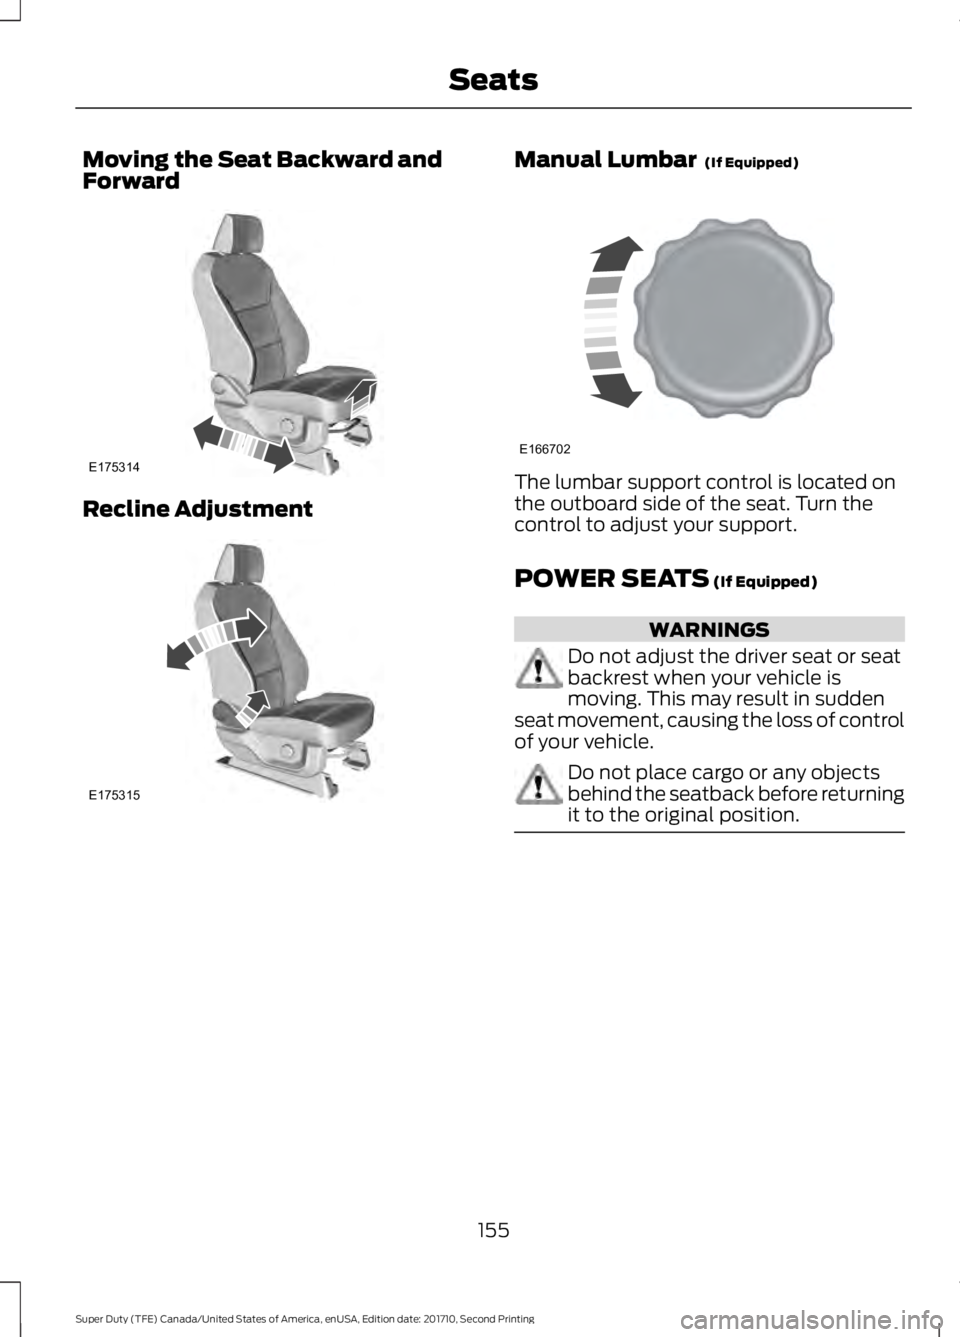
Moving the Seat Backward andForward
Recline Adjustment
Manual Lumbar (If Equipped)
The lumbar support control is located onthe outboard side of the seat. Turn thecontrol to adjust your support.
POWER SEATS (If Equipped)
WARNINGS
Do not adjust the driver seat or seatbackrest when your vehicle ismoving. This may result in suddenseat movement, causing the loss of controlof your vehicle.
Do not place cargo or any objectsbehind the seatback before returningit to the original position.
155
Super Duty (TFE) Canada/United States of America, enUSA, Edition date: 201710, Second Printing
SeatsE175314 E175315 E166702
Page 159 of 642
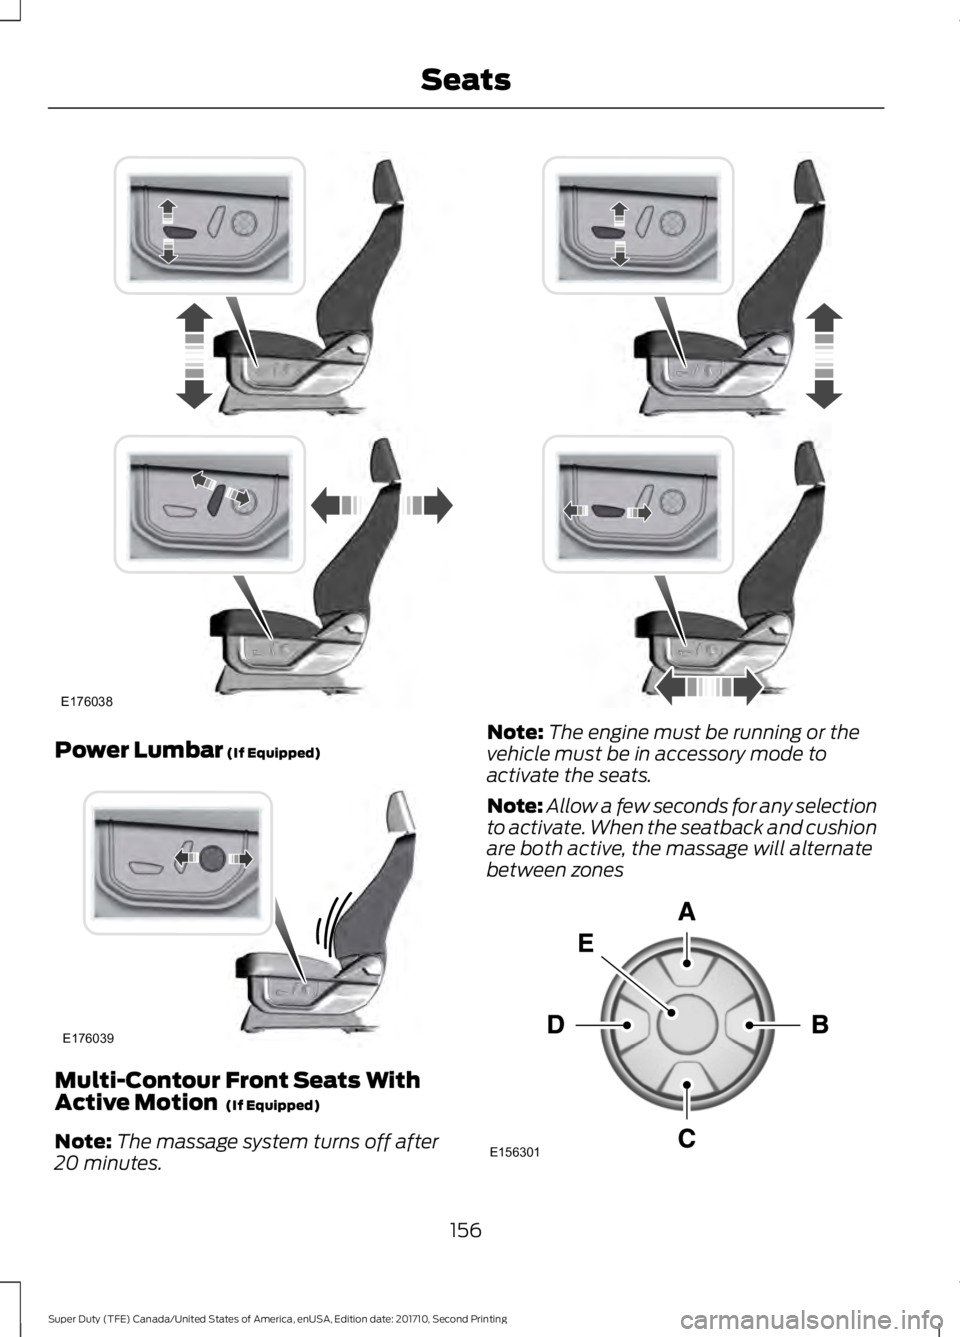
Power Lumbar (If Equipped)
Multi-Contour Front Seats WithActive Motion (If Equipped)
Note:The massage system turns off after20 minutes.
Note:The engine must be running or thevehicle must be in accessory mode toactivate the seats.
Note:Allow a few seconds for any selectionto activate. When the seatback and cushionare both active, the massage will alternatebetween zones
156
Super Duty (TFE) Canada/United States of America, enUSA, Edition date: 201710, Second Printing
SeatsE176038 E176039 E156301
Page 160 of 642
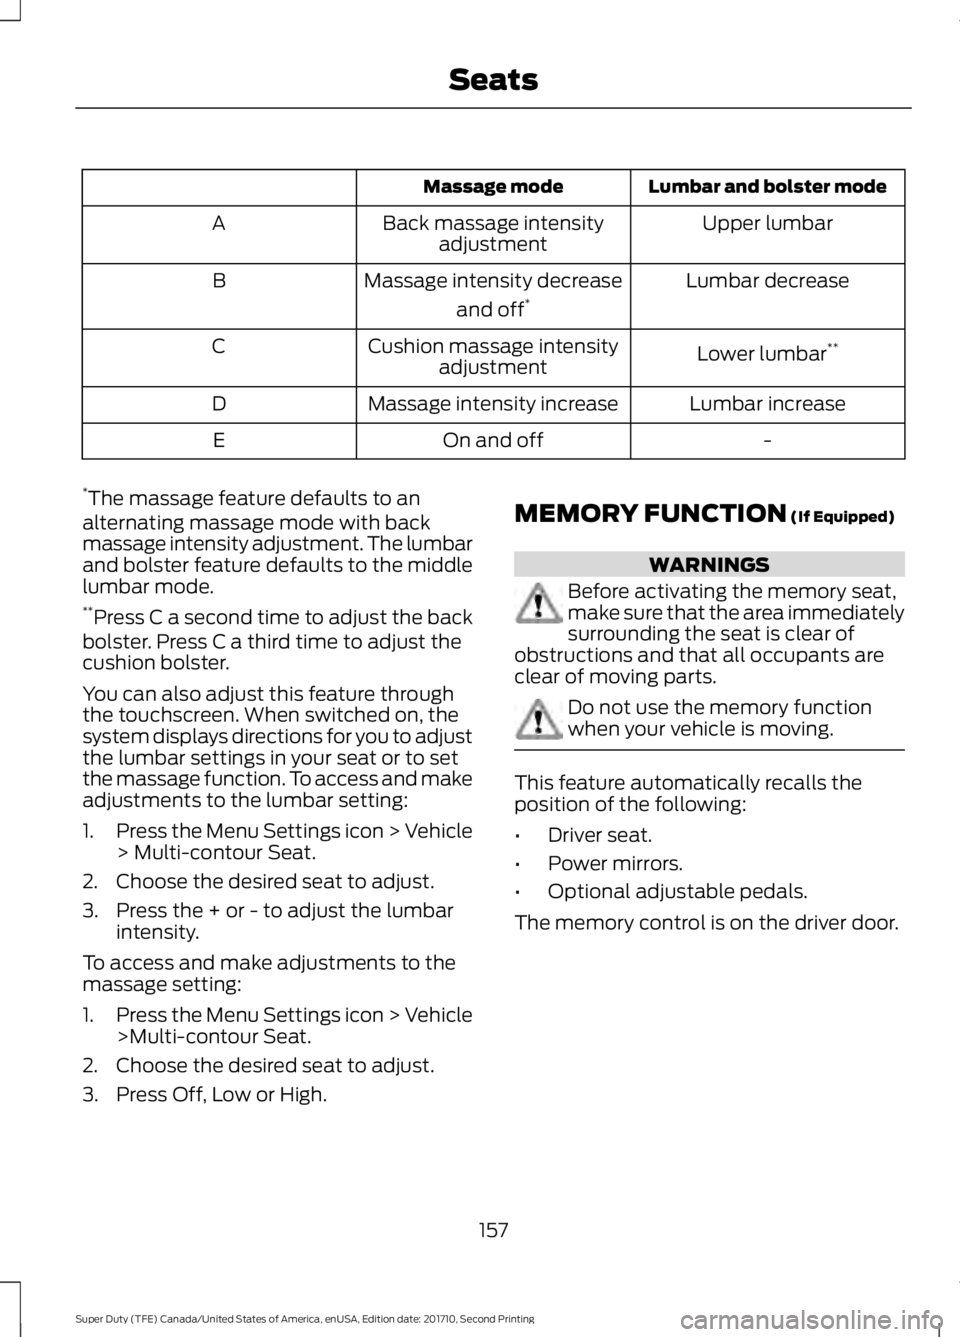
Lumbar and bolster modeMassage mode
Upper lumbarBack massage intensityadjustmentA
Lumbar decreaseMassage intensity decrease
and off*B
Lower lumbar**Cushion massage intensityadjustmentC
Lumbar increaseMassage intensity increaseD
-On and offE
*The massage feature defaults to analternating massage mode with backmassage intensity adjustment. The lumbarand bolster feature defaults to the middlelumbar mode.**Press C a second time to adjust the backbolster. Press C a third time to adjust thecushion bolster.
You can also adjust this feature throughthe touchscreen. When switched on, thesystem displays directions for you to adjustthe lumbar settings in your seat or to setthe massage function. To access and makeadjustments to the lumbar setting:
1.Press the Menu Settings icon > Vehicle> Multi-contour Seat.
2. Choose the desired seat to adjust.
3. Press the + or - to adjust the lumbarintensity.
To access and make adjustments to themassage setting:
1.Press the Menu Settings icon > Vehicle>Multi-contour Seat.
2. Choose the desired seat to adjust.
3. Press Off, Low or High.
MEMORY FUNCTION (If Equipped)
WARNINGS
Before activating the memory seat,make sure that the area immediatelysurrounding the seat is clear ofobstructions and that all occupants areclear of moving parts.
Do not use the memory functionwhen your vehicle is moving.
This feature automatically recalls theposition of the following:
•Driver seat.
•Power mirrors.
•Optional adjustable pedals.
The memory control is on the driver door.
157
Super Duty (TFE) Canada/United States of America, enUSA, Edition date: 201710, Second Printing
Seats