FORD F250 SUPER DUTY 2017 Owners Manual
Manufacturer: FORD, Model Year: 2017, Model line: F250 SUPER DUTY, Model: FORD F250 SUPER DUTY 2017Pages: 642, PDF Size: 12.35 MB
Page 221 of 642
Maintenance and Modifications
The suspension and steering systems onyour vehicle have been designed andtested to provide predictable performancewhether loaded or empty. For this reason,we strongly recommend that you do notmake modifications such as adding orremoving parts (i.e. lift kits or stabilizerbars) or by using replacement parts notequivalent to the original factoryequipment.
We recommend that you use caution whenyour vehicle has either a high load or device(i.e. ladder or luggage racks). Anymodifications to your vehicle that raise thecenter of gravity may cause your vehicleto roll over when there is a loss of vehiclecontrol.
Failure to maintain your vehicle correctlymay void the warranty, increase your repaircost, reduce vehicle performance andoperational capabilities and adverselyaffect you and your passenger's safety. Werecommend you frequently inspect yourvehicle's chassis components when yourvehicle is subject to off road usage.
218
Super Duty (TFE) Canada/United States of America, enUSA, Edition date: 201710, Second Printing
Four-Wheel Drive (If Equipped)
Page 222 of 642
LIMITED SLIP DIFFERENTIAL
This axle provides added traction onslippery surfaces, particularly when onewheel is on a poor traction surface. Undernormal conditions, the limited-slip axlefunctions like a standard rear axle. The axlemay exhibit a slight noise or vibrationduring tight turns with low vehicle speed.This is normal behavior and indicates theaxle is working.
ELECTRONIC LOCKING
DIFFERENTIAL (If Equipped)
Note:The electronic locking differential isfor off-road use only and is not for use ondry pavement. Using the electronic lockingdifferential on dry pavement will result inincreased tire wear, noise and vibration.
The electronic locking differential is adevice housed in the rear axle that allowsboth rear wheels to turn at the samespeed. The electronic locking differentialcan provide additional traction should yourvehicle become stuck. You can activatethe differential electronically and shift iton the fly within the differential operatingspeed range. The differential is for use inmud, rocks, sand, or any off-road conditionwhere you need maximum traction. It isnot for use on dry pavement.
The following conditions will affect theelectronic locking differential:
•The electronic locking differential willnot engage if your vehicle speed isabove 20 mph (32 km/h) in 4x2, 4x4Auto, or 4x4 High modes.
•The electronic locking differential willnot engage if your vehicle speed isabove or 56 mph (90 km/h) in 4X4Low.
•The electronic locking differential maynot engage if you press youraccelerator pedal during anengagement attempt. A message maydisplay in the instrument displayguiding you to release the acceleratorpedal.
•In 4x2, 4x4 Auto, and 4x4 High modes,the electronic locking differential willautomatically disengage at speedsabove 25 mph (41 km/h) and willautomatically reengage at speedsbelow 20 mph (32 km/h).
•In 4L (4X4 low), the electronic lockingdifferential will automaticallydisengage at speeds above 62 mph(100 km/h) and will automaticallyreengage at speeds below 56 mph(90 km/h).
•The AdvanceTrac system has theability to take over control of theelectronic locking differential anddisable it during driving maneuverswhen necessary.
When you switch the system on, if you donot meet the required conditions forelectronic locking differential activation,the instrument cluster will display theappropriate information guiding youthrough the proper activation process.
Activating the Electronic LockingDifferential
Note:Do not use electronic lockingdifferential on dry, hard surfaced roads.Doing so will produce excessive noise,vibration and increase tire wear.
Note:If the electronic locking differentialhas difficulty disengaging, release theaccelerator pedal and turn the steeringwheel in the opposite direction while rolling.
219
Super Duty (TFE) Canada/United States of America, enUSA, Edition date: 201710, Second Printing
Rear Axle
Page 223 of 642
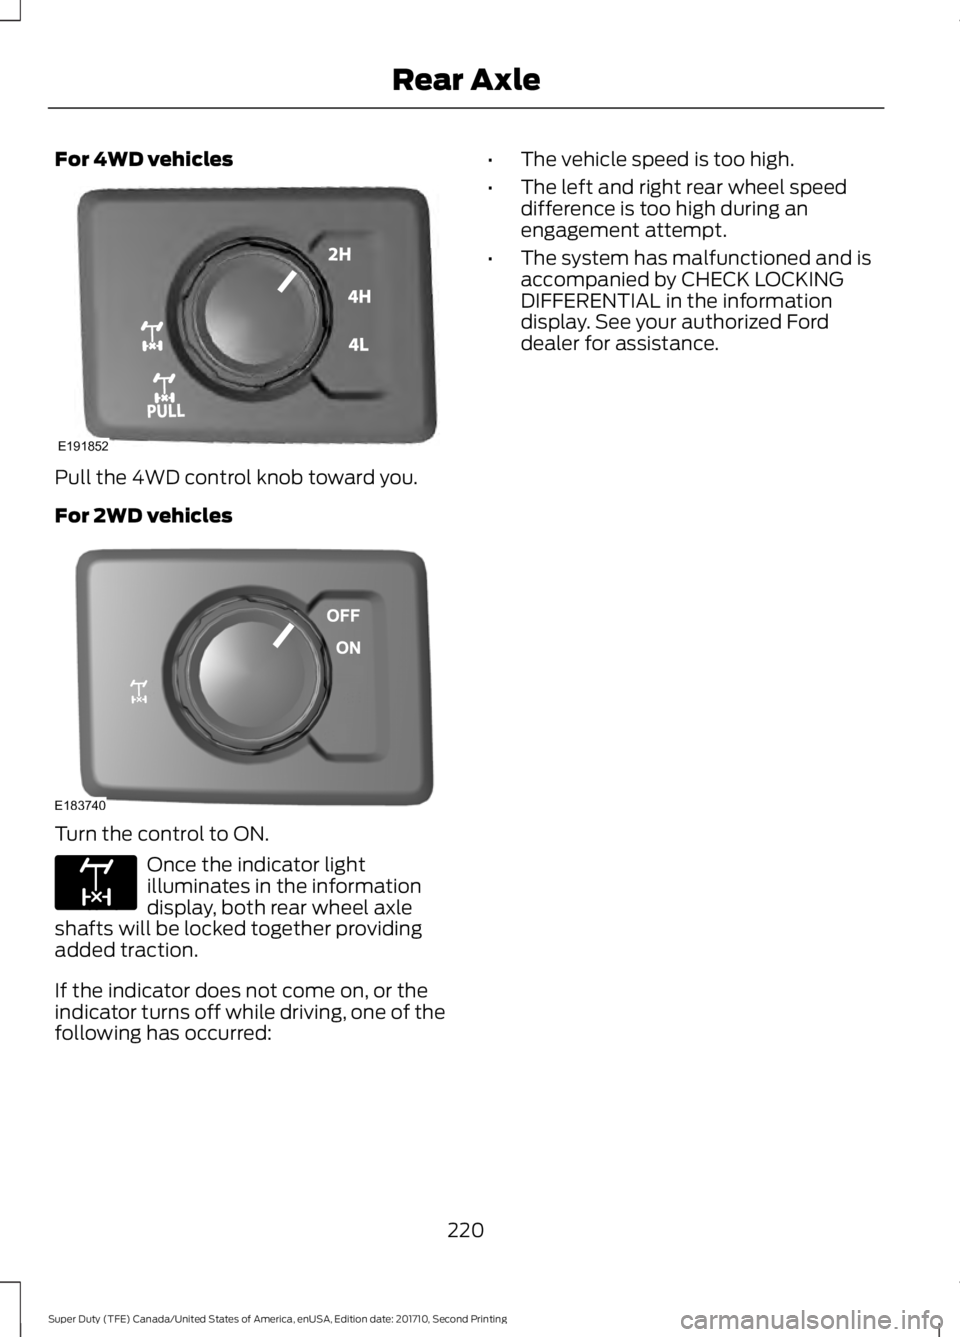
For 4WD vehicles
Pull the 4WD control knob toward you.
For 2WD vehicles
Turn the control to ON.
Once the indicator lightilluminates in the informationdisplay, both rear wheel axleshafts will be locked together providingadded traction.
If the indicator does not come on, or theindicator turns off while driving, one of thefollowing has occurred:
•The vehicle speed is too high.
•The left and right rear wheel speeddifference is too high during anengagement attempt.
•The system has malfunctioned and isaccompanied by CHECK LOCKINGDIFFERENTIAL in the informationdisplay. See your authorized Forddealer for assistance.
220
Super Duty (TFE) Canada/United States of America, enUSA, Edition date: 201710, Second Printing
Rear AxleE191852 E183740 E163170
Page 224 of 642
GENERAL INFORMATION
Note:Occasional brake noise is normal. Ifa metal-to-metal, continuous grinding orcontinuous squeal sound is present, thebrake linings may be worn-out. Have thesystem checked by an authorized dealer. Ifyour vehicle has continuous vibration orshudder in the steering wheel while braking,have it checked by an authorized dealer.
Note:Brake dust may accumulate on thewheels, even under normal drivingconditions. Some dust is inevitable as thebrakes wear and does not contribute tobrake noise. See Cleaning the Wheels(page 370).
See Warning Lamps andIndicators (page 105).
Wet brakes result in reduced brakingefficiency. Gently press the brake pedal afew times when driving from a car wash orstanding water to dry the brakes.
Brake Over Accelerator
In the event the accelerator pedalbecomes stuck or entrapped, apply steadyand firm pressure to the brake pedal toslow the vehicle and reduce engine power.If you experience this condition, apply thebrakes and bring your vehicle to a safestop. Move the transmission to park (P),switch the engine off and apply the parkingbrake. Inspect the accelerator pedal forany interference. If none are found and thecondition persists, have your vehicle towedto the nearest authorized dealer.
Brake Assist
Brake assist detects when you brakerapidly by measuring the rate at which youpress the brake pedal. It providesmaximum braking efficiency as long as youpress the pedal, and can reduce stoppingdistances in critical situations.
Anti-lock Brake System
This system helps you maintain steeringcontrol during emergency stops by keepingthe brakes from locking.
This lamp momentarilyilluminates when you switch theignition on. If the light does notilluminate during start up, remains on orflashes, the system may be disabled. Havethe system checked by an authorizeddealer. If the anti-lock brake system isdisabled, normal braking is still effective.
If the brake warning lampremains illuminated after yourelease the parking brake, havethe system checked by an authorizeddealer.
Diesel Engine Braking (If Equipped)
WARNING
Do not use tow/haul or enginebraking when driving in icy or slipperyconditions as the increased brakingcan cause the rear wheels to slide and yourvehicle to swing around with the possibleloss of vehicle control.
This feature increases engine braking athigher engine speeds to provide bettergrade descent control with less brake andtransmission wear and tear. It alsoimproves engine braking when towing orcarrying heavy loads.
Press the button on the switchbank next to the audio unit toswitch the system on or off.
There are two engine brake modes, manualand automatic.
Manual Engine Braking
1. Press the button to switch on manualengine braking.
221
Super Duty (TFE) Canada/United States of America, enUSA, Edition date: 201710, Second Printing
BrakesE144522 E144522 E171217
Page 225 of 642
2. Release the accelerator pedal tomaximize engine braking.
3. Apply the brakes. The transmissiondownshifts to lower gears.
Note:You can shift the transmission tolower gears with progressive range selection(PRS) or manual shifting independent ofpressing the brakes.
Note:You can also use manual enginebraking with cruise control to improve gradedescent control.
Automatic Engine Braking
1. Press the button twice to switch onautomatic engine braking.
2.Release the accelerator or brake pedal.The system remembers your vehiclespeed.
Note:The system automatically activatesthe engine brake and, if necessary,downshifts the transmission to lower gearsto not exceed your vehicle's set speed whenthe brake or accelerator were last released.
Note:Use this when driving downhill andcarrying heavy loads or trailering.
Warning Lamp Conditions
•Illuminates when this feature isswitched on and the system isoperating properly. See WarningLamps and Indicators (page 105).
•Flashes when the engine brake isdisabled due to a fault or the enginedoes not meet the required brakingconditions.
•Does not illuminate when the switchor indicator is faulty.
You can switch the system on at anytime.The system becomes active once thebraking conditions are met.
Braking Conditions
•Your vehicle is in a forward gear.
•The engine speed is above about 1500RPM.
•Your foot is off the accelerator.
You can use this feature with tow/haul orprogressive range selection to providefurther increased engine braking. Thetransmission automatically upshifts toprevent the engine from entering the redzone on the tachometer. See AutomaticTransmission (page 205).
HINTS ON DRIVING WITH
ANTI-LOCK BRAKES
Note:When the system is operating, thebrake pedal may pulse and may travelfurther. Maintain pressure on the brakepedal. You may also hear a noise from thesystem. This is normal.
The anti-lock braking system will noteliminate the risks when:
•You drive too closely to the vehicle infront of you.
•Your vehicle is hydroplaning.
•You take corners too fast.
•The road surface is poor.
PARKING BRAKE
WARNING
Always set the parking brake fullyand make sure the transmission isplaced in park (P). Failure to set theparking brake and engage park could resultin vehicle roll-away, property damage orbodily injury. Turn the ignition to the lockposition and remove the key whenever youleave your vehicle.
222
Super Duty (TFE) Canada/United States of America, enUSA, Edition date: 201710, Second Printing
Brakes
Page 226 of 642
Apply the parking brake whenever yourvehicle is parked. Press the pedaldownward to set the parking brake. Thebrake warning lamp in the instrumentcluster will illuminate and remainsilluminated until the parking brake isreleased.
To release, pull the brake release leverlocated at the lower left side of theinstrument panel.
If you are parking your vehicle on a gradeor with a trailer, press and hold the brakepedal down, then set the parking brake.There may be a little vehicle movement asthe parking brake sets to hold the vehicle'sweight. This is normal and should be noreason for concern. If needed, press andhold the service brake pedal down, thentry reapplying the parking brake. Chock thewheels if required. If the parking brakecannot hold the weight of the vehicle, theparking brake may need to be serviced orthe vehicle may be overloaded.
HILL START ASSIST
WARNINGS
The system does not replace theparking brake. When you leave yourvehicle, always apply the parkingbrake and shift the transmission into park(P) (automatic transmission) or first gear(1) (manual transmission).
You must remain in your vehicle onceyou have activated the system.
During all times, you are responsiblefor controlling your vehicle,supervising the system andintervening, if required.
If the engine is revved excessively, orif a malfunction is detected, thesystem will be deactivated.
The system makes it easier to pull awaywhen your vehicle is on a slope without theneed to use the parking brake.
When the system is active, your vehicle willremain stationary on the slope for two tothree seconds after you release the brakepedal. This allows you time to move yourfoot from the brake to the acceleratorpedal. The brakes release automaticallywhen the engine has sufficient torque toprevent your vehicle from rolling down thegrade. This is an advantage when pullingaway on a slope, for example from a carpark ramp, traffic lights or when reversinguphill into a parking space.
The system will activate automatically onany slope that will cause significant vehiclerollback. For vehicles with a manualtransmission, you can switch this featureoff using the information display. SeeInformation Displays (page 111). Thesystem will remain on or off depending onhow it was last set.
Note:There is no warning lamp to indicatethe system is either on or off.
Note:If your vehicle is equipped with AutoHold, Hill Start Assist will not be availablewhile Auto Hold is active.
Using Hill Start Assist
1. Bring your vehicle to a completestandstill. Keep the brake pedalpressed and select an uphill gear (forexample, first (1) when facing uphill orreverse (R) when facing downhill).
2. If the sensors detect that your vehicleis on a slope, the system will activateautomatically.
3. When you remove your foot from thebrake pedal, your vehicle will remainon the slope without rolling away forabout two or three seconds. This holdtime will automatically be extended ifyou are in the process of driving off.
223
Super Duty (TFE) Canada/United States of America, enUSA, Edition date: 201710, Second Printing
Brakes
Page 227 of 642
4. Drive off in the normal manner. Thebrakes will release automatically.
Switching the System On and Off
You can switch this feature on or off if yourvehicle is equipped with a manualtransmission and an information display.See General Information (page 111). Thesystem remembers the last setting whenyou start your vehicle.
If your vehicle is not equipped with amanual transmission and an informationdisplay, you cannot turn the system on oroff. When you switch the ignition on, thesystem automatically turns on.
224
Super Duty (TFE) Canada/United States of America, enUSA, Edition date: 201710, Second Printing
Brakes
Page 228 of 642
PRINCIPLE OF OPERATION
The traction control system helps avoiddrive wheel spin and loss of traction.
If your vehicle begins to slide, the systemapplies the brakes to individual wheelsand, when needed, reduces engine powerat the same time. If the wheels spin whenaccelerating on slippery or loose surfaces,the system reduces engine power in orderto increase traction.
USING TRACTION CONTROL
WARNING
The stability and traction controllight illuminates steadily if thesystem detects a failure. Make sureyou did not manually disable the tractioncontrol system using the informationdisplay controls or the switch. If thestability control and traction control lightis still illuminating steadily, have thesystem serviced by an authorized dealerimmediately. Operating your vehicle withthe traction control disabled could lead toan increased risk of loss of vehicle control,vehicle rollover, personal injury and death.
The system automatically turns on eachtime you switch the ignition on.
If your vehicle is stuck in mud or snow,switching traction control off may bebeneficial as this allows the wheels to spin.
Note:When you switch traction control off,stability control remains fully active.
Note:For additional information on thetraction and stability control systems. SeeUsing Stability Control (page 227).
Switching the System Off
When you switch the system off or on, amessage appears in the informationdisplay showing system status.
Use the traction and stability controlswitch on the instrument panel to switchthe system off or on.
The switch illuminates when tractioncontrol is off.
When you place your vehicle intofour-wheel drive low mode the tractioncontrol disables. Traction control resumesfull operation when you put your vehicleback into two-wheel drive mode.
System Indicator Lights andMessages
The stability and traction controllight:
•Temporarily illuminates on enginestart-up.
•Flashes when a driving conditionactivates either of the systems.
•Illuminates if a problem occurs in eitherof the systems.
The stability and traction controloff light temporarily illuminateson engine start-up and stays onwhen you switch the traction controlsystem off.
225
Super Duty (TFE) Canada/United States of America, enUSA, Edition date: 201710, Second Printing
Traction ControlE166706 E225465 E225466
Page 229 of 642
PRINCIPLE OF OPERATION
WARNINGS
Vehicle modifications involvingbraking system, aftermarket roofracks, suspension, steering system,tire construction and wheel and tire sizemay change the handling characteristicsof your vehicle and may adversely affectthe performance of the electronic stabilitycontrol system. In addition, installing anystereo loudspeakers may interfere withand adversely affect the electronic stabilitycontrol system. Install any aftermarketstereo loudspeaker as far as possible fromthe front center console, the tunnel, andthe front seats in order to minimize the riskof interfering with the electronic stabilitycontrol sensors. Reducing theeffectiveness of the electronic stabilitycontrol system could lead to an increasedrisk of loss of vehicle control, vehiclerollover, personal injury and death.
Remember that even advancedtechnology cannot defy the laws ofphysics. It’s always possible to losecontrol of a vehicle due to inappropriatedriver input for the conditions. Aggressivedriving on any road condition can causeyou to lose control of your vehicleincreasing the risk of personal injury orproperty damage. Activation of theelectronic stability control system is anindication that at least some of the tireshave exceeded their ability to grip the road;this could reduce the operator’s ability tocontrol the vehicle potentially resulting ina loss of vehicle control, vehicle rollover,personal injury and death. If your electronicstability control system activates, SLOWDOWN.
The system automatically turns on eachtime you switch the ignition on.
If a fault occurs in either the stabilitycontrol or the traction control system, youmay experience the following conditions:
•The stability and traction control lightilluminates steadily.
•The stability control and tractioncontrol systems do not enhance yourvehicle's ability to maintain traction ofthe wheels.
•The Adaptive Steering system (ifequipped) automatically changes thesteering function to a fixed steeringratio. See Steering (page 256).
If a driving condition activates either thestability control or the traction controlsystem you may experience the followingconditions:
•The stability and traction control lightflashes.
•Your vehicle slows down.
•Reduced engine power.
•A vibration in the brake pedal.
•The brake pedal is stiffer than usual.
•If the driving condition is severe andyour foot is not on the brake, the brakepedal may move as the system applieshigher brake force.
The stability control system has severalfeatures built into it to help you maintaincontrol of your vehicle:
Electronic Stability Control
The system enhances your vehicle’s abilityto prevent skids or lateral slides byapplying brakes to one or more of thewheels individually and, if necessary,reducing engine power.
226
Super Duty (TFE) Canada/United States of America, enUSA, Edition date: 201710, Second Printing
Stability Control
Page 230 of 642
Roll Stability Control
The system enhances your vehicle’s abilityto prevent rollovers by detecting yourvehicle’s roll motion and the rate at whichit changes by applying the brakes to oneor more wheels individually.
Traction Control
The system enhances your vehicle’s abilityto maintain traction of the wheels bydetecting and controlling wheel spin. SeeUsing Traction Control (page 225).
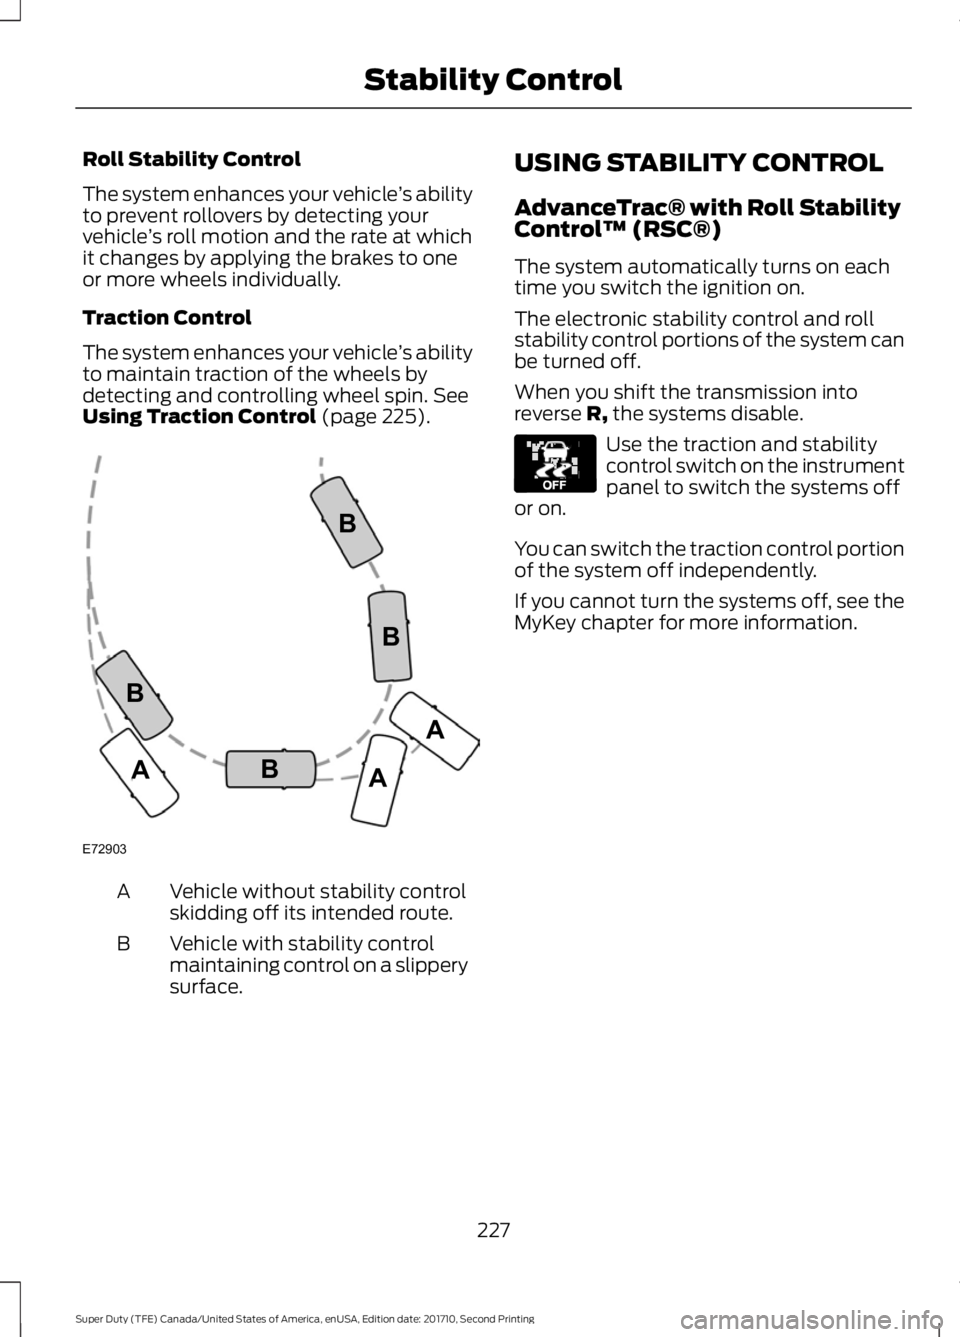
Vehicle without stability controlskidding off its intended route.A
Vehicle with stability controlmaintaining control on a slipperysurface.
B
USING STABILITY CONTROL
AdvanceTrac® with Roll StabilityControl™ (RSC®)
The system automatically turns on eachtime you switch the ignition on.
The electronic stability control and rollstability control portions of the system canbe turned off.
When you shift the transmission intoreverse R, the systems disable.
Use the traction and stabilitycontrol switch on the instrumentpanel to switch the systems offor on.
You can switch the traction control portionof the system off independently.
If you cannot turn the systems off, see theMyKey chapter for more information.
227
Super Duty (TFE) Canada/United States of America, enUSA, Edition date: 201710, Second Printing
Stability ControlE72903A
AA
B
BB
B E130458