brake light FORD F250 SUPER DUTY 2018 Owners Manual
[x] Cancel search | Manufacturer: FORD, Model Year: 2018, Model line: F250 SUPER DUTY, Model: FORD F250 SUPER DUTY 2018Pages: 656, PDF Size: 9.34 MB
Page 12 of 656
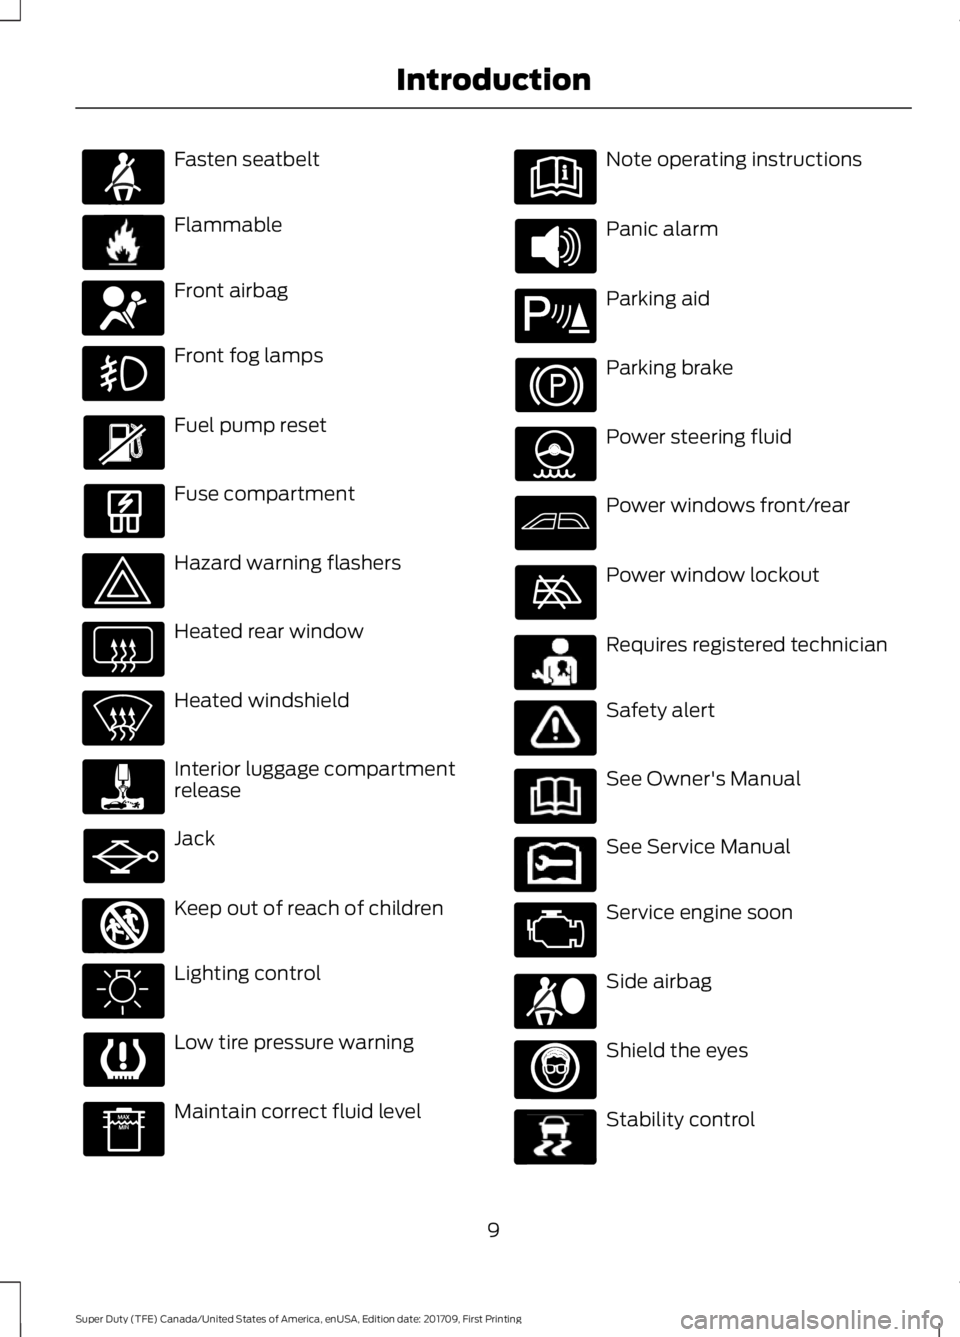
Fasten seatbelt
Flammable
Front airbag
Front fog lamps
Fuel pump reset
Fuse compartment
Hazard warning flashers
Heated rear window
Heated windshield
Interior luggage compartment
release
Jack
Keep out of reach of children
Lighting control
Low tire pressure warning
Maintain correct fluid level Note operating instructions
Panic alarm
Parking aid
Parking brake
Power steering fluid
Power windows front/rear
Power window lockout
Requires registered technician
Safety alert
See Owner's Manual
See Service Manual
Service engine soon
Side airbag
Shield the eyes
Stability control
9
Super Duty (TFE) Canada/United States of America, enUSA, Edition date: 201709, First Printing IntroductionE71880 E231160 E67017 E161353 E139213 E231159 E231158 E167012 E138639
Page 21 of 656
Horn.
M
Cruise control. See Cruise Control (page 245).
N
Steering wheel adjustment. See
Adjusting the Steering Wheel (page 82).
O
Parking brake release. See
Brakes (page 227).
P
Lighting control. See
Lighting Control (page 89).
Q
18
Super Duty (TFE) Canada/United States of America, enUSA, Edition date: 201709, First Printing At a Glance
Page 47 of 656
Deactivating and Activating the
Belt-Minder Feature (Driver only)
WARNING
While the system allows you to
deactivate it, this system is designed
to improve your chances of being
safely belted and surviving an accident.
We recommend you leave the system
activated for yourself and others who may
use the vehicle. To reduce the risk of injury,
do not deactivate or activate the system
while driving the vehicle. Note:
If you are using MyKey, you cannot
disable the Belt-Minder. Also, if the
Belt-Minder has been previously disabled,
it will be re-enabled during the use of
MyKey. See MyKey ™ (page 63).
Read Steps 1 - 4 thoroughly before
proceeding with the programming
procedure.
Before following the procedure, make sure
that:
• The parking brake is set.
• The transmission is in park (P).
• The ignition is off.
• All vehicle doors are closed.
• The driver seatbelt is unbuckled.
1. Switch the ignition on. Do not start the
engine.
2. Wait until the seatbelt warning light turns off (about one minute). You must
complete Step 3 within 30 seconds
after the seatbelt warning light turns
off.
3. Buckle then unbuckle the seatbelt three times at a moderate speed,
ending with the seatbelt in the
unbuckled state. After Step 3, the
seatbelt warning light turns on. 4. While the seatbelt warning light is on,
buckle then unbuckle the seatbelt.
After Step 4, the seatbelt warning light
flashes for confirmation.
• This will switch the feature off if it is
currently on.
• This will switch the feature on if it is
currently off.
CHILD RESTRAINT AND
SEATBELT MAINTENANCE
Inspect the vehicle safety belts and child
safety seat systems periodically to make
sure they work properly and are not
damaged. Inspect the vehicle and child
seat safety belts to make sure there are no
nicks, tears or cuts. Replace if necessary.
All vehicle safety belt assemblies, including
retractors, buckles, front safety belt buckle
assemblies, buckle support assemblies
(slide bar-if equipped), shoulder belt
height adjusters (if equipped), shoulder
belt guide on seat back (if equipped), child
safety seat LATCH and tether anchors, and
attaching hardware, should be inspected
after a crash. Read the child restraint
manufacturer's instructions for additional
inspection and maintenance information
specific to the child restraint.
Ford Motor Company recommends that
all safety belt assemblies in use in vehicles
involved in a crash be replaced. However,
if the crash was minor and an authorized
dealer finds that the belts do not show
damage and continue to operate properly,
they do not need to be replaced. Safety
belt assemblies not in use during a crash
should also be inspected and replaced if
either damage or improper operation is
noted.
Properly care for safety belts. See Vehicle
Care
(page 371).
44
Super Duty (TFE) Canada/United States of America, enUSA, Edition date: 201709, First Printing Seatbelts
Page 94 of 656
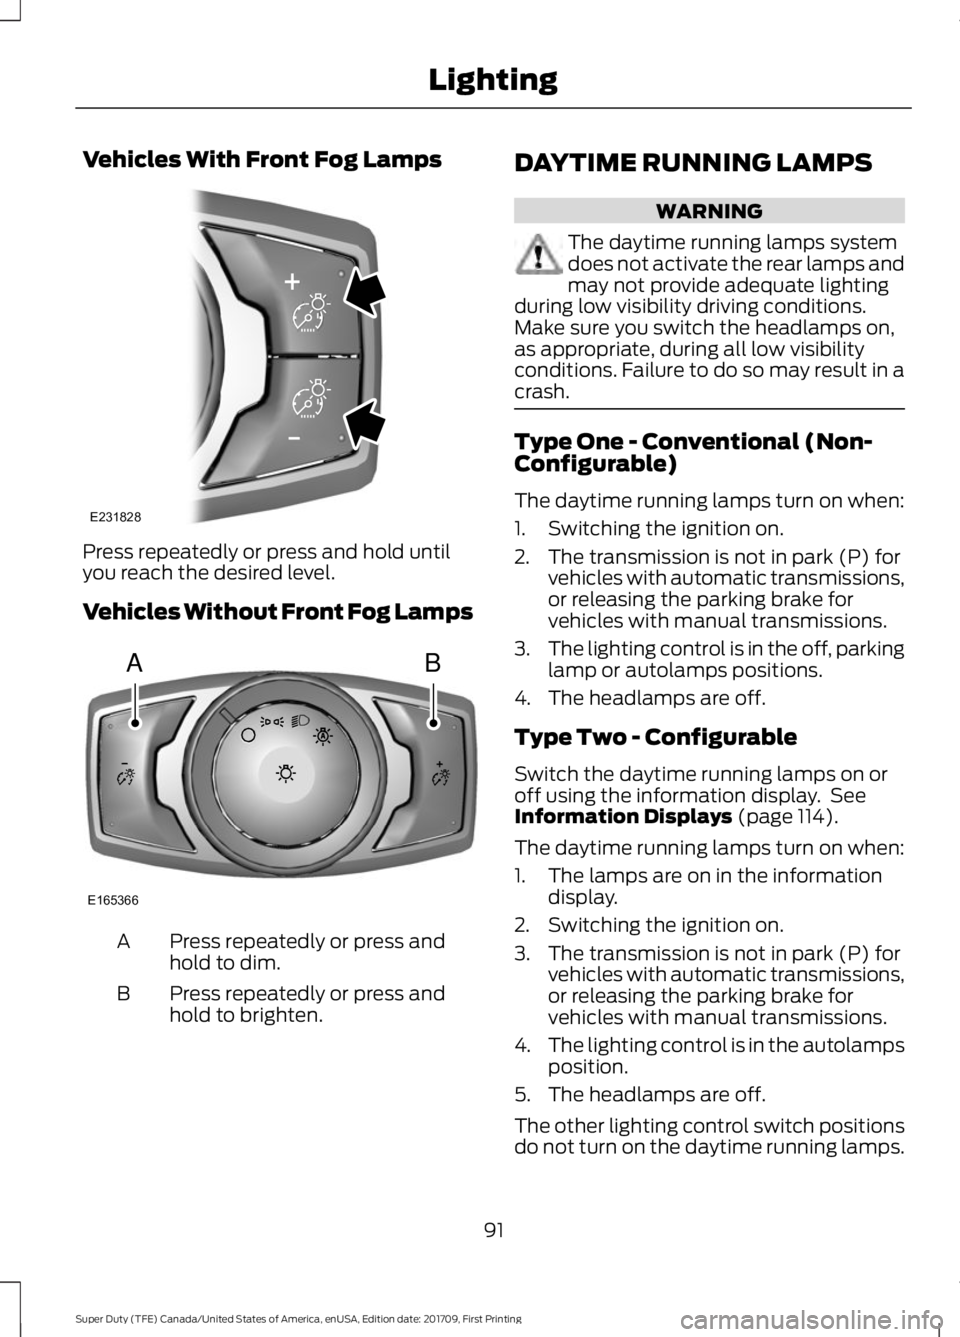
Vehicles With Front Fog Lamps
Press repeatedly or press and hold until
you reach the desired level.
Vehicles Without Front Fog Lamps
Press repeatedly or press and
hold to dim.
A
Press repeatedly or press and
hold to brighten.
B DAYTIME RUNNING LAMPS WARNING
The daytime running lamps system
does not activate the rear lamps and
may not provide adequate lighting
during low visibility driving conditions.
Make sure you switch the headlamps on,
as appropriate, during all low visibility
conditions. Failure to do so may result in a
crash. Type One - Conventional (Non-
Configurable)
The daytime running lamps turn on when:
1. Switching the ignition on.
2. The transmission is not in park (P) for
vehicles with automatic transmissions,
or releasing the parking brake for
vehicles with manual transmissions.
3. The lighting control is in the off, parking
lamp or autolamps positions.
4. The headlamps are off.
Type Two - Configurable
Switch the daytime running lamps on or
off using the information display. See
Information Displays (page 114).
The daytime running lamps turn on when:
1. The lamps are on in the information display.
2. Switching the ignition on.
3. The transmission is not in park (P) for vehicles with automatic transmissions,
or releasing the parking brake for
vehicles with manual transmissions.
4. The lighting control is in the autolamps
position.
5. The headlamps are off.
The other lighting control switch positions
do not turn on the daytime running lamps.
91
Super Duty (TFE) Canada/United States of America, enUSA, Edition date: 201709, First Printing LightingE231828 AB
E165366
Page 115 of 656
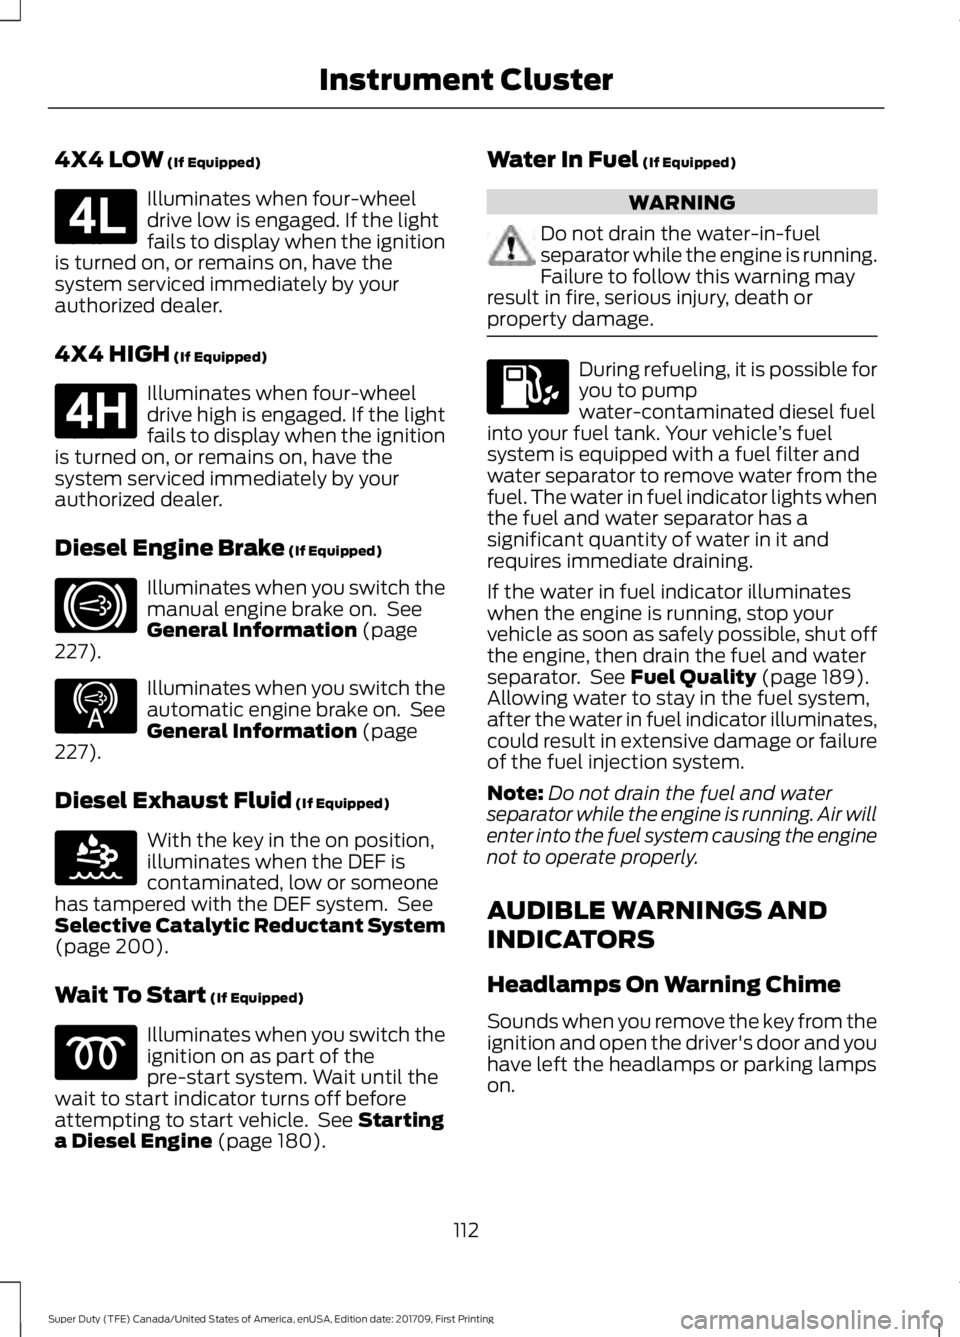
4X4 LOW (If Equipped)
Illuminates when four-wheel
drive low is engaged. If the light
fails to display when the ignition
is turned on, or remains on, have the
system serviced immediately by your
authorized dealer.
4X4 HIGH
(If Equipped) Illuminates when four-wheel
drive high is engaged. If the light
fails to display when the ignition
is turned on, or remains on, have the
system serviced immediately by your
authorized dealer.
Diesel Engine Brake
(If Equipped) Illuminates when you switch the
manual engine brake on. See
General Information
(page
227). Illuminates when you switch the
automatic engine brake on. See
General Information
(page
227).
Diesel Exhaust Fluid
(If Equipped) With the key in the on position,
illuminates when the DEF is
contaminated, low or someone
has tampered with the DEF system. See
Selective Catalytic Reductant System
(page
200).
Wait To Start
(If Equipped) Illuminates when you switch the
ignition on as part of the
pre-start system. Wait until the
wait to start indicator turns off before
attempting to start vehicle. See
Starting
a Diesel Engine (page 180). Water In Fuel
(If Equipped) WARNING
Do not drain the water-in-fuel
separator while the engine is running.
Failure to follow this warning may
result in fire, serious injury, death or
property damage. During refueling, it is possible for
you to pump
water-contaminated diesel fuel
into your fuel tank. Your vehicle ’s fuel
system is equipped with a fuel filter and
water separator to remove water from the
fuel. The water in fuel indicator lights when
the fuel and water separator has a
significant quantity of water in it and
requires immediate draining.
If the water in fuel indicator illuminates
when the engine is running, stop your
vehicle as soon as safely possible, shut off
the engine, then drain the fuel and water
separator. See
Fuel Quality (page 189).
Allowing water to stay in the fuel system,
after the water in fuel indicator illuminates,
could result in extensive damage or failure
of the fuel injection system.
Note: Do not drain the fuel and water
separator while the engine is running. Air will
enter into the fuel system causing the engine
not to operate properly.
AUDIBLE WARNINGS AND
INDICATORS
Headlamps On Warning Chime
Sounds when you remove the key from the
ignition and open the driver's door and you
have left the headlamps or parking lamps
on.
112
Super Duty (TFE) Canada/United States of America, enUSA, Edition date: 201709, First Printing Instrument ClusterE181780 E181779 E171217 E234452 E163176
Page 120 of 656
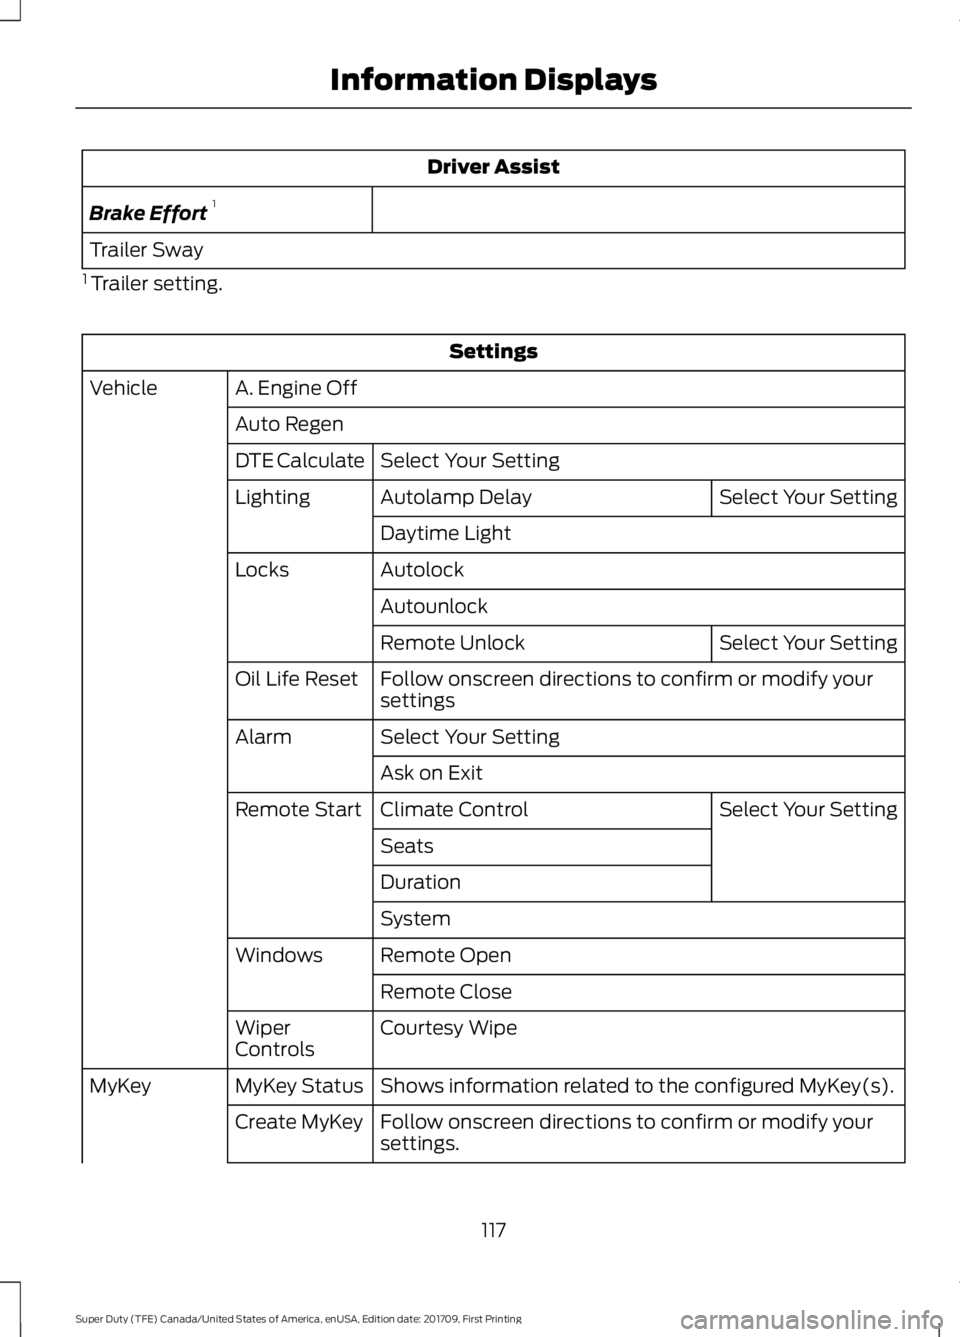
Driver Assist
Brake Effort 1
Trailer Sway
1 Trailer setting. Settings
A. Engine Off
Vehicle
Auto RegenSelect Your Setting
DTE Calculate
Select Your Setting
Autolamp Delay
Lighting
Daytime Light
Autolock
Locks
Autounlock Select Your Setting
Remote Unlock
Follow onscreen directions to confirm or modify your
settings
Oil Life Reset
Select Your Setting
Alarm
Ask on Exit Select Your Setting
Climate Control
Remote Start
Seats
Duration
System
Remote Open
Windows
Remote Close
Courtesy Wipe
Wiper
Controls
Shows information related to the configured MyKey(s).
MyKey Status
MyKey
Follow onscreen directions to confirm or modify your
settings.
Create MyKey
117
Super Duty (TFE) Canada/United States of America, enUSA, Edition date: 201709, First Printing Information Displays
Page 123 of 656
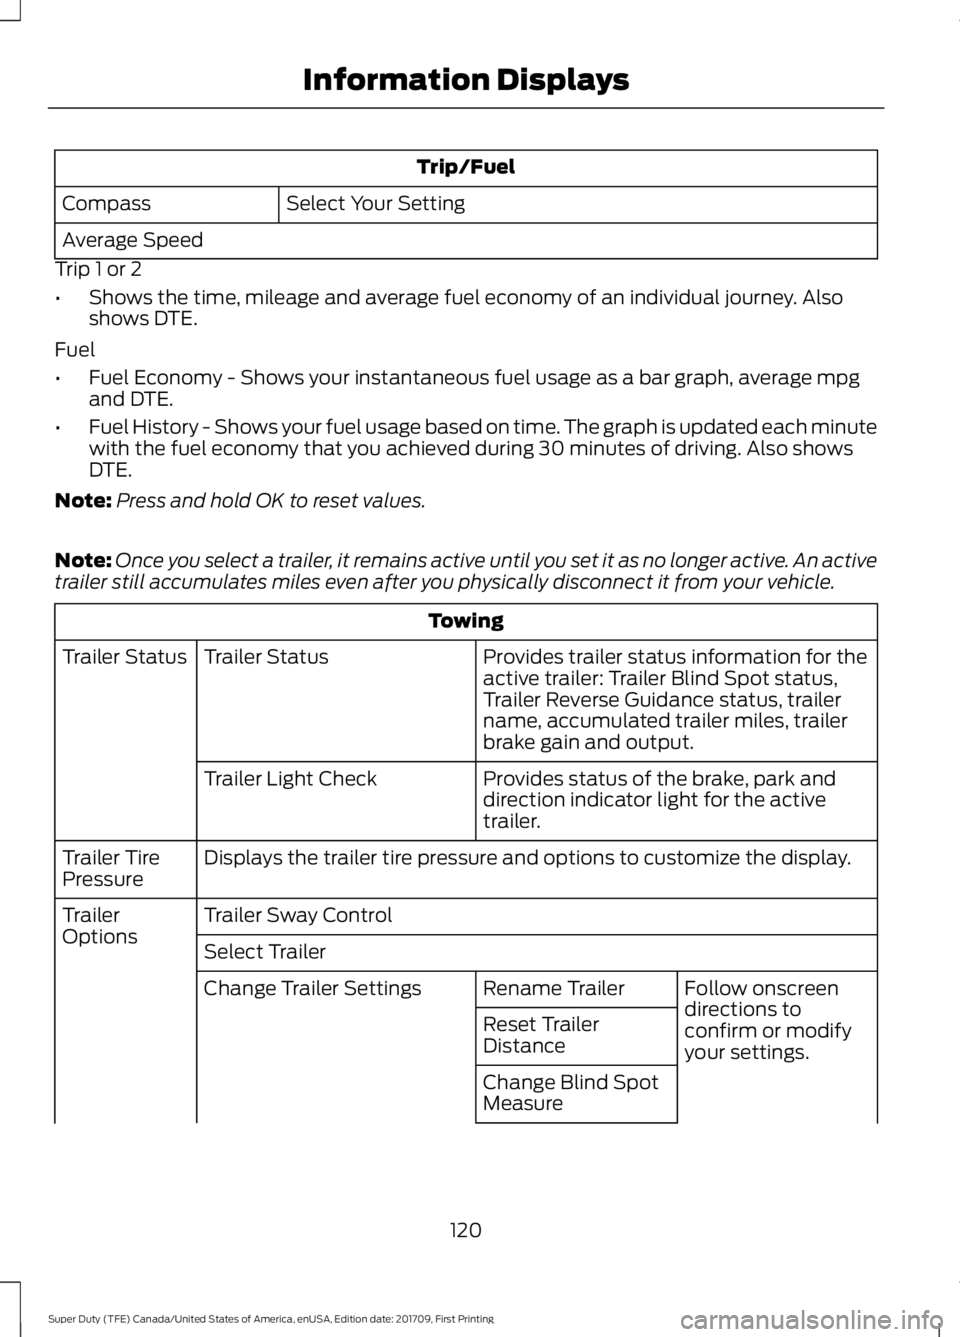
Trip/Fuel
Select Your Setting
Compass
Average Speed
Trip 1 or 2
• Shows the time, mileage and average fuel economy of an individual journey. Also
shows DTE.
Fuel
• Fuel Economy - Shows your instantaneous fuel usage as a bar graph, average mpg
and DTE.
• Fuel History - Shows your fuel usage based on time. The graph is updated each minute
with the fuel economy that you achieved during 30 minutes of driving. Also shows
DTE.
Note: Press and hold OK to reset values.
Note: Once you select a trailer, it remains active until you set it as no longer active. An active
trailer still accumulates miles even after you physically disconnect it from your vehicle. Towing
Provides trailer status information for the
active trailer: Trailer Blind Spot status,
Trailer Reverse Guidance status, trailer
name, accumulated trailer miles, trailer
brake gain and output.
Trailer Status
Trailer Status
Provides status of the brake, park and
direction indicator light for the active
trailer.
Trailer Light Check
Displays the trailer tire pressure and options to customize the display.
Trailer Tire
Pressure
Trailer Sway Control
Trailer
Options
Select Trailer
Follow onscreen
directions to
confirm or modify
your settings.
Rename Trailer
Change Trailer Settings
Reset Trailer
Distance
Change Blind Spot
Measure
120
Super Duty (TFE) Canada/United States of America, enUSA, Edition date: 201709, First Printing Information Displays
Page 131 of 656
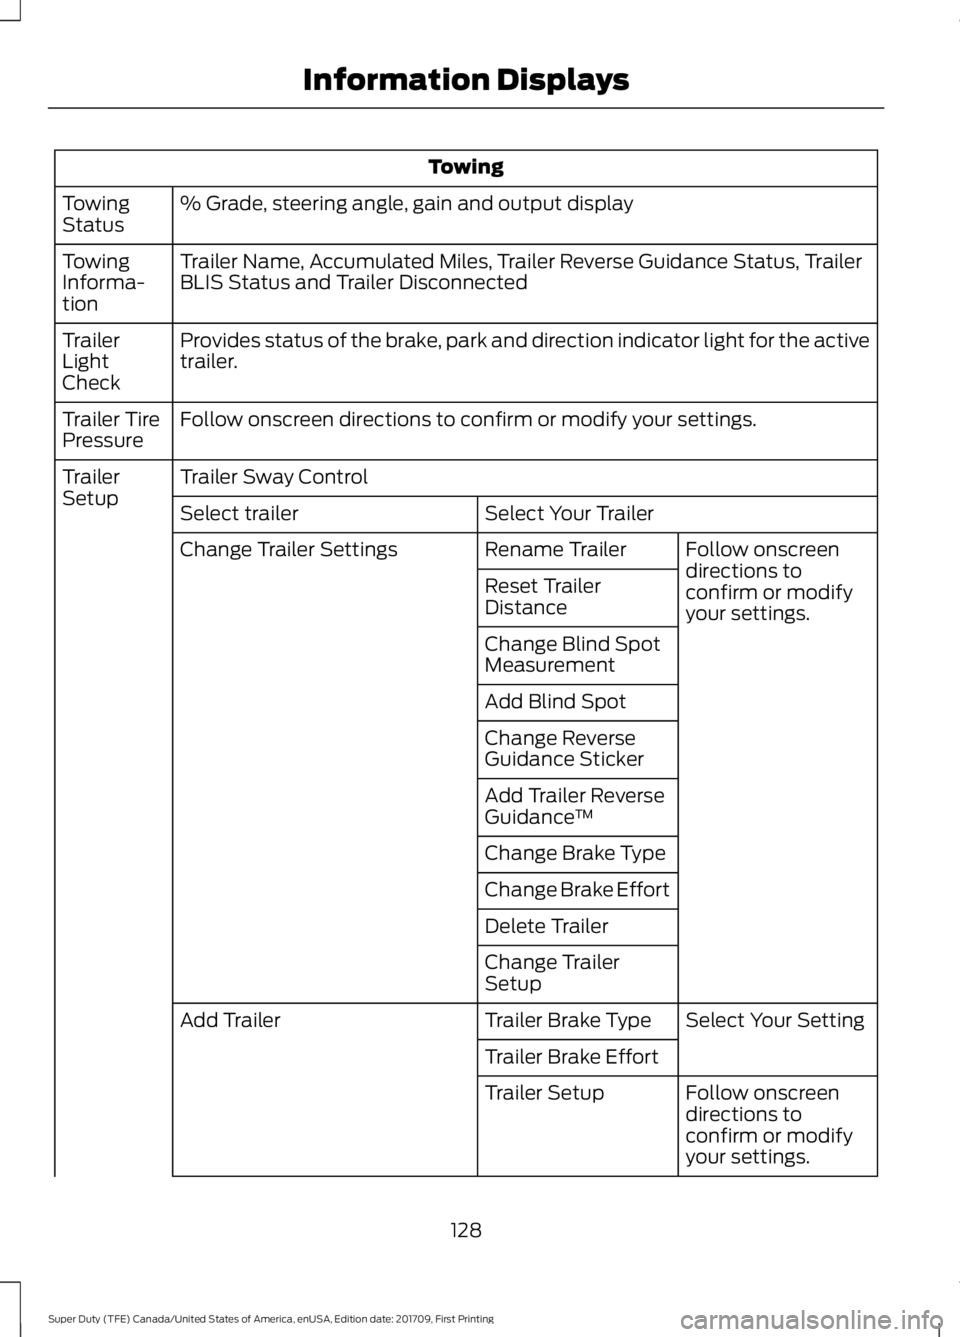
Towing
% Grade, steering angle, gain and output display
Towing
Status
Trailer Name, Accumulated Miles, Trailer Reverse Guidance Status, Trailer
BLIS Status and Trailer Disconnected
Towing
Informa-
tion
Provides status of the brake, park and direction indicator light for the active
trailer.
Trailer
Light
Check
Follow onscreen directions to confirm or modify your settings.
Trailer Tire
Pressure
Trailer Sway Control
Trailer
Setup
Select Your Trailer
Select trailer
Follow onscreen
directions to
confirm or modify
your settings.
Rename Trailer
Change Trailer Settings
Reset Trailer
Distance
Change Blind Spot
Measurement
Add Blind Spot
Change Reverse
Guidance Sticker
Add Trailer Reverse
Guidance™
Change Brake Type
Change Brake Effort
Delete Trailer
Change Trailer
Setup Select Your Setting
Trailer Brake Type
Add Trailer
Trailer Brake EffortFollow onscreen
directions to
confirm or modify
your settings.
Trailer Setup
128
Super Duty (TFE) Canada/United States of America, enUSA, Edition date: 201709, First Printing Information Displays
Page 149 of 656
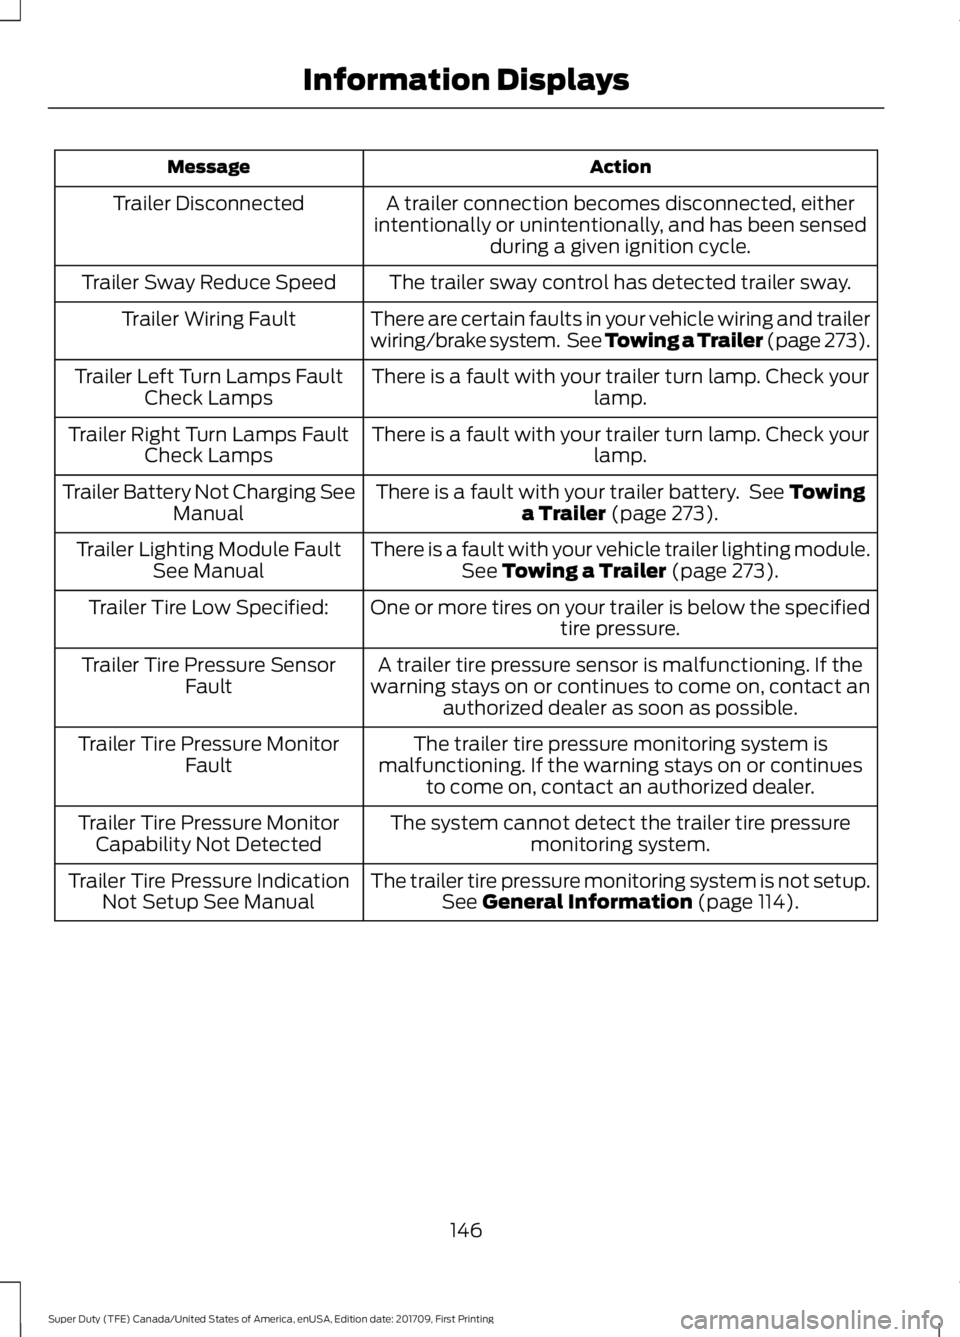
Action
Message
A trailer connection becomes disconnected, either
intentionally or unintentionally, and has been sensed during a given ignition cycle.
Trailer Disconnected
The trailer sway control has detected trailer sway.
Trailer Sway Reduce Speed
There are certain faults in your vehicle wiring and trailer
wiring/brake system. See Towing a Trailer (page 273).
Trailer Wiring Fault
There is a fault with your trailer turn lamp. Check yourlamp.
Trailer Left Turn Lamps Fault
Check Lamps
There is a fault with your trailer turn lamp. Check yourlamp.
Trailer Right Turn Lamps Fault
Check Lamps
There is a fault with your trailer battery. See
Towing
a Trailer (page 273).
Trailer Battery Not Charging See
Manual
There is a fault with your vehicle trailer lighting module.See
Towing a Trailer (page 273).
Trailer Lighting Module Fault
See Manual
One or more tires on your trailer is below the specifiedtire pressure.
Trailer Tire Low Specified:
A trailer tire pressure sensor is malfunctioning. If the
warning stays on or continues to come on, contact an authorized dealer as soon as possible.
Trailer Tire Pressure Sensor
Fault
The trailer tire pressure monitoring system is
malfunctioning. If the warning stays on or continues to come on, contact an authorized dealer.
Trailer Tire Pressure Monitor
Fault
The system cannot detect the trailer tire pressuremonitoring system.
Trailer Tire Pressure Monitor
Capability Not Detected
The trailer tire pressure monitoring system is not setup.See
General Information (page 114).
Trailer Tire Pressure Indication
Not Setup See Manual
146
Super Duty (TFE) Canada/United States of America, enUSA, Edition date: 201709, First Printing Information Displays
Page 181 of 656
D (start) - Cranks the engine.
KEYLESS STARTING
Note: The system may not function if the
intelligent access key is close to metal
objects or electronic devices, for example
keys or a cell phone.
Note: A valid intelligent access key must
be located inside your vehicle to switch the
ignition on and start your vehicle.
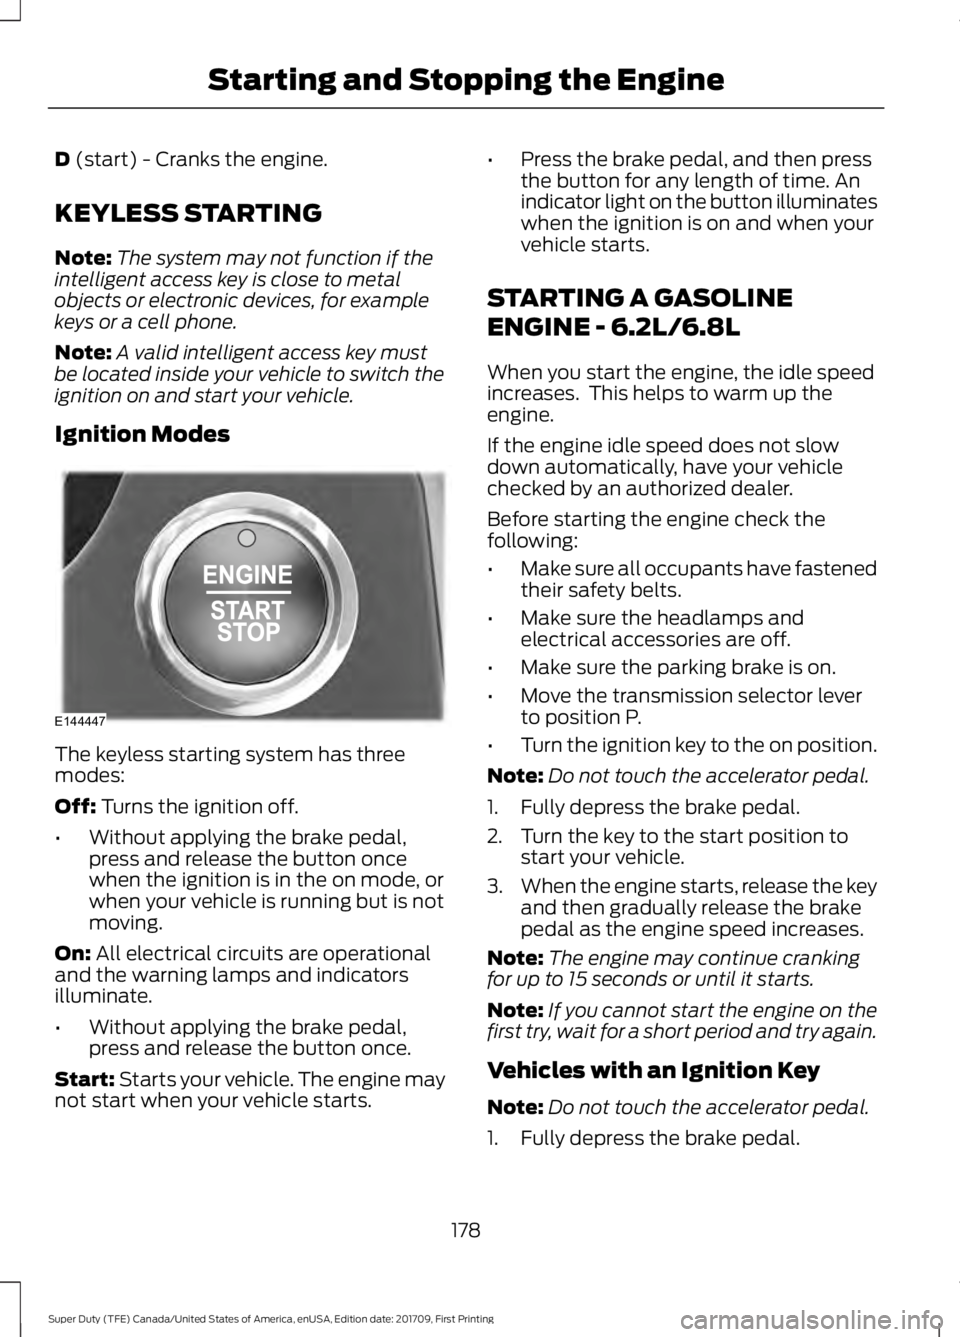
Ignition Modes The keyless starting system has three
modes:
Off:
Turns the ignition off.
• Without applying the brake pedal,
press and release the button once
when the ignition is in the on mode, or
when your vehicle is running but is not
moving.
On:
All electrical circuits are operational
and the warning lamps and indicators
illuminate.
• Without applying the brake pedal,
press and release the button once.
Start:
Starts your vehicle. The engine may
not start when your vehicle starts. •
Press the brake pedal, and then press
the button for any length of time. An
indicator light on the button illuminates
when the ignition is on and when your
vehicle starts.
STARTING A GASOLINE
ENGINE - 6.2L/6.8L
When you start the engine, the idle speed
increases. This helps to warm up the
engine.
If the engine idle speed does not slow
down automatically, have your vehicle
checked by an authorized dealer.
Before starting the engine check the
following:
• Make sure all occupants have fastened
their safety belts.
• Make sure the headlamps and
electrical accessories are off.
• Make sure the parking brake is on.
• Move the transmission selector lever
to position P.
• Turn the ignition key to the on position.
Note: Do not touch the accelerator pedal.
1. Fully depress the brake pedal.
2. Turn the key to the start position to start your vehicle.
3. When the engine starts, release the key
and then gradually release the brake
pedal as the engine speed increases.
Note: The engine may continue cranking
for up to 15 seconds or until it starts.
Note: If you cannot start the engine on the
first try, wait for a short period and try again.
Vehicles with an Ignition Key
Note: Do not touch the accelerator pedal.
1. Fully depress the brake pedal.
178
Super Duty (TFE) Canada/United States of America, enUSA, Edition date: 201709, First Printing Starting and Stopping the EngineE144447