manual transmission FORD F350 1999 Owner's Manual
[x] Cancel search | Manufacturer: FORD, Model Year: 1999, Model line: F350, Model: FORD F350 1999Pages: 248, PDF Size: 1.72 MB
Page 133 of 248
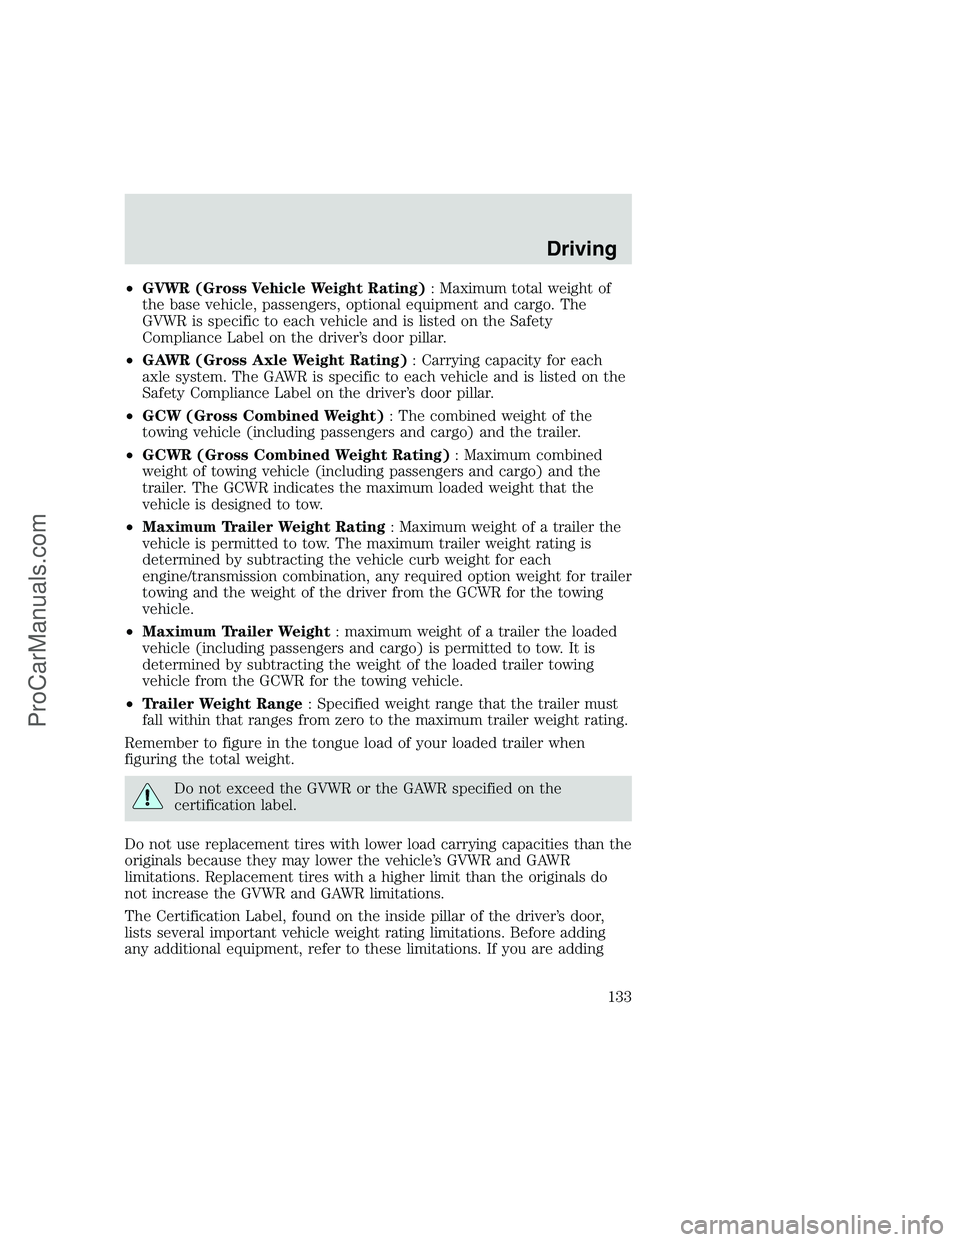
•GVWR (Gross Vehicle Weight Rating): Maximum total weight of
the base vehicle, passengers, optional equipment and cargo. The
GVWR is specific to each vehicle and is listed on the Safety
Compliance Label on the driver’s door pillar.
•GAWR (Gross Axle Weight Rating): Carrying capacity for each
axle system. The GAWR is specific to each vehicle and is listed on the
Safety Compliance Label on the driver’s door pillar.
•GCW (Gross Combined Weight): The combined weight of the
towing vehicle (including passengers and cargo) and the trailer.
•GCWR (Gross Combined Weight Rating): Maximum combined
weight of towing vehicle (including passengers and cargo) and the
trailer. The GCWR indicates the maximum loaded weight that the
vehicle is designed to tow.
•Maximum Trailer Weight Rating: Maximum weight of a trailer the
vehicle is permitted to tow. The maximum trailer weight rating is
determined by subtracting the vehicle curb weight for each
engine/transmission combination, any required option weight for trailer
towing and the weight of the driver from the GCWR for the towing
vehicle.
•Maximum Trailer Weight: maximum weight of a trailer the loaded
vehicle (including passengers and cargo) is permitted to tow. It is
determined by subtracting the weight of the loaded trailer towing
vehicle from the GCWR for the towing vehicle.
•Trailer Weight Range: Specified weight range that the trailer must
fall within that ranges from zero to the maximum trailer weight rating.
Remember to figure in the tongue load of your loaded trailer when
figuring the total weight.
Do not exceed the GVWR or the GAWR specified on the
certification label.
Do not use replacement tires with lower load carrying capacities than the
originals because they may lower the vehicle’s GVWR and GAWR
limitations. Replacement tires with a higher limit than the originals do
not increase the GVWR and GAWR limitations.
The Certification Label, found on the inside pillar of the driver’s door,
lists several important vehicle weight rating limitations. Before adding
any additional equipment, refer to these limitations. If you are adding
Driving
133
ProCarManuals.com
Page 135 of 248
Driving through deep water where the transmission is submerged
may allow water into the transmission and cause internal
transmission damage.
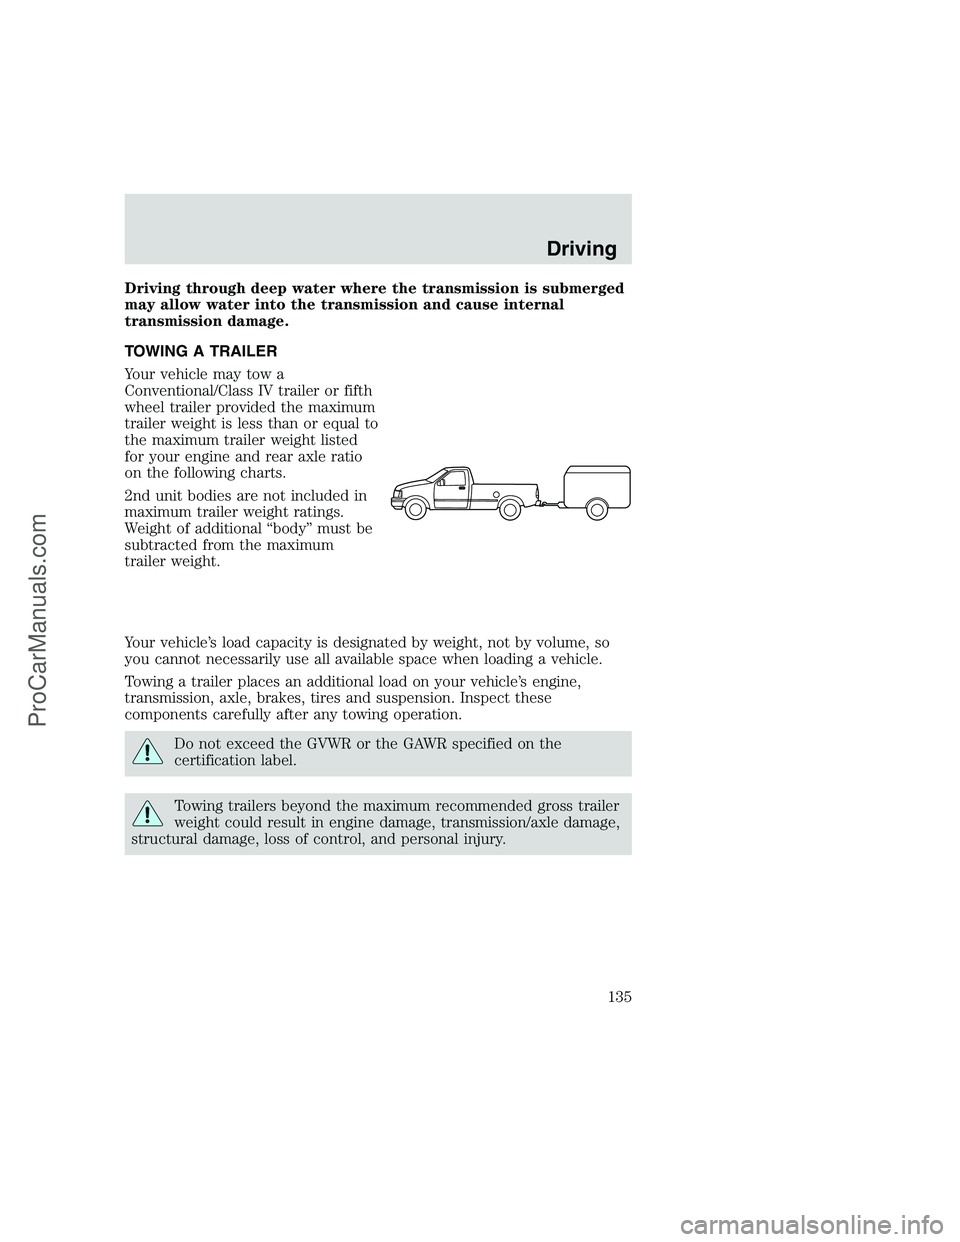
TOWING A TRAILER
Your vehicle may tow a
Conventional/Class IV trailer or fifth
wheel trailer provided the maximum
trailer weight is less than or equal to
the maximum trailer weight listed
for your engine and rear axle ratio
on the following charts.
2nd unit bodies are not included in
maximum trailer weight ratings.
Weight of additional “body” must be
subtracted from the maximum
trailer weight.
Your vehicle’s load capacity is designated by weight, not by volume, so
you cannot necessarily use all available space when loading a vehicle.
Towing a trailer places an additional load on your vehicle’s engine,
transmission, axle, brakes, tires and suspension. Inspect these
components carefully after any towing operation.
Do not exceed the GVWR or the GAWR specified on the
certification label.
Towing trailers beyond the maximum recommended gross trailer
weight could result in engine damage, transmission/axle damage,
structural damage, loss of control, and personal injury.
Driving
135
ProCarManuals.com
Page 136 of 248
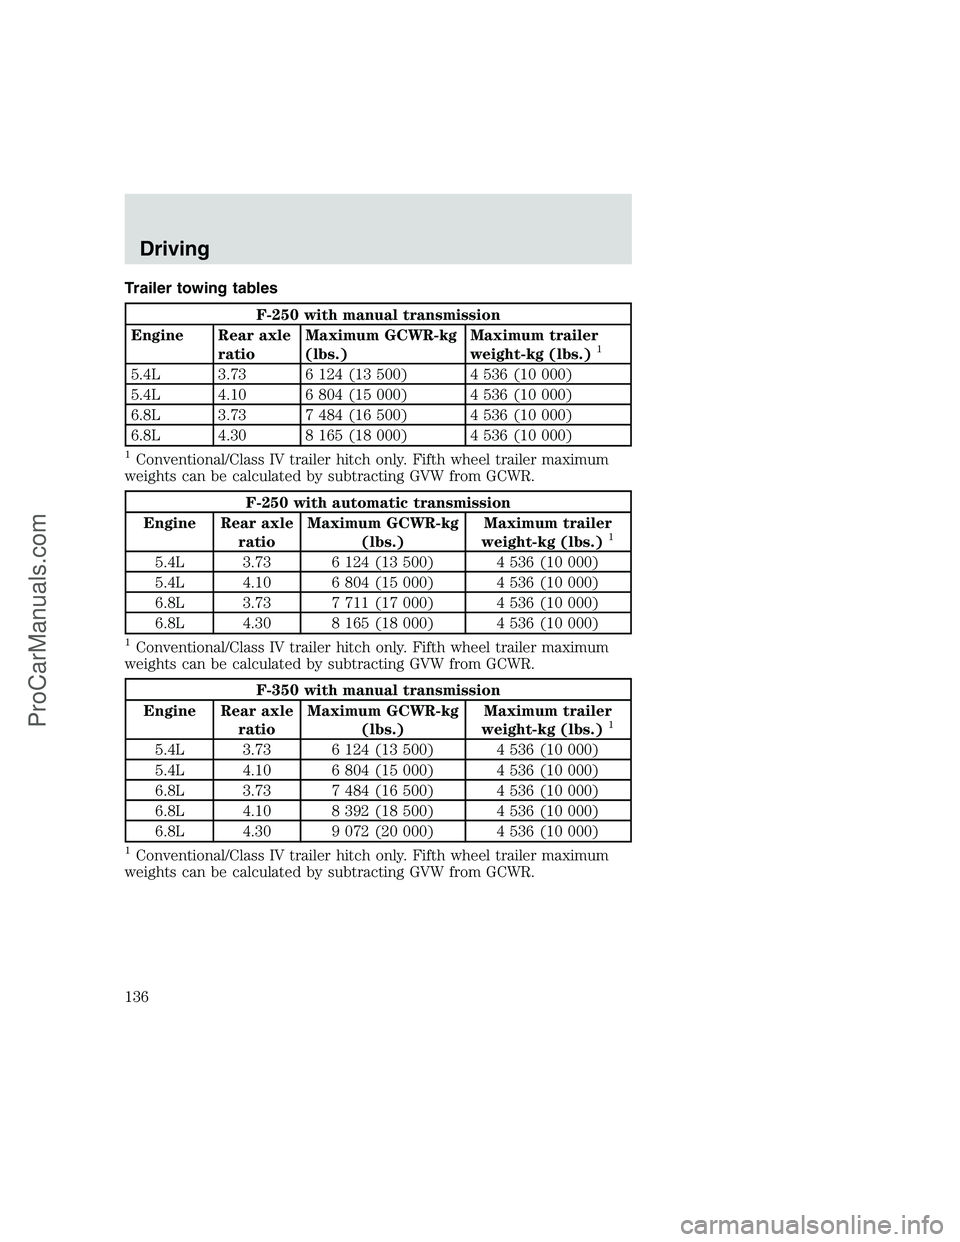
Trailer towing tables
F-250 with manual transmission
Engine Rear axle
ratioMaximum GCWR-kg
(lbs.)Maximum trailer
weight-kg (lbs.)
1
5.4L 3.73 6 124 (13 500) 4 536 (10 000)
5.4L 4.10 6 804 (15 000) 4 536 (10 000)
6.8L 3.73 7 484 (16 500) 4 536 (10 000)
6.8L 4.30 8 165 (18 000) 4 536 (10 000)
1Conventional/Class IV trailer hitch only. Fifth wheel trailer maximum
weights can be calculated by subtracting GVW from GCWR.
F-250 with automatic transmission
Engine Rear axle
ratioMaximum GCWR-kg
(lbs.)Maximum trailer
weight-kg (lbs.)
1
5.4L 3.73 6 124 (13 500) 4 536 (10 000)
5.4L 4.10 6 804 (15 000) 4 536 (10 000)
6.8L 3.73 7 711 (17 000) 4 536 (10 000)
6.8L 4.30 8 165 (18 000) 4 536 (10 000)
1Conventional/Class IV trailer hitch only. Fifth wheel trailer maximum
weights can be calculated by subtracting GVW from GCWR.
F-350 with manual transmission
Engine Rear axle
ratioMaximum GCWR-kg
(lbs.)Maximum trailer
weight-kg (lbs.)
1
5.4L 3.73 6 124 (13 500) 4 536 (10 000)
5.4L 4.10 6 804 (15 000) 4 536 (10 000)
6.8L 3.73 7 484 (16 500) 4 536 (10 000)
6.8L 4.10 8 392 (18 500) 4 536 (10 000)
6.8L 4.30 9 072 (20 000) 4 536 (10 000)
1Conventional/Class IV trailer hitch only. Fifth wheel trailer maximum
weights can be calculated by subtracting GVW from GCWR.
Driving
136
ProCarManuals.com
Page 137 of 248
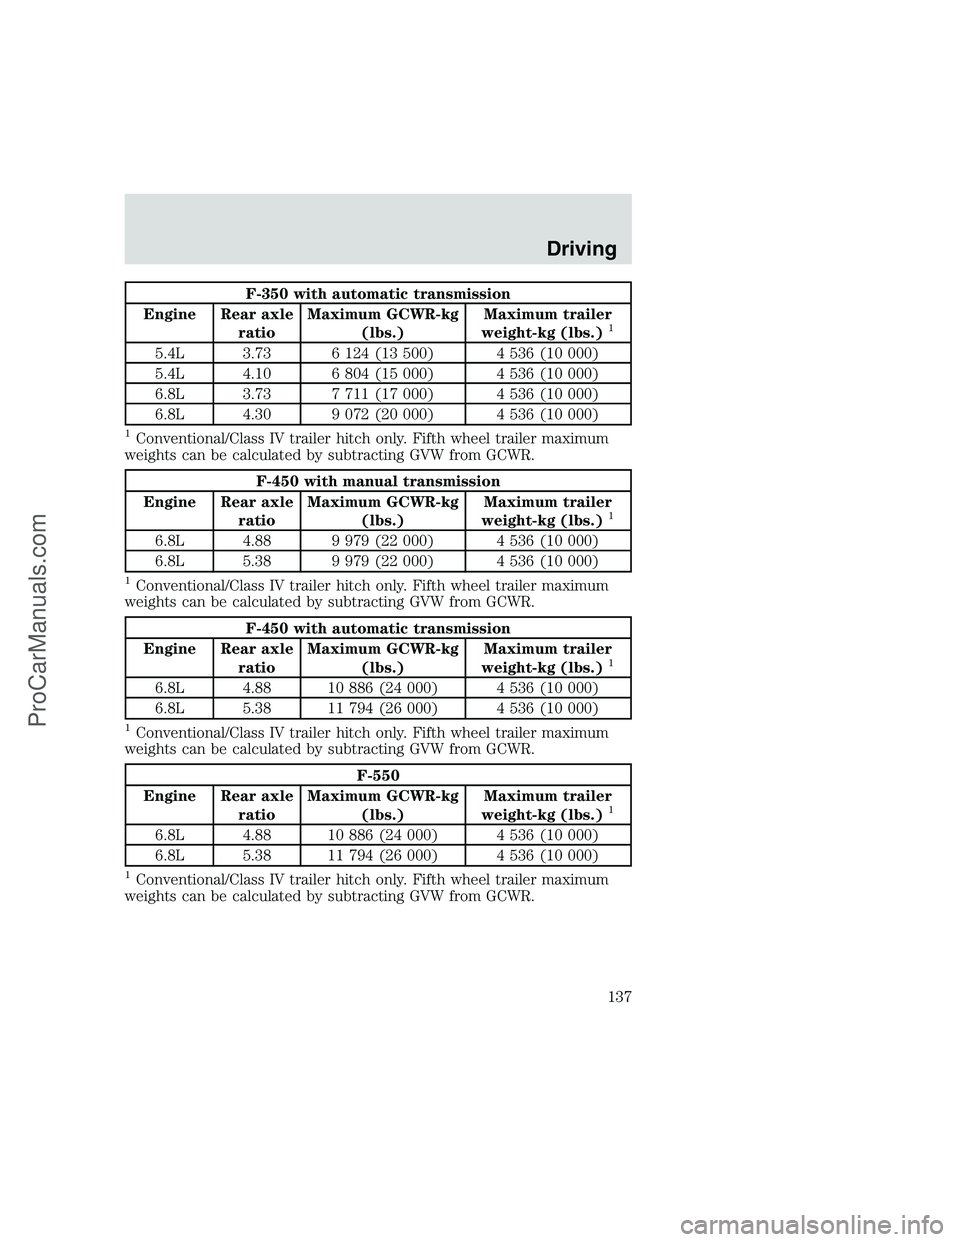
F-350 with automatic transmission
Engine Rear axle
ratioMaximum GCWR-kg
(lbs.)Maximum trailer
weight-kg (lbs.)
1
5.4L 3.73 6 124 (13 500) 4 536 (10 000)
5.4L 4.10 6 804 (15 000) 4 536 (10 000)
6.8L 3.73 7 711 (17 000) 4 536 (10 000)
6.8L 4.30 9 072 (20 000) 4 536 (10 000)
1Conventional/Class IV trailer hitch only. Fifth wheel trailer maximum
weights can be calculated by subtracting GVW from GCWR.
F-450 with manual transmission
Engine Rear axle
ratioMaximum GCWR-kg
(lbs.)Maximum trailer
weight-kg (lbs.)
1
6.8L 4.88 9 979 (22 000) 4 536 (10 000)
6.8L 5.38 9 979 (22 000) 4 536 (10 000)
1Conventional/Class IV trailer hitch only. Fifth wheel trailer maximum
weights can be calculated by subtracting GVW from GCWR.
F-450 with automatic transmission
Engine Rear axle
ratioMaximum GCWR-kg
(lbs.)Maximum trailer
weight-kg (lbs.)
1
6.8L 4.88 10 886 (24 000) 4 536 (10 000)
6.8L 5.38 11 794 (26 000) 4 536 (10 000)
1Conventional/Class IV trailer hitch only. Fifth wheel trailer maximum
weights can be calculated by subtracting GVW from GCWR.
F-550
Engine Rear axle
ratioMaximum GCWR-kg
(lbs.)Maximum trailer
weight-kg (lbs.)
1
6.8L 4.88 10 886 (24 000) 4 536 (10 000)
6.8L 5.38 11 794 (26 000) 4 536 (10 000)
1Conventional/Class IV trailer hitch only. Fifth wheel trailer maximum
weights can be calculated by subtracting GVW from GCWR.
Driving
137
ProCarManuals.com
Page 139 of 248
Trailer brakes
Electric brakes and manual, automatic or surge-type brakes are safe if
installed properly and adjusted to the manufacturer’s specifications. The
trailer brakes must meet local and Federal regulations.
Do not connect a trailer’s hydraulic brake system directly to your
vehicle’s brake system. Your vehicle may not have enough
braking power and your chances of having a collision greatly increase.
The braking system of the tow vehicle is rated for operation at the
GVWR not GCWR.
Trailer lamps
Trailer lamps are required on most towed vehicles. Make sure your
trailer lamps conform to local and Federal regulations. See your dealer or
trailer rental agency for proper instructions and equipment for hooking
up trailer lamps.
Using a step bumper
The rear bumper is equipped with an integral hitch and requires only a
ball with a 25.4 mm (one inch) shank diameter. The bumper hasa2270
kg (5 000 lb.) trailer weight and 227 kg (500 lb.) tongue weight
capability.
If it is necessary to relocate the trailer hitch ball position, a
frame-mounted trailer hitch must be installed.
Driving while you tow
Do not drive faster than 88 km/h (55 mph) when towing a trailer.
Speed control may shut off if you are towing on long, steep grades.
When towing a trailer:
•Use a lower gear when towing up or down steep hills. This will
eliminate excessive downshifting and upshifting for optimum fuel
economy and transmission cooling.
•Anticipate stops and brake gradually.
Exceeding the GCWR rating may cause internal transmission
damage and void your warranty coverage.
Driving
139
ProCarManuals.com
Page 140 of 248
Servicing after towing
If you tow a trailer for long distances, your vehicle will require more
frequent service intervals. Refer to your Scheduled Maintenance guide
for more information.
Trailer towing tips
•Practice turning, stopping and backing up in an area before starting on
a trip to get the feel of the vehicle trailer combination. When turning,
make wider turns so the trailer wheels will clear curbs and other
obstacles.
•Allow more distance for stopping with a trailer attached.
•The trailer tongue weight should be 10–15% of the loaded trailer
weight.
•After you have traveled 80 km (50 miles), thoroughly check your
hitch, electrical connections and trailer wheel lug nuts.
•When stopped in traffic for long periods of time in hot weather, place
the gearshift in P (Park) (automatic transmissions) or N (Neutral)
(manual transmissions). This aids engine cooling and air conditioner
efficiency.
•Vehicles with trailers should not be parked on a grade. If you must
park on a grade, place wheel chocks under the trailer’s wheels.
Launching or retrieving a boat
When backing down a ramp during boat launching or retrieval,
•Do not allow the static water level to rise above the bottom edge of
the rear bumper and
•Do not allow waves to break higher than 15 cm (six inches) above the
bottom edge of the rear bumper.
Exceeding these limits may allow water to enter critical vehicle
components, adversely affecting driveability, emissions and reliability.
Replace front and rear axle lubricants anytime the axles have been
submerged in water. Axle lubricant quantities are not to be checked
unless a leak is suspected.
Recreational towing
If you may want to tow your vehicle behind another vehicle, such as an
RV, follow these guidelines:
Driving
140
ProCarManuals.com
Page 141 of 248
•4x2 vehicles must have the driveshaft removed if the rear wheels are
to be kept on the ground. If only the front wheels will be on the
ground, the driveshaft does not need to be removed.
•4x4 Electronic Shift on the Fly vehicles cannot be towed with any
wheels on the ground.
•
4x4 vehicles with a manual shift (floor-mounted) transfer case shifter
must have the transfer case and transmission gearshift levers placed in
the N (Neutral) position in order to tow with all wheels on the ground.
SNOWPLOWING
For low speed snow removal, Ford offers a Snowplow Package as an
option. If you do not have this equipment, do not use your vehicle as a
snowplow or powertrain and suspension system damage may occur.
Do not install a snowplow and plow with your vehicle until it has been
driven at least 800 km (500 miles).
Installing snowplow
Read the following instructions before installing a snowplow:
•Front GAWR must not exceed 63% of the GVW. Add ballast weight to
the back of the vehicle, if necessary. Refer to the Safety Compliance
Certification Label to find Front GAWR.
•The Front Axle Accessory Reserve Capacity and the Total Accessory
Reserve Capacity listed on the bottom right of the Safety Compliance
Certification Label will determine whether or not the addition of a
snowplow will overload your vehicle.
•The weight of the snowplow and supporting components distributed to
the front axle must not exceed the front accessory reserve capacity.
•The total weight of the snowplow and aftermarket equipment must
not exceed the Total Accessory Reserve Capacity.
•The weight of the installed snowplow and aftermarket equipment must
not load the vehicle beyond the GAWR (front/rear) and GVWR listed
on the Safety Compliance Certification Label.
•The total weight of the snowplow and aftermarket equipment must be
considered part of the payload and must not exceed the Gross
Combined Weight Rating (GCWR) for towing.
•Federal and most local regulations require additional exterior lamps
for snowplow-equipped vehicles. Consult your dealer for additional
information.
Driving
141
ProCarManuals.com
Page 142 of 248
•After installing a snowplow to the vehicle, ensure the vehicle’s front
toe alignment and front ride height are within specification (reset if
required). These specifications are located in the vehicle’s Workshop
Manual. Adherence to the toe, tire pressures and ride height
specification is important for proper tire wear, ride, handling and
headlight aim. Also, maintain the engine oil and transmission fluid
change intervals following the severe duty schedule.
Do not exceed the GVWR or the GAWR specified on the
certification label.
Removing snowplow
Read the following instructions before removing a snowplow:
•After removing a snowplow from the vehicle, ensure the vehicle’s front
toe alignment and front ride height are within specification (reset if
required). These specifications are located in the vehicle’s Workshop
Manual. Adherence to the toe and ride height specification is
important for proper tire wear, ride, handling and headlight aim.
Snowplowing with your air bag equipped vehicle
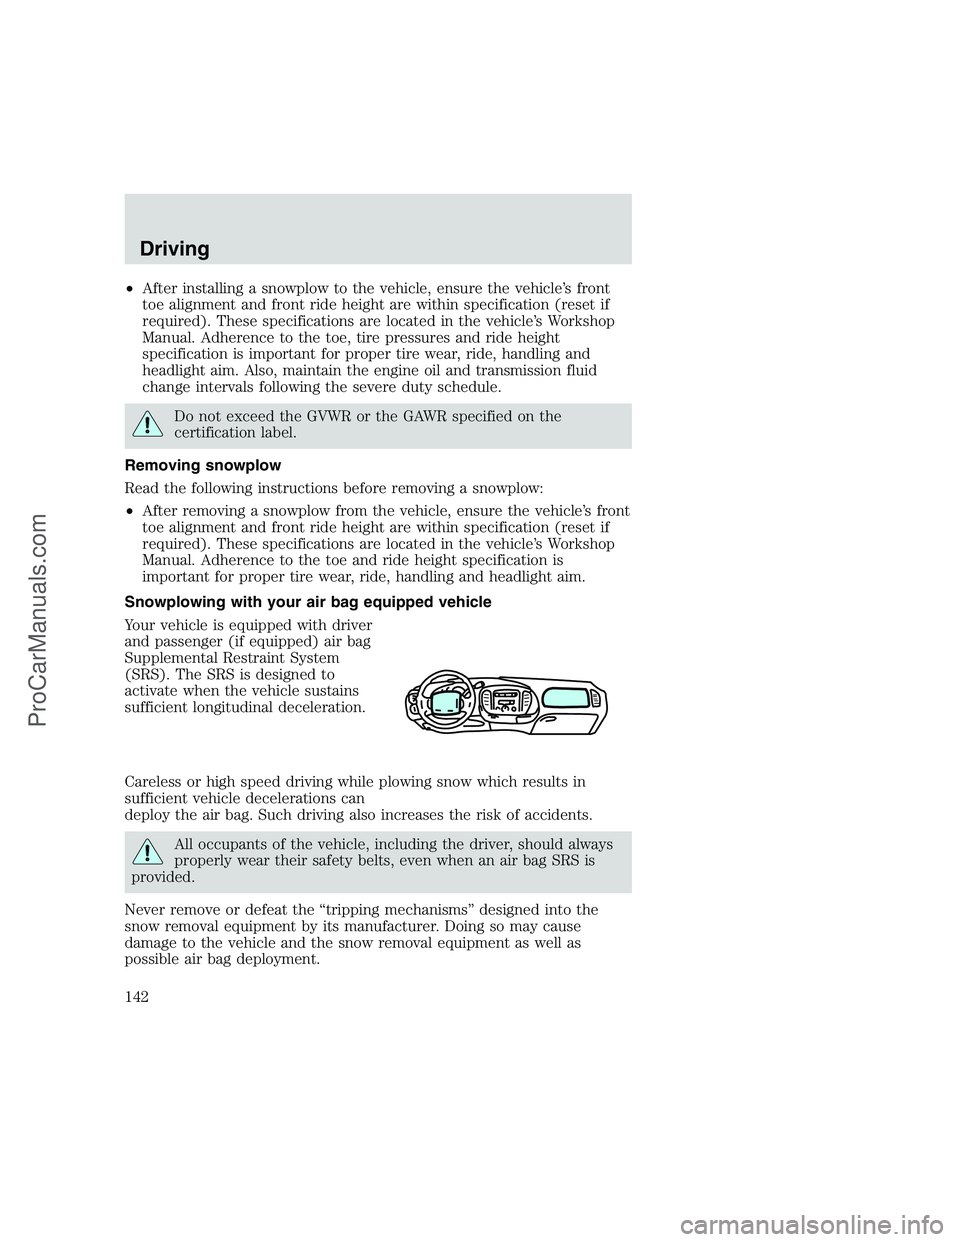
Your vehicle is equipped with driver
and passenger (if equipped) air bag
Supplemental Restraint System
(SRS). The SRS is designed to
activate when the vehicle sustains
sufficient longitudinal deceleration.
Careless or high speed driving while plowing snow which results in
sufficient vehicle decelerations can
deploy the air bag. Such driving also increases the risk of accidents.
All occupants of the vehicle, including the driver, should always
properly wear their safety belts, even when an air bag SRS is
provided.
Never remove or defeat the “tripping mechanisms” designed into the
snow removal equipment by its manufacturer. Doing so may cause
damage to the vehicle and the snow removal equipment as well as
possible air bag deployment.
Driving
142
ProCarManuals.com
Page 143 of 248
Do not attempt to service, repair, or modify the Air Bag
Supplemental Restraint System or its fuses. See your Ford or
Lincoln-Mercury dealer.
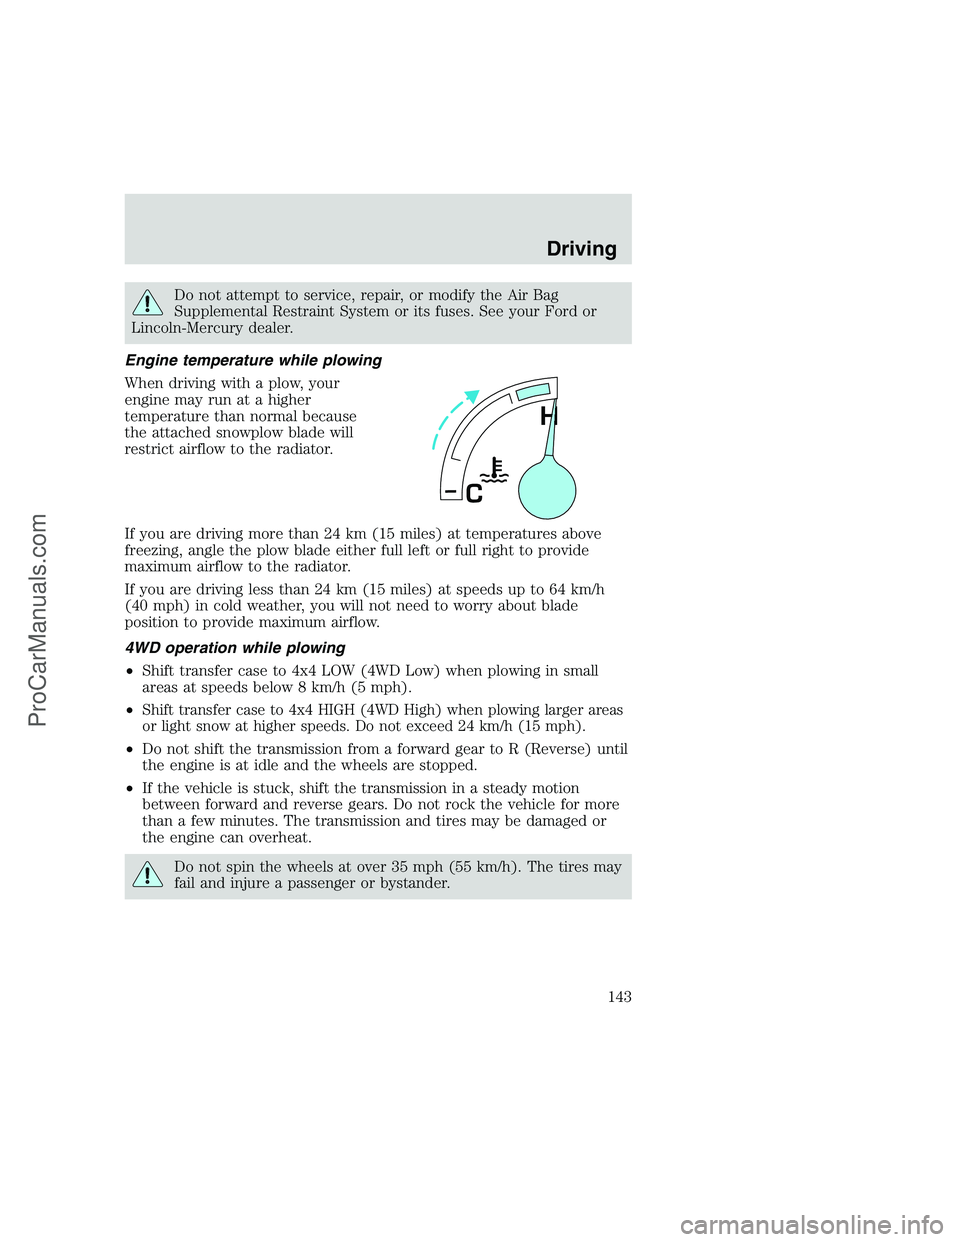
Engine temperature while plowing
When driving with a plow, your
engine may run at a higher
temperature than normal because
the attached snowplow blade will
restrict airflow to the radiator.
If you are driving more than 24 km (15 miles) at temperatures above
freezing, angle the plow blade either full left or full right to provide
maximum airflow to the radiator.
If you are driving less than 24 km (15 miles) at speeds up to 64 km/h
(40 mph) in cold weather, you will not need to worry about blade
position to provide maximum airflow.
4WD operation while plowing
•Shift transfer case to 4x4 LOW (4WD Low) when plowing in small
areas at speeds below 8 km/h (5 mph).
•
Shift transfer case to 4x4 HIGH (4WD High) when plowing larger areas
or light snow at higher speeds. Do not exceed 24 km/h (15 mph).
•Do not shift the transmission from a forward gear to R (Reverse) until
the engine is at idle and the wheels are stopped.
•If the vehicle is stuck, shift the transmission in a steady motion
between forward and reverse gears. Do not rock the vehicle for more
than a few minutes. The transmission and tires may be damaged or
the engine can overheat.
Do not spin the wheels at over 35 mph (55 km/h). The tires may
fail and injure a passenger or bystander.
H
C
Driving
143
ProCarManuals.com
Page 155 of 248
5. The following steps are required to secure the support bracket (if
equipped) under the spare tire:
•Move the support bracket over the spare tire.
•Slide the support bracket over the eyebolt into the slot on the support
bracket.
•Tighten the eyebolt with tapered end of lug wrench leaving it
positioned at a right angle of the slot on the support bracket.
Tire change procedure
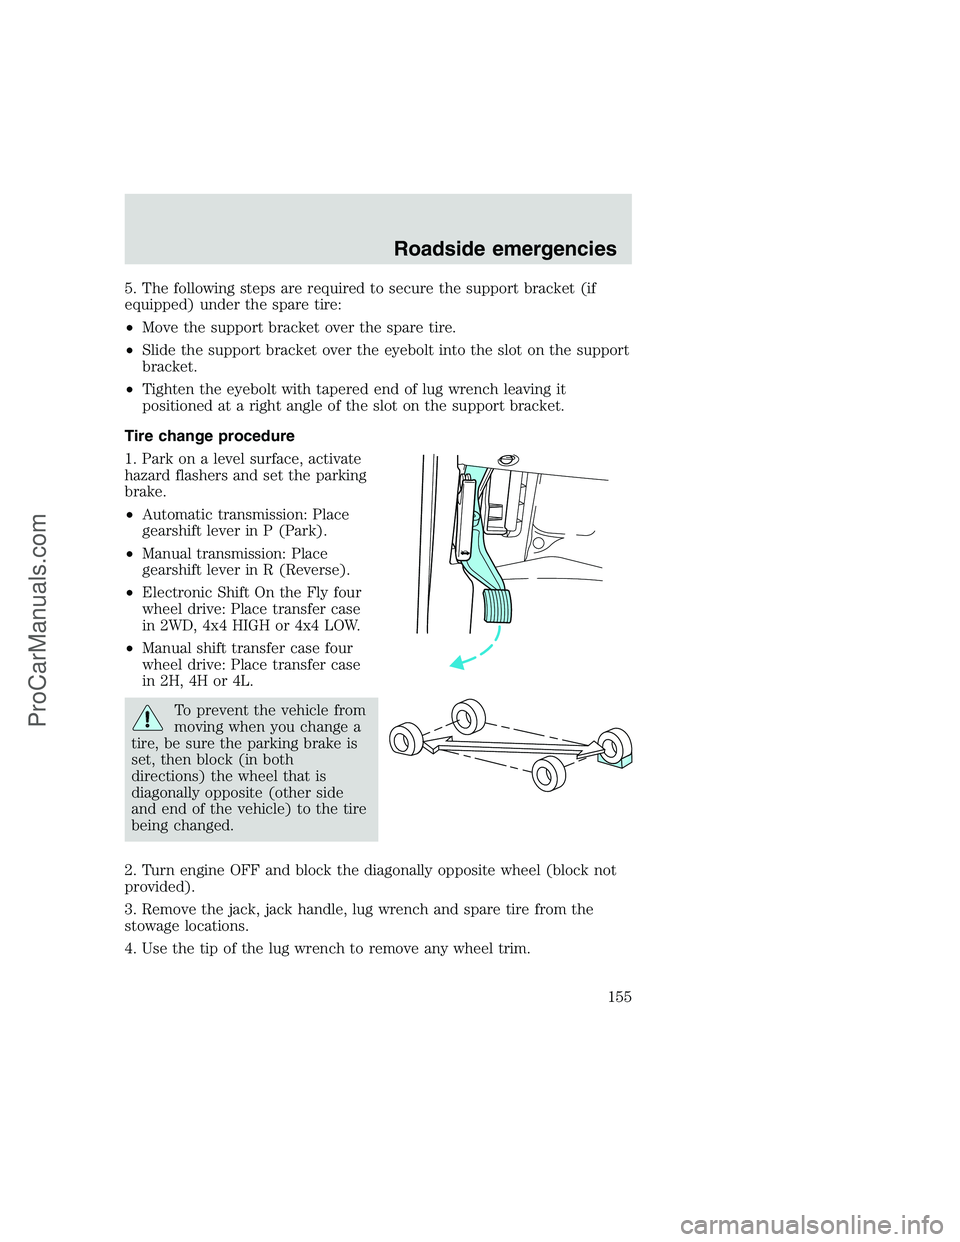
1. Park on a level surface, activate
hazard flashers and set the parking
brake.
•Automatic transmission: Place
gearshift lever in P (Park).
•Manual transmission: Place
gearshift lever in R (Reverse).
•Electronic Shift On the Fly four
wheel drive: Place transfer case
in 2WD, 4x4 HIGH or 4x4 LOW.
•Manual shift transfer case four
wheel drive: Place transfer case
in 2H, 4H or 4L.
To prevent the vehicle from
moving when you change a
tire, be sure the parking brake is
set, then block (in both
directions) the wheel that is
diagonally opposite (other side
and end of the vehicle) to the tire
being changed.
2. Turn engine OFF and block the diagonally opposite wheel (block not
provided).
3. Remove the jack, jack handle, lug wrench and spare tire from the
stowage locations.
4. Use the tip of the lug wrench to remove any wheel trim.
Roadside emergencies
155
ProCarManuals.com