display FORD F450 SUPER DUTY 2017 Owners Manual
[x] Cancel search | Manufacturer: FORD, Model Year: 2017, Model line: F450 SUPER DUTY, Model: FORD F450 SUPER DUTY 2017Pages: 642, PDF Size: 12.35 MB
Page 5 of 642
Voice Control...................................................82
Cruise Control..................................................82
Information Display Control.......................82
Heated Steering Wheel................................82
Pedals
Adjusting the Pedals.....................................83
Wipers and Washers
Windshield Wipers........................................84
Autowipers.......................................................84
Windshield Washers.....................................85
Lighting
General Information.....................................86
Lighting Control..............................................86
Autolamps........................................................87
Instrument Lighting Dimmer.....................88
Daytime Running Lamps............................88
Automatic High Beam Control.................88
Front Fog Lamps............................................90
Direction Indicators.......................................90
Spot Lamps.....................................................90
Interior Lamps..................................................91
Ambient Lighting...........................................94
Windows and Mirrors
Power Windows.............................................95
Global Opening..............................................96
Exterior Mirrors................................................96
Interior Mirror...................................................98
Sliding Windows............................................99
Sun Visors.........................................................99
Moonroof........................................................100
Instrument Cluster
Gauges..............................................................102
Warning Lamps and Indicators...............105
Audible Warnings and Indicators............110
Information Displays
General Information......................................111
Information Messages................................128
Climate Control
Manual Climate Control.............................145
Automatic Climate Control......................146
Hints on Controlling the InteriorClimate.........................................................148
Heated Windows and Mirrors..................150
Heated Exterior Mirrors................................151
Cabin Air Filter.................................................151
Remote Start...................................................151
Seats
Sitting in the Correct Position..................152
Head Restraints.............................................152
Manual Seats.................................................154
Power Seats....................................................155
Memory Function..........................................157
Rear Seats.......................................................159
Heated Seats.................................................160
Climate Controlled Seats...........................161
Front Seat Armrest......................................162
Rear Seat Armrest........................................163
Universal Garage DoorOpener
Universal Garage Door Opener...............164
Auxiliary Power Points
Auxiliary Power Points...............................168
Storage Compartments
Center Console..............................................170
Overhead Console........................................170
Under Seat Storage.....................................170
2
Super Duty (TFE) Canada/United States of America, enUSA, Edition date: 201710, Second Printing
Table of Contents
Page 8 of 642
Changing the Engine Air Filter - 6.7LDiesel............................................................357
Changing the Engine-Mounted andDiesel Fuel Conditioner Module FuelFilters - 6.7L Diesel..................................359
Vehicle Care
General Information...................................364
Cleaning Products.......................................364
Cleaning the Exterior..................................365
Waxing.............................................................366
Cleaning the Engine...................................366
Cleaning the Exhaust - 6.7L Diesel........367
Cleaning the Windows and WiperBlades..........................................................367
Cleaning the Interior...................................368
Cleaning the Instrument Panel andInstrument Cluster Lens.......................368
Cleaning Leather Seats.............................369
Repairing Minor Paint Damage..............370
Cleaning the Wheels..................................370
Vehicle Storage..............................................371
Wheels and Tires
General Information...................................374
Tire Care...........................................................377
Using Snow Chains.....................................394
Tire Pressure Monitoring System..........394
Changing a Road Wheel...........................402
Technical Specifications............................413
Capacities and Specific-ations
Engine Specifications - 6.2L.....................415
Engine Specifications - 6.7L Diesel........415
Engine Specifications - 6.8L....................416
Motorcraft Parts - 6.2L...............................417
Motorcraft Parts - 6.7L Diesel..................418
Motorcraft Parts - 6.8L..............................419
Vehicle Identification Number...............420
Vehicle Certification Label........................421
Transmission Code Designation.............421
Capacities and Specifications - 6.2L....422
Capacities and Specifications - 6.7LDiesel............................................................427
Capacities and Specifications -6.8L...............................................................434
Audio System
General Information....................................441
Audio Unit - Vehicles With: AM/FM/CD..................................................................442
Audio Unit - Vehicles With: AM/FM/CD/SYNC............................................................443
Audio Unit - Vehicles With: AM/FM/CD/Touchscreen Display..............................447
Digital Radio..................................................448
Satellite Radio...............................................451
USB Port.........................................................454
SYNC™
General Information...................................455
Using Voice Recognition...........................457
Using SYNC™ With Your Phone...........459
SYNC™ Applications and Services.......471
Using SYNC™ With Your MediaPlayer...........................................................476
SYNC™ Troubleshooting.........................485
SYNC™ 3
General Information...................................493
Home Screen................................................504
Using Voice Recognition...........................505
Entertainment................................................512
Climate............................................................522
Phone...............................................................524
Navigation......................................................530
Apps.................................................................538
Settings............................................................541
SYNC™ 3 Troubleshooting......................553
5
Super Duty (TFE) Canada/United States of America, enUSA, Edition date: 201710, Second Printing
Table of Contents
Page 59 of 642
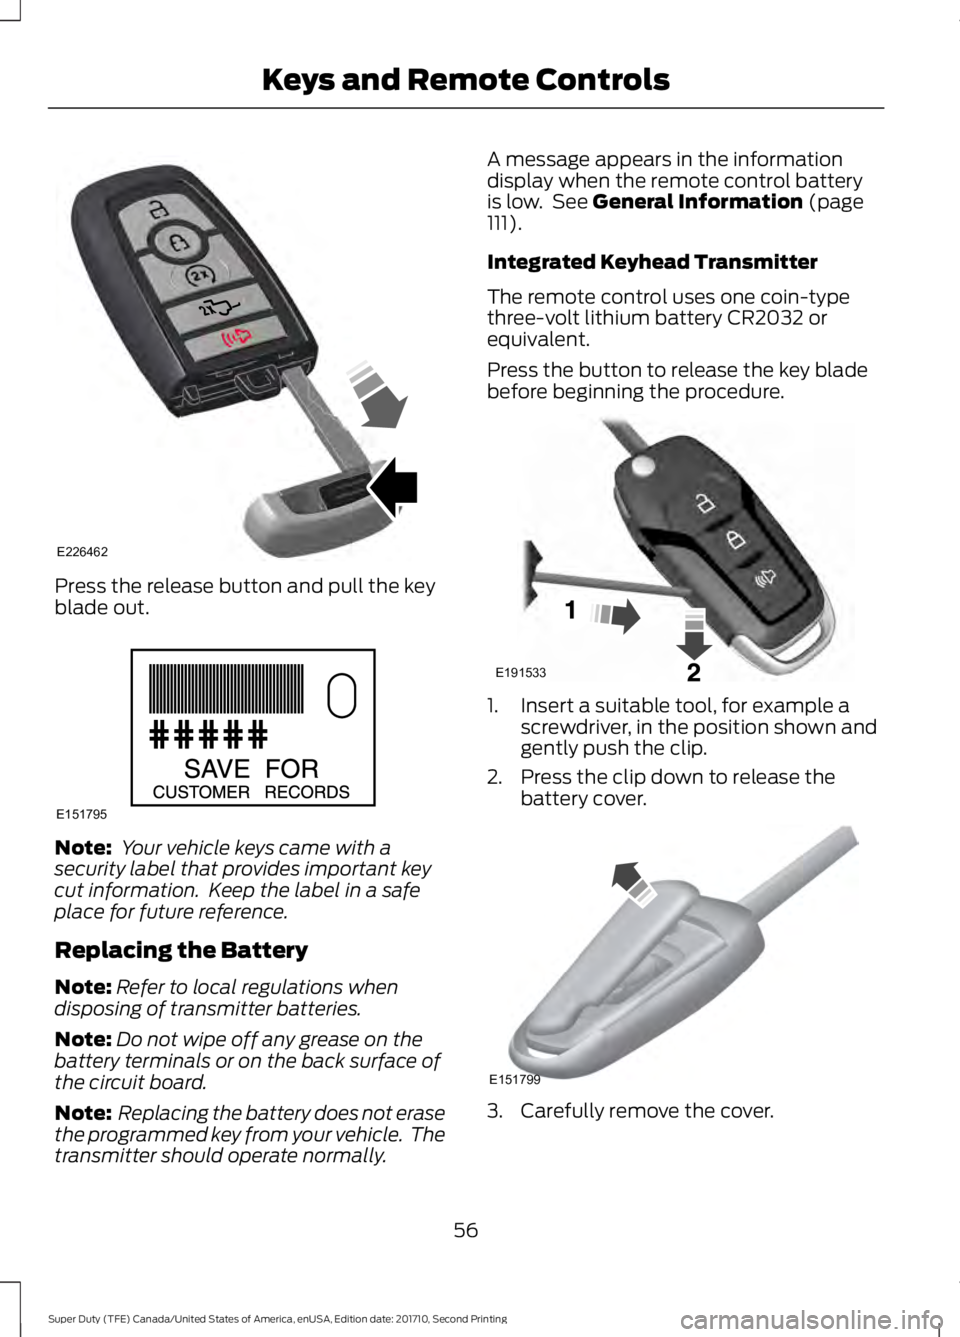
Press the release button and pull the keyblade out.
Note: Your vehicle keys came with asecurity label that provides important keycut information. Keep the label in a safeplace for future reference.
Replacing the Battery
Note:Refer to local regulations whendisposing of transmitter batteries.
Note:Do not wipe off any grease on thebattery terminals or on the back surface ofthe circuit board.
Note: Replacing the battery does not erasethe programmed key from your vehicle. Thetransmitter should operate normally.
A message appears in the informationdisplay when the remote control batteryis low. See General Information (page111).
Integrated Keyhead Transmitter
The remote control uses one coin-typethree-volt lithium battery CR2032 orequivalent.
Press the button to release the key bladebefore beginning the procedure.
1. Insert a suitable tool, for example ascrewdriver, in the position shown andgently push the clip.
2. Press the clip down to release thebattery cover.
3. Carefully remove the cover.
56
Super Duty (TFE) Canada/United States of America, enUSA, Edition date: 201710, Second Printing
Keys and Remote ControlsE226462 E151795 E191533 E151799
Page 63 of 642
The label on your transmitter details thestarting procedure.
To remote start your vehicle:
1. Press the lock button.
2. Press the remote start button twice.The exterior lamps flash twice.
The horn sounds if the system fails to start,unless quiet start is on. Quiet start runs theblower fan at a slower speed to reducenoise. You can switch it on or off in theinformation display. See GeneralInformation (page 111).
Note:If you do not follow this sequence,your vehicle does not start remotely, thedirection indicators do not flash twice andthe horn does not sound.
Note:If you remote start your vehicle withan integrated keyhead transmitter, you mustswitch on the ignition before driving yourvehicle. If you remote start your vehicle withan intelligent access transmitter, you mustpress the push button ignition switch on theinstrument panel once while applying thebrake pedal before driving your vehicle.
The power windows do not work duringremote start and the radio does not turnon automatically.
The parking lamps remain on and yourvehicle runs for 5, 10 or 15 minutesdepending on the setting.
Extending the Engine Running Time
To extend the engine running time durationof your vehicle during remote start, repeatsteps 1 and 2 while the engine is running.If the duration is set to 10 minutes, theduration extends by another 10 minutes.For example, if your vehicle had beenrunning from the first remote start for 5minutes, your vehicle continues to run nowfor a total of 20 minutes. You can extendthe remote start up to a maximum of 35minutes.
Wait at least five seconds before remotestarting after the engine stops running.
Turning Your Vehicle Off After RemoteStarting
Press the button once. Theparking lamps turn off.
You may have to be closer to thevehicle than when starting due to groundreflection and the added noise of therunning vehicle.
You can turn the remote start system onor off using the information display. SeeGeneral Information (page 111).
REPLACING A LOST KEY OR
REMOTE CONTROL
Replacement keys or remote controls canbe purchased from an authorized dealer.Authorized dealers can program remotecontrols for your vehicle. See PassiveAnti-Theft System (page 74).
60
Super Duty (TFE) Canada/United States of America, enUSA, Edition date: 201710, Second Printing
Keys and Remote ControlsE138625
Page 64 of 642
PRINCIPLE OF OPERATION
MyKey allows you to program keys withrestricted driving modes to promote gooddriving habits. You can program therestrictions to all keys but one. Any keysthat you did not program are administratorkeys or admin keys.
You can use admin keys to:
•Create a MyKey with certain vehiclerestrictions.
•Program certain MyKey settings.
•Clear all MyKey restrictions.
After you program a MyKey, you can viewthe following information through theinformation display:
•The total number of admin keys andMyKeys for your vehicle.
•The total distance a MyKey drivertraveled with your vehicle.
Note: Every MyKey receives the samerestrictions and settings. You cannotprogram them individually.
Note: For vehicles equipped with apush-button start switch: When both aMyKey and an admin key are present whenyou start your vehicle, the system recognizesthe admin key only.
Standard Settings
Not every vehicle includes the featureslisted below. If your vehicle has thisequipment, then you cannot change thefollowing settings when using a MyKey:
•Seatbelt reminder or Belt-Minder™.MyKey mutes the audio system untildrivers, and in some instances,passengers, fasten their seatbelts.
•Earlier low-fuel warning. The low-fuelwarning activates earlier for MyKeydrivers, giving them more time to refuel.
•Certain driver alerts, stability systemsor parking aids turn on automaticallywhen you use the MyKey system. Forexample, Blind Spot InformationSystem (BLIS), cross traffic alert, lanedeparture warning or forward collisionwarning.
•Restricted touchscreen operation insome markets. For example, MyKeymay prevent manual navigationdestination input while the vehicle is inany gear other than park (P) or whenthe vehicle reaches a certain rate ofspeed.
•Satellite radio adult contentrestrictions, if this feature is availablein your market.
Note:MyKey drivers may be able to switchthe lane departure warning feature off, butthis feature turns back on automaticallywith every new key cycle.
Note:MyKey drivers can turn on the forwardcollision warning when it is turned off by anadmin key.
Note:If your vehicle includes an AM/FMradio or a very basic audio system, then theradio may not mute.
Optional Settings
You can configure certain vehicle featuresettings when you first create a MyKey. Youcan also change the settings afterwardwith an admin key.
Note:Not every feature applies to everyvehicle in every market. When they areavailable for your vehicle, then they appearin your information display, providingchoices to switch them on or off, or to selecta more specific setting.
61
Super Duty (TFE) Canada/United States of America, enUSA, Edition date: 201710, Second Printing
MyKey™
Page 65 of 642
•Various vehicle speed limits so theMyKey driver cannot exceed certainspeeds. The information display showswarnings followed by an audible tonewhen the MyKey driver reaches the setspeed. You cannot override the setspeed by fully depressing theaccelerator pedal.
WARNING
Do not set MyKey maximum speedlimit to a limit that will prevent thedriver from maintaining a safe speedconsidering posted speed limits andprevailing road conditions. The driver isalways responsible to drive in accordancewith local laws and prevailing conditions.Failure to do so could result in accident orinjury.
•Various vehicle speed reminders soMyKey drivers know when their vehiclespeed approaches the limits. Warningsappear in your information display anda tone sounds when the MyKey driversexceed the set vehicle speed.
•The audio system's maximum volumelimits to 45% so MyKey drivers canconcentrate on the road. A messageappears in the information displaywhen MyKey drivers attempt to exceedthe limited volume. MyKey alsodisables the automatic volume control.
•Always on setting. This setting forcescertain features to remain on andactive for MyKey drivers. For example,E911 or emergency assistance and thedo not disturb features stay on even ifa MyKey driver uses the feature'scontrol to switch it off.
Note:If your vehicle includes an AM/FMradio or a very basic audio system, then theradio may not mute.
CREATING A MYKEY
Use the information display to create aMyKey.
1. Switch the ignition on using the key orthe transmitter you want to program.
2. Access the main menu in theinformation display and then scrollthrough the menus to beginprogramming your MyKey. SeeInformation Displays (page 111).
3. Follow the instructions in the display.
4.A confirmation message appears in thedisplay after you finish programmingyour MyKey. The programmedrestrictions apply when you key off,open and close driver door and restartyour vehicle with the programmed keyor transmitter.
Note:Make sure you label the programmedMyKey so you can distinguish it from theadmin keys.
You can also program the optional MyKeysettings.
Programming or ChangingConfigurable Settings
Use the information display to program orchange your optional MyKey settings.
1. Switch the ignition on using the key orthe transmitter you want to program.
2. Access the main menu in theinformation display and then scrollthrough the menus to change thesettings of your MyKey. SeeInformation Displays (page 111).
3. Follow the instructions in the display.
4.A confirmation message appears in thedisplay after you finish programmingyour MyKey. The programmedrestrictions apply when you restart yourvehicle with the programmed key ortransmitter.
62
Super Duty (TFE) Canada/United States of America, enUSA, Edition date: 201710, Second Printing
MyKey™
Page 66 of 642
Note: You can clear or change your MyKeysettings at any time during the same keycycle as you created the MyKey. If youswitch the engine off, you must use anadmin key to change or clear your optionalMyKey settings.
CLEARING ALL MYKEYS
When you clear your MyKeys, you removeall restrictions and return all MyKeys totheir original admin key status at once. Toclear all MyKeys of all MyKey settings, usethe information display.
1. Switch the ignition on using an adminkey.
2. Access the main menu in theinformation display and then scrollthrough the menus to begin clearingyour MyKey programming. SeeInformation Displays (page 111).
3. Follow the instructions in the display.
4.A confirmation message appears in thedisplay after you finish clearing yourMyKeys.
Note:When you clear your MyKeys, youremove all restrictions and return all MyKeysto their original admin key status. Youcannot remove the MyKey restrictionsindividually.
CHECKING MYKEY SYSTEM
STATUS
You can find information about yourprogrammed MyKeys by using theinformation display. See InformationDisplays (page 111).
MyKey Distance
Tracks the distance when drivers use aMyKey. The only way to delete theaccumulated distance is by using an adminkey to clear all MyKeys. If the distance doesnot accumulate as expected, then theintended user is not using the MyKey, or anadmin key user recently cleared and thenrecreated a MyKey.
Number of MyKeys
Indicates the number of MyKeysprogrammed to your vehicle. Use thisfeature to detect how many MyKeys youhave for your vehicle and determine whenall MyKeys have been deleted.
Number of Admin Keys
Indicates how many admin keys areprogrammed to your vehicle. Use thisfeature to determine how many adminkeys you have for your vehicle, and detectif an additional MyKey has beenprogrammed.
USING MYKEY WITH REMOTE
START SYSTEMS
MyKey is not compatible with nonFord-approved, aftermarket remote startsystems. If you choose to install a remotestart system, see an authorized dealer fora Ford-approved remote start system.
63
Super Duty (TFE) Canada/United States of America, enUSA, Edition date: 201710, Second Printing
MyKey™
Page 70 of 642
•Using the keyless entry keypad.
•Using the lock button on the remotecontrol.
Smart Unlocks for IntelligentAccess Keys (If Equipped)
This feature helps to prevent you fromlocking your intelligent access key insideyour vehicle’s passenger compartment orrear cargo area.
When you lock your vehicle using thepower door lock control (with the dooropen, vehicle in park and ignition off), yourvehicle will search for an intelligent accesskey in the passenger compartment afteryou close the door. If your vehicle finds akey, all of the doors will immediatelyunlock.
In order to override the smart unlockfeature and intentionally lock theintelligent access key inside your vehicle,you can lock your vehicle after all doorsare closed by using the keyless entrykeypad, pressing the lock button onanother intelligent access key or touchingthe locking area on the handle with anotherintelligent access key in your hand.
When you open one of the front doors andlock your vehicle using the power door lockcontrol, all doors will lock then unlock ifthe ignition is on.
Autolock and Autounlock (If Equipped)
The autolock feature locks all the doorswhen your doors are closed, the ignition ison, and your vehicle reaches a speedgreater than 12 mph (20 km/h).
When your doors autolock while driving,stopping the vehicle then switching theignition off or to accessory and openingthe driver door unlocks all your doors. Thisautounlock feature remains active for 10minutes after stopping.
Note:The doors do not autounlock if youhave electronically locked them beforeopening the driver door.
Enabling or Disabling Autolock andAutounlock
You can enable or disable these featuresindependently of each other using theinformation display. An authorized dealercan also help you enable or disable thesefeatures. See General Information (page111).
Illuminated Entry
The interior lamps and select exteriorlamps illuminate when you unlock thedoors with the remote entry system.
The illuminated entry system turns off thelights if:
•The ignition is on.
•You press the remote control lockbutton.
•After 25 seconds of illumination.
The dome lamp does not turn on if thecontrol is set to the off position.
The lights do not turn off if:
•You switch them on with the dimmercontrol.
•Any door is open.
Battery Saver
The battery saver turns off the interiorlamps 30 minutes after you switch off theignition if a door is open and the domelamp switch is on. It turns off the interiorlamps after 10 minutes if the dome lampswitch is off.
Accessory Mode Battery Saver forIntelligent Access Keys (If Equipped)
If you leave the ignition on after leavingyour vehicle, it turns off 15 minutes afteryou close all of the doors.
67
Super Duty (TFE) Canada/United States of America, enUSA, Edition date: 201710, Second Printing
Doors and Locks
Page 77 of 642
PASSIVE ANTI-THEFT
SYSTEM
Note: The system is not compatible withnon-Ford aftermarket remote start systems.Use of these systems may result in enginestarting problems and a loss of securityprotection.
Note: Metallic objects, electronic devicesor a second coded key on the same keychain may result in vehicle startingproblems, especially if they are too close tothe key when starting your vehicle. Preventthese objects from touching the coded keywhen starting your vehicle. Switch theignition off, move all objects on the keychain away from the coded key and restartyour vehicle if a problem occurs.
Note: Do not leave a duplicate coded keyin your vehicle. Always take your keys andlock all doors when leaving your vehicle.
SecuriLock®
The system helps prevent the engine fromstarting unless you use a coded keyprogrammed to your vehicle. Using thewrong key may prevent your vehicle fromstarting. A message may appear in theinformation display.
If you are unable to start your vehicle witha coded key, it is not operating correctly.A message may appear in the informationdisplay.
Automatic Arming
The system arms when you switch theignition off.
Automatic Disarming
The system disarms when you switch theignition on with a coded key.
Replacement Keys
Note:Your vehicle comes with two keys.
The integrated keyhead transmitterfunctions as a programmed ignition keythat operates all the locks and starts yourvehicle, as well as a remote control.
The intelligent access key functions as aprogrammed key that operates the driverdoor lock and turns on the intelligentaccess with push button start system, aswell as a remote control.
If your coded keys are lost or stolen andyou do not have an extra coded key, youneed to erase the key codes from yourvehicle and program new coded keys.Contact an authorized dealer.
Store an extra programmed key away fromyour vehicle in a safe place. You canpurchase replacement keys or remotecontrols from an authorized dealer.
Programming a Spare IntegratedKeyhead Transmitter
Note:You can program a maximum of sixkeys to your vehicle. All six can be integratedkeyhead transmitters.
You can program your own integratedkeyhead transmitter or standardSecuriLock coded keys to your vehicle.This procedure programs both the vehicleimmobilizer keycode and the remotecontrol to your vehicle.
Only use integrated keyhead transmittersor standard SecuriLock keys.
You must have two previouslyprogrammed coded keys and the newunprogrammed key readily accessible.Contact an authorized dealer to have thespare key programmed if two previouslyprogrammed keys are not available.
Read and understand the entire procedurebefore you begin.
1.Insert the first previously programmedcoded key into the ignition.
74
Super Duty (TFE) Canada/United States of America, enUSA, Edition date: 201710, Second Printing
Security
Page 79 of 642
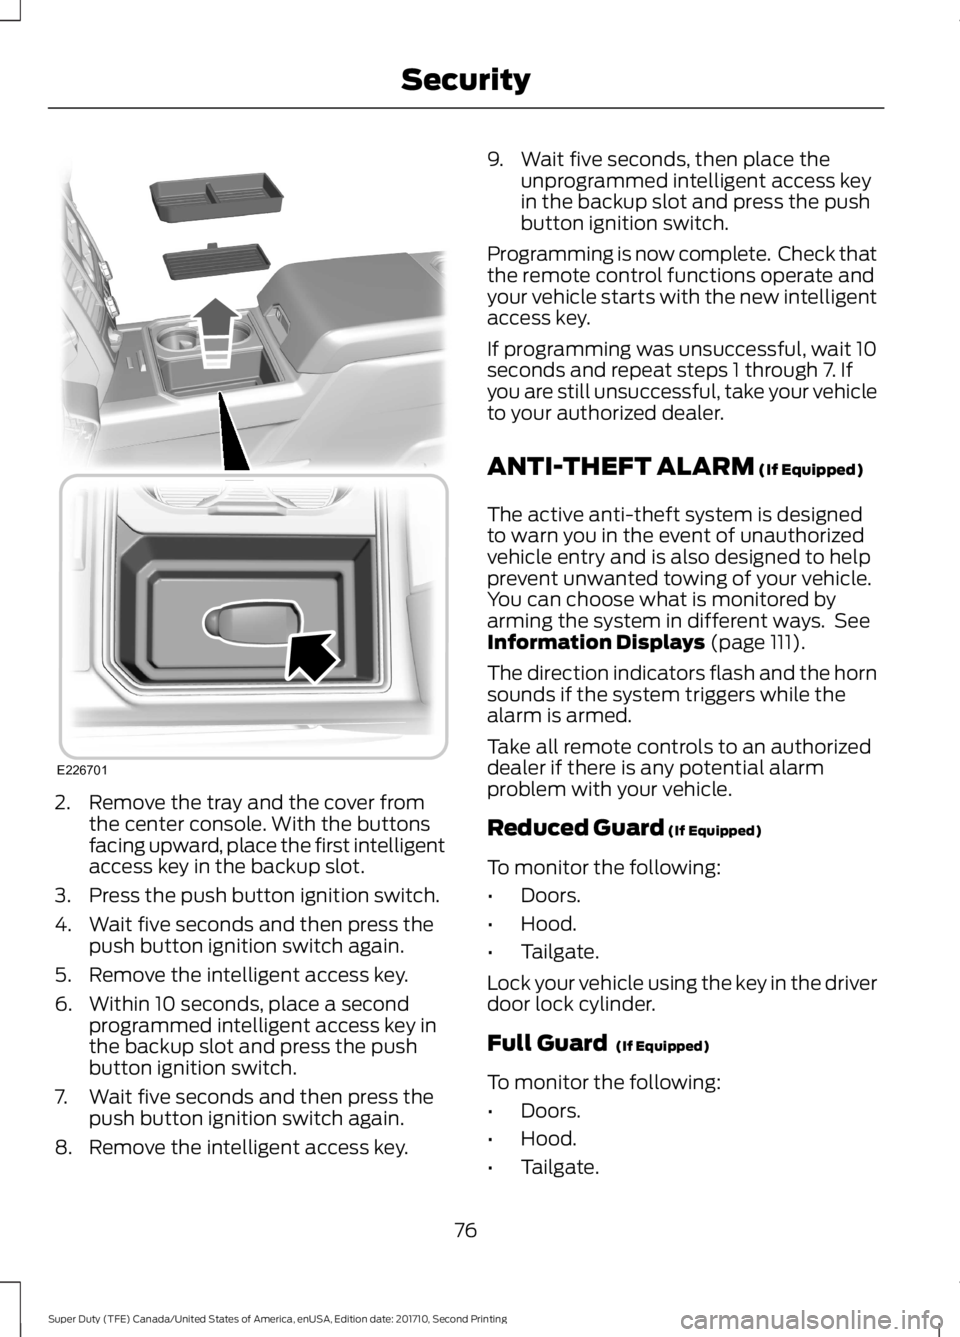
2. Remove the tray and the cover fromthe center console. With the buttonsfacing upward, place the first intelligentaccess key in the backup slot.
3. Press the push button ignition switch.
4. Wait five seconds and then press thepush button ignition switch again.
5. Remove the intelligent access key.
6. Within 10 seconds, place a secondprogrammed intelligent access key inthe backup slot and press the pushbutton ignition switch.
7. Wait five seconds and then press thepush button ignition switch again.
8. Remove the intelligent access key.
9. Wait five seconds, then place theunprogrammed intelligent access keyin the backup slot and press the pushbutton ignition switch.
Programming is now complete. Check thatthe remote control functions operate andyour vehicle starts with the new intelligentaccess key.
If programming was unsuccessful, wait 10seconds and repeat steps 1 through 7. Ifyou are still unsuccessful, take your vehicleto your authorized dealer.
ANTI-THEFT ALARM (If Equipped)
The active anti-theft system is designedto warn you in the event of unauthorizedvehicle entry and is also designed to helpprevent unwanted towing of your vehicle.You can choose what is monitored byarming the system in different ways. SeeInformation Displays (page 111).
The direction indicators flash and the hornsounds if the system triggers while thealarm is armed.
Take all remote controls to an authorizeddealer if there is any potential alarmproblem with your vehicle.
Reduced Guard (If Equipped)
To monitor the following:
•Doors.
•Hood.
•Tailgate.
Lock your vehicle using the key in the driverdoor lock cylinder.
Full Guard (If Equipped)
To monitor the following:
•Doors.
•Hood.
•Tailgate.
76
Super Duty (TFE) Canada/United States of America, enUSA, Edition date: 201710, Second Printing
SecurityE226701