differential FORD F650 2009 12.G Owners Manual
[x] Cancel search | Manufacturer: FORD, Model Year: 2009, Model line: F650, Model: FORD F650 2009 12.GPages: 276, PDF Size: 1.75 MB
Page 25 of 276
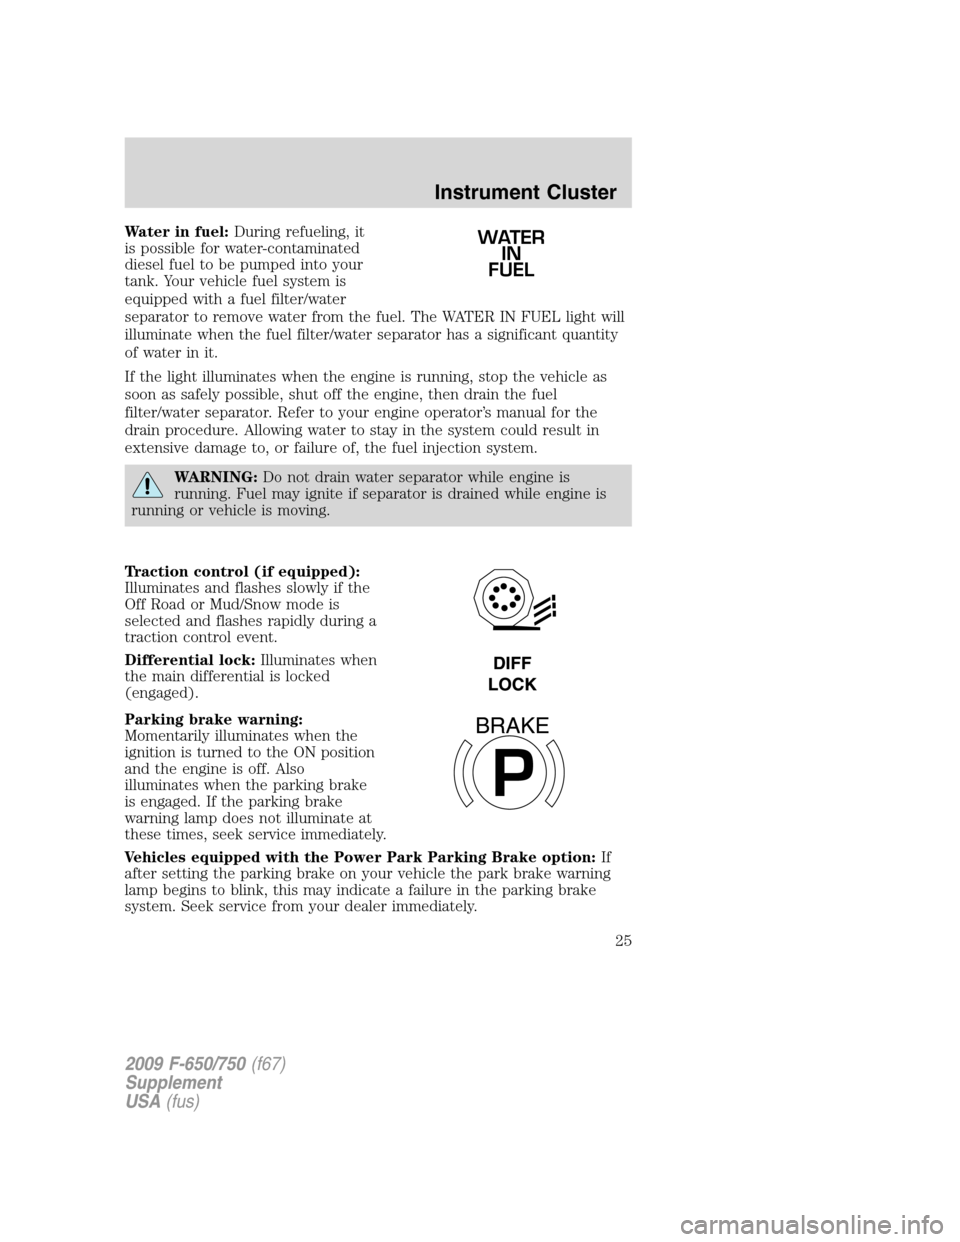
Water in fuel:During refueling, it
is possible for water-contaminated
diesel fuel to be pumped into your
tank. Your vehicle fuel system is
equipped with a fuel filter/water
separator to remove water from the fuel. The WATER IN FUEL light will
illuminate when the fuel filter/water separator has a significant quantity
of water in it.
If the light illuminates when the engine is running, stop the vehicle as
soon as safely possible, shut off the engine, then drain the fuel
filter/water separator. Refer to your engine operator’s manual for the
drain procedure. Allowing water to stay in the system could result in
extensive damage to, or failure of, the fuel injection system.
WARNING:Do not drain water separator while engine is
running. Fuel may ignite if separator is drained while engine is
running or vehicle is moving.
Traction control (if equipped):
Illuminates and flashes slowly if the
Off Road or Mud/Snow mode is
selected and flashes rapidly during a
traction control event.
Differential lock:Illuminates when
the main differential is locked
(engaged).
Parking brake warning:
Momentarily illuminates when the
ignition is turned to the ON position
and the engine is off. Also
illuminates when the parking brake
is engaged. If the parking brake
warning lamp does not illuminate at
these times, seek service immediately.
Vehicles equipped with the Power Park Parking Brake option:If
after setting the parking brake on your vehicle the park brake warning
lamp begins to blink, this may indicate a failure in the parking brake
system. Seek service from your dealer immediately.
WATER
IN
FUEL
P
BRAKE
2009 F-650/750(f67)
Supplement
USA(fus)
Instrument Cluster
25
Page 133 of 276
Rear axles with locking or limited-slip differentials (if equipped)
If your vehicle is equipped with a locking or limited-slip differential, note
the following:
•Power will be transmitted to the opposite wheel should one of the
wheels begin to slip.
•Both wheels must be raised off the ground should it be necessary to
operate one wheel with the vehicle stationary.
WARNING:If both wheels are not raised off the ground, the
one wheel that is not raised may pull the vehicle off its support,
possibly resulting in personal injury
Driver-controlled differential lock
To prevent the vehicle from moving when servicing the wheels, tires or
brakes, turn the engine off and raise all drive wheels of the locker
differential axle. Axles equipped with NoSPIN Detroit Locker differentials
deliver power to both wheels even when only one wheel is on the ground.
WARNING:Failure to raise all drive wheels with this type of
differential could cause the vehicle to move unexpectedly,
resulting in property damage, personal injury or death.
Care should be taken to avoid sudden accelerations when both drive
wheels are on a slippery surface.
WARNING:Sudden accelerations on slippery surfaces could
cause the wheels to spin, the vehicle to turn sideways on a
crowned road surface or in a turn, possibly resulting in loss of vehicle
control and personal injury.
Some Dana/Spicer drive axles have a driver-controlled differential lock.
The differential lock can lock or unlock the differential when the vehicle
is moving or stopped. When extra traction is required, the differential
lock will provide full power to both axles.
When the differential is locked, the vehicle’s turning radius will increase
(vehicle will “under-steer”)
The differential can be locked or unlocked when the vehicle is moving at
a constant speed of less than 25 mph (40 km/h) and while the wheels
are not slipping. The differential must not be locked when the vehicle is
traveling down steep grades and traction is minimal.
2009 F-650/750(f67)
Supplement
USA(fus)
Driving
133
Page 134 of 276
Note:Never use the differential lock at vehicle speeds above 25 mph
(40 km/h).
The differential lock and differential lock light will automatically
disengage at speeds above 25 mph (40 km/h). The differential lock will
remain off until either the vehicle is restarted or the differential lock
switch is turned off then back on.
Axle conversions
It is not recommended, or approved, for axle conversions to be
performed. However, it is understood that, on occasion, aftermarket
add-on axles are installed by others on the truck chassis which allow
operator control for weight transfer from other axles (i.e., air lift axles).
WARNING:When operating a loaded vehicle, the driver must
keep all adjustable axles on the ground at all times, supporting
their share of the vehicle’s load. Failure to do so can overload other
axles, tires, wheels, springs, steering components, brakes and frames,
resulting in early component failure, loss of vehicle control, possible
property damage and personal injury.
TWO-SPEED REAR AXLE (IF EQUIPPED)
A two-speed rear axle allows the driver to select a LO range for greater
pulling power and a HI range for greater road speed and fuel economy.
These ranges can also be used to provide additional steps between
transmission shifts when driving on steep grades and/or fuel economy
may be factors.
Note:Do not shift between ranges when the speed control is on.
WARNING:Never shift a two-speed axle when descending a
steep grade as this may cause loss of vehicle control and result
in personal injury.
Axle shifting
Manual transmissions:
•To downshift,select the next lower gear, release and depress the
accelerator pedal rapidly, or while holding the accelerator pedal down,
release and engage the clutch rapidly.Note:The clutch method is
recommended when driving at slower speeds.
•To upshift,keep the accelerator pedal down, select the next higher
gear, release the accelerator and pause until the axle upshifts.Note:
De-clutch for smoother axle upshifts when driving at slower speeds.
2009 F-650/750(f67)
Supplement
USA(fus)
Driving
134
Page 146 of 276
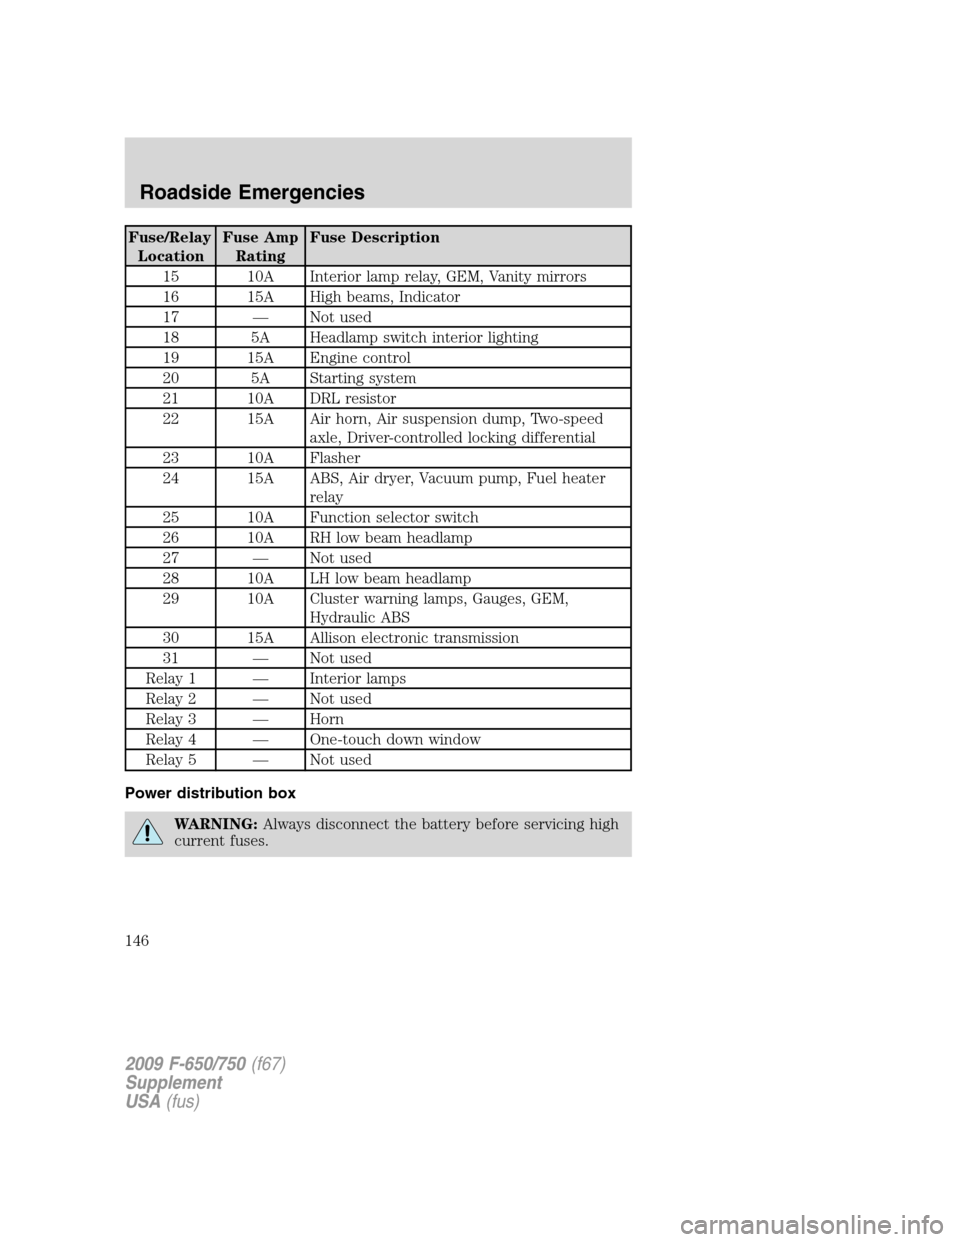
Fuse/Relay
LocationFuse Amp
RatingFuse Description
15 10A Interior lamp relay, GEM, Vanity mirrors
16 15A High beams, Indicator
17 — Not used
18 5A Headlamp switch interior lighting
19 15A Engine control
20 5A Starting system
21 10A DRL resistor
22 15A Air horn, Air suspension dump, Two-speed
axle, Driver-controlled locking differential
23 10A Flasher
24 15A ABS, Air dryer, Vacuum pump, Fuel heater
relay
25 10A Function selector switch
26 10A RH low beam headlamp
27 — Not used
28 10A LH low beam headlamp
29 10A Cluster warning lamps, Gauges, GEM,
Hydraulic ABS
30 15A Allison electronic transmission
31 — Not used
Relay 1 — Interior lamps
Relay 2 — Not used
Relay 3 — Horn
Relay 4 — One-touch down window
Relay 5 — Not used
Power distribution box
WARNING:Always disconnect the battery before servicing high
current fuses.
2009 F-650/750(f67)
Supplement
USA(fus)
Roadside Emergencies
146
Page 157 of 276
4. Remove the jumper cable from the positive (+) terminal of the
disabled vehicle’s battery.
After the disabled vehicle has been started and the jumper cables
removed, allow it to idle for several minutes so the engine computer can
relearnits idle conditions.
WRECKER TOWING INSTRUCTIONS
Before moving the disabled vehicle, check for adequate road clearance of
vehicle components. It is recommended the disabled vehicle be unloaded
prior to being towed to reduce any abnormal load to the vehicle
components resulting from the towing procedures. Before towing, be
sure to fully release the parking brake. The spring-actuated type parking
brake can be reset by recharging the air system with at least 64 psi
(441 kPa) of air. If the brake system will not retain air pressure, then the
spring brakes must be released manually. Refer toParking brakein the
Drivingchapter
Note:For towing, make sure the vehicle is securely connected to the
tow vehicle and the tow vehicle parking brakes are applied before
releasing the disabled vehicle’s spring brakes.
WARNING:To reduce the risk of personal injury or property
damage when manually releasing the spring brakes, be sure to
block the wheels so the vehicle cannot move once the brakes are
released.
Towing the vehicle with the front wheels suspended
When it is necessary to tow a vehicle with the front wheels suspended,
extra precautions must be taken to avoid transmission or differential
damage. Proceed as follows:
•Remove the axle shafts from the axle assembly to prevent the wheels
from driving the differential and the transmission.
+–+–
2009 F-650/750(f67)
Supplement
USA(fus)
Roadside Emergencies
157
Page 158 of 276
•The wheel hub ends must be covered to prevent loss of axle lubricant
and entrance of other contaminants. If the axle shafts are not
removed, removal of the driveshaft is required.
Note:To avoid transmission damage, vehicles should not be towed even
a short distance without suspending rear wheels or removing the axle
shaft or driveshaft.
Note:In the event the chassis is equipped with a tandem axle and the
vehicle is to be towed from the front, the forward rear axle may be
raised to clear the road surface and secured to the frame by chains or
U-bolts, allowing only the rear rear axle to contact the road surface. Axle
shafts must be removed from the rear rear axle assembly. The wheel hub
ends must be covered to prevent loss of axle lubricant and entrance of
contaminants. Use extreme care in securing the chains or U-bolts to
avoid possible damage to the brake lines, hoses or other components.
Towing vehicles equipped with a driver-controlled differential lock
Note:If the vehicle must be towed to a service facility with the drive
axle wheels on the ground, it is necessary to remove the axle shafts
before the vehicle is towed.
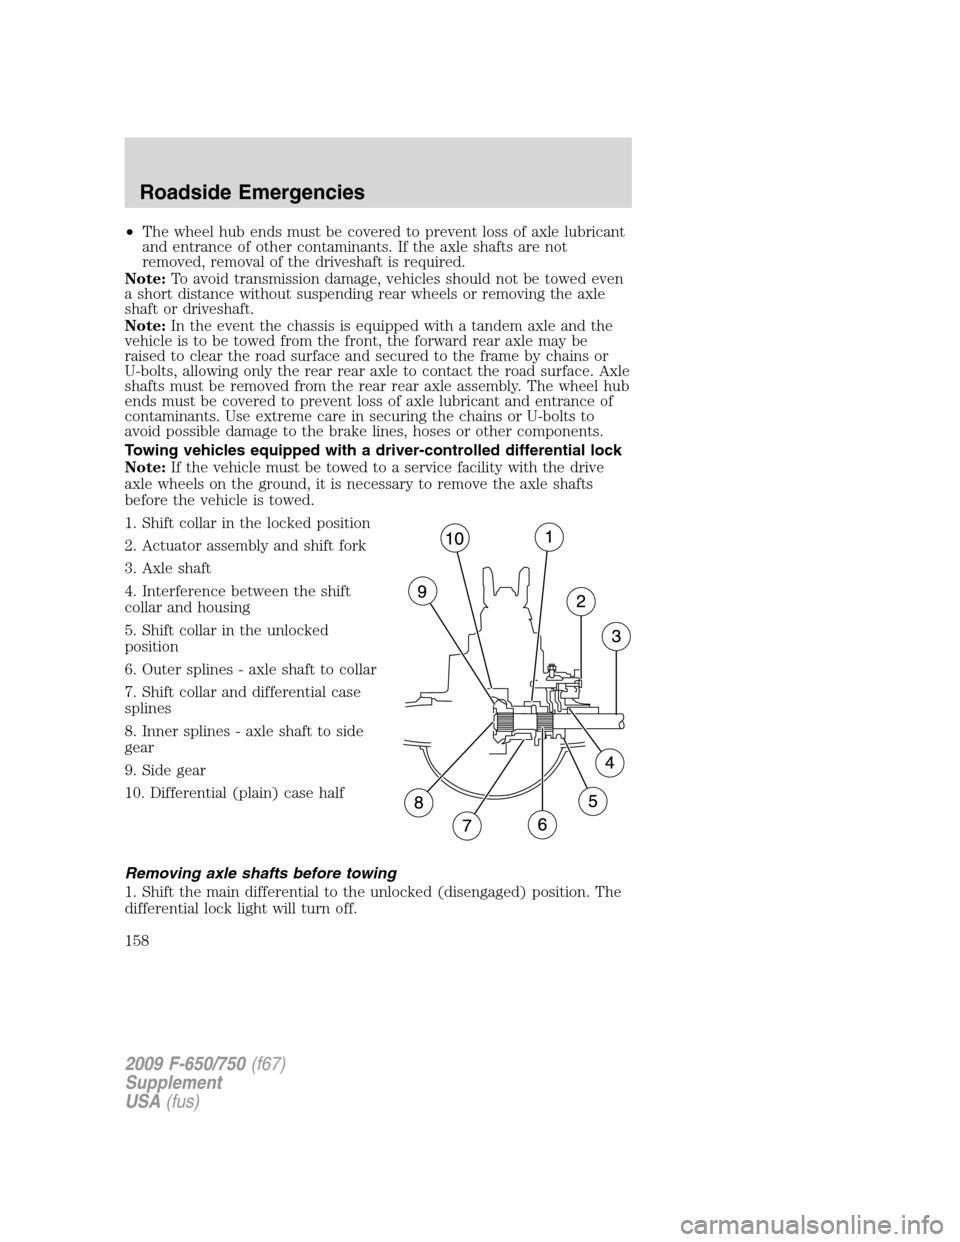
1. Shift collar in the locked position
2. Actuator assembly and shift fork
3. Axle shaft
4. Interference between the shift
collar and housing
5. Shift collar in the unlocked
position
6. Outer splines - axle shaft to collar
7. Shift collar and differential case
splines
8. Inner splines - axle shaft to side
gear
9. Side gear
10. Differential (plain) case half
Removing axle shafts before towing
1. Shift the main differential to the unlocked (disengaged) position. The
differential lock light will turn off.
2009 F-650/750(f67)
Supplement
USA(fus)
Roadside Emergencies
158
Page 159 of 276
2. Remove the capscrews and washers or stud nuts and washers from
flanges of both axle shafts.
3. Loosen the tapered dowels in the flanges of both axle shafts by
holding a 1
1�2inch diameter brass drift or hammer against the axle shaft
center and hitting it with a five or six pound hammer.Note:Do not use
a chisel or wedge to loosen the axle shafts and dowels. Use of a chisel or
wedge can damage the hub, axle shafts and oil seals.
4. Remove the tapered dowels and both axle shafts from the axle
assembly.
5. Assemble a cover over openings of both wheels ends to prevent loss of
lubricant and keep dirt away from the wheel bearing cavities.
Note:One of the axle shafts has two sets of splines. One set to engage
with the differential side gear and one set to engage with the shift collar
for the differential lock. It may be necessary to rotate the shaft slightly
to align the gear spline teeth with the shift collar teeth in order to
remove the axle shaft.
Installing the axle shafts
1. Remove the covers from the wheel ends.
2. Shift the differential lock to the unlocked position (disengaged)
position.
3. Install the axle shafts.
•Place the gaskets on the wheel hub studs.
•Push the right-hand axle shaft and gasket into the wheel end and
housing until the shaft stops against the differential shift collar.
•Push down and in on the axle shaft flange and rotate the shaft until
the splines of the shaft and shift collar are engaged.
•Push the axle shaft further into the housing until the shaft stops
against the differential side gear.
•Push down on the axle shaft flange and rotate the shaft until the
splines of the shaft and side gear are engaged.
•Push the axle shaft completely into the housing until the axle shaft
flange and the gasket are flush against the wheel hub.
•Install the left-hand axle shaft and gasket into the wheel end.
4. If tapered dowels are required, install them at each stud and into the
flange of the axle shaft. Use a punch or drift and hammer, if needed.
5. Install the fasteners and tighten to correct torque value. Refer to the
Service Manual.
2009 F-650/750(f67)
Supplement
USA(fus)
Roadside Emergencies
159
Page 173 of 276
Check to make sure that the axle mounting U-bolt nuts, attaching or
mounting bolts and nuts are securely tightened. Regularly check front
axle for damage, binding, worn parts and adequate lubrication.
At regular intervals, or during other scheduled maintenance, (tire
rotation/service, wheel bearing service, alignment, etc.) the kingpins
should be checked for excessive wear. Refer to the service manual for
proper procedures.
Toe-in setting - general inspection
Inspecting steer axle tires in the first 3,000–10,000 service miles
(4,800–16,000 service km) will generally show if tires are wearing
normally.
Rapid outside shoulder wear on both tires indicates too much toe-in.
Rapid inside shoulder wear on both tires indicates too much toe-out. In
P&D-type service, left-to-right steer tire tread life differentials up to 40%
can be observed depending on routes and other variables.
Follow the tire manufacturer’s recommended cold inflation pressure for
the tire size, load range (ply rating) and steer axle loading typical for
their operation (each steer axle tire will equal
1�2steer axle loading).
Special applications may warrant a setting based on past experience with
the type of tire operating loads and conditions. Radial tires are more
sensitive to toe-in setting than bias ply tires. While not insensitive to
vehicle alignment, fine tuning school bus alignment to line-haul truck
standards will not drastically improve tire tread life.
It is essential that correct toe-in and tire pressure be maintained for
optimum tire wear.
Rear axle - general inspection
Check to make sure that the axle mounting U-bolts, attaching or
mounting bolts and nuts are securely tightened. Refer toU-bolt nut
torquein this chapter. Regularly check the rear axle for damaged,
binding or worn parts.
NoSpin Detroit Locker positive locking differential
Vehicles equipped with this type differential have the operator’s manual
supplied with the vehicle. Refer to this manual for maintenance checks.
2009 F-650/750(f67)
Supplement
USA(fus)
Maintenance and Specifications
173
Page 233 of 276
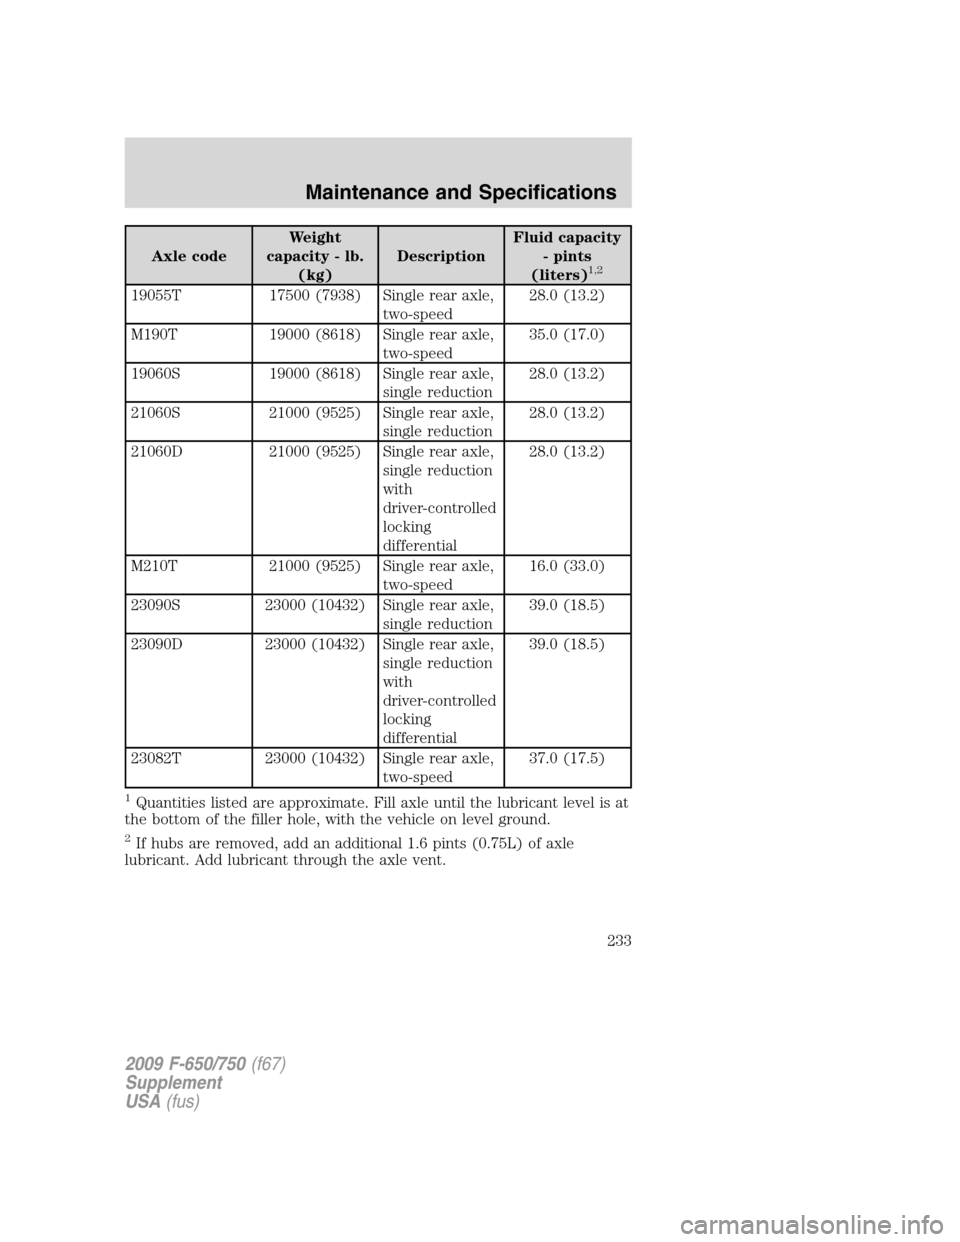
Axle codeWeight
capacity - lb.
(kg)DescriptionFluid capacity
- pints
(liters)1,2
19055T 17500 (7938) Single rear axle,
two-speed28.0 (13.2)
M190T 19000 (8618) Single rear axle,
two-speed35.0 (17.0)
19060S 19000 (8618) Single rear axle,
single reduction28.0 (13.2)
21060S 21000 (9525) Single rear axle,
single reduction28.0 (13.2)
21060D 21000 (9525) Single rear axle,
single reduction
with
driver-controlled
locking
differential28.0 (13.2)
M210T 21000 (9525) Single rear axle,
two-speed16.0 (33.0)
23090S 23000 (10432) Single rear axle,
single reduction39.0 (18.5)
23090D 23000 (10432) Single rear axle,
single reduction
with
driver-controlled
locking
differential39.0 (18.5)
23082T 23000 (10432) Single rear axle,
two-speed37.0 (17.5)
1Quantities listed are approximate. Fill axle until the lubricant level is at
the bottom of the filler hole, with the vehicle on level ground.
2If hubs are removed, add an additional 1.6 pints (0.75L) of axle
lubricant. Add lubricant through the axle vent.
2009 F-650/750(f67)
Supplement
USA(fus)
Maintenance and Specifications
233